Posted on Leave a comment

Better Customer Engagement with eCommerce wishlist implementation for shopping cart

Last modified on January 5th, 2021.

Increase user engagement with your eCommerce website to see your sales leap forward. There are multiple tools like rating, comments, queries, and wishlist to increase user engagement.

A persistent shopping cart (over different user sessions) allows user’s to store and earmark products for future purchase. A wishlist helps to do that in a better organized way.

A wishlist is an eCommerce website feature that helps the users to manage list of products that the user wants to purchase later. It also allows maintaining a “yet to purchase” list of items. This feature will increase your eCommerce business conversion rate.

The eCommerce application providers follow types of mechanisms to implement this feature. The terminology may differ from application to application. Example: Save for future, wishlist, favorites and more.

This example uses a simple way of implementation with a straight-forward code. It user database to manage users wishlist.

You can integrate the wishlist module of this example for your online shopping cart software.

eCommerce Wishlist Screenshot

What is inside?

  1. About this example
  2. File structure
  3. eCommerce wishlist view in HTML
  4. jQuery AJAX to add/remove wishlist items
  5. PHP code to create and manage eCommerce wishlist
  6. Database script
  7. E-Commerce wishlist example output

About this example

This example code is with the feature to create users’ wishlist for eCommerce software. It will give a clean and simple code to add the eCommerce wishlist feature.

I have created a simple php shopping cart script before in a previous tutorial. This example is an enhanced version of the simple shopping cart with a wishlist.

This code will allow users to add products to their wishlist from the product gallery. Also, it allows to unset an item to remove from the wishlist.

The wishlist gallery items are dynamic from the database. The add/remove actions will change the wishlist data in the database.
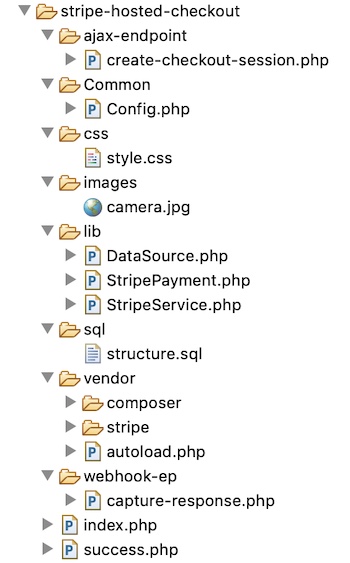
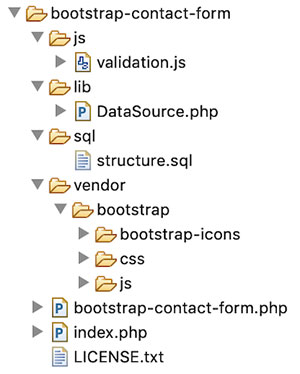
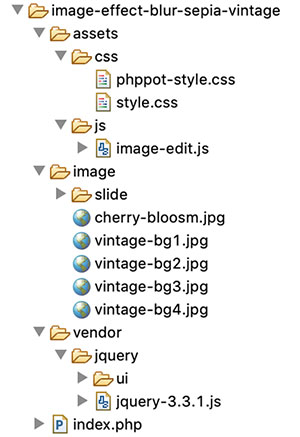
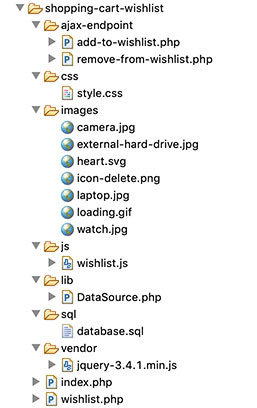
File Structure

This diagram shows the files created for this example. It has an organized structured code of eCommerce wishlist implementation.

It shows the view files, libraries and application assets separated in a proper manner.

The image folder contains application icons. Also, it includes images to display the product and wishlist gallery.

This tutorial has a downloadable source at the end with the database script.

Wishlist File Structure

eCommerce wishlist view in HTML

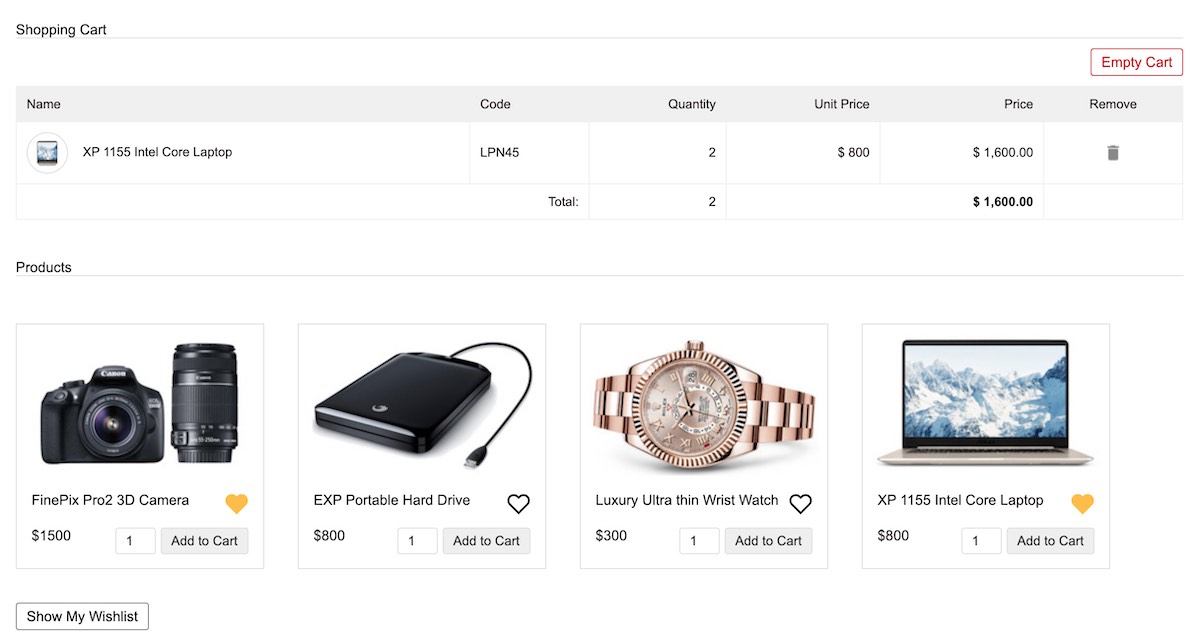
This example has two types of galleries. One is a regular eCommerce product gallery and the other is a users’ wishlist gallery.

This example uses a hard-coded member id to get the users’ wishlist from the database. It may adopt a login module to get the id from the session.

The product gallery is on the landing page, below the shopping cart list view. This page includes the navigation link to go to the eCommerce application wishlist.

The product gallery has the line heart icon in each tile. It will add the items to the wishlist on its click event. After adding, the wishlist gallery shows the filled heart on the particular tile.

The filled heart icon on-click event will remove the items from the wishlist.

index.php

<?php
session_start();
require_once __DIR__ . "/lib/DataSource.php";
$db_handle = new DataSource(); $query = 'SELECT * FROM tbl_whish_list JOIN tblproduct ON tblproduct.id = tbl_whish_list.product_id ORDER BY tbl_whish_list.product_id ASC'; $whish_array = $db_handle->select($query);
$whish_array_pid = array();
if (! empty($whish_array)) { foreach ($whish_array as $z => $value) { $whish_array_pid[] = $whish_array[$z]['product_id']; }
}
if (! empty($_GET["action"])) { switch ($_GET["action"]) { case "add": if (! empty($_POST["quantity"])) { $query = 'SELECT * FROM tblproduct WHERE code= ? '; $paramType = 's'; $paramValue = array( $_GET["code"] ); $productByCode = $db_handle->select($query, $paramType, $paramValue); $itemArray = array( $productByCode[0]["code"] => array( 'name' => $productByCode[0]["name"], 'code' => $productByCode[0]["code"], 'quantity' => $_POST["quantity"], 'price' => $productByCode[0]["price"], 'image' => $productByCode[0]["image"] ) ); if (! empty($_SESSION["cart_item"])) { if (in_array($productByCode[0]["code"], array_keys($_SESSION["cart_item"]))) { foreach ($_SESSION["cart_item"] as $k => $v) { if ($productByCode[0]["code"] == $k) { if (empty($_SESSION["cart_item"][$k]["quantity"])) { $_SESSION["cart_item"][$k]["quantity"] = 0; } $_SESSION["cart_item"][$k]["quantity"] += $_POST["quantity"]; } } } else { $_SESSION["cart_item"] = array_merge($_SESSION["cart_item"], $itemArray); } } else { $_SESSION["cart_item"] = $itemArray; } } break; case "remove": if (! empty($_SESSION["cart_item"])) { foreach ($_SESSION["cart_item"] as $k => $v) { if ($_GET["code"] == $k) unset($_SESSION["cart_item"][$k]); if (empty($_SESSION["cart_item"])) unset($_SESSION["cart_item"]); } } break; case "empty": unset($_SESSION["cart_item"]); break; }
}
?>
<HTML>
<HEAD>
<TITLE>Simple PHP Shopping Cart</TITLE>
<link href="css/style.css" type="text/css" rel="stylesheet" />
</HEAD>
<BODY> <div id="shopping-cart"> <div class="txt-heading">Shopping Cart</div> <a id="btnEmpty" href="index.php?action=empty">Empty Cart</a>
<?php
if (isset($_SESSION["cart_item"])) { $total_quantity = 0; $total_price = 0; ?>
<table class="tbl-cart" cellpadding="10" cellspacing="1"> <tbody> <tr> <th class="text-left">Name</th> <th class="text-left">Code</th> <th class="text-right">Quantity</th> <th class="text-right">Unit Price</th> <th class="text-right">Price</th> <th class="text-center">Remove</th> </tr>
<?php foreach ($_SESSION["cart_item"] as $item) { $item_price = $item["quantity"] * $item["price"]; ?> <tr> <td><img src="<?php echo $item["image"]; ?>" class="cart-item-image" /><?php echo $item["name"]; ?></td> <td><?php echo $item["code"]; ?></td> <td class="text-right"><?php echo $item["quantity"]; ?></td> <td class="text-right"><?php echo "$ ".$item["price"]; ?></td> <td class="text-right"><?php echo "$ ". number_format($item_price,2); ?></td> <td class="text-center"><a href="index.php?action=remove&code=<?php echo $item["code"]; ?>" class="btnRemoveAction"><img src="images/icon-delete.png" alt="Remove Item" /></a></td> </tr> <?php $total_quantity += $item["quantity"]; $total_price += ($item["price"] * $item["quantity"]); } ?> <tr> <td colspan="2" align="right">Total:</td> <td align="right"><?php echo $total_quantity; ?></td> <td align="right" colspan="2"><strong><?php echo "$ ".number_format($total_price, 2); ?></strong></td> <td></td> </tr> </tbody> </table> <?php
} else { ?>
<div class="no-records">Your Cart is Empty</div>
<?php
}
?>
</div> <div id="product-grid"> <div class="txt-heading">Products</div> <?php
$query = 'SELECT * FROM tblproduct ORDER BY id ASC';
$product_array = $db_handle->select($query);
if (! empty($product_array)) { foreach ($product_array as $key => $value) { ?> <div class="product-item"> <form method="post" action="index.php?action=add&code=<?php echo $product_array[$key]["code"]; ?>"> <div class="product-image"> <img src="<?php echo $product_array[$key]["image"]; ?>"> </div> <div class="product-tile-footer"> <div class="product-title"><?php echo $product_array[$key]["name"]; ?> <?php if (in_array($product_array[$key]["id"], $whish_array_pid)) { ?> <span data-pid="<?php echo $product_array[$key]["id"]; ?>" class="heart" onclick="removeFromWishlist(this)" title="Remove from wishlist"> <svg xmlns="http://www.w3.org/2000/svg" width="24" height="24" viewBox="0 0 24 24" fill="none" stroke-width="2" stroke-linecap="round" stroke-line join="round" stroke="currentColor" class="feather feather-heart color-filled"> <path d="M20.84 4.61a5.5 5.5 0 0 0-7.78 0L12 5.67l-1.06-1.06a5.5 5.5 0 0 0-7.78 7.78l1.06 1.06L12 21.23l7.78-7.78 1.06-1.06a5.5 5.5 0 0 0 0-7.78z"></path></svg><img src="images/loading.gif" id="loader"> </span> <?php } else { ?> <span data-pid="<?php echo $product_array[$key]["id"]; ?>" class="heart" onclick="addToWishlist(this)" title="Add to wishlist"> <svg xmlns="http://www.w3.org/2000/svg" width="24" height="24" viewBox="0 0 24 24" fill="none" stroke-width="2" stroke-linecap="round" stroke-line join="round" stroke="currentColor" class="feather feather-heart"> <path d="M20.84 4.61a5.5 5.5 0 0 0-7.78 0L12 5.67l-1.06-1.06a5.5 5.5 0 0 0-7.78 7.78l1.06 1.06L12 21.23l7.78-7.78 1.06-1.06a5.5 5.5 0 0 0 0-7.78z"></path></svg><img src="images/loading.gif" id="loader"> </span> <?php } ?> </div> <div class="product-price"><?php echo "
quot;.$product_array[$key]["price"]; ?></div> <div class="cart-action"> <input type="text" class="product-quantity" name="quantity" value="1" size="2" /><input type="submit" value="Add to Cart" class="btnAddAction" /> </div> </div> </form> </div> <?php }
}
?> </div> <div id="shopping-cart"> <a id="whishlist" href="wishlist.php">Show My Wishlist</a> </div> <script type="text/javascript" src="vendor/jquery-3.4.1.min.js"></script> <script type="text/javascript" src="js/wishlist.js"></script>
</BODY>
</HTML>

wishlist.php

<?php
require_once __DIR__ . "/lib/DataSource.php";
$db = new DataSource();
?>
<HTML>
<HEAD>
<TITLE>Simple PHP Shopping Cart</TITLE>
<link href="css/style.css" type="text/css" rel="stylesheet" />
</HEAD>
<BODY> <div id="shopping-cart"> <div class="whishlist-cntr"> <div class="txt-heading">Wishlist</div> <div id="whishlist-grid"> <?php $query = 'SELECT * FROM tbl_whish_list JOIN tblproduct ON tblproduct.id = tbl_whish_list.product_id'; $whish_array = $db->select($query); if (! empty($whish_array)) { foreach ($whish_array as $key => $value) { ?> <div class="product-item"> <form method="post" action="index.php?action=add&code=<?php echo $whish_array[$key]["code"]; ?>"> <div class="product-image"> <img src="<?php echo $whish_array[$key]["image"]; ?>"> </div> <div class="product-tile-footer"> <div class="product-title"><?php echo $whish_array[$key]["name"]; ?> <span data-pid="<?php echo $whish_array[$key]["product_id"]; ?>" class="heart" onclick="removeFromWishlist(this)" title="Add to wish list"> <svg xmlns="http://www.w3.org/2000/svg" width="24" height="24" viewBox="0 0 24 24" fill="none" stroke-width="2" stroke-linecap="round" stroke-line join="round" stroke="currentColor" class="feather feather-heart color-filled"> <path d="M20.84 4.61a5.5 5.5 0 0 0-7.78 0L12 5.67l-1.06-1.06a5.5 5.5 0 0 0-7.78 7.78l1.06 1.06L12 21.23l7.78-7.78 1.06-1.06a5.5 5.5 0 0 0 0-7.78z"></path></svg> <img src="images/loading.gif" id="loader"> </span> </div> <div class="product-price"><?php echo "
quot;.$whish_array[$key]["price"]; ?></div> <div class="cart-action"> <input type="text" class="product-quantity" name="quantity" value="1" size="2" /><input type="submit" value="Add to Cart" class="btnAddAction" /> </div> </div> </form> </div> <?php }
}
?>
</div> </div> </div> <script type="text/javascript" src="vendor/jquery-3.4.1.min.js"></script> <script type="text/javascript" src="js/wishlist.js"></script>
</BODY>
</HTML>

jQuery AJAX to add / remove wishlist items

This JavaScript file contains the functions to process the AJAX request to add/remove wishlist items.

The addToWishList() function gets the product id from the HTML data attribute. This id is a request param to perform the add action in the server.

Similarly, the removeFromWishlist() function calls the server URL to execute the delete query on the wishlist database.

Both the AJAX functions manipulate UI elements to give a seamless and very good user experience on these actions.

js/wishlist.js

function addToWishlist(obj) { var p_id = $(obj).data("pid"); $(obj).find("svg").hide(); $(obj).find("img").show(); $.ajax({ url : "ajax-endpoint/add-to-wishlist.php", type : "POST", data : 'p_id=' + p_id, success : function(data) { $(obj).find("svg").show(); $(obj).find("img").hide(); if (data > 0) { markedAsChecked($(obj)); } } });
} function removeFromWishlist(obj) { var p_id = $(obj).data("pid"); $(obj).find("svg").hide(); $(obj).find("img").show(); $.ajax({ url : "ajax-endpoint/remove-from-wishlist.php", type : "POST", data : 'p_id=' + p_id, success : function(data) { if (data > 0) { $(obj).find("svg").show(); $(obj).find("img").hide(); markedAsUnchecked($(obj)); } } });
} function markedAsChecked(obj) { $(obj).find("svg").addClass("color-filled"); $(obj).find("svg").parent().attr("onClick", "removeFromWishlist(this)"); $(obj).find("svg").parent().attr("title", "Remove from wishlist")
} function markedAsUnchecked(obj) { $(obj).find("svg").removeClass("color-filled"); $(obj).find("svg").parent().attr("onClick", "addToWishlist(this)"); $(obj).find("svg").parent().attr("title", "Add to wishlist")
}

PHP code to create and manage wishlist

This section shows the code to move product to or from the eCommerce wishlist.

On clicking the heart icon in the product gallery, the AJAX will call this PHP. This file inserts the selected item to the users’ eCommerce wishlist.

ajax-endpoint/add-to-wishlist.php

<?php
require_once __DIR__ . "/../lib/DataSource.php";
$db_handle = new DataSource();
if (! empty($_POST["p_id"])) { $memberId = 1; $sql = "INSERT INTO tbl_whish_list (product_id, member_id) VALUES (?, ?)"; $paramType = 'ii'; $paramValue = array( $_POST["p_id"], $memberId ); $whishlist_id = $db_handle->insert($sql, $paramType, $paramValue); echo $whishlist_id; exit();
}
?>

On clicking the filled heart icon, it calls the following PHP file. It receives the product id from the request param array.

Based on the product_id it prepares the delete query to remove the item from the user’s wishlist.

ajax-endpoint/remove-from-wishlist.php

<?php
require_once __DIR__ . "/../lib/DataSource.php";
$db_handle = new DataSource();
if (! empty($_POST["p_id"])) { $memberId = 1; $query = "DELETE FROM tbl_whish_list WHERE product_id = ? AND member_id = ?"; $paramType = 'ii'; $paramValue = array( $_POST["p_id"], $memberId ); $affectedRows = $db_handle->delete($query, $paramType, $paramValue); echo $affectedRows;
}
exit();

Database script

Import this database script to run this example in your server. It has the tables to manage shopping cart products, wishlist in the database.

--
-- Database: `ecommerce-wishlist`
-- -- -------------------------------------------------------- CREATE TABLE IF NOT EXISTS `tblproduct` (
`id` int(8) NOT NULL, `name` varchar(255) NOT NULL, `code` varchar(255) NOT NULL, `image` text NOT NULL, `price` double(10,2) NOT NULL
) ENGINE=InnoDB AUTO_INCREMENT=5 DEFAULT CHARSET=latin1; INSERT INTO `tblproduct` (`id`, `name`, `code`, `image`, `price`) VALUES
(1, 'FinePix Pro2 3D Camera', '3DcAM01', 'images/camera.jpg', 1500.00),
(2, 'EXP Portable Hard Drive', 'USB02', 'images/external-hard-drive.jpg', 800.00),
(3, 'Luxury Ultra thin Wrist Watch', 'wristWear03', 'images/watch.jpg', 300.00),
(4, 'XP 1155 Intel Core Laptop', 'LPN45', 'images/laptop.jpg', 800.00); -- -------------------------------------------------------- CREATE TABLE IF NOT EXISTS `tbl_whish_list` (
`id` int(11) NOT NULL, `member_id` int(11) NOT NULL, `product_id` int(11) NOT NULL
) ENGINE=InnoDB AUTO_INCREMENT=111 DEFAULT CHARSET=latin1; INSERT INTO `tbl_whish_list` (`id`, `member_id`, `product_id`) VALUES
(110, 0, 1); ALTER TABLE `tblproduct` ADD PRIMARY KEY (`id`), ADD UNIQUE KEY `product_code` (`code`); ALTER TABLE `tbl_whish_list` ADD PRIMARY KEY (`id`); ALTER TABLE `tblproduct`
MODIFY `id` int(8) NOT NULL AUTO_INCREMENT,AUTO_INCREMENT=5; ALTER TABLE `tbl_whish_list`
MODIFY `id` int(11) NOT NULL AUTO_INCREMENT,AUTO_INCREMENT=111; 

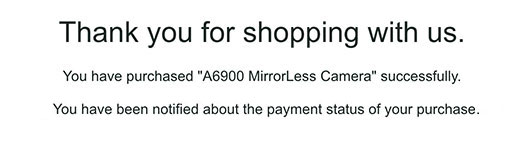
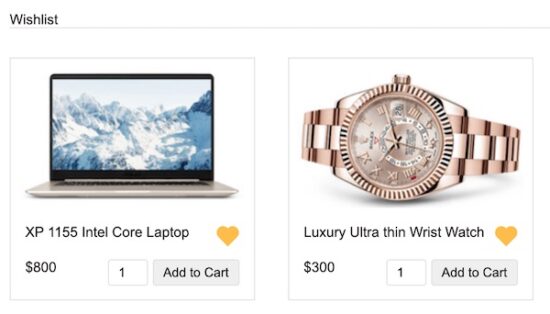
E-Commerce shopping cart wishlist example output

This screenshot shows the eCommerce product gallery below the shopping cart.

Each item in this gallery contains a clickable heart icon to move the item to/from the wishlist.

Items with the filled heart denote that they are on the users’ wishlist.

eCommerce with wishlist gallery

Conclusion

Thus, we have seen a simple example for creating an eCommerce wishlist for customers.

I hope, it helps you to build a module to support your shopping cart to have this feature to increase the conversion rate.

With straight forward PHP, MySQL code with AJAX, we have seen a reasonably good implementation for getting started.

Since it is with core PHP without any libraries, it is easily adaptable to any eCommerce framework.

Download

↑ Back to Top

Posted on Leave a comment

Login with Twitter using OAuth1.0a Protocol via API in PHP

Last modified on December 27th, 2020.

Almost all Internet giants (in good sense) like Google, Facebook, Twitter and LinkedIn support OAuth login. They provide API with detailed documentation to help developers integrate OAuth authentication.

There are many client libraries available to implement Twitter OAuth login. But we will do with just plain core PHP. Yes, actually it is sufficient, lightweight and better.

Application with the OAuth login feature has many advantages.

  • Simplifies the login process.
  • Reduces friction by minimising user’s effort with a single click.
  • Saves developers’ effort from building a custom login.
  • Assures secure authentication flow.

We have already seen how to integrate Facebook OAuth login into an application. Let us see how to Login with Twitter using OAuth authentication.

In its community API gallery, Twitter lists many PHP libraries. These libraries contain handlers to read-write API data in a secure manner. An authentication step ensures access security on each API request.

Twitter uses various authentication methods. Those are, OAuth 1.0a, OAuth 2.0 Bearer token, Basic authentication. I used OAuth 1.0a authentication to validate login with Twitter API requests.

During the login flow, Twitter prompts to enter user credentials to login. Then, it will ask to authorize the App for the first time.

“Login with Twitter” flow is very similar to the 3-legged OAuth flow used to get the access token. With the reference of this token, API will return user data as per the request URL. This example will read user name, photo and more details after successful authentication.

In this article, we will see how to integrate “Login with Twitter” by completing each of the below steps.

  • How to get and configure the API keys.
  • How to perform the 3-step authentication flow.
  • Create requests and handle responses during the authentication flow.
  • Store the authenticated user data into the Database.

What is inside?

  1. Twitter OAuth login flow
  2. How to integrate Twitter OAuth login?
  3. Generating Twitter app keys
  4. About this example
  5. Twitter OAuth PHP service
  6. PHP code to handle logged-in user data
  7. Database script
  8. Login with Twitter PHP example output

Twitter OAuth login flow

The Twitter login authentication flow includes three steps.

  1. Get a Request token and a secret-key.
  2. Redirect to Twitter to login and approve access rights to the Twitter app.
  3. Get an Access token and the secret-key to access the user account via API.

During the OAuth login process, each request has to be signed with an OAuth signature. In this example, it has a service class to prepare signed requests.

The following diagram shows the “Login with Twitter” flow. It indicates the steps, request parameters and API response data.

Twitter 3-Step OAuth Login Authentication Diagram

Click to see a larger image.

How to integrate Twitter OAuth login?

Twitter gives a Login with Twitter or Sign in with Twitter button control to put into an application. It makes users sign in to the application with a couple of clicks.

After obtaining the Twitter API keys and token secret, configure them with the PHP application. The next section will show the config file created for this example.

Then, create the request-response handlers to communicate with the Twitter API. It will proceed step by step process to obtain tokens to process the next request.

Instead of using custom handlers, we can use built-in Twitter client libraries.

With the access_token, API will allow access to hit the endpoints. But, it depends on the App permissions set in the developer console.

On getting the response data from the API, the application login flow comes to end. With this step, it will change the logged-in status of the application users in the UI.

Generating Twitter API keys

The process of generating Twitter API keys is straight-forward. Once we have seen the steps to get keys for Google OAuth login integration.

Login to the Twitter developer portal and follow the below steps.

  1. Login to Twitter and go to its developer console.
  2. Create a Twitter developer App. (project-specific app or standalone app).
  3. Go to app settings to edit permissions and authentication settings.
  4. Go to the “keys and tokens” tab to copy the consumer key and the secret key.
  5. Save the keys in a secured place and configure them into the application.

Twitter API Keys

Twitter allows creating two types of developer App. A project-specific app or a standalone app. The project-specific app can use v2 endpoints. The standalone apps can only access the v1 endpoints.

Twitter API keys will no longer keep the API keys and tokens permanently. This is for security purposes. But it allows regenerating the keys and tokens.

Configure the Twitter App consumer_key and secret_key in Config.php file. This application config defines the application constants. It includes the root path, database config and Twitter consumer and secrete key.

Common/config.php

<?php
namespace Phppot; class Config
{ const WEB_ROOT = "https://yourdomain/twitter-oauth"; // Database Configuration const DB_HOST = "localhost"; const DB_USERNAME = "root"; const DB_PASSWORD = ""; const DB_NAME = "twitter-oauth"; // Twitter API configuration const TW_CONSUMER_KEY = ''; const TW_CONSUMER_SECRET = ''; const TW_CALLBACK_URL = Config::WEB_ROOT . '/signin_with_twitter.php';
}

About this example

There are various ways to implement Twitter OAuth login in a PHP application. Generally, people use built-in client-side libraries to implement this. Twitter also recommends one or more PHP libraries in its community API gallery.

This example shows a simple code for “Login with Twitter” integration. It uses no external libraries to achieve this.

It has a custom class that prepares the API request and handle responses. It creates OAuth signatures to send valid signed requests to the API.

A landing page will show the “Sign in with Twitter” button to trigger the OAuth login process. On clicking, it invokes the PHP service to proceed with the three steps sign-in flow.

As a result, it gets the Twitter user data on successful authentication. The resultant page will change the logged-in state and display the user data.

If you refuse to approve the app access or login, Twitter will redirect back to the application. This redirect URL is set with the param list of the API request.

This example uses the Database to keep the user details read from the API response. Thus, it records the application’s users logged-in via Twitter OAuth login.

Twitter OAuth File Structure

Twitter OAuth PHP service

This PHP service class request Twitter API for the access key and token. It follows the three steps to obtain the access token.

We have seen such similar steps to get the access token in the LinkedIn OAuth login example code earlier.

The following three methods perform the three steps.

Step 1: getRequestToken() – sends the oauth_callback with the authentication header. It requests request_token and the secrete key from the Twitter API.

Step 2: getOAuthVerifier() – redirects the user to the Twitter authentication page. It let users sign in and approve the App to access the account. It passes the OAuth request token received in step1 with the URL. After authentication, Twitter will invoke the oauth_callback with the oauth_verifier in the querystring.

Step 3: getAccessToken() – requests the access_token and secrete key from the API. The params are the request_token, request_token_secret, oauth_verifier get from Step 1, 2.

Twitter requires each of the API requests has to be signed. This PHP service class has a function to generate the signature by the use of API request parameters.

lib/TwitterOAuthLogin.php

<?php
namespace Phppot; class TwitterOauthService
{ private $consumerKey; private $consumerSecret; private $signatureMethod = 'HMAC-SHA1'; private $oauthVersion = '1.0'; private $http_status = ""; public function __construct() { require_once __DIR__ . '/../Common/Config.php'; $this->consumerKey = Config::TW_CONSUMER_KEY; $this->consumerSecret = Config::TW_CONSUMER_SECRET; } public function getOauthVerifier() { $requestResponse = $this->getRequestToken(); $authUrl = "https://api.twitter.com/oauth/authenticate"; $redirectUrl = $authUrl . "?oauth_token=" . $requestResponse["request_token"]; return $redirectUrl; } public function getRequestToken() { $url = "https://api.twitter.com/oauth/request_token"; $params = array( 'oauth_callback' => Config::TW_CALLBACK_URL, "oauth_consumer_key" => $this->consumerKey, "oauth_nonce" => $this->getToken(42), "oauth_signature_method" => $this->signatureMethod, "oauth_timestamp" => time(), "oauth_version" => $this->oauthVersion ); $params['oauth_signature'] = $this->createSignature('POST', $url, $params); $oauthHeader = $this->generateOauthHeader($params); $response = $this->curlHttp('POST', $url, $oauthHeader); $responseVariables = array(); parse_str($response, $responseVariables); $tokenResponse = array(); $tokenResponse["request_token"] = $responseVariables["oauth_token"]; $tokenResponse["request_token_secret"] = $responseVariables["oauth_token_secret"]; session_start(); $_SESSION["oauth_token"] = $tokenResponse["request_token"]; $_SESSION["oauth_token_secret"] = $tokenResponse["request_token_secret"]; session_write_close(); return $tokenResponse; } public function getAccessToken($oauthVerifier, $oauthToken, $oauthTokenSecret) { $url = 'https://api.twitter.com/oauth/access_token'; $oauthPostData = array( 'oauth_verifier' => $oauthVerifier ); $params = array( "oauth_consumer_key" => $this->consumerKey, "oauth_nonce" => $this->getToken(42), "oauth_signature_method" => $this->signatureMethod, "oauth_timestamp" => time(), "oauth_token" => $oauthToken, "oauth_version" => $this->oauthVersion ); $params['oauth_signature'] = $this->createSignature('POST', $url, $params, $oauthTokenSecret); $oauthHeader = $this->generateOauthHeader($params); $response = $this->curlHttp('POST', $url, $oauthHeader, $oauthPostData); $fp = fopen("eg.log", "a"); fwrite($fp, "AccessToken: " . $response . "\n"); $responseVariables = array(); parse_str($response, $responseVariables); $tokenResponse = array(); $tokenResponse["access_token"] = $responseVariables["oauth_token"]; $tokenResponse["access_token_secret"] = $responseVariables["oauth_token_secret"]; return $tokenResponse; } public function getUserData($oauthVerifier, $oauthToken, $oauthTokenSecret) { $accessTokenResponse = $this->getAccessToken($oauthVerifier, $oauthToken, $oauthTokenSecret); $url = 'https://api.twitter.com/1.1/account/verify_credentials.json'; $params = array( "oauth_consumer_key" => $this->consumerKey, "oauth_nonce" => $this->getToken(42), "oauth_signature_method" => $this->signatureMethod, "oauth_timestamp" => time(), "oauth_token" => $accessTokenResponse["access_token"], "oauth_version" => $this->oauthVersion ); $params['oauth_signature'] = $this->createSignature('GET', $url, $params, $accessTokenResponse["access_token_secret"]); $oauthHeader = $this->generateOauthHeader($params); $response = $this->curlHttp('GET', $url, $oauthHeader); return $response; } public function curlHttp($httpRequestMethod, $url, $oauthHeader, $post_data = null) { $ch = curl_init(); $fp = fopen("eg.log", "a"); fwrite($fp, "Header: " . $oauthHeader . "\n"); $headers = array( "Authorization: OAuth " . $oauthHeader ); $options = [ CURLOPT_HTTPHEADER => $headers, CURLOPT_HEADER => false, CURLOPT_URL => $url, CURLOPT_RETURNTRANSFER => true, CURLOPT_SSL_VERIFYPEER => false, ]; if($httpRequestMethod == 'POST') { $options[CURLOPT_POST] = true; } if(!empty($post_data)) { $options[CURLOPT_POSTFIELDS] = $post_data; } curl_setopt_array($ch, $options); $response = curl_exec($ch); $this->http_status = curl_getinfo($ch, CURLINFO_HTTP_CODE); curl_close($ch); return $response; } public function generateOauthHeader($params) { foreach ($params as $k => $v) { $oauthParamArray[] = $k . '="' . rawurlencode($v) . '"'; } $oauthHeader = implode(', ', $oauthParamArray); return $oauthHeader; } public function createSignature($httpRequestMethod, $url, $params, $tokenSecret = '') { $strParams = rawurlencode(http_build_query($params)); $baseString = $httpRequestMethod . "&" . rawurlencode($url) . "&" . $strParams; $fp = fopen("eg.log", "a"); fwrite($fp, "Baaaase: " . $baseString . "\n"); $signKey = $this->generateSignatureKey($tokenSecret); $oauthSignature = base64_encode(hash_hmac('sha1', $baseString, $signKey, true)); return $oauthSignature; } public function generateSignatureKey($tokenSecret) { $signKey = rawurlencode($this->consumerSecret) . "&"; if (! empty($tokenSecret)) { $signKey = $signKey . rawurlencode($tokenSecret); } return $signKey; } public function getToken($length) { $token = ""; $codeAlphabet = "ABCDEFGHIJKLMNOPQRSTUVWXYZ"; $codeAlphabet .= "abcdefghijklmnopqrstuvwxyz"; $codeAlphabet .= "0123456789"; $max = strlen($codeAlphabet) - 1; for ($i = 0; $i < $length; $i ++) { $token .= $codeAlphabet[$this->cryptoRandSecure(0, $max)]; } return $token; } public function cryptoRandSecure($min, $max) { $range = $max - $min; if ($range < 1) { return $min; // not so random... } $log = ceil(log($range, 2)); $bytes = (int) ($log / 8) + 1; // length in bytes $bits = (int) $log + 1; // length in bits $filter = (int) (1 << $bits) - 1; // set all lower bits to 1 do { $rnd = hexdec(bin2hex(openssl_random_pseudo_bytes($bytes))); $rnd = $rnd & $filter; // discard irrelevant bits } while ($rnd >= $range); return $min + $rnd; }
}

Initiate login flow with “Sign in with Twitter” control

The landing page of this example will show a “Sign in with Twitter” button. On clicking this button, it invokes functions to proceed with the 3-step login flow.

The following code shows the index.php file script. It checks if any user logged-in already. If so, it displays the user dashboard. Otherwise, it shows the “Sign in with Twitter” button.

It invokes the TwitterOAuthService to initiate the login flow. This initiation will happen when the user tries to log in.

index.php

<?php
namespace Phppot; if (isset($_GET["action"]) && $_GET["action"] == "login") { require_once __DIR__ . '/lib/TwitterOauthService.php'; $twitterOauthService = new TwitterOauthService(); $redirectUrl = $twitterOauthService->getOauthVerifier(); header("Location: " . $redirectUrl); exit();
} session_start();
if ($_SESSION["id"]) { $memberId = $_SESSION["id"];
}
session_write_close(); ?>
<html>
<head>
<title>Home</title>
<link rel="stylesheet" href="assets/style.css">
</head>
<body> <div class="phppot-container">
<?php
if (empty($memberId)) { ?> <a href="?action=login"> <img class="twitter-btn" src="sign-in-with-twitter.png"></a>
<?php
} else { require_once './lib/Member.php'; $member = new Member(); $userData = $member->getUserById($memberId); ?>
<div class="welcome-messge-container"> <img src="<?php echo $userData[0]["photo_url"]; ?>" class="profile-photo" /> <div>Welcome <?php echo $userData[0]["screen_name"]; ?></div> </div>
<?php
}
?>
</div>
</body>
</html>

PHP code to handle logged-in user data

After completing the 3-steps, the TwitterOauthService will return the user access token. Then it invokes GET oauth/verify_credentials endpoint to read the user daya.

It will return the logged-in user data as a JSON response. The application callback endpoint receives this data.

Then, the code will save the data into the database and put the logged-in user id into the session. Based on the existence of this user session the landing page will show the user dashboard.

sign-in-with-twitter.php

<?php
namespace Phppot; require_once './lib/TwitterOauthService.php';
$TwitterOauthService = new TwitterOauthService(); session_start();
$oauthTokenSecret = $_SESSION["oauth_token_secret"]; if (! empty($_GET["oauth_verifier"]) && ! empty($_GET["oauth_token"])) { $userData = $TwitterOauthService->getUserData($_GET["oauth_verifier"], $_GET["oauth_token"], $oauthTokenSecret); $userData = json_decode($userData, true); if (! empty($userData)) { $oauthId = $userData["id"]; $fullName = $userData["name"]; $screenName = $userData["screen_name"]; $photoUrl = $userData["profile_image_url"]; require_once './lib/Member.php'; $member = new Member(); $isMemberExists = $member->isExists($oauthId); if (empty($isMemberExists)) { $memberId = $member->insertMember($oauthId, $fullName, $screenName, $photoUrl); } else { $memberId = $isMemberExists[0]["id"]; } if (! empty($memberId)) { unset($_SESSION["oauth_token"]); unset($_SESSION["oauth_token_secret"]); $_SESSION["id"] = $memberId; header("Location: index.php"); } }
} else { ?>
<HTML>
<head>
<title>Signin with Twitter</title>
<link rel="stylesheet" href="assets/style.css">
</head>
<body> <div class="phppot-container"> <div class="error"> Sorry. Something went wrong. <a href="index.php">Try again</a>. </div> </div>
</body>
</HTML>
<?php
}
session_write_close();
exit();

The following PHP class has functions to prepare database queries. It is to read data, to check user existency, to insert new records.

lib/Member.php

<?php
namespace Phppot; class Member
{ private $db; private $userTbl; function __construct() { require_once __DIR__ . '/DataSource.php'; $this->db = new DataSource(); } function isExists($twitterOauthId) { $query = "SELECT * FROM tbl_member WHERE oauth_id = ?"; $paramType = "s"; $paramArray = array( $twitterOauthId ); $result = $this->db->select($query, $paramType, $paramArray); return $result; } function insertMember($oauthId, $fullName, $screenName, $photoUrl) { $query = "INSERT INTO tbl_member (oauth_id, oauth_provider, full_name, screen_name, photo_url) values (?,?,?,?,?)"; $paramType = "sssss"; $paramArray = array( $oauthId, 'twitter', $fullName, $screenName, $photoUrl ); $this->db->insert($query, $paramType, $paramArray); } function getUserById($id) { $query = "SELECT * FROM tbl_member WHERE id = ?"; $paramType = "i"; $paramArray = array( $id ); $result = $this->db->select($query, $paramType, $paramArray); return $result; }
}

DataSource class and Database script

The database related functions are in the DataSource class. It is for creating the database connection and to perform read, write operations.

It uses MySQLi prepared statements to execute database queries. It will help to have a secured code that prevents SQL injection.

lib/DataSource.php

<?php
/** * Copyright (C) Phppot * * Distributed under 'The MIT License (MIT)' * In essense, you can do commercial use, modify, distribute and private use. * Though not mandatory, you are requested to attribute Phppot URL in your code or website. */
namespace Phppot; /** * Generic datasource class for handling DB operations. * Uses MySqli and PreparedStatements. * * @version 2.6 - recordCount function added */
class DataSource
{ const HOST = 'localhost'; const USERNAME = 'root'; const PASSWORD = 'test'; const DATABASENAME = 'oauth_login'; private $conn; /** * PHP implicitly takes care of cleanup for default connection types. * So no need to worry about closing the connection. * * Singletons not required in PHP as there is no * concept of shared memory. * Every object lives only for a request. * * Keeping things simple and that works! */ function __construct() { $this->conn = $this->getConnection(); } /** * If connection object is needed use this method and get access to it. * Otherwise, use the below methods for insert / update / etc. * * @return \mysqli */ public function getConnection() { $conn = new \mysqli(self::HOST, self::USERNAME, self::PASSWORD, self::DATABASENAME); if (mysqli_connect_errno()) { trigger_error("Problem with connecting to database."); } $conn->set_charset("utf8"); return $conn; } /** * To get database results * * @param string $query * @param string $paramType * @param array $paramArray * @return array */ public function select($query, $paramType = "", $paramArray = array()) { $stmt = $this->conn->prepare($query); if (! empty($paramType) && ! empty($paramArray)) { $this->bindQueryParams($stmt, $paramType, $paramArray); } $stmt->execute(); $result = $stmt->get_result(); if ($result->num_rows > 0) { while ($row = $result->fetch_assoc()) { $resultset[] = $row; } } if (! empty($resultset)) { return $resultset; } } /** * To insert * * @param string $query * @param string $paramType * @param array $paramArray * @return int */ public function insert($query, $paramType, $paramArray) { $stmt = $this->conn->prepare($query); $this->bindQueryParams($stmt, $paramType, $paramArray); $stmt->execute(); $insertId = $stmt->insert_id; return $insertId; } /** * To execute query * * @param string $query * @param string $paramType * @param array $paramArray */ public function execute($query, $paramType = "", $paramArray = array()) { $stmt = $this->conn->prepare($query); if (! empty($paramType) && ! empty($paramArray)) { $this->bindQueryParams($stmt, $paramType, $paramArray); } $stmt->execute(); } /** * 1. * Prepares parameter binding * 2. Bind prameters to the sql statement * * @param string $stmt * @param string $paramType * @param array $paramArray */ public function bindQueryParams($stmt, $paramType, $paramArray = array()) { $paramValueReference[] = &$paramType; for ($i = 0; $i < count($paramArray); $i ++) { $paramValueReference[] = &$paramArray[$i]; } call_user_func_array(array( $stmt, 'bind_param' ), $paramValueReference); } /** * To get database results * * @param string $query * @param string $paramType * @param array $paramArray * @return array */ public function getRecordCount($query, $paramType = "", $paramArray = array()) { $stmt = $this->conn->prepare($query); if (! empty($paramType) && ! empty($paramArray)) { $this->bindQueryParams($stmt, $paramType, $paramArray); } $stmt->execute(); $stmt->store_result(); $recordCount = $stmt->num_rows; return $recordCount; }
}

The below section shows the tbl_member database table script. Import this script before executing this example.

sql/structure.sql

--
-- Database: `oauth_login`
-- -- -------------------------------------------------------- --
-- Table structure for table `tbl_member`
-- CREATE TABLE `tbl_member` ( `id` int(11) NOT NULL, `oauth_id` varchar(255) NOT NULL, `oauth_provider` varchar(255) NOT NULL, `full_name` varchar(255) NOT NULL, `screen_name` varchar(255) NOT NULL, `photo_url` varchar(255) NOT NULL, `create_at` timestamp NOT NULL DEFAULT CURRENT_TIMESTAMP ON UPDATE CURRENT_TIMESTAMP
) ENGINE=InnoDB DEFAULT CHARSET=latin1; --
-- Indexes for dumped tables
-- --
-- Indexes for table `tbl_member`
--
ALTER TABLE `tbl_member` ADD PRIMARY KEY (`id`); --
-- AUTO_INCREMENT for dumped tables
-- --
-- AUTO_INCREMENT for table `tbl_member`
--
ALTER TABLE `tbl_member` MODIFY `id` int(11) NOT NULL AUTO_INCREMENT;

Login with Twitter example output

After completing the application config, the home page will display the “Sign in with Twitter” button as below.

Sign In with Twitter Gray

Before login, the home page will display the “Sign in with Twitter” button as below. I used the login button downloaded from the official Twitter documentation.

User Dashboard Twitter Login

Download

↑ Back to Top

Posted on Leave a comment

Guide to Setup Raspberry Pi with LCD Display using I2C Backpack

Last modified on November 8th, 2020.

Internet of things (IoT) is fascinating. I am predominantly a web applications person. But sensors, LED display, chips, soldering and the collage of software with these “things” is exciting.

The credit card sized Raspberry Pi computer gives all the opportunity to experiment and explore IoT. I wrote getting started with IoT using Raspberry Pi and PHP a while back. Now I thought of extending that and write about my hobby projects that I do with Raspberry Pi.

I have been using Raspberry Pi to,

  • Notify for new emails integrating GMail API.
  • Show the number of unread emails.
  • Monitor website uptime and notify if it’s up or down.
  • Show traffic user count to my website integrating Google Analytics.
  • Notify if there is a sale in my online shop.

Raspberry Pi is my hobby and I thought of sharing with you about these tiny projects. This will be a multi article series. Let us start with how to connect a I2C LCD display with the Raspberry Pi.

Then I will write about all the above items one by one.

I2C LCD display module

Widely popular are 16×2(LCD1602) and 20×4 (LCD2004) LCD displays. The below image shows a 20×4 LCD display module.

20x4 LCD Display Module

Three main reasons to choose this type of LCD display for IoT projects using Raspberry Pi or Arduino.

  1. Economical to purchase. You can buy a 16×2 LCD module for just $1 USD.
  2. It requires 5v to run and so we can hook it to Raspberry Pi and no dedicated power source required.
  3. Consumes low current. You can keep it on 24×7 with backlight on without burning your purse.

Why I2C backpack?

These LCD modules have parallel interface. That will not be convenient to connect multiple pins to the chip and use them in parallel mode.

I2C is a serial bus developed by Philips. So we can use I2C communication and just use 4 wires to communicate. To do this we need to use an I2C adapter and solder it to the display.

I2C uses two bidirectional lines, called SDA (Serial Data Line) and SCL (Serial Clock Line) with 5V standard power supply requirement a ground pin. So just 4 pins to deal with.

When you buy the LCD module, you can purchase LCD, I2C adapter separately and solder it. If soldering is not your thing, then it is better to buy the LCD module that comes with the I2C adapter backpack with it.

2004LCD with I2C Adapter

The above image is backside of a 2004 LCD module. The black thing is the I2C adapter. You can see the four pins GND, VCC, SDA and SCL. That’s where the you will be connecting the Raspberry Pi.

The square blue thing with plus mark is used for adjusting the brightness of the display. The blue jumper is used to switch on or off the backlight.

Switching off the backlight may not be necessary. If you switch off, the characters will be barely visible. You can keep it on 24×7, it will not eat up power as it is a low power consumption device.

Logic converter

Raspberry Pi GPIO pins are natively of 3.3V. So we should not pull 5v from Raspberry Pi. The I2C LCD module works on 5V power and to make these compatible, we need to shift up the 3.3V GPIO to 5V. To do that, we can use a logic level converter.

Reference: https://www.raspberrypi.org/documentation/faqs/#pi-power-gpioout

Logic Level Converter

This is an important point and this is where a lot of beginners fail out. You may find some conflicting information in the Internet pages.

You might see RPIs connected directly to a 5V devices, but they may not be pulling power from RPI instead supplying externally. Only for data / instruction RPI might be used. So watch out, you might end up frying the LCD module or the RPI itself.

Required hardware list

  • Raspberry Pi (I have used Zero W and you can use any model you have).
  • LCD display with I2C adapter backpack (I have used 20×4, you can use as per your choice).
  • 3.3V to 5V bi-directional logic level converter
  • Breadboard
  • Jumper wires

Pre-requisite

  • Micro SD card with Raspbian OS
  • 5.1V power supply (Official power adapter recommended)
  • Memory card reader

Why official power adapter?

Why am I recommending the official power adapter! There is a reason to it. The cheap mobile adapters though guarantee a voltage, they do not provide a steady voltage. That may not be required in charging a cellphone device but not in the case of Raspberry Pi. That is the main reason, a USB keyboard or mouse attached does not get detected. They may not get sufficient power. Either go for an official power adapter or use the best branded one you know.

Headless

I have a headless setup. I am doing SSH from my MAC terminal and use VIM as editor. VNC viewer may occasionally help but doing the complete programming / debugging may not be comfortable. If you do not prefer SSH way, then you will need a monitor to plug-in to Raspberry Pi.

Headless Raspberry Pi

Raspberry Pi LCD I2C Circuit diagram

I have used a breadboard, logic level converter, 20×4 LCD display module with I2C backpack and Raspberry Pi Zero W in the circuit diagram.

Raspberry Pi LCD2004 I2C Circuit

3.3V GPIO of Raspberry Pi is converted using a logic level converter to 5V to be compatible for the LCD display.

Raspberry Pi setup with LCD display module using I2C backpack

Raspberry Pi with I2C LCD Setup

Programming

As you know my language of choice to build website is PHP. But for IoT with Raspberry Pi, let us use Python. Reason being availability of packages and that will save ton of effort. Low level interactions via serial or parallel interface is easier via Python.

I2C

We need the below two tools for working with I2C. So install it by running the following command in the RPI terminal.

sudo apt-get install python-smbus i2c-tools

Enable I2C

sudo raspi-config

The above command opens the Raspberry Pi configuration in the terminal. Under ‘Interfacing Options’, activate I2C.

sudo vi /etc/modules

Add the following two lines at the end of the file and save it.

i2c-bcm2708
i2c-dev

Then restart Raspberry Pi.

sudo reboot

Test I2C

To check if the I2C is properly connected and detected.

sudo i2cdetect -y 1

This will return a matrix with ’27’ highlighted, that means you I2C is detected and it is the address.

Install PIP

curl https://bootstrap.pypa.io/get-pip.py -o get-pip.py
python3 get-pip.py

LCD Library

We need a library to interact with the LCD module. There are many Python libraries available. I prefer RPLCD.

sudo pip install RPLCD

This will install the RPLCD library.

Raspberry Pi LCD Hello World Python program

LCDHelloWorld.py

Following code imports the RPLCD library. Then initializes the LCD instance. Then print the “Hello World” string followed by new line. Then another two statements. Then a sleep for 5 seconds and switch off the LCD backlight. Finally, clear the LCD screen.

# Import LCD library
from RPLCD import i2c # Import sleep library
from time import sleep # constants to initialise the LCD
lcdmode = 'i2c'
cols = 20
rows = 4
charmap = 'A00'
i2c_expander = 'PCF8574' # Generally 27 is the address;Find yours using: i2cdetect -y 1 address = 0x27 port = 1 # 0 on an older Raspberry Pi # Initialise the LCD
lcd = i2c.CharLCD(i2c_expander, address, port=port, charmap=charmap, cols=cols, rows=rows) # Write a string on first line and move to next line
lcd.write_string('Hello world')
lcd.crlf()
lcd.write_string('IoT with Vincy')
lcd.crlf()
lcd.write_string('Phppot')
sleep(5)
# Switch off backlight
lcd.backlight_enabled = False # Clear the LCD screen
lcd.close(clear=True) 

My next article in this series will be on how to integrate the GMail API and notify for new mails.

↑ Back to Top

Posted on Leave a comment

Stripe One Time Payment with Prebuilt Hosted Checkout in PHP

Last modified on October 6th, 2020.

Stripe provides payment processing to support eCommerce software and mobile APPs. The key features by Stripe are,

  • fast and interactive checkout experience.
  • secure, smooth payment flow.
  • scope to uplift the conversion rate and business growth.

Stripe is the most popular payment gateway solution supporting card payments along with PayPal. Its complete documentation helps developers to do an effortless integration.

Stripe provides different types of payment services to accept payments. It supports accepting one-time payment, recurring payment, in-person payment and more.

There are two ways to set up the Stripe one-time payment option in a eCommerce website.

  1. Use the secure prebuilt hosted checkout page.
  2. Create a custom payment flow.

Let us take the first method to integrate Stripe’s one-time payment. The example code redirects customers to the Stripe hosted checkout page. It’s a pre-built page that allows customers to enter payment details.

Stripe hosted checkout option piggybacks on the Stripe trust factor. If your website is lesser-known, if you are not popular, then it is best to choose this option. Because the end users may feel uncomfortable to enter their card details on your page.

This diagram depicts the Stripe payment flow, redirect and response handling.

Stripe Hosted Checkout Block Diagram

In this example, it uses the latest checkout version to set up a one-time payment. If you want to create Stripe subscription payment, then the linked article has an example for it.

What is inside?

  1. About Stripe Checkout
  2. Steps to set up Stripe one-time payment flow
  3. About this example
  4. Generate and configure Stripe API keys
  5. Create webhook and map events
  6. Required libraries to access Stripe API
  7. Create client-server-side code to initiate checkout
  8. Capture and process webhook response
  9. Evaluate integration with test data
  10. Stripe one-time payment example output

About Stripe Checkout

Latest Stripe Checkout provides a frictionless smooth checkout experience. The below list shows some features of the latest Stripe checkout version.

  • Strong Customer Authentication (SCA).
  • Checkout interface fluidity over various devices’ viewport.
  • Multilingual support.
  • Configurable options to enable billing address collection, email receipts, and Button customizations

If you are using the legacy version,  it’s so simple to migrate to the latest Stripe Checkout version. The upgraded version supports advanced features like 3D secure, mobile payments and more.

Steps to setup Stripe one-time payment flow

The below steps are the least needs to set up a Stripe one-time payment online.

  1. Register with Stripe and generate API keys.
  2. Configure API keys with the application.
  3. Install and load the required libraries to access API.
  4. Create client and server-side code to make payments.
  5. Create endpoints to receive payment response and log into a database.
  6. Create a UI template to acknowledge customers.

We will see the above steps in this article with example code and screenshots.

About Stripe payment integration example

Stripe API allows applications to access and use its online payment services. It provides Stripe.js a JavaScript library to initiate the payment session flow.

This example code imports the Stripe libraries to access the API functions. It sets the endpoint to build the request and receive the response.

The client and server-side code redirect customers to the Stripe hosted checkout page. In the callback handlers, it processes the payment response sent by the API.

This example uses a database to store payment entries. It uses MySQLi with prepared statements to execute queries.

This image shows the simple file architecture of this example.

Stripe Hosted Checkout File Structure

Get and configure Stripe API keys

Register and log in with Stripe to get the API keys. Stripe dashboard will show two keys publishable_key and secret_key.

These keys are the reference to validate the request during the authentication process.

Note: Once finish testing in a sandbox mode, Stripe requires to activate the account to get the live API keys.

Get Stripe API Keys

This code shows the constants created to configure the API keys for this example.

<?php
namespace Phppot; class Config
{ const ROOT_PATH = "https://your-domain/stripe-hosted"; /* Stripe API test keys */ const STRIPE_PUBLISHIABLE_KEY = ""; const STRIPE_SECRET_KEY = ""; /* PRODUCT CONFIGURATIONS BEGINS */ const PRODUCT_NAME = 'A6900 MirrorLess Camera'; const PRODUCT_IMAGE = Config::ROOT_PATH . '/images/camera.jpg'; const PRODUCT_PRICE = '289.61'; const CURRENCY = 'USD'; const PRODUCT_TYPE = 'good';
}

Create webhook and map events

Creating a webhook is a conventional way to get the payment notifications sent by the API. All payment gateway providers give the option to create webhook for callback.

In PayPal payment gateway integration article, we have seen the types of notification mechanisms supported by PayPal.

The code has the webhook endpoint registered with Stripe. It handles the API responses based on the event that occurred.

The below image shows the screenshot of the add-endpoint dialog. It populates the URL and the mapped events in the form fields.

Navigate via Developers->Webhooks and click the Add endpoint button to see the dialog.

Add Stripe Webhook Endpoint

Required libraries to access Stripe API

First, download and install the stripe-php library. This will help to send flawless payment initiation request to the Stripe API.

This command helps to install this library via Composer. It is also available to download from GitHub.

composer require stripe/stripe-php

Load Stripe.js JavaScript library into the page which has the checkout button. Load this file by using https://js.stripe.com/v3/ instead of having it in local.

<script src="https://js.stripe.com/v3/"></script>

Create client-server code to process checkout

This section includes the steps needed to create the client-server code for setting up the Stripe one-time payment.

  1. Add checkout button and load Stripe.js
  2. Create a JavaScript event handler to initiate checkout session
  3. Create PHP endpoint to post create-checkout-session request
  4. Redirect customers to the Stripe hosted checkout page
  5. Get checkout session-id from the response.

HTML page with Stripe checkout button

This page has HTML code to add the Stripe checkout button. It loads the Stripe.js library.

This page loads a JavaScript that initiates the checkout session and redirects the user to the prebuilt Stripe hosted checkout.

The Stripe hosted checkout form handles the card validation effectively. We have created a custom car validator for Authorize.net payment integration code. Hosted checkout is more secure than handling card details by custom handlers.

index.php

<?php
namespace Phppot;
?>
<html>
<title>Stripe Prebuilt Hosted Checkout</title>
<head>
<link href="css/style.css" type="text/css" rel="stylesheet" />
<script src="https://js.stripe.com/v3/"></script>
</head>
<body> <div class="phppot-container"> <h1>Stripe Prebuilt Hosted Checkout</h1> <div id="payment-box"> <img src="images/camera.jpg" /> <h4 class="txt-title">A6900 MirrorLess Camera</h4> <div class="txt-price">$289.61</div> <button id="checkout-button">Checkout</button> </div> </div> <script> var stripe = Stripe('<?php echo Config::STRIPE_PUBLISHIABLE_KEY; ?>'); var checkoutButton = document.getElementById('checkout-button'); checkoutButton.addEventListener('click', function() { fetch('create-checkout-session.php', { method: 'POST', }) .then(function(response) { return response.json(); }) .then(function(session) { return stripe.redirectToCheckout({ sessionId: session.id }); }) .then(function(result) { if (result.error) { alert(result.error.message); } }) .catch(function(error) { console.error('Error:', error); }); }); </script>
</body>
</html>

JavaScript event handler initiates checkout session

In the previous section, it loads a JavaScript to do the following.

  1. Instantiate Stripe Javascript library object with the reference of the Stripe Publishable key.
  2. Map the checkout button’s click event to initiate a create-checkout-session.
  3. Redirect customers to the Stripe hosted checkout page with the checkout session id.

It calls the PHP endpoint builds the API request params to start a checkout session.

Then it receives the checkout-session-id as returned by the PHP endpoint. The redirectToCheckout() method sends customers to the prebuilt checkout to complete the payment.

PHP endpoint processing create-checkout-session request

When clicking the checkout button, the JavaScript executes an AJAX request. It fetches the PHP endpoint processing the create-checkout-session request.

The below code shows how to create the Stripe checkout-session via API. The API request is with the required query parameters. It includes the product detail, unit amount, payment method and more.

Then the API will return the session object after processing this request. This endpoint parses the response and grab the session-id and return it.

ajax-endpoint/create-checkout-session.php

<?php
namespace Phppot; use Phppot\StripeService;
use Phppot\StripePayment; $orderReferenceId = rand(100000, 999999); require_once __DIR__ . "/../lib/StripeService.php";
require_once __DIR__ .'/../Common/Config.php'; require_once __DIR__ . '/../lib/StripePayment.php';
$stripePayment = new StripePayment(); $stripeService = new StripeService(); $currency = Config::CURRENCY; $orderId = $stripePayment->insertOrder(Config::PRODUCT_PRICE, $currency, $orderReferenceId, "Payment in-progress");
$unitAmount = Config::PRODUCT_PRICE * 100;
$session = $stripeService->createCheckoutSession($unitAmount, $orderId);
echo json_encode($session);

The StripeService is a PHP class created to build API requests and process responses.

The createCheckoutSession() function builds the param array for the create-checkout-session request.

This service also handles the webhook responses sent by the API. The API sends the response on the occurrences of the events mapped with the webhook endpoint URL.

lib/StripeService.php

<?php
namespace Phppot; require_once __DIR__ . '/../Common/Config.php'; class StripeService
{ function __construct() { require_once __DIR__ . "/../vendor/autoload.php"; // Set your secret key. Remember to set your live key in production! \Stripe\Stripe::setApiKey(Config::STRIPE_SECRET_KEY); } public function createCheckoutSession($unitAmount, $clientReferenceId) { $checkout_session = \Stripe\Checkout\Session::create([ 'payment_method_types' => ['card'], 'line_items' => [[ 'price_data' => [ 'currency' => Config::CURRENCY, 'unit_amount' => $unitAmount, 'product_data' => [ 'name' => Config::PRODUCT_NAME, 'images' => [Config::PRODUCT_IMAGE], ], ], 'quantity' => 1, ]], 'mode' => 'payment', 'client_reference_id' => $clientReferenceId, 'success_url' => Config::ROOT_PATH . '/success.php?session_id={CHECKOUT_SESSION_ID}', 'cancel_url' => Config::ROOT_PATH . '/index.php?status=cancel', ]); return $checkout_session; } public function captureResponse() { $payload = @file_get_contents('php://input'); $event = json_decode($payload); require_once __DIR__ . "/../lib/StripePayment.php"; $stripePayment = new StripePayment(); switch($event->type) { case "customer.created": $param["stripe_customer_id"] = $event->data->object->id; $param["email"] = $event->data->object->email; $param["customer_created_datetime"] = date("Y,m,d H:i:s", $event->data->object->created); $param["stripe_response"] = json_encode($event->data->object); $stripePayment->insertCustomer($param); break; case "checkout.session.completed": $param["order_id"] = $event->data->object->client_reference_id; $param["customer_id"] = $event->data->object->customer; $param["payment_intent_id"] = $event->data->object->payment_intent; $param["stripe_checkout_response"] = json_encode($event->data->object); $stripePayment->updateOrder($param); break; case "payment_intent.created": $param["payment_intent_id"] = $event->data->object->id; $param["payment_create_at"] = date("Y-m-d H:i:s", $event->data->object->created); $param["payment_status"] = $event->data->object->status; $param["stripe_payment_response"] = json_encode($event->data->object); $stripePayment->insertPayment($param); break; case "payment_intent.succeeded": $param["payment_intent_id"] = $event->data->object->id; $param["billing_name"] = $event->data->object->charges->data[0]->billing_details->name; $param["billing_email"] = $event->data->object->charges->data[0]->billing_details->email; $param["payment_last_updated"] = date("Y-m-d H:i:s", $event->data->object->charges->data[0]->created); $param["payment_status"] = $event->data->object->charges->data[0]->status; $param["stripe_payment_response"] = json_encode($event->data->object); $stripePayment->updatePayment($param); break; case "payment_intent.canceled": $param["payment_intent_id"] = $event->data->object->id; $param["billing_name"] = $event->data->object->charges->data[0]->billing_details->name; $param["billing_email"] = $event->data->object->charges->data[0]->billing_details->email; $param["payment_last_updated"] = date("Y-m-d H:i:s", $event->data->object->charges->data[0]->created); $param["payment_status"] = $event->data->object->charges->data[0]->status; $param["stripe_payment_response"] = json_encode($event->data->object); $stripePayment->updatePayment($param); break; case "payment_intent.payment_failed": $param["payment_intent_id"] = $event->data->object->id; $param["billing_name"] = $event->data->object->charges->data[0]->billing_details->name; $param["billing_email"] = $event->data->object->charges->data[0]->billing_details->email; $param["payment_last_updated"] = date("Y-m-d H:i:s", $event->data->object->charges->data[0]->created); $param["payment_status"] = $event->data->object->charges->data[0]->status; $param["stripe_payment_response"] = json_encode($event->data->object); $stripePayment->updatePayment($param); break; } http_response_code(200); }
} 

Capture and process response

The capture-response.php file calls the StripeService class to handle the webhook response.

The registered webhook endpoint has the mapping for the events. The figure shows the mapped events and the webhook URL below.

Stripe Developers Webhook Detail

The captureResponse() function handles the API response based on the events that occurred.

On each event, it updates the customer, order database tables. It creates the payment response log to put entries into the tbl_stripe_response table.

webhook-ep/capture-response.php

<?php
namespace Phppot; use Phppot\StriService; require_once __DIR__ . "/../lib/StripeService.php"; $stripeService = new StripeService(); $stripeService->captureResponse(); ?>

It invokes the StripeService function captureResponse(). It calls StripePayment to store Orders, Customers and Payment data into the database.

The StripePayment class it uses DataSource to connect the database and access it.

lib/StripePayment.php

<?php
namespace Phppot; use Phppot\DataSource; class StripePayment
{ private $ds; function __construct() { require_once __DIR__ . "/../lib/DataSource.php"; $this->ds = new DataSource(); } public function insertOrder($unitAmount, $currency, $orderReferenceId, $orderStatus) { $orderAt = date("Y-m-d H:i:s"); $insertQuery = "INSERT INTO tbl_order(order_reference_id, amount, currency, order_at, order_status) VALUES (?, ?, ?, ?, ?) "; $paramValue = array( $orderReferenceId, $unitAmount, $currency, $orderAt, $orderStatus ); $paramType = "sisss"; $insertId = $this->ds->insert($insertQuery, $paramType, $paramValue); return $insertId; } public function updateOrder($param) { $paymentDetails = $this->getPaymentByIntent($param["payment_intent_id"]); if (! empty($paymentDetails)) { if($paymentDetails[0]["payment_status"] == "succeeded") { $paymentStatus = "Paid"; } else if($paymentDetails[0]["payment_status"] == "requires_source") { $paymentStatus = "Payment in-progress"; } $query = "UPDATE tbl_order SET stripe_customer_id = ?, stripe_payment_intent_id = ?, stripe_checkout_response = ?, order_status = ? WHERE id = ?"; $paramValue = array( $param["customer_id"], $param["payment_intent_id"], $param["stripe_checkout_response"], $paymentStatus, $param["order_id"] ); $paramType = "ssssi"; $this->ds->execute($query, $paramType, $paramValue); } } public function insertCustomer($customer) { $insertQuery = "INSERT INTO tbl_customer(stripe_customer_id, email, customer_created_datetime, stripe_response) VALUES (?, ?, ?, ?) "; $paramValue = array( $customer["stripe_customer_id"], $customer["email"], $customer["customer_created_datetime"], $customer["stripe_response"] ); $paramType = "ssss"; $this->ds->insert($insertQuery, $paramType, $paramValue); } public function insertPayment($param) { $insertQuery = "INSERT INTO tbl_payment(stripe_payment_intent_id, payment_create_at, payment_status, stripe_payment_response) VALUES (?, ?, ?, ?) "; $paramValue = array( $param["payment_intent_id"], $param["payment_create_at"], $param["payment_status"], $param["stripe_payment_response"] ); $paramType = "ssss"; $this->ds->insert($insertQuery, $paramType, $paramValue); } public function updatePayment($param) { $query = "UPDATE tbl_payment SET billing_name = ?, billing_email = ?, payment_last_updated = ?, payment_status = ?, stripe_payment_response = ? WHERE stripe_payment_intent_id = ?"; $paramValue = array( $param["billing_name"], $param["billing_email"], $param["payment_last_updated"], $param["payment_status"], $param["stripe_payment_response"], $param["payment_intent_id"] ); $paramType = "ssssss"; $this->ds->execute($query, $paramType, $paramValue); } public function getPaymentByIntent($paymentIntent) { $query = "SELECT * FROM tbl_payment WHERE stripe_payment_intent_id = ?"; $paramValue = array( $paymentIntent ); $paramType = "s"; $result = $this->ds->select($query, $paramType, $paramValue); return $result; }
}
?>

Showing success page after payment

As sent with the create-checkout-session request, Stripe invokes the success page URL after payment.

The below code has the payment success message to acknowledge customers.

success.php

<?php
namespace Phppot; require_once __DIR__ . '/Common/Config.php';
?>
<html>
<head>
<title>Payment Response</title>
<link href="./css/style.css" type="text/css" rel="stylesheet" />
</head>
<body> <div class="phppot-container"> <h1>Thank you for shopping with us.</h1> <p>You have purchased "<?php echo Config::PRODUCT_NAME; ?>" successfully.</p> <p>You have been notified about the payment status of your purchase shortly.</p> </div>
</body>
</html>

Database script

Import the following SQL script to execute this example in your environment. It has the SQL to create tables created for this example and to build a relationship between them.

sql/structure.sql

--
-- Table structure for table `tbl_customer`
-- CREATE TABLE `tbl_customer` ( `id` int(11) NOT NULL, `stripe_customer_id` varchar(255) NOT NULL, `email` varchar(50) NOT NULL, `customer_created_datetime` timestamp NOT NULL DEFAULT CURRENT_TIMESTAMP ON UPDATE CURRENT_TIMESTAMP, `stripe_response` text NOT NULL, `create_at` timestamp NOT NULL DEFAULT CURRENT_TIMESTAMP ON UPDATE CURRENT_TIMESTAMP
) ENGINE=InnoDB DEFAULT CHARSET=latin1; -- -------------------------------------------------------- --
-- Table structure for table `tbl_order`
-- CREATE TABLE `tbl_order` ( `id` int(11) NOT NULL, `order_reference_id` varchar(255) NOT NULL, `stripe_customer_id` varchar(255) DEFAULT NULL, `stripe_payment_intent_id` varchar(255) DEFAULT NULL, `amount` decimal(10,2) NOT NULL, `currency` varchar(10) NOT NULL, `order_at` timestamp NOT NULL DEFAULT CURRENT_TIMESTAMP ON UPDATE CURRENT_TIMESTAMP, `order_status` varchar(25) NOT NULL, `stripe_checkout_response` text NOT NULL, `create_at` timestamp NOT NULL DEFAULT CURRENT_TIMESTAMP ON UPDATE CURRENT_TIMESTAMP
) ENGINE=InnoDB DEFAULT CHARSET=latin1; -- -------------------------------------------------------- --
-- Table structure for table `tbl_payment`
-- CREATE TABLE `tbl_payment` ( `id` int(11) NOT NULL, `stripe_payment_intent_id` varchar(255) NOT NULL, `payment_create_at` timestamp NULL DEFAULT NULL, `payment_last_updated` timestamp NULL DEFAULT '0000-00-00 00:00:00', `billing_name` varchar(255) NOT NULL, `billing_email` varchar(255) NOT NULL, `payment_status` varchar(255) NOT NULL, `stripe_payment_response` text NOT NULL, `create_at` timestamp NOT NULL DEFAULT CURRENT_TIMESTAMP ON UPDATE CURRENT_TIMESTAMP
) ENGINE=InnoDB DEFAULT CHARSET=latin1; --
-- Indexes for dumped tables
-- --
-- Indexes for table `tbl_customer`
--
ALTER TABLE `tbl_customer` ADD PRIMARY KEY (`id`), ADD UNIQUE KEY `stripe_customer_id` (`stripe_customer_id`); --
-- Indexes for table `tbl_order`
--
ALTER TABLE `tbl_order` ADD PRIMARY KEY (`id`), ADD KEY `stripe_payment_intent_id` (`stripe_payment_intent_id`), ADD KEY `stripe_customer_id` (`stripe_customer_id`); --
-- Indexes for table `tbl_payment`
--
ALTER TABLE `tbl_payment` ADD PRIMARY KEY (`id`), ADD UNIQUE KEY `stripe_payment_intent_id` (`stripe_payment_intent_id`); --
-- AUTO_INCREMENT for dumped tables
-- --
-- AUTO_INCREMENT for table `tbl_customer`
--
ALTER TABLE `tbl_customer` MODIFY `id` int(11) NOT NULL AUTO_INCREMENT; --
-- AUTO_INCREMENT for table `tbl_order`
--
ALTER TABLE `tbl_order` MODIFY `id` int(11) NOT NULL AUTO_INCREMENT; --
-- AUTO_INCREMENT for table `tbl_payment`
--
ALTER TABLE `tbl_payment` MODIFY `id` int(11) NOT NULL AUTO_INCREMENT; --
-- Constraints for dumped tables
-- --
-- Constraints for table `tbl_order`
--
ALTER TABLE `tbl_order` ADD CONSTRAINT `tbl_order_ibfk_1` FOREIGN KEY (`stripe_payment_intent_id`) REFERENCES `tbl_payment` (`stripe_payment_intent_id`), ADD CONSTRAINT `tbl_order_ibfk_2` FOREIGN KEY (`stripe_customer_id`) REFERENCES `tbl_customer` (`stripe_customer_id`);
COMMIT;

Evaluate integration with test data

After integrating Stripe one-time payment, evaluate the integration with test card details.

The following test card details help to try a successful payment flow.

Card Number 4242424242424242
Expiry Month/Year Any future date
CVV Three-digit number

Stripe provides more test card details to receive more types of responses.

Stripe one-time payment example output

This example displays a product tile with the Stripe Checkout button as shown below.

Stripe Payment Landing Page

On clicking the Checkout button, it redirects customers to the prebuilt Stripe hosted checkout page.

Stripe Hosted Checkout Page

After processing the payment, Stripe will redirect customers to the success page URL.

Payment Success Page

Conclusion

We have seen how to integrate the stripe hosted checkout in PHP with an example. Hope it is simple and easy to follow.

It helps to have a quick glance with the bullet points pre-requisites, implementation steps. It pinpoints the todo items in short.

The downloadable source code has the required vendor files. It is not needed to download libraries and SDK from anywhere.

With database intervention, the code is ready to integrate with a full-fledged application.

With the latest Stripe checkout version, it provides payment services with SCA and more advanced features.

Download

↑ Back to Top

Posted on Leave a comment

Bootstrap Contact Form with JavaScript Validation and PHP

Last modified on September 7th, 2020.

Bootstrap is the most popular solution to design an optimum, intuitive, mobile-ready UI components. It is easy to integrate the Bootstrap library for the application interface.

Often, many of my readers ask for a Bootstrap contact form code. So I thought of creating a basic example for a Bootstrap enabled PHP contact form.

Bootstrap provides in-built features to take care of UI responsiveness, form validation, and more. I used its SVG icon library to display the contact form fields with suitable icons.

A Bootstrap contact form looks enriched. UI attracts people and enables them to use it with ease. Also, the developers’ effort is reduced by using the Bootstrap framework.

I have created a secure feature-packed responsive contact form – Iris. This is one of the best and sleek contact form component you can ever get.

What is inside?

  1. Contact form with vs without Bootstrap
  2. Majority of  the contact form fields
  3. About this example
  4. File Structure
  5. Slim UI layout with the Bootstrap contact from
  6. Contact form validation with plain JavaScript
  7. Processing contact form data in PHP code
  8. Bootstrap contact form UI output

A contact form collects a different type of user details like name, message and more. There are various popular templates for contact forms.

I have created various PHP contact form examples. And those form templates uses my own custom CSS.

Though it is straight forward to go with custom CSS, designing with Bootstrap gives irrefutable offer.

Bootstrap provides full-fledged styles to create various types of form layout. It includes more of element-specific, attribute-specific forms styles.

With a Bootstrap contact form, the responsiveness, the cross-browser compatibilities are an easy deal.

If you already use the Bootstrap framework, then also it would be natural not to choose the custom CSS UI option.

For a simple example to prepend icons to form inputs without Bootstrap needs a bunch of CSS and media queries. But, with Bootstrap it has input-group selector to achieve this.

In case if you want to render a thin, primitive contact form, then custom CSS is preferable.

Most of the contact forms have the name, email, subject, message fields. Some times it varies based on the applications’ purpose.

For example, site-admin may merge the user feedbacks and inquiries entry points. In such cases, the contact form may have a radio option group to choose between feedback and inquiry.

Sometimes, people may collect phone numbers with country code. Also, it may have checkbox options to receive GDPR consent as per the European legislation.

In a way, contact forms become complex in positioning fields, giving fluidity and more aspects.

Bootstrap supports a variety of layout options to create even a more complex form. Based on the complexity of the contact form layout, the Bootstrap is even dependable.

About this example

This example uses rebooted form styles with classes to create a Bootstrap contact form. It makes this form UI responsive and consistent in all browsers and viewports.

It includes a default contact form having vertically stacked form controls. Each form-control has a prepended icon suitable to the contact input. I downloaded the Bootstrap SVG icon library to have such icons.

The form validation with a plain JavaScript simplifies the effort of loading any external libraries.

In PHP, it handles the posted data for sending them via a contact email. Also, it stores the data into a database table if any. It is optional and can disable in code.

This code uses a simple PHP mail() function for sending the emails. In a previous example, I have added how to send email using Gmail SMTP. Replace the simple mail() function with the one using PhpMailer via Gmail SMTP.

File Structure

The contact form code is a small integrative component of an application. This example contains a very minimal code of having a Bootstrap contact form.

The vendor directory includes the Bootstrap CSS and icon library.

The bootstrap-contact-form.phpfile contains the contact form HTML template. The landing page renders the contact form by including this template.

Bootstrap Contact Form File Structure

This section shows the Bootstrap contact form HTML code. This HTML shows a default vertically stacked contact form fields.

The Bootstrap form grid styles and CSS provides options to display a horizontal form.

In the below HTML, each form element is in a form-group container. It groups the form element label, form controls, validation and help-text properly.

The Email field has a help text that displays a note spaced as text-muted.

The input-group specific styles help to display icon-prepended form controls. These icons are from the Bootstrap SVG icon library.

bootstrap-contact-form.php

<html>
<head>
<meta name="viewport" content="width=device-width, initial-scale=1, shrink-to-fit=no">
<title>Bootstrap Contact Form</title>
<link rel="stylesheet" href="./vendor/bootstrap/css/bootstrap.min.css">
</head>
<body class="bg-light"> <div class="container"> <div class="row py-4"> <div class="col"> <h2>Bootstrap Contact Form</h2> </div> </div> <form name="frmContact" id="frmContact" method="post" action="" enctype="multipart/form-data" novalidate> <div class="row"> <div class="form-group col-md-4"> <label>Name</label> <span id="userName-info" class="invalid-feedback"></span> <div class="input-group"> <div class="input-group-prepend"> <span class="input-group-text"><?php require __DIR__ . '/vendor/bootstrap/bootstrap-icons/person.svg';?></span> </div> <input type="text" class="form-control" name="userName" id="userName" required> </div> </div> </div> <div class="row"> <div class="form-group col-md-4"> <label>Email</label> <span id="userEmail-info" class="invalid-feedback"></span> <div class="input-group"> <div class="input-group-prepend"> <span class="input-group-text"><?php require __DIR__ . '/vendor/bootstrap/bootstrap-icons/envelope.svg';?></span> </div> <input type="email" name="userEmail" id="userEmail" class="form-control" required> </div> <small id="emailHelp" class="form-text text-muted">Your email will not be shared.</small> </div> </div> <div class="row"> <div class="form-group col-md-8"> <label>Subject</label> <span id="subject-info" class="invalid-feedback"></span> <div class="input-group"> <div class="input-group-prepend"> <span class="input-group-text"><?php require __DIR__ . '/vendor/bootstrap/bootstrap-icons/question.svg';?></span> </div> <input type="text" name="subject" id="subject" class="form-control" required> </div> </div> </div> <div class="row"> <div class="form-group col-md-8"> <label>Message</label> <span id="content-info" class=" invalid-feedback"></span> <div class="input-group"> <div class="input-group-prepend"> <span class="input-group-text"><?php require __DIR__ . '/vendor/bootstrap/bootstrap-icons/pencil.svg';?></span> </div> <textarea class="form-control" rows="5" name="message" id="message" required></textarea> </div> </div> </div> <div class="row"> <div class="col"> <input type="submit" name="send" class="btn btn-primary" value="Send Message" /> </div> </div>
<?php
if (! empty($displayMessage)) { ?> <div class="row"> <div class="col-md-8"> <div id="statusMessage" class="alert alert-success mt-3" role="alert"><?php echo $displayMessage; ?> </div> </div> </div>
<?php
}
?> </form> </div> <script type="text/javascript" src="./js/validation.js"></script>
</body>
</html> 

The above HTML template imports the Bootstrap CSS from the vendor location.

After submitting the contact details, users will receive an acknowledgment message. The bootstrap success alert box displays a positive response on successful mail sending.

All the fields are mandatory in this Bootstrap contact form example.

The js/validation.js file has the validation script. On the window load event, this script sets the submit event listener to check the form validity.

Once it found invalid form fields, it will prevent the form to submit. Added to that it will add Bootstrap custom validation styles to highlight the invalid fields.

It adds the .was-validated class to the parent form element. It highlights the form fields with respect to the :valid and :invalid pseudo-classes.

Apart from the red-bordered invalid field highlighting, the script displays a text-based error message. The setValidationResponse() checks the form data and insert the error message into the target.

This custom function invokes markAsValid() and markAsInvalid() to show the error messages. These functions set the element’s display property and the innerText.

js/validation.js

(function() { 'use strict'; window.addEventListener('load', function() { var form = document.getElementById('frmContact'); form.addEventListener('submit', function(event) { if (form.checkValidity() === false) { event.preventDefault(); event.stopPropagation(); setValidationResponse(); } form.classList.add('was-validated'); }, false); }, false);
})(); function setValidationResponse() { var emailRegex = /^([a-zA-Z0-9_.+-])+\@(([a-zA-Z0-9-])+\.)+([a-zA-Z0-9]{2,4})+$/; var userName = document.getElementById("userName").value; var userEmail = document.getElementById("userEmail").value; var subject = document.getElementById("subject").value; var content = document.getElementById("message").value; if (userName == "") { markAsInvalid("userName", "required"); } else { markAsValid("userName"); } if (userEmail == "") { markAsInvalid("userEmail", "required"); } else if(!emailRegex.test(userEmail)) { markAsInvalid("userEmail", "invalid"); } else { markAsValid("userEmail"); } if (subject == "") { markAsInvalid("subject", "required"); } else { markAsValid("subject"); } if (content == "") { markAsInvalid("content", "required"); } else { markAsValid("content"); }
} function markAsValid(id) { document.getElementById(id+"-info").style.display = "none";
} function markAsInvalid(id, feedback) { document.getElementById(id+"-info").style.display = "inline"; document.getElementById(id+"-info").innerText = feedback;
}

This section is something common in all of my contact forms example. But, this is important for which we have started.

In this example, it has support to store the contact form data into a database. But, it is optional and configurable in the coding.

The PHP code has a variable $isDatabase which may have a boolean true to enable the database.

structure.sql

--
-- Database: `bootstrap_contact_form`
-- -- -------------------------------------------------------- --
-- Table structure for table `tbl_contact`
-- CREATE TABLE `tbl_contact` ( `id` int(11) NOT NULL, `user_name` varchar(255) NOT NULL, `user_email` varchar(255) NOT NULL, `subject` varchar(255) NOT NULL, `message` varchar(255) NOT NULL
) ENGINE=InnoDB DEFAULT CHARSET=latin1; --
-- Indexes for dumped tables
-- --
-- Indexes for table `tbl_contact`
--
ALTER TABLE `tbl_contact` ADD PRIMARY KEY (`id`); --
-- AUTO_INCREMENT for dumped tables
-- --
-- AUTO_INCREMENT for table `tbl_contact`
--
ALTER TABLE `tbl_contact` MODIFY `id` int(11) NOT NULL AUTO_INCREMENT, AUTO_INCREMENT=1;

The below code shows the backend logic created in PHP for handling the posted data. This code has the default PHP mail() function to send the contact details.

index.php

<?php
use Phppot\DataSource; if (! empty($_POST["send"])) { $name = $_POST["userName"]; $email = $_POST["userEmail"]; $subject = $_POST["subject"]; $message = $_POST["message"]; $isDatabase = false; if ($isDatabase) { require_once __DIR__ . "/lib/DataSource.php"; $ds = new DataSource(); $query = "INSERT INTO tbl_contact (user_name, user_email, subject, message) VALUES (?, ?, ?, ?)"; $paramType = "ssss"; $paramArray = array( $name, $email, $subject, $message ); $ds->insert($query, $paramType, $paramArray); } $toEmail = "[email protected]"; $mailHeaders = 'From: [email protected]' . "\r\n" . 'Reply-To: ' . $name . '<' . $email . ">\r\n" . 'X-Mailer: PHP/' . phpversion(); $mailHeaders = "From: " . $name . "<" . $email . ">\r\n"; // if lines are larger than 70 chars, then should be wrapped $message = wordwrap($message, 70, "\r\n"); // your PHP setup should have configuration to send mail $isValidMail = mail($toEmail, $subject, $message, $mailHeaders); if ($isValidMail) { $displayMessage = "Message sent. Thank you."; }
}
require_once __DIR__ . "/bootstrap-contact-form.php"; 

After setting $isDatabase to true, configure the database details in this class to connect the database for the contact form action.

lib/DataSource.php

<?php
/** * Copyright (C) Phppot * * Distributed under 'The MIT License (MIT)' * In essense, you can do commercial use, modify, distribute and private use. * Though not mandatory, you are requested to attribute Phppot URL in your code or website. */
namespace Phppot; /** * Generic datasource class for handling DB operations. * Uses MySqli and PreparedStatements. * * @version 2.6 - recordCount function added */
class DataSource
{ const HOST = 'localhost'; const USERNAME = 'root'; const PASSWORD = 'test'; const DATABASENAME = 'bootstrap_contact_form'; private $conn; /** * PHP implicitly takes care of cleanup for default connection types. * So no need to worry about closing the connection. * * Singletons not required in PHP as there is no * concept of shared memory. * Every object lives only for a request. * * Keeping things simple and that works! */ function __construct() { $this->conn = $this->getConnection(); } /** * If connection object is needed use this method and get access to it. * Otherwise, use the below methods for insert / update / etc. * * @return \mysqli */ public function getConnection() { $conn = new \mysqli(self::HOST, self::USERNAME, self::PASSWORD, self::DATABASENAME); if (mysqli_connect_errno()) { trigger_error("Problem with connecting to database."); } $conn->set_charset("utf8"); return $conn; } /** * To get database results * * @param string $query * @param string $paramType * @param array $paramArray * @return array */ public function select($query, $paramType = "", $paramArray = array()) { $stmt = $this->conn->prepare($query); if (! empty($paramType) && ! empty($paramArray)) { $this->bindQueryParams($stmt, $paramType, $paramArray); } $stmt->execute(); $result = $stmt->get_result(); if ($result->num_rows > 0) { while ($row = $result->fetch_assoc()) { $resultset[] = $row; } } if (! empty($resultset)) { return $resultset; } } /** * To insert * * @param string $query * @param string $paramType * @param array $paramArray * @return int */ public function insert($query, $paramType, $paramArray) { $stmt = $this->conn->prepare($query); $this->bindQueryParams($stmt, $paramType, $paramArray); $stmt->execute(); $insertId = $stmt->insert_id; return $insertId; } /** * To execute query * * @param string $query * @param string $paramType * @param array $paramArray */ public function execute($query, $paramType = "", $paramArray = array()) { $stmt = $this->conn->prepare($query); if (! empty($paramType) && ! empty($paramArray)) { $this->bindQueryParams($stmt, $paramType, $paramArray); } $stmt->execute(); } /** * 1. * Prepares parameter binding * 2. Bind prameters to the sql statement * * @param string $stmt * @param string $paramType * @param array $paramArray */ public function bindQueryParams($stmt, $paramType, $paramArray = array()) { $paramValueReference[] = & $paramType; for ($i = 0; $i < count($paramArray); $i ++) { $paramValueReference[] = & $paramArray[$i]; } call_user_func_array(array( $stmt, 'bind_param' ), $paramValueReference); } /** * To get database results * * @param string $query * @param string $paramType * @param array $paramArray * @return array */ public function getRecordCount($query, $paramType = "", $paramArray = array()) { $stmt = $this->conn->prepare($query); if (! empty($paramType) && ! empty($paramArray)) { $this->bindQueryParams($stmt, $paramType, $paramArray); } $stmt->execute(); $stmt->store_result(); $recordCount = $stmt->num_rows; return $recordCount; }
} 

This screenshot shows the Bootstrap contact form example output. It displays the valid fields in green and the invalid fields in red.

This indication will notify the user on clicking the “Send Email” submit button.

Bootstrap Contact Form Output

On successful mail sending, a success response will send to the user as shown below.

Contact Form Success Response
Download

↑ Back to Top

Posted on Leave a comment

Top 20 Laws for Freelance Web Developers

Last modified on August 30th, 2020.

I got an email from a freelance developer friend. I have a list of associates with whom I collaborate (I get their help) when I am overloaded. The email had two inevitable questions,

  1. How do you ensure that you get the full payment?
  2. How did you create such a testimonial page? Is it fake?

My testimonials

First let me write a short note on my testimonials page. You can easily identify that all the testimonials listed are true.

  • Live link to client’s website.
  • Logo, company name, address, client’s name, designation.

All the above are public information and can be verified within minutes. There are more that twenty five testimonials listed and cannot be faked.

Project success

Okay let us get back to the two questions. With a decade of freelancing experience, I have come up with twenty laws for freelance web developers. If you follow that, a project will be a success. 

When I say “project success” it means, client is happy. Everything else is a derivative of that. You get full payment, a good testimonial, repeat order, possible new reference and all the good things will happen as a by product.

The Laws

  1. All projects are not doable
  2. Empty your cup
  3. Write the requirements
  4. Be explicit with freelance terms
  5. Commit to milestones, dates and a plan
  6. Never work without an advance payment
  7. Create UI mockups
  8. Be reachable and receptive
  9. Initiate communication
  10. Show the progress and get feedback
  11. Give suggestions and add value
  12. When it is out of scope, call it out
  13. Do not discuss subsequent phases in between
  14. Absorb up to 20% variation in effort
  15. Document the source code
  16. Do not be ad-hoc, have policies and principles
  17. Holding a deliverable is not a solution
  18. When client says ‘not working’, it’s not working!
  19. Freelancer’s support is essential
  20. Request for a testimonial

freelance web developer laws

1. All projects are not doable

Do not accept everything that comes your way. Play to your strength. You may have to spend time without projects, even then you should be ready to say no.

There are various reasons to not accept a project.

  • As a web developer we have numerous tech stack options, plugins, extensions. You may not have knowledge or experience with the tech stack the client wishes. A freelance project is not a platform for you to experiment and learn.
  • A client does not know what he needs.
  • You do not have the required domain expertise.
  • You do not know how to achieve what he asks for. 
  • You are already occupied. Trying to accept projects in parallel will not allow you to focus.
  • Do not accept if you have to work for free or under-billed. Always conduct yourself as a professional business.
  • When you do not have access to the actual person giving the order. You can be sub-contracted, but you should have access to the person who gives the requirements. When there are multiple middle men passing requirements to you, things will get lost in the transfer. Unless you directly talk to the person who drives the requirements, you will not get a good hang of it.

Unless you are able to estimate the work and arrive at a detailed work break down structure, do not accept it.

Sometimes a long-term client may bring a project on an alien territory to you. He may try to persuade you, because he is comfortable working with you. If you accept and fail, you will loose. Better explain him why you do not want to take the project and it will add to your respect. 

2. Empty your cup

Every project is a new beginning. As you keep on delivering project, there is a possibility to become complacent. That will lead you to underestimate a project. 

Start as if it is your first freelance web project. Learning is critical a freelance web developer. Most of the times, you will be sitting alone coding from your attic.

There is no team to discuss, share and learn. It is all dependent on your thought process. If you start fresh, you will be receptive (law no. 12). 

3. Write the requirements

Spend more time on requirements phase. As a freelance web developer you will not be billing the time spent on proposal process. Requirements analysis and elaboration is the most critical phase in a software development life cycle. Even critical than the design phase.

Unless you know what you are building where you will be headed. As a web developer, you will be dealing with intangible things. So it is important to get the detailed requirements upfront. 

If you are working based on fixed rate, then waterfall method of development is best suited. You need to fix every inch of the requirement before start.

If you are working based on time and material (hour based billing), then agile iterative development methodology is fine. It is suitable for projects, where the requirement has to evolve over a period as you build. 

In both the cases, write the requirements. Ask the client to write a document and email to you. You analyze and elaborate it. Write it as a document and circulate back for feedback. Iterate the process and arrive at a final document. have the conversation recorded via email as it will help you later to recollect. 

Telephonic conversations has to be converted to a document. At the end of the phase, there should be a requirements document as detailed as possible. 

4. Be explicit with freelance terms

Do not assume things. In particular when it comes to money, do not assume. There are numerous ways the freelance developer world works. 

Explain the terms is detail and get the acknowledgement. Do not shy away from it. Discuss the percentage breakup, schedule, milestone, billing rate, fixed or hourly etc and the mode of payment.

Understand the emphasize is on money. It will also help to plan his budget allocation and be prepared for payment. Never ask for ad-hoc payments. Stick to the agreed schedule and payment mode.

5. Commit to milestones, dates and a plan

Before the project is agreed, the plan should be in place. It should have detailed work break down structure with milestones. The plan should be approved.

You should initiate this process even if the client does not insists on a plan. You should voluntarily commit to it. If you do not do so, it will allow for micro management and ad-hoc reporting.

Client will be guessing the progress and will be on his toes. It will subject you to pressure. Working without a shared plan will never be an advantage for you.

6. Never work without an advance payment

This is not to be on the safer side. This is for a commitment. This is a business. The client has to get involved from day one. He needs to invest on it. You will be investing your time and building the product and for his part he needs to invest the money. It is mutual.

Beginner freelancers fear for everything. If I ask for advance and the client says no to the project, I will loose an opportunity. Working without a commitment is even worser. 

Next, how much to ask is the question. In the freelance web developer world, it is customary to ask for 50% advance payment for smaller (less than 1000 USD) projects. For projects larger than that, the payment can be in three or four parts. Can be even tied to milestones (law no. 5). But whatsoever, there should be an advance to start the project.

7. Create UI mockups

A freelance web developer will always have an urge to commit a project, take advance and jump coding immediately. All these needs to happen immediately. There will be fear of losing the order. But you have to resist that urge.

The more the time you spend on requirements, it will save you later. Remember money is not the only objective. You should retain him for a repeat order, you need to get a testimonial from him, you need to get order references from him.

If all these have to happen, then do not rush into the project. The success is more essential than getting the final payment. Success encompasses more things than the final payment. 

Client’s happiness directly relates to the success. A freelance web developer needs to step into his shoes. Should make all the effort to understand his objective. 

A web developer’s key tool to obtain that objective is UI mockup. You need to invest on a fancy tool, monthly subscription etc. My go to tool is the good old pen and paper, sometimes color pencils will add jazz. 

Just draw, write to create a rough sketch of how you envision the application. Take a snapshot and share with the client. Get his concurrence. Do not over work it. Remember you will be doing this in the proposal stage and the time spent is not billed. All you need to do is covey your idea of the understanding to the client. 

A freelance web developer’s success depends on the strong grip on the project. The first step towards that is the UI mockups. 

8. Be reachable and receptive

Establish a proper communication channel with the client. Along with the quote, share the ways using which the client can reach you. Give multiple possible channels,

  1. Email
  2. Project collaboration tools
  3. IM
  4. Telephone

A freelance web developer is like a juggler. If you loose balance at any point, the whole act will come down. For you to maintain the balance, the client should be comfortable.

Be easily reachable. Clearly convey the client that you prefer email as the communication mode. Attend to emails at least twice a day. Communication channel preference should be in the above order for comfortable execution.

IM and telephone should be the last choice in the list. It never helps. As a freelance web developer, I work with global clients. Imagine a client calling you at midnight and asking for a modification.

When the client writes, it will give clarity to his thoughts. So written communication should be encouraged. You should show that you are listening. In an email, never put any points under the carpet. Whether you agree or not, respond to everything. 

If you are not able to reply immediately, just acknowledge and get back with details later. Your immediate response says that you are receptive.

9. Initiate communication

Do not be casual and wait for client to talk to you. Every mail, ping, call should emanate from the freelance developer and not the client. This will give a comfort to the client. This will assure the client that you are taking care of the project and it is in trusted hands.

Initiating the conversation for a doubt from your side is usual. Every freelance developer does it. But the emphasise is on initiation to inform that the milestone is getting delayed, or you are not able to achieve a feature that you agreed. It might be a bad news, but have the courage to initiate communication. 

10. Show the progress and get feedback

As a freelance web developer you might follow multiple different models for development. In agile development methodology, it is imperative the way it works is by iteration and sprints. You show the progress, get feedback, iterate and keep developing.

A freelance developer has a mindset to get into a cocoon. Nature of the work style drives into it. You keep on developing yourself, there is no team, no one around you to ensure that you are on the right track. Here comes the client. Whatever model you choose, establish a schedule.

Do not be ad-hoc to show the progress. Before you write the first line of code, in fact at the proposal itself lay out a plan. What are all the dates you are going to show the progress should be transparently conveyed to the client. It will drive your progress. More than that, it will avoid rework.

Whenever you get feedback, give priority for the feedback. Not the regular planned tasks. Adjust the plan and covey the client. Always feedback goes first, it should not be accumulated.

11. Give suggestions and add value

A freelance web developer is an expert. The client does it for the first or second time. But you are doing it for the hundredth time. It should reflect in the work.

You are not a data entry operator, you are a developer. Lot more is expected from you. You should contribute in all aspects from design to implementation to training. 

The client will have a narrowed down objective. He just focuses on only one thing, just the UI. You know the engine better. What component to use, how to modularize, how to make things interact, there are numerous aspects. 

Sometimes enthusiastic clients take things outside the track and it might derail the stability of the software. That’s where you step-in. Say no, be steadfast and more important you have to explain and make the client understand. After all he is the one investing.

There might be some intricate things, as an experienced person only you will know. Explain it to the client, add value to his investment. Those will not go free and you will be rewarded.

12. When it is out of scope, call it out

As per law 10, you are supposed to get feedback in regular interval. This opens up other possibility, scope creep. Every feedback has to be organized into bullet points.

Feedbacks should be encouraged to be communicated in written form. If it comes in paragraphs break it down to points. That will reveal hidden gems. Client may not be doing it intentionally. He wants to get a product of his dream. 

So he will be thinking about only what he wants. A freelance developer is doing business. Profitability is important. By informing the client that this is out of scope you are also helping him. Scope creep, will take you down. If you go down, the project goes down and so the client.

Explain it, give reference from the requirements document. Do not say no! A scope creep is an opportunity for a freelance web developer. Do not take it negatively and jump on the client. Explain him politely and increase the scope of the project and so the bill.

13. Do not discuss subsequent phases in between

If an out of scope item is minor that can be informed to the client, reestimate the project, schedule and cost. Sometimes, the out scope item can be a module. If in proportion it is 50% of the current size or more than that, then it should be carved out as a separate phase.

Do not mix it with the current scope of work. Tell the client that you will definitely work on it. But will be taken as next phase. Let us document it and move forward with the current scope of items. Let us finish the planned work and then take this as a next project.

Re estimate and re scheduling can be done once or twice. If you keep on repeating it, then the client will get a feeling that things are dragged. It will feel like when this thing will end. So it is all in perception.

14. Absorb up to 20% variation in effort

If you are billing by hourly (time and material), then this is not an issue. To be safe on this, people advice to always go for hourly billing and avoid fixed rate. Not necessarily. 

If you are good in your territory, then fixed rate is fine. Client’s prefer that. If you are skilled enough to arrive at a good estimate, then why not? Go for fixed billing.

Freelance web development is a haunting story, most of the time. Despite you follow all these laws, expect unexpected turns. A freelance web developer has to swim in uncharted territories at times.

This may result in effort variation, remember plus or minus both. Sometimes you loose and sometimes you win. In any case, up to 20% variation is fine. 

In situations beyond that, explain the client. Attribute proper reasons, give reference and evidences. It is your responsibility as a freelance developer to convince. Web development keeps on changing. A freelance developer needs to keep up the pace. Otherwise you will be in this situation quite often.

15. Document the source code

Developer’s responsibility is to ensure that the project is a success. In the success durability is also a critical element. A freelance developer is not expected to launch and run away (see law 19). 

A web application should have a life of minimum five years. Without any maintenance project should run. But when there is a necessity, it should be doable easily. Either you or some other freelance developer might work on it in the future.

The comments you are going to add now will be of great help later. Freelance web development should not be seen as a one time job. If you do not add code comments, the same project may be freelanced to you later and the web application will come back and haunt you.

There are so many literature around the web explaining the goodness of source code comments.

16. Do not be ad-hoc, have policies and principles

As a freelance web developer, you need to draw your own rules. How do you arrive that? Is there any web developer template available? There is none. If you find something, do not follow it blindly.

Every freelance developer is a unique breed. Every web development project has unique challenges. You handle it in your own style. You have to arrive at your own rules. 

But you cannot live without rules. For example, let us take non disclosure agreement (NDA). There are numerous template NDA littered all over the web. As a freelance developer you will come across many. Over a period build document for your own. Incorporate the best and keep updating it. 

Hourly billing, fixed rate, what is your style. If fixed rate, do not keep it volatile. Which UI web component you will use? Which web responsive framework will you use? Right from money to tech stack, a freelance developer should have written everything. This is what you will follow, this what you will use.

What is your free support duration? These are all questions that are thrown at a freelance developer quite often. You should have readymade fixed answers for these. You should have freelance policy document. 

17. Holding a deliverable is not a solution

The rope is holding you back. Did you see the movie “The Dark Knight Rises”? The scene where the batman tries to get out of the well (prison pit). It neatly sums up what fear does to you.

You are not exchanging illegal things. Holding a deliverable makes the client feel untrusted. Business requires trust from both the sides. If you have followed all the laws till now, the client will be more than happy to pay you.

You need not hold the deliverable and ask for money. It feels like threatening. You are a web developer. If you are confident that you have done a good job, do not tie the deliverable to the payment. They should be independent of each other.

No client will burn the bridge. If you do a good job and you make the client feel it, then he will pay you. Sometimes even more than what you agreed for. I have got paid extra many times.

The client will need you in the future in two cases. He may require you for maintenance or enhancement for the application you have built. He may also require you for new projects. So he will not attempt to run away.

To get the full payment, to get a testimonial, or for any similar objective, do not hold the deliverable. Your fear will make things worse. Be good and focus on client’s objective, then you will get everything.

18. When client says ‘not working’, it’s not working!

You have delivered the project and the job is over. But, the client says it is not working. Never ever reply saying, “it is working for me!”. When he says, he means it.

If it is a web application, ask for access. First have intention to identify what is happening. Then think about how to help solve the issue.

How you respond to the call is important. Instead of saying working for me think about understanding the issue. Nobody cares about whether it works for you or in your environment. It needs to work in the production and work for the investor. Only then the developer job is complete. 

19. Freelancer’s support is essential

Freelancer should always provide a support period. The terms may vary, but you should always provide support.

The terms of support should be discussed and conveyed at the proposal stage itself. For example, a freelancer can give six months of free support. Then what comes under free needs to be described. 

Support is essential for the durability of the web application. For maintenance and enhancements will always be there. The client will bank on you as a first choice. You should be available for that.

Repeat work has higher priority than new job. Free support has higher priority than repeat work. That’s how it goes in the freelance world. That’s how you ensure project success.

20. Request for a testimonial

“The crying baby gets the milk”, you should ask for it and there is nothing wrong in it. There are two main purposes to ask for a testimonial.

  1. To use it in your showcase
  2. To ensure that whether you have done a good job.

A freelancer’s worth is determined by the testimonials he has. It is your pride. It is far better and more important than a portfolio.

The words in the testimonial will teach you your strengths and weaknesses. Sometimes the client will not give you one. Don’t pester. Instead ask for what help should be done to make the project success.

Go the extra mile and make it a success. Then ensure that you get a testimonial.

↑ Back to Top

Posted on Leave a comment

How to Make Online Photo Editing Effects like Blur Image, Sepia, Vintage

Last modified on August 23rd, 2020.

Photo editing effects will turn graphical elements to be expressive. With suitable effects, you can use a simple image and convey an idea. For example, you can bring logo to the foreground by blurring the background image.

The effects like image blur, transparency, shadowing creates attractive visual effects. There are many different image effects available. In fact, hundreds of them are available.

Online photo editing tools use a variety of methods to apply the effects on a target image. For example, either a CSS filter property or a SVG filter primitive can create an image blur effect.

Most of the visual effects are achievable with HTML5 and CSS3 filter properties. We will see how to make photo editing effects to blur, apply sepia, and vintage effect on a target image.

I created a simple image editing tool to apply blur, sepia, and vintage effect on a target image. Following is a live preview of the tool.

I have added a jQuery slider to allow you fiddle with the image editing effects between a min-max range.

What is inside?

  1. Popular photo editing effects
  2. Uses of image editing effects
  3. About this example
  4. File structure
  5. Online photo editing UI to apply blur sepia effects
  6. Managing image editing effects with jQuery slider
  7. Blur image using CSS and SVG filter
  8. How to apply sepia effect on an image
  9. Applying various tones with vintage effects
  10. Editing tool output with image Blur Sepia and Vintage effects

Popular photo editing effects

You can use photo editing effects and manipulate images in an innovative way. They cause visual conversion on the UI graphics. You can add tones, brightness, shadow, themes, and lot more effects on a photo.

There is almost no limit to add effects on a photo. In a previous article, I gave an image-editing example with image transition effects.

Below is a sample list of visual effects achievable with simple CSS.

  • Grayscale
  • Blur
  • Brightness
  • Contrast
  • Opacity
  • Saturate
  • Sepia
  • Invert

Uses of image editing effects

The photo editing may seem like a fun and easy job. But, it’s not true. Rather, it’s a real challenge to show your potential to give the best results.

I used some of the effects on the output of the image editing example scripts like fade-in-out image background.

Many of the image editing effects are most frequently required by the user. They are,

  • Blur image – to highlight something important in the foreground.
  • opacity – to add transparency for the product labels displayed on the shop gallery images.
  • grayscale – to remove the color of an image.

With CSS filter property, these effects can give a combined result on a target UI element.

About this example

This example handles blur, sepia and vintage effect on an image element.

For applying the blur and sepia effects, there is a jQuery slider handle above the image target. It will allow you to change the intensity.

This code will preview four vintage tones in a row. On clicking the preview, the editor panel will apply the appropriate vintage effect.

There is an option to reset the applied image editing effects. Blur is the default effect the slider handler events apply.

File Structure

This screenshot shows the file structure of the image editing example code. It’s a pure CSS jQuery example that provides image editing features.

There are no third-party plugins used to achieve the editing effects on this example.

Image Editing File Structure

I have rendered a static image as a target for applying the blur and more effects. You may include an image upload option to render dynamic images.

Online photo editing UI to apply blur sepia vintage effects

This section shows the HTML of the online photo editing interface to allow image blur like effects.

The landing page has the complete HTML code for the image editing UI.

It shows the action buttons to choose the editing effects among blur, sepia and vintage.

index.php

<html>
<head>
<meta name="viewport" content="width=device-width, initial-scale=1">
<title>Image Effects Blur Sepia Vintage</title>
<link href="./assets/css/phppot-style.css" type="text/css" rel="stylesheet" />
<link href="./assets/css/style.css" type="text/css" rel="stylesheet" />
<link href="./vendor/jquery/ui/jquery-ui.min.css" type="text/css" rel="stylesheet" />
</head>
<body> <div class="phppot-container"> <div class="container"> <input type='button' value='Blur' class="btn action selected" /> <input type='button' id='btnSpin' value='Sepia' class="btn action" /> <input type='button' value='Vintage' class="btn" id="vintage" /><input type='button' value='Reset' class="btn" id="reset" /> <div id="vintage-slide"> <?php for ($i = 1; $i <= 4; $i ++) { ?> <img src="./image/slide/vintage-slide<?php echo $i; ?>.png" class="vintage-effect" id="vintage-effect<?php echo $i; ?>" data-slide="<?php echo $i; ?>" /> <?php } ?> </div> <div class="image-demo-box"> <div id="slider"> <div id="slider-handle" class="ui-slider-handle"></div> </div> <img src='./image/cherry-bloosm.jpg' id='image' /> <div class="overlay"></div> </div> </div> </div> <script src='./vendor/jquery/jquery-3.3.1.js' type='text/javascript'></script> <script src='./vendor/jquery/ui/jquery-ui.min.js' type='text/javascript'></script> <script src='./assets/js/image-edit.js'></script>
</body>
</html>

After selecting the action buttons, the slider control will supply the value of the selected editing effect.

The reset button helps revert back to the original state of the rendered image element.

Managing image editing effects with jQuery slider

This jQuery script initializes UI slider on document ready. It applies the selected effects on an image by clicking the blur, sepia, vintage buttons. On dragging the slider handle the value from the ui.value has the effect’s intensity.

On selecting each effect, the slider reset will happen to bring the handle to the min position.

The reset button will clear the applied photo effects on the image. It reverts the target image back to its original.

assets/js/image-edit.js

$(document).ready(function() { $("#slider").slider({ range : "min", min : 0, max : 100, slide : function(event, ui) { var val = ui.value; var action = $('.action.selected').val(); applyEffect(action, val); } }); $('.action').on('click', function() { resetSlider(); $('.btn').removeClass("selected"); $(this).addClass("selected"); }); $('#vintage').on('click', function() { $('.btn').removeClass("selected"); $(this).addClass("selected"); $("#slider").hide(); $("#vintage-slide").show(); vintage(1); }); $('.vintage-effect').on('click', function() { var val = $(this).data("slide") vintage(val); }); $('#reset').on('click', function() { resetSlider(); $('.btn').removeClass("selected"); $('.btn').first().addClass("selected"); }); });
function applyEffect(action, val) { if (action == 'Blur') { blur(val); } else if (action == 'Sepia') { sepia(val); }
}
function blur(val) { $("#image").css("filter", "blur(" + val + "px)");
}
function sepia(val) { $("#image").css("filter", "sepia(" + val + "%)");
}
function vintage(val) { $('.vintage-effect').removeClass("selected") $("#vintage-effect"+val).addClass("selected"); $(".overlay").show(); $(".overlay").css("background", "url('./image/vintage-bg"+val+".jpg')")
}
function resetSlider() { $("#slider").show(); $("#vintage-slide").hide(); $(".overlay").hide(); var options = $("#slider").slider('option'); $("#slider").slider("value", options.min); var action = $('.action.selected').val(); applyEffect(action, options.min);
}

Blur image using CSS and SVG filter

As shown in the above example, blur image action is possible with CSS filter function blur(). It accepts a value as its parameter to apply the blur filter on the target element.

The CSS in the below code will apply the blur effect on the image element of the HTML.

<style>
#image { margin: 50px auto; border: #f6f5f6 10px solid; width: 500px; filter: blur(10px);
}
</style>
<img src='./image/cherry-bloosm.jpg' id='image' />

This example has a slider’s drag event-based photo editing effects. So, the jQuery script manages the CSS filter property on dragging the slider handle.

Blur image with SVG filter and CSS url() function

In the below code, it shows yet another way to blur images HTML element. It uses CSS url() function to apply the blur effect.

The url() function accepts a path or a selector string to apply the filter via CSS.

This code has the svg with <fegaussianblur> filter primitive. The blur intensity will vary based on the stdDeviation attribute’s value.

<style>
#image{ filter:url('#blur');
}
</style>
<img src='./image/cherry-bloosm.jpg' id='image' />
<svg> <defs> <filter id="blur"> <feGaussianBlur in="SourceGraphic" stdDeviation="1,4" /> </filter> </defs>
</svg>

How to apply sepia effect on an image

Sepia is one of the photo editing effects used in this example to apply on a HTML image. It gives light reddish or brownish tones to monochromatic photos.

There is yet another CSS filter function sepia() to apply this effect on an image.

The CSS sepia() function may have a number or percentage as a parameter. All the below CSS styles are valid to create the sepia() effect.

filter:sepia(0);
filter:sepia(25%);
filter:sepia(0.3);
filter:sepia(1);

Applying various tones with vintage effects

The vintage effect on a photograph gives an ancient tone to the photo. It’s an art to giving a flimsy tone to the modern photo output.

In this example, I have used template films to create a vintage effect on an image. It uses four types of films as a background to add different tones to the image element.

There are plugins to convert photos with vintage effects. For getting a basic result, the combination of the basic photo editing effects may help.

Editing tool output with image Blur Sepia and Vintage effects

In the below screenshot, I have shown all the three photo effects in a single output window.

Blur Sepia Vintage Effect- Output

Conclusion

We have seen how to apply three of the popular photo effects blur, sepia and vintage on an image. Though there are more possible effects, this example code is a very good beginning to achieve all.

I hope, applying effects with jQuery slider is more comfortable than any other type of input. I prefer slider whenever required to collect input between ranges.

Applying a creative combinational photo editing effects will give impressive results. Not only beautification but also helps to convey your thoughts via graphical representation. Rock on!

Download

↑ Back to Top

Posted on Leave a comment

How to Migrate Website from PHP 5.6 to PHP 7

Last modified on August 16th, 2020.

If you have to come this article now with an intention to migrate your website from PHP 5.6 to PHP 7, first please be aware. Your time is already over. This is too late. Somehow you should get this done now. Do not postpone this work beyond this moment.

This is an overwhelming task. We never know what will break. For now things are running smooth with the website. If we migrate the version to PHP 7, we do not know if it will run or not. So everybody keeps postponing this sensitive task.

Fear not, I will guide you through this migration journey. I have done it for many shopping cart, financial domain and critical websites. I have sound experience doing this and you can bank on me. I will present you my experience doing these migrations.

Upgrading the setup or development or server environment to PHP 7

I will guide you for the migration of the PHP application or website only. Upgrading the server environment like Apache version or the installed PHP version can be dealt with another article. It is a sysadmin thing.

If you are on a shared web hosting server, you will have an option in your control panel. It should be a single click easy work. Otherwise your hosting provider will do it for you. You may have to raise a ticket to get it done. Unless if you are in a dedicated server environment, you need not worry about.

Whatsoever, migration of the website or the PHP application should be done by you. It is not in the hosting provider or sysadmin’s scope. It should be done by the PHP developer.

PHP versions, support and EOL

Why now? What is the necessity to migrate PHP 5.6 to PHP 7 now? Before going into why, you should know about the PHP versions, their support duration and EOL details. It will give you the answers.

PHP versions support and EOL

Ref: https://www.php.net/supported-versions.php

Why should you migrate from PHP 5.6?

PHP 5.6 version active releases ended in early 2017 and reached its end of life (EOL) by 2018 end. That was once upon a time and long long ago. After PHP 5.6, we had PHP 7.0, 7.1, … and the current live version is 7.4

My longtime client recently forward an email he got from his hosting provider. His website is hosted with a popular shared hosting server.

The hosting provider has given ten days time to upgrade from PHP 5.6 to PHP 7.2 Even they have asked to migrate PHP 7.0 and PHP 7.1 to PHP 7.2 If the upgrade is not done within the given time frame, the hosting provider will upgrade the PHP version to 7.2 themselves.

This timeframe is to allow migrate the website to be compatible with 7.2. The control panel allows to change the PHP versions back and forth.

If you are in a shared hosting server environment, you will be forced to migrate anytime soon. You better make the move yourself, so that you can plan and execute at your convenience.

Security

If there is one reason that stands on top of everything is security. There are many vulnerabilities that are being exposed to public daily. When there is a known vulnerability, PHP team will release a fix.

But if the PHP version has reached it EOL, then there will not be a release. Your website will stand exposed inviting the hackers. So it is important to migrate your website to a PHP version that is being supported. Upgrade your old PHP now!

Performance

There are numerous studies published and circulated widely. PHP 7 has, “100%+ performance gain on most real-world applications” says Rasmus Lerdorf (Ref: http://talks.php.net/fluent15#/php7) This is from his slides from PHP 7 talk at fluentconf. The good performance due to low latency is widely acknowledged.

PHP 7 performance

So how does good performance help your website? For one second lag, you will loose a minimum of 10% visitors. Search engines give priority to fast loading websites. Are these two reasons not enough?

As published by Christian Vigh, PHP 7 is faster by a whooping 400% than PHP 5.2

PHP performance benchmark

Ref: https://www.phpclasses.org/blog/post/493-php-performance-evolution.html#performance

New PHP features

Developers should be armed with good set of tools. When the language gives a good set of features, that enables the developer to produce a good product. Following are some of the features that are available in PHP 7.

  • The null coalescing operator
  • Return and scalar type declarations
  • Anonymous Classes
  • Zero cost asserts
  • Typed properties 2.0
  • Preloading
  • Null coalescing assignment operator
  • Improve openssl_random_pseudo_bytes
  • Weak references
  • New custom object serialization mechanism
  • Password hash registry
  • Covariant returns and contravariant parameters
  • Spread operator in array expression
  • Multi-catch exceptions
  • Keys usable in lists

Backwards compatibility

This is the key thing to focus on website migration. You might have used a feature that is available only in the lower version and removed in the newer version. Here is a list of backward incompatible changes between PHP 5.6 and PHP 7.0

  • set_exception_handler() is no longer guaranteed to receive Exception objects
  • Internal constructors always throw exceptions on failure
  • Parse errors throw ParseError
  • list() no longer assigns variables in reverse order
  • Empty list() assignments have been removed
  • list() cannot unpack strings
  • Array ordering when elements are automatically created during by reference assignments has changed
  • Parentheses around function arguments no longer affect behaviour
  • foreach no longer changes the internal array pointer and more changes.
  • Changes to Division By Zero and more integer handling changes.
  • Hexadecimal strings are no longer considered numeric and more string handling changes.
  • All ext/mysql functions and more list of functions removed.
  • New objects cannot be assigned by reference
  • Switch statements cannot have multiple default blocks
  • JSON extension replaced with JSOND

The above list is a summary only. Go through Ref: https://www.php.net/manual/en/migration70.incompatible.php for the complete list.

Deprecated features in PHP 7.0

So you are going to move forward. Know about what you should not use going forward. If you have already used the deprecated features, then it is better to migrate them also. Here is a list the deprecated list.

  • PHP 4 style constructors
  • Static calls to non-static methods
  • password_hash() salt option
  • capture_session_meta SSL context option
  • ldap_sort() function is deprecated.

More list of changes to keep an eye on

Steps to do the PHP website migration

  1. Backup your website, application, database, data in disk.
  2. Check if your hosting provider or your environment will allow to rollback the PHP version. This will be helpful if in case you are stuck at some point.
  3. Check the PHP compatibility for the respective version of the dependent vendor applications, plugins, modules and extensions.
  4. Prepare a checklist for items to be changed for backwards incompatibility. Refer above for consolidated list.
  5. Add the deprecated items to the checklist. Refer above for consolidated list.
  6. Use a well equipped IDE. Detach the old dependent PHP library and then add the new to be migrated PHP library. The IDE will warn and show errors. I promise, this will be helpful. If you are a person using a plain texteditor, then now is the time to dump it.
  7. Refactor the code.
  8. Deploy in a staging environment.
  9. Test.
  10. Go live.

↑ Back to Top

Posted on Leave a comment

How to Get the Client User IP Address in PHP

Last modified on August 13th, 2020.

This is fairly a straightforward topic. Just a few lines of PHP code will do the work of getting the client user IP address. Most of the times it is true, it is all about a few lines of PHP script.

Sometimes things get tricky. We shall see about those things and also an other aspect like the privacy issue involved with it.

Following one line PHP code will get you the client user’s IP address. Then why all the fuss? Read through the article and you will know about it.

$_SERVER['REMOTE_ADDR'];

$_SERVER is a PHP array which is set by the server. Depending on this one line PHP code may not yield the best results in many a situation. For example, if a client is behind a proxy server, then this variable will not be suitable. Also be aware that, these headers can be easily spoofed by the users by setting an IP address themselves.

Following PHP script covers majority of the scenario and returns the user’s IP address.

<?php class Request
{ /** * Retrieves IP address set in the request header. * * Each ISPs sets them following their own logic. There is also a possibility for the user * to easily spoof their IP address. * * So using this for mission critical situations is not advisable. * If you are getting the IP address for casual logging purposes, then this is fine. */ public function getIpAddress() { $ipAddress = ''; if (! empty($_SERVER['HTTP_CLIENT_IP']) && $this->isValidIpAddress($_SERVER['HTTP_CLIENT_IP'])) { // check for shared ISP IP $ipAddress = $_SERVER['HTTP_CLIENT_IP']; } else if (! empty($_SERVER['HTTP_X_FORWARDED_FOR'])) { // check for IPs passing through proxy servers // check if multiple IP addresses are set and take the first one $ipAddressList = explode(',', $_SERVER['HTTP_X_FORWARDED_FOR']); foreach ($ipAddressList as $ip) { if ($this->isValidIpAddress($ip)) { $ipAddress = $ip; break; } } } else if (! empty($_SERVER['HTTP_X_FORWARDED']) && $this->isValidIpAddress($_SERVER['HTTP_X_FORWARDED'])) { $ipAddress = $_SERVER['HTTP_X_FORWARDED']; } else if (! empty($_SERVER['HTTP_X_CLUSTER_CLIENT_IP']) && $this->isValidIpAddress($_SERVER['HTTP_X_CLUSTER_CLIENT_IP'])) { $ipAddress = $_SERVER['HTTP_X_CLUSTER_CLIENT_IP']; } else if (! empty($_SERVER['HTTP_FORWARDED_FOR']) && $this->isValidIpAddress($_SERVER['HTTP_FORWARDED_FOR'])) { $ipAddress = $_SERVER['HTTP_FORWARDED_FOR']; } else if (! empty($_SERVER['HTTP_FORWARDED']) && $this->isValidIpAddress($_SERVER['HTTP_FORWARDED'])) { $ipAddress = $_SERVER['HTTP_FORWARDED']; } else if (! empty($_SERVER['REMOTE_ADDR']) && $this->isValidIpAddress($_SERVER['REMOTE_ADDR'])) { $ipAddress = $_SERVER['REMOTE_ADDR']; } return $ipAddress; } /** * To validate if an IP address is both a valid and does not fall within * a private network range. * * @access public * @param string $ip */ public function isValidIpAddress($ip) { if (filter_var($ip, FILTER_VALIDATE_IP, FILTER_FLAG_IPV4 | FILTER_FLAG_IPV6 | FILTER_FLAG_NO_PRIV_RANGE | FILTER_FLAG_NO_RES_RANGE) === false) { return false; } return true; } } 

There are many options given all through this article to get the client user’s IP address. This is the best among all the possibilities given, but I highly recommend you to read the section “IP address reliability” below.

Flowchart to get client user’s IP address

I have tried my best minimize the flowchart. Please do not look for diagrammatic accuracy. It is just an attempt to present the above PHP script in a flowchart model. But after drawing I realized that the above PHP script is easier to understand than this flowchart 🙁

flowchart to get client user ip address in php

Minimal code to get user’s IP address

Below one line code will work in most of the situation. Read the ‘IP address reliability’ section below, must. It will give you a good idea.

$ipAddress = $_SERVER['REMOTE_ADDR']?:($_SERVER['HTTP_X_FORWARDED_FOR']?:$_SERVER['HTTP_CLIENT_IP']); 

Get user’s IP address for CloudFlare hosted websites

I have taken CloudFlare as example. There are many similar services. You need to talk to that service provider to know which request header they are setting and get the IP address accordingly.

When the website is hosted using CloudFlare service, $_SERVER['REMOTE_ADDR'] will return the CloudFlare server’s IP address and not the user’s IP address. So in such a situation, you can make use of the variable set by the CloudFlare server to get the IP address.

if (isset($_SERVER["HTTP_CF_CONNECTING_IP"])) { $_SERVER['REMOTE_ADDR'] = $_SERVER["HTTP_CF_CONNECTING_IP"]; $ipAddress = $_SERVER['REMOTE_ADDR'];
} 

IP address reliability

$_SERVER['REMOTE_ADDR'] is the most reliable variable from the above list of variables. REMOTE_ADDR may not contain the real IP address of the TCP connection as well. It depends on the SAPI configuration.

If the user is behind a proxy server, HTTP_X_FORWARDED_FOR will be set. But this can be easily spoofed by the user by setting an IP address he wishes to expose.

Even the variable X-Forwarded-For or the Client-IP can be set by the user to any value he wishes. So, when you maintain a log of user’s IP address, it is better to store the IP address that is returned by $_SERVER['REMOTE_ADDR'] also.

Take an example of a shopping cart. You may display the product price according to the user’s country. In such a scenario, you may use the user’s IP address to determine the user’s country. In such a scenario, the code to get user’s IP address should be fool-proof.

So in summary, if you are building a mission critical application that depends on the user’s IP address, then this is not the way to go. For audit log of the user’s IP address, this may suffice. In essence, understand each line of these PHP code and variables used. Know your use-case well and use it accordingly.

IP address field length

When you are storing the IP address in the database, remember to have the field size as 45 for single IP. Because there is a possibility for IPv6 IP addresses. It its full form the IPv6 IP address can be 45 characters in length.

How to get the IP address of a host

Using a hostname, we can get the server’s IP address using the PHP’s built-in function gethostbyname. This returns the IPv4 address for the host given in argument.

$ipAddress = gethostbyname('www.example.com');

The reverse is possible too by using gethostbyaddr().

Client user’s IP address and privacy issues

Client’s IP address can be considered as private information in certain legislation. It depends on the land of law. Internet is public in general. You never know from which geographic region you will get users.

As per GDPR (Article 4, Point 1; and Recital 49), IP address is a personal data. I would suggest to inform the user and get consent to log the IP address. Also, call it out explicitly in your “Privacy Policy” document.

Explicitly state that you are collecting and logging the client user’s IP address and the reason for doing so.

Conclusion

Understand your use-case well. A good understanding of the scenario in which you are going to get and use the client user’s IP address is important. Then understand that the end user can easily spoof his IP address and present you something else. Third understand each line of the code, the server variables, from where the IP address is fetched, who sets it etc. Then decide how it will impact your use-case. Last but not the least, explicitly call out in your privacy policy that you are getting the client user’s IP address and storing it. Also state why you are doing it. As per GDPR, IP address is user’s personal information and so it would be better to get user’s consent before processing it.

↑ Back to Top

Posted on Leave a comment

Form Builder – Dike

CRUD Form generator tool

Smooth responsive interface to build form. It has tools menu and options to add, edit, delete and reorder form fields.

Preview, generate and download

Two-step CRUD form generation. 1. Choose tools and build the CRUD form. 2. Preview form and generate code to distribute.

Easy customization

Code is sleek, too short for easy understanding and customization. Source code with optimum comments. Easy to understand, integrate and maintain.

AJAX based CRUD

AJAX via CRUD action handling is easier to use for the end users. Easy for the developer to customize.

Unified CRUD handlers

Form can be regenerated number of times. No matter about what are the form fields or how many are there. It has unified CRUD handlers for any form.