Posted on Leave a comment

Contact Us Page Design – HTML Form

by Vincy. Last modified on March 23rd, 2023.

This article has HTML templates for contact form pages. All these templates are responsive to fit any viewports.

On a responsive page, the site header menu can be toggled. Template 1 and 2 of this example has JavaScript function to perform the toggle events for a sliding menu in the mobile view.

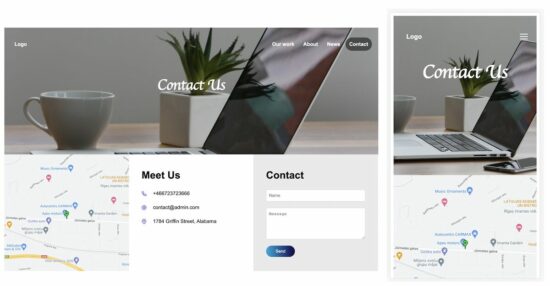
Contact Form Template 1

This template has the contact form in the site footer. The footer contains three columns to show the contact form details.

If you are creating a contact form page, it should clearly show the location and the contact details.

In this template, the footer columns show these details with a contact form.

The site header contains menu links and a hamburger icon. The hamburger icon can be seen in the mobile view only.

The header dropdown menu will be shown on clicking that icon in the site banner.

contact form template1

template-1/index.html

<html>
<head>
<meta name="viewport" content="width=device-width, initial-scale=1">
<link href="style.css" rel="stylesheet" type="text/css">
</head>
<body> <div class="container"> <div class="site-banner"> <div class="header-menu"> <a href="">Logo</a> <span id="menu-icon" onClick="toggleMenu()"><img src="images/menu.svg" /></span> <span id="header-right-menu"> <a href="#">Our work</a> <a href="#">About</a> <a href="#">News</a> <a href="#" class="header-active">Contact</a> </span> </div> <h1 class="heading">Contact Us</h1> </div><div class="footer"> <div class="footer-column"><img class="map-image" src="images/location.jpg" /></div> <div class="footer-column"> <div class="tile-content"> <h1>Meet Us</h1> <div class="contact-row"> <img src="images/phone.svg"><span class="tile-field">+466723723666</span> </div> <div class="contact-row"> <img src="images/at-sign.svg"><span class="tile-field">[email protected]</span> </div> <div class="contact-row"> <img src="images/map-pin.svg"><span class="tile-field">1784 Griffin Street, Alabama</span> </div> </div> </div> <div class="footer-column contact-form-container"> <div class="tile-content"> <form method="POST"> <h1>Contact</h1> <div class="contact-row"> <input type="text" class="form-field" placeholder="Name"> </div> <div class="contact-row"> <textarea rows="5" class="form-field" placeholder="Message"></textarea> </div> <button class="button">Send</button> </form> </div> </div> </div> </div> <script> function toggleMenu() { var menuElement = document.getElementById("header-right-menu"); if (menuElement.style.display === "block") { menuElement.style.display = "none"; } else { menuElement.style.display = "block"; } } </script>
</body>
</html>

The below CSS is created for this contact form template. It contains media queries for the responsiveness of the contact form page.

template-1/style.css

body { font-family: Arial;
} .container { max-width: 1180px; margin: 0 auto; line-height: 1.5;
}
/* header style starts */
.site-banner { min-height: 400px; background-image: url('images/header-image.jpg'); background-size: cover; background-position: center; color: #ffffff;
} .site-banner a { color: #ffffff; text-decoration: none; font-weight: bold; padding: 12px;
} .header-menu { padding: 40px 20px;
} #header-right-menu { float: right;
} .header-active { background: rgba(0, 0, 0, 0.5); border-radius: 25px;
} .heading { color: #ffffff; text-align: center; font-family: cursive; padding: 40px 0px; font-size: 3em; margin: 0px;
}
/* header style ends */ .footer { display: flex;
} .footer-column { width: 33.3%; float: left;
} .map-image { width: 100%;
} .contact-form-container { background-color: #eaeaea;
} img { vertical-align: middle;
} .tile-content { padding: 20px 40px;
} .tile-content .contact-row { margin-bottom: 20px;
} .tile-field { margin-left: 20px;
} .form-field { width: 100%; padding: 10px 8px; border-radius: 4px; border: #d9d8d8 1px solid;
} .button { color: #ffffff; padding: 10px 30px 10px 30px; border-radius: 20px; background: linear-gradient(to right, #08a9df, #12054a); border: 0px;
} #menu-icon { display: none; float: right;
} @media screen and (max-width: 1000px) { .footer-column { width: 50%; } .contact-form-container { width: 100%; } .footer { display: block; }
} @media screen and (max-width: 540px) { #header-right-menu { float: none; display: none; } #header-right-menu a { display: block; } .heading { padding: 0px; } .tile-content { padding: 0px 20px; } .footer-column { width: 100%; } #menu-icon { display: block; float: right; }
}

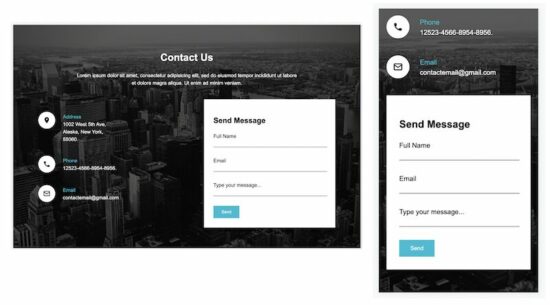
Contact Form Template 2

This contact template shows the contact details, address, phone, and email. It offers a form with primary fields to let the user communicate with the site owner.

This template has two columns in the site content area. The contact details and the contact form are shown in these two columns, respectively.

contact form template2

template-2/index.html

<!DOCTYPE html>
<html>
<head>
<title>Contact - Form</title>
<meta name="viewport" content="width=device-width, initial-scale=1">
<link rel="stylesheet" type="text/css" href="style.css">
</head>
<body> <div class="container"> <div class="text-center"> <h1>Contact Us</h1> <div> Lorem ipsum dolor sit amet, consectetur adipisicing elit, sed do eiusmod tempor incididunt ut labore <div>et dolore magra aliqua. Ut enim ad minim veniam.</div> </div> </div> <div class="content"> <div class="col-1"> <div class="address-line"> <img alt="location" src="image/marker.png" class="icon"> <div class="contact-info"> <div class="contact-info-title">Address</div> <div>1002 West 5th Ave,</div> <div>Alaska, New York,</div> <div>55060.</div> </div> </div> <div class="address-line"> <img alt="location" src="image/phone.png" class="icon"> <div class="contact-info"> <div class="contact-info-title">Phone</div> <div>12523-4566-8954-8956.</div> </div> </div> <div class="address-line"> <img alt="location" src="image/mail.png" class="icon"> <div class="contact-info"> <div class="contact-info-title">Email</div> <div>[email protected]</div> </div> </div> </div> <div class="col-2"> <form> <div class="form-container"> <h2>Send Message</h2> <div class="form-row"> <label>Full Name</label> <div> <input type="text" class="form-field"> </div> </div> <div class="form-row"> <label>Email</label> <div> <input type="text" class="form-field"> </div> </div> <div class="form-row"> <label>Type your message...</label> <div> <input type="text" class="form-field"> </div> </div> <input type="button" class="send-btn" value="Send"> </div> </form> </div> </div> </div>
</body>
</html>

See the below CSS and include it in the template 2 HTML.

template-2/style.css

body { font-family: Arial; background-image: url('image/bg.png'); background-size: cover; background-position: center; background-repeat: no-repeat; background-attachment: fixed;
} .container { width: 950px; margin: 80px auto; color: white; line-height: 1.5;
} .text-center { text-align: center;
} .content { display: flex; margin-top: 40px;
} .icon { background-color: white; border-radius: 30px; padding: 15px; vertical-align: top;
} .contact-info { display: inline-block; padding: 4px 20px 0px 20px;
} .address-line { margin-top: 40px;
} .col-1 { width: 530px;
} .col-2 { flex: 1 1 auto; background-color: white;
} .form-container { color: #000; padding: 30px;
} .contact-info-title { color: #01bdd4;
} .form-row { padding-bottom: 30px;
} .form-field { width: 100%; border: none; border-bottom: 1px solid #000;
} .send-btn { border: 0px; padding: 12px 26px; background-color: #01bdd4; color: white;
} @media all and (max-width: 1024px) { .container { width: auto; padding: 30px; } .col-1 { width: 360px; } } @media all and (max-width: 700px) { .content { display: block; } .col-2 { margin-top: 40px; } .col-1{ width:100%; }
} @media all and (max-width: 500px) { .container { padding: 10px; }
}

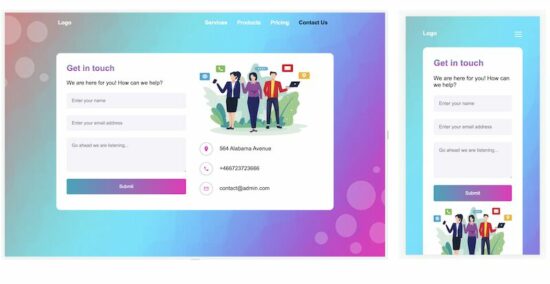
Contact Form Template 3

Template 3 is a simple and clean theme for a contact form page. It displays a contact form with a few primary fields. Also, it shows only the vital contact details on the page.

A simple contact template will encourage the end user to connect with you and increase the conversion rate.

contact form template3

template-3/index.html

<html> <head> <meta name="viewport" content="width=device-width, initial-scale=1"> <link href="style.css" rel="stylesheet" type="text/css">
</head> <body> <div class="container"> <div class="header-content"> <a href="">Logo</a> <span id="menu-icon" onClick="toggleMenu()"><img src="images/menu.svg" /></span> <span id="header-right-menu"> <a href="#">Services</a> <a href="#">Products</a> <a href="#">Pricing</a> <a href="#" class="header-active">Contact Us</a> </span> </div> <div class="inner-container"> <div class="tile1"> <div class="tile1-heading">Get in touch</div> <div class="form-row">We are here for you! How can we help?</div> <form> <div class="form-row"> <input type="text" class="form-field" placeholder="Enter your name"> </div> <div class="form-row"> <input type="text" class="form-field" placeholder="Enter your email address"> </div> <div class="form-row"> <textarea class="form-field" placeholder="Go ahead we are listening..."></textarea> </div> <div class="form-row"> <input type="button" class="form-field btn" value="Submit"> </div> </form> </div> <div class="tile2"> <div class="tile2-image"> <img src="images/contact.png"> </div> <div> <div class="form-row"> <img src="images/loaction.png" class="contact-image"><span>564 Alabama Avenue</span> </div> <div class="form-row"> <img src="images/phone.png" class="contact-image"><span>+466723723666</span> </div> <div class="form-row"> <img src="images/mail.png" class="contact-image"><span>[email protected]</span> </div> </div> </div> </div> </div> <script> function toggleMenu() { var menuElement = document.getElementById("header-right-menu"); if (menuElement.style.display === "block") { menuElement.style.display = "none"; } else { menuElement.style.display = "block"; } } </script> </body> </html>

And the styles of this template three are shown below.

template-3/style.css

body { font-family: Arial; background-image: url('images/bg.jpg'); background-position: center; background-size: cover; background-repeat: no-repeat; background-attachment: fixed;
} .container { border-radius: 16px; max-width: 1180px; margin: 0 30px;
} a { color: #ffffff; text-decoration: none;
} .header-content { font-weight: bold; width: 800px; margin: 20px auto;
} #header-right-menu { float: right;
} #header-right-menu a { padding: 12px;
} .header-active{ color:#000;
} .inner-container { width: 750px; margin: 80px auto; display: flex; background-color: white; border-radius: 12px; padding: 30px
} .tile1 { width: 350px;
} .tile2 { flex: 1 1 auto; padding: 0px 40px;
} .tile1-heading { background: -webkit-linear-gradient(#0aa6bd, #f126bd); -webkit-background-clip: text; -webkit-text-fill-color: transparent; font-weight: bold; font-size: 1.5em;
} .form-row { padding: 20px 0px 0px 0px;
} .form-field { border-radius: 4px; width: 100%; padding: 15px; background-color: #f5f4fa; border: 0px;
} .contact-image { padding: 10px; border-radius: 35px; border: 1px solid #a8a4a4; vertical-align: middle; margin-right: 20px; width: 16px; height: 16px;
} textarea { height: 100px; font-family: Arial;
} .btn { color: white; background: linear-gradient(to right, #0aa6bd, #f126bd);
} .tile2-image img { width: 321px; height: 211px;
} #menu-icon { display: none; float: right;
} @media all and (max-width: 900px) { .inner-container { width: auto; display: block; margin: 30px auto; } .header-content { width: auto; } .tile1 { width: 100%; } .tile2 { padding: 0px; } .tile2-image img { width: 100%; height: auto; }
} @media all and (max-width: 540px) { #header-right-menu { float: none; display: none; } #header-right-menu a { display: block; padding: 10px 0px; } #menu-icon { display: block; float: right; }
} @media all and (max-width: 400px) { .container { padding: 10px; }
}

Download

↑ Back to Top

Posted on Leave a comment

Convert PHP CSV to JSON

by Vincy. Last modified on March 17th, 2023.

JSON format is a widely used format while working with API development. Most of the existing API responses are in JSON format.

Converting CSV content into a JSON format is simple in PHP. In this article, we will see different methods of achieving this conversion.

Quick example

<?php $csvFileContent= file_get_contents("animals.csv");
// Converts the CSV file content into line array $csvLineArray = explode("\n", $csvFileContent);
// Forms row results in an array format
$result = array_map("str_getcsv", $csvLineArray);
$jsonObject = json_encode($result);
print_r($jsonObject);
?>

The above quick example in PHP converts the CSV file content into JSON with few lines of code.

  1. First, it reads the .csv file content using the PHP file_get_contents() function.
  2. It explodes the CSV row by the new line (\n) escape sequence.
  3. Then, it iterates the line array and reads the line data of the CSV row.
  4. Finally, the resultant CSV row array is converted to JSON using the json_encode() function.

In step 3, the iteration happens with a single line of code. This line maps the array to call  PHP str_getcsv to parse and convert the CSV lines into an array.

When we saw the methods of reading a CSV file, we created an example using str_getcsv function.

The below input file is saved and used for this PHP example.

Input CSV

Id,Name,Type,Role
1,Lion,Wild,"Lazy Boss"
2,Tiger,Wild,CEO
3,Jaguar,Wild,Developer

Output JSON

This PHP quick example displays the below JSON output on the browser.

[["Id","Name","Type","Role"],["1","Lion","Wild","Lazy Boss"],["2","Tiger","Wild","CEO"],["3","Jaguar","Wild","Developer"]]

In the following sections, we will see two more examples of converting CSV files into JSON.

  1. Method 2: Convert CSV (containing header) into a JSON (associating the column=>value pair)
  2. Method 3: Upload a CSV file and convert it into JSON

upload and convert csv to json

Method 2: Convert CSV (containing header) into a JSON (associating the column=>value pair)

This example uses a CSV string as its input instead of a file.

It creates the header column array by getting the first row of the CSV file.

Then, the code iterates the CSV rows from the second row onwards. On each iteration, it associates the header column and the iterated data column.

This loop prepares an associative array containing the CSV data.

In the final step, the json_encode() function converts the associative array and writes it into an output JSON file.

<?php
$csvString = "Id,Name,Type,Role
1,Lion,Wild,Boss
2,Tiger,Wild,CEO
3,Jaguar,Wild,Developer"; $lineContent = array_map("str_getcsv", explode("\n", $csvString)); $headers = $lineContent[0];
$jsonArray = array();
$rowCount = count($lineContent);
for ($i=1;$i<$rowCount;$i++) { foreach ($lineContent[$i] as $key => $column) { $jsonArray[$i][$headers[$key]] = $column; }
} header('Content-type: application/json; charset=UTF-8');
$fp = fopen('animals.json', 'w');
fwrite($fp, json_encode($jsonArray, JSON_PRETTY_PRINT));
fclose($fp);
?>

Output – The animal.json file

This is the output written to the animal.json file via this PHP program.

{ "1": { "Id": "1", "Name": "Lion", "Type": "Wild", "Role": "Boss" }, "2": { "Id": "2", "Name": "Tiger", "Type": "Wild", "Role": "CEO" }, "3": { "Id": "3", "Name": "Jaguar", "Type": "Wild", "Role": "Developer" }
}

Method 3: Upload a CSV file and convert it into JSON

Instead of using a fixed CSV input assigned to a program, this code allows users to choose the CSV file.

This code shows an HTML form with a file input to upload the input CSV file.

Once uploaded, the PHP script will read the CSV file content, prepare the array, and form the JSON output.

In a previous tutorial, we have seen how to convert a CSV into a PHP array.

upload-and-convert-csv-to-json.php

<?php
if (isset($_POST["convert"])) { if ($_FILES['csv_file_input']['name']) { if ($_FILES['csv_file_input']["type"] == 'text/csv') { $jsonOutput = array(); $csvFileContent = file_get_contents($_FILES['csv_file_input']['tmp_name']); $result = array_map("str_getcsv", explode("\n", $csvFileContent)); $header = $result[0]; $recordCount = count($result); for ($i = 1; $i < $recordCount; $i++) { // Associates the data with the string index in the header array $data = array_combine($header, $result[$i]); $jsonOutput[$i] = $data; } header('Content-disposition: attachment; filename=output.json'); header('Content-type: application/json'); echo json_encode($jsonOutput); exit(); } else { $error = 'Invalid CSV uploaded'; } } else { $error = 'Invalid CSV uploaded'; }
}
?>
<!DOCTYPE html>
<html> <head> <title>Convert CSV to JSON</title> <style> body { font-family: arial; } input[type="file"] { padding: 5px 10px; margin: 30px 0px; border: #666 1px solid; border-radius: 3px; } input[type="submit"] { padding: 8px 20px; border: #232323 1px solid; border-radius: 3px; background: #232323; color: #FFF; } .validation-message { color: #e20900; } </style>
</head>
<body> <form name="frmUpload" method="post" enctype="multipart/form-data"> <input type="file" name="csv_file_input" accept=".csv" /> <input type="submit" name="convert" value="Convert"> <?php if (!empty($error)) { ?> <span class="validation-message"><?php echo $error; ?></span> <?php } ?> </form>
</body>
</html>

Output:

This program writes the output JSON into a file and downloads it automatically to the browser.

Note: Both methods 2 and 3 require CSV input with a header column row to get good results.
output json file
Download

↑ Back to Top

Posted on Leave a comment

phpMyAdmin – How to Connect a Remote Database?

by Vincy. Last modified on March 16th, 2023.

Do you want to connect a remote server from the phpMyAdmin installed on a local or test server? This article gives the steps needed to achieve it.

There are many database clients, most of which support connecting a database server. But, working with phpMyAdmin to connect to a remote database server is heavenly easier than with other clients.

We have seen many tutorials for phpMyAdmin to create a database and perform the operations around it.

Configure remote server details in the phpMyAdmin application config file

A configuration file config.inc.php is there for the phpMyAdmin application. Open that file and add the below settings into it.

This setting is to add the remote database details, host, username, and password. The database port is optional if it is the default.

Before setting the database details, it increments the existing config array index. We can add as many configurations as following the current batch of settings.

$i++;
$cfg['Servers'][$i]['host'] = 'DATABASE_HOST:PORT';//set the database hostname.
$cfg['Servers'][$i]['user'] = 'DATABASE_USER';// set the remote database user
$cfg['Servers'][$i]['password'] = 'DATABASE_PASSWORD';// database password
$cfg['Servers'][$i]['auth_type'] = 'config';

After adding these details, the phpMyAdmin application lists the configured database hostnames.

The list is a dropdown of selectable database hosts that appears above the left navigation menu.

The below figure shows the dropdown options of the current localhost and the RemoteHost server.

It allows navigation between these two database servers to manage their assets.

Note: The RemoteHost:port is a test configuration data. Replace it with the remote database IP and port to be connected.

phpmyadmin remote database

These guidelines assume that you have the PHP and MySQL environment with the phpMyAdmin application installed.

If you newly create the environment or install the phpMyAdmin, ensure the required privileges and security measures. We have seen steps to install phpMyAdmin on a windows machine via the WAMP package installer.

Security measures needed for the machine connecting the remote database

(1) Use a Linux environment

Before connecting the remote database via phpMyAdmin, we must be confident about the security.

Linux-based machines are safe for proceeding with the remote connection.

If you are using a Windows machine, there are settings to enable WSL to let it be secure while working with the remote database servers.

(2) Let login configuration empty

When setup the remote database server configuration, let the username and password empty.

Set only the remote database server IP address to show in the phpMyAdmin web interface.

Choosing the remote server to connect will redirect to the phpMyAdmin login panel to enter the details.

Directly access the remote phpMyAdmin web application URL

If you know the URL of the phpMyAdmin web application installed on the remote server, we can visit and land on its login page.

The login page prompts the MySQL database host, username, and password. Entering and submitting these details allows access to the remote database.

Thus, we have seen the possible ways of connecting the remote database server using the phpMyAdmin application.

↑ Back to Top

Posted on Leave a comment

Event Management System Project in PHP

by Vincy. Last modified on March 10th, 2023.

When managing events, the date and time come into the picture. So, the calendar component is the best to render events in a viewport. It is convenient compared to other views like card-view or list-view.

This example uses the JavaScript library FullCalendar to render and manage events. The events are from the database by using PHP and MySQL.

The following script gives you a simple event management system in PHP with AJAX. The AJAX handlers connect the PHP endpoint to manage events with the database.

In a previous tutorial, we have seen how to create a PHP event management system with Bootstrap.

create edit delete events in php

Step 1: Create an HTML base with the FullCalendar library

The client-side script has the HTML with the required dependencies. This HTML uses CDN to import the JS and CSS. It uses the following libraries

  1. FullCalendar.
  2. MomentJS.
  3. jQuery and jQuery UI.

It has an empty DIV target that will display the calendar UI after initiating the FullCalendar JavaScript library class.

index.php

<!DOCTYPE html>
<html>
<head>
<title>Event management in php</title> <script type="text/javascript" src="https://cdnjs.cloudflare.com/ajax/libs/moment.js/2.22.2/moment.js"></script>
<script src="https://cdnjs.cloudflare.com/ajax/libs/jquery/3.3.1/jquery.min.js" type="text/javascript"></script>
<script src="https://cdnjs.cloudflare.com/ajax/libs/jqueryui/1.12.1/jquery-ui.min.js"></script>
<script src="https://cdnjs.cloudflare.com/ajax/libs/fullcalendar/3.9.0/fullcalendar.min.js"></script>
<script src="https://cdnjs.cloudflare.com/ajax/libs/fullcalendar/3.9.0/locale-all.js"></script>
<link href="https://cdnjs.cloudflare.com/ajax/libs/fullcalendar/3.9.0/fullcalendar.min.css" rel="stylesheet">
<link rel="stylesheet" href="//code.jquery.com/ui/1.13.2/themes/base/jquery-ui.css">
<link rel="stylesheet" href="assets/css/style.css">
<link rel="stylesheet" href="assets/css/form.css">
<script src="assets/js/event.js"></script>
<style>
.btn-event-delete { font-size: 0.85em; margin: 0px 10px 0px 5px; font-weight: bold; color: #959595;
}
</style>
</head> <body> <div class="phppot-container"> <h2>Event management in php</h2> <div class="response"></div> <div class="row"> <input type="text" name="filter" id="filter" placeholder="Choose date" /> <button type="button" id="button-filter" onClick="filterEvent();">Filter</button> </div> <div class="row"> <div id='calendar'></div> </div> </div>
</body>
</html>

Step 2: Create MySQL Structure in phpMyAdmin

This example creates a persistent event management system in PHP. The newly created or modified event data are permanently stored in the database.

This script has the CREATE STATEMENT and indexes of the tbl_events database. Do the following steps to set up this database in a development environment.

  1. Create a database and import the below SQL script into it.
  2. Configure the newly created database in config/db.php of this project.

Database script

sql/structure.sql

--
-- Database: `full_calendar`
-- -- -------------------------------------------------------- --
-- Table structure for table `tbl_events`
-- CREATE TABLE `tbl_events` ( `id` int(11) NOT NULL, `title` varchar(255) CHARACTER SET utf8 COLLATE utf8_bin DEFAULT NULL, `start` date DEFAULT NULL, `end` date DEFAULT NULL
) ENGINE=InnoDB DEFAULT CHARSET=latin1; --
-- Indexes for dumped tables
-- --
-- Indexes for table `tbl_events`
--
ALTER TABLE `tbl_events` ADD PRIMARY KEY (`id`); --
-- AUTO_INCREMENT for dumped tables
-- --
-- AUTO_INCREMENT for table `tbl_events`
--
ALTER TABLE `tbl_events` MODIFY `id` int(11) NOT NULL AUTO_INCREMENT;

Database configuration

db.php

<?php
$conn = mysqli_connect("localhost", "root", "", "full_calendar"); if (! $conn) { echo "Failed to connect to MySQL: " . mysqli_connect_error();
}
?>

Step 3: Initiate Fullcalendar and create listeners to manage events

This section initiates the JavaScript calendar library with suitable settings. For example, the below script enables the following directives to allow mouse events to make changes in the calendar.

  1. editable – It will enable event editing on the calendar by switching it on.
  2. droppable – It supports event drag and drops to change the date.
  3. eventResize – It supports inline extending or reducing the event period by resizing.
  4. eventLimit – It allows limiting the number of events displayed on a date instance.
  5. displayEventTime – It shows event time if added.

The Fullcalendar property “events” specifies the array of events rendered download. In this example, it has the PHP endpoint URL to read calendar events dynamically from the database.

This script maps the calendar event’s select, drag, drop, and resize with the defined AJAX handlers.

$(document).ready(function() { var calendar = $('#calendar').fullCalendar({ editable: true, eventLimit: true, droppable: true, eventColor: "#fee9be", eventTextColor: "#232323", eventBorderColor: "#CCC", eventResize: true, header: { right: 'prev, next today', left: 'title', center: 'listMonth, month, basicWeek, basicDay' }, events: "ajax-endpoint/fetch-calendar.php", displayEventTime: false, eventRender: function(event, element) { element.find(".fc-content").prepend("<span class='btn-event-delete'>X</span>"); element.find("span.btn-event-delete").on("click", function() { if (confirm("Are you sure want to delete the event?")) { deleteEvent(event); } }); }, selectable: true, selectHelper: true, select: function(start, end, allDay) { var title = prompt('Event Title:'); if (title) { var start = $.fullCalendar.formatDate(start, "Y-MM-DD HH:mm:ss"); var end = $.fullCalendar.formatDate(end, "Y-MM-DD HH:mm:ss"); addEvent(title, start, end); calendar.fullCalendar('renderEvent', { title: title, start: start, end: end, allDay: allDay }, true ); } calendar.fullCalendar('unselect'); }, eventClick: function(event) { var title = prompt('Event edit Title:', event.title); if (title) { var start = $.fullCalendar.formatDate(event.start, "Y-MM-DD HH:mm:ss"); var end = $.fullCalendar.formatDate(event.end, "Y-MM-DD HH:mm:ss"); editEvent(title, start, end, event); } }, eventDrop: function(event) { var title = event.title; if (title) { var start = $.fullCalendar.formatDate(event.start, "Y-MM-DD HH:mm:ss"); var end = $.fullCalendar.formatDate(event.end, "Y-MM-DD HH:mm:ss"); editEvent(title, start, end, event); } }, eventResize: function(event) { var title = event.title; if (title) { var start = $.fullCalendar.formatDate(event.start, "Y-MM-DD HH:mm:ss"); var end = $.fullCalendar.formatDate(event.end, "Y-MM-DD HH:mm:ss"); editEvent(title, start, end, event); } } }); $("#filter").datepicker();
});
function addEvent(title, start, end) { $.ajax({ url: 'ajax-endpoint/add-calendar.php', data: 'title=' + title + '&start=' + start + '&end=' + end, type: "POST", success: function(data) { displayMessage("Added Successfully"); } });
} function editEvent(title, start, end, event) { $.ajax({ url: 'ajax-endpoint/edit-calendar.php', data: 'title=' + title + '&start=' + start + '&end=' + end + '&id=' + event.id, type: "POST", success: function() { displayMessage("Updated Successfully"); } });
} function deleteEvent(event) { $('#calendar').fullCalendar('removeEvents', event._id); $.ajax({ type: "POST", url: "ajax-endpoint/delete-calendar.php", data: "&id=" + event.id, success: function(response) { if (parseInt(response) > 0) { $('#calendar').fullCalendar('removeEvents', event.id); displayMessage("Deleted Successfully"); } } });
}
function displayMessage(message) { $(".response").html("<div class='success'>" + message + "</div>"); setInterval(function() { $(".success").fadeOut(); }, 5000);
} function filterEvent() { var filterVal = $("#filter").val(); if (filterVal) { $('#calendar').fullCalendar('gotoDate', filterVal); $("#filter").val(""); }
}

Step 4: Create AJAX endpoints to create, render and manage event data

This section shows the PHP code for the AJAX endpoint. The Fullcalendar callback handlers call these endpoints via AJAX.

This endpoint receives the event title, start date, and end date. It processes the requested database operation using the received parameters.

ajax-endpoint/fetch-calendar.php

<?php
require_once "../config/db.php"; $json = array();
$sql = "SELECT * FROM tbl_events ORDER BY id"; $statement = $conn->prepare($sql);
$statement->execute();
$dbResult = $statement->get_result(); $eventArray = array();
while ($row = mysqli_fetch_assoc($dbResult)) { array_push($eventArray, $row);
}
mysqli_free_result($dbResult); mysqli_close($conn);
echo json_encode($eventArray);
?>

ajax-endpoint/add-calendar.php

<?php
require_once "../config/db.php"; $title = $_POST['title'];
$start = $_POST['start'];
$end = $_POST['end'];
$statement = $conn->prepare('INSERT INTO tbl_events (title,start,end) VALUES (?,?,?)');
$statement->bind_param('sss', $title, $start, $end);
$rowResult = $statement->execute();
if (! $rowResult) { $result = mysqli_error($conn);
}
?>

ajax-endpoint/edit-calendar.php

<?php
require_once "../config/db.php"; $id = $_POST['id'];
$title = $_POST['title'];
$start = $_POST['start'];
$end = $_POST['end'];
$statement = $conn->prepare('UPDATE tbl_events SET title = ?, start= ?, end=? WHERE id = ?');
$statement->bind_param('sssi', $title, $start, $end, $id);
$rowResult = $statement->execute();
mysqli_close($conn);
?>

ajax-endpoint/delete-calendar.php

<?php
require_once "../config/db.php"; $id = $_POST['id'];
$statement = $conn->prepare('DELETE from tbl_events WHERE id= ?');
$statement->bind_param('i', $id);
$rowResult = $statement->execute();
echo mysqli_affected_rows($conn);
mysqli_close($conn);
?>

Event management calendar output

event management in php

Download

↑ Back to Top

Posted on Leave a comment

Convert PHP JSON to CSV

by Vincy. Last modified on March 7th, 2023.

This tutorial gives examples for converting a PHP JSON variable content into a CSV file.

This quick example achieves it in a few steps. It uses the PHP fputcsv() method to prepare the CSV output.

  1. It reads the input JSON and decodes it into an array.
  2. Iterate the JSON array to read the line of the record.
  3. Apply PHP fputcsv() to write the array keys in the header, followed by array values.

Quick example

<?php function convertJsonToCSV($jsonFile, $csvFile)
{ if (($json = file_get_contents($jsonFile)) == false) { die('Unable to read JSON file.'); } $jsonString = json_decode($json, true); $fp = fopen($csvFile, 'w'); fputcsv($fp, array_keys($jsonString[0])); for ($i = 0; $i < count($jsonString); $i ++) { fputcsv($fp, array_values($jsonString[$i])); } fclose($fp); return;
}
$jsonFile = 'animals.json';
$csvFile = 'animals.csv'; convertJsonToCSV($jsonFile, $csvFile);
echo 'JSON to CSV converted. <a href="' . $csvFile . '" target="_blank">Download CSV file</a>';

The input JSON file is in the local drive and specified to a PHP variable $jsonFile.

This example creates a custom function convertJsonToCSV(). It requires the input JSON and the target CSV file names.

It converts the input JSON object to a PHP array. Then, it iterates the PHP array to read the row.

This function uses the PHP fputcsv() function to write each row into the target CSV file.

Output:

The above program will return the following CSV content in a file. In a previous tutorial, we have seen how to export to a CSV file using the PHP fputcsv() function.

Id,Name,Type,Role
1,Lion,Wild,"Lazy Boss"
2,Tiger,Wild,CEO
3,Jaguar,Wild,Developer

Note: The input JSON must be a one-dimensional associative array to get a better output.

php json to csv

JSON string to CSV in PHP

This example has a different approach to dealing with PHP JSON to CSV conversion.

It uses a JSON string as its input instead of reading a file. The JSON string input is initiated in a PHP variable and passed to the convertJSONtoCSV() function.

It reads the JSON string and converts it into a JSON array to prepare CSV. The linked article has an example of reading CSV using PHP.

Then, it iterates the JSON array and applies PHP fputcsv() to write the CSV row.

It reads the array_keys to supply the CSV header. And this will be executed only for the first time. It writes the column names as the first row of the output CSV.

json-string-to-csv.php

<?php
function convertJsonToCSV($jsonString, $csvFile)
{ $jsonArray = json_decode($jsonString, true); $fp = fopen($csvFile, 'w'); $header = false; foreach ($jsonArray as $line) { if (empty($header)) { $header = array_keys($line); fputcsv($fp, $header); $header = array_flip($header); } fputcsv($fp, array_merge($header, $line)); } fclose($fp); return;
}
$jsonString = '[ { "Id": "1", "Name": "Lion", "Type": "Wild", "Role": "Lazy Boss" }, { "Id": "2", "Name": "Tiger", "Type": "Wild", "Role": "CEO" }, { "Id": "3", "Name": "Jaguar", "Type": "Wild", "Role": "Developer" }
]';
$csvFile = 'animals.csv'; convertJsonToCSV($jsonString, $csvFile);
echo 'JSON to CSV converted. <a href="' . $csvFile . '" target="_blank">Download CSV file</a>';

Upload CSV file to convert into JSON in PHP

This example is to perform the JSON to CSV with a file upload option.

This code will be helpful if you want to convert the uploaded JSON file into a CSV.

It shows an HTML form with a file input field. This field will accept only ‘.json’ files. The restriction is managed with the HTML ‘accept’ attribute. It can also be validated with a server-side file validation script in PHP.

The $_FILES[‘csv-file’][‘tmp_name’] contains the posted CSV file content. The JSON to CSV conversion script uses the uploaded file content.

Then, it parses the JSON and converts it into CSV. Once converted, the link will be shown to the browser to download the file.

upload-json-to-convert-to-csv.php

<?php
if (! empty($_FILES["csv-file"]["tmp_name"])) { $csvFile = 'animal.csv'; if (($json = file_get_contents($_FILES["csv-file"]["tmp_name"])) == false) { die('Unable to read JSON file.'); } $jsonString = json_decode($json, true); $fp = fopen($csvFile, 'w'); fputcsv($fp, array_keys($jsonString[0])); for ($i = 0; $i < count($jsonString); $i ++) { fputcsv($fp, array_values($jsonString[$i])); } fclose($fp); echo 'JSON to CSV converted. <a href="' . $csvFile . '" target="_blank">Download CSV file</a>';
}
?>
<HTML>
<head>
<title>Convert JSON to CSV</title>
<style>
body { font-family: arial;
} input[type="file"] { padding: 5px 10px; margin: 30px 0px; border: #666 1px solid; border-radius: 3px;
}
input[type="submit"] { padding: 8px 20px; border: #232323 1px solid; border-radius: 3px; background: #232323; color: #FFF;
}
</style>
</head> <body> <form method="post" enctype="multipart/form-data"> <input type="file" name="csv-file" accept=".json" /> <input type="submit" name="upload" value="Upload"> </form>
</body>
</HTML>

Download

↑ Back to Top

Posted on Leave a comment

How to Install phpMyAdmin on a Windows?

by Vincy. Last modified on February 2nd, 2023.

Installing phpMyAdmin on a Windows computer will vary based on the existing environment. This article will tell the step-by-step process of installing phpMyAdmin using the following methods.

  1. Manual installation on top of the existing Apache server.
  2. Installation via WAMP package.

Method 2 is an easier one, which will automatically install as part of the WAMP package. Not only WAMP but all packages like XAMPP and LAMP also have the advantage of reducing the effort.

In a previous tutorial, we have seen how to install XAMPP. It helped to set up an Apache, PHP, and MySQL database server environment on a server.

install phpmyadmin windows

Manual installation on top of the existing Apache server

We have seen the advantages of phpMyAdmin managing databases through a web interface.

Prerequisites

Make sure that you have installed the following before start installing phpMyAdmin.

  • Apache server
  • MySQL server
  • PHP

Then, follow the below steps.

  • Step 1: Download the phpMyAdmin project from its official website. Download the zip file to your browser by clicking the required downloadable.
  • Step 2: Unzip the downloaded zip and copy the phpMyAdmin project.
  • Step 3: Move the phpMyAdmin extracted folder to the Apache web root, the htdocs directory.
  • Step 4: Open the php.ini file found in the PHP config root. Make sure that the file has administrator permission to edit the config.
  • Step 5: Uncomment the following extensions to enable them.
    • php_mbstring.dll
    • php_mysqli.dll
  • Step 6: Restart Apache and MySQL servers.
  • Step 7: Run the phpMyAdmin application as same as you run other PHP applications on the Apache web root.
    • An example web address is http://localhost/phpmyadmin/. It will show the PHPMyAdmin home by listing all the databases.

Installation via WAMP package

We have seen a seven-step process of installing phpMyAdmin manually. Now, let’s see how the WAMP package provides an easy way of achieving this.

  • Step 1: Choose the suitable WAMP installer and click “download directly” -> “Download Latest Version”
  • Step 2: Double-click the downloaded WAMP installer and proceed with the wizards asking the following.
    • Choose language.
    • Accept the agreement.
    • Accept or configure the default browser.
    • Accept or Configure the default editor.
  • Step 3: Click “Finish” when the wizard prompts.
  • Step 4: Open the WAMP tool and choose phpMyAdmin from the menu.

Thus, the phpMyAdmin is installed simply by this method.

Conclusion

Once installed, the phpMyAdmin will help manage the database easily via a web application interface. Previously, we saw steps to use the frequently used tools of this application. E.g., How to create a database using phpMyAdmin?

This application helps connect a local or remote database by logging in via the landing login panel.

↑ Back to Top

Share this page

Posted on Leave a comment

Chart JS Doughnut

by Vincy. Last modified on January 30th, 2023.

The doughnut chart is similar to the pie chart except for the cutout area in the middle of the pie graph.

It shows the partitions out of a boundary taken. The circle of the pie or doughnut chart is the boundary and the partitions give relational statistics.

This quick example has the Chart JS JavaScript to display a doughnut chart. Earlier, we started with Chart JS line chart and have seen many examples for this library.

Quick example

<!DOCTYPE html>
<html>
<head>
<title>Chart JS Doughnut</title>
<link rel='stylesheet' href='style.css' type='text/css' />
</head>
<body> <div class="phppot-container"> <h1>Chart JS Doughnut</h1> <div> <canvas id="chartjs-doughnut"></canvas> </div> </div> <script src="https://cdn.jsdelivr.net/npm/[email protected]/dist/chart.umd.min.js"></script> <script> new Chart(document.getElementById("chartjs-doughnut"), { type: 'doughnut', data: { labels: ["Lion", "Horse", "Elephant", "Tiger", "Jaguar"], datasets: [{ backgroundColor: ["#51EAEA", "#FCDDB0", "#FF9D76", "#FB3569", "#82CD47"], data: [418, 263, 434, 586, 332] }] }, options: { title: { display: true, text: 'Chart JS Doughnut.' }, cutout: '60%', // the portion of the doughnut that is the cutout in the middle radius: 200 } }); </script>
</body>
</html>

In a previous article, we have seen how to create Chart JS JavaScript library to create a pie chart.

The code doughnut chart differs only by the property type: doughnut instead of type: pie.

Output

It displays the count of an animal on each wing of the doughnut chat.

As in the pie chart example, the animal names are taken for the “labels” property. The count of each animal is the chart data. Different background colors classify it in the doughnut chart.

The below figure shows the output of this Chart JS doughnut example.

Doughnut Chart with PHP and MySQL Database

This example will be helpful if you want to display dynamic data from an external source.

It uses a database source to supply data for the Chart JS doughnut chart.

The db_chartjs_data is the database that contains the tbl_marks table. It has student’s mark in percentage.

The doughnut chart should display the number of students who got a particular percentage.

doughnut-chart-with-php-database.php

<?php
$conn = new mysqli('localhost', 'root', '', 'db_chartjs_data');
$sql = "SELECT count(*) as marks_percentage_count, percentage FROM tbl_marks GROUP BY percentage";
$result = $conn->query($sql);
{ $label = array(); $percentage = array(); while ($row = $result->fetch_assoc()) { $label[] = $row["percentage"] . "%"; $percentage[] = $row["marks_percentage_count"]; }
}
$chartLabel = json_encode($label);
$chartData = json_encode($percentage);
?>
<!DOCTYPE html>
<html>
<head>
<title>Doughnut Chart with PHP and MySQL Database</title>
<link rel='stylesheet' href='style.css' type='text/css' />
</head> <body> <div class="phppot-container"> <h1>Doughnut Chart with PHP and MySQL Database</h1> <div> <canvas id="chartjs-doughnut"></canvas> </div> </div> <script src="https://cdn.jsdelivr.net/npm/[email protected]/dist/chart.umd.min.js"></script> <script> new Chart(document.getElementById("chartjs-doughnut"), { type: 'doughnut', data: { labels: <? php echo $chartLabel; ?>, datasets: [{ backgroundColor: ["#51EAEA", "#FCDDB0", "#FF9D76", "#FB3569", "#82CD47"], data: <? php echo $chartData; ?> }] }, options: { title: { display: true, text: 'Chart JS Doughnut' }, cutout: '60%', // the portion of the doughnut that is cutout in the middle radius: 200 } }); </script>
</body>
</html>

This is the database script to import before running this example.

db_chartjs_data.sql

--
-- Database: `db_chartjs_data`
-- --
-- Table structure for table `tbl_marks`
-- CREATE TABLE `tbl_marks` ( `id` int(11) NOT NULL, `name` varchar(55) NOT NULL, `percentage` int(11) NOT NULL
) ENGINE=InnoDB DEFAULT CHARSET=utf8mb4; --
-- Dumping data for table `tbl_marks`
-- INSERT INTO `tbl_marks` (`id`, `name`, `percentage`) VALUES
(1, 'John', 85),
(2, 'Matthew', 85),
(3, 'Tim', 65),
(4, 'Clare', 75),
(5, 'Viola', 85),
(6, 'Vinolia', 75),
(7, 'Laura', 85),
(8, 'Leena', 75),
(9, 'Evan', 85),
(10, 'Ellen', 90); --
-- Indexes for table `tbl_marks`
--
ALTER TABLE `tbl_marks` ADD PRIMARY KEY (`id`); --
-- AUTO_INCREMENT for dumped tables
-- --
-- AUTO_INCREMENT for table `tbl_marks`
--
ALTER TABLE `tbl_marks` MODIFY `id` int(11) NOT NULL AUTO_INCREMENT, AUTO_INCREMENT=11;

This code prepares a query to fetch the student’s count grouped by percentage. There are four distinct percentages in the database.

This output screenshot displays the number of students who scored a particular percentage.

Output

dynamic doughnut chart

The ChartJS script to display a doughnut chart requires additional (optional) property. That is, the cutout property specified under the ChartJS options array.

It accepts value in percentage. It decides the transparent area cutout from the middle of the doughnut chart.

Download

↑ Back to Top

Posted on Leave a comment

Convert PHP Array to CSV

by Vincy. Last modified on January 23rd, 2023.

This tutorial is to convert a PHP array to a CSV file or format. It has two examples of implementing this conversion.

  1. A quick example is that parses a PHP array dataset to a CSV and prints the CSV data on the browser.
  2. Another example is to convert the database array to CSV and download the .csv file.

Example 1: Quick example

The below code uses the PHP fputcsv() function to convert the array to CSV. This function requires the following arguments to specify.

  1. A target CSV file.
  2. Iterating array pinter to put the CSV row.
  3. Data delimiter.
  4. Data enclosure.
<?php
$array = array( array(100, 200, 300, 400, 500), array('Lion', 'Tiger', 'Elephant', 'Horse', 'Dog "Domestic"'),
);
$csvDelimiter = ',';
$csvEnclosure = '"'; // to physically write to a file in disk
$csvFile = fopen('example.csv', 'w+'); // to write to temp
$csvFile = fopen('php://temp', 'r+'); foreach ($array as $line) { fputcsv($csvFile, $line, $csvDelimiter, $csvEnclosure);
}
rewind($csvFile); // to display CSV file contents on browser
$contents = '';
while (!feof($csvFile)) { $contents .= fread($csvFile, 8192);
}
fclose($csvFile);
echo $contents;
?>

php array to csv

This quick example creates an input array for converting into CSV. This is a multidimensional array that has the dataset.

This code sets the delimiter and enclosure before converting the input array.

It iterates the array and calls fputcsv() on each iteration to form the data row.

Get the code from the linked article if you want to convert CSV to a PHP array.

Example 2: Convert database result array to CSV to download

This PHP code is to learn how to convert an array of data from the database to CSV. Previously, we have seen how to handle CSV in PHP to read, write, import, and export operations with a database.

In this example, code connects the database and reads the results into an array. Then, it creates a PHP file output stream to put the CSV data row by row.

First, the code sets the array of column headers. Then, it iterates the database result array and calls fputcsv() on each row of data.

The PHP header() is set with the application/csv to download the CSV file to the browser.

<?php
// PHP code will connect to a database
// Read from a table and get result
// Formulate the result as an array to use in a convenient form
// Iterate the array
// Use PHP's function fputcsv and write the array elements
// to a CSV file
// Then push that CSV file as download
$mysqli = new mysqli("localhost", "root", "", "db_phppot_examples");
$i = 0;
$query = "SELECT id, name, type FROM tbl_php_array_to_csv";
if ($resultArray = $mysqli->query($query)) { while ($record = $resultArray->fetch_array()) { $animalArray[$i]['id'] = $record['id']; $animalArray[$i]['name'] = $record['name']; $animalArray[$i]['type'] = $record['type']; $i++; }
}
$fileOut = fopen("php://output", 'w') or die("Unable open php://output"); // Header forces the CSV file to download
header("Content-Type:application/csv");
header("Content-Disposition:attachment;filename=example-csv.csv");
// writing the first CSV record as the column labels
// Refer: https://www.php.net/manual/en/function.fputcsv.php
fputcsv($fileOut, array('id', 'name', 'type')); // writing array elements as CSV file records one by one
foreach ($animalArray as $animal) { fputcsv($fileOut, $animal);
}
fclose($fileOut) or die("Unable to close php://output");
?>

Database script

This database script imports the table structure and data to run this example.

You may also try this code with a different database table. It requires only minor code changes to edit the new table’s column names.

--
-- Database: `db_phppot_examples`
-- -- -------------------------------------------------------- --
-- Table structure for table `tbl_php_array_to_csv`
-- CREATE TABLE `tbl_php_array_to_csv` ( `id` int NOT NULL, `name` varchar(255) NOT NULL, `type` varchar(255) NOT NULL
); --
-- Dumping data for table `tbl_php_array_to_csv`
-- INSERT INTO `tbl_php_array_to_csv` (`id`, `name`, `type`) VALUES
(1, 'Lion', 'Wild'),
(3, 'Dog', 'Domestic'),
(4, 'Tiger', 'Wild'); --
-- Indexes for dumped tables
-- --
-- Indexes for table `tbl_php_array_to_csv`
--
ALTER TABLE `tbl_php_array_to_csv` ADD PRIMARY KEY (`id`); --
-- AUTO_INCREMENT for dumped tables
-- --
-- AUTO_INCREMENT for table `tbl_php_array_to_csv`
--
ALTER TABLE `tbl_php_array_to_csv` MODIFY `id` int NOT NULL AUTO_INCREMENT, AUTO_INCREMENT=6;

Uses of PHP array to CSV conversion

(1) Database table export

We can use this code export database to a CSV file. It is for taking a backup of a database table.

If you want to create a PHP program to take a complete database backup into an excel, the linked article has the code.

(2) Format data into a comma-separated value

It helps to convert various data sources and create a dumb in a unified CSV format.

In case of loading more data from an array into an existing CSV, this code will be helpful.

Download

↑ Back to Top

Posted on Leave a comment

Chart JS Stacked Bar Example

by Vincy. Last modified on January 20th, 2023.

The ChartJS JavaScript library supports various types of charts to display on a webpage.

This quick example shows how to display a basic stacked bar chart using this library. The library initiation will be simple for all types of charts as we did in the ChartJS line chart code.

Quick example

<!DOCTYPE html>
<html>
<head>
<title>Chart JS Stacked Bar Chart Example</title>
<link rel='stylesheet' href='style.css' type='text/css' />
</head>
<body> <div class="phppot-container"> <h1>Chart JS Stacked Bar Chart Example</h1> <canvas id="stacker-bar-chart"></canvas> </div> <script src="https://cdn.jsdelivr.net/npm/[email protected]/dist/chart.umd.min.js"></script> <script> var ctx = document.getElementById("stacker-bar-chart").getContext('2d'); var myChart = new Chart(ctx, { type: 'bar', data: { labels: ["< 100", "100 - 200", "300 - 400", "500 - 800", "900 - 1000"], datasets: [{ label: 'Lion', backgroundColor: "#51EAEA", data: [90, 120, 305, 526, 958], }, { label: 'Tiger', backgroundColor: "#FCDDB0", data: [82, 145, 335, 516, 936], }, { label: 'Elephant', backgroundColor: "#FF9D76", data: [62, 159, 375, 756, 951], }], }, options: { tooltips: { displayColors: true, callbacks: { mode: 'x', }, }, scales: { x: { stacked: true, }, y: { stacked: true } }, responsive: true } }); </script>
</body>
</html>

Output:

The graph output displays the stack on a vertical axis. It compares the animals’ counts at each point taken for the graph.

The stacked bar chart plots a group of bars on top of one another. We have already seen grouped bar charts that combine bars side by side.

The grouped and stacked bar charts are used to show a comparison of data.

ChartJS Horizontal stacked graph example

This example is to display the stacked chart horizontally. The ChartJS initiation of this example differs from the above code only by the index axis.

This example specifies indexAxis: ‘x’ to show a horizontal stacked bar chart. By specifying this the data points are taking the x-axis about which the bars are stacked on top of one another.

horizontal-stacked-chart.html

<!DOCTYPE html>
<html>
<head>
<title>Chart JS Horizontal Stacked Bar Chart Example</title>
<link rel='stylesheet' href='style.css' type='text/css' />
</head>
<body> <div class="phppot-container"> <h1>Chart JS Horizontal Stacked Bar Chart Example</h1> <canvas id="horizontal-stacker-bar-chart"></canvas> </div> <script src="https://cdn.jsdelivr.net/npm/[email protected]/dist/chart.umd.min.js"></script> <script> var ctx = document.getElementById("horizontal-stacker-bar-chart").getContext('2d'); var myChart = new Chart(ctx, { type: 'bar', data: { labels: ["< 100", "100 - 200", "300 - 400", "500 - 800", "900 - 1000"], datasets: [{ label: 'Jaguar', backgroundColor: "#FB3569", data: [90, 120, 305, 526, 958], }, { label: 'Horse', backgroundColor: "#FCDDB0", data: [82, 145, 335, 516, 936], }, { label: 'Leopard', backgroundColor: "#82CD47", data: [62, 159, 375, 756, 951], }], }, options: { tooltips: { displayColors: true, callbacks: { mode: 'x', }, }, scales: { x: { stacked: true, }, y: { stacked: true } }, indexAxis: 'y', responsive: true } }); </script>
</body>
</html>

About the ChartJS target and parameters to render the stacked bar chart

Let us see some of the important parameters required to create the stacked bar chart for the browser.

The above two examples include the ChartJS library file using the CDN URL. It is preferable compared to having a local copy of this library.

This JS script targets a HTML canvas element to render the stacked bar chart.

It gets the canvas element context and uses it during the ChartJS initiation.

What are the parameters for rendering the stacked bar using ChartJS?

  • type – It requires specifying ‘bar’ as we did for displaying a ChartJS bar chart.
  • data – It prepares the array of labels and datasets.
    • labels parameter has the data points.
    • datasets have the readings with appropriate captions and colors.
  • options – It specifies the chart properties about the direction or axis. For example,
    • tooltips
    • scales
    • indexAxis
    • responsive

This example displays a responsive chart by setting the option responsive as true. We have also used Google charts to create responsive bar/column/pie charts.
Download

↑ Back to Top

Posted on Leave a comment

phpMyAdmin – How to Export a Database?

by Vincy. Last modified on January 16th, 2023.

Do you want to take a backup of your database? Are you a beginner at using the phpMyAdmin application?

This article will guide you with straightforward bullet points to achieve this.

The phpMyAdmin provides an “Export” operation to take a backup with a few clicks.

How to export databases and tables using phpMyAdmin?

  1. Log in to the phpMyAdmin interface.
  2. Choose the database from the left-side menu.
  3. Click the “Export” tab that exists below the phpMyAdmin header.
  4. Choose “Export Method” and “Format” of the exported to be in.
  5. Click “Go” to see or download the exported data.

Note:

phpmyadmin export database

Export methods allowed by phpMyAdmin

There are two export methods allowed by the phpMyAdmin interface.

  1. Quick – Minimal and quick option to export the database and it is the default option.
  2. Custom – This method allows more customization.

The “Quick” method exports the selected database or table structure and data entirely.

But, the “Custom” method provides more options. Some of them are listed below.

  • It allows selecting one are more tables from the list.
  • It allows exporting of either structure or data or both.
  • It provides the “Save-as” option to mention how to output the exported data. The phpMyAdmin can deliver the exported output in the below ways.
    • It will save it as a file if the user selects “Save output to a file”.
    • It will show as text on the interface if the user selects “View output as text”.

Export formats provided by phpMyAdmin

It supports numerous formats in which the output exported data. Some of them are listed below.

  • SQL (default option)
  • CSV
  • JSON
  • XML

Export a database to another database

To export a database to another database, we have to perform the phpMyAdmin “Import” after the “Export” action.

In a previous tutorial, we have seen how to import a database using phpMyAdmin.

↑ Back to Top

Share this page