Apple’s HomePod starts with a simple setup and it ends with you forgetting you didn’t always have music surrounding you. In between, though, there are details to consider about that first setup and many options for when you move the HomePod to a new room. AppleInsider takes a dive into the use of Apple’s latest speaker.


If you’ve just got a HomePod then you’ll use your iPhone to set it up and we’ll show you what you need to do. Yet after that initial setup, it’s very unclear what you can do if, for instance, you move the HomePod to another room.
It’s not as if HomePods are difficult to carry around, though they are startlingly heavy. It’s also not as if you have to do anything to make a HomePod recognize that it’s been moved and should start adjusting its speakers to the new environment.
[youtube https://www.youtube.com/watch?v=fgyfGfjBOzo&w=560&h=315]
Rather, it’s that if you’ve initially identified the HomePod as being in your den and now it’s in your office, good luck figuring out how to change that label. We guarantee that across the nation there are HomePods in kitchens who are labelled Living Room and plenty of people who neither know nor care.
As long as they only use the HomePod to play tracks directly from Apple Music, that’s fine. It’s when you want to send audio from your iOS devices that it begins to be an issue. Even then, though, if you only have the one HomePod, you’ll cope. Yet it’s still a case of having to remember to choose Bedroom in AirPlay even though that HomePod is now in your study.
The problem is that HomePod doesn’t get its own app as the Apple Watch does and it’s also not found under Bluetooth the way AirPods are. Instead, it’s part of the Home app and each HomePod is a separate accessory that can be included in automation.
If you have two HomePods, for instance, you could have one set up as part of your evening routine so that at sunset, the HomePod in your den can start playing jazz. And the one in your kitchen can play some cool country. So long as you remember which one you’re asking to play this music.
However, we do get the ability to say what room of our house the HomePod is in —and we even get the option to give the speaker a name —so let’s use it.
Out of the box
Rip that HomePod out of its packaging and stumble a little as you find out just how densely heavy these little things are. Then, though, make sure your iPhone or iPad has been updated to the latest software.

Apple HomePod packaging
There’s more. Your iOS device probably has all of this already set up but you need it. The device must be signed in to iCloud. If it isn’t, go to Settings, tap on your name at the top of the screen and then on iCloud.
Sign in if necessary and then scroll down to Keychain. That’s got to be switched on too.
Last, make sure that Bluetooth is switched on and also that the iOS device is on your Wi-Fi network.
This all takes far longer to say than to do. In the great majority of cases, your iPhone or iPad will already be setup for this and shortly you’re going to see just how fast Apple makes adding a HomePod.
Surface tension
In theory, you can place your HomePod anywhere you like. In practice, it’s got to be near a mains outlet. You can always add an extension socket but you’re stuck with Apple’s own cable as that’s hard-wired into the HomePod.
Apple also recommends that you leave six inches of space around it and that the HomePod isn’t pressed up against a wall.

HomePod on Wood
We’d add that you should avoid wooden surfaces. This is not as big a deal as it appeared when the HomePods first came out, but it is possible that one will leave a white ring on the wood. It depends on how that wood was oiled but the surface can react with the silicone ring at the bottom of the HomePod.
If you happen to know that your wooden surface has been treated with a silicon type of polish, then you could place the HomePod somewhere else. If that’s the best spot, though, or if you have no earthly way of knowing what’s been done to the wood before, put the HomePod there anyway.
The worst that is likely to happen is that you will get such a ring after a few days but it can be removed by cleaning. Or, actually, you can just take the HomePod away and the ring may well disappear by itself over time.
This is fast
You’ll love this bit. Plug the HomePod into power and wait for it to chime. There’ll also be a white light that pulses on the top of the speaker. When there is, hold your iPhone next to the HomePod.

The initial setup screen you see on iPhone
A popup dialog will appear showing the HomePod and displaying a Set Up button. This is the same as you get on the Apple Watch but the setup procedure that follows is, if anything, even easier.
Where are you?
The very first question you get after pressing Set Up is Where is the HomePod? and there’s a list of answers.

It only helps for identification later but pick the room you’re going to put the speaker
That list includes choices such as Bedroom, Living Room, Entrance and Office. It makes zero difference which you pick as far as how the HomePod will work. Apple doesn’t automatically set the HomePod to be louder if you’ve picked the office and quieter in the bedroom, for instance. It’s solely for identification later.
So tap on one to choose it and then press Continue.
Getting personal
Next, the HomePod setup screen on your iPhone asks for a type of permission called Personal Requests. You’re going to say yes by tapping on Enable Personal Requests but it’s worth being clear about just what this means.
This page of the setup is quite straightforward about how saying yes means anyone can use this HomePod to do various things. What they will actually be using is your iPhone, they’re just talking to it via the HomePod.
So that’s why the setup says that it will allow anyone to read and send messages, and so on.

Allow Personal Requests unless you’ve great reason not to. It’s just so handy.
This is genuinely one of the best things about HomePod because it means you come as close to a Star Trek-style of ambient computing as possible. Just say to the air that you want to place a call to someone and the HomePod will do it.
Yet it’s also the worst part of the HomePod because it is so specifically tied to you and your iPhone. If your partner tries to phone someone through the HomePod, it’s going on your cellular bill. Similarly, anyone can add a calendar event or a reminder but they’re adding it to you.
Add in that the HomePod is tied to your Apple Music account so it has only your playlists. Add in that any music anyone else asks it to play will have an impact on how Apple curates your weekly Favorites list, too.
Then the HomePod becomes this brilliant device for you and merely a great one for the rest of the household.
Still, you are you and this is your HomePod, you might as well get all the value you can out of the money you spent. So tap on Enable Personal Requests.
One more thing to note, incidentally. All of this using the HomePod to add things to your iPhone only works when that phone is on the same Wi-Fi network as your HomePod. If it isn’t, if you’ve switched Wi-Fi off for some reason, Siri on the HomePod will explain to you what’s wrong. Really irritatingly, though, it will sometimes explain it to you twice.
Maybe that’s covered under the next screen, Terms and Conditions, but we nod through that one just as fast you do.
Accounts and Settings
You noticed that this setup required your iPhone to have Bluetooth switched on. Everything you’ve done so far has been over Bluetooth and of course it has. There’s no control on the HomePod to tell it which is the right Wi-Fi network, let alone any keyboard to let you enter a password it.
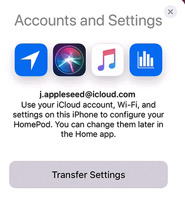
Tap on Transfer Settings and your HomePod will pick up your Wi-Fi network, password and much more
All of that is handled by this next and final step. Accounts and Settings offers to pass details from your iPhone to your HomePod. Those details include which Wi-Fi network and what password, but also your iCloud account login and others such as your choice of Siri voice.
Tap the Transfer Settings button. You’ll hear a chime on the HomePod and the iPhone setup screen will change to show a picture of that HomePod.
When it’s done, that screen will change to one saying hello to you and the HomePod will speak. “Welcome to HomePod,” your new speaker will say. “You can’t tell, but I’m waving.”
If you can figure out why that’s gently amusing instead of irritating, you’re a better person than we are, but it is. It’s a make-you-smile moment that leads you into some training.
You’re being trained
Siri tells you that you can get the HomePod’s attention by saying “Hey, Siri”, and then it walks you through trying that out through a couple of examples.
The last example has you asking Siri to play some music, and it does. This is the moment when you’re going to realise that yes, you spent your money well. Siri will play some music based on what it believes you like from your previous Apple Music selections but if you want a suggestion, say “Hey, Siri, play Hymn Orchestrated by Midge Ure.”
It’s not such a loud song that it’s going to get the neighbors annoyed, but it will shake your floor. When you’ve jolted your head at how clear and strong the music is, say “Hey, Siri, turn it down”. Or be more specific and say “Hey, Siri, turn the volume to 20 percent.”
That’s it
Your HomePod is setup with all your details and what you won’t have noticed is that it is also setup for the specific room you’ve put it in. It’s setup for the exact position you’ve placed it within that room, too.
HomePod has scoped out the area and adjusted its speaker output to mean that you get its best possible sound regardless of where you are in the room.
Which just raises the first of several questions about what happens when you want to move rooms or make any other substantive changes.
Moving stories
If you want to move your HomePod to another part of your house or even another part of your room, unplug it and move it. When you then plug it back into power, it will automatically do its scanning to work out the best use of its many internal speakers.
You don’t have to do anything else at all. The HomePod will play music just as well in your office as in the living room, regardless of where it thinks it is.
Nonetheless, open the Home app on your iPhone. Under its Home section, there will be a button somewhere with an icon of a HomePod and the name of the room you said it’s in.
Tap and hold on that button. If you just tap it, the HomePod either starts playing or pauses its playback if it’s already working. Tapping and holding gets you a very bare screen with a small image of a HomePod and then two buttons.
Alarms is just like the alarms section of your iPhone’s Clock app and it’s where you can set new ones or see when your existing ones are going to sound.
Then there’s the Settings button and that’s the one to tap.
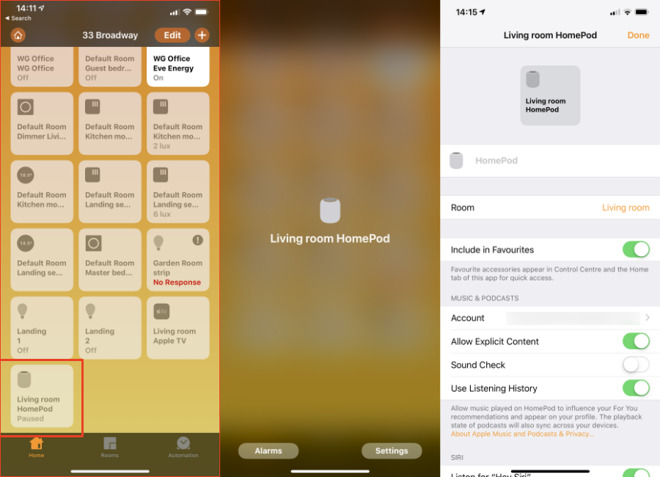
In the Home app, search for HomePod and then press and hold to get settings
There are a lot of options within this HomePod settings app but you’re going to ignore most of them. They’re ones such as controlling how you can use Siri and what voice that will use. You’ll also find a section where you can specify whether HomePod will play music that has explicit lyrics or not.
This is one setting that was automatically taken from your iPhone so if you cared about explicit lyrics there, the HomePod already cares about them here.
Instead, the sections that you’re going to find useful when you’re moving the HomePod around are all at the top of the screen. First there’s one that just says HomePod. This is grayed-out as if you can’t edit it, but you can.
If you choose to, tap on that gray HomePod word and start typing a name for your HomePod.
Right beneath it, there’s a section called Room and on that same line there is the name of the room you’ve said your HomePod is in. Tap on that name and you get a list of alternatives.
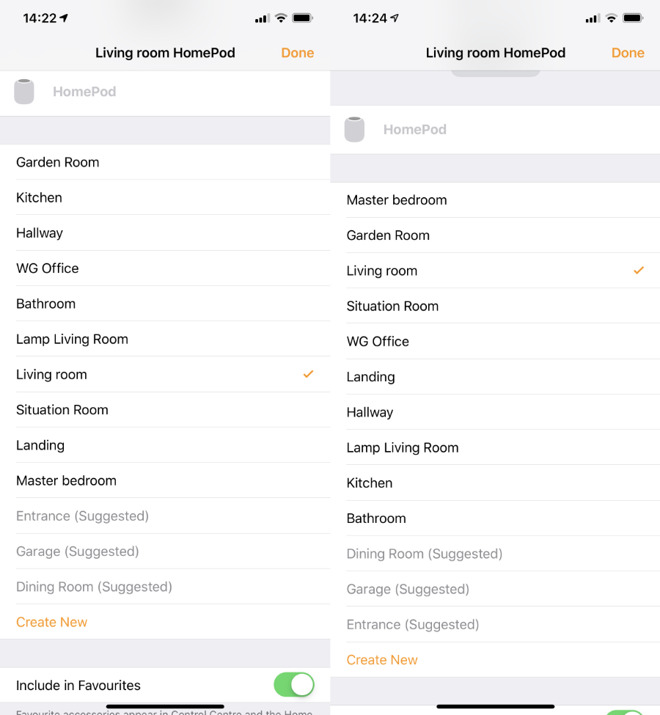
Among the many things you can adjust there is a setting for what room the HomePod is in
The list is a standard one with items like Living Room, Master Bedroom and so on but it also takes all the ones you’ve ever set up in the Home.
Pick the room you’ve moved the HomePod into or tap on Create New if it’s not already on the list. When you do that, you get the option to give the room a name and also to pick a wallpaper for it.
This is moving away from HomePod-specific issues to how Home and HomeKit works so just briefly, if you assign the device to a room, you can later see it listed with everything else there.
On the main screen of Home, there is also a section called Rooms and this shows you all of the HomeKit devices room by room. It’s not the fastest system. Each room gets its own page and you have to swipe along to reach the right one.
Each room has its name at the top but to help you focus after you’ve got bored swiping, you can choose to have any or all rooms have their own wallpaper. This can mean any image you like but there’s also the option to take a photo. So if you move the HomePod into the den, you could take a photo of the den with it there.
Favorites
Back in the HomePod’s settings page, there is then a switch called Include in Favorites. In theory, switch this on would put the HomePod into Control Center. Or rather, Control Center can have a Home button and tapping on that gets you a grid of favorite devices that includes the HomePod but also, for instance, lightbulbs.
The trouble is that there’s only room for nine favorites. As the default is for Include in Favorites to be on, you very rapidly fill up all nine slots. And there’s nothing to tell you that you have.
You have to swipe down on your iPhone to get Control Center, tap the Home button and then see whether your HomePod is there. If it isn’t, you have to go back through all the devices in your Home app and switch off this Include in Favorites switch for some of them.
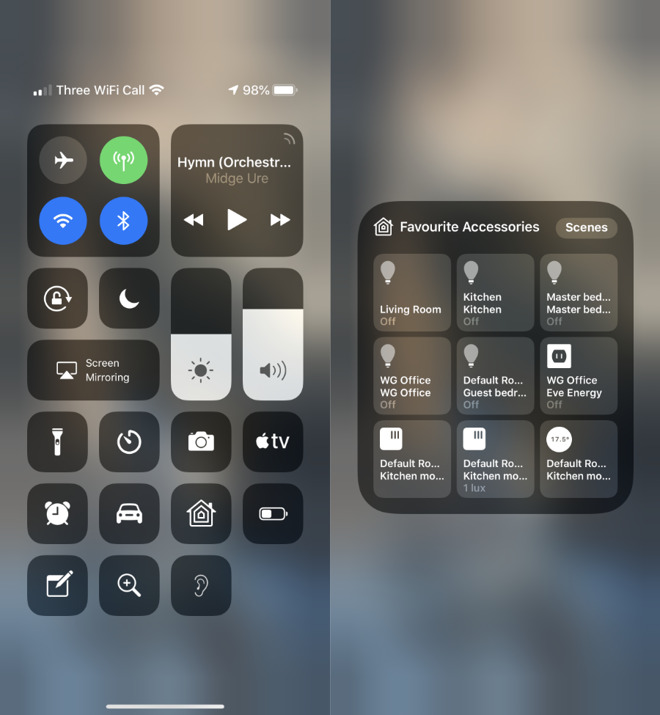
You can add HomePod to a Home button in Control Center
If you want to, that is. It is handy to be able to get Control Center and just tap to switch off the lights in the living room, kitchen and den then to switch on the ones for the landing and the bedroom.
It feels less handy to have a button to play or pause HomePod. Maybe you’ll sometimes leave the room and only remember later that it’s playing. Otherwise, skip adding HomePod to Favorites and instead just get in the habit of calling out “Hey, Siri, stop.”
Advantages
Maybe the Home app isn’t a quick one to use but if you list the HomePod in the right room, you could save time later. Say you’ve got it in your office and you’re heading there in the dark one cold winter morning. Call up the office room and you might be able to tap to switch on the lights, turn on the heating and set the HomePod playing.
It depends on what devices you have but HomePod can both be controlled by HomeKit and it can control it right back.
So it’s worth taking a moment to set all this up. Plus there is one more important part of this Home app’s setup for HomePod and it’s to do with the single best thing you can do to your speaker.
Get another one
Yes, HomePod is expensive. Nonetheless, when you’ve got one, you will soon want two. And then when you get that second HomePod, if you’re setting it up on the same Wi-Fi network as the first, it will know.
You’ll be prompted to set them up as a pair. If you do want them in the same room then you do want them as a pair.
Still, they are expensive and a single HomePod on its own is very good so you might well buy the second one for a different part of your house. In that case you would say no to creating a pair when you’re initially setting up the second one.
Later, though, you will either buy a third HomePod because these things are only as resistible as your bank account says, and you will then want to pair up two of them. Plus, if you haven’t already heard that two HomePods together sound incredible, let us be the first to tell you. Two HomePods together sound incredible.
To pair two up some time after the initial setup, go to the Home app. Press and hold on either of them to bring up settings. So long as the two are on the same Wi-Fi network, the settings page will now have an extra option.
Right underneath the Include in Favorites section there will be a new button called Create Stereo Pair.
The HomePod whose settings you’re adjusting will be one of the pair and you get to select any other HomePod you’ve got as the second. Then you can choose which is to be the left speaker and which the right, or swap them around again as you need.
It takes time
Initially you wonder if the HomePod is going to be worth the money, especially when it costs far more than rivals such as Amazon Echo. Then when you’ve got one, you hear how great it is and you get a kind of new-toy feel for a time.
Later you might add a second HomePod or you might not, but this is how you know that you’ve made a good buy. At some point you are going to be in a room without a HomePod and you’ll announce to the air that you want to play some music.