Fedora test days are events where anyone can help make certain that changes in Fedora Linux work well in an upcoming release. Fedora community members often participate, and the public is welcome at these events. If you’ve never contributed to Fedora before, this is a perfect way to get started.
There are two test periods occurring in the coming days:
Monday February 2 through February 9 is to test the KDE Plasma 6.6.
Wednesday February 11 through February 13 is to test GNOME 50 Desktop.
Come and test with us to make Fedora 44 even better. Read more below on how to do it.
KDE Plasma 6.6
Our Test Day focus on making KDE work better on all your devices. We are improving core features for both Desktop and Mobile, starting with Plasma Setup, a new and easy way to install the system. This update also introduces the Plasma Login Manager to startup experience feel smoother, along with Plasma Keyboard—a smart on-screen keyboard made for tablets and 2-in-1s so you can type easily without a physical keyboard.
GNOME 50 Desktop
Our next Test Day focuses on GNOME 50 in Fedora 44 Workstation. We will check the main desktop and the most important apps to make sure everything works well. We also want you to try out the new apps added in this version. Please explore the system and use it as you normally would for your daily work to see how it acts during real use.
This article introduces projects available in Flathub with installation instructions.
Flathub is the place to get and distribute apps for all of Linux. It is powered by Flatpak, allowing Flathub apps to run on almost any Linux distribution.
Flatseal is a graphical utility to review and modify permissions from your Flatpak applications. This is one of the most used apps in the flatpak world, it allows you to improve security on flatpak applications. However, it needs to be used with caution because you can make your permissions be too open.
It’s very simple to use: Simply launch Flatseal, select an application, and modify its permissions. Restart the application after making the changes. If anything goes wrong just press the reset button.
You can install “Flatseal” by clicking the install button on the web site or manually using this command:
Reco is an audio recording app that helps you recall and listen to things you listened to earlier.
Some of the features include:
Recording sounds from both your microphone and system at the same time.
Support formats like ALAC, FLAC, MP3, Ogg Vorbis, Opus, and WAV
Timed recording.
Autosaving or always-ask-where-to-save workflow.
Saving recording when the app quits.
I used it a lot to help me record interviews for the Fedora Podcast
You can install “Reco” by clicking the install button on the web site or manually using this command:
flatpak install flathub com.github.ryonakano.reco
Mini Text
Mini Text is a very small and minimalistic text viewer with minimal editing capabilities. It’s meant as a place to edit text to be pasted, it doesn’t have saving capabilities. It uses GTK4 and it’s interface integrates nicely with GNOME.
I found this to be very useful just to keep data that I want to paste anywhere, it doesn’t have unwanted and/or unneeded rich text capabilities, just plain text with minimal editing features.
You can install “Mini Text” by clicking the install button on the web site or manually using this command:
This article introduces projects available in Flathub with installation instructions.
Flathub is the place to get and distribute apps for all of Linux. It is powered by Flatpak, allowing Flathub apps to run on almost any Linux distribution.
Authenticator is a simple app that allows you to generate Two-Factor authentication codes. It has a very simple and elegant interface with support for a a lot of algorithms and methods. Some of its features are:
Time-based/Counter-based/Steam methods support
SHA-1/SHA-256/SHA-512 algorithms support
QR code scanner using a camera or from a screenshot
Lock the application with a password
Backup/Restore from/into known applications like FreeOTP+, Aegis (encrypted / plain-text), andOTP, Google Authenticator
You can install “Authenticator” by clicking the install button on the site or manually using this command:
Secrets is a password manager that integrates with GNOME. It’s easy to use and uses the KeyPass file format. Some of its features are:
Supported Encryption Algorithms:
AES 256-bit
Twofish 256-bit
ChaCha20 256-bit
Supported Derivation algorithms:
Argon2 KDBX4
Argon2id KDBX4
AES-KDF KDBX 3.1
Create or import KeePass safes
Add attachments to your encrypted database
Generate cryptographically strong passwords
Quickly search your favorite entries
Automatic database lock during inactivity
Support for two-factor authentication
You can install “Secrets” by clicking the install button on the site or manually using this command:
flatpak install flathub org.gnome.World.Secrets
Flatsweep
Flatsweep is a simple app to remove residual files after a flatpak is unistalled. It uses GTK4 and Libadwaita to provide a coherent user interface that integrates nicely with GNOME, but you can use it on any desktop environment.
You can install “Flatsweep” by clicking the install button on the site or manually using this command:
Fedora Silverblue is an operating system for your desktop built on Fedora Linux. It’s excellent for daily use, development, and container-based workflows. It offers numerous advantages such as being able to roll back in case of any problems. If you want to update or rebase to Fedora Linux 38 on your Fedora Silverblue system (these instructions are similar for Fedora Kinoite), this article tells you how. It not only shows you what to do, but also how to revert things if something unforeseen happens.
Update your existing system
Prior to actually doing the rebase to Fedora Linux 38, you should apply any pending updates. Enter the following in the terminal:
$ rpm-ostree update
or install updates through GNOME Software and reboot.
Rebasing using GNOME Software
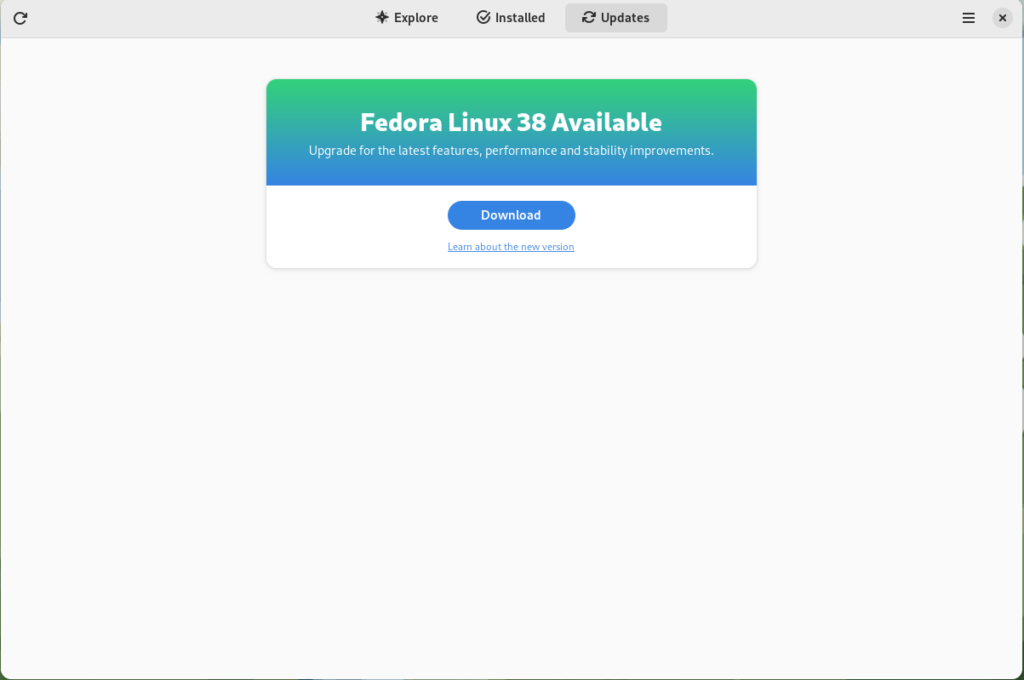
GNOME Software shows you that there is new version of Fedora Linux available on the Updates screen.
Fedora 38 update available
First thing you need to do is download the new image, so click on the Download button. This will take some time. When it’s done you will see that the update is ready to install.
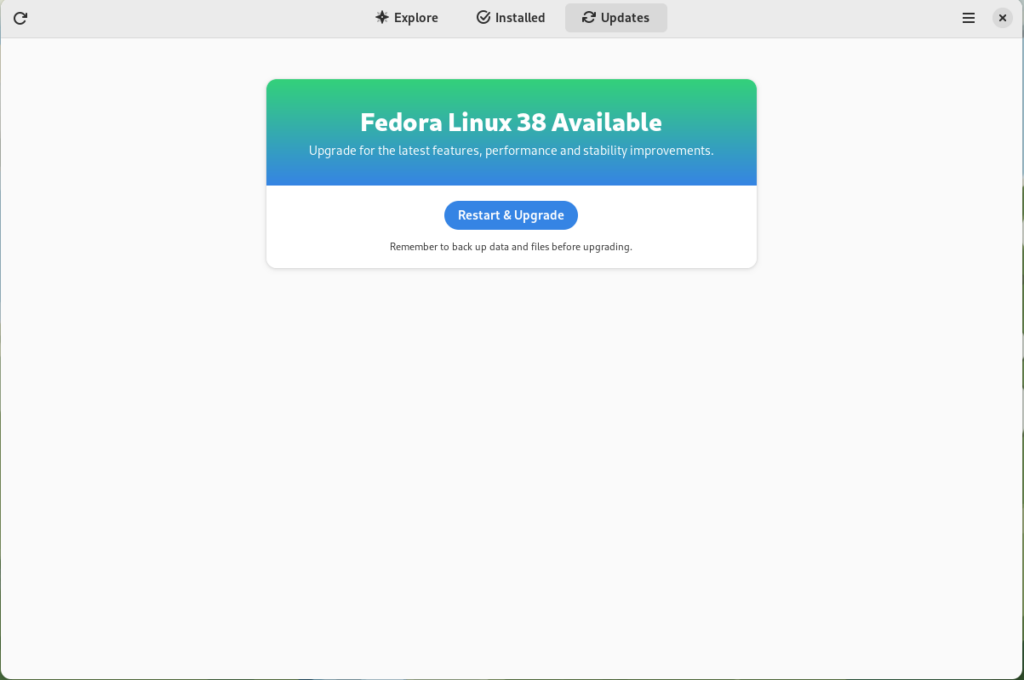
Fedora 38 update ready to install
Click on the Restart & Upgrade button. This step will take only a few moments and the computer will be restarted when the update is completed. After the restart you will end up in new and shiny release of Fedora Linux 38. Easy, isn’t it?
Rebasing using terminal
If you prefer to do everything in a terminal, then this part of the guide is for you.
Rebasing to Fedora Linux 38 using the terminal is easy. First, check if the 38 branch is available:
$ ostree remote refs fedora
You should see the following in the output:
fedora:fedora/38/x86_64/silverblue
If you want to pin the current deployment (meaning that this deployment will stay as an option in GRUB until you remove it), you can do it by running:
# 0 is entry position in rpm-ostree status
$ sudo ostree admin pin 0
To remove the pinned deployment use the following command:
# 2 is entry position in rpm-ostree status
$ sudo ostree admin pin --unpin 2
Next, rebase your system to the Fedora Linux 38 branch.
$ rpm-ostree rebase fedora:fedora/38/x86_64/silverblue
Finally, the last thing to do is restart your computer and boot to Fedora Linux 38.
How to roll back
If anything bad happens—for instance, if you can’t boot to Fedora Linux 38 at all—it’s easy to go back. At boot time, pick the entry in the GRUB menu for the version prior to Fedora Linux 38 and your system will start in that previous version rather than Fedora Linux 38. If you don’t see the GRUB menu, try to press ESC during boot. To make the change to the previous version permanent, use the following command:
$ rpm-ostree rollback
That’s it. Now you know how to rebase Fedora Silverblue to Fedora Linux 38 and roll back. So why not do it today?
FAQ
Because there are similar questions in comments for each article about rebasing to newer version of Silverblue I will try to answer them in this section.
Question: Can I skip versions during rebase of Fedora? For example from Fedora 36 Silverblue to Fedora 38 Silverblue?
Answer: Although it could be sometimes possible to skip versions during rebase, it is not recommended. You should always update to one version above (37->38 for example) to avoid unnecessary errors.
Question: I have rpm-fusion layered and I got errors during rebase. How should I do the rebase?
Answer: If you have rpm-fusion layered on your Silverblue installation, you should do the following before rebase:
Fedora Silverblue is an operating system for your desktop built on Fedora Linux. It’s excellent for daily use, development, and container-based workflows. It offers numerous advantages such as being able to roll back in case of any problems. If you want to update or rebase to Fedora Linux 37 on your Fedora Silverblue system (these instructions are similar for Fedora Kinoite), this article tells you how. It not only shows you what to do, but also how to revert things if something unforeseen happens.
Prior to actually doing the rebase to Fedora Linux 37, you should apply any pending updates. Enter the following in the terminal:
$ rpm-ostree update
or install updates through GNOME Software and reboot.
Rebasing using GNOME Software
GNOME Software shows you that there is new version of Fedora Linux available on the Updates screen.
Fedora 37 update available
First thing you need to do is download the new image, so click on the Download button. This will take some time. When it’s done you will see that the update is ready to install.
Fedora 37 update ready to install
Click on the Restart & Upgrade button. This step will take only a few moments and the computer will be restarted at the end. After restart you will end up in new and shiny release of Fedora Linux 37. Easy, isn’t it?
Rebasing using terminal
If you prefer to do everything in a terminal, then this part of the guide is for you.
Rebasing to Fedora Linux 37 using the terminal is easy. First, check if the 37 branch is available:
$ ostree remote refs fedora
You should see the following in the output:
fedora:fedora/37/x86_64/silverblue
If you want to pin the current deployment (this deployment will stay as option in GRUB until you remove it), you can do it by running:
# 0 is entry position in rpm-ostree status
$ sudo ostree admin pin 0
To remove the pinned deployment use the following command:
# 2 is entry position in rpm-ostree status
$ sudo ostree admin pin --unpin 2
where 2 is the position in the rpm-ostree status.
Next, rebase your system to the Fedora Linux 37 branch.
$ rpm-ostree rebase fedora:fedora/37/x86_64/silverblue
Finally, the last thing to do is restart your computer and boot to Fedora Linux 37.
How to roll back
If anything bad happens—for instance, if you can’t boot to Fedora Linux 37 at all—it’s easy to go back. Pick the previous entry in the GRUB menu at boot (if you don’t see it, try to press ESC during boot), and your system will start in its previous state before switching to Fedora Linux 37. To make this change permanent, use the following command:
$ rpm-ostree rollback
That’s it. Now you know how to rebase Fedora Silverblue to Fedora Linux 37 and roll back. So why not do it today?
Fedora Silverblue is an operating system for your desktop built on Fedora Linux. It’s excellent for daily use, development, and container-based workflows. It offers numerous advantages such as being able to roll back in case of any problems. If you want to update or rebase to Fedora Linux 36 on your Fedora Silverblue system (these instructions are similar for Fedora Kinoite), this article tells you how. It not only shows you what to do, but also how to revert things if something unforeseen happens.
Prior to actually doing the rebase to Fedora Linux 36, you should apply any pending updates. Enter the following in the terminal:
$ rpm-ostree update
or install updates through GNOME Software and reboot.
Rebasing using GNOME Software
GNOME Software shows you that there is new version of Fedora Linux available on the Updates screen.
Fedora 36 update available
First thing you need to do is download the new image, so click on the Download button. This will take some time. When it’s done you will see that the update is ready to install.
Fedora 36 update ready to install
Click on the Restart & Upgrade button. This step will take only a few moments and the computer will be restarted at the end. After restart you will end up in new and shiny release of Fedora Linux 36. Easy, isn’t it?
Rebasing using terminal
If you prefer to do everything in a terminal, then this part of the guide is for you.
Rebasing to Fedora Linux 36 using the terminal is easy. First, check if the 36 branch is available:
$ ostree remote refs fedora
You should see the following in the output:
fedora:fedora/36/x86_64/silverblue
If you want to pin the current deployment (this deployment will stay as option in GRUB until you remove it), you can do it by running:
$ sudo ostree admin pin 0
To remove the pinned deployment use the following command:
$ sudo ostree admin pin --unpin 2
where 2 is the position in the $rpm-ostree status
Next, rebase your system to the Fedora Linux 36 branch.
$ rpm-ostree rebase fedora:fedora/36/x86_64/silverblue
Finally, the last thing to do is restart your computer and boot to Fedora Linux 36.
How to roll back
If anything bad happens—for instance, if you can’t boot to Fedora Linux 36 at all—it’s easy to go back. Pick the previous entry in the GRUB menu at boot (if you don’t see it, try to press ESC during boot), and your system will start in its previous state before switching to Fedora Linux 36. To make this change permanent, use the following command:
$ rpm-ostree rollback
That’s it. Now you know how to rebase Fedora Silverblue to Fedora Linux 36 and roll back. So why not do it today?
Nowadays, the number of devices is getting bigger and bigger, and modern operating systems must try to support all types and several of them with every integration, with every release. Maintaining a large number of devices is difficult, expensive and also hard to test, specially for plug-and-play devices, like USB devices.
Therefore, it is necessary to create a mechanism to facilitate the maintenance and testing of old and new USB devices. And this is where USB device emulation comes in. In that way, a complete framework including a big bunch of emulated and validated USB devices will allow easier integration and release. The area of application would be very wide: earlier bug search/detection even during development, automatic tests, continuous integration, etc.
How to emulate USB devices
USB/IP project allows sharing the USB devices connected to a local machine so that they can be managed by another machine connected to the network by means of a TCP/IP connection.
Then USB/IP project consists of two parts:
local device support (host) to allow remote access to every necessary control events and data
remote control that catches every necessary control event and data to process like a normal driver
The procedure is valid for Linux and Windows, here I will focus only on Linux.
The idea behind emulation is to replace the remote device support with an application that behaves in the same way. In this way we can emulate devices with software applications that follow the commented USB/IP protocol specification.
In the following points I will describe how to configure and run the remote support and how to connect to our USB emulated device.
Remote support
Remote support is divided in two parts:
kernel space to control a remote device as it was local, that is, to be probed by the normal driver.
user space application to configure access to remote devices.
At this point, it is important to remark that the device emulators, after configuration by user space application, will communicate directly with the kernel space.
Local support has a very similar structure, but the focus of this article is device emulation.
Let’s analyze every part of remote support.
Kernel space
First of all, in order to get the functionality we need to compile the Linux Kernel with the following options:
CONFIG_USBIP_CORE=m
CONFIG_USBIP_VHCI_HCD=m
These options enable the USB/IP virtual host controller driver, which is run on the remote machine.
Normal USB drivers need to be also included because they will be probed and configured in the same way from virtual host controller drivers.
Besides there are other important configuration options:
These options define the number of ports per USB/IP virtual host controller and the number of USB/IP virtual host controllers as if adding physical host controllers. These are the default values if CONFIG_USBIP_VHCI_HCD is enabled, increase if necessary.
The commented options and kernel modules are already included in some Linux distributions like Fedora Linux.
Let’s see an example of available virtual USB buses and ports that we will use later.
Default and real resources in example equipment:
$ lsusb
Bus 002 Device 001: ID 1d6b:0003 Linux Foundation 3.0 root hub
Bus 001 Device 002: ID 0627:0001 Adomax Technology Co., Ltd
Bus 001 Device 001: ID 1d6b:0002 Linux Foundation 2.0 root hub
$ lsusb -t
/: Bus 02.Port 1: Dev 1, Class=root_hub, Driver=xhci_hcd/15p, 5000M
/: Bus 01.Port 1: Dev 1, Class=root_hub, Driver=xhci_hcd/15p, 480M
|__ Port 1: Dev 2, If 0, Class=Human Interface Device, Driver=usbhid, 480M
$
Now, we will load the module vhci-hcd into the system (default configuration for CONFIG_USBIP_VHCI_HC_PORTS and CONFIG_USBIP_VHCI_NR_HCS):
$ sudo modprobe vhci-hcd
$ lsusb
Bus 004 Device 001: ID 1d6b:0003 Linux Foundation 3.0 root hub
Bus 003 Device 001: ID 1d6b:0002 Linux Foundation 2.0 root hub
Bus 002 Device 001: ID 1d6b:0003 Linux Foundation 3.0 root hub
Bus 001 Device 002: ID 0627:0001 Adomax Technology Co., Ltd
Bus 001 Device 001: ID 1d6b:0002 Linux Foundation 2.0 root hub
$ lsusb -t
/: Bus 04.Port 1: Dev 1, Class=root_hub, Driver=vhci_hcd/8p, 5000M
/: Bus 03.Port 1: Dev 1, Class=root_hub, Driver=vhci_hcd/8p, 480M
/: Bus 02.Port 1: Dev 1, Class=root_hub, Driver=xhci_hcd/15p, 5000M
/: Bus 01.Port 1: Dev 1, Class=root_hub, Driver=xhci_hcd/15p, 480M
|__ Port 1: Dev 2, If 0, Class=Human Interface Device, Driver=usbhid, 480M
$
The remote USB/IP virtual host controller driver will only use the configured virtualized resources. Of course, emulated devices will work in the same way.
User space
The other necessary part in the USB/IP project is the user space tool usbip and needs to be used to configure the referred kernel space on both sides, although, in the same way, we only focus on the remote side, since the local side will be represented by the emulator.
That is, usbip tool will configure the USB/IP virtual controller (tcp client) in kernel space to connect to the device emulator (tcp server) in order to establish a direct connection between them for USB configuration, events, data, etc. exchange.
The tool is independent of the type of device and is able to provide information about available and reserved resources (see more information in the examples below).
The local USB/IP virtual host controller needs to specify the pair bus-port that will used for remote access, it will be the same for emulated devices, but in this case, this pair can be anything because there is no real device and resource reservation is not necessary.
This tool is found on the Linux Kernel repository in order to be totally synchronized with it.
Location of the tool on the Linux Kernel repository: ./tools/usb/usbip
In some distribution like Fedora Linux, the usbip utility can be installed by means of usbip package from repositories. If usbip utility or related package can not be found, follow the instruction in the available README file to compile and install. Suitable rpm package can also be generated from the usbip-emulatorrepository:
$ git clone https://github.com/jtornosm/USBIP-Virtual-USB-Device.git $ cd USBIP-Virtual-USB-Device/usbip $ make rpm ...
$
How to emulate USB devices
Emulators are generated in Python and C. I have started with C development (I will focus on this part), but the same could be done in Python.
For C development, compile emulation tools from the usbip-emulatorrepository:
$ git clone https://github.com/jtornosm/USBIP-Virtual-USB-Device.git $ cd USBIP-Virtual-USB-Device/c $ make ...
$
All the supported devices emulated at this moment will be generated:
hid-keyboard
hid-mouse
cdc-adm
hso
cdc-ether
bt
rpm package (usbip-emulator) can be also generated with:
$ make rpm ...
$
As examples, Vendor and Product IDs are hardcoded in the code.
Following three examples to show how emulation works. We are using the same equipment for the emulator and remote USB/IP but they could run in different equipment. Besides, we are reserving different resources so all the devices could be emulated at the same time.
Example 1: hso
From one terminal, let’s emulate the hso device:
(“1-1” is the pair bus-port for the USB device on the local machine, as we are emulating, it could be anything. It is only important because usbip tool will have to use the same name to request the emulated device)
(As we saw previously, for this example machine, bus 3 is virtualized)
$ ip addr show dev hso
0 3: hso0: <POINTOPOINT,MULTICAST,NOARP> mtu 1486 qdisc noop state DOWN group default qlen 10 link/none $ rfkill list 0: hso-0: Wireless WAN Soft blocked: no Hard blocked: no ...
$ lsusb ... Bus 003 Device 002: ID 0af0:6711 Option GlobeTrotter Express 7.2 v2 ... $ lsusb -t ...
/: Bus 03.Port 1: Dev 1, Class=root_hub, Driver=vhci_hcd/8p, 480M |__ Port 1: Dev 2, If 0, Class=Vendor Specific Class, Driver=hso, 12M ...
$
In order to release resources:
$ sudo usbip port
Imported USB devices
====================
Port 00: <Port in Use> at Full Speed(12Mbps)
Option : GlobeTrotter Express 7.2 v2 (0af0:6711)
3-1 -> usbip://127.0.0.1:3241/1-1
-> remote bus/dev 001/002
$ sudo usbip detach -p 00
usbip: info: Port 0 is now detached!
$
And we can check that the device is released:
$ ip addr show dev hso0 Device "hso0" does not exist. $ rfkill list ...
$ lsusb ... $
After this, we can emulate again or stop the emulated device from the first terminal (i.e. with Ctrl-C).
Example 2: cdc-ether
From one terminal, let’s emulate the cdc-ether device (root permission is required because raw socket needs to bind to specified interface for data plane):
(“1-1” is the pair bus-port for the USB device on the local machine, as we are emulating, it could be anything. It is only important because usbip tool will have to use the same name to request the emulated device)
(As we saw previously, for this example machine, bus 3 is virtualized)
$ ip addr show dev eth0 4: eth0: <BROADCAST,MULTICAST,UP,LOWER_UP> mtu 1500 qdisc fq_codel state UNKNOWN group default qlen 1000 link/ether 88:00:66:99:5b:aa brd ff:ff:ff:ff:ff:ff $ sudo ethtool eth0 ...
Link detected: yes $ lsusb ... Bus 003 Device 003: ID 0fe6:9900 ICS Advent ... $ lsusb -t ...
/: Bus 03.Port 1: Dev 1, Class=root_hub, Driver=vhci_hcd/8p, 480M |__ Port 2: Dev 3, If 0, Class=Communications, Driver=cdc_ether, 480M |__ Port 2: Dev 3, If 1, Class=CDC Data, Driver=cdc_ether, 480M ...
$
For this example, we can also test the data plane.
(IP forwarding is disabled in both sides)
First, we can configure the IP address in the emulated device:
$ sudo ip addr add 10.0.0.1/24 dev eth0
$ ip addr show dev eth0
4: eth0: <BROADCAST,MULTICAST,UP,LOWER_UP> mtu 1500 qdisc fq_codel state UNKNOWN group default qlen 1000
link/ether 88:00:66:99:5b:aa brd ff:ff:ff:ff:ff:ff
inet 10.0.0.1/24 scope global eth0
valid_lft forever preferred_lft forever
$
Second, for example, from other directly Ethernet connected machine (real or virtual) we can configure a macvlan interface in the same subnet to send/receive traffic (ping, iperf, etc.):
$ sudo ip link add macvlan0 link enp1s0 type macvlan mode bridge $ sudo ip addr add 10.0.0.2/24 dev macvlan0 $ sudo ip link set macvlan0 up $ ip addr show dev macvlan0 3: macvlan0@enp1s0: <BROADCAST,MULTICAST,UP,LOWER_UP> mtu 1500 qdisc noqueue state UP group default qlen 1000 link/ether d6:f1:cd:f1:cc:02 brd ff:ff:ff:ff:ff:ff inet 10.0.0.2/24 scope global macvlan0 valid_lft forever preferred_lft forever inet6 fe80::d4f1:cdff:fef1:cc02/64 scope link valid_lft forever preferred_lft forever $ ping 10.0.0.1 PING 10.0.0.1 (10.0.0.1) 56(84) bytes of data. 64 bytes from 10.0.0.1: icmp_seq=1 ttl=64 time=55.6 ms 64 bytes from 10.0.0.1: icmp_seq=2 ttl=64 time=2.19 ms 64 bytes from 10.0.0.1: icmp_seq=3 ttl=64 time=1.74 ms 64 bytes from 10.0.0.1: icmp_seq=4 ttl=64 time=1.76 ms 64 bytes from 10.0.0.1: icmp_seq=5 ttl=64 time=1.93 ms 64 bytes from 10.0.0.1: icmp_seq=6 ttl=64 time=1.65 ms ...
In order to release resources:
$ sudo usbip port Imported USB devices ==================== ...
Port 01: <Port in Use> at High Speed(480Mbps) ICS Advent : unknown product (0fe6:9900) 3-2 -> usbip://127.0.0.1:3245/1-1 -> remote bus/dev 001/003 $ sudo usbip detach -p 01 usbip: info: Port 1 is now detached! $
And we can check that the device is released:
$ ip addr show dev eth0
Device "eth0" does not exist.
$ lsusb
...
$
And of course, traffic from the other machine is not working:
From 10.0.0.2 icmp_seq=167 Destination Host Unreachable From 10.0.0.2 icmp_seq=168 Destination Host Unreachable From 10.0.0.2 icmp_seq=169 Destination Host Unreachable From 10.0.0.2 icmp_seq=170 Destination Host Unreachable ...
After this, we can emulate again or stop the emulated device from the first terminal (i.e. with Ctrl-C).
Example 3: bt
From one terminal, let’s emulate the Bluetooth device:
(“1-1” is the pair bus-port for the USB device on the local machine, as we are emulating, it could be anything. It is only important because usbip tool will have to use the same name to request the emulated device)
(As we saw previously, for this example machine, bus 3 is virtualized)
$ hciconfig -a hci0: Type: Primary Bus: USB BD Address: AA:BB:CC:DD:EE:11 ACL MTU: 310:10 SCO MTU: 64:8 UP RUNNING PSCAN ISCAN INQUIRY RX bytes:1451 acl:0 sco:0 events:80 errors:0 TX bytes:1115 acl:0 sco:0 commands:73 errors:0 Features: 0xff 0xff 0x8f 0xfe 0xdb 0xff 0x5b 0x87 Packet type: DM1 DM3 DM5 DH1 DH3 DH5 HV1 HV2 HV3 Link policy: RSWITCH HOLD SNIFF PARK Link mode: SLAVE ACCEPT Name: 'BT USB TEST - CSR8510 A10' Class: 0x000000 Service Classes: Unspecified Device Class: Miscellaneous, HCI Version: 4.0 (0x6) Revision: 0x22bb LMP Version: 3.0 (0x5) Subversion: 0x22bb Manufacturer: Cambridge Silicon Radio (10) $ rfkill list ...
1: hci0: Bluetooth Soft blocked: no Hard blocked: no $ lsusb ...
Bus 003 Device 004: ID 0a12:0001 Cambridge Silicon Radio, Ltd Bluetooth Dongle (HCI mode) ...
$ lsusb -t ...
/: Bus 03.Port 1: Dev 1, Class=root_hub, Driver=vhci_hcd/8p, 480M |__ Port 3: Dev 4, If 0, Class=Wireless, Driver=btusb, 12M |__ Port 3: Dev 4, If 1, Class=Wireless, Driver=btusb, 12M ...
$
And we can turn off and turn on the emulated Bluetooth device, detecting several fake Bluetooth devices:
(At this moment, fake Bluetooth devices are not emulated/simulated so we can not set up)
Turn Bluetooth offTurn Bluetooth on
In order to release resources:
$ sudo usbip port Imported USB devices ==================== ...
Port 02: <Port in Use> at Full Speed(12Mbps) Cambridge Silicon Radio, Ltd : Bluetooth Dongle (HCI mode) (0a12:0001) 3-3 -> usbip://127.0.0.1:3243/1-1 -> remote bus/dev 001/002 $ sudo usbip detach -p 02 usbip: info: Port 2 is now detached! $
And we can check that the device is released:
$ hciconfig $ rfkill list ...
$ lsusb ... $
And of course, device is not detected (as before emulation):
Bluetooth is not found
After this, we can emulate again or stop the emulated device from the first terminal (i.e. with Ctrl-C).
Emulated vs real USB devices
When the real hardware and/or final device is not used to test, we can always feel insecure about the results, and this is the biggest hurdle that we will have to overcome to check the correct operation of the devices by means of emulation.
So, in order to be confident, emulation must be as close as possible to the real hardware and in order to get the most real emulation every aspect of the device must be covered (or at least the necessary ones if they are not related with other aspects). In fact, for a correct test, we must not modify the driver, that is, we must only emulate the physical layer, so that the driver is not able to know if the device is real or emulated.
Starting to test with the real hardware device is a very good idea to get a reference to build the emulator with the same features. For the case of USB devices, the device emulator building is easier because of the existing procedure to get remote control that complies with all the characteristics mentioned above.
Conclusion
USB device emulation is the best way to integrate and test the related features in an efficient, automatic and easy way. But, in order to be confident about the emulation procedure, device emulators need to be previously validated to confirm that they work in the same way as real hardware.
Of course, the USB device emulator is not the same as the real hardware device, but the commented method, thanks to the tested procedure to get remote control of the device, it’s very close to the real scenario and can help a lot to improve our release and testing processes.
Finally, I would like to comment that one of the best advantages of using software emulators is that we will be able to cause specific behaviors, in a simple way, that would be very difficult to reproduce with real hardware, and this could help to find issues and be more robust.
Homebrew is a package manager for macOS to install UNIX tools on macOS. But, it can be used on Linux (and Windows WSL) as well. It is written in Ruby and provides software packages that might not be provided by the host system (macOS or Linux), so it offers an auxiliary package manager besides the OS package manager. In addition, it installs packages only to its prefix (either /home/linuxbrew/.linuxbrew or ~/.linuxbrew) as a non-root user, without polluting system paths. This package manager works on Fedora Linux too. In this article, I will try to show you how Homebrew is different from Fedora Linux package manager dnf , why you might want to install and use it on Fedora Linux, and how.
Warning
You should always inspect the packages and binaries you are installing on your system. Homebrew packages usually run as a non-sudoer user and to a dedicated prefix so they are quite unlikely to cause harm or misconfigurations. However, do all the installations at your own risk. The author and the Fedora community are not responsible for any damages that might result directly or indirectly from following this article.
How Homebrew Works
Homebrew uses Ruby and Git behind the scenes. It builds software from source using special Ruby scripts called formulae which look like this (Using wget package as an example):
class Wget < Formula homepage "https://www.gnu.org/software/wget/" url "https://ftp.gnu.org/gnu/wget/wget-1.15.tar.gz" sha256 "52126be8cf1bddd7536886e74c053ad7d0ed2aa89b4b630f76785bac21695fcd" def install system "./configure", "--prefix=#{prefix}" system "make", "install" end
end
How Homebrew is Different from dnf
Homebrew is a package manager that provides up-to-date versions of many UNIX software tools and packages e.g. ffmpeg, composer, minikube, etc. It proves useful when you want to install some packages that are not available in Fedora Linux rpm repositories for some reason. So, it does not replace dnf.
Install Homebrew
Before starting to install Homebrew, make sure you have glibc and gcc installed. These tools can be installed on Fedora with:
sudo dnf groupinstall "Development Tools"
Then, install Homebrew by running the following command in a terminal:
During the installation you will be prompted for your sudo password. Also, you will have the option to choose the installation prefix for Homebrew, but the default prefix is fine. During the install, you will be made the owner of the Homebrew prefix, so that you will not have to enter the sudo password to install packages. The installation will take several minutes. Once finished, run the following commands to add brew to your PATH:
To install a package using a formula on Homebrew, simply run:
brew install <formula>
Replace <formula> with the name of the formula you want to install. For example, to install Minikube, simply run:
brew install minikube
You can also search for formulae with:
brew search <formula>
To get information about a formula, run:
brew info <formula>
Also, you can see all the installed formulae with the following command:
brew list
Uninstall Packages
To uninstall a package from your Homebrew prefix, run:
brew uninstall <formula>
Upgrade Packages
To upgrade a specific package installed with Homebrew, run:
brew upgrade <formula>
To update Homebrew and all the installed Formulae to the latest versions, run:
brew update
Wrap Up
Homebrew is a simple package manager that can be a helpful tool alongside dnf (The two are not related at all). Try to stick with the native dnf package manager for Fedora to avoid software conflicts. However, if you don’t find a piece of software in the Fedora Linux repositories, then you might be able to find and install it with Homebrew. See the Formulae list for what is available. Also, Homebrew on Fedora Linux does not support graphical applications (called casks in Homebrew terminology) yet. At least, I didn’t have any luck installing any GUI apps.
References and Further Reading
To learn more about Homebrew, check out the following resources:
You do not want someone else to be able to monitor or even control your computer and you usually work hard to cut off any such attempts using various security mechanisms. However, sometimes a situation occurs when you desperately need a friend, or an expert, to help you with a computer problem, but they are not at the same location at the same time. How do you show them? Should you take your mobile phone, take pictures of your screen, and send it to them? Should you record a video? Certainly not. You can share your screen with them and possibly let them control your computer remotely for a while. In this article, I will describe how to allow sharing the computer screen in Gnome.
Setting up the server to share its screen
A server is a computer that provides (serves) some content that other computers (clients) will consume. In this article the server runs Fedora Workstation with the standard Gnome desktop.
Switching on Gnome Screen Sharing
By default, the ability to share the computer screen in Gnome is off. In order to use it, you need to switch it on:
Start Gnome Control Center.
Click on the Sharing tab.
Switch on sharing with the slider in the upper right corner.
Click on Screen sharing.
Switch on screen sharing using the slider in the upper left corner of the window.
Check the Allow connections to control the screen if you want to be able to control the screen from the client. Leaving this button unchecked will only allow view-only access to the shared screen.
If you want to manually confirm all incoming connections, select New connections must ask for access.
If you want to allow connections to people who know a password (you will not be notified), select Require a password and fill in the password. The password can only be 8 characters long.
Check Show password to see what the current password is. For a little more protection, do not use your login password here, but choose a different one.
If you have more networks available, you can choose on which one the screen will be accessible.
Setting up the client to display a remote screen
A client is a computer that connects to a service (or content) provided by a server. This demo will also run Fedora Workstation on the client, but the operating system actually should not matter too much, if it runs a decent VNC client.
Check for visibility
Sharing the computer screen in Gnome between the server and the client requires a working network connection and a visible “route” between them. If you cannot make such a connection, you will not be able to view or control the shared screen of the server anyway and the whole process described here will not work.
To make sure a connection exists
Find out the IP address of the server.
Start Gnome Control Center, a.k.a Settings. Use the Menu in the upper right corner, or the Activities mode. When in Activities, type
settings
and click on the corresponding icon.
Select the Network tab.
Click on the Settings button (cogwheel) to display your network profile’s parameters.
Open the Details tab to see the IP address of your computer.
Go to your client’s terminal (the computer from which you want to connect) and find out if there is a connection between the client and the server using the ping command.
$ ping -c 5 192.168.122.225
Examine the command’s output. If it is similar to the example below, the connection between the computers exists.
PING 192.168.122.225 (192.168.122.225) 56(84) bytes of data. 64 bytes from 192.168.122.225: icmp_seq=1 ttl=64 time=0.383 ms 64 bytes from 192.168.122.225: icmp_seq=2 ttl=64 time=0.357 ms 64 bytes from 192.168.122.225: icmp_seq=3 ttl=64 time=0.322 ms 64 bytes from 192.168.122.225: icmp_seq=4 ttl=64 time=0.371 ms 64 bytes from 192.168.122.225: icmp_seq=5 ttl=64 time=0.319 ms --- 192.168.122.225 ping statistics --- 5 packets transmitted, 5 received, 0% packet loss, time 4083ms rtt min/avg/max/mdev = 0.319/0.350/0.383/0.025 ms
You will probably experience no problems if both computers live on the same subnet, such as in your home or at the office, but problems might occur, when your server does not have a public IP address and cannot be seen from the external Internet. Unless you are the only administrator of your Internet access point, you will probably need to consult about your situation with your administrator or with your ISP. Note, that exposing your computer to the external Internet is always a risky strategy and you must pay enough attention to protecting your computer from unwanted access.
Install the VNC client (Remmina)
Remmina is a graphical remote desktop client that can you can use to connect to a remote server using several protocols, such as VNC, Spice, or RDP. Remmina is available from the Fedora repositories, so you can installed it with both the dnf command or the Software, whichever you prefer. With dnf, the following command will install the package and several dependencies.
$ sudo dnf install remmina
Connect to the server
If there is a connection between the server and the client, make sure the following is true:
The computer is running.
The Gnome session is running.
The user with screen sharing enabled is logged in.
The session is not locked, i.e. the user can work with the session.
Then you can attempt to connect to the session from the client:
Start Remmina.
Select the VNC protocol in the dropdown menu on the left side of the address bar.
Type the IP address of the server into the address bar and hit Enter.
When the connection starts, another connection window opens. Depending on the server settings, you may need to wait until the server user allows the connection, or you may have to provide the password.
Type in the password and press OK.
Press to resize the connection window to match the server resolution, or press to resize the connection window over your entire desktop. When in fullscreen mode, notice the narrow white bar at the upper edge of the screen. That is the Remmina menu and you can access it by moving the mouse to it when you need to leave the fullscreen mode or change some of the settings.
When you return back to the server, you will notice that there is now a yellow icon in the upper bar which indicates that you are sharing the computer screen in Gnome. If you no longer wish to share the screen, you can enter the menu and click on Screen is being shared and then on select Turn off to stop sharing the screen immediately.
Terminating the screen sharing when session locks.
By default, the connection will always terminate when the session locks. A new connection cannot be established until the session is unlocked.
On one hand, this sounds logical. If you want to share your screen with someone, you might not want them to use your computer when you are not around. On the other hand, the same approach is not very useful, if you want to control your own computer from a remote location, be it your bed in another room or your mother-in-law’s place. There are two options available to deal with this problem. You can either disable locking the screen entirely or you can use a Gnome extension that supports unlocking the session via the VNC connection.
Disable screen lock
In order to disable the screen lock:
Open the Gnome Control Center.
Click on the Privacy tab.
Select the Screen Lock settings.
Switch off Automatic Screen Lock.
Now, the session will never lock (unless you lock it manually), so it will be possible to start a VNC connection to it.
Use a Gnome extension to allow unlocking the session remotely.
If you do not want to switch off locking the screen or you want to have an option to unlock the session remotely even when it is locked, you will need to install an extension that provides this functionality as such behavior is not allowed by default.
In the upper part of the page, find an info block that tells you to install GNOME Shell integration for Firefox.
Install the Firefox extension by clicking on Click here to install browser extension.
After the installation, notice the Gnome logo in the menu part of Firefox.
Click on the Gnome logo to navigate back to the extension page.
Search for allow locked remote desktop.
Click on the displayed item to go to the extension’s page.
Switch the extension ON by using the on/off button on the right.
Now, it will be possible to start a VNC connection any time. Note, that you will need to know the session password to unlock the session. If your VNC password differs from the session password, your session is still protected a little.
Conclusion
This article, described the way to enable sharing the computer screen in Gnome. It mentioned the difference between the limited (view-only) access or not limited (full) access. This solution, however, should in no case be considered a correct approach to enable a remote access for serious tasks, such as administering a production server. Why?
The server will always keep its control mode. Anyone working with the server session will be able to control the mouse and keyboard.
If the session is locked, unlocking it from the client will also unlock it on the server. It will also wake up the display from the stand-by mode. Anybody who can see your server screen will be able to watch what you are doing at the moment.
The VNC protocol per se is not encrypted or protected so anything you send over this can be compromised.
There are several ways, you can set up a protected VNC connection. You could tunnel it via the SSH protocol for better security, for example. However, these are beyond the scope of this article.
Disclaimer: The above workflow worked without problems on Fedora 35 using several virtual machines. If it does not work for you, then you might have hit a bug. Please, report it.
Fedora CoreOS is a lightweight, secure operating system optimized for running containerized workloads. A YAML document is all you need to describe the workload you’d like to run on a Fedora CoreOS server.
This is wonderful for a single server, but how would you describe a fleet of cooperating Fedora CoreOS servers? For example, what if you wanted a set of servers running load balancers, others running a database cluster and others running a web application? How can you get them all configured and provisioned? How can you configure them to communicate with each other? This article looks at how Terraform solves this problem.
Getting started
Before you start, decide whether you need to review the basics of Fedora CoreOS. Check out this previous article on the Fedora Magazine:
Terraform is an open source tool for defining and provisioning infrastructure. Terraform defines infrastructure as code in files. It provisions infrastructure by calculating the difference between the desired state in code and observed state and applying changes to remove the difference.
HashiCorp, the company that created and maintains Terraform, offers an RPM repository to install Terraform.
To get yourself familiar with the tools, start with a simple example. You’re going to create a single Fedora CoreOS server in AWS. To follow along, you need to install awscli and have an AWS account. awscli can be installed from the Fedora repositories and configured using the aws configure command
sudo dnf install -y awscli
aws configure
Please note, AWS is a paid service. If executed correctly, participants should expect less than $1 USD in charges, but mistakes may lead to unexpected charges.
Configuring Terraform
In a new directory, create a file named config.yaml. This file will hold the contents of your Fedore CoreOS configuration. The configuration simply adds an SSH key for the core user. Modify theauthorized_ssh_key section to use your own.
Next, create a file main.tf to contain your Terraform specification. Take a look at the contents section by section. It begins with a block to specify the versions of your providers.
Terraform uses providers to control infrastructure. Here it uses the AWS provider to provision EC2 servers, but it can provision any kind of AWS infrastructure. The ct provider from Poseidon Labs stands for config transpiler. This provider will transpile Fedora CoreOS configurations into Ignition configurations. As a result, you do not need to use fcct to transpile your configurations. Now that your provider versions are specified, initialize them.
provider "aws" { region = "us-west-2"
} provider "ct" {}
The AWS region is set to us-west-2 and the ct provider requires no configuration. With the providers configured, you’re ready to define some infrastructure. Use a data source block to read the configuration.
With this data block defined, you can now access the transpiled Ignition output as data.ct_config.config.rendered. To create an EC2 server, use a resource block, and pass the Ignition output as the user_data attribute.
This configuration hard-codes the virtual machine image (AMI) to the latest stable image of Fedora CoreOS in the us-west-2 region at time of writing. If you would like to use a different region or stream, you can discover the correct AMI on the Fedora CoreOS downloads page.
Finally, you’d like to know the public IP address of the server once it’s created. Use an output block to define the outputs to be displayed once Terraform completes its provisioning.
output "instance_ip_addr" { value = aws_instance.server.public_ip
}
Alright! You’re ready to create some infrastructure. To deploy the server simply run:
terraform init # Installs the provider dependencies
terraform apply # Displays the proposed changes and applies them
Oncecompleted, Terraform prints the public IP address of the server, and you can SSH to the server by running ssh core@{public ip here}. Congratulations — you’ve provisioned your first Fedora CoreOS server using Terraform!
Updates and immutability
At this point you can modify the configuration in config.yaml however you like. To deploy your change simply run terraform apply again. Notice that each time you change the configuration, when you run terraform apply it destroys the server and creates a new one. This aligns well with the Fedora CoreOS philosophy: Configuration can only happen once. Want to change that configuration? Create a new server. This can feel pretty alien if you’re accustomed to provisioning your servers once and continuously re-configuring them with tools like Ansible, Puppet or Chef.
The benefit of always creating new servers is that it is significantly easier to test that newly provisioned servers will act as expected. It can be much more difficult to account for all of the possible ways in which updating a system in place may break. Tooling that adheres to this philosophy typically falls under the heading of Immutable Infrastructure. This approach to infrastructure has some of the same benefits seen in functional programming techniques, namely that mutable state is often a source of error.
Using variables
You can use Terraform input variables to parameterize your infrastructure. In the previous example, you might like to parameterize the AWS region or instance type. This would let you deploy several instances of the same configuration with differing parameters. What if you want to parameterize the Fedora CoreOS configuration? Do so using the templatefile function.
As an example, try parameterizing the username of your user. To do this, add a username variable to the main.tf file:
To deploy with username set to jane, run terraform apply -var=”username=jane”. To verify, try to SSH into the server with ssh jane@{public ip address}.
Leveraging the dependency graph
Passing variables from Terraform into Fedora CoreOS configuration is quite useful. But you can go one step further and pass infrastructure data into the server configuration. This is where Terraform and Fedora CoreOS start to really shine.
Terraform creates a dependency graph to model the state of infrastructure and to plan updates. If the output of one resource (e.g the public IP address of a server) is passed as the input of another service (e.g the destination in a firewall rule), Terraform understands that changes in the former require recreating or modifying the later. If you pass infrastructure data into a Fedora CoreOS configuration, it will participate in the dependency graph. Updates to the inputs will trigger creation of a new server with the new configuration.
Consider a system of one load balancer and three web servers as an example.
The goal is to configure the load balancer with the IP address of each web server so that it can forward traffic to them.
Web server configuration
First, create a file web.yaml and add a simple Nginx configuration with a templated message.
Notice the use of count = 3 and the count.index variable. You can use count to make many copies of a resource. Here, it creates three configurations and three web servers. The count.index variable is used to pass the first configuration to the first web server and so on.
Load balancer configuration
The load balancer will be a basic HAProxy load balancer that forwards to each server. Place the configuration in a file named lb.yaml:
The template expects a map with server names as keys and IP addresses as values. You can create that using the zipmap function. Use the ID of the web servers as keys and the public IP addresses as values.
Finally, add an output block to display the IP address of the load balancer.
output "load_balancer_ip" { value = aws_instance.lb.public_ip
}
All right! Run terraform apply and the IP address of the load balancer displays on completion. You should be able to make requests to the load balancer and get responses from each web server.
$ export LB={{load balancer IP here}}
$ curl $LB
<html> <h1>Hello from Server 0</h1>
</html>
$ curl $LB
<html> <h1>Hello from Server 1</h1>
</html>
$ curl $LB
<html> <h1>Hello from Server 2</h1>
</html>
Now you can modify the configuration of the web servers or load balancer. Any changes can be realized by running terraform apply once again. Note in particular that any change to the web server IP addresses will cause Terraform to recreate the load balancer (changing the count from 3 to 4 is a simple test). Hopefully this emphasizes that the load balancer configuration is indeed a part of the Terraform dependency graph.
Clean up
You can destroy all the infrastructure using the terraform destroy command. Simply navigate to the folder where you created main.tf and run terraform destroy.
Where next?
Code for this tutorial can be found at this GitHub repository. Feel free to play with examples and contribute more if you find something you’d love to share with the world. To learn more about all the amazing things Fedora CoreOS can do, dive into the docs or come chat with the community. To learn more about Terraform, you can rummage through the docs, checkout #terraform on freenode, or contribute on GitHub.