From the multi-award-winning strategy series, A Total War Saga: Thrones of Britannia combines huge real-time battles with engrossing turn-based campaign, set at a critical flashpoint in history. Anglo-Saxons, Gaelic clans and Viking settlers clash for control. What Kingdom will you build?
Embark upon a twisted, satirical adventure with Agatha, a young girl who?s conflicted between her love for eating meat and her friendship with animals. Explore this hand-crafted world, meet peculiar characters, and establish your own religion to convince animals that their sacrifice is for the greater good.
F1™ 2015 Free For A Limited Time – Plus Get F1™ 2017 At 70% Off
Add F1™ 2015 to your account for FREE starting now until Saturday at 12PM Pacific*! Once you add the game, it will remain in your account permanently, so don’t miss out on this opportunity to own this great title! Additionally, get 70% off for F1™ 2017 until Saturday at 12PM Pacific*!
Blog: Scaling dedicated game servers with Kubernetes – Part 4
The following blog post, unless otherwise noted, was written by a member of Gamasutra’s community. The thoughts and opinions expressed are those of the writer and not Gamasutra or its parent company.
On the surface, scaling down nodes in our cluster may seem particularly complicated. Each game server has in-memory state of the current game and multiple game clients are connected to an individual game server playing a game. Deleting arbitrary nodes could potentially disconnect active players — and that tends to make them angry! Therefore, we can only remove nodes from a cluster when a node is empty of dedicated game servers.
This means that if you are running on Google Kubernetes Engine (GKE), or similar, you can’t use a managed autoscaling system. To quote the documentation for the GKE autoscaler “Cluster autoscaler assumes that all replicated Pods can be restarted on some other node…” — which in our case is definitely not going to work, since it could easily delete nodes that have active players on them.
That being said, when looking at this situation more closely, we discover that we can break this down into three separate strategies that when combined together make scaling down a manageable problem that we can implement ourselves:
Group game servers together to avoid fragmentation across the cluster
Cordon nodes when CPU capacity is above the configured buffer
Delete a cordoned node from the cluster once all the games on the node have exited
Let’s look at each of these detail.
Grouping Game Servers Together in the Cluster
We want to avoid fragmentation of game servers across the cluster so we don’t end up with a wayward small set of game servers still running across multiple nodes, which will prevent those nodes from being shut down and reclaiming their resources.
This means we don’t want a scheduling pattern that creates game server Pods on random nodes across our cluster like this:
But instead want to have our game server Pods scheduled packed as tight as possible like this:
To group our game servers together, we can take advantage of Kubernetes Pod PodAffinity configuration with the PreferredDuringSchedulingIgnoredDuringExecution option. This gives us the ability to tell Pods that we prefer to group them by the hostname of the node that they are currently on, which essentially means that Kubernetes will prefer to put a dedicated game server Pod on a node that already has a dedicated game server Pod on it already.
In an ideal world, we would want a dedicated game server Pod to be scheduled on the node with the most dedicated game server Pods, as long as that node also has enough spare CPU resources. We could definitely do this if we wanted to write our own custom scheduler for Kubernetes, but to keep this demo simple, we will stick with the PodAffinity solution. That being said, when we consider the short length of our games, and that we will be adding (and explaining) cordoning nodes shortly, this combination of techniques is good enough for our requirements, and removes the need for us to write additional complex code.
When we add the PodAffinity configuration to the previous post’s configuration, we end up with the following, which tells Kubernetes to put pods with the labels sessions: game on the same node as each other whenever possible.
apiVersion: v1

kind: Pod

metadata: generateName: "game-"

spec: hostNetwork: true restartPolicy: Never nodeSelector: role: game-server containers: - name: soccer-server image: gcr.io/soccer/soccer-server:0.1 env: - name: SESSION_NAME valueFrom: fieldRef: fieldPath: metadata.name resources: limits: cpu: "0.1" affinity: podAffinity: # group game server Pods preferredDuringSchedulingIgnoredDuringExecution: - podAffinityTerm: labelSelector: matchLabels: sessions: game topologyKey: kubernetes.io/hostname
Cordoning Nodes
Now that we have our game servers relatively well packed together in the cluster, we can discuss “cordoning nodes”. What does cordoning nodes really mean? Very simply, Kubernetes gives us the ability to tell the scheduler: “Hey scheduler, don’t schedule anything new on this node here”. This ensures that no new Pods get scheduled on that node. In fact, in some places in the Kubernetes documentation, this is simply referred to as marking a node unschedulable.
In the code below, if you focus on the section s.bufferCount < available you will see that we make a request to cordon nodes if the amount of CPU buffer we currently have is greater than what we have set as our need. We’ve stripped some parts out for brevity, but you can see the original here.
// scale scales nodes up and down, depending on CPU constraints

// this includes adding nodes, cordoning them as well as deleting them

func (s Server) scaleNodes() error { nl, err := s.newNodeList() if err != nil { return err } available := nl.cpuRequestsAvailable() if available < s.bufferCount { finished, err := s.uncordonNodes(nl, s.bufferCount-available) // short circuit if uncordoning means we have enough buffer now if err != nil || finished { return err } nl, err := s.newNodeList() if err != nil { return err } // recalculate available = nl.cpuRequestsAvailable() err = s.increaseNodes(nl, s.bufferCount-available) if err != nil { return err } } else if s.bufferCount < available { err := s.cordonNodes(nl, available-s.bufferCount) if err != nil { return err } } return s.deleteCordonedNodes()

}
As you can also see from the code above, we can uncorden any available cordoned nodes in the cluster if we drop below the configured CPU buffer. This is faster than adding a whole new node, so it’s important to check for cordoned nodes before adding a whole new node from scratch. Because of this we also have a configured delay on how long before a cordoned node is deleted (you can see the source here) to limit thrashing on creating and deleting nodes in the cluster unnecessarily.
This is a pretty great start. However, when we want to cordon nodes, we want to cordon only the nodes that have the least number of game server Pods on them, as in this instance, they are most likely to empty first as game sessions come to an end.
Thanks to the Kubernetes API, it’s relatively straightforward to count the number of game server Pods on each Node, and sort them in ascending order. From there we can do arithmetic to determine if we still remain above the desired CPU buffer if we cordon each of the available nodes. If so, we can safely cordon those nodes.
// cordonNodes decrease the number of available nodes by the given number of cpu blocks (but not over),

// but cordoning those nodes that have the least number of games currently on them

func (s Server) cordonNodes(nl *nodeList, gameNumber int64) error { // … removed some input validation ... // how many nodes (n) do we have to delete such that we are cordoning no more // than the gameNumber capacity := nl.nodes.Items[0].Status.Capacity[v1.ResourceCPU] //assuming all nodes are the same cpuRequest := gameNumber * s.cpuRequest diff := int64(math.Floor(float64(cpuRequest) / float64(capacity.MilliValue()))) if diff <= 0 { log.Print("[Info][CordonNodes] No nodes to be cordoned.") return nil } log.Printf("[Info][CordonNodes] Cordoning %v nodes", diff) // sort the nodes, such that the one with the least number of games are first nodes := nl.nodes.Items sort.Slice(nodes, func(i, j int) bool { return len(nl.nodePods(nodes[i]).Items) < len(nl.nodePods(nodes[j]).Items) }) // grab the first n number of them cNodes := nodes[0:diff] // cordon them all for _, n := range cNodes { log.Printf("[Info][CordonNodes] Cordoning node: %v", n.Name) err := s.cordon(&n, true) if err != nil { return err } } return nil

}
Removing Nodes from the Cluster
Now that we have nodes in our clusters being cordoned, it is just a matter of waiting until the cordoned node is empty of game server Pods before deleting it. The code below also makes sure the node count never drops below a configured minimum as a nice baseline for capacity within our cluster.
You can see this in the code below, and in the original context:
// deleteCordonedNodes will delete a cordoned node if it

// the time since it was cordoned has expired

func (s Server) deleteCordonedNodes() error { nl, err := s.newNodeList() if err != nil { return err } l := int64(len(nl.nodes.Items)) if l <= s.minNodeNumber { log.Print("[Info][deleteCordonedNodes] Already at minimum node count. exiting") return nil } var dn []v1.Node for _, n := range nl.cordonedNodes() { ct, err := cordonTimestamp(n) if err != nil { return err } pl := nl.nodePods(n) // if no game session pods && if they have passed expiry, then delete them if len(filterGameSessionPods(pl.Items)) == 0 && ct.Add(s.shutdown).Before(s.clock.Now()) { err := s.cs.CoreV1().Nodes().Delete(n.Name, nil) if err != nil { return errors.Wrapf(err, "Error deleting cordoned node: %v", n.Name) } dn = append(dn, n) // don't delete more nodes than the minimum number set if l--; l <= s.minNodeNumber { break } } } return s.nodePool.DeleteNodes(dn)

}
Conclusion
We’ve successfully containerised our game servers, scaled them up as demand increases, and now scaled our Kubernetes cluster down, so we don’t have to pay for underutilised machinery — all powered by the APIs and capabilities that Kubernetes makes available out of the box. While it would take more work to turn this into a production level system, you can already see how to take advantage of the many building blocks available to you.
Before we finish, I would like to apologise for the delay in producing the fourth part in this series. If you saw the announcement, you may have guessed that a lot of my time got taken up developing and releasing Agones, the open source, productised version of this series of posts on running game servers on Kubernetes.
On that note, this will also be the last installment in this series. I had already completed the work to implement scaling down before starting on Agones, and rather than build out new functionality for global cluster management on Paddle Soccer, I’m going to focus those efforts building out awesome new features for Agones and bring it up from its current 0.1 alpha release, to a full 1.0, production-ready milestone.
Starting at 12:00 p.m. PDT today, members of the Xbox One Preview Alpha Rings will begin receiving the latest Xbox One system update (1805.180418-1920). Read on for more about the New Features, fixes and known issues in the latest system update.
New Features:
Xbox Insider Blog post on the 1805 features:
Fixes:
Home – Avatars
Fixed an issue in which Avatars were not properly displayed within the profile pages.
Home – Cortana
Fixed an issue in which Cortana was unable to make selection of account names.
Mixer
Fixed an issue for a user when broadcasting and opening the guide would cause the camera momentarily to vanish from the active broadcast.
My Games and Apps
Fixed an issue in with users would lose navigation controls/focus in the manage game section for a game or app.
Notifications
Fixed the social icon within the notifications toasts that was appearing as a blank square while in Light theme contrast.
Settings – Accessory App
We have resolved an issue in which some users were not able to navigate correctly, assign controller configurations and set Vibration settings in the Xbox Accessory app.
Known Issues:
Audio
Some users may experience intermittent loss of Audio with certain configurations of AV receivers with ATMOS or with changing audio configurations during console use.
Pi-hole
Pi-hole users may encounter issues signing in, creating, or recovering accounts upon downloading the 1804 update. This is due to a new configuration file which is downloaded from a URL Pi-hole blocks by default.
Workaround: Add clientconfig.passport.net to the Pi-hole allowed IP address list.
Profile Color
Sometimes users may encounter an incorrect Profile color when powering on the console.
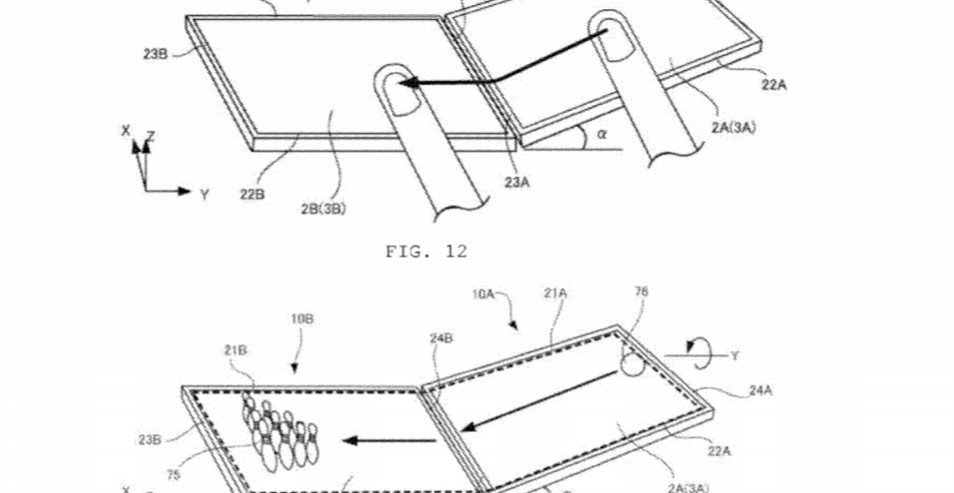
Nintendo’s New Multi-Screen Patent Could Revolutionise Local Multiplayer
Nintendo has filed a new patent in the US, one that could take co-operative play and local multiplayer and inject it with that classic Nintendo sense of innovation. The patent, which was filed with the United States Patent and Trademark Office on 12th April, describes a game system with, “a plurality of information processing apparatuses that are capable of communicating with each other.”
In other words, it would use two separate screens – potentially running on two separate devices – where the actions on one screen would be replicated on the other, with information being shared seamlessly between the two. The patent even shows one object being sent from one screen to the other, while another example sees the movement of one screen creating momentum on the other.
With Switch selling as well as it is at the moment, it seems unlikely this concept will be introduced anytime soon, but it’s an exciting potential feature for future hardware. It’s also not the first time Nintendo has filed a rather peculiar patent…
Let us know what you make of it in the comments sections below and share your thoughts with the NL community below…
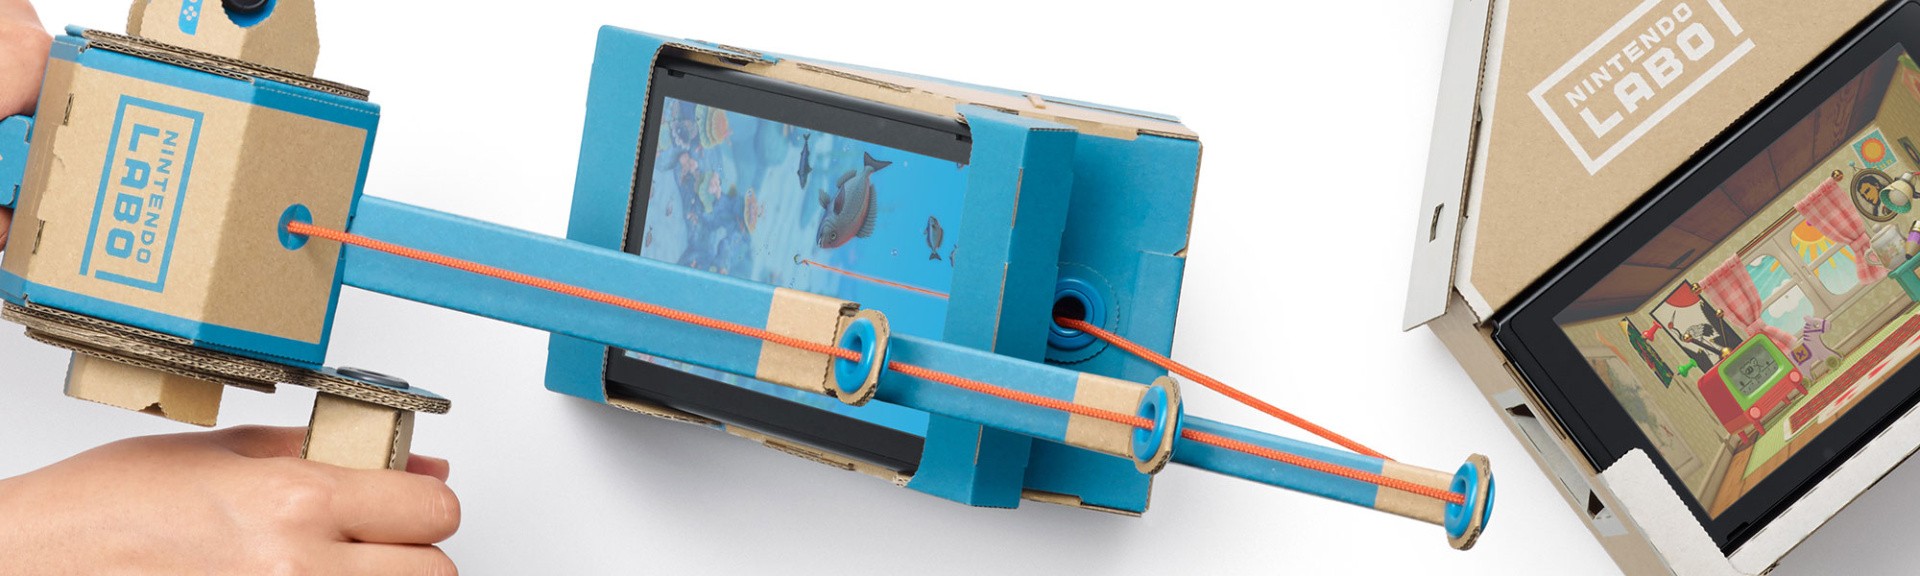
Review: Nintendo Labo: Toy-Con 01 – Variety Kit (Switch)
Editor’s Note: We’ve reviewed the Toy-Con 01 – Variety Kit and Toy-Con 02 – Robot Kit separately. You can read our official verdict on the Robot Kit in the coming days.
As unusual and ‘out there’ as its concept appears, Nintendo Labo is perhaps the most Nintendo thing Nintendo has ever created. From the safe and rewarding nature of its built-in design suite to the simple pleasure of building its cardboard sets, it ticks all the boxes you’d expect from a company that once made its name in hanafuda cards and toys – all the while offering something no other platformer holder would ever dream of (never mind have the guts to invest so much time and effort into).
And that’s what makes it so special; a core concept that takes the basic principles that make Nintendo Switch what it is – the HD Rumble, the IR camera, the motion controls of the Joy-Cons – and conjures up something so bizarre it somehow works. Whether you’re using Switch’s screen in portrait mode while you use a makeshift fishing rod to dangle a real (and virtual) line to catch fish, or playing a light symphony (with cat meows, naturally) on a homemade keyboard, it’s just the kind of wholesome silliness that follows in the footsteps of Wii Music and 1-2-Switch.
Right out of the box, Nintendo Labo comes in three distinct experiences; ‘Make’ (where you’ll follow on-screen instructions to create the physical Toy-Cons), ‘Play’ (where you can play the games that utilise each Toy-Con build) and ‘Discover’ (and mode that serves as both tutorial, inspiration board and programming suite). Each one weaves into the other, and there’s far more to do here than simply ‘make things out of cardboard’, as some of the product’s critics have stated.
The Toy-Con 01 Variety Kit comes complete with a multitude of flatpack sheets, each one with a symbol, lettering and colouring system to ensure you know which one applies to each of the Toy-Con designs (even if you mess them up – which you almost certainly will in the maelstrom of making them). Each of the five designs included with this kit has a handy rough guide to how long it’ll take, and outside of the Joy-Con holder you make in the tutorial and the RC-Car, most take anywhere from an hour and a half to three-plus hours to build.
The cardboard designs themselves vary in quality – some are thick and pliable enough to fold into their respective shapes, but some are a little too flimsy, so don’t be shocked to make the occasional accidental fold. None snapped or tore during any of our builds, but they’re not built to withstand the usual rigours a children’s toy gets put through.
The builds are chunky too, so it’s probably best to have somewhere to store them (the Motorbike, Fishing Rod and Piano builds are particularly bulky). There are a handful of spare pieces included with each box, although perhaps not enough to justify its hefty £70 price tag. You can use cardboard you have lying around the house if you need to repair or modify these builds, but it’s best to rely on the corrugated stuff Labo uses if you want these additions to last.
The on-screen tutorials are designed to be followed at your own pace, with an on-screen button (which can also be controlled by holding ‘A’ on the Joy-Con) moving the process forwards and back. They’re simple enough for even tiny players to follow, with witty on-screen prompts and words of encouragement showing that Nintendo really is aiming to cater to every age group in a family.
The process is much like putting together a sizeable LEGO build, with each Toy-Con build broken up into sections to make its lengthy creation sessions more manageable for smaller attention spans. The length of each build will make this a tougher sell for those of you with very young children, and it would have made more sense to have had two larger models and three or more smaller-to-medium-sized ones to make its ‘Build’ mode seem less of a slog.
On the plus side, there’s no cutting or glueing involved. Everything just pops out of its cardboard frame and can be folded and slotted into place with relative ease. Bar the occasional piece of string, IR-friendly sticker, rubber band or washer, the process of actually making everything from the simple RC Car to the elaborate Piano is a joy. You can rewind and pause the instructions at any time, and with Switch’s kickstand you can simply take it anywhere, set your console up and follow the on-screen tutorials.
Whether you’re putting these builds together on your own or in the company of a child (we built all the kits with a mixture of the two), it becomes one of the most involving and rewarding co-operative experiences. Which is a strange thing to write for a game based around making things out of cardboard, but it’s a collaborative conceit that’s infinitely more involving than any other toys-to-life concept that’s come before it. Being able to use Switch’s touchscreen to view each step in full 3D simply adds more agency to an already empowering mix.
Initially, the ‘Play’ area of Labo appears the shallowest. The five core games of the Variety Kit (controlling the RC-Car, fishing with the Fishing Rod, interacting with a ball-like creature in the House, riding around a track on the Motorbike and playing a tune on the Piano) are fun, but the basic nature of their premises means they’re unlikely to hold your attention (or that of a younger players) for as long as it took to make the bigger builds. Some do feel like glorified tech demos, but others manage to keep that Labo magic pumping away. Being able to scan objects to create custom tracks for your makeshift Motorbike is a trump card even Mario Kart 8 Deluxe can’t match, although it’s a shame you can’t draw or design them from scratch.
The RC Car (well, it’s more like an ‘RC Bug’, but we’re not going to knock a remote control vehicle that moves without wheels), is more of a toy in and of itself, with Switch’s touchscreen doubling for an RC controller. You can even use the IR camera to see through your new creation. Sure, it looks like you’re trying to view the world through the medium of Game Boy Camera, but it’s just another little dimension that’s both weird and cool all at once. There are three more mini-builds to make (one based on the House design, and another two for the Motorbike) but they don’t add anything particularly groundbreaking to the mix. But that’s not to say Play serves no further purpose past these select experiences. In fact, these games are just the beginning…
It’s in ‘Discover’ mode that Labo’s real genius – and ultimately, its true longevity – really lies. Hidden among the cartoonish mini-game ideas and customisation prompts you’ll find a manhole cover. Give it a tap and you’ll find the Toy-Con Garage. It’s easily Labo’s most important feature, and one that might not be immediately apparent to first-time users (or, in fact, those yet to be convinced its more than a childish fad). It’s effectively a simplified programming suite, which enables you to take the Toy-Cons you’ve already built and make them do entirely new things. And that’s not even touching on the brand new creations you can create with any old cardboard around the house, some sticky tape and a few well-placed nodes.
From a working clock to a convincing Game & Watch build – and so many other things in between – it’s an ideal way to introduce users to the world of programming and simple engineering principles. If you know your way around the world of coding its simple presentation isn’t going to change your world, but it’s the exactly the kind of mode young users need to begin their journey towards anything from engineering to game design. And all from the safety of a Nintendo handheld console.
Conclusion
Nintendo Labo might seem like a gimmick – and it is, to a certain extent – but there’s far more it than at first meets the eye. It’s a collaborative concept as rewarding in its construction as it is in its final result (much like any LEGO build you’ve ever worked on), and one that utilises every facet of Switch’s DNA in a way only Nintendo could pull off. With the unbound potential of Toy-Con Garage at its heart, Nintendo Labo mixes the physical and digital so seamlessly even its hefty price tag shouldn’t put you off.
Turtle helmet will no longer give you particle effects
Turtle helmet will no longer make you absolutely completely 100% invulnerable
Blue ice is now ever-so-slightly less slippery than before. Still pretty slippery!
When water spreads and would later turn into a source block, it now immediately just places a source block
We changed how we calculate the temperature of ocean biomes, which should result in nicer transitions between oceans
Mining coral blocks now requires silk touch
Changed particle effect from the Conduit
Optimized spawn position finding code
Technical: there’s now a distinction between scheduled “liquid ticks” and “block ticks”
Technical: there’s new block & item tags for coral
Lots of bug fixes!
BUFFET WORLDS
All you can pick!
As a popular request, we readded a way to play with single biome worlds
You can check it out when creating a new world by selecting Buffet World as a world type
As a side bonus, we also threw in another way to generate chunks in there
Keep an eye on this screen, there might be more things on their way!
(it’s pretty crazy)
FIXED BUGS IN 18W16A
MC-18903 – Villagers’/ Witchs’ right arm doesn’t have the texture flipped. (Like zombies/giants/players/zombie pigmen/zombie villagers/Illagers’ does.)
MC-83064 – Accumulated fall damage is not reset when levitation starts
[ ] – x25 more bugs fixed
To get snapshots, open your launcher and go to the “launch options” tab. Check the box saying “Enable snapshots” and save. To switch between the snapshot and normal version, you can find a new dropdown menu next to the “Play” button. Back up your world first or run the game on in a different folder (In the “launch options” page).
Please report any and all bugs you find in Minecraft to bugs.mojang.com.
Snapshots can corrupt your world, please backup and/or run them in a different folder from your main worlds. 1.13 will have a lot of experimental snapshots that may break everything and smell funny. This may be one of those snapshots. This is what happens when Mojang are changing all the things!
Share your thoughts on how 1.13 is shaping up in the comments below!
This week at Bungie, we unleashed teams of six into Iron Banner.
We have a lot to cover. Iron Banner 6v6 is in full swing. Exotic weapon previews have been dropping like loot. We’re following that up with some important info on Power progression and reward changes coming in Season 3. On top of all this, we’re having special guests in the building to give us valuable feedback.
Let’s get to it.
Crucible Recap
Last week, we postponed Iron Banner while we worked out an issue. In its place, we rolled out a six-player version of Rumble based on player feedback. Here is PvP Design Lead Derek Carroll with more info on the state of combat between Guardians.
Derek: How did six-player Rumble treat you? We heard your comments and took action when the eight-player version got too big for its cage, and we hope our work paid off. There are additional map-specific spawning fixes that will be present in the next update, so keep the feedback coming!
By the time you read this, Iron Banner will be well underway. As with everything we do in the Crucible, the true test is when players experience it out in the wild. Once you’ve felt how it plays, we’d love to hear your thoughts. Meet me here in a week or so?
As you may have read last week, we are changing the way Crucible playlists work when Season 3 launches alongside the new expansion, Warmind. Beginning on May 8, all Destiny 2 players will be able to compete on any of the Crucible maps we put in our match-made playlists. (Platform timed-exclusive content will still be limited to that platform, but everything else is fair game.) We believe this is a big win for everyone, since players will no longer need to choose between playing in a limited DLC playlist to see “the new stuff” and playing in a mainstream playlist to get the largest pool of opponents and maps. More fun for everyone!
Weapon Showcase
A few weeks ago, we gave you a preview of upcoming changes to Sturm and Drang. Telling you what changes are coming is important, but the old saying holds true: “A picture is worth a thousand words.” Back in February, we told you a few things we had planned for Graviton Lance. Earlier this week, we showed off those changes in action.
[embedded content]
Those poor, poor Fallen. That wasn’t the only video we teased out this week. You also got a glimpse of what Skyburner’s Oath will be capable of in Season 3. Now that we have shown you, here is Senior Designer Jon Weisnewski to tell you more about what is changing about those weapons and another you haven’t seen yet.
Jon: Hello. For some bizarre reason Cozmo asked me to come back and waste some more space on the TWAB. So here I am bloating the internet tubes with more bits and gigawatts. What does that mean for you? Another update on the Exotic weapon tuning headed your way this May.
Today, we’ll talk about two guns: Skyburner’s Oath and Rat King.
A while back, I talked about Graviton Lance and how one of the main areas to improve was the lack of utility within a pretty successful show of spectacle. Skyburner’s Oath almost has the opposite problem: It’s a comparatively strong weapon, effective at multiple ranges, strong in ADS and from hip, with varying fire rates. However, it lacks spectacle to give it that exotic feeling; it kind of plays just like any other gun. To address this, we started with giving the projectiles explosive rounds as their default impact response. In ADS, the weapon will perform the same. Full auto, slow firing, high impact.
When firing from the hip, Skyburner’s Oath now lobs slower projectiles at a faster rate of fire that tracks targets and explodes. The tracking functionality tends to draw projectiles to center mass rather than to precision regions, so we reduced the precision scalar a bit and increased damage to the body (precision hits still do bonus damage; and overall DPS is increased). The end result is a dual utility weapon that fires hit-scan, high-damage projectiles while aiming down sights and rapid-fire, lobbed, exploding, tracking projectiles from the hip. It almost feels like a rapid-fire grenade launcher that can transition to a precision death dealer with the press of a button. Here it is in action.
[embedded content]
Next up is Rat King, which already has something of a fan base, but definitely has room to improve. Of the stats that improve with more fireteam members running Rat King, the strongest is probably the increased rate of fire. Unfortunately, the DPS potential is hard to realize because some people just can’t physically pull the trigger fast enough to cash in on this benefit (or don’t know to try). To make sure this is both felt and used, we made Rat King full auto to ensure the rate of fire increase can make a difference when running in a pack.
Another pain point was that the restriction of having Rat Pack only activate when allies have Rat Kings equipped in-hand felt a bit too situational. Rat Pack perk now triggers when fireteam members have Rat King slotted as their kinetic weapon, stowed or in hand. We also front-loaded the stat benefits of Rat Pack so they increase a bit more drastically with one or two fireteam members—and upped the base invisibility timer of Vermin to seven seconds. Last but not least, and not to overly tease, but why not, I’m gonna tease: the Masterwork upgrade for Rat King is going to put a tasty garnish on this meal you won’t want to miss out on.
[embedded content]
It’s never a waste of space to have Newsk stop by to share what weapon changes he’s currently working on. Maybe we can convince him to come back next week to tell us about some more Exotics we are buffing up for Season 3.
Power Climb
We have received a lot of feedback on rewards, Power, and how you want your actions to be more meaningful in determining how your character performs in the world of Destiny 2. We’re planning some adjustments based on this feedback, and Senior Designer Daniel Auchenpaugh is here to give you the details.
Daniel: Last time I was here, I talked about our adjustments to the Raid rewards. This time, I want to talk about some more broad changes we’re making to the reward structure of Destiny 2. One of the things we did when Destiny 2 launched was make the climb to the power cap fast and easy for everyone. It didn’t matter who you were or what your play style was; the road to the cap was quick and accessible for everyone. The result was that achieving the cap felt less satisfying: It was easy, and there weren’t any activities that dared to require it.
So, with the release of Destiny 2 Expansion II: Warmind, we’re making some changes to the size and frequency of upgrades. These changes will apply to all of Destiny 2—not just the Warmind endgame content. Our goals with this change are to bring back meaning and accomplishment to achieving the Power cap, to give players a sense of progression when they come back to play each week, and to reward players who engage in a broader scope of the Destiny 2 endgame content. We’ve made an effort to de-emphasize grinding public events for Exotics and to reduce the impact of clan engrams on endgame progression.
Before we get into specifics, I want to define a couple terms so we’re on common ground. Soft cap is the point you can climb to easily via drops from any source. The hard cap is the power level you can obtain from weekly reward sources. The soft cap for Warmind is 340, and the hard cap is 380. These numbers don’t consider any +5 mods. Remember that all drops are calculated using your Best Possible Power, regardless of if you have the gear equipped or not. It can even be in the vault or on another character!
Our target is that players who participate in all the weekly activities should take several weeks to reach the hard cap. Raids/Trials grant the largest increases, clan engrams provide very small increases, and the other weekly sources fall between those two. Players who don’t participate in any group weekly activities are unlikely to hit the hard cap before the next release; dedicated omnivore players will hit it before players that just play Raids or Trials exclusively. Additionally, the final 10 points from 370 to 380 will be significantly slower than 340 to 370; we expect it to take players roughly equal time to go from 340 to 370 as from 370 to 380. We decided to make this change because climbing to 370 allows you to tackle endgame content without suffering a severe under level penalty, but creates a significant accomplishment in achieving 380.
Clan engrams offer excellent upgrades while a player is climbing to the soft cap; they should grant awards an average of 15 Power higher than your current best possible while you’re on the way there. This will help players catch up with their clanmates who are completing weekly activities. Once you’ve achieved the soft cap, your progress is going to rely a lot more on your own achievements; clan engrams above the soft cap will grant gear only 0–2 points above your best possible.
In an effort to combat exploits around creating new characters to take advantage of one-time quest rewards, we’ve decided to limit those rewards to the soft cap for the release they first appeared in. This means Destiny 2 launch quests cap at 260 (before mods), Curse of Osiris caps at 300, and Warmind caps at 340. To compensate for their new caps, they’ll give you a large boost (15 Power) when you earn them as long as you’re below that cap. Farming Exotics to increase your Power has been removed; if they drop from a non-weekly source, they’ll come out of the engram at the same Power as a Legendary would after you’ve gotten to the soft cap. We believe the changes to quest rewards and Exotic farming will ensure the most effective way to reach the Power cap is to play the most challenges and social weekly activities.
Thanks for hanging in there through this long explanation. Please let us know any feedback you have about this new way forward for Destiny 2 rewards. We’re going to carefully monitor feedback from this post and our early data after Warmind launches to guide any changes we might make to this in the future. So if you love it, let us know! If you hate it, let us know that too!
High Altitude
The guy who used to write these “weekly blog addresses” (those are his words—he apparently hates the term “TWAB”) wants to hog the mic for just a minute to share some final thoughts on the Community Summit that’s happening tomorrow and Friday at Bungie.
DeeJ: Thanks, Cozmo.
Thursday and Friday, we’ll be honored and humbled to host a small but insightful sampling of the community here in our studio. They’ll be here to give us their opinions on our goals and our plans. Some of them you know. Some of them we know. We want you to know that this is not the only way we’re gathering feedback about Destiny 2, and these are not the only people we’re listening to about the game. This summit will be about collaboration. Our best conversations will be about the future. This isn’t a marketing event. There will be no reveals this week. We’re not streaming while they’re here. They won’t have a wealth of news to report once our time together is over. They’ll be welcome to report on the mood from the gathering and to tell you what they told us. We’d ask you not to press them for promises on what the state of Destiny 2 will be in the months to come. That work will still fall to us, and there is still plenty of time for those things to find their final form. Next week, if they want to, they’ll share some of their own content from the next expansion. For this week, we wanted to give them a seat at our table.
Back to you, Cozmo.
Helpful Hands
Whether its plants, animals, or other oddly named error codes, the Destiny Player Support has the information you need to diagnose any issues you come across in the wild.
This is their report.
Iron Banner Updated
This week marks the first arrival of 6v6 Iron Banner, and is the first Iron Banner post-Update 1.1.4. Listed below are changes that players can expect to see in this playlist, as outlined in the Update 1.1.4 Patch Notes:
Now features 6v6
Time limit is 12 minutes
Score limit is 125 points
Respawn time is 7 seconds
All Control Zones start off neutral
Additional Guardians (max of 3) in a zone increases capture speed
Emperor’s Respite has been removed from the Iron Banner Control playlist
Power ammo
Recurring side crate respawn times reduced from 90 seconds to 45 seconds
Initial side crate respawn times reduced from 90 seconds to 30 seconds
Additionally, all Season 2 Iron Banner weapons will be available from Lord Saladin through either Reward Packages, or direct purchase using Iron Banner Tokens. For more information regarding Iron Banner, players should visit our Iron Banner Guide.
Error Codes
We are still investigating an increase in reports of CABBAGE, COCONUT, CURRANT, LETTUCE, and RABBIT error codes.
We have implemented a fix that should resolve most instances of ZEBRA error codes. Players with a poor connection quality or below minimum spec PC hardware may continue to encounter this error code.
Players who encounter these errors should try relaunching into their activity. Players who repeatedly encounter these error codes should report them to the #Help forum.
Put the Bunny Back in the Box
Get ‘em while they’re hot. We got fresh new movies for you to consume. In case you don’t know how this works, we pick our favorite videos each week and send the creators a special emblem. If you want your shot, send your video to the Creations page. Make sure to put all player names who worked on the video in the description so we know who to send the rewards to.
Here are this week’s winners.
Movie of the Week: New World
[embedded content]
Honorable Mention: Yoga Flame!
[embedded content]
Before we go, here are last week’s Nightfall scores.
You just read over 2,400 words of knowledge. How you feeling? We have more lined up for you next week during the stream. Join us April 24 at 10 a.m. PDT on Twitch to see Warmind and Season 3.
In the meantime, I’ll be playing some Iron Banner 6v6 and finishing up some ornaments. I’ll see you out there.


