An ancient evil has returned to Baldur's Gate, intent on devouring it from the inside out. The fate of Faerun lies in your hands. Alone, you may resist. But together, you can overcome. Gather your party and return to the Forgotten Realms in a tale of fellowship and betrayal, sacrifice and survival, and the lure of absolute power. Mysterious abilities are awakening inside you, drawn from a mind flayer parasite planted in your brain. Resist, and turn darkness against itself. Or embrace corruption, and become ultimate evil.
Posted by: xSicKxBot - 08-21-2023, 10:25 AM - Forum: Python
- No Replies
[Tut] Python Tuple Concatenation: A Simple Illustrated Guide
5/5 – (1 vote)
Python tuples are similar to lists, but with a key difference: they are immutable, meaning their elements cannot be changed after creation.
Tuple concatenation means joining multiple tuples into a single tuple. This process maintains the immutability of the tuples, providing a secure and efficient way to combine data. There are several methods for concatenating tuples in Python, such as using the + operator, the * operator, or built-in functions like itertools.chain().
# Using the + operator to concatenate two tuples

tuple1 = (1, 2, 3)

tuple2 = (4, 5, 6)

concatenated_tuple = tuple1 + tuple2

print("Using +:", concatenated_tuple) # Output: (1, 2, 3, 4, 5, 6) # Using the * operator to repeat a tuple

repeated_tuple = tuple1 * 3

print("Using *:", repeated_tuple) # Output: (1, 2, 3, 1, 2, 3, 1, 2, 3) # Using itertools.chain() to concatenate multiple tuples

import itertools

tuple3 = (7, 8, 9)

chained_tuple = tuple(itertools.chain(tuple1, tuple2, tuple3))

print("Using itertools.chain():", chained_tuple)

# Output: (1, 2, 3, 4, 5, 6, 7, 8, 9)
The + operator is used to join two tuples, the * operator is used to repeat a tuple, and the itertools.chain() function is used to concatenate multiple tuples. All these methods maintain the immutability of the tuples
Understanding Tuples
Python tuple is a fundamental data type, serving as a collection of ordered, immutable elements. Tuples are used to group multiple data items together. Tuples are created using parentheses () and elements within the tuple are separated by commas.
For example, you can create a tuple as follows:
my_tuple = (1, 2, 3, 4, 'example')
In this case, the tuple my_tuple has five elements, including integers and a string. Python allows you to store values of different data types within a tuple.
Immutable means that tuples cannot be changed once defined, unlike lists. This immutability makes tuples faster and more memory-efficient compared to lists, as they require less overhead to store and maintain element values.
Being an ordered data type means that the elements within a tuple have a definite position or order in which they appear, and this order is preserved throughout the tuple’s lifetime.
One common operation performed on tuples is tuple concatenation, which involves combining two or more tuples into a single tuple. This section will discuss the basics of tuple concatenation using the + operator and provide examples to demonstrate the concept.
Using the + Operator
The + operator is a simple and straightforward way to concatenate two tuples. When using the + operator, the two tuples are combined into a single tuple without modifying the original tuples. This is particularly useful when you need to merge values from different sources or create a larger tuple from smaller ones.
Here’s the basic syntax for using the + operator:
new_tuple = tuple1 + tuple2
new_tuple will be a tuple containing all elements of tuple1 followed by elements of tuple2. It’s essential to note that since tuples are immutable, the original tuple1 and tuple2 remain unchanged after the concatenation.
Examples of Tuple Concatenation
Let’s take a look at a few examples to better understand tuple concatenation using the + operator:
In this example, we concatenated tuple1 and tuple2 to create a new tuple called tuple3. Notice that the elements are ordered, and tuple3 contains all the elements from tuple1 followed by the elements of tuple2.
Here’s another example with tuples containing different data types:
In this case, we combined a tuple containing strings with a tuple containing an integer and a string, resulting in a new tuple containing all elements in the correct order.
Using the * Operator
The * operator can be used for replicating a tuple a specified number of times and then concatenating the results. This method can be particularly useful when you need to create a new tuple by repeating an existing one.
In the example above, the original tuple is repeated three times and then concatenated to create the replicated_tuple. Note that using the * operator with non-integer values will result in a TypeError.
Using itertools.chain()
The itertools.chain() function from the itertools module provides another way to concatenate tuples. This function takes multiple tuples as input and returns an iterator that sequentially combines the elements of the input tuples.
Here’s an illustration of using itertools.chain():
In this example, the itertools.chain() function is used to combine tuple1 and tuple2. The resulting iterator is then explicitly converted back to a tuple using the tuple() constructor.
It’s important to note that itertools.chain() can handle an arbitrary number of input tuples, making it a flexible option for concatenating multiple tuples:
Both the * operator and itertools.chain() offer efficient ways to concatenate tuples in Python.
Manipulating Tuples
Tuples are immutable data structures in Python, which means their content cannot be changed once created. However, there are still ways to manipulate and extract information from them.
Slicing Tuples
Slicing is a technique for extracting a range of elements from a tuple. It uses brackets and colons to specify the start, end, and step if needed. The start index is inclusive, while the end index is exclusive.
my_tuple = (0, 1, 2, 3, 4)

sliced_tuple = my_tuple[1:4] # This will return (1, 2, 3)
You can also use negative indexes, which count backward from the end of the tuple:
sliced_tuple = my_tuple[-3:-1] # This will return (2, 3)
Tuple Indexing
Tuple indexing allows you to access a specific element in the tuple using its position (index).
my_tuple = ('apple', 'banana', 'cherry')

item = my_tuple[1] # This will return 'banana'
An IndexError will be raised if you attempt to access an index that does not exist within the tuple.
Adding and Deleting Elements
Since tuples are immutable, you cannot directly add or delete elements. However, you can work around this limitation by:
Concatenating tuples: You can merge two tuples by using the + operator.
Converting to a list: If you need to perform several operations that involve adding or removing elements, you can convert the tuple to a list. Once the operations are completed, you can convert the list back to a tuple.
my_tuple = (1, 2, 3)

my_list = list(my_tuple)

my_list.append(4) # Adding an element

my_list.remove(2) # Removing an element

new_tuple = tuple(my_list) # This will return (1, 3, 4)
Remember that manipulating tuples in these ways creates new tuples and does not change the original ones.
Common Errors and Solutions
One common error that users might encounter while working with tuple concatenation in Python is the TypeError. This error can occur when attempting to concatenate a tuple with a different data type, such as an integer or a list.
>>> (1, 2, 3) + 1

Traceback (most recent call last): File "<pyshell#2>", line 1, in <module> (1, 2, 3) + 1

TypeError: can only concatenate tuple (not "int") to tuple
To overcome this issue, make sure to convert the non-tuple object into a tuple before performing the concatenation.
For example, if you’re trying to concatenate a tuple with a list, you can use the tuple() function to convert the list into a tuple:
Another common error related to tuple concatenation is the AttributeError. This error might arise when attempting to call a non-existent method or attribute on a tuple. Since tuples are immutable, they don’t have methods like append() or extend() that allow addition of elements.
Instead, you can concatenate two tuples directly using the + operator:
When working with nested tuples, ensure proper syntax and data structure handling to avoid errors like ValueError and TypeError. To efficiently concatenate nested tuples, consider using the itertools.chain() function provided by the itertools module.
This function helps to flatten the nested tuples before concatenation:
The result variable now contains the concatenated tuple (1, 2, 3, 4, 5, 6).
What is the syntax for tuple concatenation?
The syntax for concatenating tuples is straightforward. Just use the + operator between the two tuples you want to concatenate.
concatenated_tuples = first_tuple + second_tuple
How to concatenate a tuple and a string?
To concatenate a tuple and a string, first convert the string into a tuple containing a single element, and then concatenate the tuples. Here’s an example:
The concatenated_result will be (1, 2, 3, 'hello').
Is it possible to modify a tuple after creation?
Tuples are immutable, which means they cannot be modified after creation (source). If you need to modify the contents of a collection, consider using a list instead.
How can I combine multiple lists of tuples?
To combine multiple lists of tuples, use a combination of list comprehensions and tuple concatenation. Here is an example:
lists_of_tuples = [ [(1, 2), (3, 4)], [(5, 6), (7, 8)]

] combined_list = [t1 + t2 for lst in lists_of_tuples for t1, t2 in lst]
The combined_list variable will contain [(1, 2, 3, 4), (5, 6, 7, 8)].
Can tuple concatenation be extended to more than two tuples?
Yes, tuple concatenation can be extended to more than two tuples by using the + operator multiple times. For example:
Web pages contain external links that open URLs in a new tab. For example, Wikipedia articles show links to open the reference sites in a new tab. This is absolutely for beginners.
There are three ways to open a URL in a new tab.
HTML anchor tags with target=_blank attribute.
JavaScript window.open() to set hyperlink and target.
JavaScript code to create HTML link element.
HTML anchor tags with target=_blank attribute
This is an HTML basic that you are familiar with. I added the HTML with the required attributes since the upcoming JavaScript example works with this base.
<a href="https://www.phppot.com" target="_blank">Go to Phppot</a>
Scenarios of opening URL via JavaScript.
When we need to open a URL on an event basis, it has to be done via JavaScript at run time. For example,
Show product page from the gallery via Javascript to keep track of the shopping history.
The below two sections have code to learn how to achieve opening URLs in a new tab using JavaScript.
JavaScript window.open() to set hyperlink and target
This JavaScript one-line code sets the link to open the window.open method. The second parameter is to set the target to open the linked URL in a new tab.
The intense world of Formula 1 comes alive for a new season in F1 Manager 2023. Twenty-three races, six F1 Sprint events, new cars, new circuits including the Las Vegas street circuit, new drivers, new challenges... Your legacy begins here.
F1 Manager 2023 gives you unparalleled control of your chosen F1 team, with rich and detailed management features, refined racing spectacle, deeper authenticity and a brand-new mode that allows you to rewrite the season on your terms.
[Tut] Measure Execution Time with timeit() in Python
5/5 – (1 vote)
Understanding Timeit in Python
The timeit module is a tool in the Python standard library, designed to measure the execution time of small code snippets. It makes it simple for developers to analyze the performance of their code, allowing them to find areas for optimization.
The timeit module averages out various factors that affect the execution time, such as the system load and fluctuations in CPU performance. By running the code snippet multiple times and calculating an average execution time, it provides a more reliable measure of your code’s performance.
To get started using timeit, simply import the module and use the timeit() method. This method accepts a code snippet as a string and measures its execution time. Optionally, you can also pass the number parameter to specify how many times the code snippet should be executed.
Sometimes, you might want to evaluate a code snippet that requires additional imports or setup code. For this purpose, the timeit() method accepts a setup parameter where you can provide any necessary preparation code.
For instance, if we adjust the previous example to include a required import:
Keep in mind that timeit is primarily intended for small code snippets and may not be suitable for benchmarking large-scale applications.
Measuring Execution Time
The primary method of measuring execution time with timeit is the timeit() function. This method runs the provided code repeatedly and returns the total time taken. By default, it repeats the code one million times! Be careful when measuring time-consuming code, as it may take a considerable duration.
When using the timeit() method, the setup time is excluded from execution time. This way, the measurement is more accurate and focuses on the evaluated code’s performance, without including the time taken to configure the testing environment.
Another useful method in the timeit module is repeat(), which calls the timeit() function multiple times and returns a list of results.
Sometimes it’s necessary to compare the execution speeds of different code snippets to identify the most efficient implementation. With the time.time() function, measuring the execution time of multiple code sections is simplified.
In conclusion, using the timeit module and the time.time() function allows you to accurately measure and compare execution times in Python.
The Timeit Module
To start using the timeit module, simply import it:
import timeit
The core method in the timeit module is the timeit() method used to run a specific code snippet a given number of times, returning the total time taken.
import timeit code_to_test = """

squared_numbers = [x**2 for x in range(10)] """ elapsed_time = timeit.timeit(code_to_test, number=1000)

print("Time taken:", elapsed_time)
If you are using Jupyter Notebook, you can take advantage of the %timeit magic function to conveniently measure the execution time of a single line of code:
%timeit squared_numbers = [x**2 for x in range(10)]
In addition to the timeit() method, the timeit module provides repeat() and autorange() methods.
The repeat() method allows you to run the timeit() method multiple times and returns a list of execution times, while
the autorange() method automatically determines the number of loops needed for a stable measurement.
Here’s an example using the repeat() method:
import timeit code_to_test = """

squared_numbers = [x**2 for x in range(10)] """ elapsed_times = timeit.repeat(code_to_test, number=1000, repeat=5)

print("Time taken for each run:", elapsed_times)
Using Timeit Function
To measure the execution time of a function, you can use the timeit.timeit() method. This method accepts two main arguments: the stmt and setup. The stmt is a string representing the code snippet that you want to time, while the setup is an optional string that can contain any necessary imports and setup steps. Both default to 'pass' if not provided.
Let’s say you have a function called square() that calculates the square of a given number:
def square(x): return x ** 2
To measure the execution time of square() using timeit, you can do the following:
Here, we’re asking timeit to execute the square(10) function 1000 times and return the total execution time in seconds. You can adjust the number parameter to run the function for a different number of iterations.
Another way to use timeit, especially for testing a callable function, is to use the timeit.Timer class. You can pass the callable function directly as the stmt parameter without the need for a setup string:
In the example above, we measure the time it takes to execute sum(range(100)) 1000 times. The number parameter controls how many repetitions of the code snippet are performed. By default, number=1000000, but you can set it to any value you find suitable.
The timeit module in Python allows you to accurately measure the execution time of small code snippets. It provides two essential functions: timeit.timeit() and timeit.repeat().
The timeit.timeit() function measures the execution time of a given statement. You can pass the stmt argument as a string containing the code snippet you want to time. By default, timeit.timeit() will execute the statement 1,000,000 times and return the average time taken to run it.
However, you can adjust the number parameter to specify a different number of iterations.
The timeit.repeat() function is a convenient way to call timeit.timeit() multiple times. It returns a list of timings for each repetition, allowing you to analyze the results more thoroughly. You can use the repeat parameter to specify the number of repetitions.
In some cases, you might need to include additional setup code to prepare your test environment. You can do this using the setup parameter, which allows you to define the necessary setup code as a string. The execution time of the setup code will not be included in the overall timed execution.
The timeit module provides a straightforward interface for measuring the execution time of small code snippets. You can use this module to measure the time taken by a particular code block in your program.
Here’s a brief example:
import timeit def some_function(): # Your code block here time_taken = timeit.timeit(some_function, number=1)

print(f"Time taken: {time_taken} seconds")
In this example, the timeit.timeit() function measures the time taken to execute the some_function function. The number parameter specifies the number of times the function will be executed, which is set to 1 in this case.
For more accurate results, you can use the timeit.repeat() function, which measures the time taken by the code block execution for multiple iterations.
Here’s an example:
import timeit def some_function(): # Your code block here repeat_count = 5

time_taken = timeit.repeat(some_function, number=1, repeat=repeat_count)

average_time = sum(time_taken) / repeat_count

print(f"Average time taken: {average_time} seconds")
In this example, the some_function function is executed five times, and the average execution time is calculated.
Besides measuring time for standalone functions, you can also measure the time taken by individual code blocks inside a function. Here’s an example:
import timeit def some_function(): # Some code here start_time = timeit.default_timer() # Code block to be measured end_time = timeit.default_timer() print(f"Time taken for code block: {end_time - start_time} seconds")
In this example, the timeit.default_timer() function captures the start and end times of the specified code block.
Using Timeit with Jupyter Notebook
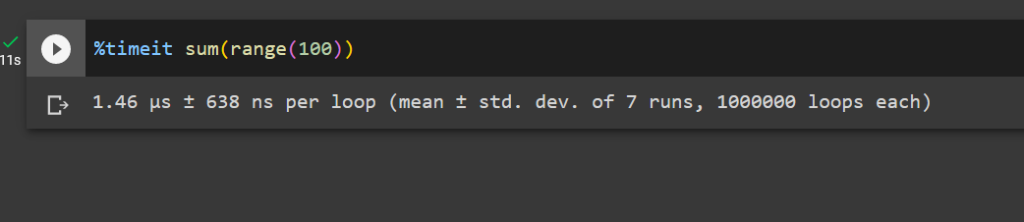
Jupyter Notebook provides an excellent environment for running and testing Python code. To measure the execution time of your code snippets in Jupyter Notebook, you can use the %timeit and %%timeit magic commands, which are built into the IPython kernel.
The %timeit command is used to measure the execution time of a single line of code. When using it, simply prefix your line of code with %timeit.
For example:
%timeit sum(range(100))
This command will run the code multiple times and provide you with detailed statistics like the average time and standard deviation.
To measure the execution time of a code block spanning multiple lines, you can use the %%timeit magic command. Place this command at the beginning of a cell in Jupyter Notebook, and it will measure the execution time for the entire cell.
For example:
%%timeit

total = 0

for i in range(100): total += i
Managing Garbage Collection and Overhead
When using timeit in Python to measure code execution time, it is essential to be aware of the impact of garbage collection and overhead.
Garbage collection is the process of automatically freeing up memory occupied by objects that are no longer in use. This can potentially impact the accuracy of timeit measurements if left unmanaged.
By default, timeit disables garbage collection to avoid interference with the elapsed time calculations. However, you may want to include garbage collection in your measurements if it is a significant part of your code’s execution, or if you want to minimize the overhead and get more realistic results.
To include garbage collection in timeit executions, you can use the gc.enable() function from the gc module and customize your timeit setup.
Keep in mind that including garbage collection will likely increase the measured execution time. Manage this overhead by balancing the need for accurate measurements with the need to see the impact of garbage collection on your code.
Additionally, you can use the timeit.repeat() and timeit.autorange() methods to measure execution time of your code snippets multiple times, which can help you capture the variability introduced by garbage collection and other factors.
Choosing the Best Timer for Performance Measurements
Measuring the execution time of your Python code is essential for optimization, and the timeit module offers multiple ways to achieve this. This section will focus on selecting the best timer for measuring performance.
When using the timeit module, it is crucial to choose the right timer function. Different functions may provide various levels of accuracy and be suitable for different use cases. The two main timer functions are time.process_time() and time.perf_counter().
time.process_time() measures the total CPU time used by your code, excluding any time spent during the sleep or wait state. This is useful for focusing on the computational efficiency of your code. This function is platform-independent and has a higher resolution on some operating systems.
Here is an example code snippet:
import time

import timeit start = time.process_time() # Your code here end = time.process_time()

elapsed = end - start

print(f"Execution time: {elapsed} seconds")
On the other hand, time.perf_counter() measures the total elapsed time, including sleep or wait states. This function provides a more accurate measurement of the total time required by your code to execute. This can help in understanding the real-world performance of your code.
Here’s an example using time.perf_counter():
import time

import timeit start = time.perf_counter() # Your code here end = time.perf_counter()

elapsed = end - start

print(f"Execution time: {elapsed} seconds")
In addition to measuring execution time directly, you can also calculate the time difference using the datetime module. This module provides a more human-readable representation of time data.
Here’s an example code snippet that calculates the time difference using datetime:
from datetime import datetime start = datetime.now() # Your code here end = datetime.now()

elapsed = end - start

print(f"Execution time: {elapsed}")
Frequently Asked Questions
How to measure function execution time using timeit?
To measure the execution time of a function using the timeit module, you can use the timeit.timeit() method. First, import the timeit module, and then create a function you want to measure. You can call the timeit.timeit() method with the function’s code and the number of executions as arguments.
For example:
import timeit def my_function(): # Your code here execution_time = timeit.timeit(my_function, number=1000)

print("Execution time:", execution_time)
What is the proper way to use the timeit module in Python?
The proper way to use the timeit module is by following these steps:
Import the timeit module.
Define the code or function to be timed.
Use the timeit.timeit() method to measure the execution time, and optionally specify the number of times the code should be executed.
Print or store the results for further analysis.
How to time Python functions with arguments using timeit?
To time a Python function that takes arguments using timeit, you can use a lambda function or functools.partial(). For example:
import timeit

from functools import partial def my_function(arg1, arg2): # Your code here # Using a lambda function

time_with_lambda = timeit.timeit(lambda: my_function("arg1", "arg2"), number=1000) # Using functools.partial()

my_function_partial = partial(my_function, "arg1", "arg2")

time_with_partial = timeit.timeit(my_function_partial, number=1000)
What are the differences between timeit and time modules?
The timeit module is specifically designed for measuring small code snippets’ execution time, while the time module is more generic for working with time-related functions. The timeit module provides more accurate and consistent results for timing code execution, as it disables the garbage collector and uses an internal loop, reducing the impact of external factors.
How to use timeit in a Jupyter Notebook?
In a Jupyter Notebook, use the %%timeit cell magic command to measure the execution time of a code cell:
%%timeit

# Your code here
This will run the code multiple times and provide the average execution time and standard deviation.
What is the best practice for measuring execution time with timeit.repeat()?
The timeit.repeat() method is useful when you want to measure the execution time multiple times and then analyze the results. The best practice is to specify the number of repeats, the number of loops per repeat, and analyze the results to find the fastest, slowest, or average time. For example:
Using timeit.repeat() allows you to better understand the function’s performance in different situations and analyze the variability in execution time.
Most of the applications have the requirement to upload files to the server. In previous articles, we have seen a variety of file upload methods with valuable features.
For example, we learned how to upload files with or without AJAX, validate the uploaded files, and more features.
This tutorial will show how to code for file uploading with a progress bar by Dropzone.
To the extreme, websites start showing the progressing percentage of the upload. It is the best representation of showing that the upload request is in progress.
About Dropzone
The Dropzone is a JavaScript library popularly known for file uploading and related features. It has a vast market share compared to other such libraries.
It provides a massive list of features. Some of the attractive features are listed below.
It supports multi-file upload.
It represents progressing state and percentage.
It allows browser image resizing. It’s a valuable feature that supports inline editing of images.
Image previews in the form of thumbnails.
It supports configuring the uploaded file’s type and size limit.
How to integrate dropzone.js to upload with the progress bar
Integrating Dropzone into an application is simple. It is all about keeping these two points during the integration.
Mapping the UI element with the Dropzone initiation.
Handling the upload event callbacks effectively.
Mapping the UI element with the Dropzone initiation
The below code has the HTML view to show the Dropzone file upload to the UI. It includes the Dropzone JS and the CSS via a CDN URL.
This section has the Dropzone library script to include in the view. This script sets the file properties and limits to the upload process. Some of the properties are,
maxFilesize – Maximum size allowed for the file to upload.
paramName – File input name to access like $_FILE[‘paramName here’].
maxFiles – File count allowed.
acceptedFiles – File types or extensions allowed.
The init property of this script allows handling the upload event. The event names are listed below.
uploadprogress – To track the percentage of uploads to update the progress bar.
success – When the file upload request is completed. This is as similar to a jQuery AJAX script‘s success/error callbacks.
Dropzone options have the upload form reference to listen to the file drop event. The callback function receives the upload status to update the UI.
The dropzone calls the endpoint action when dropping the file into the drop area.
The drop area will show thumbnails or a file preview with the progress bar.
Dropzone.options.myDropzone = { paramName: "file", // filename handle to upload maxFilesize: 2, // MB maxFiles: 1, // number of files allowed to upload acceptedFiles: ".png, .jpg, .jpeg, .gif", // file types allowed to upload init: function () { this.on("uploadprogress", function (file, progress) { var progressBar = file.previewElement.querySelector(".progress-bar"); progressBar.style.width = progress + "%"; progressBar.innerHTML = progress + "%"; }); this.on("success", function (file, response) { var progressBar = file.previewElement.querySelector(".progress-bar"); progressBar.classList.add("bg-success"); progressBar.innerHTML = "Uploaded"; }); this.on("error", function (file, errorMessage) { var progressBar = file.previewElement.querySelector(".progress-bar"); progressBar.classList.add("bg-danger"); progressBar.innerHTML = errorMessage; }); } };
PHP file upload script
This a typical PHP file upload script suite for any single file upload request. But, the dependent changes are,
File handle name ($_FILES[‘File handle name’]).
Target directory path for $uploadDir variable.
<?php if ($_SERVER['REQUEST_METHOD'] === 'POST' && isset($_FILES['file'])) { $file = $_FILES['file']; // file to be uploaded to this directory // should have sufficient file permissions $uploadDir = 'uploads/'; // unique file name generated for the uploaded file $fileName = uniqid() . '_' . $file['name']; // moving the uploaded file from temp directory to uploads directory if (move_uploaded_file($file['tmp_name'], $uploadDir . $fileName)) { echo 'File uploaded successfully.'; } else { echo 'Failed to upload file.'; }

}
How to hide the progress bar of uploaded files
By default, the Dropzone JS callback adds a dz-complete CSS class selector to the dropzone element. It will hide the progress bar from the preview after a successful upload.
This default behavior is by changing the progress bar opacity to 0. But the markup will be there in the source. Element hide and show can be done in various ways.
If you want to remove the progress bar element from the HTML preview, use the JavaScript remove() function. This script calls it for the progress bar element on the success callback.
Dropzone.options.myDropzone = { ... ... init: function () { ... ... this.on("success", function (file, response) { var progressBar = file.previewElement.querySelector(".progress-bar"); progressBar.remove(); }); ... ... }

};
Posted by: xSicKxBot - 08-20-2023, 12:34 AM - Forum: Python
- No Replies
[Tut] Python – Get Quotient and Remainder with divmod()
5/5 – (1 vote)
Understanding divmod() in Python
divmod() is a useful built-in function in Python that takes two arguments and returns a tuple containing the quotient and the remainder. The function’s syntax is quite simple: divmod(x, y), where x is the dividend, and y is the divisor.
The divmod() function is particularly handy when you need both the quotient and the remainder for two numbers. In Python, you can typically compute the quotient using the // operator and the remainder using the % operator. Using divmod() is more concise and efficient because it avoids redundant work.
Here’s a basic example to illustrate how divmod() works:
x, y = 10, 3

result = divmod(x, y)

print(result) # Output: (3, 1)
In this example, divmod() returns a tuple (3, 1) – the quotient is 3, and the remainder is 1.
divmod() can be particularly useful in various applications, such as solving mathematical problems or performing operations on date and time values. Note that the function will only work with non-complex numbers as input.
Here’s another example demonstrating divmod() with larger numbers:
x, y = 2050, 100

result = divmod(x, y)

print(result) # Output: (20, 50)
In this case, the quotient is 20, and the remainder is 50.
To summarize, the divmod() function in Python is an efficient way to obtain both the quotient and the remainder when dividing two non-complex numbers.
I created an explainer video on the function here:
Divmod’s Parameters and Syntax
The divmod() function in Python is a helpful built-in method used to obtain the quotient and remainder of two numbers. To fully understand its use, let’s discuss the function’s parameters and syntax.
This function accepts two non-complex parameters, number1 and number2.
The first parameter, number1, represents the dividend (the number being divided), while
the second parameter, number2, denotes the divisor (the number dividing) or the denominator.
The syntax for using divmod() is straightforward:
divmod(number1, number2)
Note that both parameters must be non-complex numbers. When the function is executed, it returns a tuple containing two values – the quotient and the remainder.
Here’s an example to make it clear:
result = divmod(8, 3)

print("Quotient and Remainder =", result)
This code snippet would output:
Quotient and Remainder = (2, 2)
This indicates that when 8 is divided by 3, the quotient is 2 and the remainder is 2. Similarly, you can apply divmod() with different numbers or variables representing numbers.
Return Value of Divmod
The divmod() function in Python is a convenient way to calculate both the quotient and remainder of two numbers simultaneously. This function accepts two arguments, which are the numerator and denominator, and returns a tuple containing the quotient and remainder as its elements.
The syntax for divmod() is as follows:
quotient, remainder = divmod(number1, number2)
Here is an example of how divmod() can be used:
result = divmod(8, 3)

print('Quotient and Remainder =', result)
In this example, divmod() returns the tuple (2, 2) representing the quotient (8 // 3 = 2) and the remainder (8 % 3 = 2). The function is useful in situations where you need to calculate both values at once, as it can save computation time by avoiding redundant work.
When working with arrays, you can use NumPy’s divmod() function to perform element-wise quotient and remainder calculations.
Here is an example using NumPy:
import numpy as np x = np.array([10, 20, 30])

y = np.array([3, 5, 7]) quotient, remainder = np.divmod(x, y)

print('Quotient:', quotient)

print('Remainder:', remainder)
In this case, the output will be two arrays, one for the quotients and one for the remainders of the element-wise divisions.
Working with Numbers
In Python, working with numbers, specifically integers, is a common task that every programmer will encounter. The divmod() function is a built-in method that simplifies the process of obtaining both the quotient and the remainder when dividing two numbers. This function is especially useful when working with large datasets or complex calculations that involve integers.
The divmod() function takes two arguments, the dividend and the divisor, and returns a tuple containing the quotient and remainder. The syntax for using this function is as follows:
result = divmod(number1, number2)
Here’s a simple example that demonstrates how to use divmod():
In this example, we divide 10 by 3, and the function returns the tuple (3, 1), representing the quotient and remainder, respectively.
An alternative approach to finding the quotient and remainder without using divmod() is to employ the floor division // and modulus % operators. Here’s how you can do that:
While both methods yield the same result, the divmod() function offers the advantage of calculating the quotient and remainder simultaneously, which can be more efficient in certain situations.
When working with floating-point numbers, the divmod() function can still be applied. However, keep in mind that the results may be less precise due to inherent limitations in representing floating-point values in computers:
The divmod() function in Python makes it easy to simultaneously obtain the quotient and remainder when dividing two numbers. It returns a tuple that includes both values. Let’s dive into several examples to see how it works.
Consider dividing 25 by 7. Using divmod(), we can quickly obtain the quotient and remainder:
result = divmod(25, 7)

print(result) # Output: (3, 4)
In this case, the quotient is 3, and the remainder is 4.
Now, let’s look at a scenario involving floating-point numbers. The divmod() function can also handle them:
result = divmod(8.5, 2.5)

print(result) # Output: (3.0, 0.5)
Here, we can see that the quotient is 3.0, and the remainder is 0.5.
Another example would be dividing a negative number by a positive number:
result = divmod(-15, 4)

print(result) # Output: (-4, 1)
The quotient is -4, and the remainder is 1.
It’s essential to remember that divmod() does not support complex numbers as input:
result = divmod(3+2j, 2)

# Output: TypeError: can't take floor or mod of complex number.
The Division and Modulo Operators
In Python programming, division and modulo operators are commonly used to perform arithmetic operations on numbers. The division operator (//) calculates the quotient, while the modulo operator (%) computes the remainder of a division operation. Both these operators are an essential part of Python’s numeric toolkit and are often used in mathematical calculations and problem-solving.
The division operator is represented by // and can be used as follows:
quotient = a // b
Here, a is the dividend, and b is the divisor. This operation will return the quotient obtained after dividing a by b.
On the other hand, the modulo operator is represented by % and helps in determining the remainder when a number is divided by another:
remainder = a % b
Here, a is the dividend, and b is the divisor. This operation will return the remainder obtained after dividing a by b.
Let’s take a look at an example:
a = 10

b = 3

quotient = a // b # Result: 3

remainder = a % b # Result: 1

print("Quotient:", quotient, "Remainder:", remainder)
This code snippet computes the quotient and remainder when 10 is divided by 3. The output of this code will be:
Quotient: 3 Remainder: 1
Python also provides a built-in function divmod() for simultaneously computing the quotient and remainder. The divmod() function takes two arguments – the dividend and the divisor – and returns a tuple containing the quotient and the remainder:
result = divmod(10, 3)

print(result) # Output: (3, 1)
Alternative Methods to Divmod
In Python, the divmod() method allows you to easily compute the quotient and remainder of a division operation. However, it’s also worth knowing a few alternatives to the divmod() method for computing these values.
One of the simplest ways to find the quotient and remainder of a division operation without using divmod() is by using the floor division (//) and modulus (%) operators. Here’s an example:
If you want to avoid using the floor division and modulus operators and only use basic arithmetic operations, such as addition and subtraction, you can achieve the quotient and remainder through a while loop. Here’s an example:
For finding the quotient and remainder of non-integer values, you may consider using the math module, which provides math.floor() and math.fmod() functions that work with floating-point numbers:
The divmod() function in Python is a convenient way to obtain both the quotient and the remainder of two numbers. It takes two numbers as arguments and returns a tuple containing the quotient and the remainder.
Here’s a basic example that demonstrates how to use the divmod() function:
In this example, the divmod() function receives two arguments, numerator and denominator, and returns the tuple (quotient, remainder). The output will be:
Quotient: 3

Remainder: 1
You can also use divmod() in a program that iterates through a range of numbers. For example, if you want to find the quotient and remainder of dividing each number in a range by a specific denominator, you can do the following:
denominator = 3

for num in range(1, 11): quotient, remainder = divmod(num, denominator) print(f"{num} // {denominator} = {quotient}, {num} % {denominator} = {remainder}")
This program will print the quotient and remainder for each number in the range 1 to 10 inclusive, when divided by 3.
When writing functions that require a variable number of arguments, you can use the *args syntax to pass a tuple of numbers to divmod().
In this example, the custom_divmod() function receives a variable number of arguments. The zip() function is used to create pairs of numerators and denominators by slicing the input arguments. The resulting list of quotient-remainder tuples is then returned.
By utilizing the divmod() function in your programs, you can efficiently obtain both the quotient and remainder of two numbers in a single call, making your code more concise and easier to read.
Frequently Asked Questions
How to use divmod function in Python?
The divmod() function in Python is a built-in function that takes two numbers as arguments and returns a tuple containing the quotient and the remainder of the division operation. Here’s an example:
result = divmod(10, 3)

print(result) # Output: (3, 1)
How to find quotient and remainder using divmod?
To find the quotient and remainder of two numbers using divmod(), simply pass the dividend and divisor as arguments to the function. The function will return a tuple where the first element is the quotient and the second element is the remainder:
q, r = divmod(10, 3)

print("Quotient:", q) # Output: 3

print("Remainder:", r) # Output: 1
How does divmod work with negative numbers?
When using divmod() with negative numbers, the function will return the quotient and remainder following the same rules as for positive numbers. However, if either the dividend or the divisor is negative, the result’s remainder will have the same sign as the divisor:
result = divmod(-10, 3)

print(result) # Output: (-4, 2)
How to perform division and modulo operations simultaneously?
By using the divmod() function, you can perform both division and modulo operations in a single step, as it returns a tuple containing the quotient and the remainder:
result = divmod(10, 3)

print("Quotient and Remainder:", result) # Output: (3, 1)
Is there a divmod equivalent in other languages?
While not all programming languages have a function named “divmod,” most languages provide a way to perform integer division and modulo operations. For example, in JavaScript, you can use the following code to obtain similar results:
let dividend = 10;

let divisor = 3; let quotient = Math.floor(dividend / divisor);

let remainder = dividend % divisor;

console.log(`Quotient: ${quotient}, Remainder: ${remainder}`); // Output: Quotient: 3, Remainder: 1
What are the differences between divmod and using // and %?
Using divmod() is more efficient when you need both the quotient and remainder, as it performs the calculation in a single step. However, if you only need the quotient or the remainder, you can use the floor division // operator for the quotient and the modulo % operator for the remainder:






 Python tuple is a fundamental data type, serving as a collection of ordered, immutable elements. Tuples are used to group multiple data items together. Tuples are created using parentheses






 The
The 










Share this page