Create an account


Welcome, Guest
You have to register before you can post on our site.

Username
  

Password


Search Forums

(Advanced Search)

Forum Statistics
» Members: 20,112
» Latest member: poxah56770
» Forum threads: 21,791
» Forum posts: 22,657

Full Statistics

Online Users
There are currently 607 online users.
» 0 Member(s) | 602 Guest(s)
Applebot, Baidu, Bing, Google, Yandex

 
  [Tut] ModuleNotFoundError: No Module Named OpenAI
Posted by: xSicKxBot - 03-01-2023, 06:10 AM - Forum: Python - No Replies

ModuleNotFoundError: No Module Named OpenAI

5/5 – (1 vote)

Quick Fix: Python raises the ImportError: No module named 'openai' when it cannot find the library openai. The most frequent source of this error is that you haven’t installed openai explicitly with pip install openai. Alternatively, you may have different Python versions on your computer, and openai is not installed for the particular version you’re using.

Before I dive into the tutorial, try out one of the following solutions (quick fix):

# ✅ Python 2 or Virtual Environment pip install openai # ✅ Python 3
pip3 install openai # ✅ Python 3.10
pip3.10 install openai # ✅ If you get a Permission Error
sudo pip3 install openai # ✅ If pip is not in your PATH environment variable
python -m pip install openai # ✅ Python 3 if pip is not in your PATH
python3 -m pip install openai # ✅ Python 3.10 if pip is not in your PATH
python3.10 -m pip install openai # ✅ Anaconda
conda install -c conda-forge openai

Problem Formulation


You’ve just learned about the awesome capabilities of the openai library and you want to try it out, so you start your code with the following statement:

import openai

This is supposed to import the OpenAI library into your (virtual) environment. However, it only throws the following ImportError: No module named 'openai':

>>> import openai
Traceback (most recent call last): File "<pyshell#6>", line 1, in <module> import openai
ModuleNotFoundError: No module named 'openai'

Solution Idea 1: Install Library OpenAI


The most likely reason is that Python doesn’t provide openai in its standard library. You need to install it first!

Before being able to import the OpenAI module, you need to install it using Python’s package manager pip. Make sure pip is installed on your machine.

To fix this error, you can run the following command in your Windows shell:

$ pip install openai

This simple command installs openai in your virtual environment on Windows, Linux, and MacOS. It assumes that your pip version is updated. If it isn’t, use the following two commands in your terminal, command line, or shell (there’s no harm in doing it anyways):

$ python -m pip install --upgrade pip
$ pip install openai

? Note: Don’t copy and paste the $ symbol. This just illustrates that you run it in your shell/terminal/command line.

Solution Idea 2: Fix the Path


The error might persist even after you have installed the openai library. This likely happens because pip is installed but doesn’t reside in the path you can use. Although pip may be installed on your system the script is unable to locate it. Therefore, it is unable to install the library using pip in the correct path.

To fix the problem with the path in Windows follow the steps given next.

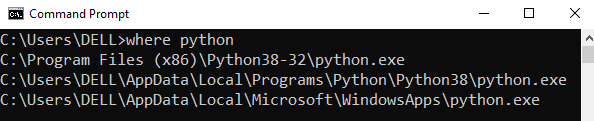
Step 1: Open the folder where you installed Python by opening the command prompt and typing where python


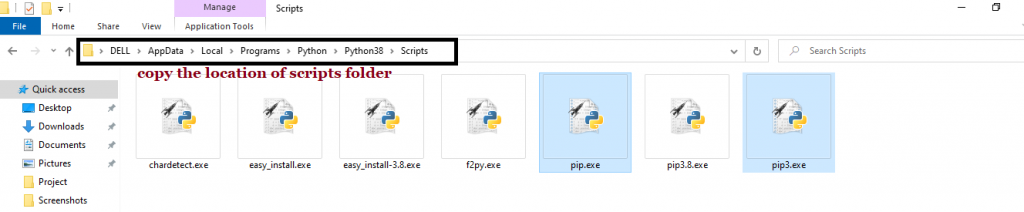
Step 2: Once you have opened the Python folder, browse and open the Scripts folder and copy its location. Also verify that the folder contains the pip file.


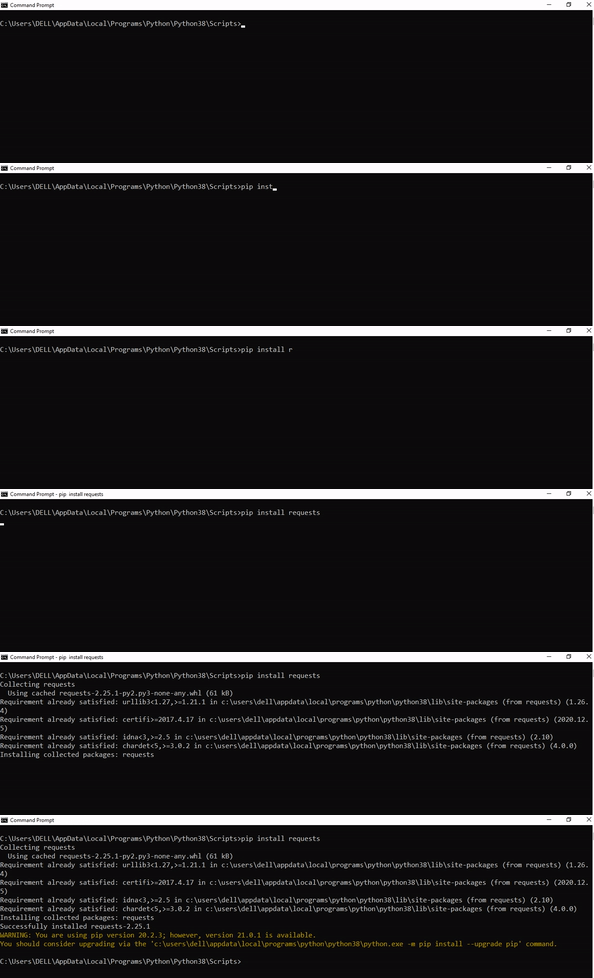
Step 3: Now open the Scripts directory in the command prompt using the cd command and the location that you copied previously.


Step 4: Now install the library using pip install openai command. Here’s an analogous example:


After having followed the above steps, execute our script once again. And you should get the desired output.

Other Solution Ideas


  • The ModuleNotFoundError may appear due to relative imports. You can learn everything about relative imports and how to create your own module in this article.
  • You may have mixed up Python and pip versions on your machine. In this case, to install openai for Python 3, you may want to try python3 -m pip install openai or even pip3 install openai instead of pip install openai
  • If you face this issue server-side, you may want to try the command pip install --user openai
  • If you’re using Ubuntu, you may want to try this command: sudo apt install openai
  • You can check out our in-depth guide on installing openai here.
  • You can also check out this article to learn more about possible problems that may lead to an error when importing a library.

Understanding the “import” Statement


import openai

In Python, the import statement serves two main purposes:

  • Search the module by its name, load it, and initialize it.
  • Define a name in the local namespace within the scope of the import statement. This local name is then used to reference the accessed module throughout the code.

What’s the Difference Between ImportError and ModuleNotFoundError?


What’s the difference between ImportError and ModuleNotFoundError?

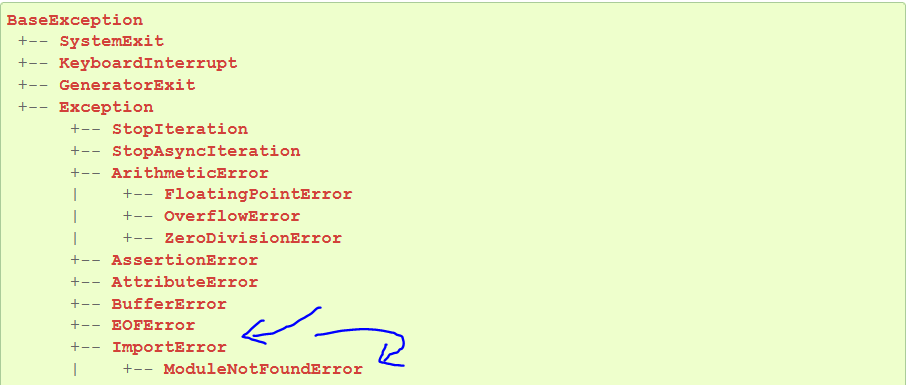
Python defines an error hierarchy, so some error classes inherit from other error classes. In our case, the ModuleNotFoundError is a subclass of the ImportError class.

You can see this in this screenshot from the docs:


You can also check this relationship using the issubclass() built-in function:

>>> issubclass(ModuleNotFoundError, ImportError)
True

Specifically, Python raises the ModuleNotFoundError if the module (e.g., openai) cannot be found. If it can be found, there may be a problem loading the module or some specific files within the module. In those cases, Python would raise an ImportError.

If an import statement cannot import a module, it raises an ImportError. This may occur because of a faulty installation or an invalid path. In Python 3.6 or newer, this will usually raise a ModuleNotFoundError.

Related Videos


The following video shows you how to resolve the ImportError:

YouTube Video

The following video shows you how to import a function from another folder—doing it the wrong way often results in the ModuleNotFoundError:

YouTube Video

How to Fix “ModuleNotFoundError: No module named ‘openai’” in PyCharm


If you create a new Python project in PyCharm and try to import the openai library, it’ll raise the following error message:

Traceback (most recent call last): File "C:/Users/.../main.py", line 1, in <module> import openai
ModuleNotFoundError: No module named 'openai' Process finished with exit code 1

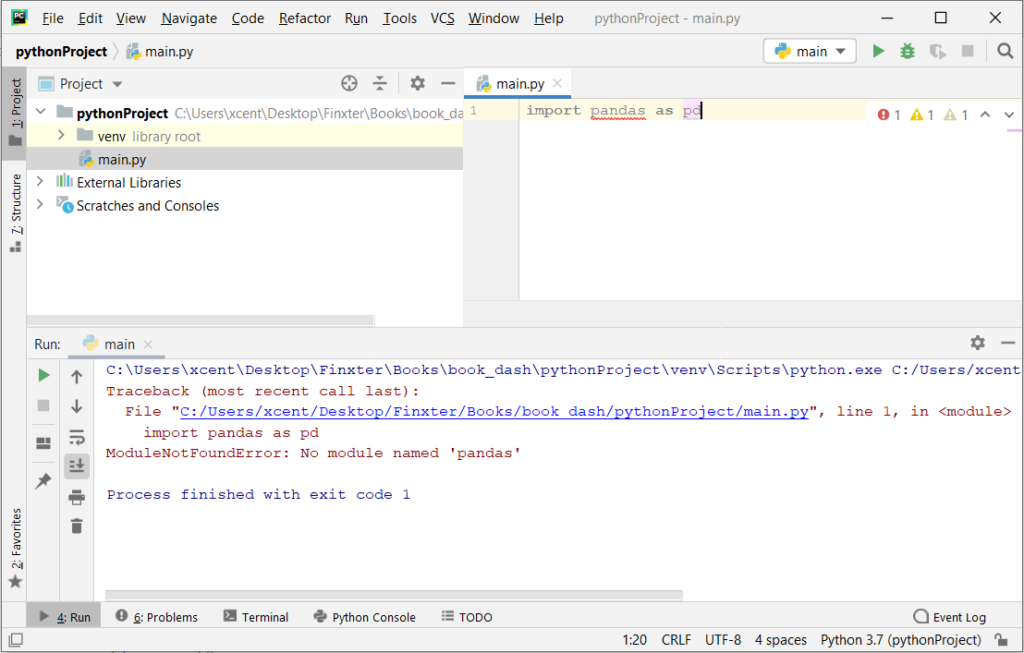
The reason is that each PyCharm project, per default, creates a virtual environment in which you can install custom Python modules. But the virtual environment is initially empty—even if you’ve already installed openai on your computer!

Here’s a screenshot exemplifying this for the pandas library. It’ll look similar for openai.


The fix is simple: Use the PyCharm installation tooltips to install OpenAI in your virtual environment—two clicks and you’re good to go!

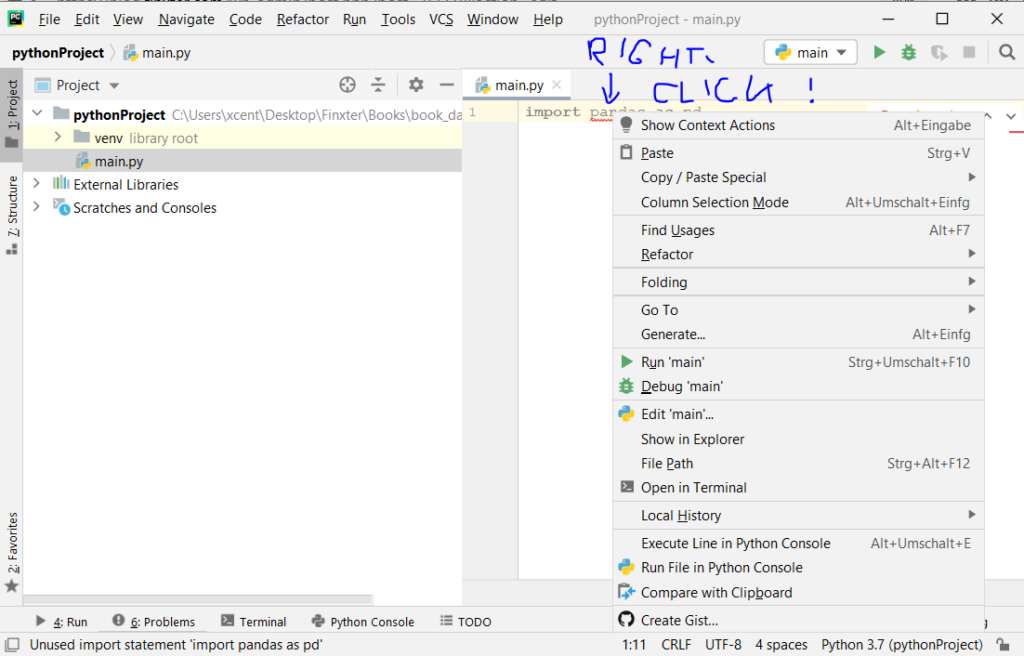
First, right-click on the openai text in your editor:


Second, click “Show Context Actions” in your context menu. In the new menu that arises, click “Install OpenAI” and wait for PyCharm to finish the installation.

The code will run after your installation completes successfully.

As an alternative, you can also open the Terminal tool at the bottom and type:

$ pip install openai

If this doesn’t work, you may want to set the Python interpreter to another version using the following tutorial: https://www.jetbrains.com/help/pycharm/2016.1/configuring-python-interpreter-for-a-project.html

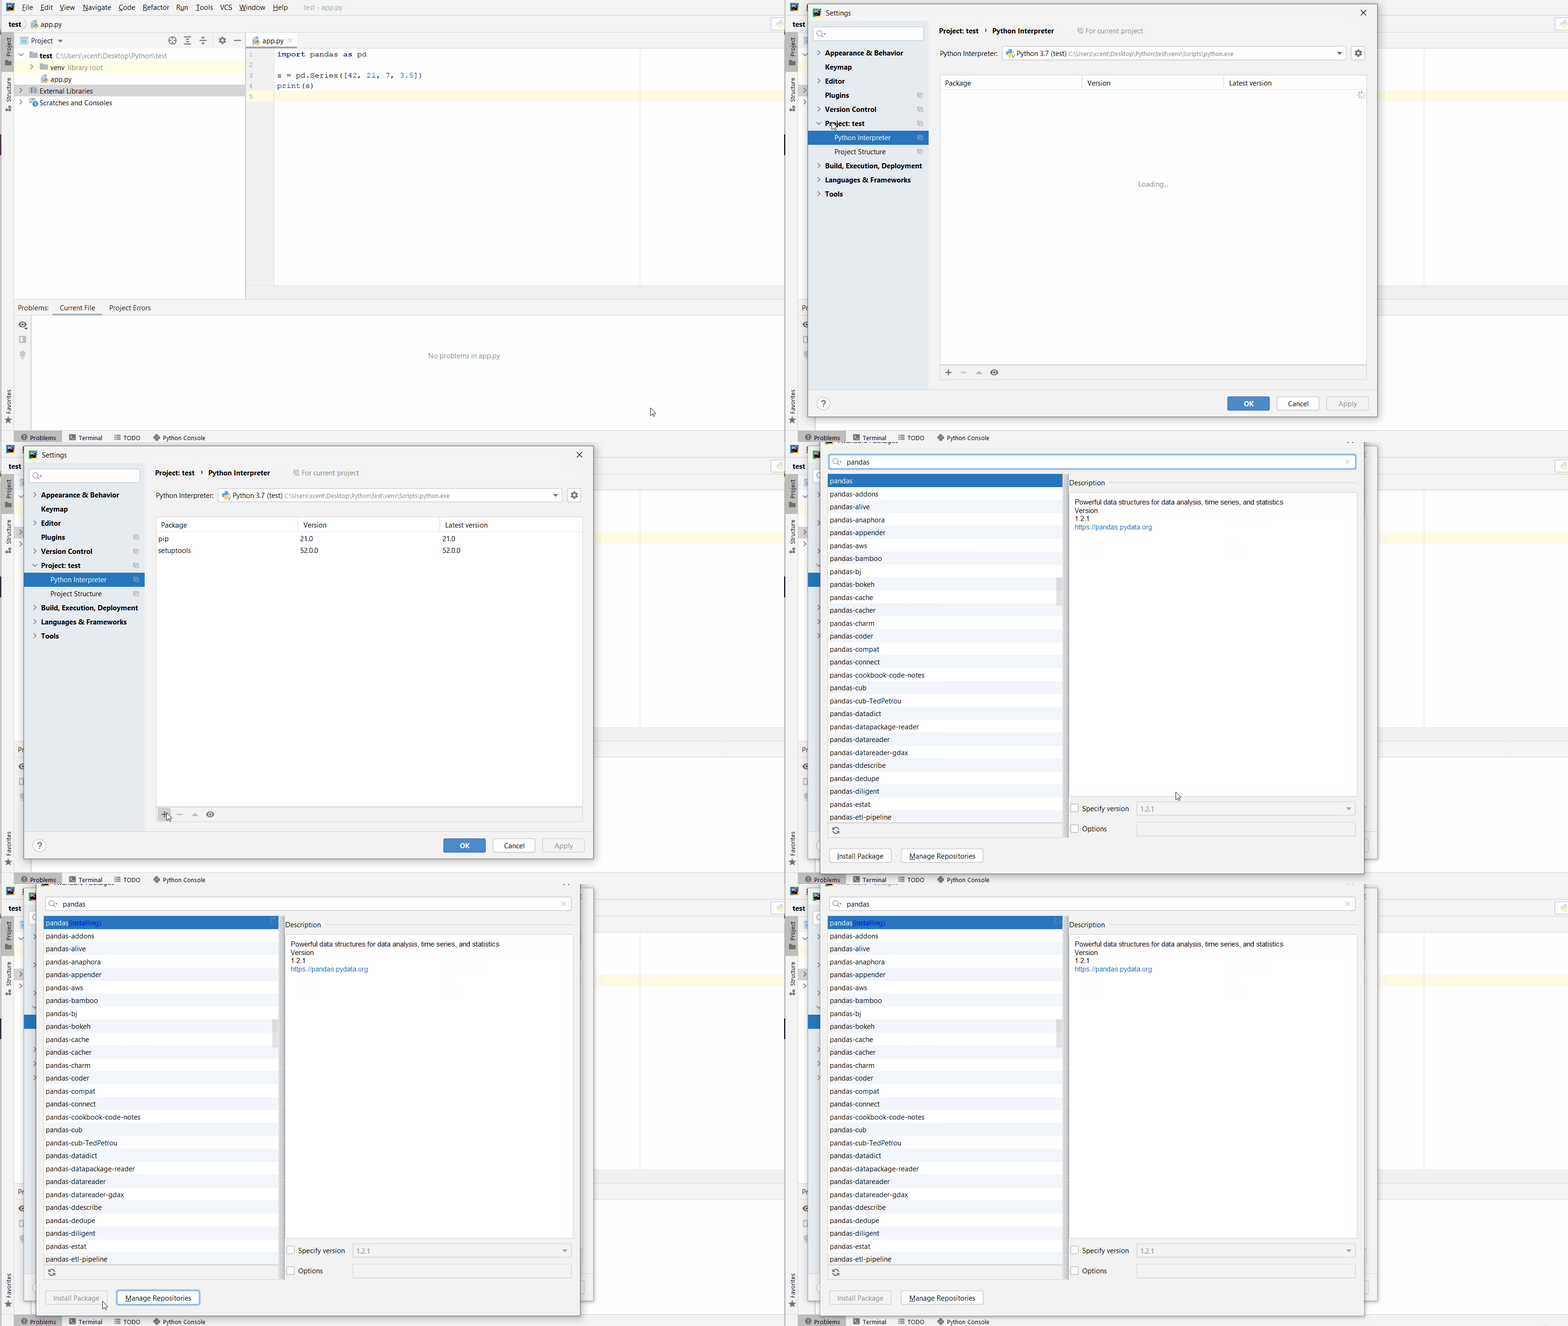
You can also manually install a new library such as openai in PyCharm using the following procedure:

  • Open File > Settings > Project from the PyCharm menu.
  • Select your current project.
  • Click the Python Interpreter tab within your project tab.
  • Click the small + symbol to add a new library to the project.
  • Now type in the library to be installed, in your example OpenAI, and click Install Package.
  • Wait for the installation to terminate and close all popup windows.

Here’s an analogous example:


Here’s a full guide on how to install a library on PyCharm.


https://www.sickgaming.net/blog/2023/02/...ed-openai/

Print this item

  (Indie Deal) FREE Last Dream, KSP2 is out, Bethesda Deals
Posted by: xSicKxBot - 03-01-2023, 06:10 AM - Forum: Deals or Specials - No Replies

FREE Last Dream, KSP2 is out, Bethesda Deals

Last Dream FREEbie
[freebies.indiegala.com]
https://www.youtube.com/watch?v=4MYQjq1y41A

Hi-Fi RUSH (16%), Ghostwire: Tokyo (68%), Redfall (15%/pre-order bonuses), DEATHLOOP (72%), The Elder Scrolls Online Collection: Necrom (15%/pre-purchase bonuses), DOOM Eternal (70%), Fallout 4 (72%), Dishonored 2 (81%), The ESO Collection: High Isle (70%)

Annapurna Sale, up to 77% OFF
[www.indiegala.com]

Love Riddle Bundle Happy Hour Active
[www.indiegala.com]


https://steamcommunity.com/groups/indieg...6832075892

Print this item

  PC - Redemption Reapers
Posted by: xSicKxBot - 03-01-2023, 06:09 AM - Forum: New Game Releases - No Replies

Redemption Reapers


Descending suddenly on the world, the macabre Mort armies destroy nation after nation, leaving humanity decimated in their wake. Among the forces resisting the Mort is a small band of mercenaries known as the Ashen Hawk Brigade.

Redemption Reapers is a dark fantasy simulation game set in a medieval world. Be immersed in the tale of the desperate struggle between the Ashen Hawk Brigade and the terrifying Mort legions.

With despair looming as the menacing Mort horde marches ever closer, help your small resistance defeat the enemy masses by bringing together a rich variety of character builds and a meticulous strategy. Experience the exhilaration as you rise up to overcome the odds and achieve victory!

Publisher: Binary Haze Interactive

Release Date: Feb 22, 2023


https://www.metacritic.com/game/pc/redemption-reapers

Print this item

  Digital marketing services in USA
Posted by: crecentechsystem - 02-28-2023, 11:50 AM - Forum: Windows - No Replies

CrecenTech is a US based one stop creative company to cater to your marketing, software, support, and staffing solutions requirements Contact us now!
Digital marketing services in USA

Print this item

  [Oracle Blog] Java Card 3.1: Security Services
Posted by: xSicKxBot - 02-28-2023, 06:55 AM - Forum: Java Language, JVM, and the JRE - No Replies

Java Card 3.1: Security Services

A key goal of version 3.1 is to ensure the availability of security services on a large range of secure hardware, including smartcards, embedded chips, secure enclaves within microprocessor units (MPUs) and microcontroller units (MCUs), and removable SIMs.


https://blogs.oracle.com/java/post/java-...y-services

Print this item

  [Tut] How to Install Pip? 5 Easy Steps
Posted by: xSicKxBot - 02-28-2023, 06:55 AM - Forum: Python - No Replies

How to Install Pip? 5 Easy Steps

5/5 – (1 vote)

In this article, I’ll quickly guide you through the installation steps for Python’s package installer pip. But first things first: ?

What Is Pip?


✅ pip is the package installer for Python used to install and manage software packages (also known as libraries or modules) written in Python. pip makes it easy to install, upgrade, and uninstall packages in your Python environment.

When you install a package with pip, it automatically downloads and installs any dependencies required by the package, making it very convenient for managing your Python projects. You can use pip from the command line but it also integrates with popular development environments like Jupyter, PyCharm, and Visual Studio Code.

Is Pip Already Included in Python?


pip is included with Python distributions from version 3.4 onwards, so if you have a recent version of Python installed, you should already have pip.

✅ Recommended: How to Check Your Python Version?

If you don’t have pip installed, you can easily install it using the steps outlined as follows:

5 Steps to Install Pip Easily


To install pip in Python, follow these steps:

  1. Check if pip is already installed by running the command “pip -V” in your command prompt or terminal. If you see a version number, pip is already installed. If not, proceed to step 2.

  1. Download the get-pip.py script from the official Python website (see below).
  2. Open a command prompt or terminal and navigate to the directory where you downloaded the get-pip.py script.
  3. Run the command python get-pip.py to install pip.
  4. Verify that pip is installed by running the command pip -V.

That’s it! You should now have pip installed and ready to use in your Python environment.

In case you weren’t able to complete step 2, here’s how to do it quickly:

How to Download get-pip.py from Official Python?


To download the get-pip.py script from the official Python website, follow these steps:

  1. Open a web browser and go to the following URL: https://bootstrap.pypa.io/get-pip.py
  2. Right-click on the page and select “Save As” (or similar option) to download the file.
  3. Choose a directory to save the file to and click “Save”.
  4. Once the download is complete, navigate to the directory where you saved the file.

Alternatively, you can use the following command in your command prompt or terminal to download the file directly:

curl https://bootstrap.pypa.io/get-pip.py -o get-pip.py

This will download the get-pip.py file to your current working directory.

Are There Other Ways to Install Pip?


Yes, there are a few other ways to install pip depending on your operating system and Python distribution.

Here are the three most common methods:

  1. Package managers: Many Linux distributions include pip in their package repositories, which means you can use your distribution’s package manager to install it. For example, on Ubuntu, you can use the following command: sudo apt-get install python-pip.
  2. Python installers: Some Python distributions come with pip pre-installed, such as Anaconda and ActivePython. If you are using one of these distributions, you should already have pip installed.
  3. Python package installer: Another way to install pip is by using the ensurepip module, which is included with Python since version 3.4. You can use the following command: python -m ensurepip --default-pip.

Regardless of the method you choose, it’s always a good idea to verify that pip is installed and working correctly by running the command pip -V.

How to Upgrade Pip?


To upgrade pip to the latest version, follow these steps:

Step 1: Open a command prompt or terminal and enter the following command to upgrade pip:

python -m pip install --upgrade pip

The previous command was for Linux or macOS. For Windows, you may want to use:

 py -m pip install --upgrade pip

Step 2: Depending on your system configuration, you may need to run this command with administrator privileges. On Linux or macOS, you can use sudo to run the command as root, like this:

sudo python -m pip install --upgrade pip

Step 3: pip will download and install the latest version of itself. Once the upgrade is complete, you can verify that pip is up to date by running the command:

pip --version

This will display the version number of the newly installed pip.


That’s it! You should now have the latest version of pip installed on your system.

Note that it’s a good idea to keep pip up to date to take advantage of bug fixes, security updates, and new features. You can check for updates to individual packages installed with pip using the pip list --outdated command, and upgrade them with pip install --upgrade <package>.

✅ Recommended: Pip Commands — The Ultimate Guide


https://www.sickgaming.net/blog/2023/02/...asy-steps/

Print this item

  PC - Atomic Heart
Posted by: xSicKxBot - 02-28-2023, 06:54 AM - Forum: New Game Releases - No Replies

Atomic Heart


In the Soviet Union of the future, in 1955, science reigns supreme. The world is on the verge of the greatest event. You are Agent Major P-3 and you will have to find out what is really lying behind the utopian dream.

Publisher: Mundfish

Release Date: Feb 21, 2023


https://www.metacritic.com/game/pc/atomic-heart

Print this item

  [Oracle Blog] Java Card 3.1: Enhanced deployment model and core features
Posted by: xSicKxBot - 02-27-2023, 11:06 AM - Forum: Java Language, JVM, and the JRE - No Replies

Java Card 3.1: Enhanced deployment model and core features

Java Card 3.1 introduces an extended file format, the management of static resources, binary compatibility improvements, and the support of array views. Those features evolve the deployment and upgrade of applications, and they permit better design modularity and security as well.


https://blogs.oracle.com/java/post/java-...e-features

Print this item

  [Tut] BrainWaves P2P Social Network – How I Created a Basic Server
Posted by: xSicKxBot - 02-27-2023, 11:06 AM - Forum: Python - No Replies

BrainWaves P2P Social Network – How I Created a Basic Server

5/5 – (1 vote)

Welcome back to the Brainwaves P2P project, or at least my take on it :-).

The previous article was a theoretical explanation of how I envision this project. It is now time to start laying the groundwork!

I learn as I go…


As some of you might have guessed already, I’m a completely self-taught coder. Because of that, I’m sure many professionals might not agree with how I code.

I accept that and will welcome any constructive criticism. I have been learning non-stop since I started this project. I assume this will not slow down anytime soon. YouTube is my main source of knowledge as I learn best when seeing something done. I am, in other words, a visual learner. I found an article that explains it well here.

Articles on various sites are the other half of how I learn new concepts in coding. That is how I found Finxter :-).

So to sum it up, my code is far from perfect, and I will never claim it is. This is my take on trying to solve this puzzle. I actually look forward to alternative approaches!

You can open issues on my GitHub if you want to address something.

Now that we all know where we stand let us dive right in! How to build a server for our peer-to-peer social network app?

Flask vs FastAPI


In the previous article, I mentioned that I want to use FastAPI to build the relay server, as opposed to Flask. As I have done before and will do again, I asked ChatGPT about the differences between Flask and FastAPI.

? Flask vs FastAPI Flask is based on the Werkzeug WSGI (Web Server Gateway Interface) toolkit, which is synchronous by default. However, Flask can still be used to build asynchronous applications. You will need to use a third-party library like gevent or asyncio. With these libraries, Flask can use coroutines and event loops to handle I/O operations asynchronously. FastAPI, on the other hand, is designed to be fully asynchronous from the ground up. It uses the async/await syntax of Python to write asynchronous code. It is based on the ASGI (Asynchronous Server Gateway Interface) specification. FastAPI uses the Starlette framework as its foundation. the framework provides a high-performance event loop and asynchronous request handlers.

Both the speed and the asynchrony determined my choice for FastAPI.

Those of you familiar with Flask will know about its built-in development server. As FastAPI doesn’t have this, we’ll need to install a separate server.

Uvicorn Server


This is where I encountered my first small hiccup. I code on Windows (I know, sue me ?), and I wanted to use Uvicorn. As this only runs on Linux, I needed to get it to function in WSL.

I’ll not go into all the details here, but I could write something about it if anyone has an interest in it. Let me know!

After getting Uvicorn to function as it should, we can continue. It is important to remember that the Python interpreter on WSL does not share anything with its Windows counterpart. This means that you either need two separate virtual environments or that you install pip packages for each OS.

Creating Basic FastAPI App


Once all this annoying prep work is done, creating a basic FastAPI app is very easy. We first import FastAPI as below:

from fastapi import FastAPI

All you need to do afterward is define the basic app and create an endpoint.

#---APP INIT---#
app = FastAPI() @app.get("/")
async def root(): return {"message": "Hello World"}

To get this to run, you need to navigate to the working directory of your FastAPI project via WSL. Afterward, you call the Uvicorn server. The command below assumes you called your Python file main.py!

uvicorn main:app --reload

I usually run the Uvicorn server in a separate terminal instance of WSL.

That way, I can leave it on and test any changes I make immediately. Later, when I’ll be working on the client also, I can split the terminal. You can then make API calls through the client terminal window. FastAPI’s response in the server WSL window is then visible immediately.

Receiving “Hello World” from Server


If you now navigate to 127.0.0.1:8000 you should get a JSON response with the "Hello World" we returned in the endpoint above. We will change this endpoints function later, but for now, it works to prove our API is working.

For the API server, I have the following layout in mind. It might change throughout the development process. I currently foresee two endpoints that do not require the user to be logged in with a JWT token. The first will be to get that token, and the second to register a new user. Everything else will require the user to be authenticated.

I stated earlier that I would change the root’s endpoint function. Its new role is now to allow a user to request a JWT token. The token is only granted after providing a correct combination of username and password. This requires a dedicated set of both helper functions and Pydantic models to work.

I will go into this in another article, as it requires much explaining :-). It was something I am still learning myself.

Endpoint Layout


The current layout of my endpoints at a high level is the following:

#---OPEN ENDPOINTS---# #Root route to get token
@app.post("/", response_model=Token) #Route to create a new user
@app.post("/api/v1/users") #---AUTH ENDPOINTS---# #Route to get all current users and their attributes(development only)
@app.get("/api/v1/users") #Route to test if the token is valid, used while authenticating
@app.get("/api/v1/token-test") #Route to get all thoughts/messages created by a certain user
@app.get("/api/v1/thoughts/{username}") #Route to return all thoughts/messages containing the query string
@app.get("/api/v1/thoughts/{query_str}") #Route to create a new message/thought
@app.post("/api/v1/thoughts") #Route to return all info about the current user(like a user profile)
@app.get("/api/v1/me", response_model=User)

The current setup should allow for the barebones functionality of the application. At least from a server point of view. The routes above and/or their function are liable to change during development.  I do find it helps to have a visual reminder of what I am working toward. That is why I created the high-level outlay. As you might recall, I am a visual learner ?.

Database Considerations


I will dedicate the last part of this article to the database part. As we need to store both users, user credentials, and messages/tweets somewhere, a database is a must.

If you have read any of my previous articles, you will know I like Deta a lot.

Their NoSQL databases work great for development. They recently evolved into Deta Space. This change makes their ecosystem even more interesting for developers. The fact that they are free is also important for a single developer coding this app on his own time ?. Make sure to check them out!

The next article will focus on both the database code and the Pydantic models we will need to get our API to function.

As always, feel free to ask me questions or pass suggestions! And check out the GitHub repository for participation!

? GitHub: https://github.com/shandralor/PeerBrain



https://www.sickgaming.net/blog/2023/02/...ic-server/

Print this item

  (Indie Deal) FREE Drop Hunt, Tropico & NMS Deals
Posted by: xSicKxBot - 02-27-2023, 11:06 AM - Forum: Deals or Specials - No Replies

FREE Drop Hunt, Tropico & NMS Deals

Drop Hunt - Adventure Puzzle FREEbie
[freebies.indiegala.com]
Be prepared for next impossible challenge in the adventure

https://www.youtube.com/watch?v=I6ISYwy_l9M
https://www.youtube.com/watch?v=FW1SzMv0jSQ
Tropico Franchise Sale
[www.indiegala.com]
New Vorax Short
https://www.youtube.com/watch?v=ruEMPgLJ9Co
https://www.youtube.com/watch?v=t3bWhhsbeXA
[discord.gg]


https://steamcommunity.com/groups/indieg...6827390843

Print this item

 
Latest Threads
Forza Horizon 5 Game Save...
Last Post: poxah56770
53 minutes ago
Secure Your First Apollo ...
Last Post: KALYANI1x
1 hour ago
Save Big During Apollo Ne...
Last Post: KALYANI1x
1 hour ago
Apollo Neuro Coupon Code ...
Last Post: jax9090mm
1 hour ago
[Latest] Temu Coupon Code...
Last Post: codestar99
1 hour ago
Apollo Neuro Discount Cod...
Last Post: jax9090mm
1 hour ago
Experience Better Tech Ap...
Last Post: KALYANI1x
1 hour ago
Temu Deutschland Gutschei...
Last Post: Benbeckman5
1 hour ago
Apollo Neuro Coupon Code ...
Last Post: jax9090mm
1 hour ago
Temu Coupon Code 30% Off ...
Last Post: codestar99
1 hour ago

Forum software by © MyBB Theme © iAndrew 2016