A former member of the criminal underworld is lured back into “the life” by a mysterious drone claiming they have until sunrise to prevent a citywide criminal takeover together.
Posted by: xSicKxBot - 08-30-2022, 02:11 AM - Forum: Python
- No Replies
How to Convert a Log to a CSV File in Python?
5/5 – (1 vote)
A not-so-fictious problem: Say, you’ve created a web application that runs on a dedicated Linux server in the cloud. Thousands of users visit your web app and suddenly … it crashes. Your users start complaining, and you lose revenue. More importantly, you bleed credibility by the hour. Your server is down, so what do you do?
First, don’t panic.
Let’s analyze your server logs!
This article shows you how to convert your log file to a CSV file in Python, that you can use for further processing (e.g., in Pandas or Excel).
Problem Formulation by Example
Given a file my_file.log like this one I pulled from a real IBM server log example:
03/22 08:51:01 INFO :.main: *************** RSVP Agent started ***************

03/22 08:51:01 INFO :...locate_configFile: Specified configuration file: /u/user10/rsvpd1.conf

03/22 08:51:01 INFO :.main: Using log level 511

03/22 08:51:01 INFO :..settcpimage: Get TCP images rc - EDC8112I Operation not supported on socket.

03/22 08:51:01 INFO :..settcpimage: Associate with TCP/IP image name = TCPCS
How to convert this log file to a CSV file of the following standard comma-separated values format:
03/22,08:51:01,INFO,:.main: *************** RSVP Agent started ***************

03/22,08:51:01,INFO,:...locate_configFile: Specified configuration file: /u/user10/rsvpd1.conf

03/22,08:51:01,INFO,:.main: Using log level 511

03/22,08:51:01,INFO,:..settcpimage: Get TCP images rc - EDC8112I Operation not supported on socket.

03/22,08:51:01,INFO,:..settcpimage: Associate with TCP/IP image name = TCPCS
Or, here’s how that would look if you opened it with Excel:
Prettier, isn’t it? Unlike the first representation (log file), this CSV representation is easier to read for (most) human beings.
Convert Server Log to CSV with Pandas
You can convert a .log file to a CSV file in Python in four simple steps: (1) Install the Pandas library, (2) import the Pandas library, (3) read the log file as DataFrame, and (4) write the DataFrame to the CSV file.
Note: The regular expressionsep='\s\s+' specifies more than one single whitespace as a separator between two CSV values. If you have a different separator string, you can define it here.
You specify the engine='python' to tell Pandas that we want the Python regular expression engine to process the separator regular expression.
The result of the code is the following CSV file:
You can use this CSV file as input for, say, an Excel sheet or Google Spreadsheet for further processing and analysis.
This is what your log file looks converted to a CSV and imported to Excel:
Remove all matching elements by value from JavaScript array.
Remove elements from JavaScript array using filter (an alternate).
Remove first element from array javascript.
Remove last element from array javascript.
1) Remove an element from JavaScript array (by index and value)
This quick example gets the first index of the given element. Then, it applies JavaScript splice() by sending the first index position. The splice() removes the item in the specified index.
Quick example
// this JavaScript example removes first occurrence of the matching element from array

const elements = [2, 5, 4, 5, 6, 5, 8];

console.log(elements);

// returns the index of the first match of value '5' from an array

const index = elements.indexOf(5);

// when the element is found the index will be non-negative

if (index > -1) { // the second parameter '1' asks to remove one element elements.splice(index, 1);

}

// result array after delete is [ 2, 4, 5, 6, 5, 8 ]

console.log(elements);
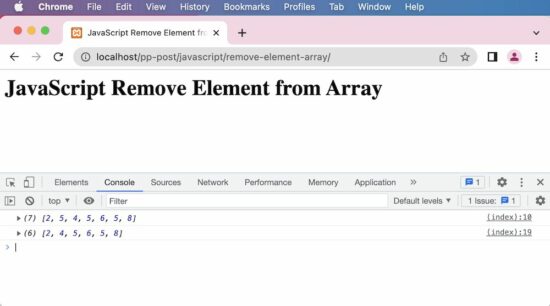
This screenshot shows the output of the above example. It shows first the original array and then the modified array after the removal of an item.
2) Remove all matching elements by value from JavaScript array
This example creates a custom JavaScript function to remove all the occurrences of a given element. It iterates all the array elements in a loop.
On each iteration, it compares and calls array.splice() by the current index. In PHP, it is about one line to remove all the occurrences by using array_diff() function.
remove-all-item.html
<html>

<head>

<title>JavaScript Remove All Matching Element from Array</title>

</head>

<body> <h1>JavaScript Remove All Matching Element from Array</h1> <script> function removeAllItem(elementsArray, element) { var i = 0; // iterate the elements array and remove matching element // till the end of the array index while (i < elementsArray.length) { if (elementsArray[i] === element) { elementsArray.splice(i, 1); } else { ++i; } } return elementsArray; } // this JavaScript example removes all occurence of the matching element from array const elements = [ 2, 5, 4, 5, 6, 5, 8 ]; console.log(elements); elementAfterRemoval = removeAllItem(elements, 5); console.log(elementAfterRemoval); </script>

</body>

</html>
3) Remove elements from JavaScript array using filter (an alternate)
This is an alternate method that returns the same array output as the result of removing an item.
Instead of a loop, it parses the input array by using a JavaScript filter. The filter callback checks the condition to find the element match to remove.
If the match is not found, the current element will be pushed to an output array.
remove-alternate.html
<html>

<head>

<title>JavaScript Remove Element from Array - Alternate Method using filter</title>

</head>

<body> <h1>JavaScript Remove Element from Array - Alternate Method using filter</h1> <script> const elements = [ 2, 5, 4, 5, 6, 5, 8 ]; console.log(elements); var value = 5 // filter function does not change the original array // but the splice function changes the original array newElements = elements.filter(function(item) { return item !== value }) console.log(newElements) // result is [ 2, 4, 6, 8 ] </script>

</body>

</html>
In JavaScript, the array.shift() function removes the first element of an input array. The shift() function returns the remove element which is 2 in this example.
remove-first-element.html
<html>

<head>

<title>JavaScript Remove First Element from Array</title>

</head>

<body> <h1>JavaScript Remove First Element from Array</h1> <script> // the JavaScript shift function moves elements to the left // this is like pop from a stack // splice function can also be used to achieve this var elements = [ 2, 5, 4, 5, 6, 5, 8 ]; console.log(elements); // removedElement is 2 var removedElement = elements.shift(); // result array after delete is [ 5, 4, 5, 6, 5, 8 ] console.log(elements); </script>

</body>

</html>
5) Remove the last element from array using JavaScript
JavaScript has a function array.pop() to remove the last item of an array. It also returns the removed item to the calling point as like like array.shift().
Note: If the input array is empty then the shift() and pop() will return undefined.
remove-last-element.html
<html>

<head>

<title>JavaScript Remove Last Element from Array</title>

</head>

<body> <h1>JavaScript Remove Last Element from Array</h1> <script> // the JavaScript pop function removes last element from an array var elements = [ 2, 5, 4, 5, 6, 5, 8 ]; console.log(elements); // removedElement is 8 var removedElement = elements.pop(); // result array after delete is [ 2, 5, 4, 5, 6, 5 ]; console.log(elements); </script>

</body>

</html>
This example created custom functions in JavaScript to remove all the occurrences of the specified element. Instead, there should be a native function in JavaScript for doing this. PHP, Python and most of the languages have the native function for this.
Information in our possession is conflicting, but it seems that the infection has spread very quickly within a few days, perhaps even in a few hours. It seems that in the hours immediately following the outbreak of the infection, 43rd NATO airborne battalion was sent to the island but all contacts were lost after only 8 hours.
PMCW considers this matter with the utmost importance. Objectives of team W1 are:
Locate the biolab
Take in vitro samples of the pathogen (codename: "Vorax")
Liquidate surviving medical personnel (optionally) and any witnesses.
In NO case must the presence of the PMCW be revealed.
Every W1 squad member is equipped with cyanide capsules. Squad commander is authorized to start liquidation procedure in case of emergency.
Proceed with the utmost caution.
THE ENVIRONMENT
The island is vast and offers a wide variety of natural resources. There are also several settlements, a main village, a hotel and tourist attractions. In the event of an emergency landing, or loss of tactical equipment, each squad member is trained to survive in a hostile environment. As a good mercenary of a private military company, you know how to use local plants and herbs to make ointments and medications to treat state effects such as burns, bleeding, relieve your stress or simply restore your health. But more importantly, you can use building materials provided by nature to make rudimentary melee weapons, traps, barricades and much more. Even a silent bow, very useful for knocking out the infected without being detected.
THE INFECTION
It seems that the infected are the side effect of the virus grown in the bio-laboratory. Probably when a security flaw opened, the virus spread to the island.
It is not yet clear whether it spreads by air or through aquifers but what is certain is that biomass, similar to fleshy appendages that are sometimes glimpsed in the environment, are one of the final stages of the virus. The biomass therefore seems to be responsible for the mutations that occurred to the civilian inhabitants and to the military personnel who rushed to contain the first stages of the infection. Contact with non-bottled liquids or non-canned food is therefore strictly prohibited.
Mutates are fast, extremely aggressive and above all voracious. The first to be devoured were the breeding animals of the surrounding farms and estates. For this reason, any living being, human or animal, is for them a prey.
Apparently they do not devour each other ( to be confirmed ).
Finally, it seems that they are photosensitive. At least the infected humans. Our drones have in fact observed the absence of external diurnal activity by the mutants, even if some animal species that have come into contact with the pathogen, such as stray dogs, wolves, wild boars and bears, do not seem to suffer from photosensitivity.
It is therefore recommended to exercise extreme caution at night.
OPERATIONAL INFO
You will land in the North area, a few hundred meters from the bio-laboratory, at 4.30 in the morning. The helicopter will wait 25 minutes and then will take off.
Posted by: xSicKxBot - 08-30-2022, 02:11 AM - Forum: Lounge
- No Replies
Google Play Games Now Lets You Play Android Games On PC In Select Countries
Google Play Games, an application that lets users play select Android games on PC, is officially releasing in beta for the following countries: Korea, Hong Kong, Taiwan, Thailand, and Australia.
If you're a player in those regions, you'll need to sign up in order to try out Google's feature. There are 50+ titles, and include mobile titles like Summoners War, Cookie Run: Kingdom, Last Fortress: Underground, and Top War. Check Google Play Games' website to see how you can register.
This giveaway is for GOG, its a platform for distributing games, similar to steam and others
- Go to the giveaway page - Login or make an account if you do not have one - Go to the GOG Homepage - https://www.gog.com/ - Scroll a bit down until you see the banner for the game Lovecraft's Untold Stories - Its and above "Highest discount ever" - Wait for the button to appear on the right - Click on the "Yes, and claim the game" button - That's it
We are welcoming everyone to join our discord[discord.gg]. We are more active there on finding giveaways, small or large, and there are daily raffles you can participate.
Itsumi Saito just moved Downtown and broke up with her long-term girlfriend, leaning into her dream of making it in music. But juggling practice, friends, a brutal commute to the west side, and a full-time job... Itsu is struggling to establish herself in the cutthroat music scene of LA. When she talks her way into a shmoozy Hollywood party and makes friends with a rising music producer, she sees a chance to bring her dreams a little closer.
We Are OFK is an interactive narrative series of arguing over lyrics, sending sad texts, and playing Interactive Music Videos, including OFK's debut single "Follow/Unfollow" and more!
Posted by: xSicKxBot - 08-29-2022, 08:37 AM - Forum: Python
- No Replies
Tensors: The Vocabulary of Neural Networks
5/5 – (1 vote)
In this article, we will introduce one of the core elements describing the mathematics of neural networks: tensors.
Although typically, you won’t work directly with tensors (usually they operate under the hood), it is important to understand what’s going on behind the scenes. In addition, you may often wish to examine tensors so that you can look directly at the data, or look at the arrays of weights and biases, so it’s important to be able to work with tensors.
Theoretically, we could use pure Python to implement neural networks.
We could use Python lists to represent data in the network;
We could use other lists representing weights and biases in the network; and
We could use nested for loops to perform the operations of multiplying the inputs by the connection weights.
There are a few issues with this, however: Python, especially the list data type, performs rather slowly. Also, the code would not be very readable with nested for loops.
Instead, the libraries that implement neural networks in software packages such as PyTorch use tensors, and they run much more quickly than pure Python. Also, as you will see, tensors allow much more readable descriptions of networks and their data.
Tensors
Tensors are essentially arrays of values. Since neural networks are essentially arrays of neurons, tensors are a natural fit for describing them. They can be used for describing the data, describing the network connection weights, and other things.
A one-dimensional tensor is known as a vector. Here is an example:
Vectors can also be written horizontally. Here’s the same vector written horizontally:
Switching a vector from vertical to horizontal, or vice versa, is called transposing, and is sometimes needed depending on the math specifics. We will not go into detail on this in this article (see here for more).
Vectors are typically used to represent data in the network. For example, each individual element in a vector can represent the input value for each individual input neuron in the network.
2D Tensor Matrix
A two-dimensional tensor is known as a matrix. Here’s an example:
For a fully connected network, where each neuron in one layer connects to every neuron in the next layer, a matrix is typically used to represent all the connection weights. If there are m neurons connected to n neurons you would need an n x m matrix to describe all the connection weights.
Here’s an example of two neurons connected to three neurons. Here is the network, with connection weights included:
And here is the connection weights matrix:
Why We Use Tensors
Before we finish introducing tensors, let’s use what we’ve seen so far to see why they’re so important to use when modeling neural networks.
Let’s introduce a two-element vector of data and run it through the network we just showed.
Info: Recall neurons add together their weighted inputs, then run the result through an activation function.
In this example, we are ignoring the activation function to keep things simple for the demonstration.
Here is our data vector:
Here’s a diagram depicting the operation:
Let’s calculate the operation (the neuron computations) by hand:
The final result is a 3 element vector:
If you have learned about matrices in grade school and remember doing matrix multiplication, you may note that what we just calculated is identical to matrix multiplication:
Note: Recall matrix multiplication involves multiplying first matrix rows by second matrix columns element-wise, then adding elements together.
This is why tensors are so important for neural networks: tensor math precisely describes neural network operation.
As an added benefit, the equation above showing matrix multiplication is so much more a succinct description than nested for loops would be.
If we introduce the nomenclature of bold lower case for a vector and bold upper case for a matrix, then the operation of vector data running through a neural network weight matrix is described by this very compact equation:
We will see later that matrix multiplication within PyTorch is a similarly compact code equation.
Higher Dimensional Tensors
A three-dimensional (3D) tensor is known simply as a tensor. As you can see, the term tensor generically refers to any dimensional array of numbers. It’s just one-dimensional and two-dimensional tensors that have the unique names “vector” and “matrix” respectively.
You might not think that there is a need for three-dimensional and larger tensors, but that’s not quite true.
A grayscale image is clearly a two-dimensional tensor, in other words, a matrix. But a color image is actually three two-dimensional arrays, one each for red, green, and blue color channels. So a color image is essentially a three-dimensional tensor.
In addition, typically we process data in mini-batches. So if we’re processing a mini-batch of color images we have the three-dimensional aspect already noted, plus one more dimension of the list of images in the mini-batch. So a mini-batch of color images can be represented by a four-dimensional tensor.
Tensors in Neural Network Libraries
One Python library that is well suited to working with arrays is NumPy. In fact, NumPy is used by some users for implementing neural networks. One example is the scikit-learn machine learning library which works with NumPy.
However, the PyTorch implementation of tensors is more powerful than NumPy arrays. PyTorch tensors are designed with neural networks in mind. PyTorch tensors have these advantages:
PyTorch tensors include gradient calculations integrated into them.
PyTorch tensors also support GPU calculations, substantially speeding up neural network calculations.
However, if you are used to working with NumPy, you should feel fairly at home with PyTorch tensors. Though the commands to create PyTorch tensors are slightly different, they will feel fairly familiar. For the rest of this article, we will focus exclusively on PyTorch tensors.
Tensors in PyTorch: Creating Them, and Doing Math
OK, let’s finally do some coding!
First, make sure that you have PyTorch available, either by installing on your system or by accessing it through online Jupyter notebook servers.
Reference: See PyTorch’s website for instructions on how to install it on your own system.
See this Finxter article for a review of available online Jupyter notebook services:
For this article, we will use the online Jupyter notebook service provided by Google called Colab. PyTorch is already installed in Colab; we simply have to import it as a module to use it:
import torch
There are a number of ways of creating tensors in PyTorch.
Typically you would be creating tensors by importing data from data sets available through PyTorch, or by converting your own data into tensors.
For now, since we simply want to demonstrate the use of tensors we will use basic commands to create very simple tensors.
You can create a tensor from a list:
t_list = torch.tensor([[1,2], [3,4]])

t_list
Output:
tensor([[1, 2], [3, 4]])
Note that when we evaluate the tensor variable, the output is labeled to indicate it as a tensor. This means that it is a PyTorch tensor object, so an object within PyTorch that performs just like math tensors, plus has various features provided by PyTorch (such as supporting gradient calculations, and supporting GPU processing).
You can create tensors filled with zeros, filled with ones, or filled with random numbers:
An important attribute to be familiar with to understand the shape of a tensor is the appropriately named shape attribute:
t_rand.shape

# Output: torch.Size([3, 2, 4])
This shows you that tensor “t_rand” is a three-dimensional tensor composed of three elements of two rows by four columns.
Note: The dimensions of a tensor is referred to as its rank. A one-dimensional tensor, or vector, is a rank-1 tensor; a two-dimensional tensor, or matrix, is a rank-2 tensor; a three-dimensional tensor is a rank-3 tensor, and so on.
Let’s do some math with tensors – let’s add two tensors together:
Note the tensors are added together element-wise. Now here it is in PyTorch:
Let’s add a scalar, that is, an independent number (or a rank-0 tensor!) to a tensor:
t_add3 = t_first + 3

t_add3
Output:
tensor([[4, 5], [6, 7]])
Note that the scalar is added to each element of the tensor. The same applies when multiplying a scalar by a tensor:
t_times3 = t_first * 3

t_times3
Output:
tensor([[ 3, 6], [ 9, 12]])
The same kind of thing applies to raising a tensor to a power, that is the power operation is applied element-wise:
t_squared = t_first ** 2

t_squared
Output:
tensor([[ 1, 4], [ 9, 16]])
Recall that after summing weighted inputs, the neuron processes the result through an activation function. Note that the same performance applies here as well: when a vector is processed through an activation function, the operation is applied to the vector element-wise.
Earlier, we pointed out that matrix multiplication is an important part of neural network calculations.
There are two ways to do this in PyTorch: you can use the matmul function:
Or you can use the matrix multiplication symbol “@“:
t_matmul2 = t_first @ t_second

t_matmul2
Output:
tensor([[19, 22], [43, 50]])
Recall previously, we showed running an input signal through a neural network, where a vector of input signals was multiplied by a matrix of connection weights.
Here is that in PyTorch:
x = torch.tensor([[7],[8]])

x
Output:
tensor([[7], [8]])
W = torch.tensor([[1,4], [2,5], [3,6]])

W
Output:
tensor([[1, 4], [2, 5], [3, 6]])
y = W @ x

y
Output:
tensor([[39], [54], [69]])
Note how compact and readable that is instead of doing nested for loops.
Other math can be done with tensors as well, but we have covered most situations that are relevant to neural networks. If you find you need to do additional math with your tensors, check PyTorch documentation or do a web search.
Indexing and Slicing Tensors
Slicing allows you to examine subsets of your data and better understand how the dataset is constructed. You may find you will use this a lot.
Indexing Slicing PyTorch vs NumPy vs Python Lists
Indexing and slicing tensors work the same way it does with NumPy arrays. Note that the syntax is different from Python lists. With Python lists, a separate pair of brackets are used for each level of nested lists. Instead, with Pytorch one pair of brackets contains all dimensions, separated by commas.
Let’s find the item in tensor “t_rand” that is 2nd element, first row, third column. First here is “t_rand” again:
Important Slicing Tip: In the above, we use the standard Python convention that a blank before a “:” means “start from the beginning”, and a blank after a “:” means “go all the way to the end”. So a “:” alone means “include everything from beginning to end”.
A likely use for slicing would be to look at a full array (i.e. a matrix) within a set of arrays, i.e. one image out of a set of images.
Let’s pretend our “t_rand” tensor is a list of images. We may wish to sample just a few “images” to get an idea of what they are like.
Let’s examine the first “image” in our tensor (“list of images”):
Using small tensors to demonstrate indexing can be instructive, but let’s see it in action for real. Let’s examine some real datasets with real images.
Real Example
We won’t describe the following in detail, except to note that we are importing various libraries that allow us to download and work with a dataset. The last line creates a function that converts tensors into PIL images:
import torch

from torch.utils.data import Dataset

from torchvision import datasets

from torchvision.transforms import ToTensor

import matplotlib.pyplot as plt import torchvision.transforms as T conv_to_PIL = T.ToPILImage()
The following downloads the Caltech 101 dataset, which is a collection of over 8000 images in 101 categories:
The above code shows the dataset contains 8677 items. Looking at the first item of the set we can see they are tuples of 2 items each. Here are the kinds of items in the tuples:
type(caltech101_data[0][0])

# torch.Tensor type(caltech101_data[0][1])

# int
The two items in the tuple are the image as a tensor, and an integer code corresponding to the image’s category.
Colab has a convenient function display() which will display images. First, we use the conversion function we created earlier to convert our tensors to a PIL image, then we display the images.
This article provides a lightweight JavaScript plugin to display news tickers on a website. The news ticker is a way of showing content in marquee mode either in horizontal or vertical scroll. It is useful to display content like the latest updates and upcoming events.
It saves the site space real estate by occupying less portion of the screen. It also reduces the user effort of scrolling to see more content by keeping on ticking the content display.
In a way it is an older thing. Couple of decades back we cannot see a website without a scrolling ticker. Over a period its eradicated as a bad UI/UX practice. But it is still widely used in news websites and in particular in stock price display. If you use it wisely, it provides good advantages.
The following examples will remind you of the places that require news tickers on screen.
Online news bytes display headlines in a ticker.
Stock prices.
Online shops that show ‘what is new’ on a ticker board.
This tutorial shows a simple news ticker on a webpage. On hovering the ticker box, it stops the content marquee and releases on mouse out.
It will look like a carousal effect but applied to an element with text content.
STEP 3: Call startTicker JavaScript function immediately next to ticker-box div.
This step is to call the library function with reference to the ticker box id attribute.
The startTicker() function has an optional parameter to supply the speed and interval between news contents. The default speed is 5 and the default interval is 500 milliseconds.
This library contains functions to enable a news ticker on a web page. The startTicker() function iterates the ticker <li> elements and let it slides horizontally.
It applies styles to change the position of the ticker element based on the speed. The extend() function changes the default speed and interval with the specified option.
function applyStyles(obj, styles) { var property; var styleLength = Object.keys(styles).length; for (var i = 0; i < styleLength; i++) { property = Object.keys(styles)[i]; obj.style[property] = styles[property]; }

} function extend(object1, object2) { for (var attrname in object2) { object1[attrname] = object2[attrname]; } return object1;

} function startTicker(id, param) { var tickerBox = document.getElementById(id); var defaultParam = { speed: 5, delay: 500, rotate: true }; var extendedParam = extend(defaultParam, param); applyStyles(tickerBox, { overflow: "hidden", 'min-height': '40px' }); var ul = tickerBox.getElementsByTagName("ul"); var li = ul[0].getElementsByTagName("li"); applyStyles(ul[0], { padding: 0, margin: 0, position: 'relative', 'list-style-type': 'none' }); for (i = 0; i < li.length; i++) { applyStyles(li[i], { position: 'absolute', 'white-space': 'nowrap', display: 'none' }); } var li_index = 0; var trans_width = tickerBox.offsetWidth; var chunk_width = 1; var iterateTickerElement = function(trans_width) { li[li_index].style.left = trans_width + "px"; li[li_index].style.display = ''; var t = setInterval(function() { if (parseInt(li[li_index].style.left) > -li[li_index].offsetWidth) { li[li_index].style.left = parseInt(li[li_index].style.left) - chunk_width + "px"; } else { clearInterval(t); trans_width = tickerBox.offsetWidth; li_index++; if (li_index == li.length && extendedParam.rotate == true) { li_index = 0; iterateTickerElement(trans_width); } else if (li_index < li.length) { setTimeout(function() { iterateTickerElement(trans_width); }, extendedParam.delay); } } }, extendedParam.speed); tickerBox.onmouseover = function() { clearInterval(t); } tickerBox.onmouseout = function() { iterateTickerElement(parseInt(li[li_index].style.left)); } } iterateTickerElement(trans_width);

}
Note:
Presently the news ticker is available only in a horizontal direction. For the next release, a vertical direction is planned.
Ticker movement can be paused on mouseover.
Contact me, if you have any feature requests or for any special customization needs.
Information in our possession is conflicting, but it seems that the infection has spread very quickly within a few days, perhaps even in a few hours. It seems that in the hours immediately following the outbreak of the infection, 43rd NATO airborne battalion was sent to the island but all contacts were lost after only 8 hours.
PMCW considers this matter with the utmost importance. Objectives of team W1 are:
Locate the biolab
Take in vitro samples of the pathogen (codename: "Vorax")
Liquidate surviving medical personnel (optionally) and any witnesses.
In NO case must the presence of the PMCW be revealed.
Every W1 squad member is equipped with cyanide capsules. Squad commander is authorized to start liquidation procedure in case of emergency.
Proceed with the utmost caution.
THE ENVIRONMENT
The island is vast and offers a wide variety of natural resources. There are also several settlements, a main village, a hotel and tourist attractions. In the event of an emergency landing, or loss of tactical equipment, each squad member is trained to survive in a hostile environment. As a good mercenary of a private military company, you know how to use local plants and herbs to make ointments and medications to treat state effects such as burns, bleeding, relieve your stress or simply restore your health. But more importantly, you can use building materials provided by nature to make rudimentary melee weapons, traps, barricades and much more. Even a silent bow, very useful for knocking out the infected without being detected.
THE INFECTION
It seems that the infected are the side effect of the virus grown in the bio-laboratory. Probably when a security flaw opened, the virus spread to the island.
It is not yet clear whether it spreads by air or through aquifers but what is certain is that biomass, similar to fleshy appendages that are sometimes glimpsed in the environment, are one of the final stages of the virus. The biomass therefore seems to be responsible for the mutations that occurred to the civilian inhabitants and to the military personnel who rushed to contain the first stages of the infection. Contact with non-bottled liquids or non-canned food is therefore strictly prohibited.
Mutates are fast, extremely aggressive and above all voracious. The first to be devoured were the breeding animals of the surrounding farms and estates. For this reason, any living being, human or animal, is for them a prey.
Apparently they do not devour each other ( to be confirmed ).
Finally, it seems that they are photosensitive. At least the infected humans. Our drones have in fact observed the absence of external diurnal activity by the mutants, even if some animal species that have come into contact with the pathogen, such as stray dogs, wolves, wild boars and bears, do not seem to suffer from photosensitivity.
It is therefore recommended to exercise extreme caution at night.
OPERATIONAL INFO
You will land in the North area, a few hundred meters from the bio-laboratory, at 4.30 in the morning. The helicopter will wait 25 minutes and then will take off.



 Note: The

 Related Tutorial:



 Note: This article assumes you are familiar with how neural networks work. To review those basics, see the article