Embark on a new adventure for fortune, glory and power. Baldur's Gate: Dark Alliance II, the sequel to Baldur's Gate: Dark Alliance starts you off on a road full of danger and magic. Face a seemingly endless army of sinister enemies in over 80 levels of finger-numbing action. Master skills, spells and deadly weapons while traveling through spectacular environments. Customize your character and forge your own weapons. It's up to you to rid the lands of evil by yourself or with a friend.
Madden 23 Finally Has An Answer For Scrambling, Deep-Ball QBs, Says Producer
When Madden 23 launches this month, it will come, as always, with several much-touted new features, such as an on-the-field overhaul, collectively called Fieldsense, as well as new wrinkles to the game's Franchise mode, Face of the Franchise mode, and more. With just days to go before launch and a day-zero patch now made public, Madden gameplay producer Clint Oldenburg says the major takeaway from the beta is that the always-vocal Madden fanbase is in lockstep with EA Tiburon when it comes to what this year's game should look, play, and feel like.
"The two most active pieces of feedback from the beta were, 'don't significantly change gameplay for launch' and 'please don't nerf the pass coverage,'" Oldenburg told GameSpot. "And we were really excited to get that feedback, because not only did we spend a lot of time working on pass coverage to bring more balance to the deep-passing game, we also brought an increase in pass rush." The fact that players' biggest request so far has essentially been "if it ain't broken, don't fix it," bodes well for launch, Oldenburg believes.
Madden 23 is focused greatly on "bringing more balance to the defensive side of the ball," Oldenburg said, and the beta helped greatly in finding the right balance between giving players more influence on defense while still holding true to the league Madden mimics--one that is now pass-happier and higher-scoring than ever before.
Challenge: How to design a regular expression pattern that matches whitespace characters such as the empty space ' ' and the tabular character '\t', but not the newline character '\n'?
An example of this would be to replace all whitespaces (except newlines) between a space-delimited file with commas to obtain a CSV.
Method 1: Use Character Class
The character class pattern [ \t] matches one empty space ' ' or a tabular character '\t', but not a newline character. If you want to match an arbitrary number of empty spaces except for newlines, append the plus quantifier to the pattern like so: [ \t]+.
Here’s an example where you replace all separating whitespace (except newline) with a comma to receive a CSV formatted output:
import re txt = 'a \t b c\nd e f'

csv_txt = re.sub('[ \t]+', ',', txt)

print(csv_txt)
Output:
a,b,c

d,e,f
Why the space in the pattern [ \t]?
The reason there’s a space in the pattern is to match the empty space. The character class essentially is an OR relationship, i.e., one item within the character class is matched. For the given pattern, it matches either the empty space ' ' or the tabular character '\t'.
Method 2: Match Individual Different Whitespace Characters
The previous method only matches the horizontal tab (U+0009) and breaking space (U+0020) characters. If you want more fine-grained control about which whitespace characters to match and which not, you can use the following baseline approach.
The following list of Unicode whitespace characters UNICODE_WHITESPACES contains all major whitespace variants you may want to check your string for. You can generate a character class using the string expression '[' + ''.join(UNICODE_WHITESPACES) + ']'.
Here’s a variant that finds all matches of whitespace characters in a given text:
import re UNICODE_WHITESPACES = [ "\u0009", # character tabulation "\u000a", # line feed "\u000b", # line tabulation "\u000c", # form feed "\u000d", # carriage return "\u0020", # space "\u0085", # next line "\u00a0", # no-break space "\u1680", # ogham space mark "\u2000", # en quad "\u2001", # em quad "\u2002", # en space "\u2003", # em space "\u2004", # three-per-em space "\u2005", # four-per-em space "\u2006", # six-per-em space "\u2007", # figure space "\u2008", # punctuation space "\u2009", # thin space "\u200A", # hair space "\u2028", # line separator "\u2029", # paragraph separator "\u202f", # narrow no-break space "\u205f", # medium mathematical space "\u3000", # ideographic space

] txt = ' \t\n\r'

pattern = '[' + ''.join(UNICODE_WHITESPACES) + ']'

matches = re.findall(pattern, txt)

print(matches)

# [' ', '\t', '\n', '\r']
Of course, you can restrict this to only contain whitespaces that are not newline-related.
Method 3: Match Individual Different Whitespaces Except Newlines
The following code snippet uses the UNICODE_WHITESPACES constant but comments out the newline whitespaces so that newline-related characters such as '\n' and '\r' are not matched anymore!
import re UNICODE_WHITESPACES = [ "\u0009", # character tabulation # "\u000a", # line feed "\u000b", # line tabulation "\u000c", # form feed # "\u000d", # carriage return "\u0020", # space # "\u0085", # next line "\u00a0", # no-break space "\u1680", # ogham space mark "\u2000", # en quad "\u2001", # em quad "\u2002", # en space "\u2003", # em space "\u2004", # three-per-em space "\u2005", # four-per-em space "\u2006", # six-per-em space "\u2007", # figure space "\u2008", # punctuation space "\u2009", # thin space "\u200A", # hair space # "\u2028", # line separator # "\u2029", # paragraph separator "\u202f", # narrow no-break space "\u205f", # medium mathematical space "\u3000", # ideographic space

] txt = ' \t\n\r'

pattern = '[' + ''.join(UNICODE_WHITESPACES) + ']'

matches = re.findall(pattern, txt)

print(matches)

# [' ', '\t']
Of course, you can comment out the individual whitespace Unicode characters you don’t want to match as required by your own application.
We are welcoming everyone to join our discord[discord.gg]. We are more active there on finding giveaways, small or large, and there are daily raffles you can participate.
Lost, alone and separated from family, a stray cat must untangle an ancient mystery to escape a long-forgotten cybercity and find the way home. Stray is a third-person cat adventure game set amidst the detailed neon-lit alleys of a decaying cybercity and the murky environments of its seedy underbelly. See the world through the eyes of a stray and interact with the environment in playful ways. Stray is developed by BlueTwelve Studio, a small team from south of France mostly made of cats and a handful of humans.
Road House Reboot With Jake Gyllenhaal Heading To Amazon
Amazon Prime Video has announced that Academy Award-nominated actor Jake Gyllenhaal is set to star in Road House, a reimagined take on the 1989 Patrick Swayze classic. Doug Liman (The Bourne Identity, Mr. and Mrs. Smith) directs with the script written by Anthony Bagarozzi (The Nice Guys) and Charles Mondry.
"Road House is a homerun for us," said Jennifer Salke, head of Amazon Studios via press release. "Not only is it a nod to fans of the original, but it is also a big, fun, broad audience movie. We are thrilled to collaborate with Joel, Doug, and this great cast led by Jake Gyllenhaal, and for them to come together to reimagine the classic MGM film as an action-packed adventure for our global audience."
In one of the most iconic action roles of the 1980s, Road House starred Patrick Swayze as Dalton, a mysterious martial arts expert and bouncer, who is hired to clean up a nightclub down in Missouri. In this revamp, Gyllenhaal will play a former UFC fighter who takes a job as a bouncer at a roadhouse in the Florida Keys.
In this article, you’ll learn how to configure and display a progress bar.
A progress bar is commonly used in Python or, for that matter, any other programming language to show the user an application’s progress. For example, an installation, a transferring of files, or any other commands.
The Finxter Academy recommends implementing this to visually display to the user what is happening behind the scenes.
Question: How would we write code to display a progress bar?
We can accomplish this task by one of the following options:
This method imports the time and sys libraries combined with a for loop to display a custom progress bar output on a single line.
from time import sleep

import sys for x in range(0,21): sys.stdout.write('\r') sys.stdout.write("[%-20s] %d%%" % (''*x, 5*x)) sys.stdout.flush() sleep(0.75)
Above imports, the time library to call the sleep command and the syslibrary to write the contents to the terminal.
Next, a for loop is instantiated. This loop uses the range function to set the start position (0 by default) and the stop position (21-1). Inside this loop, the following occurs:
The first line uses a carriage return (\r) to start the code on a new line.
The following line determines how the progress bar appears by:
Left-aligning the emoji(s) inside the square brackets [%-20s].
Configuring the progress percentage %d%%" % (example 15%).
Determining the visual emoji progress ('😁'*x, 5*x).
Then sys.stdout.flush() writes everything in the buffer to the terminal.
The code pauses for the stated period (0.75).
The loop continues until 100% has been attained. Below is the end result.
[] 100%
Note: Any emoji or another symbol can be substituted for the above selection.
Method 2: Use apytl Library
This method imports the time and apytl libraries to generate a custom progress bar.
To run this code error-free, install the required library. Click here for installation instructions.
import time

import apytl total_iterations = 10 for index, value in enumerate(range(total_iterations)): apytl.Bar().drawbar(value, total_iterations, fill='*') time.sleep(0.75)
Above imports the time library to call the sleep command and the apytl library to display the progress bar.
Next, the total number of iterations to carry out is declared as 10 and saved to total_iterations.
To understand what is going on in the for loop, let’s write some test code to see what the values of index, value and total_iterations are doing:
total_iterations = 10 for index, value in enumerate(range(total_iterations)): print(index, value, total_iterations)
As you can see from the output, the index and value variables count from 0 (range default start position) to the stop position of 9 (10-1). Notice the value of total_iterations does not change.
The alive-progress library moves progress bars to the next level! With its many display options, it’s a must-a-try!
To run this code error-free, install the required library. Click here for installation instructions.
from alive_progress import alive_bar

from time import sleep for x in range(10): with alive_bar(x, bar='solid') as bar: for i in range(x): sleep(.001) bar()
Above imports the alive-progress library to use the progress bar and the time library to call the sleep command.
Next, a for loop is instantiated. This loop uses the range function to set the stop position at 9 (10-1). Inside this loop, the following occurs:
The alive_bar is called and passed the argument x and the bar type. For this example, solid was selected.
A new for loop is instantiated and loops through range passing x as an argument.
The code halts (sleep) for the stated period (.001).
The bar is output to the terminal each iteration.
The loop continues until 100% has been attained.
<■■■■■■■■■■■■■■■■■■■■■■■■■■■■■■■■> 0 in 0.0s (0.00/s) <■■■■■■■■■■■■■■■■■■■■■■■■■■■■■■■■> 1/1 [100%] in 0.0s (333.28/s) <■■■■■■■■■■■■■■■■■■■■■■■■■■■■■■■■> 2/2 [100%] in 0.0s (62.48/s) <■■■■■■■■■■■■■■■■■■■■■■■■■■■■■■■■> 3/3 [100%] in 0.0s (63.96/s) <■■■■■■■■■■■■■■■■■■■■■■■■■■■■■■■■> 4/4 [100%] in 0.1s (62.39/s) <■■■■■■■■■■■■■■■■■■■■■■■■■■■■■■■■> 5/5 [100%] in 0.1s (63.32/s) <■■■■■■■■■■■■■■■■■■■■■■■■■■■■■■■■> 6/6 [100%] in 0.1s (64.84/s) <■■■■■■■■■■■■■■■■■■■■■■■■■■■■■■■■> 7/7 [100%] in 0.1s (63.79/s) <■■■■■■■■■■■■■■■■■■■■■■■■■■■■■■■■> 8/8 [100%] in 0.1s (63.53/s) <■■■■■■■■■■■■■■■■■■■■■■■■■■■■■■■■> 9/9 [100%] in 0.1s (64.09/s)
Note: To view a list of all available progress bars, click here.
Method 4: Use tqdm
A simple yet elegant progress bar, tqdm is a must-see!
To run this code error-free, install the required library. Clickhere for installation instructions.
from tqdm import tqdm

from time import sleep for i in tqdm(range(100)): sleep(0.02)
Above imports the tqdm library for the progress bar and the time library to call the sleep() command.
Next, a for loop is instantiated. This loop uses the tqdm library with the range function to set the stop position at 99 (100-1). Inside this loop, the following occurs:
The progress bar displays on one line. Each iteration increases the progress by a percentage.
Method 5: Use progress Library
This method uses the progress library to display a progress bar. This library has many fun options to select from.
To run this code error-free, install the required library. Clickhere for installation instructions.
from time import sleep

from progress.spinner import MoonSpinner with MoonSpinner('Processing…') as bar: for i in range(100): sleep(0.02) bar.next()
Above imports the time library to call the sleep command and theprogress library to display a progress bar, specifically the MoonSpinner.
The following code displays the word Processing... at the terminal, and the MoonSpinner rotates, sleeps, and continues until the value of the range stop position (100-1) is attained.
Processing…◑
Note: Spend some time on this library page to test the different types of progress bars.
Summary
There is so much more to Python Progress Bars than was covered in this article. May we suggest you take time to delve into each method outlined above to determine the best one for your requirements.
Happy Coding!
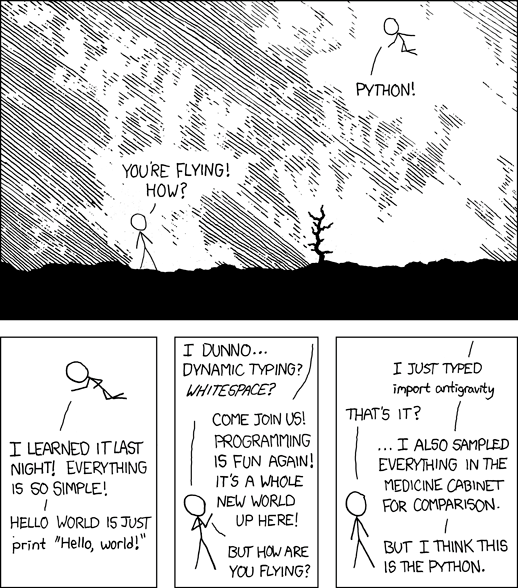
Programming Humor – Python
“I wrote 20 short programs in Python yesterday. It was wonderful. Perl, I’m leaving you.” — xkcd
Calling all daredevil drivers and creators! Blast off to the visually stunning, exhilarating new Horizon Hot Wheels Park in the clouds high above Mexico.
Experience the fastest, most extreme tracks ever devised. Design, build, and share your own Hot Wheels adventure with 80 distinct, snappable track pieces. Race 10 amazing new cars including the lightning fast 2021 Hennessey Venom F5 and the iconic 2000 Hot Wheels Deora II.
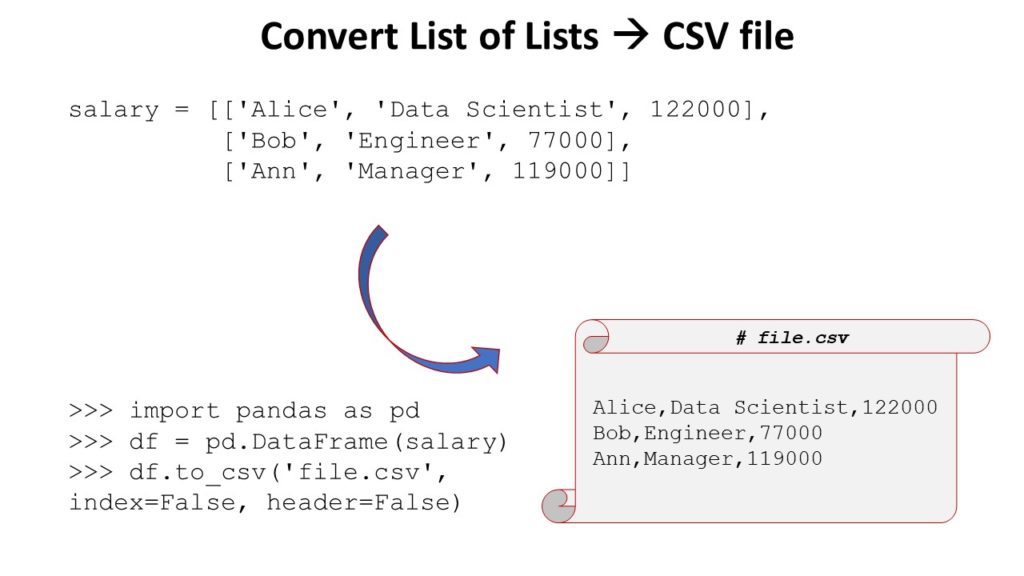
Solution: There are four simple ways to convert a list of lists to a CSV file in Python.
CSV: Import the csvmodule in Python, create a csv writer object, and find a list lst of elements representing each object as a row, that is then written into the CSV using writer.writerow(lst).
Pandas: Import the pandas library, convert each object to a list to obtain a list of lists, create a Pandas DataFrame out of the list of lists, and write the DataFrame to a file using the DataFrame method DataFrame.to_csv('file.csv').
NumPy: Import the NumPy library, convert each object to a list to obtain a list of lists, create a NumPy array, and write the output to a CSV file using the numpy.savetxt('file.csv', array, delimiter=',') method.
Python: Use a pure Python implementation that doesn’t require any library by using the Python file I/O functionality.
Finxter Favorite: My preference is Method 4 (Vanilla Python) because it’s simplest to use, efficient, and most robust for different input types (numerical or textual) and doesn’t require external dependencies and data wrangling.
Method 1: Python’s CSV Module
You can convert a list of lists to a CSV file in Python easily—by using the csv library. This is the most customizable of all four methods.
class Employee(object): def __init__(self, name, description, salary): self.name = name self.description = description self.salary = salary employees = [Employee('Alice', 'Data Scientist', 122000), Employee('Bob', 'Engineer', 77000), Employee('Ann', 'Manager', 119000)] # Method 1

import csv

with open('my_file.csv', 'w', newline='') as f: writer = csv.writer(f) for x in employees: writer.writerow([x.name, x.description, x.salary])
In the code, you first open the file using Python’s standard open() command. Now, you can write content to the file object f.
Next, you pass this file object to the constructor of the CSV writer that implements some additional helper method—and effectively wraps the file object providing you with new CSV-specific functionality such as the writerow() method.
You now iterate over the objects and convert each object to a list.
The list representing one row is then passed in the writerow() method of the CSV writer. This takes care of converting the list of objects to a CSV format.
You can customize the CSV writer in its constructor (e.g., by modifying the delimiter from a comma ',' to a whitespace ' ' character). Have a look at the specification to learn about advanced modifications.
Method 2: Pandas DataFrame to_csv()
This method converts a list of objects to a CSV file in two steps:
First, convert the list of objects to a list of lists.
You can convert a list of lists to a Pandas DataFrame that provides you with powerful capabilities such as the to_csv() method.
This is a super simple approach that avoids importing yet another library (I use Pandas in many Python projects anyways).
class Employee(object): def __init__(self, name, description, salary): self.name = name self.description = description self.salary = salary employees = [Employee('Alice', 'Data Scientist', 122000), Employee('Bob', 'Engineer', 77000), Employee('Ann', 'Manager', 119000)] # Method 2

import pandas as pd # Step 1: Convert list of objects to list of lists

lst = [[x.name, x.description, x.salary] for x in employees] # Step 2: Convert list of lists to CSV

df = pd.DataFrame(lst)

df.to_csv('my_file.csv', index=False, header=False)
You convert a list of objects to a CSV file in three main steps.
First, convert the list of objects to a list of lists by using list comprehension to iterate over each object and convert each object to an inner list using your custom expression.
Second, create a Pandas DataFrame, Python’s default representation of tabular data.
Third, the DataFrame is a very powerful data structure that allows you to perform various methods. One of those is the to_csv() method that allows you to write its contents into a CSV file.
You set the index and header arguments of the to_csv() method to False because Pandas, per default, adds integer row and column indices 0, 1, 2, ….
Think of them as the row and column indices in your Excel spreadsheet. You don’t want them to appear in the CSV file so you set the arguments to False.
If you want to customize the CSV output, you’ve got a lot of special arguments to play with. Check out this article for a comprehensive list of all arguments.
You can convert a list of objects to a CSV file by first converting it to a list of lists which is then converted to a NumPy array, and then using NumPy’s savetext() function by passing the NumPy array as an argument.
This method is best if you can represent the numerical data only—otherwise, it’ll lead to complicated data type conversions which are not recommended.
class Employee(object): def __init__(self, name, description, salary): self.name = name self.description = description self.salary = salary employees = [Employee('Alice', 'Data Scientist', 122000), Employee('Bob', 'Engineer', 77000), Employee('Ann', 'Manager', 119000)] # Method 3

import numpy as np # Convert list of objects to list of lists

lst = [[hash(x.name), hash(x.description), x.salary] for x in employees] # Convert list of lists to NumPy array

a = np.array(lst) # Convert array to CSV

np.savetxt('my_file.csv', a, delimiter=',')
In the code, we use the hash() function to obtain a numerical value for the string attributes name and description of the Employee class.
The output doesn’t look pretty: it stores the values as floats. But no worries, you can reformat the output using the format argument fmt of the savetxt() method (more here). However, I’d recommend you stick to method 2 (Pandas) to avoid unnecessary complexity in your code.
Method 4: Pure Python Without External Dependencies
If you don’t want to import any library and still convert a list of objects into a CSV file, you can use standard Python implementation as well: it’s not complicated but very efficient.
The idea is simple, iterate over the list of object and write a comma-separated representation of each object into the CSV file using a combination of the built-in open() function to create a file object and the file.write() method to write each row.
This method is best if you won’t or cannot use external dependencies.
class Employee(object): def __init__(self, name, description, salary): self.name = name self.description = description self.salary = salary employees = [Employee('Alice', 'Data Scientist', 122000), Employee('Bob', 'Engineer', 77000), Employee('Ann', 'Manager', 119000)] # Method 4

with open('my_file.csv', 'w') as f: for x in employees: f.write(f'{x.name},{x.description},{x.salary}\n')
In the code, you first open the file object f. Then you iterate over each object and write a custom comma-separated string representation of this object to the file using the file.write() method.
We use Python’s f-string functionality to do that in a concise way. At the end of each row, you place the newline character '\n'.
Method 5 – Bonus: Python One-Liner
The previous method is a one-linerized variant of Method 4. If you’re part of the Finxter community, you know how I love one-liners.
# Method 5

open('my_file.csv', 'w').writelines([f'{x.name},{x.description},{x.salary}\n' for x in employees])
Concise, isn’t it? The output is the same as before.
If you’re interested in the art of crafting beautiful one-liners, check out my book on the topic!
Python One-Liners Book: Master the Single Line First!
Python programmers will improve their computer science skills with these useful one-liners.
Python One-Linerswill teach you how to read and write “one-liners”: concise statements of useful functionality packed into a single line of code. You’ll learn how to systematically unpack and understand any line of Python code, and write eloquent, powerfully compressed Python like an expert.
The book’s five chapters cover (1) tips and tricks, (2) regular expressions, (3) machine learning, (4) core data science topics, and (5) useful algorithms.
Detailed explanations of one-liners introduce key computer science concepts and boost your coding and analytical skills. You’ll learn about advanced Python features such as list comprehension, slicing, lambda functions, regular expressions, map and reduce functions, and slice assignments.
You’ll also learn how to:
Leverage data structures to solve real-world problems, like using Boolean indexing to find cities with above-average pollution
Use NumPy basics such as array, shape, axis, type, broadcasting, advanced indexing, slicing, sorting, searching, aggregating, and statistics
Calculate basic statistics of multidimensional data arrays and the K-Means algorithms for unsupervised learning
Create more advanced regular expressions using grouping and named groups, negative lookaheads, escaped characters, whitespaces, character sets (and negative characters sets), and greedy/nongreedy operators
Understand a wide range of computer science topics, including anagrams, palindromes, supersets, permutations, factorials, prime numbers, Fibonacci numbers, obfuscation, searching, and algorithmic sorting
By the end of the book, you’ll know how to write Python at its most refined, and create concise, beautiful pieces of “Python art” in merely a single line.



 Challenge: How to design a regular expression pattern that matches whitespace characters such as the empty space
  Learn More:

 Note: Any emoji or another symbol can be substituted for the above selection.



 Finxter Favorite: My preference is Method 4 (Vanilla Python) because it’s simplest to use, efficient, and most robust for different input types (numerical or textual) and doesn’t require external dependencies and data wrangling.