Create an account


Welcome, Guest
You have to register before you can post on our site.

Username
  

Password


Search Forums

(Advanced Search)

Forum Statistics
» Members: 20,228
» Latest member: linklinklink
» Forum threads: 21,716
» Forum posts: 22,614

Full Statistics

Online Users
There are currently 845 online users.
» 0 Member(s) | 839 Guest(s)
Applebot, Baidu, Bing, DuckDuckGo, Google, Yandex

 
  (Indie Deal) Overcooked! 2, Neon Abyss, Metal Slug and more SUPER HOT deals
Posted by: xSicKxBot - 07-23-2020, 06:36 PM - Forum: Deals or Specials - No Replies

Overcooked! 2, Neon Abyss, Metal Slug and more SUPER HOT deals

Overcooked! 2 serves a tasty deal
[www.indiegala.com]
Time to save the world with chaotic cooking action in Overcooked! 2

NEW RELEASES
Neon Abyss Launch Deal[www.indiegala.com]
https://youtu.be/Zybu74BCJYM
REZ PLZ Launch Deal[www.indiegala.com]
https://youtu.be/AcKH6VhlQDY
SUPERHOT: MIND CONTROL DELETE at 40% OFF[www.indiegala.com]
https://youtu.be/rFAqvOASQrs
Day 6: SNK Corporation, up to -65%
[www.indiegala.com]
Join our Crypto Sale, and get an EXTRA 30% OFF on all bundles and 15% OFF on all store deals when paying with a supported cryptocurrency! (ends on 24 July)
Stay Inside, Stay Safe and Enjoy Good Games.
Check out IndieGala on Twitter, YouTube & Facebook[www.facebook.com]


https://steamcommunity.com/groups/indieg...7024932661

Print this item

  (Free Game Key) Next Up Hero and Tacoma - Free Epic Games
Posted by: xSicKxBot - 07-23-2020, 06:36 PM - Forum: Deals or Specials - No Replies

Next Up Hero and Tacoma - Free Epic Games

Visit the store pages:

Next Up Hero[store.epicgames.com]

Tacoma[store.epicgames.com]

Free to keep until July 30th 15:00 UTC.

We are welcoming everyone to join our discord[discord.gg]. We are more active there on finding giveaways, small or large.

?GrabFreeGames.com ?Twitter ?Steam Curator ?Facebook[fb.me]?Discord[discord.gg]
❤️Support us: ✔️HumbleBundle Partner[www.humblebundle.com] Epic Tag: GrabFreeGames


https://steamcommunity.com/groups/GrabFr...0563773612

Print this item

  Humble JavaScript Coding Bundle
Posted by: xSicKxBot - 07-23-2020, 06:56 AM - Forum: Game Development - No Replies

Humble JavaScript Coding Bundle

There is a new Humble Bundle of interest to game developers, the Humble JavaScript Coding Bundle.  This bundle consists of JavaScript themed courses from Zenva,  many of which are themed around game development related topics.  Do be aware that many of the included courses have been included in prior Humble Bundles, so be sure to check your inventory before purchasing.  As with all Humble Bundles, this bundle is organized into tiers:

1$ Tier

  • Create Interactive Pages with JavaScript and the DOM API
  • Intro to RPG Development with Phaser
  • Bite-Sized Responsive Web Design
  • The Complete Beginner’s JavaScript Course
  • JavaScript Foundations

15$ Tier

  • Build an RPG Adventure in Phaser
  • Azure Deployment for Node.js Applications
  • AWS Deployment for Node.js Applications
  • Build JavaScript Applications with Vue.js
  • Node.js and Express for Beginners
  • Modern JavaScript – From ES6 to ES9
  • Craft Web Forms with React
  • Discover React for Web Applications

25$ Tier

  • Server-Side Rendered Webapps with Node.js, Expresss and MongoDB
  • Build a Tower Defense Game with Phaser 3
  • WebVR for Beginners – Build VR Websites with A-Frame
  • Chat and Player Enhancements for Phaser MMORPGs
  • Phaser Login System with Express API
  • Real-Time Server Communication with Socket.IO
  • Discover Developer Tools for JavaScript Apps
  • Web-Based Authentication UI for Express and Node.js
  • User Authentication with MongoDB and Express
  • Node.js For Beginners – Create Server Side Apps with JavaScript
  • JavaScript Game Development – Kontra.js
  • Intermediate React and Redux

If you purchase this bundle using this link, you can decide how your money is allocated, including (and thanks so much if you do!) to support GFS.  There is no video to go with this Bundle as we have covered similar bundles such as this one several times in the past.

GameDev News


<!–

–>


https://www.sickgaming.net/blog/2020/07/...ng-bundle/

Print this item

  AppleInsider - DMs of 36 high-profile Twitter accounts accessed in breach
Posted by: xSicKxBot - 07-23-2020, 06:56 AM - Forum: Apples Mac and OS X - No Replies

DMs of 36 high-profile Twitter accounts accessed in breach

Twitter on Wednesday revealed hackers accessed the direct message inboxes of 36 high-profile accounts in an unprecedented security breach last week.

The microblogging service in a tweet said it believes DM inboxes of “up to 36” accounts were accessed, including one belonging to an unnamed elected official in the Netherlands. It was the first time a former or current elected official’s DMs were accessed in a hack, the company said.

Twitter has not disclosed which accounts were impacted in the incident, nor has the company said whose DM inboxes were infiltrated. Account holders affected by the breach have been contacted.

In total, 130 accounts were targeted in the July 15 attack; a scam campaign designed to dupe users into handing over bitcoin. Followers of Apple, Elon Musk, Jeff Bezos and others ultimately handed over more than $100,000 to the as-yet-unidentified hacker or hackers. For Apple, the scam post will go down as its first and so far only tweet.

DM inbox access was a lingering question in the wake of last week’s security snafu. Successful penetration of the messaging subsystem would not only grant hackers access to chat histories, but also the ability to directly communicate with a user’s contacts under false pretenses.

As noted by previous reports and Twitter, a social engineering attack was employed to garner employee credentials, which were then used to access internal administration tools. With admin panel privileges the hackers were able to bypass two-factor authentication protections to change email and password credentials, granting full control over multiple accounts.

Twitter continues to investigate the security breach and has instituted new safeguards in a bid to thwart future attempts.


https://www.sickgaming.net/blog/2020/07/...in-breach/

Print this item

  Fedora - SCP user’s migration guide to rsync
Posted by: xSicKxBot - 07-23-2020, 06:55 AM - Forum: Linux, FreeBSD, and Unix types - No Replies

SCP user’s migration guide to rsync

As part of the 8.0 pre-release announcement, the OpenSSH project stated that they consider the scp protocol outdated, inflexible, and not readily fixed. They then go on to recommend the use of sftp or rsync for file transfer instead.

Many users grew up on the scp command, however, and so are not familiar with rsync. Additionally, rsync can do much more than just copy files, which can give a beginner the impression that it’s complicated and opaque. Especially when broadly the scp flags map directly to the cp flags while the rsync flags do not.

This article will provide an introduction and transition guide for anyone familiar with scp. Let’s jump into the most common scenarios: Copying Files and Copying Directories.

Copying files


For copying a single file, the scp and rsync commands are effectively equivalent. Let’s say you need to ship foo.txt to your home directory on a server named server.

$ scp foo.txt me@server:/home/me/

The equivalent rsync command requires only that you type rsync instead of scp:

$ rsync foo.txt me@server:/home/me/

Copying directories


For copying directories, things do diverge quite a bit and probably explains why rsync is seen as more complex than scp. If you want to copy the directory bar to server the corresponding scp command looks exactly like the cp command except for specifying ssh information:

$ scp -r bar/ me@server:/home/me/

With rsync, there are more considerations, as it’s a more powerful tool. First, let’s look at the simplest form:

$ rsync -r bar/ me@server:/home/me/

Looks simple right? For the simple case of a directory that contains only directories and regular files, this will work. However, rsync cares a lot about sending files exactly as they are on the host system. Let’s create a slightly more complex, but not uncommon, example.

# Create a multi-level directory structure
$ mkdir -p bar/baz
# Create a file at the root directory
$ touch bar/foo.txt
# Now create a symlink which points back up to this file
$ cd bar/baz
$ ln -s ../foo.txt link.txt
# Return to our original location
$ cd -

We now have a directory tree that looks like the following:

bar
├── baz
│   └── link.txt -> ../foo.txt
└── foo.txt 1 directory, 2 files

If we try the commands from above to copy bar, we’ll notice very different (and surprising) results. First, let’s give scp a go:

$ scp -r bar/ me@server:/home/me/

If you ssh into your server and look at the directory tree of bar you’ll notice an important and subtle difference from your host system:

bar
├── baz
│   └── link.txt
└── foo.txt 1 directory, 2 files

Note that link.txt is no longer a symlink. It is now a full-blown copy of foo.txt. This might be surprising behavior if you’re used to cp. If you did try to copy the bar directory using cp -r, you would get a new directory with the exact symlinks that bar had. Now if we try the same rsync command from before we’ll get a warning:

$ rsync -r bar/ me@server:/home/me/
skipping non-regular file "bar/baz/link.txt"

Rsync has warned us that it found a non-regular file and is skipping it. Because you didn’t tell it to copy symlinks, it’s ignoring them. Rsync has an extensive manual section titled “SYMBOLIC LINKS” that explains all of the possible behavior options available to you. For our example, we need to add the –links flag.

$ rsync -r --links bar/ me@server:/home/me/

On the remote server we see that the symlink was copied over as a symlink. Note that this is different from how scp copied the symlink.

bar/
├── baz
│   └── link.txt -> ../foo.txt
└── foo.txt 1 directory, 2 files

To save some typing and take advantage of more file-preserving options, use the –archive (-a for short) flag whenever copying a directory. The archive flag will do what most people expect as it enables recursive copy, symlink copy, and many other options.

$ rsync -a bar/ me@server:/home/me/

The rsync man page has in-depth explanations of what the archive flag enables if you’re curious.

Caveats


There is one caveat, however, to using rsync. It’s much easier to specify a non-standard ssh port with scp than with rsync. If server was using port 8022 SSH connections, for instance, then those commands would look like this:

$ scp -P 8022 foo.txt me@server:/home/me/

With rsync, you have to specify the “remote shell” command to use. This defaults to ssh. You do so using the -e flag.

$ rsync -e 'ssh -p 8022' foo.txt me@server:/home/me/

Rsync does use your ssh config; however, so if you are connecting to this server frequently, you can add the following snippet to your ~/.ssh/config file. Then you no longer need to specify the port for the rsync or ssh commands!

Host server Port 8022

Alternatively, if every server you connect to runs on the same non-standard port, you can configure the RSYNC_RSH environment variable.

Why else should you switch to rsync?


Now that we’ve covered the everyday use cases and caveats for switching from scp to rsync, let’s take some time to explore why you probably want to use rsync on its own merits. Many people have made the switch to rsync long before now on these merits alone.

In-flight compression


If you have a slow or otherwise limited network connection between you and your server, rsync can spend more CPU cycles to save network bandwidth. It does this by compressing data before sending it. Compression can be enabled with the -z flag.

Delta transfers


Rsync also only copies a file if the target file is different than the source file. This works recursively through directories. For instance, if you took our final bar example above and re-ran that rsync command multiple times, it would do no work after the initial transfer. Using rsync even for local copies is worth it if you know you will repeat them, such as backing up to a USB drive, for this feature alone as it can save a lot of time with large data sets.

Syncing


As the name implies, rsync can do more than just copy data. So far, we’ve only demonstrated how to copy files with rsync. If you instead want rsync to make the target directory look like your source directory, you can add the –delete flag to rsync. The delete flag makes it so rsync will copy files from the source directory which don’t exist on the target directory. Then it will remove files on the target directory which do not exist in the source directory. The result is the target directory is identical to the source directory. By contrast, scp will only ever add files to the target directory.

Conclusion


For simple use cases, rsync is not significantly more complicated than the venerable scp tool. The only significant difference being the use of -a instead of -r for recursive copying of directories. However, as we saw rsync’s -a flag behaves more like cp’s -r flag than scp’s -r flag does.

Hopefully, with these new commands, you can speed up your file transfer workflow!


https://www.sickgaming.net/blog/2020/07/...-to-rsync/

Print this item

  News - Ninjala Shares More Details On Season 2, Crow Tengu DLC And In-Game Event
Posted by: xSicKxBot - 07-23-2020, 06:55 AM - Forum: Nintendo Discussion - No Replies

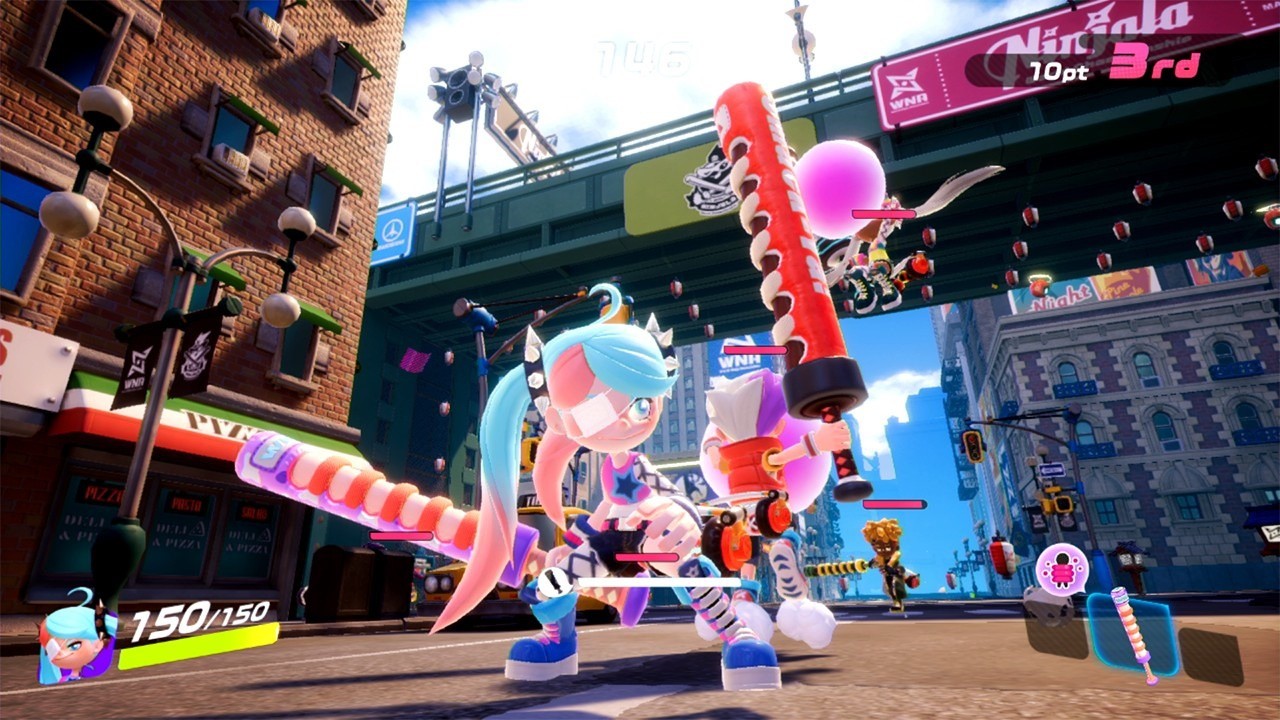
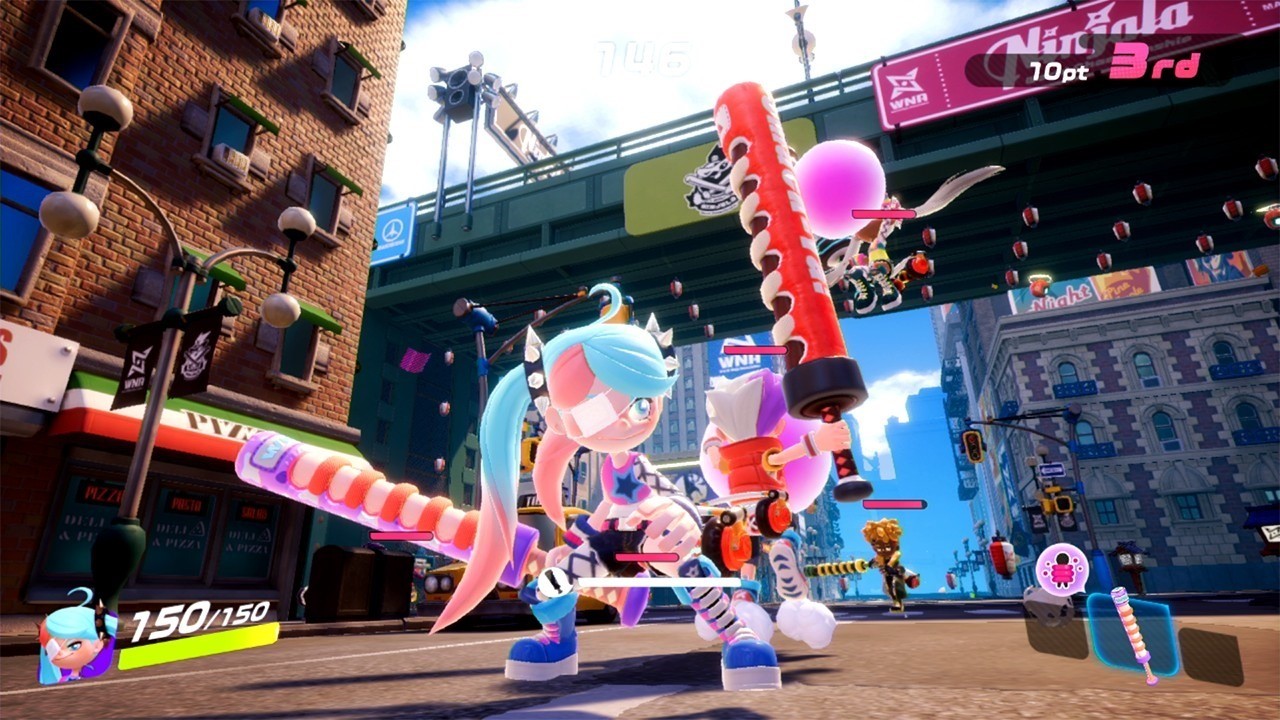
Ninjala Shares More Details On Season 2, Crow Tengu DLC And In-Game Event


A brand new episode of the Ninjala Dev Diary series has been released, sharing more in-depth news surrounding the game’s upcoming content.

We have a full rundown of all the news for you below. Dedicated players will likely already know about the Crow Tengu DLC which actually launched yesterday, but the video also explores an in-game festival where players can receive rewards, and offers more info on the upcoming Season 2.

Crow Tengu DLC Bundle – released July 21


  • Ninjala has released its first DLC bundle themed after the mythical Japanese demon, the crow tengu
  • Players who purchase the pack will get a special costume, emote, and sticker themed after the crow tengu – a crow possessed by the spirit of a fallen samurai – along with 2,000 Jala to spend on in-game items
  • The Crow Tengu DLC Bundle launched on July 21 for a suggested retail price of $29.99 USD

IPPON MATSURI (Festival) – July 21 – 26


  • Players will receive rewards based on the total amount of IPPONs scored by all players during the event. The rewards will increase throughout the event based on the collective number of IPPONs achieved. If the total number of IPPONs achieved during the event reaches 10 million, all users will receive a total of 30 Gold Medals
  • There will also be special bonuses to the rewards players receive at match end, such as higher rates for Ninja-Gums, Assist Codes, and Medals
  • To celebrate the event, a Twitter campaign will also be held where 100 users who follow and retweet Tweets tagged with #IPPON_MATSURI from the official @PlayNinjala and @Ninjala_JP Twitter accounts will be randomly selected to receive 1,000 Jala

Season 2 – launching August 26 (Free to all players)


  • Season 2 will introduce a new weapon class – the Board. Players will have access to four variations of this weapon – the Festival Board, the Home Run Surfer board, the Camu Camu Plate, and the Ninja Caliber board. Each weapon will come with new Gum Ninjutsu, abilities, and specials
  • A new stage – Shinobi City. This is a Japanese-themed stage that explores the hometown of the shinobis, hot springs, and all! Players can use this stage to their advantage by using the hot springs to recover their health and increase their Shinobi Gauge

Have you been enjoying Ninjala since it launched last month? How have you been doing now that you’ve had a few weeks’ practice? Let us know in the comments below.


https://www.sickgaming.net/blog/2020/07/...ame-event/

Print this item

  News - Contra-Inspired RPG Shooter Bite The Bullet Fires Onto Switch Next Month
Posted by: xSicKxBot - 07-23-2020, 06:55 AM - Forum: Nintendo Discussion - No Replies

Contra-Inspired RPG Shooter Bite The Bullet Fires Onto Switch Next Month


Mega Cat Studios and publisher Graffiti Games have given us a release date for their upcoming RPG shooter, Bite the Bullet. You’ll be able to sink your teeth into this one on 13th August.

In case you’ve missed our previous coverage on this one, we really mean it when we talk about sinking your teeth in. The game’s actually being marketed as a ‘run and gun and eat’ title, where players have to eat enemies, bullets and more to power-up their character, weapons and abilities. A press release describes it as “Contra meets professional eating”, and we can’t really argue with that.

Key Features Include
Devour enemies to powerup Chewy/Chewella, weapons, and abilities.
– Chow down on everything – enemies, walls, even bullets.
– Play solo or with a friend in local co-op.
– Four character classes (Carnivore, Herbivore, Omnivore, and Robovore – which means eating metal) that have their own unique abilities and perks.
– Gorge on 50 levels.
– Character customizations with a deep, branching skill tree.
– Loot powerful weapons with fun modifiers such as Spicy Critter Cannons.
– Craft exotic new weapons by wolfing down special types of characters and enemies.
– Eat enemies to energize skills and special attacks.
– Use a highly advanced shield for protection from oncoming fire or knock enemies away.
– Earn action hero bandanas by fully completing each world.
– Chew carefully – every enemy has its own nutritional information, and a body type will change based on the types of enemies consumed.
– Transform into the powerful Zombro form and smash enemies into bite-sized bits.

As mentioned above, you’ll be able to download this one from 13th August, and it’ll be priced at $14.99. If you haven’t already, make sure to check out the new trailer above.


https://www.sickgaming.net/blog/2020/07/...ext-month/

Print this item

  News - Logitech And Herman Miller Reveal A Ridiculously Expensive Gaming Chair
Posted by: xSicKxBot - 07-23-2020, 06:55 AM - Forum: Lounge - No Replies

Logitech And Herman Miller Reveal A Ridiculously Expensive Gaming Chair

Logitech has revealed its collaboration with Herman Miller, the makers of luxury and ergonomically engineered office chairs. The result is a gaming chair that looks nothing like you would expect it to, and costs far more than you might want to spend.

The Herman Miller X Logitech G Embody Gaming Chair is (aside from being a mouthful) almost unchanged from the original design Herman Miller has been selling for a while now. It features a range of comfort adjustments, including a back support segmented into 150 individual pieces that can be adjusted to perfectly match the curvature of your spine. There's also a finely tuned recline support as well as a seat adjustment that lets you get the perfect angle between your knees or thighs and your lower leg.

Gaming-specific features are almost non-existent, aside from the all black finish and a very Logitech-looking blue hue to the back support that you can see on the rear of the chair. The one notable addition is the inclusion of a copper-infused material on the back cushioning, which is meant to help distribute heat and keep you cool while using the chair for hours on end. This is, for all intents and purposes, the same chair Herman Miller has been selling to offices for years, just marketed to Logitech's gaming audience.

Continue Reading at GameSpot

https://www.gamespot.com/articles/logite...01-10abi2f

Print this item

  [Tut] NumPy argpatition()
Posted by: xSicKxBot - 07-23-2020, 05:20 AM - Forum: Python - No Replies

NumPy argpatition()

numpy.argpartition(a, kth, axis=-1, kind='introselect', order=None)

The NumPy argpatition function performs an indirect partition along the given axis using the algorithm specified by the kind keyword. It returns an array of indices of the same shape as a that index data along the given axis in partitioned order.


Arguments Type Description
c array_like or poly1d object The input polynomials to be multiplied
kth integer or sequence of integers Element index to partition by. The k-th element will be in its final sorted position and all smaller elements will be moved before it and all larger elements behind it. The order all elements in the partitions is undefined. If provided with a sequence of k-th it will partition all of them into their sorted position at once.
axis integer or None (Optional.) Axis along which to sort. The default is -1 (the last axis). If None, the flattened array is used.
kind {'introselect'} (Optional.) Selection algorithm. Default is 'introselect'.
order string or list of strings (Optional.) When a is an array with fields defined, this argument specifies which fields to compare first, second, etc. A single field can be specified as a string, and not all fields need be specified, but unspecified fields will still be used, in the order in which they come up in the dtype, to break ties.

The following table shows the return value of the function:


Type Description
Return Value index_array : ndarray, int Array of indices that partition a along the specified axis. If a is one-dimensional, a[index_array] yields a partitioned a. More generally, np.take_along_axis(a, index_array, axis=a) always yields the partitioned a, irrespective of dimensionality.

Related: See partition for notes on the different selection algorithms.

Let’s dive into some examples to show how the function is used in practice:

Examples


One-dimensional array:

import numpy as np x = np.array([3, 4, 2, 1]) print(x[np.argpartition(x, 3)])
# [2 1 3 4] print(x[np.argpartition(x, (1, 3))])
# [1 2 3 4]

Multi-dimensional array:

import numpy as np x = np.array([3, 4, 2, 1]) print(x[np.argpartition(x, 3)])
# [2 1 3 4] print(x[np.argpartition(x, (1, 3))])
# [1 2 3 4] x = [3, 4, 2, 1]
print(np.array(x)[np.argpartition(x, 3)])
# [2 1 3 4]

Any master coder has a “hands-on” mentality with a bias towards action. Try it yourself—play with the function in the following interactive code shell:

Exercise: Change the parameters of your polynomials and print them without the comparisons. Do you understand where they come from?

Master NumPy—and become a data science pro:

Coffee Break NumPy

Related Video


https://www.sickgaming.net/blog/2020/07/...gpatition/

Print this item

  [Tut] Image Editor: Move Scale Skew Rotate and Spin with CSS Transform
Posted by: xSicKxBot - 07-23-2020, 05:20 AM - Forum: PHP Development - No Replies

Image Editor: Move Scale Skew Rotate and Spin with CSS Transform

Last modified on July 22nd, 2020.

Are you interested in creating an image editor tool? If so, this article will help you to get started with it.

An image editor will have a range of tools. It can be very basic with only tools like resize, rotate and crop. Or it can be super extensive like a Photoshop.

Rotate is a basic and essential tool that is part of any image editor. Let us start with something easy and basic like rotate then add some more essential tools.

I will be using CSS transform property as the core and add JavaScript to enrich the tool.

This can become a basic starter toolkit that can be expanded to a full fledged image editor in the future.

Following is a preview of the things to come.

What is inside?


  1. How to edit an image?
  2. A quick glance on CSS transform and image editing
  3. Examples and demo on image editing
  4. Conditions and exceptions on applying transform property
  5. Importance of respecting system preferences

How to edit an image?


Do not underestimate the power of CSS. Gone or those days, where CSS just applies decoration on top of HTML and beautifies the document. CSS3 and beyond, with the combined support of HTML5, advancements in the browser support has change CSS to a powerful UI tool.

It complements well with the JavaScript. When we combine it together, we can create wonders. The divide between thin-client and thick-client has vanished. The CSS is a very good beginner’s tool to start with simple image editor features.

When you work on image editing capabilities with CSS, you must consider browser compatibility. Some browsers will not render as you code. So, we have to be carefully choosing the properties.

I have used CSS keyframesrules to set the core properties.

In an older article, we have see several animation effects with CSS and Javascript.

In this article, you can find the example code of the below items with a demo.

  • Rotation and spin
  • Skew
  • Scale
  • Translation

A quick glance on CSS transform and image editing


CSS transform property can be used to do basic image editing. It supports functions like rotation, skew, scale and translate.

The key functions are rotate()skew()scale(), translate().

The transform functions have classification based on the axis of animation. For example rotateX(), rotateY() and more. This can be used for image animation.

We can apply the transform functions in a combination way for a single UI element’s selector. When we use many transform function, the animation effects happen in a right to left order.

Examples and demo on image editing


Scaling an image


The scaling is a transform function that allows us to scale up or down the element’s dimension. The scaling transform output varies based on the function used and its parameters.

The scale() function can have single or dual parameters. With a single parameter, it applies uniform scaling in both x, y-axis. When we supply separate values for the x, y-axis, then the scaling range will vary.

With three params the scale3d() function allows scaling in x,y,z axis.

We can also apply scaling with respect to single axis by using scaleX(), scaleY() or scaleZ().

The above demo has a slider to scale up and down an image.

Below code has the UI elements to apply scaling transform on an image element. It has a pallet with an image element and animation tools.

image-scale/index.php

<!DOCTYPE html>
<html>
<head>
<meta name="viewport" content="width=device-width, initial-scale=1">
<link href="../assets/css/phppot-style.css" type="text/css" rel="stylesheet" />
<link href="./assets/css/style.css" type="text/css" rel="stylesheet" />
<link href="../vendor/jquery/ui/jquery-ui.min.css" type="text/css" rel="stylesheet" />
<script src='../vendor/jquery/jquery-3.3.1.js' type='text/javascript'></script>
<script src='../vendor/jquery/ui/jquery-ui.min.js' type='text/javascript'></script>
</head> <body> <div class="phppot-container"> <div class="container"> <div class="image-demo-box"> <div id="slider"> <div id="scale-handle" class="ui-slider-handle"></div> </div> <img src='../sweet.jpg' id='image' /> </div> </div> </div> <script src='./assets/js/scale.js'></script>
</body>
</html>

This jQuery script initiates UI slider by setting the min max ranges. The slider handle will show the scaling factor.

On dragging the slider, the script applies scaling transform on the image element. The slider’s step property defines the scaling multiples.

On dragging the slider handle, the script will populate the scaling factor in the handle.

image-scale/assets/js/scale.js

$(document).ready(function() { var scaleX = 2; var handle = $("#scale-handle"); $("#slider").slider({ min : 1, max : 2.5, value: scaleX, step: 0.1, create : function() { handle.text(scaleX+"x"); scale(scaleX); }, slide : function(event, ui) { scaleX = ui.value; handle.text(scaleX + "x"); scale(scaleX); } });
}); function scale(scaleX) { $('#image').css('transform', 'scale(' + scaleX + ')');
}

Translating image element


Like other transform functionality, the translate() function performs 2D, 3D translation.

The translate() function with one or two params results in 2D translation. The two params are to move the image in the x, y-axis of a 2D plane. With single param, the translate() will happen in a horizontal direction.

The translateX() and translateY() are for implementing translation in a particular direction.

The translate3d() with x, y, z factors allows creating 3D animation.

In this demo, there are two sliders in horizontal and vertical directions. On dragging the handle of these sliders, it moves the image on the 2D plane shown above.

This HTML shows the template elements to set the image-translate demo.

image-translate/index.php

<!DOCTYPE html>
<html>
<head>
<meta name="viewport" content="width=device-width, initial-scale=1">
<link href="../assets/css/phppot-style.css" type="text/css" rel="stylesheet" />
<link href="./assets/css/style.css" type="text/css" rel="stylesheet" />
<link href="../vendor/jquery/ui/jquery-ui.min.css" type="text/css" rel="stylesheet" />
<script src='../vendor/jquery/jquery-3.3.1.js' type='text/javascript'></script>
<script src='../vendor/jquery/ui/jquery-ui.min.js' type='text/javascript'></script>
</head> <body> <div class="phppot-container"> <div class="container"> <div class="image-demo-box"> <div id="slider"> <div id="translate-x" class="ui-slider-handle"></div> </div> <div id="v-slider"> <div id="translate-y" class="ui-slider-handle"></div> </div> <img src='../sweet.jpg' id='image' /> </div> </div> </div> <script src='./assets/js/translate.js'></script>
</body>
</html>

This script sets the horizontal and vertical translation slider properties. The horizontal slider has the range between o -160. And, the vertical translation ranges between  0 to 50.

image-translate/assets/js/translate.js

$(document).ready(function() { var translateX; var handle = $("#translate-x"); $("#slider").slider({ range : "min", min : 0, max : 160, create : function() { handle.text($(this).slider("value") + " px"); }, slide : function(event, ui) { translateX = ui.value; handle.text(translateX + " px"); translate(translateX); } }); var translateY; var vhandle = $("#translate-y"); $("#v-slider").slider({ range : "min", min : 0, max : 50, orientation : "vertical", create : function() { vhandle.text($(this).slider("value") + " px"); }, slide : function(event, ui) { translateY = ui.value; vhandle.text(translateY + " px"); translatey(translateY); } }); }); function translate(translateX) { $('#image').css('transform', 'translateX(' + translateX + 'px)');
} function translatey(translateY) { $('#image').css('transform', 'translateY(' + translateY + 'px)');
}

Tools for rotating an image


Ah yes, we have reached the rotate tool. This is a core feature in any image editor. Rotation spins the image or other UI elements based on the angle specified.

With a negative degree, the animation will happen in counter-clockwise rotation.

Like scale and translate, rotate function also has classification based on the axis. Those are,

  • rotate(angle)
  • rotate3d(x, y, z, angle)
  • rotateX(angle)
  • rotateY(angle)
  • rotateZ(angle)

The rotate3d() function needs the angle and the x, y, z co-ordinates of the rotation axis.

A spin will make the image rotate from 0 to 360 degrees. You can stop spinning or refresh the image orientation back to its original.

image-rorate/index.php

<!DOCTYPE html>
<html>
<head>
<meta name="viewport" content="width=device-width, initial-scale=1">
<link href="../assets/css/phppot-style.css" type="text/css" rel="stylesheet" />
<link href="./assets/css/style.css" type="text/css" rel="stylesheet" />
<link href="../vendor/jquery/ui/jquery-ui.min.css" type="text/css" rel="stylesheet" />
<script src='../vendor/jquery/jquery-3.3.1.js' type='text/javascript'></script>
<script src='../vendor/jquery/ui/jquery-ui.min.js' type='text/javascript'></script>
</head> <body> <div class="phppot-container"> <div class="container"> <input type='text' id='txtInputAngle' class="degree" value="10" /> <input type='button' id='btnRotate' value='Rotate' /> <input type='button' id='btnSpin' value='Spin' data-state='off' /> <input type='button' id='btnRefresh' value='Refresh' /> <div class="image-demo-box"> <div id="slider"> <div id="rotation-angle" class="ui-slider-handle"></div> </div> <img src='../sweet.jpg' id='image' /> </div> </div> </div> <script src='./assets/js/rotate.js'></script>
</body>
</html>

I have used CSS keyframes to allow continuous spinning. Below CSS shows the styles used for the image rotation demo.

image-rorate/assets/css/style.css

.image-demo-box { border: #CCC 1px solid; text-align: center; margin: 15px 0px; } input[type=button] { width: 65px; margin-right: 8px; outline: none; background: #f6f5f6;
} input.degree
{ width: 50px;
} #image { margin: 50px auto; border: #f6f5f6 10px solid; width: 200px;
}
.rotate { animation: rotation 8s infinite linear;
} div#slider { border-bottom: 1px solid #c5c5c5;
} #slider .ui-slider-range { background: #c5c5c5; } #rotation-angle { width: 50px; padding: 3px 5px 1px 5px; font-size: 0.8em; text-align: center; border-radius: 2px; outline: none; } .ui-slider-handle.ui-corner-all.ui-state-default { border: 1px solid #c5c5c5; background: #f6f6f6; font-weight: normal; color: #454545;
} @keyframes rotation { from { transform: rotate(0deg); } to { transform: rotate(359deg); }
}

When you click the rotation tool, a jQuery script rotates the image based on the specified angle.

It changes the images’ transform property using jQuery $.css() function.

The rotation slider ranges from 0 to 360 degrees. I have added the rotation script below. It shows how to turn on a jQuery UI slider to rotate an image element.

image-rorate/assets/js/rotate.js

$(document).ready(function() { var rotationAngle; var handle = $("#rotation-angle"); $("#slider").slider({ range : "min", min : 0, max : 360, create : function() { handle.text($(this).slider("value") + " deg"); }, slide : function(event, ui) { $('#image').removeClass('rotate'); rotationAngle = ui.value; handle.text(rotationAngle + " deg"); rotate(rotationAngle); } }); $('#btnSpin').on('click', function() { if ($(this).data('state') == 'off') { spin($(this)); } else { stopSpin($(this)); } }); $('#btnRotate').on('click', function() { $('#image').removeClass('rotate'); rotationAngle = $('#txtInputAngle').val(); rotate(rotationAngle); }); $('#btnRefresh').on('click', function() { $('#image').removeClass('rotate'); rotate(0); });
}); function spin(buttonElement) { $('#image').addClass('rotate'); $("#image").css("animation-play-state", "running"); $(buttonElement).data('state', 'on'); $(buttonElement).val('Stop');
} function stopSpin(buttonElement) { $("#image").css("animation-play-state", "paused"); $(buttonElement).data('state', 'off'); $(buttonElement).val('Spin');
} function rotate(rotationAngle) { if ($('#btnSpin').data('state') == 'on') { stopSpin($('#btnSpin')); } $('#image').css('transform', 'rotate(' + rotationAngle + 'deg)');
}

Apply skew transform


By changing each point of the element in a fixed direction will skew the element. This change will tilt or skews the elements layout based on the specified angle.

The skew transform functions skewX(), skewY(), skewZ() tilting element boxes along with the X, Y, Z axis.

image-skew/index.php

<!DOCTYPE html>
<html>
<head>
<meta name="viewport" content="width=device-width, initial-scale=1">
<link href="../assets/css/phppot-style.css" type="text/css" rel="stylesheet" />
<link href="./assets/css/style.css" type="text/css" rel="stylesheet" />
<link href="../vendor/jquery/ui/jquery-ui.min.css" type="text/css" rel="stylesheet" />
<script src='../vendor/jquery/jquery-3.3.1.js' type='text/javascript'></script>
<script src='../vendor/jquery/ui/jquery-ui.min.js' type='text/javascript'></script>
</head> <body> <div class="phppot-container"> <div class="container"> <div class="image-demo-box"> <div id="slider"> <div id="skew-angle" class="ui-slider-handle"></div> </div> <img src='../sweet.jpg' id='image' /> </div> </div> </div> <script src='./assets/js/skew.js'></script>
</body>
</html>

image-skew/assets/js/skew.js

$(document).ready(function() { var skewAngle; var handle = $("#skew-angle"); $("#slider").slider({ range : "min", min : 0, max : 40, create : function() { handle.text($(this).slider("value") + " deg"); }, slide : function(event, ui) { skewAngle = ui.value; handle.text(skewAngle + " deg"); skew(skewAngle); } }); });
function skew(skewAngle) { $('#image').css('transform', 'skew(' + skewAngle + 'deg)'); }

Conditions and exceptions on applying transform property


The CSS transform property will not work with some UI elements.

For example, table column element <col>, table column group element <col-group>, and more. Those are non-transformable elements.

What are transformable elements?

Most of the UI elements enclosed with the CSS box model are transformable. The following image shows the HTML element layout enclosed by a CSS box model.
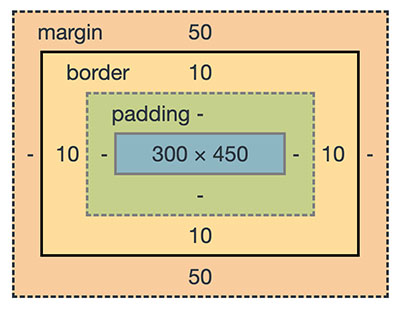
CSS Box Model

Also, renderable graphical elements, clipPath elements are also known as a transformable element.

Importance of respecting system preferences


The system preferences will affect the motion of elements. If your system preferences is set to reduce animation is on, it will omit the animation effect of the above demo.

To respect this settings we have to add a CSS media rule to set the
prefers-reduced-motion. The possible values are no-preferences and reduce.

This media rule with reduce option provides a CSS block to suppress animation.

@media (prefers-reduced-motion: reduce) { .rotate { transform: none; }
}

In the above examples, I have used the media rule to respect the user’s system preferences. You can test this with the demo by enabling the reduced-motion.
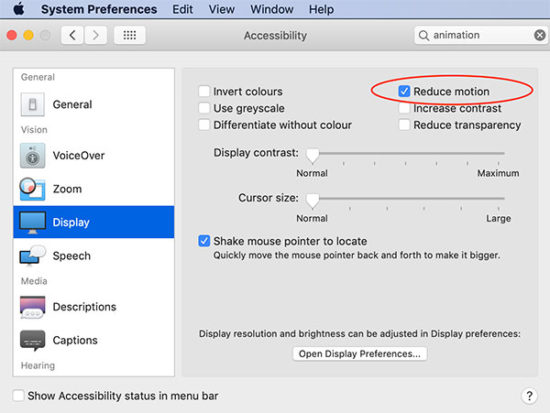
System Preferences to Reduce Animation

Conclusion


We have seen the CSS transform based image editing. This is just a beginning only. This can serve as a bootstrap for building a full fledged image editor.

With CSS transform, we have added JavaScript and enriched the tool. We have also added various motion effects.

I have added most of the template files and the jQuery scripts above. But you can find the complete bundle with the downloadable source code here below.

Download

↑ Back to Top


https://www.sickgaming.net/blog/2020/07/...transform/

Print this item

 
Latest Threads
(Free Game Key) Steam | W...
Last Post: xSicKxBot
2 hours ago
News - These Fortnite Swi...
Last Post: xSicKxBot
2 hours ago
Black Ops (BO1, T5) DLC's...
Last Post: justlance
4 hours ago
Black Ops (BO1, T5) DLC's...
Last Post: Throwaway5326
Yesterday, 12:08 PM
(Indie Deal) FREE Brocco,...
Last Post: xSicKxBot
Yesterday, 11:00 AM
(Free Game Key) Steam | P...
Last Post: xSicKxBot
Yesterday, 11:00 AM
News - World Of Warcraft’...
Last Post: xSicKxBot
Yesterday, 10:59 AM
(Indie Deal) No Clean Sta...
Last Post: xSicKxBot
07-16-2026, 06:35 PM
(Free Game Key) Steam | W...
Last Post: xSicKxBot
07-16-2026, 06:35 PM
News - PlayStation Plus E...
Last Post: xSicKxBot
07-16-2026, 06:35 PM

Forum software by © MyBB Theme © iAndrew 2016