Create an account


Thread Rating:
  • 0 Vote(s) - 0 Average
  • 1
  • 2
  • 3
  • 4
  • 5
News - Guide: How To Fit An IPS Screen To Your Game Boy Advance SP

#1
Guide: How To Fit An IPS Screen To Your Game Boy Advance SP

<div><div class="media_block"><a href="http://images.nintendolife.com/efd91e92b3603/large.jpg"><img src="http://images.nintendolife.com/efd91e92b3603/small.jpg" class="media_thumbnail"></a></div>
<figure class="picture strip"><a title="IMG 20200609 164956" href="http://images.nintendolife.com/efd91e92b3603/img-20200609-164956.original.jpg"><img src="http://images.nintendolife.com/efd91e92b3603/img-20200609-164956.900x.jpg" width="900" height="593" alt="IMG 20200609 164956"></a></figure>
<p>The Game Boy line of consoles may be old news to Nintendo, but that doesn’t mean it isn’t still evolving. Fan-made modifications are appearing all of the time which help augment and improve the tech which makes these handhelds tick, and one of the latest upgrades is a new IPS screen for the Game Boy Advance SP.</p>
<p>
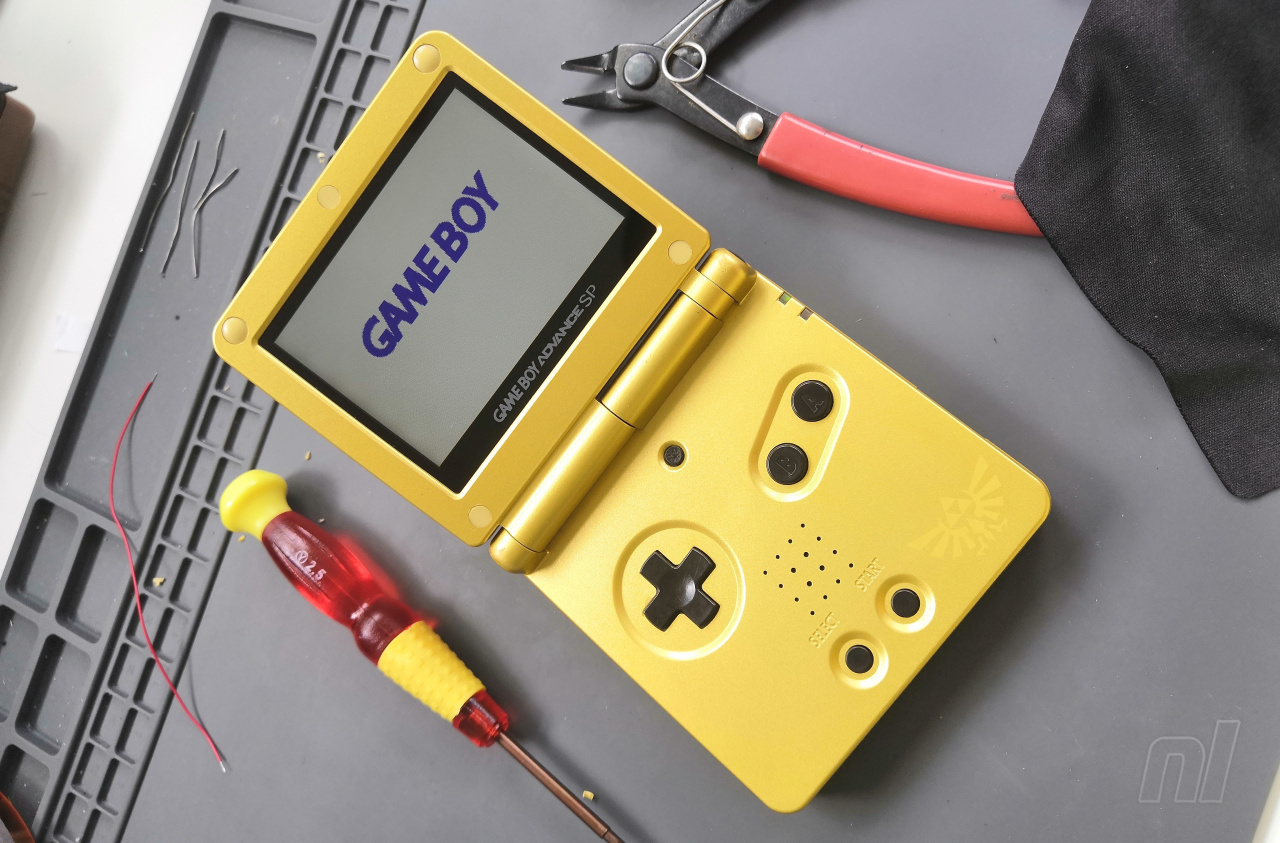
In this article, we are going to be looking at installing a new “IPS V2” replacement screen kit in a Game Boy Advance SP. These screens are slightly larger than the original display and feature bold, vibrant colours and adjustable levels of brightness. They really do look amazing!</p>
<p>This guide is specific to the AGS-001 model of the SP, with the front-lit screen. Technically, the kits could be used to replace the screens in the backlit AGS-101 model using a different method, but honestly, those are best left as they are: <em>pixel perfection.</em></p>
<aside class="object object-youtube">
<div class="youtube">[embedded content]</div>
</aside>
<p>The AGS-001 Game Boy Advance SP may have been the first-ever Game Boy with a front-lit screen, but compared to modern backlit displays, it leaves a lot to be desired in terms of brightness, clarity and vibrance.</p>
<p>IPS screens have been available for a little while now for original Game Boy Advance consoles, and now there are dedicated kits available for GBA SP, coming with a pre-fitted glass lens, eliminating those pesky bits of dust between screen and lens that are the bane of many a modder!</p>
<nav role="navigation" class="table-of-contents">
<h2>On this page:</h2>
<ol>
<li><a href="http://www.nintendolife.com/news/2020/06/guide_how_to_fit_an_ips_screen_to_your_game_boy_advance_sp#how-to-fit-an-ips-screen-to-your-gba-sp">How To Fit An IPS Screen To Your GBA SP</a></li>
</ol>
</nav>
<h2 id="how-to-fit-an-ips-screen-to-your-gba-sp">How To Fit An IPS Screen To Your GBA SP</h2>
<h3 id="the-kit">The Kit</h3>
<aside class="gallery">
<div class="col"><a title="004 Kit" href="http://images.nintendolife.com/2d1a49f002096/004-kit.original.jpg"><img class="lazy" src="//www.w3.org/2000/svg' viewBox='0 0 450 495'%3E%3C/svg%3E" width="450" height="495" data-original="http://images.nintendolife.com/2d1a49f002096/004-kit.450x495.jpg" alt="004 Kit"></a></div>
<div class="col"><a title="005 Kit Opened" href="http://images.nintendolife.com/5d1f8b040414b/005-kit-opened.original.jpg"><img class="lazy" src="//www.w3.org/2000/svg' viewBox='0 0 450 495'%3E%3C/svg%3E" width="450" height="495" data-original="http://images.nintendolife.com/5d1f8b040414b/005-kit-opened.450x495.jpg" alt="005 Kit Opened"></a></div>
</aside>
<p>The kit itself is relatively simple and very satisfying to fit, although some cutting of the shell is required to make room for the new screen and a little soldering is necessary if you want to have control over the screen’s brightness (this is entirely optional, however). There are lots of sellers currently on eBay with these V2 IPS kits; the one in this article was ordered direct from China.</p>
<p>In the kit we bought, we got the IPS screen assembly with glass lens pre-attached, a ribbon cable with the control board for the screen at one end, a piece of insulating film for the back of the screen, a foam insert, a piece of double-sided tape, and a piece of wire pre-soldered at ends for the brightness control. The kit also contained a crosshead screwdriver and a tri-wing security screwdriver to help open the shell.</p>
<p>Not every kit will come with the exact same parts, and always make sure the seller has a good reputation before placing an order.</p>
<p><strong>NOTE:</strong> We’ve noticed that these new IPS screens are quite power-hungry, so if your existing 600mAh Game Boy Advance battery is a bit long in the tooth, you might find stamina is low. You can either purchase a new 600mAh battery or upgrade to an aftermarket 850mAh battery, which are available on eBay for less than $10.</p>
<h3 id="equipment">Equipment</h3>
<figure class="picture strip"><a title="006 Tools" href="http://images.nintendolife.com/b98ea6b787b33/006-tools.original.jpg"><img class="lazy" src="//www.w3.org/2000/svg' viewBox='0 0 900 675'%3E%3C/svg%3E" width="900" height="675" data-original="http://images.nintendolife.com/b98ea6b787b33/006-tools.900x.jpg" alt="006 Tools"></a></figure>
<p>
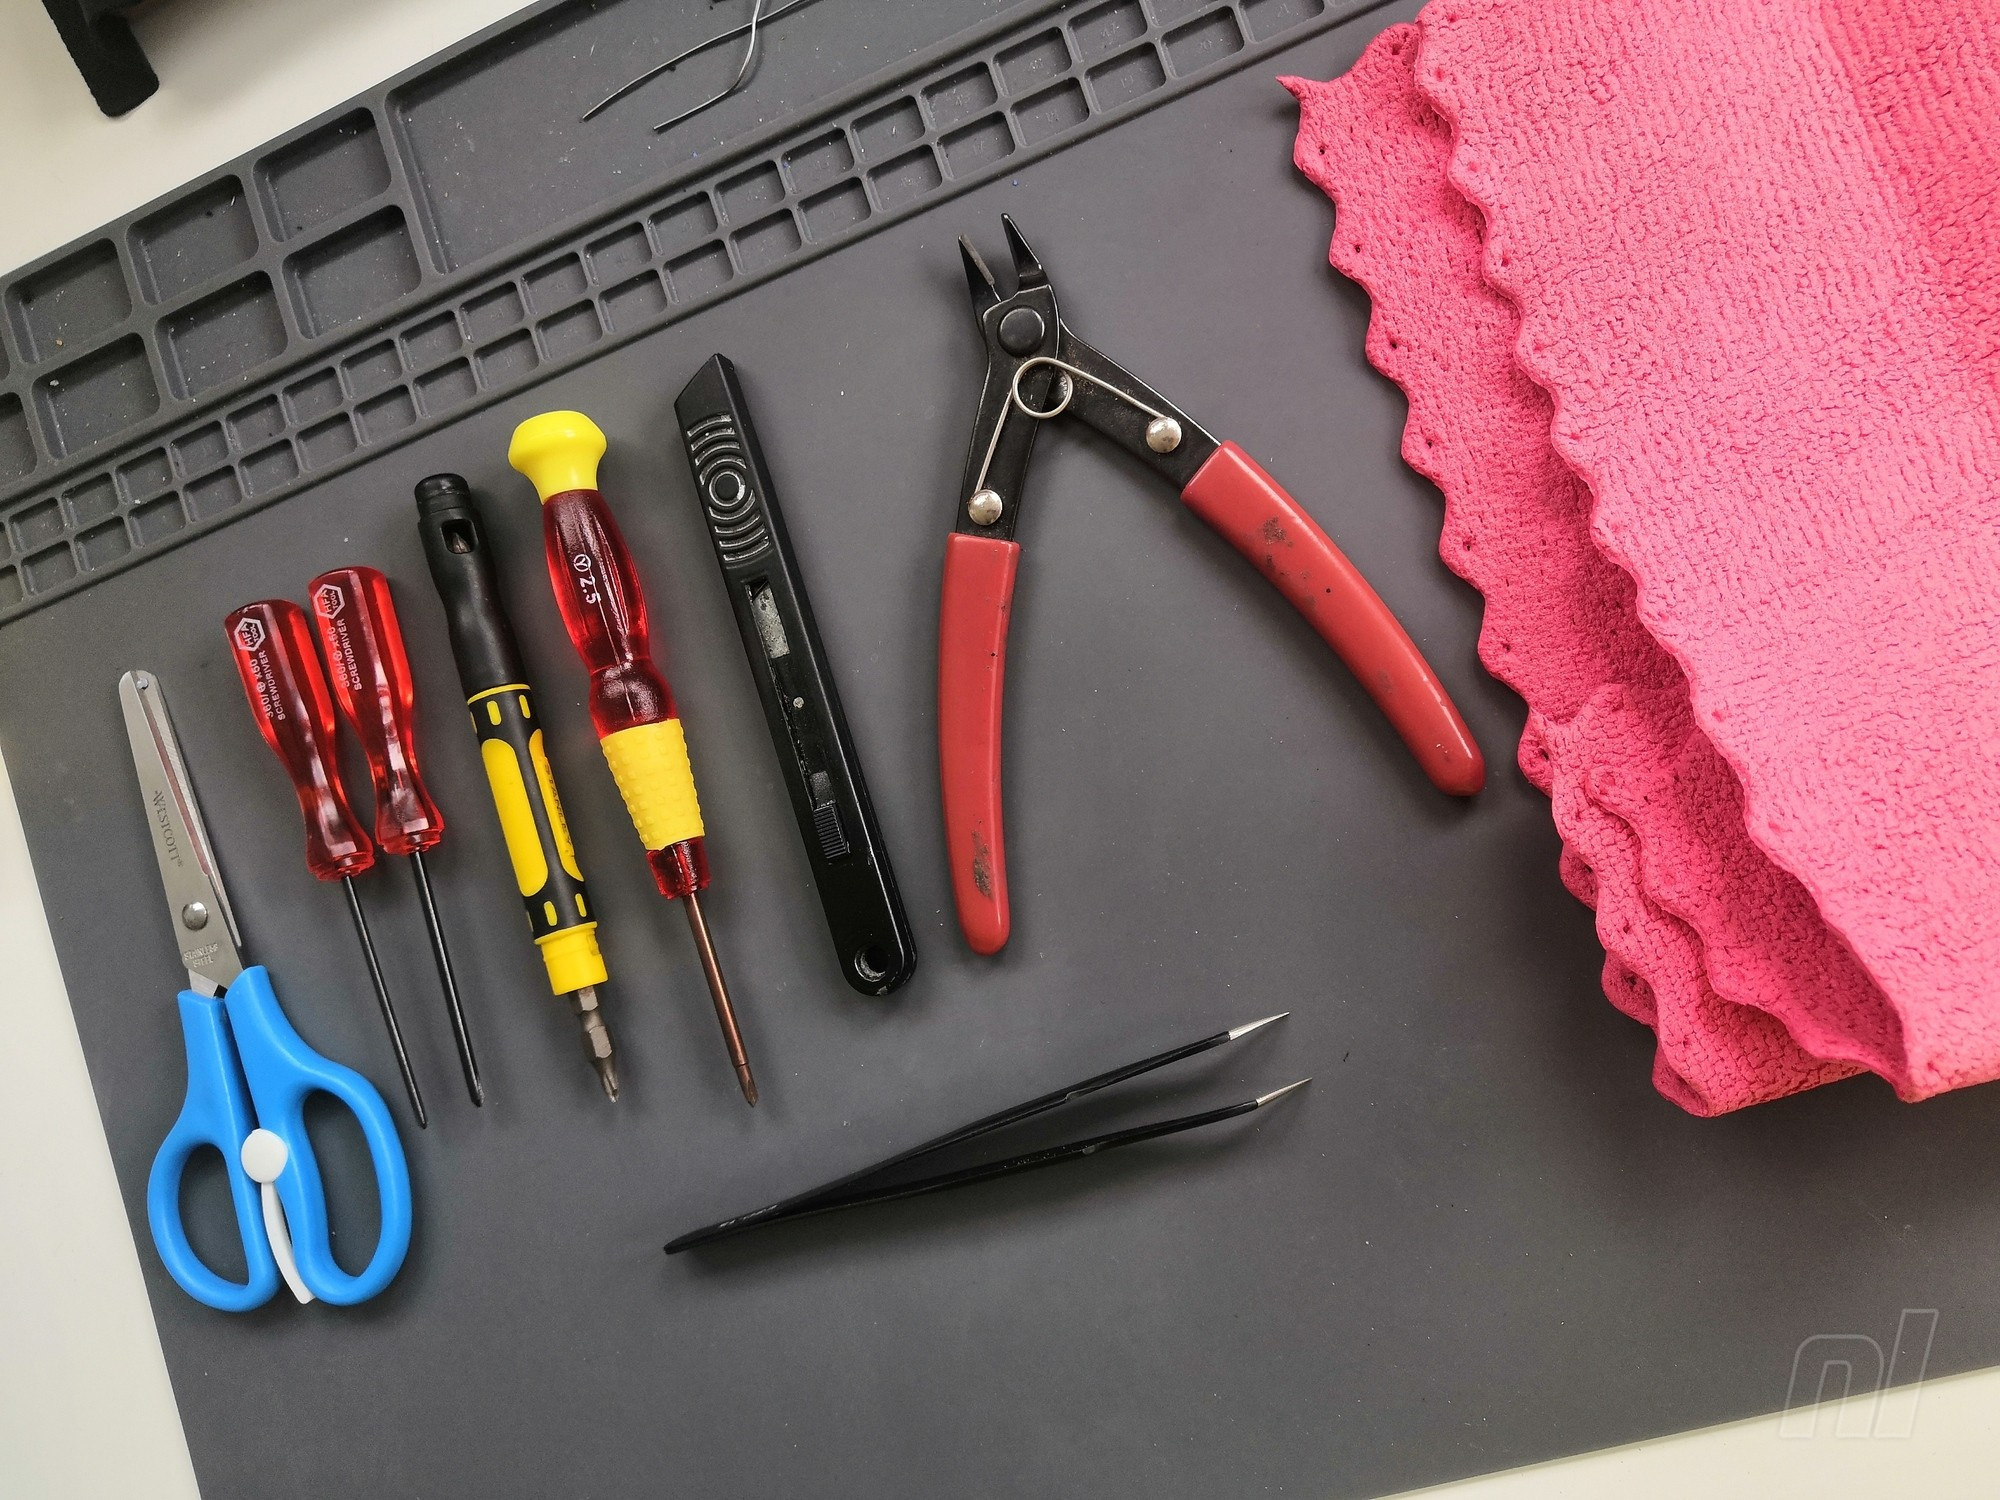
Tools recommended for installing the kit are the aforementioned screwdrivers (be warned the quality of these isn’t great, so if you have better quality ones you’ll find the job easier) and cutting tools for removing the plastic. A Dremel-type power tool is quick and easy, but not everyone has access to one of those, so in this guide we’ll focus on using a pair of side cutters and a sharp craft knife. Having a knife with a good point on it is also useful when removing the screw caps in the top of the shell. In addition to this, a pair of scissors, some tweezers and a microfibre cloth will prove useful.</p>
<figure class="picture strip"><a title="007 Solder Equipment" href="http://images.nintendolife.com/553dec6d73e7a/007-solder-equipment.original.jpg"><img class="lazy" src="//www.w3.org/2000/svg' viewBox='0 0 900 675'%3E%3C/svg%3E" width="900" height="675" data-original="http://images.nintendolife.com/553dec6d73e7a/007-solder-equipment.900x.jpg" alt="007 Solder Equipment"></a></figure>
<p>
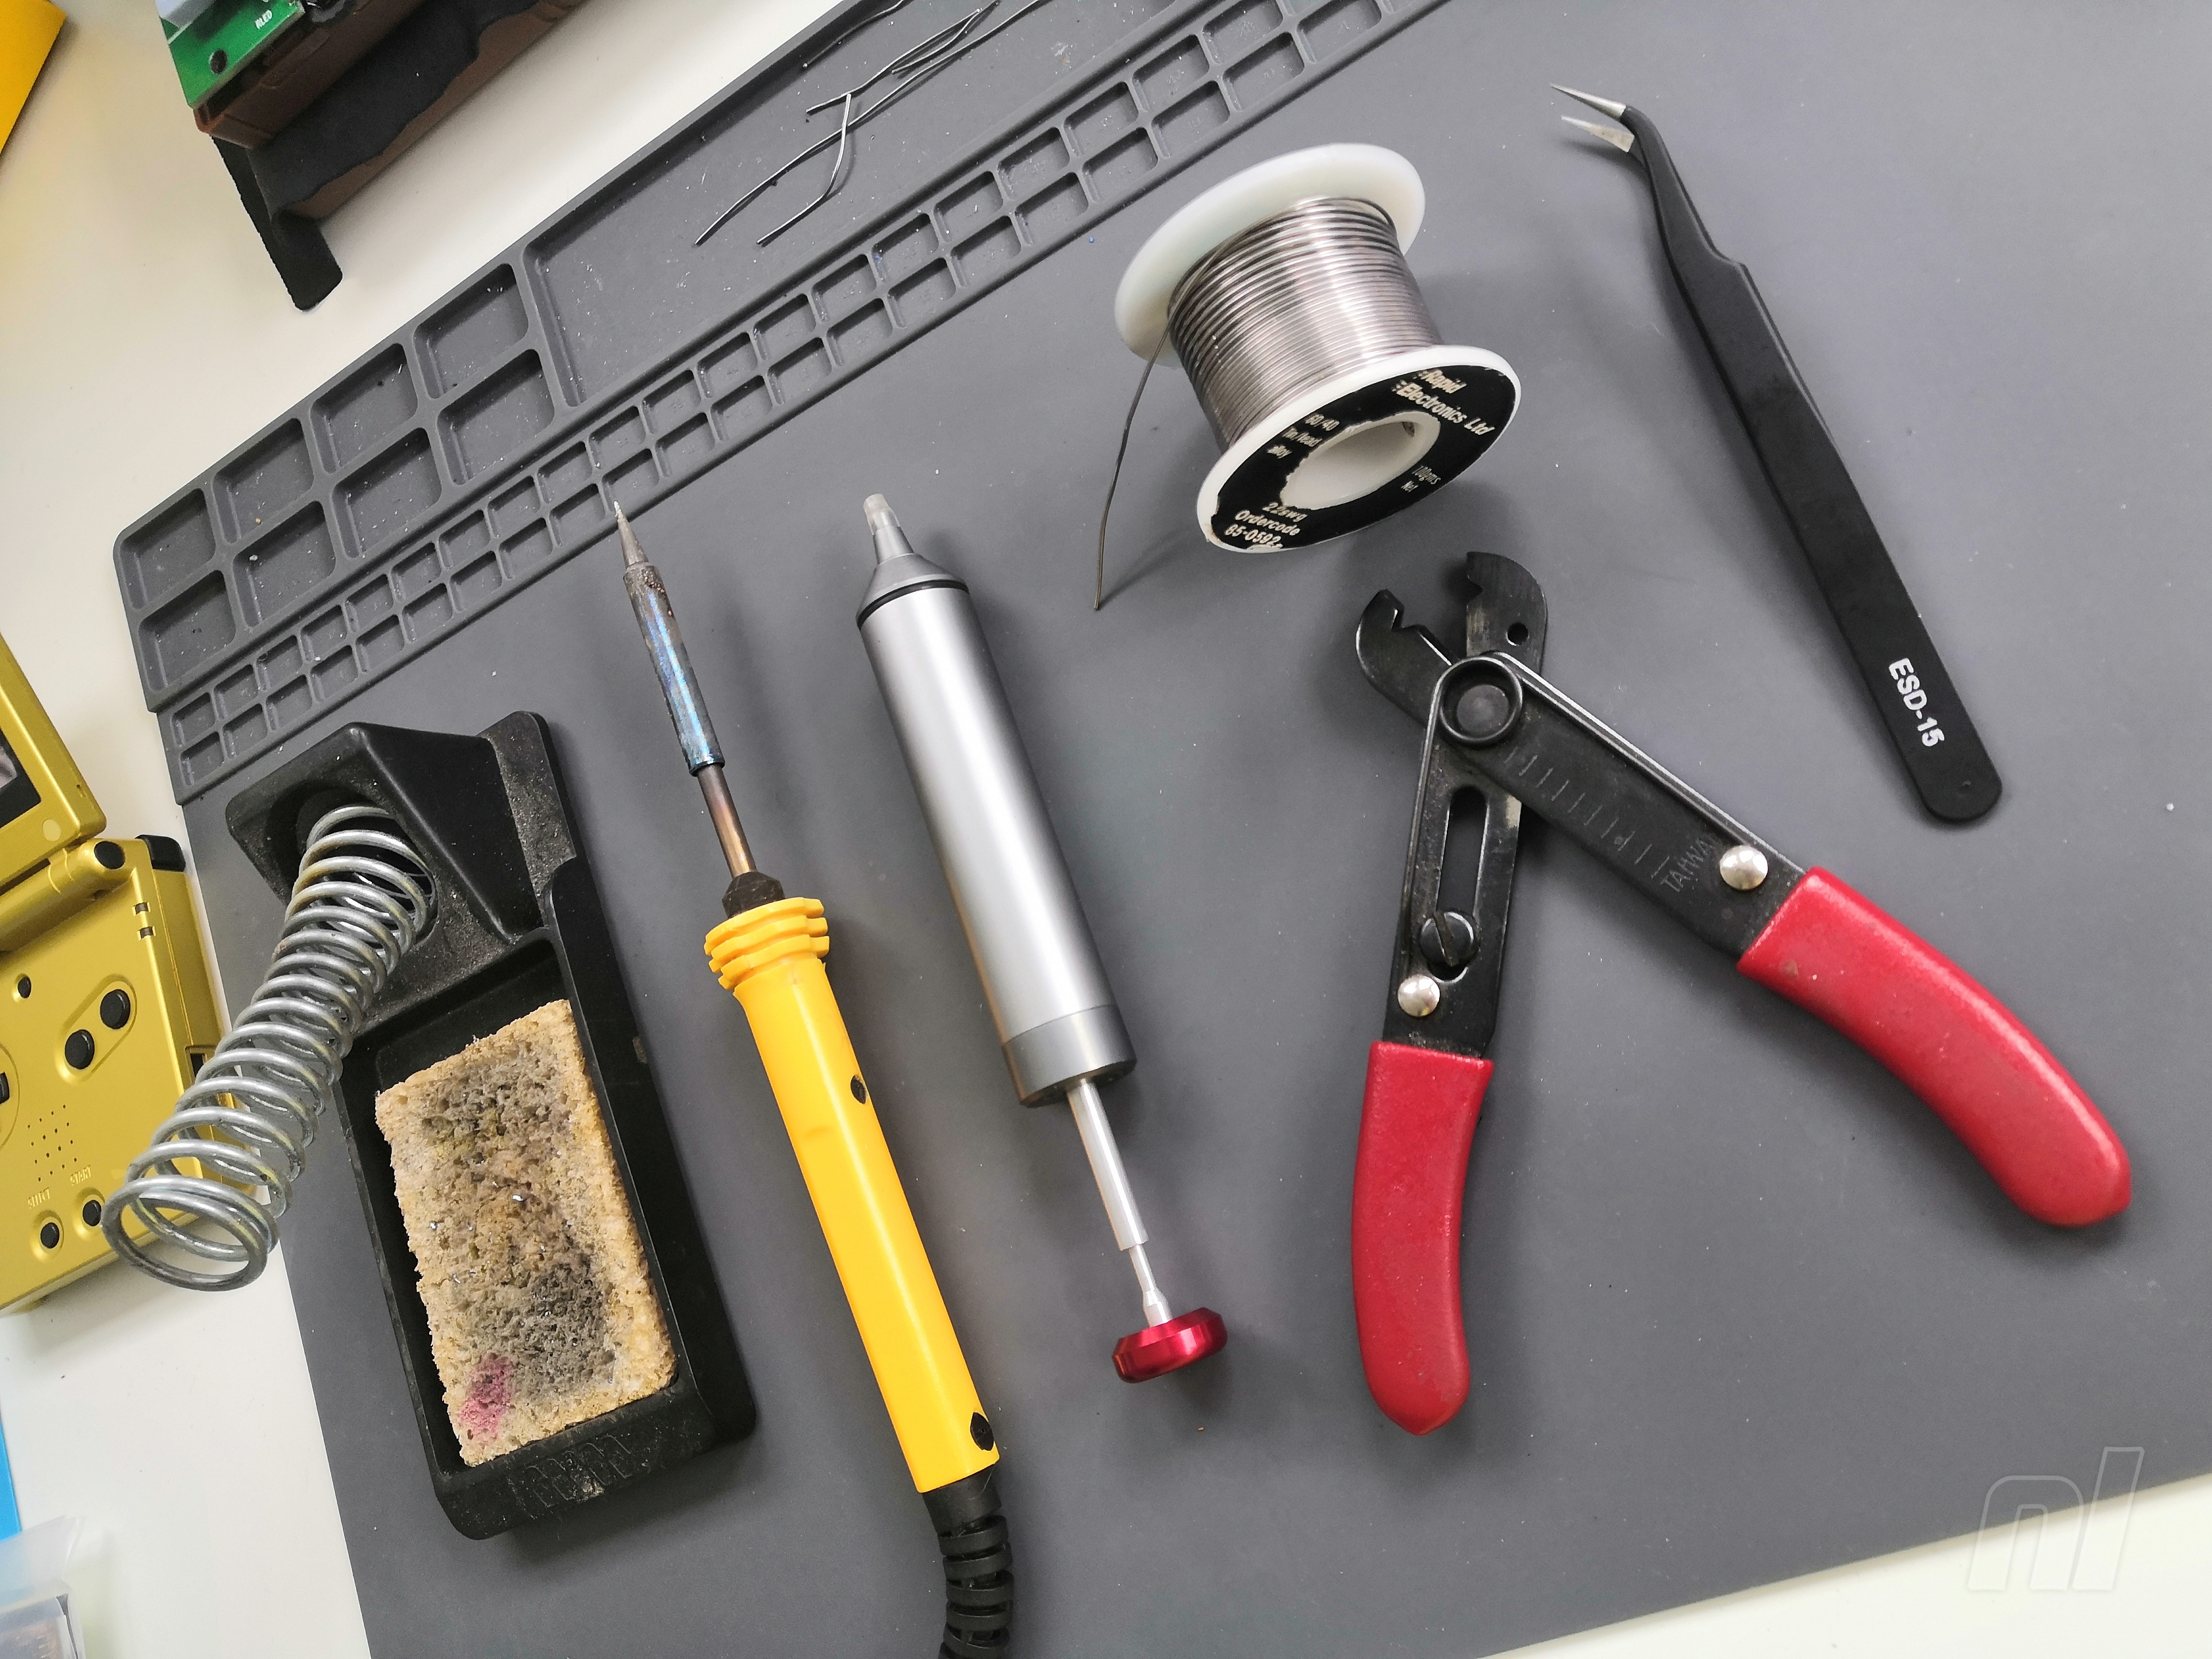
It is entirely possible to install the screen with no soldering at all; however, if you’re feeling adventurous there’s a simple one-wire soldering job that will allow you to adjust the brightness of your display – and believe us, it’s a great feature. You’ll need a low wattage soldering iron with a stand and some soft solder, and if you have access to flux, a solder sucker and a pair of wire strippers – they’ll make for an easier job.</p>
<h3 id="preparation-and-disassembly">Preparation And Disassembly</h3>
<p>Work on a soft surface free from debris; you don’t want to scratch the top of your console when you flip it over. The microfibre cloth is ideal for this.</p>
<p>Turn your Game Boy upside down, undo the crosshead screw on the battery cover and remove it from the console. Take out the battery; one end will lift allowing for easy removal.</p>
<figure class="picture strip"><a title="009 Battery Out" href="http://images.nintendolife.com/7a290e4289937/009-battery-out.original.jpg"><img class="lazy" src="//www.w3.org/2000/svg' viewBox='0 0 900 675'%3E%3C/svg%3E" width="900" height="675" data-original="http://images.nintendolife.com/7a290e4289937/009-battery-out.900x.jpg" alt="009 Battery Out"></a></figure>
<p>
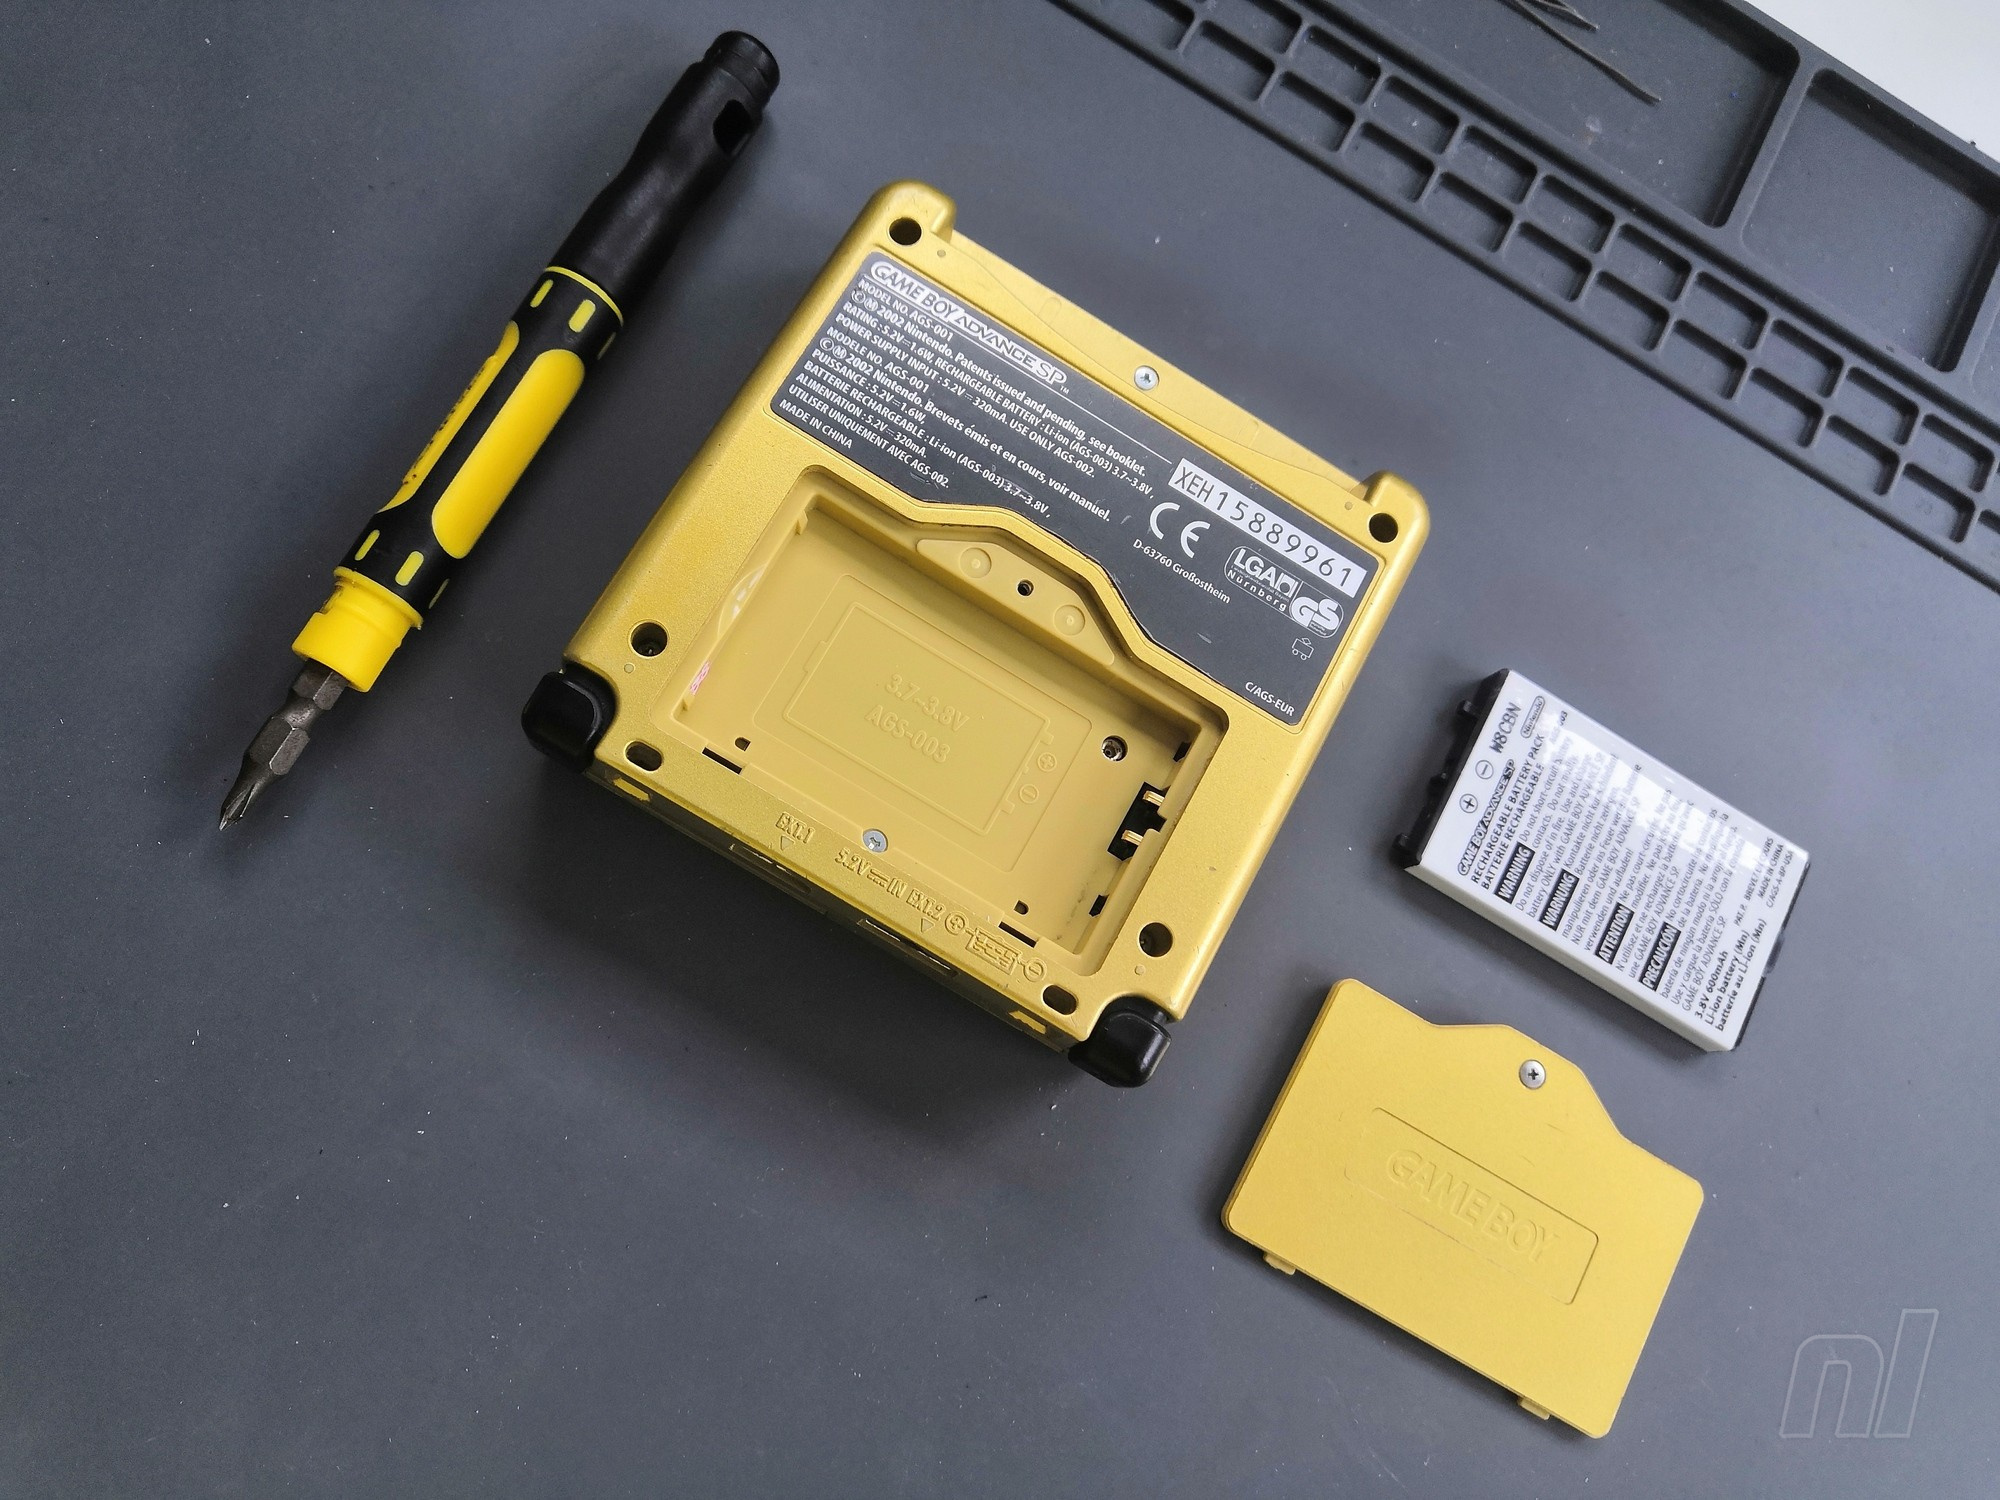
Undo the four tri-wing at the corners as well as the one that was under the battery and another at the opening of the cartridge slot. It’s a good idea to keep your screws organised as you go, as you’ll encounter more along the way – and they’re all different.</p>
<p>Remove the back shell of the console and put it to one side. It should lift off easily, and the L and R buttons should remain attached to it.</p>
<figure class="picture strip"><a title="010 Rear Shell Off" href="http://images.nintendolife.com/e52f9dd398393/010-rear-shell-off.original.jpg"><img class="lazy" src="//www.w3.org/2000/svg' viewBox='0 0 900 675'%3E%3C/svg%3E" width="900" height="675" data-original="http://images.nintendolife.com/e52f9dd398393/010-rear-shell-off.900x.jpg" alt="010 Rear Shell Off"></a></figure>
<p>
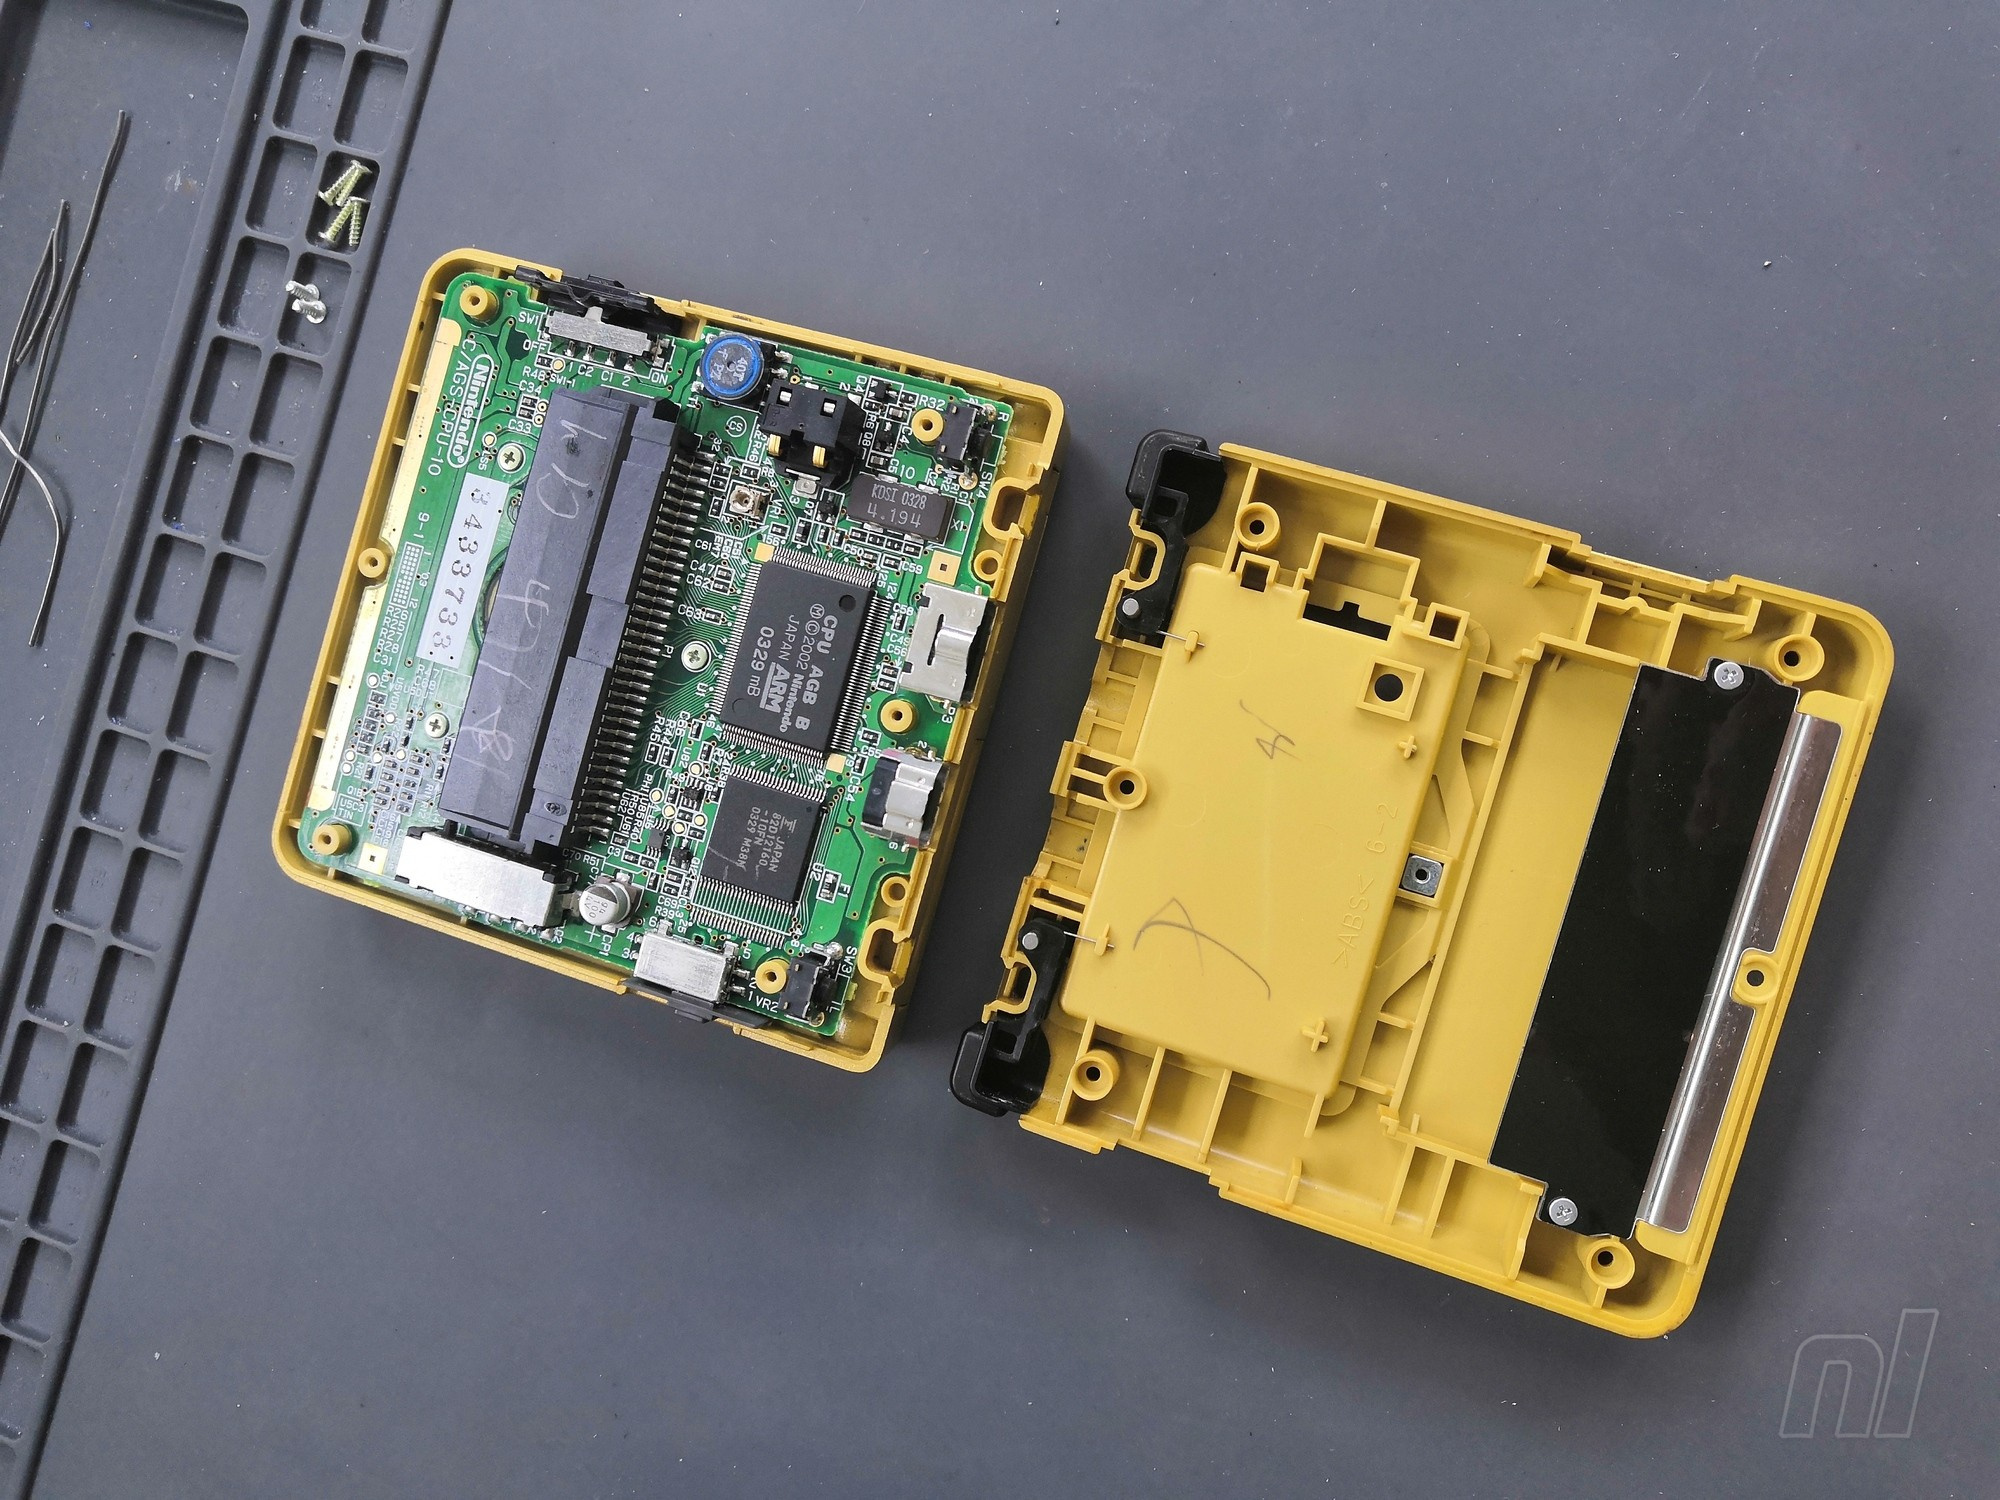
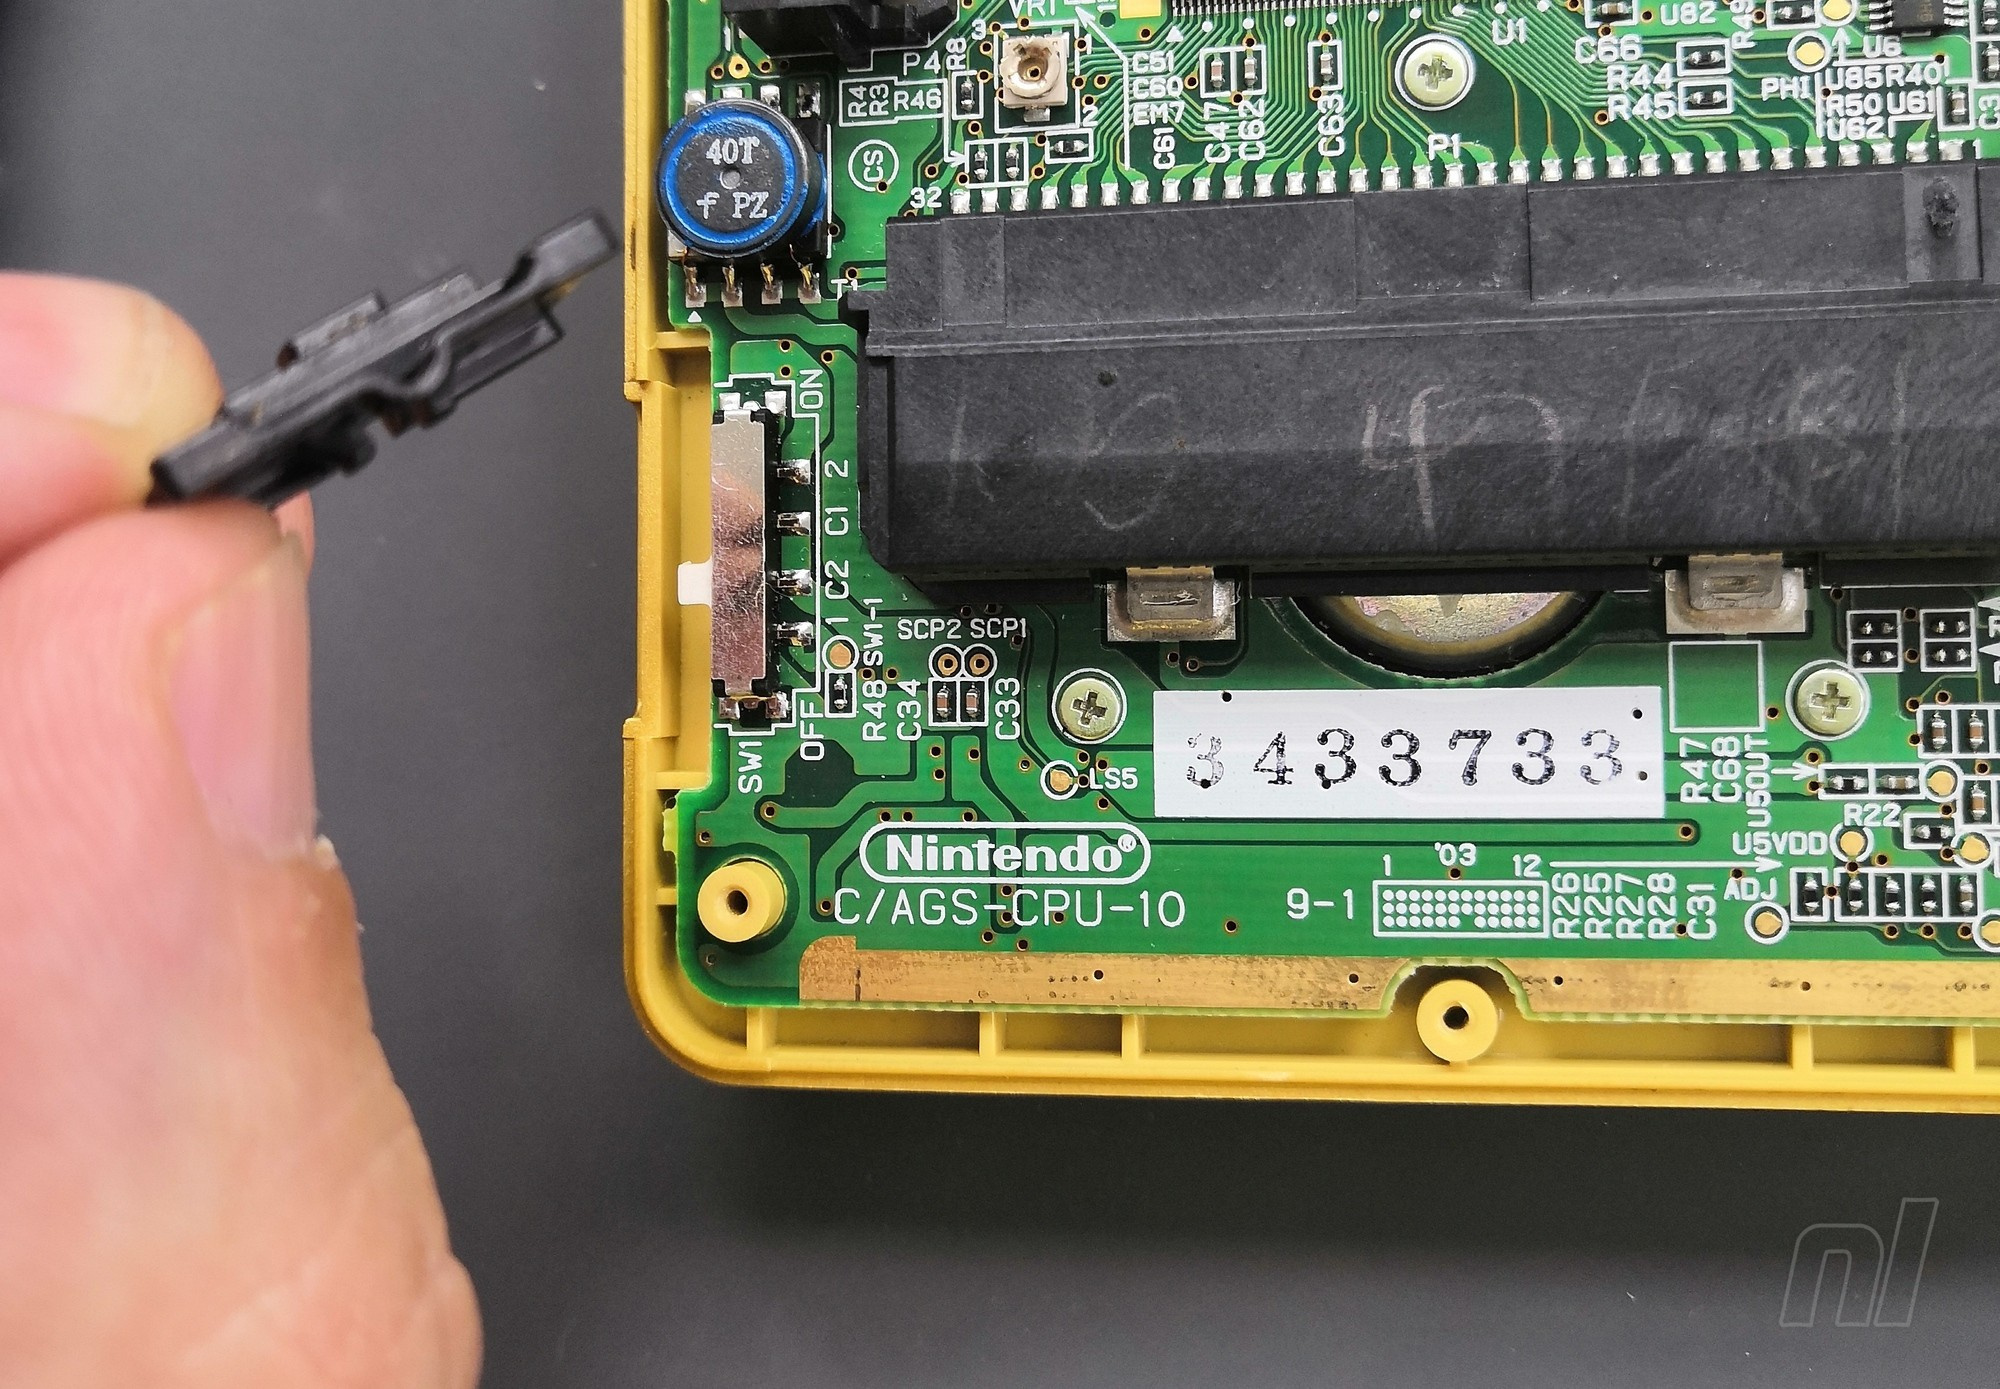
Lift out the plastic power switch piece and keep it somewhere safe.</p>
<p>
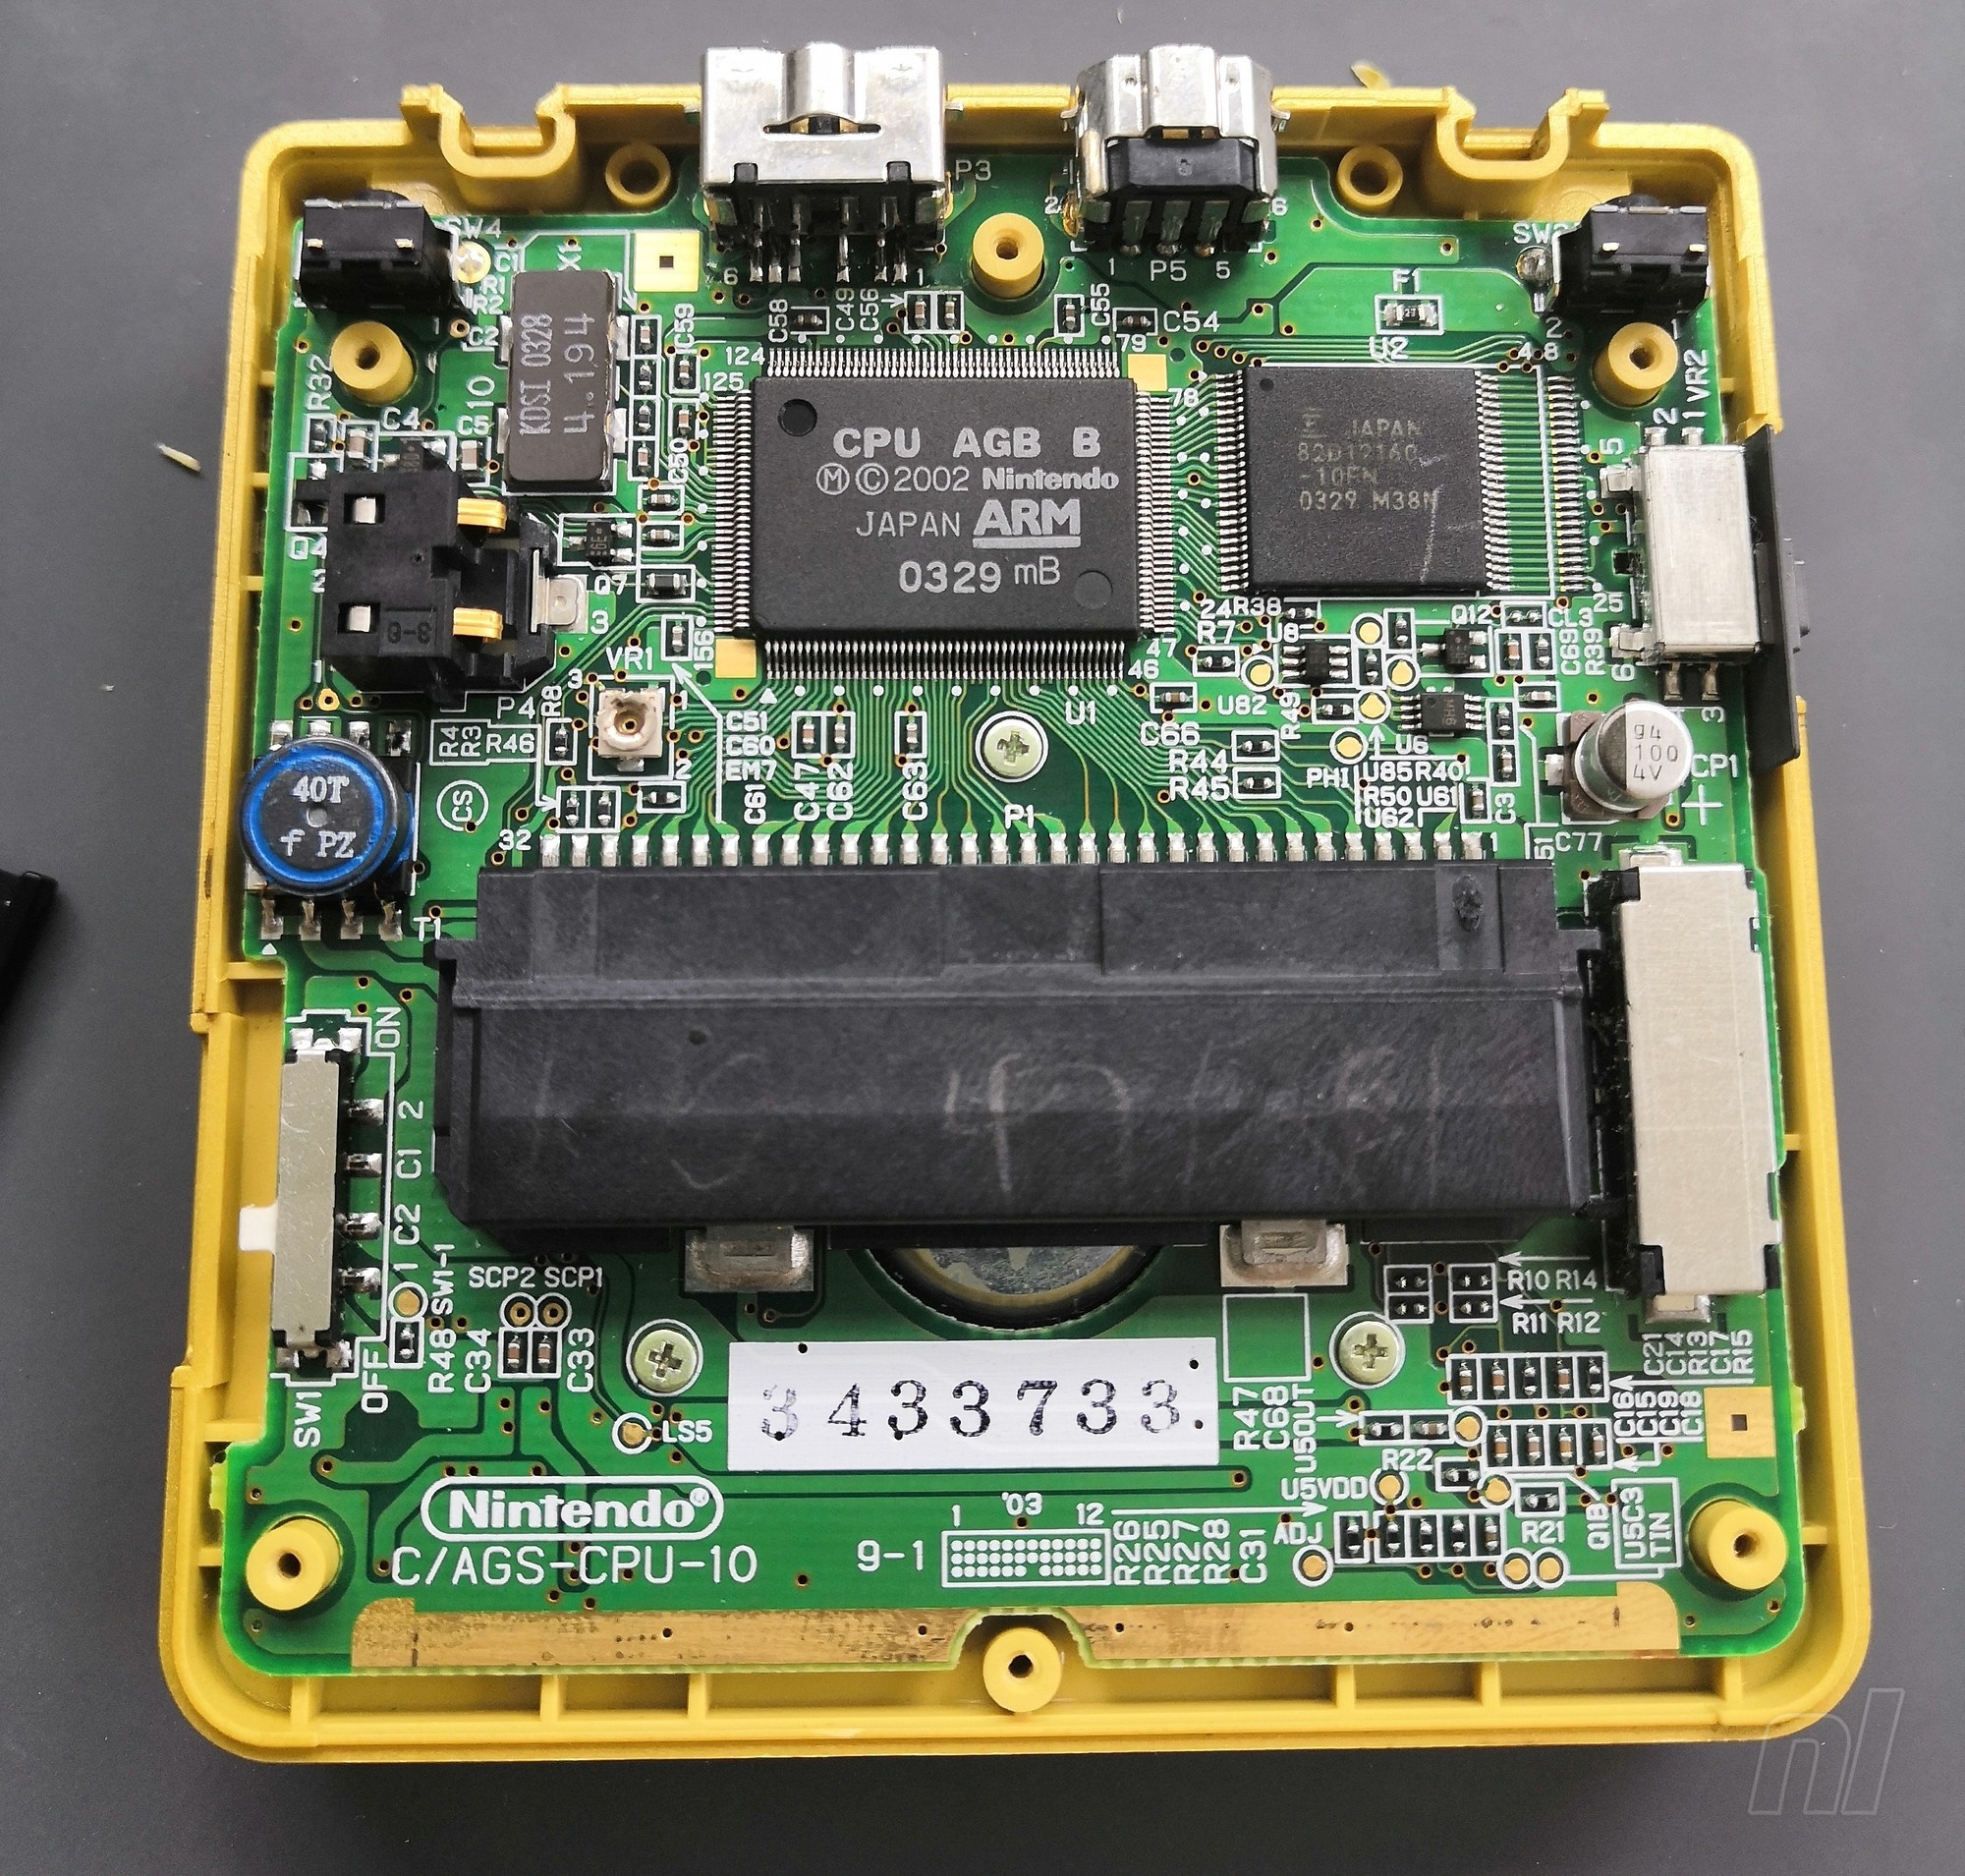
Take out the three crosshead screws holding the motherboard, which you’ll then need to carefully lift in order to access the ribbon cable where the screen is connected.</p>
<figure class="picture strip"><a title="012 Lift Motherboard" href="http://images.nintendolife.com/831588e00ec31/012-lift-motherboard.original.jpg"><img class="lazy" src="//www.w3.org/2000/svg' viewBox='0 0 900 894'%3E%3C/svg%3E" width="900" height="894" data-original="http://images.nintendolife.com/831588e00ec31/012-lift-motherboard.900x.jpg" alt="012 Lift Motherboard"></a></figure>
<p>
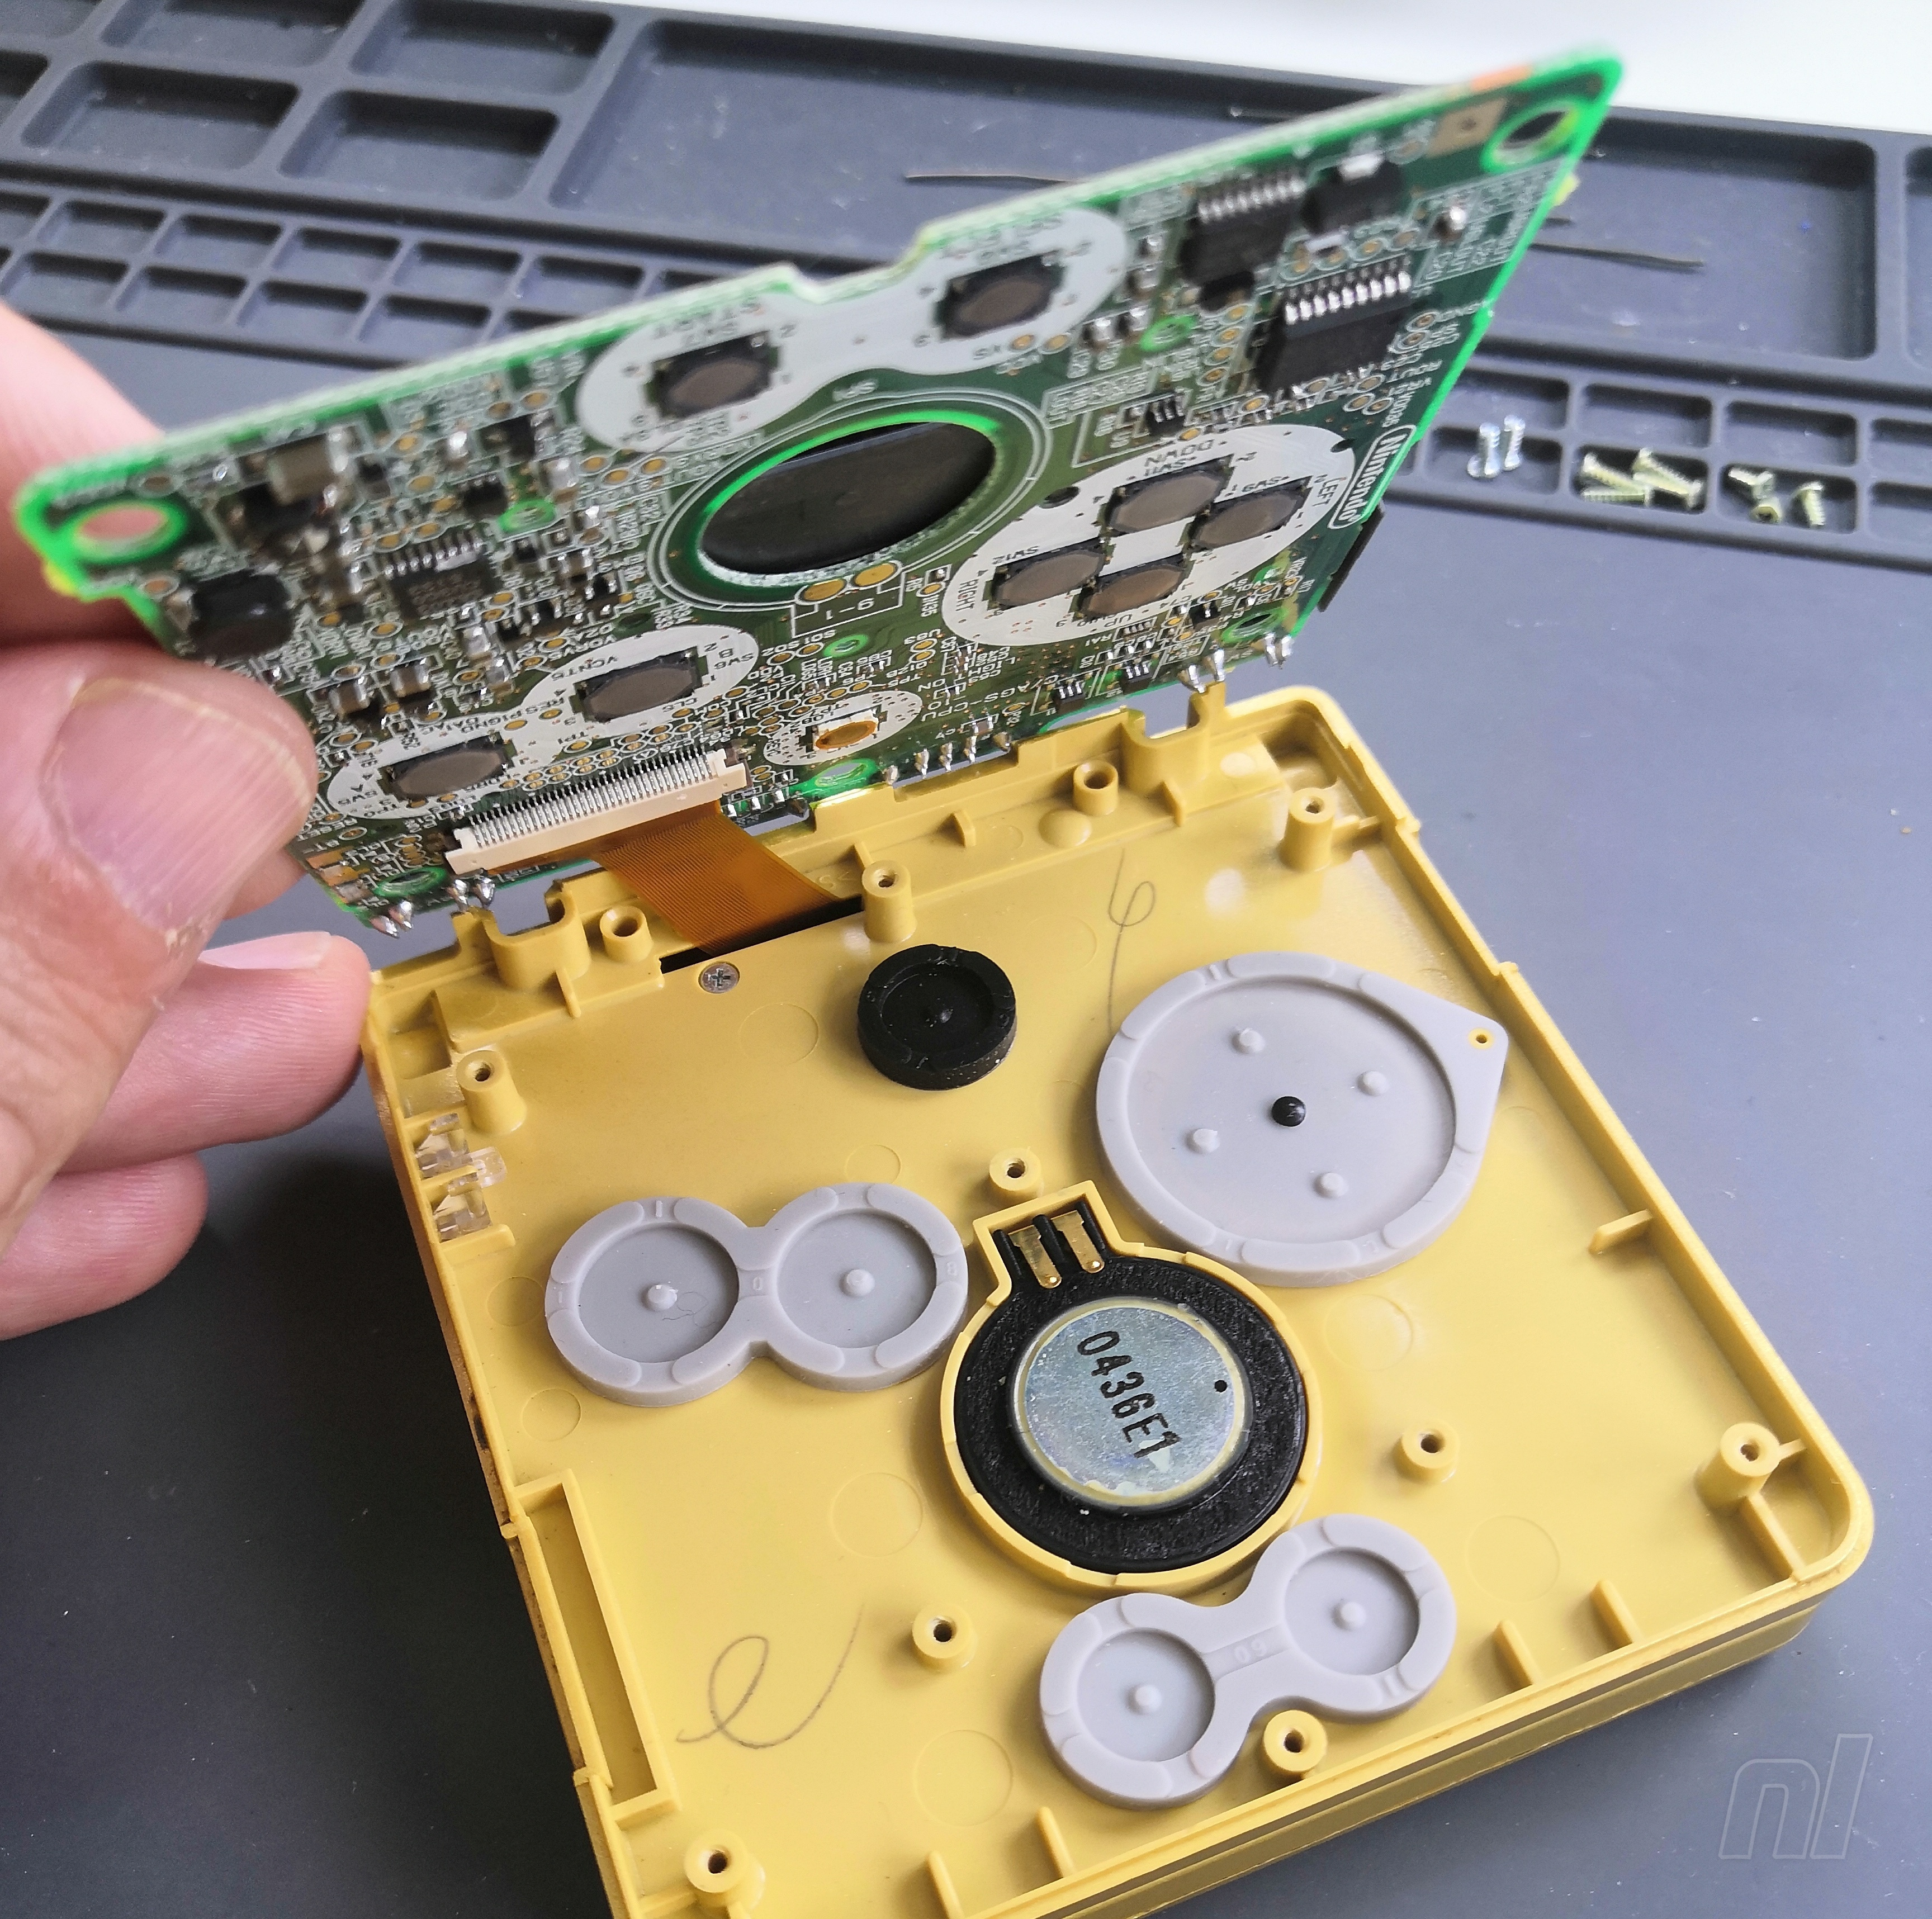
Remove all the silicone pads, buttons and the speaker, as well as the protective circular fabric piece from the speaker opening.</p>
<aside class="gallery">
<div class="col"><a title="013 Silicone Removed" href="http://images.nintendolife.com/e4914f781f334/013-silicone-removed.original.jpg"><img class="lazy" src="//www.w3.org/2000/svg' viewBox='0 0 450 495'%3E%3C/svg%3E" width="450" height="495" data-original="http://images.nintendolife.com/e4914f781f334/013-silicone-removed.450x495.jpg" alt="013 Silicone Removed"></a></div>
<div class="col"><a title="014 Buttons And Speaker Removed" href="http://images.nintendolife.com/71b15006d7dac/014-buttons-and-speaker-removed.original.jpg"><img class="lazy" src="//www.w3.org/2000/svg' viewBox='0 0 450 495'%3E%3C/svg%3E" width="450" height="495" data-original="http://images.nintendolife.com/71b15006d7dac/014-buttons-and-speaker-removed.450x495.jpg" alt="014 Buttons And Speaker Removed"></a></div>
</aside>
<p>To remove the ribbon cable from the motherboard, undo the locking mechanism by carefully unclipping the plastic retaining strip at each side. It should easily unclip with a fingernail or a spudger-type tool.</p>
<aside class="gallery">
<div class="col"><a title="015 Unclip" href="http://images.nintendolife.com/775a62c256424/015-unclip.original.jpg"><img class="lazy" src="//www.w3.org/2000/svg' viewBox='0 0 292 245'%3E%3C/svg%3E" width="292" height="245" data-original="http://images.nintendolife.com/775a62c256424/015-unclip.292x245.jpg" alt="015 Unclip"></a><a title="016 Ribbon Out" href="http://images.nintendolife.com/b0ea708dddee4/016-ribbon-out.original.jpg"><img class="lazy" src="//www.w3.org/2000/svg' viewBox='0 0 292 245'%3E%3C/svg%3E" width="292" height="245" data-original="http://images.nintendolife.com/b0ea708dddee4/016-ribbon-out.292x245.jpg" alt="016 Ribbon Out"></a></div>
<div class="col"><a title="017 Motherboard" href="http://images.nintendolife.com/78a8b0d12507a/017-motherboard.original.jpg"><img class="lazy" src="//www.w3.org/2000/svg' viewBox='0 0 603 495'%3E%3C/svg%3E" width="603" height="495" data-original="http://images.nintendolife.com/78a8b0d12507a/017-motherboard.603x495.jpg" alt="017 Motherboard"></a></div>
</aside>
<p>
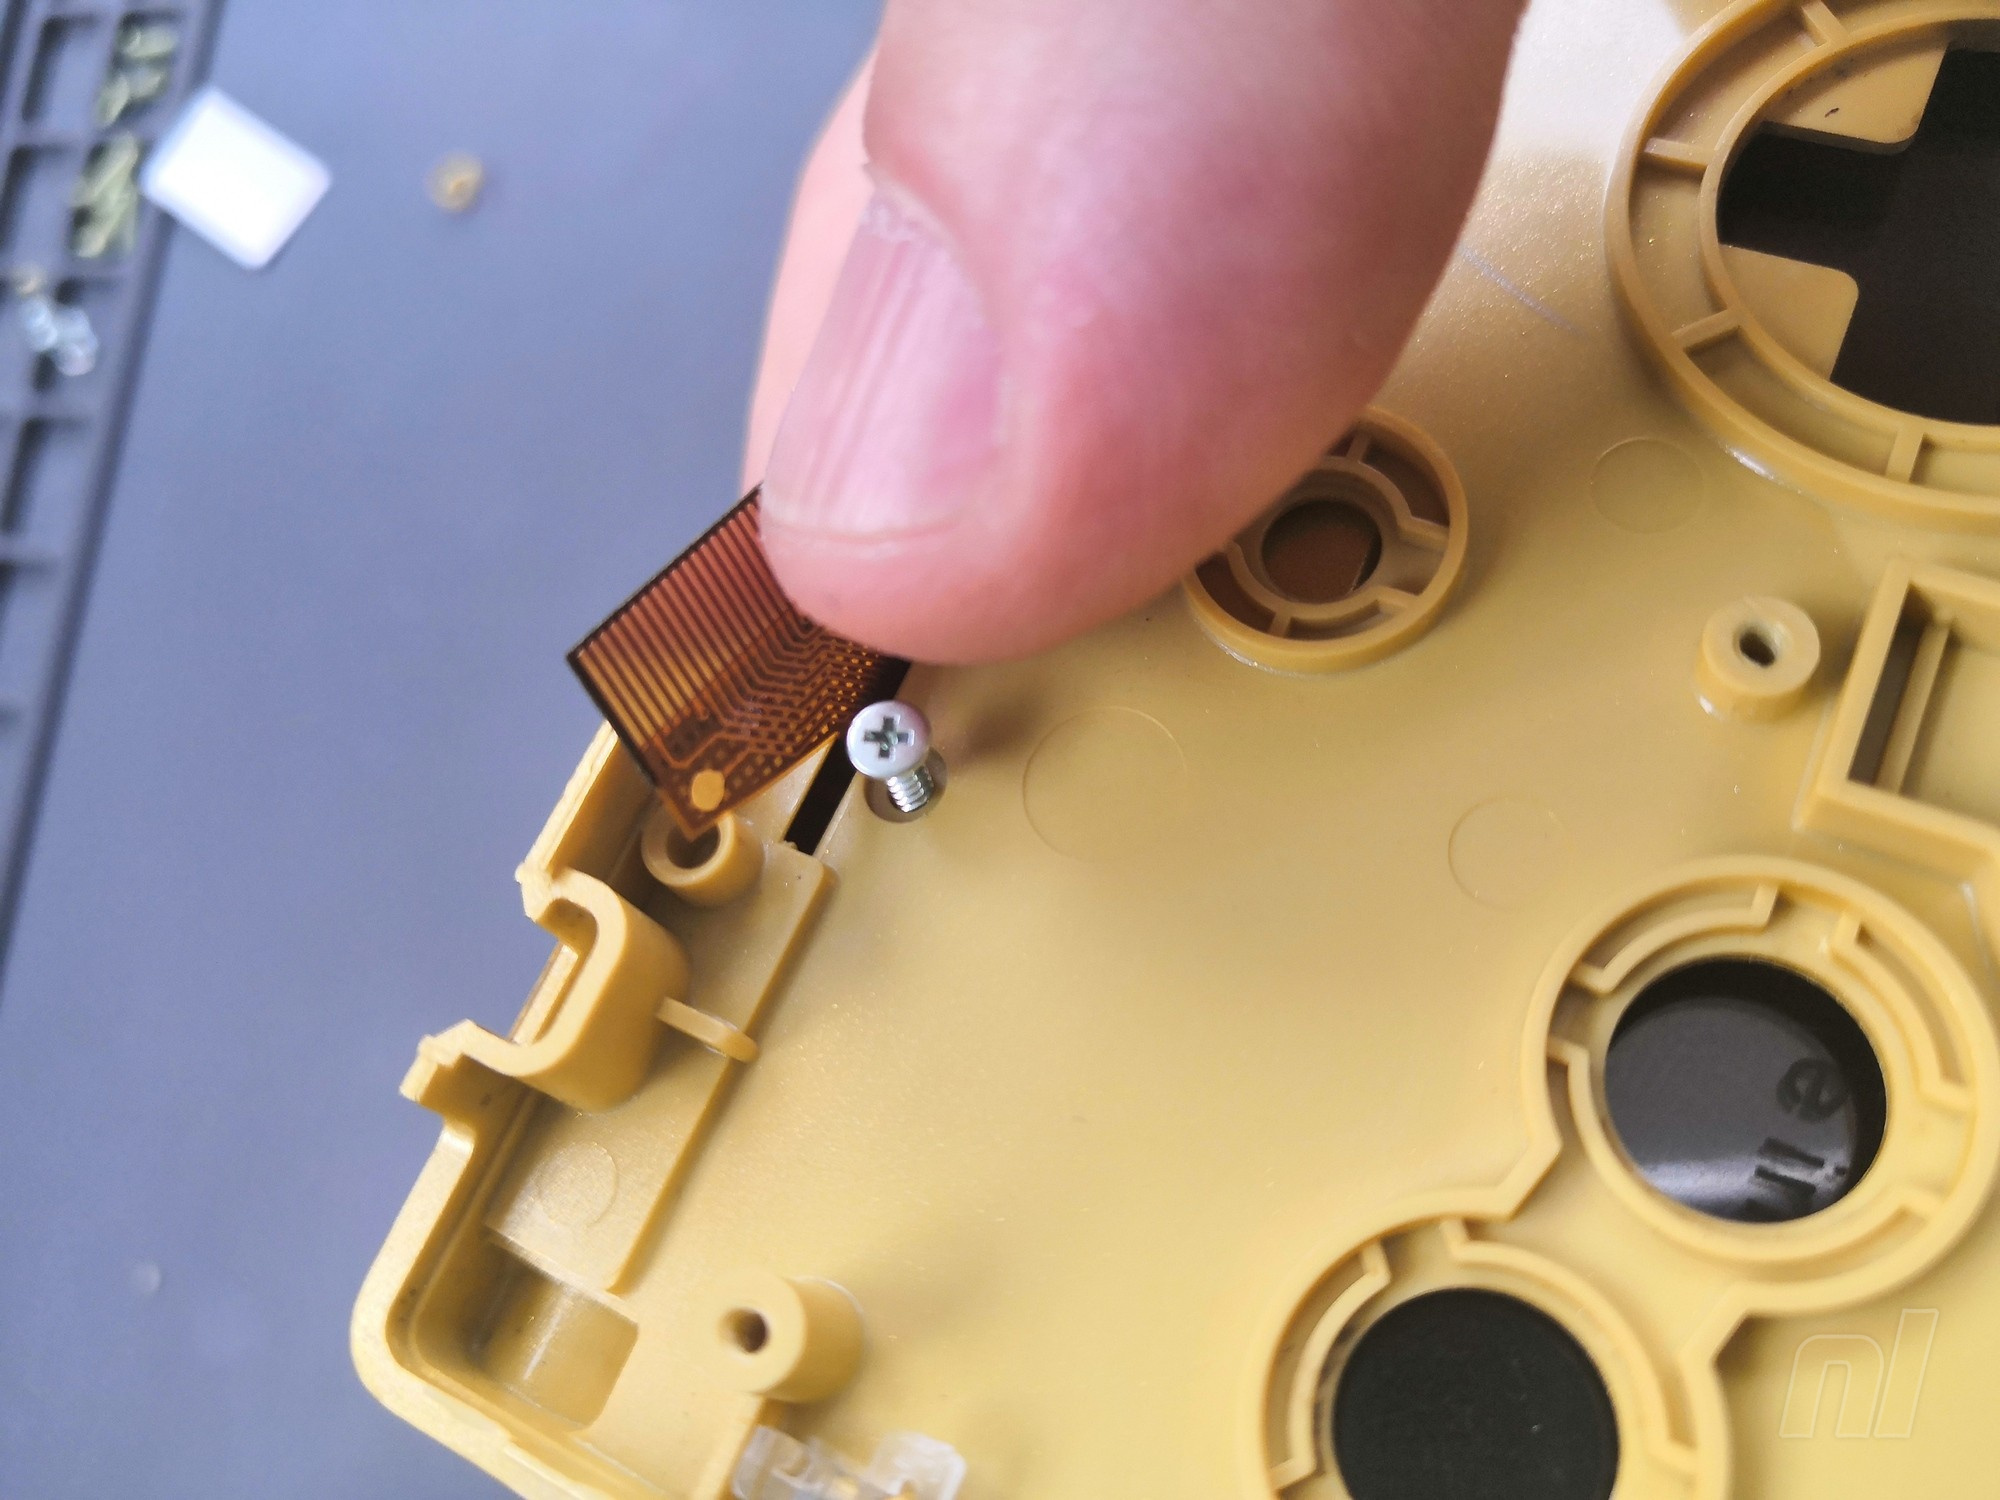
With the motherboard now out of the shell, remove the hinge cap by lifting the ribbon and removing the crosshead screw you’ll find beneath it.</p>
<aside class="gallery">
<div class="col"><a title="019 Hinge Cap Screw" href="http://images.nintendolife.com/a5bef4e680a66/019-hinge-cap-screw.original.jpg"><img class="lazy" src="//www.w3.org/2000/svg' viewBox='0 0 450 495'%3E%3C/svg%3E" width="450" height="495" data-original="http://images.nintendolife.com/a5bef4e680a66/019-hinge-cap-screw.450x495.jpg" alt="019 Hinge Cap Screw"></a></div>
<div class="col"><a title="020 Hinge Cap" href="http://images.nintendolife.com/5923f0c15ad2f/020-hinge-cap.original.jpg"><img class="lazy" src="//www.w3.org/2000/svg' viewBox='0 0 450 495'%3E%3C/svg%3E" width="450" height="495" data-original="http://images.nintendolife.com/5923f0c15ad2f/020-hinge-cap.450x495.jpg" alt="020 Hinge Cap"></a></div>
</aside>
<p>
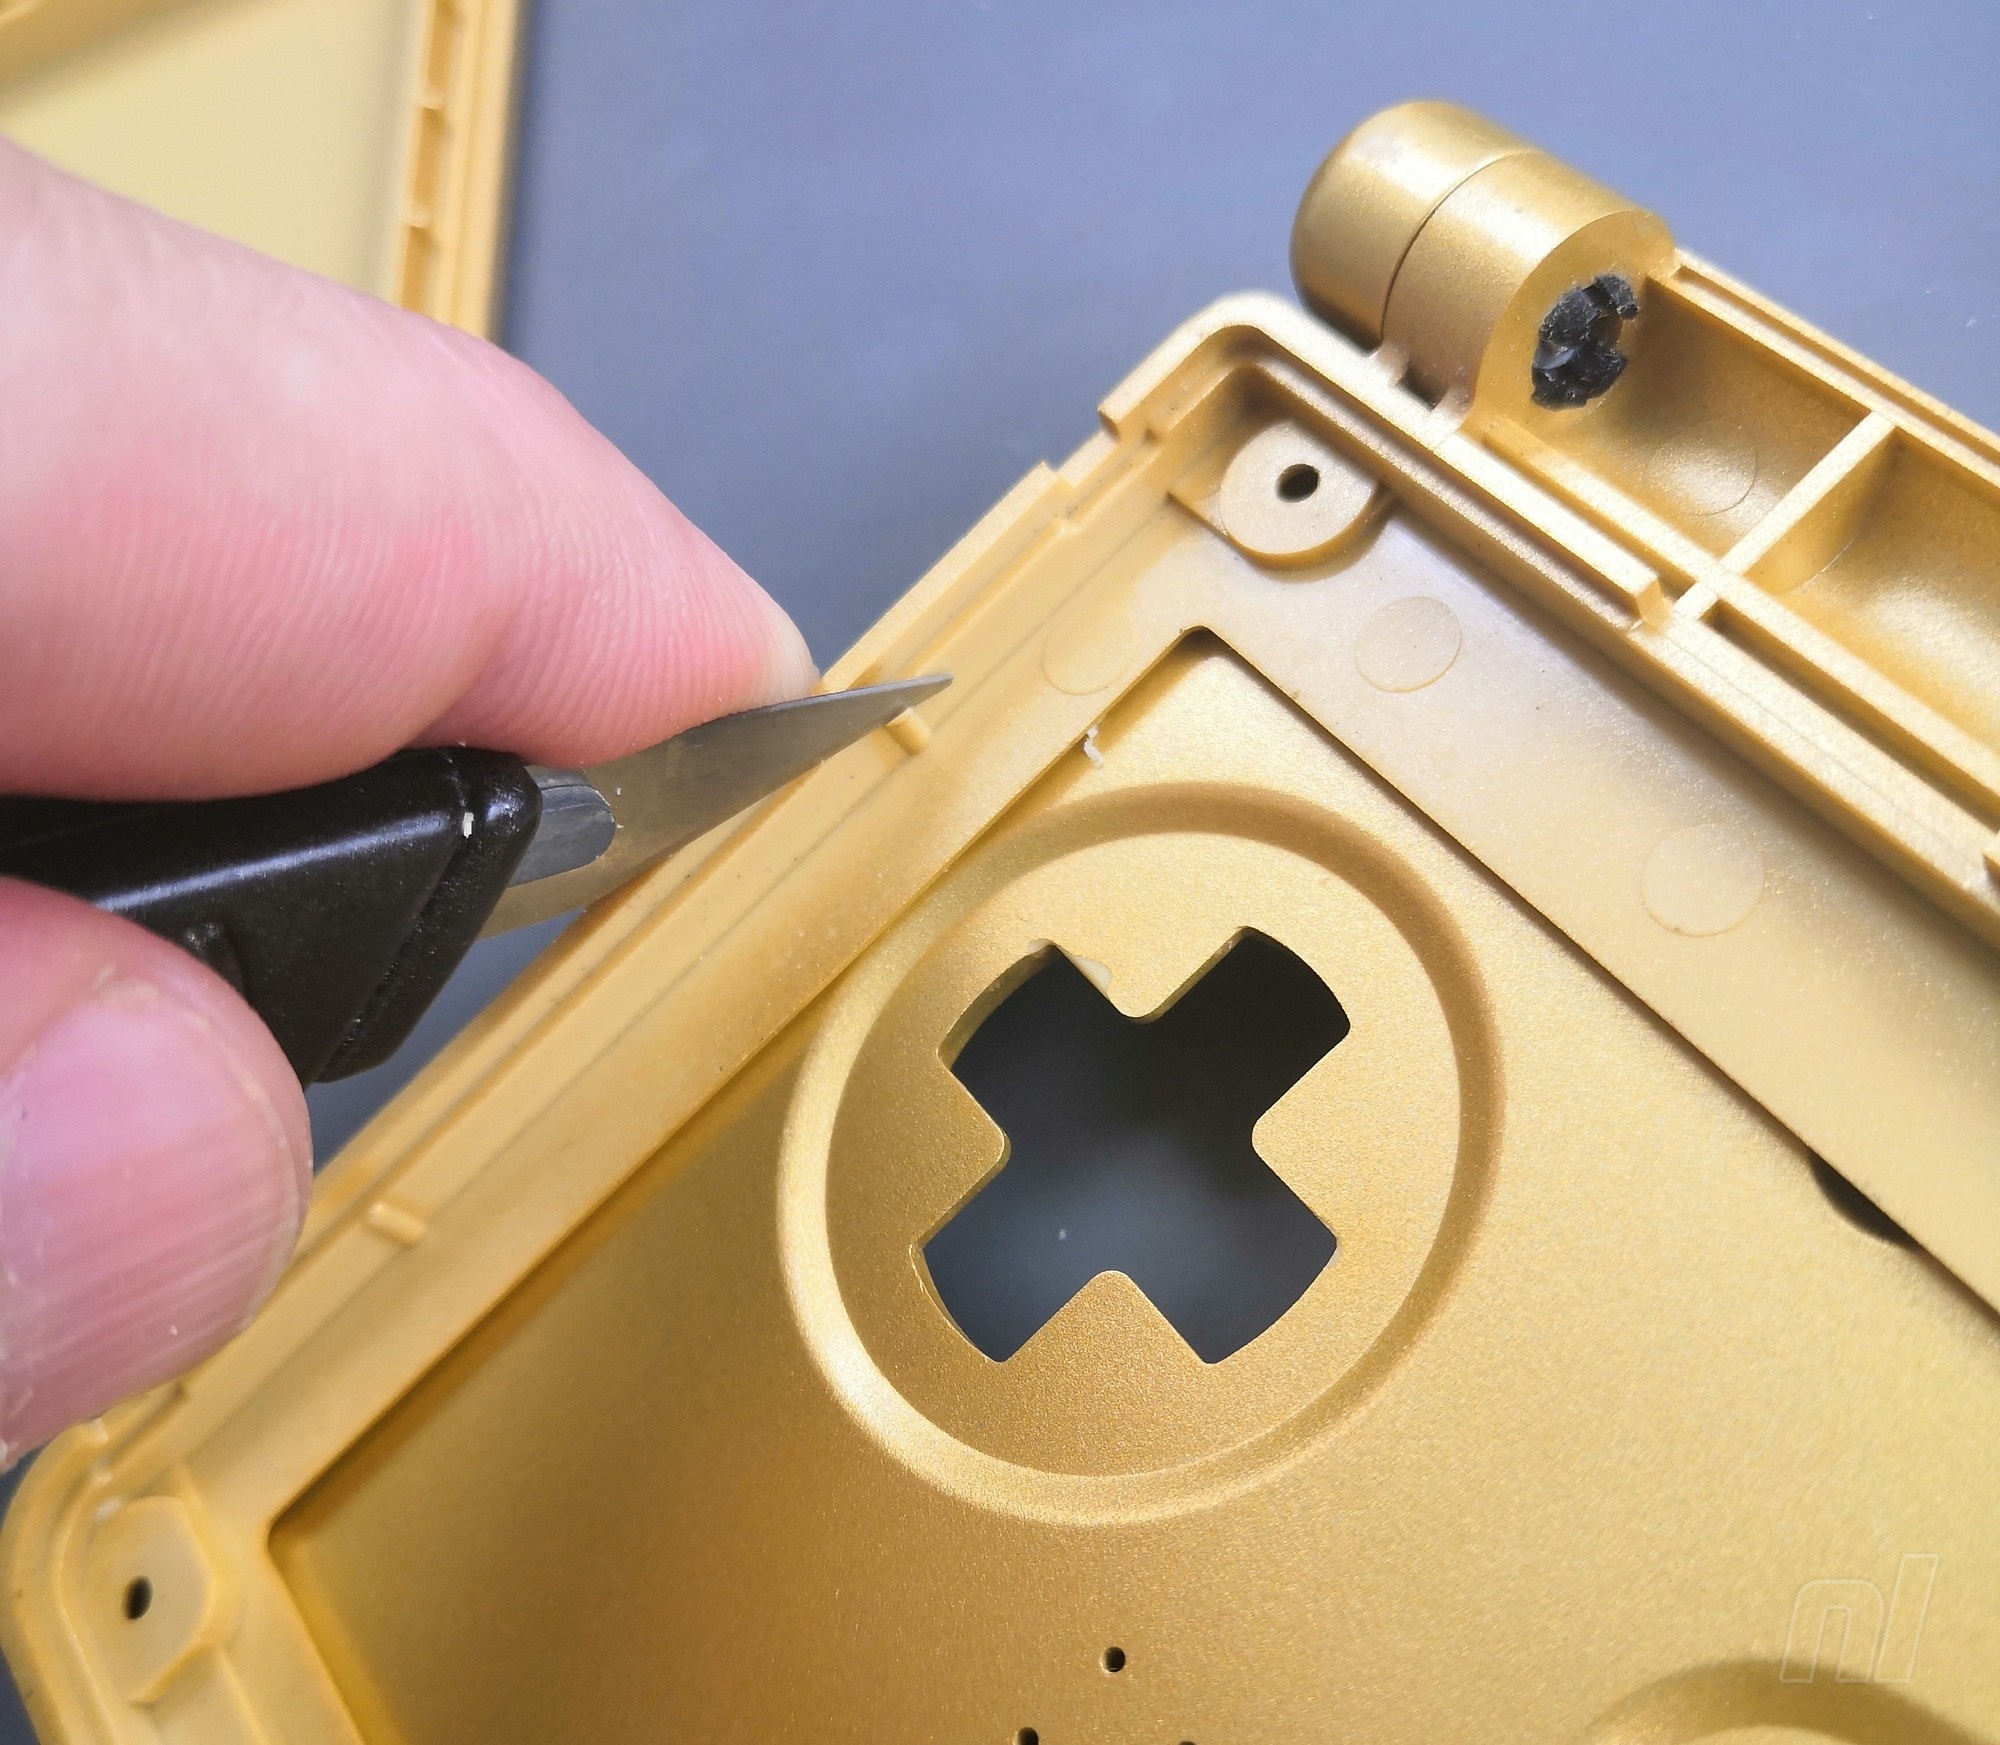
Next, you have five screws holding the top assembly together that are hidden beneath a set of silicone inserts. Remove the inserts with a sharp point, such as your knife, being very careful not to cut into the silicone or scratch the shell. It’s a delicate job; <em>be patient</em>. Try to move the point down into a small gap and then carefully lever out the insert.</p>
<aside class="gallery">
<div class="col"><a title="022 Removal A" href="http://images.nintendolife.com/7d0e6961a697f/022-removal-a.original.jpg"><img class="lazy" src="//www.w3.org/2000/svg' viewBox='0 0 292 245'%3E%3C/svg%3E" width="292" height="245" data-original="http://images.nintendolife.com/7d0e6961a697f/022-removal-a.292x245.jpg" alt="022 Removal A"></a><a title="024 Removal C" href="http://images.nintendolife.com/b1bf5db3228cc/024-removal-c.original.jpg"><img class="lazy" src="//www.w3.org/2000/svg' viewBox='0 0 292 245'%3E%3C/svg%3E" width="292" height="245" data-original="http://images.nintendolife.com/b1bf5db3228cc/024-removal-c.292x245.jpg" alt="024 Removal C"></a></div>
<div class="col"><a title="025 Caps Removed" href="http://images.nintendolife.com/667aa80d69dbc/025-caps-removed.original.jpg"><img class="lazy" src="//www.w3.org/2000/svg' viewBox='0 0 603 495'%3E%3C/svg%3E" width="603" height="495" data-original="http://images.nintendolife.com/667aa80d69dbc/025-caps-removed.603x495.jpg" alt="025 Caps Removed"></a></div>
</aside>
<p>Once the inserts are gone, you’ll have five tri-wing screws to remove.</p>
<figure class="picture strip"><a title="026 Screws Out" href="http://images.nintendolife.com/4acbaed07e209/026-screws-out.original.jpg"><img class="lazy" src="//www.w3.org/2000/svg' viewBox='0 0 900 679'%3E%3C/svg%3E" width="900" height="679" data-original="http://images.nintendolife.com/4acbaed07e209/026-screws-out.900x.jpg" alt="026 Screws Out"></a></figure>
<p>Now, close the hinge and remove the top of the shell. This is the part we’ll need to cut in order to accommodate the new, larger screen.</p>
<figure class="picture strip"><a title="028 Lid Off" href="http://images.nintendolife.com/6d9483479ea78/028-lid-off.original.jpg"><img class="lazy" src="//www.w3.org/2000/svg' viewBox='0 0 900 716'%3E%3C/svg%3E" width="900" height="716" data-original="http://images.nintendolife.com/6d9483479ea78/028-lid-off.900x.jpg" alt="028 Lid Off"></a></figure>
<p>Now carefully slide out the ribbon from the slot in the shell and remove the existing screen assembly (it should just lift out).</p>
<aside class="gallery">
<div class="col"><a title="029 Removing Ribbon" href="http://images.nintendolife.com/abc628b01a34d/029-removing-ribbon.original.jpg"><img class="lazy" src="//www.w3.org/2000/svg' viewBox='0 0 445 245'%3E%3C/svg%3E" width="445" height="245" data-original="http://images.nintendolife.com/abc628b01a34d/029-removing-ribbon.445x245.jpg" alt="029 Removing Ribbon"></a><a title="030 Ribbon Out" href="http://images.nintendolife.com/5a9aec4bb469d/030-ribbon-out.original.jpg"><img class="lazy" src="//www.w3.org/2000/svg' viewBox='0 0 445 245'%3E%3C/svg%3E" width="445" height="245" data-original="http://images.nintendolife.com/5a9aec4bb469d/030-ribbon-out.445x245.jpg" alt="030 Ribbon Out"></a></div>
<div class="col"><a title="031 Screen Out" href="http://images.nintendolife.com/42aac32708eaf/031-screen-out.original.jpg"><img class="lazy" src="//www.w3.org/2000/svg' viewBox='0 0 445 245'%3E%3C/svg%3E" width="445" height="245" data-original="http://images.nintendolife.com/42aac32708eaf/031-screen-out.445x245.jpg" alt="031 Screen Out"></a><a title="032 Screen Back" href="http://images.nintendolife.com/f610ff8b5f1e1/032-screen-back.original.jpg"><img class="lazy" src="//www.w3.org/2000/svg' viewBox='0 0 445 245'%3E%3C/svg%3E" width="445" height="245" data-original="http://images.nintendolife.com/f610ff8b5f1e1/032-screen-back.445x245.jpg" alt="032 Screen Back"></a></div>
</aside>
<h3 id="cutting-the-shell">Cutting The Shell</h3>
<p>Looking at the inside of the top shell piece, there are two rails that currently secure the existing screen in place. To allow the new screen to fit, one of these rails needs removing to make space for it. This is the part where the lens doesn’t overlap the edge of the screen, on the left-hand side as you would look at the screen when the console is open, with the hinge part pointing down. You can see how with the plastic rail still in place, the left side of the screen won’t fit in the housing.</p>
<aside class="gallery">
<div class="col"><a title="033 Inside Lid" href="http://images.nintendolife.com/3a6feab81d66a/033-inside-lid.original.jpg"><img class="lazy" src="//www.w3.org/2000/svg' viewBox='0 0 292 245'%3E%3C/svg%3E" width="292" height="245" data-original="http://images.nintendolife.com/3a6feab81d66a/033-inside-lid.292x245.jpg" alt="033 Inside Lid"></a><a title="034 Screen Wont Fit" href="http://images.nintendolife.com/4b5ec1a40fadd/034-screen-wont-fit.original.jpg"><img class="lazy" src="//www.w3.org/2000/svg' viewBox='0 0 292 245'%3E%3C/svg%3E" width="292" height="245" data-original="http://images.nintendolife.com/4b5ec1a40fadd/034-screen-wont-fit.292x245.jpg" alt="034 Screen Wont Fit"></a></div>
<div class="col"><a title="035 Rail To Remove" href="http://images.nintendolife.com/e5362bed17da1/035-rail-to-remove.original.jpg"><img class="lazy" src="//www.w3.org/2000/svg' viewBox='0 0 603 495'%3E%3C/svg%3E" width="603" height="495" data-original="http://images.nintendolife.com/e5362bed17da1/035-rail-to-remove.603x495.jpg" alt="035 Rail To Remove"></a></div>
</aside>
<p>If you have a Dremel-type cutting tool, this may well be quicker and easier, but mistakes happen easily when working with power tools, so if you use this method, be sure to work carefully and slowly.</p>
<p>For this one, we used side cutters and a craft knife. We used the side cutters to gradually nibble away at the plastic using a small bit at a time. These small plastic parts will fly in all directions, so eye protection is advised; also try to point it away from yourself whenever possible.</p>
<aside class="gallery">
<div class="col"><a title="036 Cut 1" href="http://images.nintendolife.com/3f36d266867d8/036-cut-1.original.jpg"><img class="lazy" src="//www.w3.org/2000/svg' viewBox='0 0 450 495'%3E%3C/svg%3E" width="450" height="495" data-original="http://images.nintendolife.com/3f36d266867d8/036-cut-1.450x495.jpg" alt="036 Cut 1"></a></div>
<div class="col"><a title="037 Cut 2" href="http://images.nintendolife.com/d5a00bb7115cc/037-cut-2.original.jpg"><img class="lazy" src="//www.w3.org/2000/svg' viewBox='0 0 450 495'%3E%3C/svg%3E" width="450" height="495" data-original="http://images.nintendolife.com/d5a00bb7115cc/037-cut-2.450x495.jpg" alt="037 Cut 2"></a></div>
</aside>
<aside class="gallery">
<div class="col"><a title="038 Cut 3" href="http://images.nintendolife.com/131d56379fed2/038-cut-3.original.jpg"><img class="lazy" src="//www.w3.org/2000/svg' viewBox='0 0 450 495'%3E%3C/svg%3E" width="450" height="495" data-original="http://images.nintendolife.com/131d56379fed2/038-cut-3.450x495.jpg" alt="038 Cut 3"></a></div>
<div class="col"><a title="039 Cut 4" href="http://images.nintendolife.com/866b1d7643d1a/039-cut-4.original.jpg"><img class="lazy" src="//www.w3.org/2000/svg' viewBox='0 0 450 495'%3E%3C/svg%3E" width="450" height="495" data-original="http://images.nintendolife.com/866b1d7643d1a/039-cut-4.450x495.jpg" alt="039 Cut 4"></a></div>
</aside>
<aside class="gallery">
<div class="col"><a title="040 Cut 5" href="http://images.nintendolife.com/365dd7eac24c5/040-cut-5.original.jpg"><img class="lazy" src="//www.w3.org/2000/svg' viewBox='0 0 450 495'%3E%3C/svg%3E" width="450" height="495" data-original="http://images.nintendolife.com/365dd7eac24c5/040-cut-5.450x495.jpg" alt="040 Cut 5"></a></div>
<div class="col"><a title="041 Cut 6" href="http://images.nintendolife.com/c098faa0b073d/041-cut-6.original.jpg"><img class="lazy" src="//www.w3.org/2000/svg' viewBox='0 0 450 495'%3E%3C/svg%3E" width="450" height="495" data-original="http://images.nintendolife.com/c098faa0b073d/041-cut-6.450x495.jpg" alt="041 Cut 6"></a></div>
</aside>
<p>Further into this job, you may want to alternate between the cutters and the knife; when using the knife cut away from yourself and <strong>NEVER</strong> allow your fingers to sit in the path of the blade. These knives are very sharp, and it is very easy to cut yourself if you are not careful.</p>
<aside class="gallery">
<div class="col"><a title="042 Knife 1" href="http://images.nintendolife.com/e8b5feed4979e/042-knife-1.original.jpg"><img class="lazy" src="//www.w3.org/2000/svg' viewBox='0 0 450 495'%3E%3C/svg%3E" width="450" height="495" data-original="http://images.nintendolife.com/e8b5feed4979e/042-knife-1.450x495.jpg" alt="042 Knife 1"></a></div>
<div class="col"><a title="043 Knife 2" href="http://images.nintendolife.com/6a2a179e9c53b/043-knife-2.original.jpg"><img class="lazy" src="//www.w3.org/2000/svg' viewBox='0 0 450 495'%3E%3C/svg%3E" width="450" height="495" data-original="http://images.nintendolife.com/6a2a179e9c53b/043-knife-2.450x495.jpg" alt="043 Knife 2"></a></div>
</aside>
<p>For the final stage and to neaten up your cutting, slice a small layer at a time off with the knife, and once you reach the lowest point you can drag the blade across the surface to scrape away the last remaining bumps and achieve a relatively smooth surface.</p>
<aside class="gallery">
<div class="col"><a title="044 Knife 3" href="http://images.nintendolife.com/20b72df4db10a/044-knife-3.original.jpg"><img class="lazy" src="//www.w3.org/2000/svg' viewBox='0 0 450 495'%3E%3C/svg%3E" width="450" height="495" data-original="http://images.nintendolife.com/20b72df4db10a/044-knife-3.450x495.jpg" alt="044 Knife 3"></a></div>
<div class="col"><a title="045 Knife Scrape" href="http://images.nintendolife.com/ddf2254e89edd/045-knife-scrape.original.jpg"><img class="lazy" src="//www.w3.org/2000/svg' viewBox='0 0 450 495'%3E%3C/svg%3E" width="450" height="495" data-original="http://images.nintendolife.com/ddf2254e89edd/045-knife-scrape.450x495.jpg" alt="045 Knife Scrape"></a></div>
</aside>
<h3 id="preparing-the-new-screen">Preparing The New Screen</h3>
<p>Place the insulating film as neatly as you can on the back; making sure you cover the edges at the corner where the tab is situated for attaching the control board.</p>
<aside class="gallery">
<div class="col"><a title="048 Film 1" href="http://images.nintendolife.com/6599b3328bf5e/048-film-1.original.jpg"><img class="lazy" src="//www.w3.org/2000/svg' viewBox='0 0 292 245'%3E%3C/svg%3E" width="292" height="245" data-original="http://images.nintendolife.com/6599b3328bf5e/048-film-1.292x245.jpg" alt="048 Film 1"></a><a title="049 Film 2" href="http://images.nintendolife.com/09710891e2cd6/049-film-2.original.jpg"><img class="lazy" src="//www.w3.org/2000/svg' viewBox='0 0 292 245'%3E%3C/svg%3E" width="292" height="245" data-original="http://images.nintendolife.com/09710891e2cd6/049-film-2.292x245.jpg" alt="049 Film 2"></a></div>
<div class="col"><a title="050 Film 3" href="http://images.nintendolife.com/0af71e682a0ac/050-film-3.original.jpg"><img class="lazy" src="//www.w3.org/2000/svg' viewBox='0 0 603 495'%3E%3C/svg%3E" width="603" height="495" data-original="http://images.nintendolife.com/0af71e682a0ac/050-film-3.603x495.jpg" alt="050 Film 3"></a></div>
</aside>
<p>Attach the tab to the socket on the control board by lining it up and applying a little pressure until you feel a click.</p>
<aside class="gallery">
<div class="col"><a title="051 Control 1" href="http://images.nintendolife.com/7001a961f3589/051-control-1.original.jpg"><img class="lazy" src="//www.w3.org/2000/svg' viewBox='0 0 450 495'%3E%3C/svg%3E" width="450" height="495" data-original="http://images.nintendolife.com/7001a961f3589/051-control-1.450x495.jpg" alt="051 Control 1"></a></div>
<div class="col"><a title="053 Control 3" href="http://images.nintendolife.com/23e2d717bd25a/053-control-3.original.jpg"><img class="lazy" src="//www.w3.org/2000/svg' viewBox='0 0 450 495'%3E%3C/svg%3E" width="450" height="495" data-original="http://images.nintendolife.com/23e2d717bd25a/053-control-3.450x495.jpg" alt="053 Control 3"></a></div>
</aside>
<p>Loop the ribbon around carefully to allow you to flip over the control board so it sits on the screen. Use a small amount of double-sided tape (we used half of the piece from the kit) to secure it in place, being careful to keep the edge of the control board parallel to the edge of the screen housing.</p>
<aside class="gallery">
<div class="col"><a title="054 Control 4" href="http://images.nintendolife.com/e1d862c4ad1b5/054-control-4.original.jpg"><img class="lazy" src="//www.w3.org/2000/svg' viewBox='0 0 450 495'%3E%3C/svg%3E" width="450" height="495" data-original="http://images.nintendolife.com/e1d862c4ad1b5/054-control-4.450x495.jpg" alt="054 Control 4"></a></div>
<div class="col"><a title="056 Control 6" href="http://images.nintendolife.com/68cfe1d521525/056-control-6.original.jpg"><img class="lazy" src="//www.w3.org/2000/svg' viewBox='0 0 450 495'%3E%3C/svg%3E" width="450" height="495" data-original="http://images.nintendolife.com/68cfe1d521525/056-control-6.450x495.jpg" alt="056 Control 6"></a></div>
</aside>
<aside class="gallery">
<div class="col"><a title="057 Control 7" href="http://images.nintendolife.com/752905eebe58f/057-control-7.original.jpg"><img class="lazy" src="//www.w3.org/2000/svg' viewBox='0 0 450 495'%3E%3C/svg%3E" width="450" height="495" data-original="http://images.nintendolife.com/752905eebe58f/057-control-7.450x495.jpg" alt="057 Control 7"></a></div>
<div class="col"><a title="058 Fit 1" href="http://images.nintendolife.com/4f8b5206ada41/058-fit-1.original.jpg"><img class="lazy" src="//www.w3.org/2000/svg' viewBox='0 0 450 495'%3E%3C/svg%3E" width="450" height="495" data-original="http://images.nintendolife.com/4f8b5206ada41/058-fit-1.450x495.jpg" alt="058 Fit 1"></a></div>
</aside>
<p>Check that the screen assembly drops into the frame on the housing (the part with the rectangular opening so you can see the screen). At this stage, we’ll leave the protective film in place. Usually, it will drop straight into place but in this case, there was a little resistance. It’s never a good idea to force these things and have the assembly under strain so if the fit is too tight, carefully use a knife to reduce the profile of the four raised areas inside the frame housing and make a bit more room for the screen.</p>
<p>You don’t want to remove too much, so it moves around, just try to achieve a snug fit without having to force it. Better to remove a small amount at a time and keep checking it.</p>
<figure class="picture strip"><a title="060 Fit 3" href="http://images.nintendolife.com/fdead68386cc4/060-fit-3.original.jpg"><img class="lazy" src="//www.w3.org/2000/svg' viewBox='0 0 900 785'%3E%3C/svg%3E" width="900" height="785" data-original="http://images.nintendolife.com/fdead68386cc4/060-fit-3.900x.jpg" alt="060 Fit 3"></a></figure>
<p>Once the screen drops comfortably into the housing, gently place the top of the shell in place (it won’t close up properly yet, don’t force it!) and take note of the plastic area that is keeping the top shell from closing up properly; this is the part that will end up near the control board on the back of the screen. Safely trim this part away with the craft knife, removing a thin layer at a time and being careful not to cut any of the outside edge of the casing.</p>
<figure class="picture strip"><a title="066 Trim 4" href="http://images.nintendolife.com/71ef19692e841/066-trim-4.original.jpg"><img class="lazy" src="//www.w3.org/2000/svg' viewBox='0 0 900 691'%3E%3C/svg%3E" width="900" height="691" data-original="http://images.nintendolife.com/71ef19692e841/066-trim-4.900x.jpg" alt="066 Trim 4"></a></figure>
<p>Gently test the fit and remove more plastic as necessary until the lid fits on comfortably without needing to squeeze it shut. You don’t want to be applying any pressure on the LCD or control board as this could permanently damage the display.</p>
<aside class="gallery">
<div class="col"><a title="069 Trim 7" href="http://images.nintendolife.com/6fd27e9ec82ed/069-trim-7.original.jpg"><img class="lazy" src="//www.w3.org/2000/svg' viewBox='0 0 450 495'%3E%3C/svg%3E" width="450" height="495" data-original="http://images.nintendolife.com/6fd27e9ec82ed/069-trim-7.450x495.jpg" alt="069 Trim 7"></a></div>
<div class="col"><a title="070 Fit 1" href="http://images.nintendolife.com/c1121a85781e3/070-fit-1.original.jpg"><img class="lazy" src="//www.w3.org/2000/svg' viewBox='0 0 450 495'%3E%3C/svg%3E" width="450" height="495" data-original="http://images.nintendolife.com/c1121a85781e3/070-fit-1.450x495.jpg" alt="070 Fit 1"></a></div>
</aside>
<h3 id="installing-the-screen">Installing The Screen</h3>
<p>Once the lid is trimmed and will fit correctly, you have two other jobs to do. Firstly, loop the ribbon over once and feed the tip through the slot in the shell, just like the old screen.</p>
<aside class="gallery">
<div class="col"><a title="072 Install 1" href="http://images.nintendolife.com/22acdc1e0b000/072-install-1.original.jpg"><img class="lazy" src="//www.w3.org/2000/svg' viewBox='0 0 292 245'%3E%3C/svg%3E" width="292" height="245" data-original="http://images.nintendolife.com/22acdc1e0b000/072-install-1.292x245.jpg" alt="072 Install 1"></a><a title="073 Install 2" href="http://images.nintendolife.com/ca08be16b5b20/073-install-2.original.jpg"><img class="lazy" src="//www.w3.org/2000/svg' viewBox='0 0 292 245'%3E%3C/svg%3E" width="292" height="245" data-original="http://images.nintendolife.com/ca08be16b5b20/073-install-2.292x245.jpg" alt="073 Install 2"></a></div>
<div class="col"><a title="074 Install 3" href="http://images.nintendolife.com/2a8c942003917/074-install-3.original.jpg"><img class="lazy" src="//www.w3.org/2000/svg' viewBox='0 0 603 495'%3E%3C/svg%3E" width="603" height="495" data-original="http://images.nintendolife.com/2a8c942003917/074-install-3.603x495.jpg" alt="074 Install 3"></a></div>
</aside>
<p>Next, reattach the hinge cap piece; this will help keep the ribbon in place. You can put the lid of the shell in place but don’t screw it together yet.</p>
<aside class="gallery">
<div class="col"><a title="075 Install 4" href="http://images.nintendolife.com/6232ecd44b689/075-install-4.original.jpg"><img class="lazy" src="//www.w3.org/2000/svg' viewBox='0 0 292 245'%3E%3C/svg%3E" width="292" height="245" data-original="http://images.nintendolife.com/6232ecd44b689/075-install-4.292x245.jpg" alt="075 Install 4"></a><a title="076 Install 5" href="http://images.nintendolife.com/fda083076cac4/076-install-5.original.jpg"><img class="lazy" src="//www.w3.org/2000/svg' viewBox='0 0 292 245'%3E%3C/svg%3E" width="292" height="245" data-original="http://images.nintendolife.com/fda083076cac4/076-install-5.292x245.jpg" alt="076 Install 5"></a></div>
<div class="col"><a title="077 Install 8" href="http://images.nintendolife.com/dacd6079f23b4/077-install-8.original.jpg"><img class="lazy" src="//www.w3.org/2000/svg' viewBox='0 0 603 495'%3E%3C/svg%3E" width="603" height="495" data-original="http://images.nintendolife.com/dacd6079f23b4/077-install-8.603x495.jpg" alt="077 Install 8"></a></div>
</aside>
<p>Hold the shell together so the screen doesn’t drop out, hold the cap in place and use the crosshead screw to secure it.</p>
<figure class="picture strip"><a title="080 Install 9" href="http://images.nintendolife.com/ba52be16f0525/080-install-9.original.jpg"><img class="lazy" src="//www.w3.org/2000/svg' viewBox='0 0 900 675'%3E%3C/svg%3E" width="900" height="675" data-original="http://images.nintendolife.com/ba52be16f0525/080-install-9.900x.jpg" alt="080 Install 9"></a></figure>
<p>A note on reinserting screws into plastic: there will be a thread cut into the plastic from last time the screw was fitted, that you want the screw to go back into. If you just screw straight in, you run the risk of it cutting a new thread and shearing off the plastic, preventing a secure fit. To avoid this happening, first turn the screw anticlockwise until you feel a little “pop” as the screw locates in the threaded hole. Then, turn clockwise and it should screw into place with little resistance. Turn the screw until it is in place and no more – avoid overtightening as, again, this could permanently damage the plastic and cause an unsatisfactory fit.</p>
<h3 id="brightness-control-optional">Brightness Control (Optional)</h3>
<p>You need to prepare two points with solder. Solder will only stick to hot metal, so the process involves heating the pad first with the tip of the soldering iron, melting a small amount of solder onto the pad while the iron is in place, and briefly leaving the iron in place afterwards to allow the solder to flow properly. The whole process will only take a few seconds and if you get it right it will sit like a tiny dome shape on the metal contact you soldered to.</p>
<p>First, melt a little solder onto the circular contact point near the end of the ribbon cable, then melt another little bit of solder onto the point marked <strong>Q12B</strong> on the motherboard. If you have flux put it onto the points first and it will help the solder flow correctly into place.</p>
<aside class="gallery">
<div class="col"><a title="082 Ribbon" href="http://images.nintendolife.com/3903d22d9548f/082-ribbon.original.jpg"><img class="lazy" src="//www.w3.org/2000/svg' viewBox='0 0 450 495'%3E%3C/svg%3E" width="450" height="495" data-original="http://images.nintendolife.com/3903d22d9548f/082-ribbon.450x495.jpg" alt="082 Ribbon"></a></div>
<div class="col"><a title="083 Flux" href="http://images.nintendolife.com/6d2a87764b1e6/083-flux.original.jpg"><img class="lazy" src="//www.w3.org/2000/svg' viewBox='0 0 450 495'%3E%3C/svg%3E" width="450" height="495" data-original="http://images.nintendolife.com/6d2a87764b1e6/083-flux.450x495.jpg" alt="083 Flux"></a></div>
</aside>
<aside class="gallery">
<div class="col"><a title="084 Solder Q12b" href="http://images.nintendolife.com/182eb3be44543/084-solder-q12b.original.jpg"><img class="lazy" src="//www.w3.org/2000/svg' viewBox='0 0 450 495'%3E%3C/svg%3E" width="450" height="495" data-original="http://images.nintendolife.com/182eb3be44543/084-solder-q12b.450x495.jpg" alt="084 Solder Q12b"></a></div>
<div class="col"><a title="086 Ribbon Done" href="http://images.nintendolife.com/24d22c64d8db0/086-ribbon-done.original.jpg"><img class="lazy" src="//www.w3.org/2000/svg' viewBox='0 0 450 495'%3E%3C/svg%3E" width="450" height="495" data-original="http://images.nintendolife.com/24d22c64d8db0/086-ribbon-done.450x495.jpg" alt="086 Ribbon Done"></a></div>
</aside>
<aside class="gallery">
<div class="col"><a title="087 Solder Wire" href="http://images.nintendolife.com/313a2f2565f00/087-solder-wire.original.jpg"><img class="lazy" src="//www.w3.org/2000/svg' viewBox='0 0 450 495'%3E%3C/svg%3E" width="450" height="495" data-original="http://images.nintendolife.com/313a2f2565f00/087-solder-wire.450x495.jpg" alt="087 Solder Wire"></a></div>
<div class="col"><a title="089 Wire Attached" href="http://images.nintendolife.com/e8704be98d387/089-wire-attached.original.jpg"><img class="lazy" src="//www.w3.org/2000/svg' viewBox='0 0 450 495'%3E%3C/svg%3E" width="450" height="495" data-original="http://images.nintendolife.com/e8704be98d387/089-wire-attached.450x495.jpg" alt="089 Wire Attached"></a></div>
</aside>
<p>The wire that comes with the kit is quite long so it will reach easily; the only issue is that it can make it difficult to reassemble without the wire getting in the way. We found it easier to use a shorter wire, but that involves “stripping” and “tinning” the wire before attaching it. The one that comes with the kit is stripped and tinned already so you may prefer to use that one as it is. Stripping the wire involves cutting it to length and then removing a little bit of the plastic insulation at the end to expose the metal wire inside. It can be tricky to get used to, so we suggest practising on the long wire rather than cutting to size then having your first attempt! Tinning simply involves melting a little solder onto the end of the wire. Again, heat it first, add a little solder and let it flow. The exposed metal tip only needs to be a few millimetres long, so cut it down to size after tinning if you need to.</p>
<p>Then you need to attach the wire. If you’ve prepared correctly this should be easy. Hold the wire so that the end lines up with the contact point you want to attach it to. Gently reheat with the soldering iron; the solder on the end of the wire and on the contact will melt and join. Move the soldering iron away and hold the wire steadily in place while the melted solder cools and sets. It will provide a nice secure join. Repeat with the other point and the other end of the wire.</p>
<h3 id="reassembly">Reassembly</h3>
<p>Reattaching the ribbon into the motherboard can be awkward. Gently pull the ribbon through the gap in the shell to give you a little room to work with but of course don’t put any strain on it as it’s very delicate. <em>If you rip the ribbon, you’ll need a whole new kit, so take it slowly!</em></p>
<aside class="gallery">
<div class="col"><a title="090 Insert Ribbon" href="http://images.nintendolife.com/ee4dbc80476f6/090-insert-ribbon.original.jpg"><img class="lazy" src="//www.w3.org/2000/svg' viewBox='0 0 450 495'%3E%3C/svg%3E" width="450" height="495" data-original="http://images.nintendolife.com/ee4dbc80476f6/090-insert-ribbon.450x495.jpg" alt="090 Insert Ribbon"></a></div>
<div class="col"><a title="092 Tape" href="http://images.nintendolife.com/f66b23f2e32cd/092-tape.original.jpg"><img class="lazy" src="//www.w3.org/2000/svg' viewBox='0 0 450 495'%3E%3C/svg%3E" width="450" height="495" data-original="http://images.nintendolife.com/f66b23f2e32cd/092-tape.450x495.jpg" alt="092 Tape"></a></div>
</aside>
<p>Slot the end of the ribbon into the opening on the motherboard and clip the two ends of the plastic retainer back in place. Do a visual check to make sure the ribbon is in straight and both clips are secured. If they aren’t, simply undo the clips and try again until it fits.</p>
<p>Make sure your wire is clear of the white areas around the buttons on the motherboard as this will stop it from closing properly. You can carefully tape it in place to make reassembly much easier.</p>
<p>Put all your buttons, speaker and silicone parts in place before locating the motherboard in position and securing it with the three crosshead screws.</p>
<aside class="gallery">
<div class="col"><a title="093 Buttons" href="http://images.nintendolife.com/de029caec867a/093-buttons.original.jpg"><img class="lazy" src="//www.w3.org/2000/svg' viewBox='0 0 450 495'%3E%3C/svg%3E" width="450" height="495" data-original="http://images.nintendolife.com/de029caec867a/093-buttons.450x495.jpg" alt="093 Buttons"></a></div>
<div class="col"><a title="094 Silicone" href="http://images.nintendolife.com/15adebc710c24/094-silicone.original.jpg"><img class="lazy" src="//www.w3.org/2000/svg' viewBox='0 0 450 495'%3E%3C/svg%3E" width="450" height="495" data-original="http://images.nintendolife.com/15adebc710c24/094-silicone.450x495.jpg" alt="094 Silicone"></a></div>
</aside>
<figure class="picture strip"><a title="095 Motherboard" href="http://images.nintendolife.com/22cc9a16a36b4/095-motherboard.original.jpg"><img class="lazy" src="//www.w3.org/2000/svg' viewBox='0 0 900 859'%3E%3C/svg%3E" width="900" height="859" data-original="http://images.nintendolife.com/22cc9a16a36b4/095-motherboard.900x.jpg" alt="095 Motherboard"></a></figure>
<p>Put the rear shell back on, being sure to put the power switch piece back in place first.</p>
<figure class="picture strip"><a title="096 Power 1" href="http://images.nintendolife.com/1740a8ec602d7/096-power-1.original.jpg"><img class="lazy" src="//www.w3.org/2000/svg' viewBox='0 0 900 625'%3E%3C/svg%3E" width="900" height="625" data-original="http://images.nintendolife.com/1740a8ec602d7/096-power-1.900x.jpg" alt="096 Power 1"></a></figure>
<figure class="picture strip"><a title="099 Battery" href="http://images.nintendolife.com/27b7357864644/099-battery.original.jpg"><img class="lazy" src="//www.w3.org/2000/svg' viewBox='0 0 900 1200'%3E%3C/svg%3E" width="900" height="1200" data-original="http://images.nintendolife.com/27b7357864644/099-battery.900x.jpg" alt="099 Battery"></a></figure>
<p>You can just attach two of the six tri-wing screws for now (at the cartridge opening and in the battery compartment) in case you end up needing to open it back up for troubleshooting. Reinsert the battery (either your original 600mAh battery or a higher-capacity 850mAh one) and put the battery cover in place, securing it with your crosshead screwdriver.</p>
<p>Now the bottom half is secure, it’s time to finish the screen installation. Sit the console flat and lift off the lid. Carefully lift out the screen assembly and peel off the protective film.</p>
<figure class="picture strip"><a title="101 Film" href="http://images.nintendolife.com/d6004ff5ab673/101-film.original.jpg"><img class="lazy" src="//www.w3.org/2000/svg' viewBox='0 0 900 856'%3E%3C/svg%3E" width="900" height="856" data-original="http://images.nintendolife.com/d6004ff5ab673/101-film.900x.jpg" alt="101 Film"></a></figure>
<p>
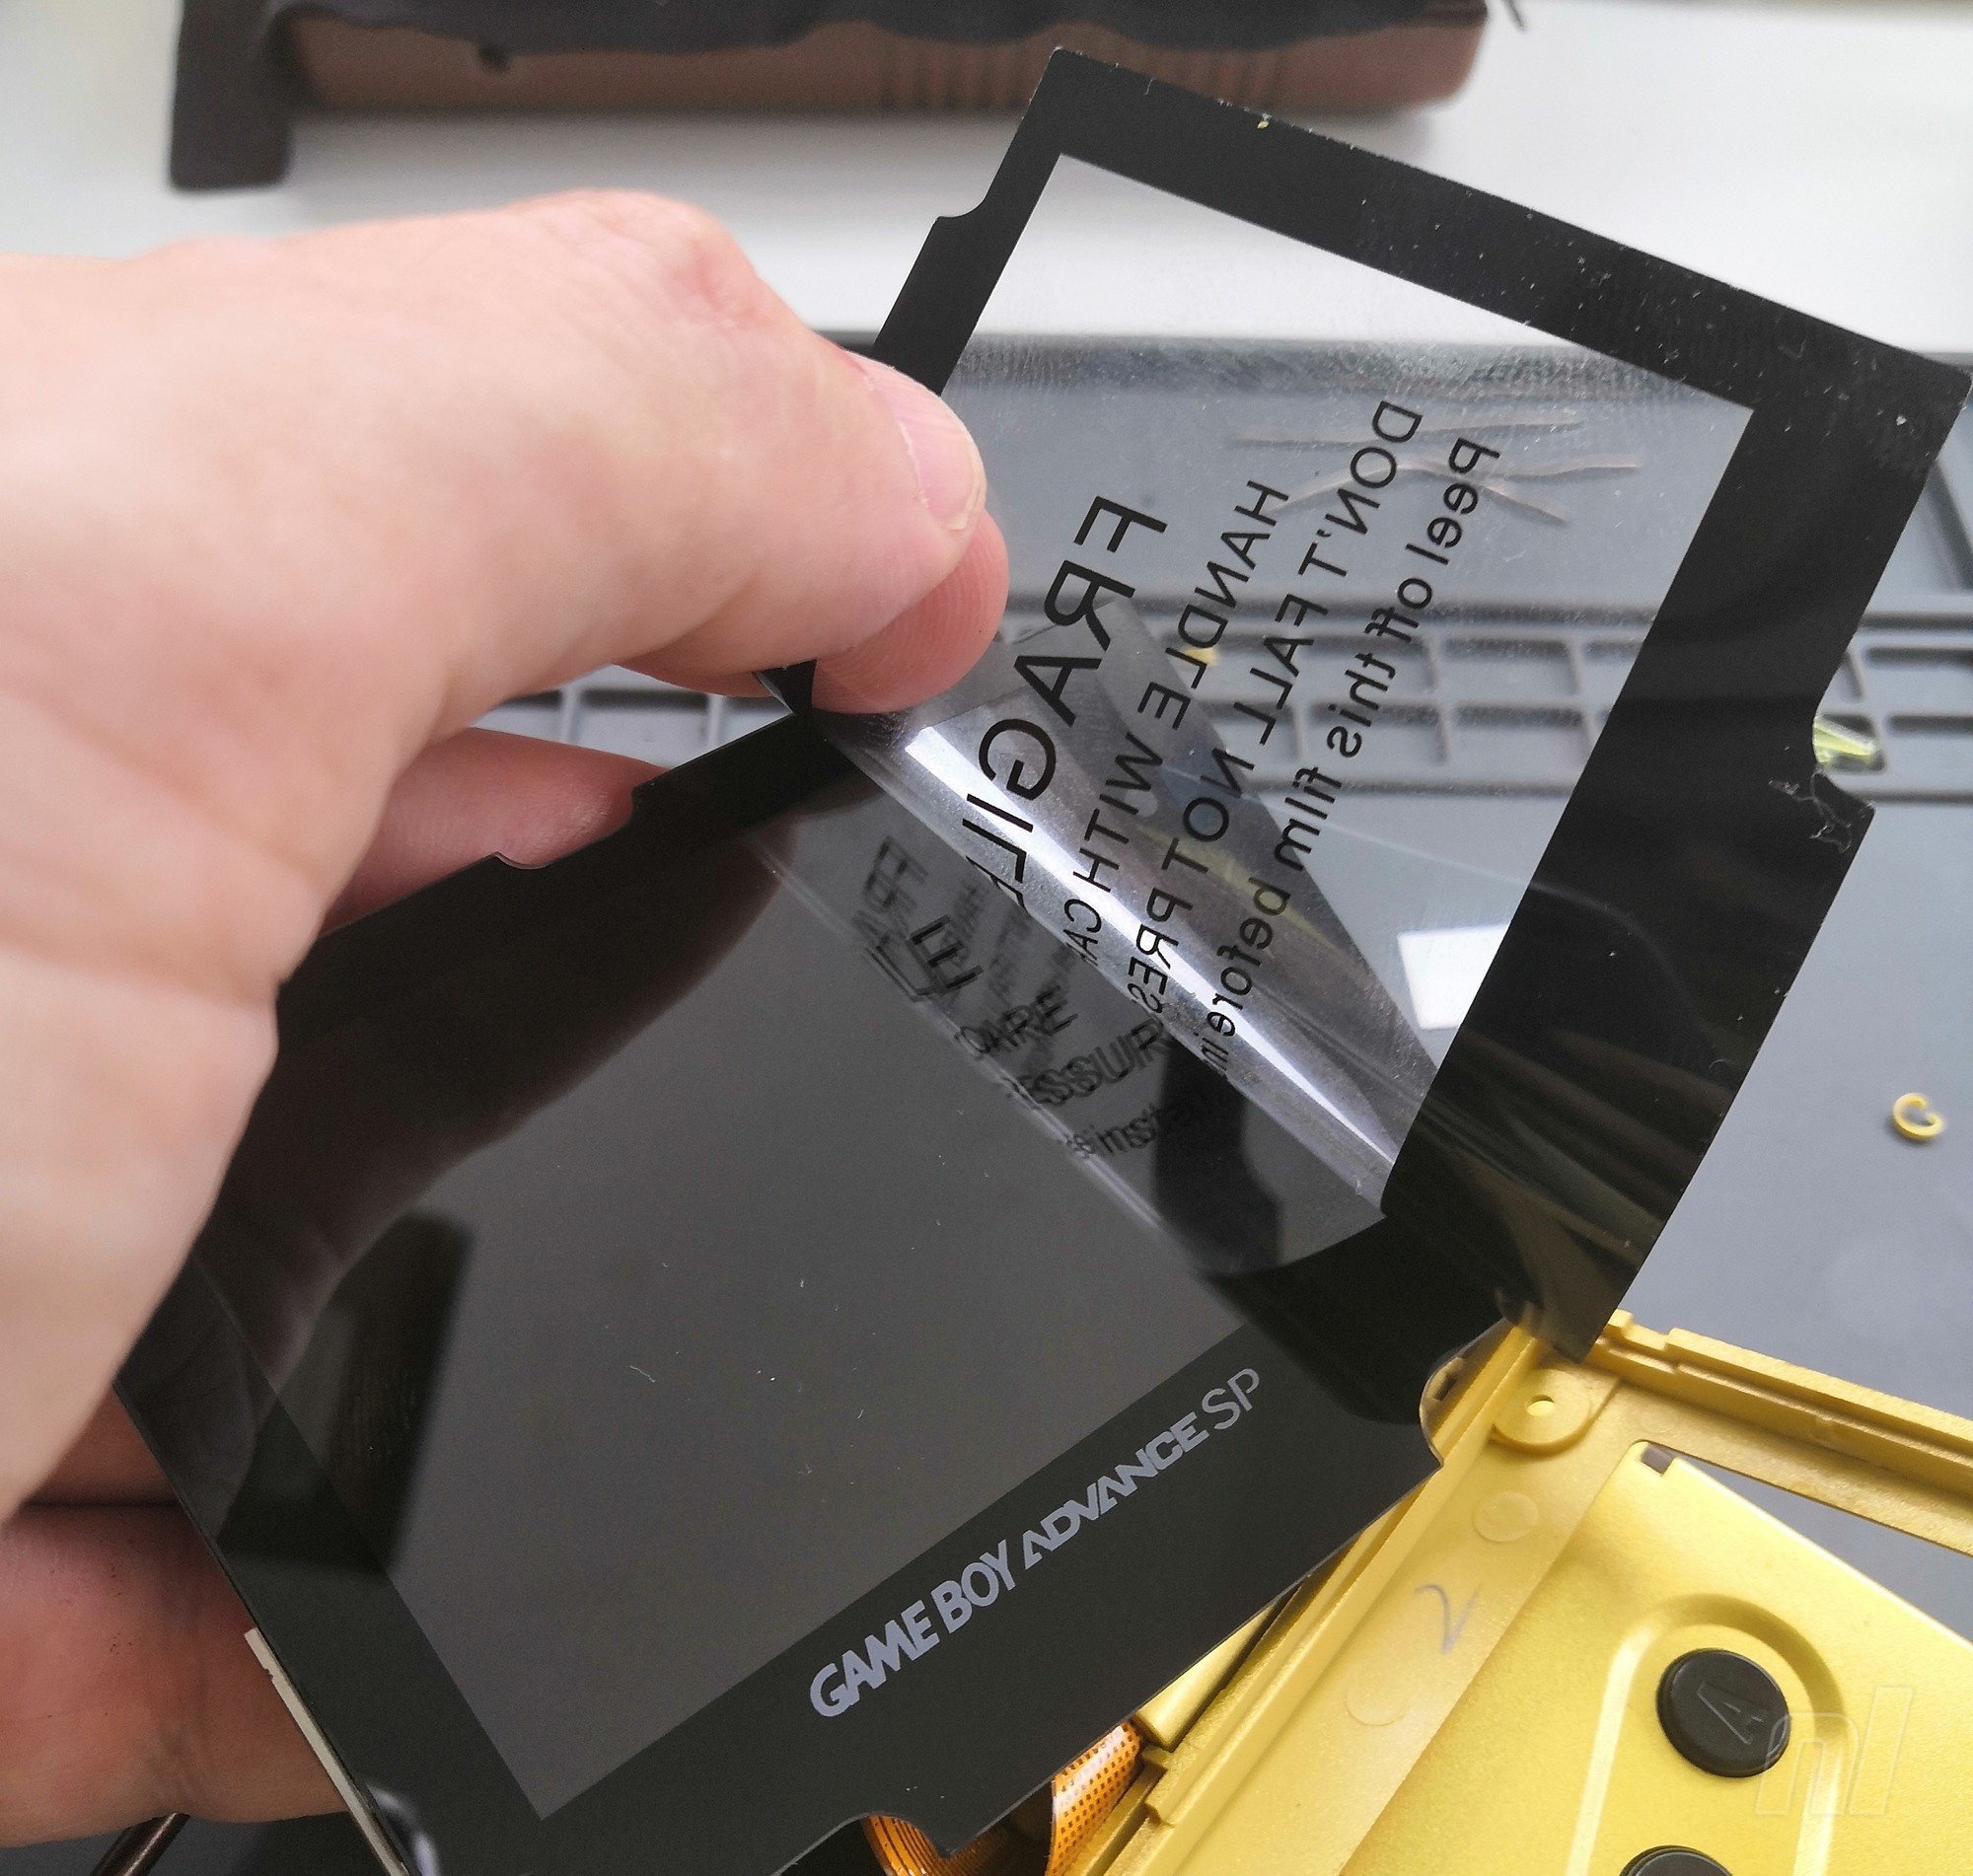
Avoid getting fingerprints on it, especially at the edge, and lower it back in place.</p>
<p>Use scissors to cut out a small section of the foam piece and use the rest of your double-sided tape to secure it to the back of the screen. We found using the entire foam piece generates a bit too much pressure and can cause the top half to bulge a bit; we don’t want that!</p>
<aside class="gallery">
<div class="col"><a title="102 Insert Screen" href="http://images.nintendolife.com/164f795672f53/102-insert-screen.original.jpg"><img class="lazy" src="//www.w3.org/2000/svg' viewBox='0 0 450 495'%3E%3C/svg%3E" width="450" height="495" data-original="http://images.nintendolife.com/164f795672f53/102-insert-screen.450x495.jpg" alt="102 Insert Screen"></a></div>
<div class="col"><a title="103 Tape" href="http://images.nintendolife.com/e2976ff412c8d/103-tape.original.jpg"><img class="lazy" src="//www.w3.org/2000/svg' viewBox='0 0 450 495'%3E%3C/svg%3E" width="450" height="495" data-original="http://images.nintendolife.com/e2976ff412c8d/103-tape.450x495.jpg" alt="103 Tape"></a></div>
</aside>
<p>
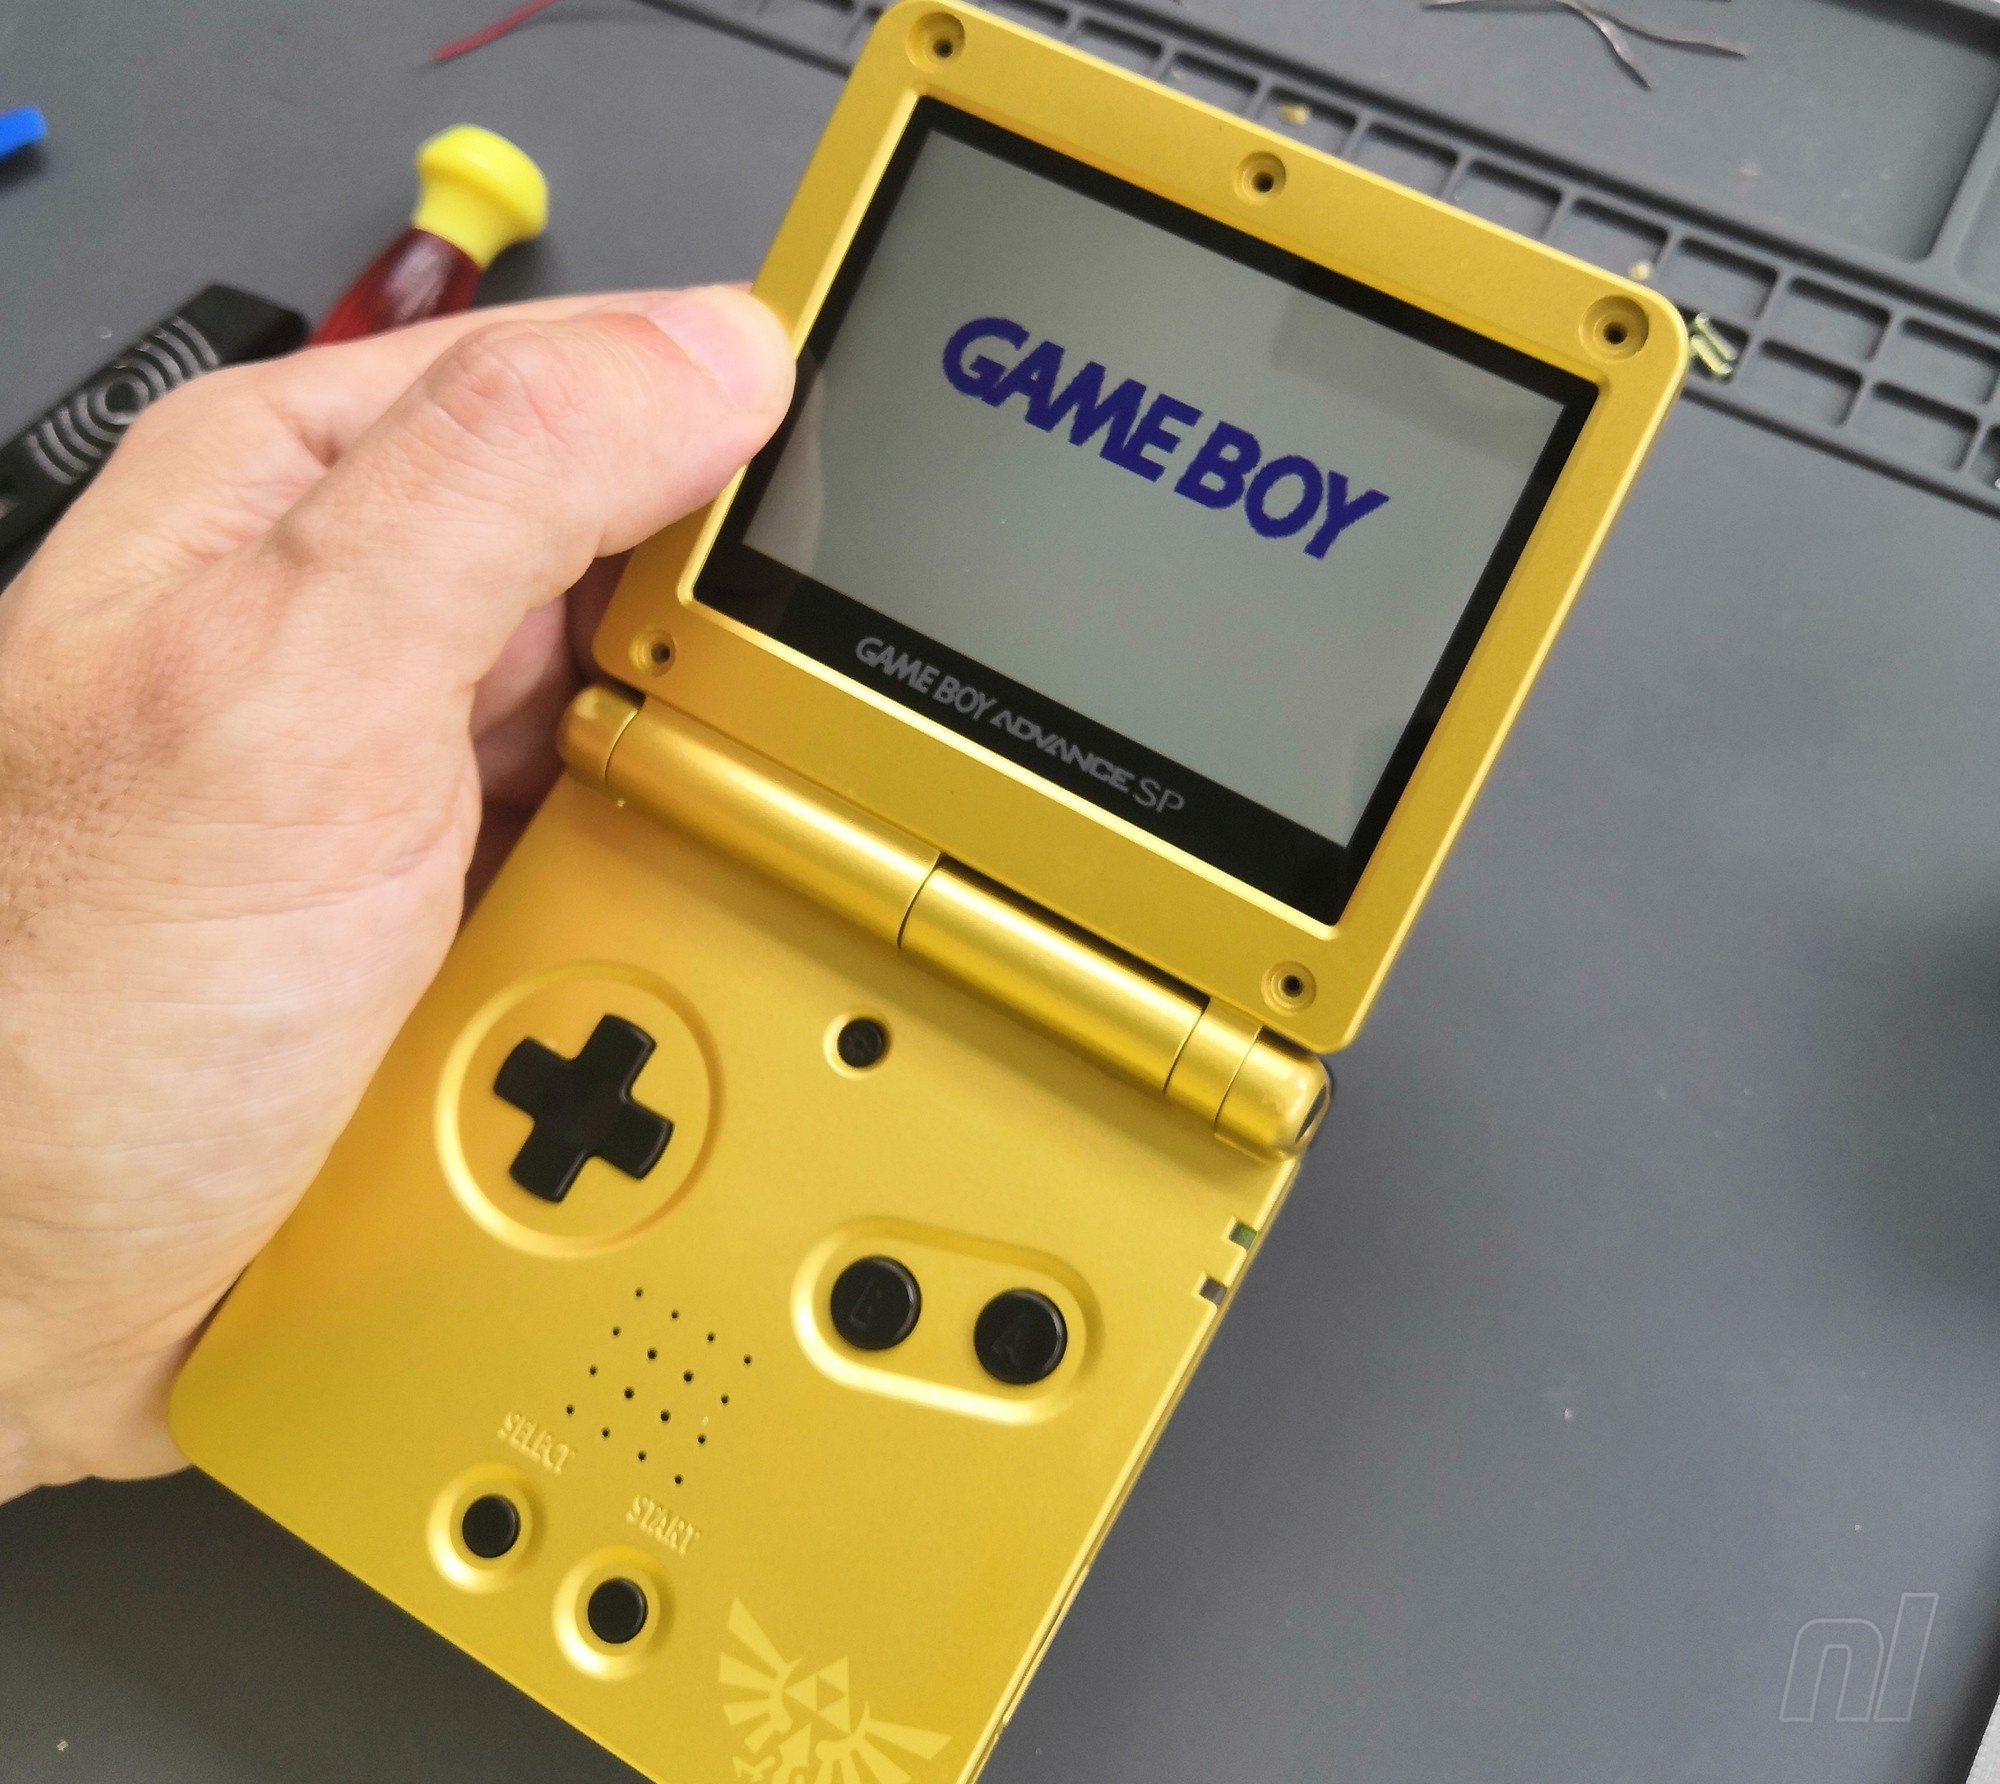
Put the lid of the shell back on, carefully lift open the hinged top half of the console, move the volume slider up if necessary, and switch on the console to test it. You should get the “GAME BOY” splash screen and the sound should come out of the speaker. If that works, well done!</p>
<figure class="picture strip"><a title="106 Test" href="http://images.nintendolife.com/2477a621c1360/106-test.original.jpg"><img class="lazy" src="//www.w3.org/2000/svg' viewBox='0 0 900 803'%3E%3C/svg%3E" width="900" height="803" data-original="http://images.nintendolife.com/2477a621c1360/106-test.900x.jpg" alt="106 Test"></a></figure>
<p>If not, don’t worry. Make sure the ribbon cable is seated correctly in the retaining bracket and secured in place. Undo and reseat it if necessary. If that doesn’t help, make sure your soldering is secure and there are no “bridges” with unwanted solder connecting the wire to other points on the board. Make sure the wire isn’t being pinched when the unit is closed.</p>
<aside class="gallery">
<div class="col"><a title="107 Screws" href="http://images.nintendolife.com/e6c1841b63881/107-screws.original.jpg"><img class="lazy" src="//www.w3.org/2000/svg' viewBox='0 0 450 495'%3E%3C/svg%3E" width="450" height="495" data-original="http://images.nintendolife.com/e6c1841b63881/107-screws.450x495.jpg" alt="107 Screws"></a></div>
<div class="col"><a title="108 Inserts" href="http://images.nintendolife.com/75dadc6b74dd0/108-inserts.original.jpg"><img class="lazy" src="//www.w3.org/2000/svg' viewBox='0 0 450 495'%3E%3C/svg%3E" width="450" height="495" data-original="http://images.nintendolife.com/75dadc6b74dd0/108-inserts.450x495.jpg" alt="108 Inserts"></a></div>
</aside>
<p>If the screen works, try pressing the brightness button in the middle top of the control panel. The brightness should increase with each successive press until it goes back to a dim display and starts to increase again.</p>
<p>Now switch it off, put a game in for testing and turn it back on to make sure all the buttons work. Something like <strong><a href="http://www.nintendolife.com/games/gba/street_fighter_alpha_3">Street Fighter Alpha 3</a></strong> is ideal as you can check all the buttons easily. Make sure the D-pad, A, B, L, R, start, select and brightness control buttons all respond correctly before securing all the remaining screws in place. If they don’t work properly, open the bottom half back up and make sure your wire isn’t interfering with the location of any of the buttons.</p>
<p>Once everything is tested and working, reinsert the five tri-wing screws to secure the top half together.</p>
<figure class="picture strip"><a title="110 Finished" href="http://images.nintendolife.com/0cb38f021097d/110-finished.original.jpg"><img class="lazy" src="//www.w3.org/2000/svg' viewBox='0 0 900 618'%3E%3C/svg%3E" width="900" height="618" data-original="http://images.nintendolife.com/0cb38f021097d/110-finished.900x.jpg" alt="110 Finished"></a></figure>
<p>It’s worth a quick check to make sure it’s all still working before you put your silicone pads back in place in the top half to hide the screws again, as we know how tricky these are to remove!</p>
<p>Reinsert your remaining four tri-wing screws into the bottom of the unit, and you’re all done. As we mentioned before, you might find that battery life is reduced due to the demands of the new screen, so an upgrade might be your next job.</p>
<p>Happy gaming, and be sure to visit <a class="external" href="https://www.youtube.com/channel/UCJV6Aj_S2G1T_gvNOu6xzMg">Joe Bleeps</a> for more cool mod videos!</p>
</div>


https://www.sickgaming.net/blog/2020/06/...dvance-sp/
Reply


Forum Jump:


Users browsing this thread:
1 Guest(s)

Forum software by © MyBB Theme © iAndrew 2016