


Earlier we learnt about WordPress widgets and their uses. Also, we saw how to create a custom widget and include them in the frontend template.
This is a continuity of the guide series to create a WooCommerce contact form. This is yet another method to enable a contact form component. It uses WordPress widgets to achieve this.
The contact form widget can be rendered in the WooCommerce UI. It can be rendered in the shop theme’s registered widget area. This article guides how to render a contact form in a default widget area.
Advantages of WordPress widgets
Creating and using widgets for a WordPress site has many advantages. Some of them are listed below.
- It adds abstraction by segregating a unit of logic from the usual flow.
- It increases performance and speed by priority-based loading of widgets.
- It acts as an add-on feature that can be enabled/disabled on a need basis.
- It adds security by dynamic loading of components and templates.
WordPress contact form plugin for registering the widget
This method creates a WordPress contact form plugin to register the widget instance. This widget is registered for displaying a contact form component in the widget area.
The plugin file creates the custom widget which inherits the WordPress widget class.
The custom widget class method loads the contact form template file reference. It is to get the content from the template HTML and render it into the widget area. Then, the WordPress contact form plugin registers the custom widget.
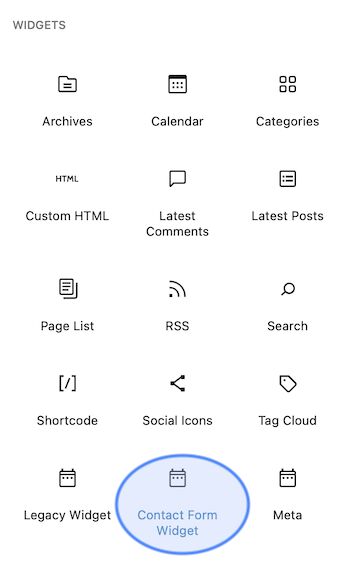
After registering, this instance can be viewed in the existing widgets components panel.
The following WordPress contact form plugin code shows the sub-class of the WP-Widget.
This plugin class inherits the WP-Widget class and overrides the widget() method. In this method, it constructs and outputs the widget UI HTML.
This plugin registers the widget by WordPress contact form plugin class name. This registration will happen on the init action of the WordPress widget.
<plugin-directory>/contact-form-widget/contact-form-widget.php
<?php

/* * Plugin Name: Contact form Widget * Plugin URI: https://phppot.com * Description: Sidebar widget contact form * Author: Vincy * Author URI: https://phppot.com * Version: 1.0.0 * Slug: content */ class Contact_Form_Widget extends WP_Widget { function __construct() { parent::__construct( 'Form_Widget', 'Contact Form Widget', array( 'description' => 'To render contact form in a default widget area', ) ); } function widget( $args, $instance ) { $contactFormHTML = getContactHTML('template-parts/contact-form' ); echo $args['before_widget']; echo $args['before_title'] . "Contact us" . $args['after_title']; echo $contactFormHTML; echo $args['after_widget']; }

} function register_contact_form_widget() { register_widget( 'Contact_Form_Widget' );

}

add_action( 'widgets_init', 'register_contact_form_widget' );
Contact form template, assets for WooCommerce shop
The theme files have the WooCommerce contact form templates and styles. A child theme is created for this example to do the theme-specific changes.
The child theme’s functions.php returns the WooCommerce contact form template HTML. The getContactHTML() function receives the WordPress template-parts slug and the filename. It uses the get_template_part() function to get the template HTML.
The WordPress contact form plugin file calls this method to grab the content.
<child-theme-directory>/functions.php
<?php /** * Enqueues scripts and styles for front end. * * @return void */

function woocommerce_contact_form_styles()

{ wp_enqueue_style('theme-style', get_stylesheet_directory_uri() . '/style.css'); wp_enqueue_script('contact-form-jquery', 'https://code.jquery.com/jquery-3.6.0.min.js', array(), null); wp_enqueue_script('contact-form-script', get_stylesheet_directory_uri() . '/assets/js/form.js', array(), null);

}

add_action('wp_enqueue_scripts', 'woocommerce_contact_form_styles'); function send_contact_email()

{ $customerName = filter_var($_POST["customer_name"], FILTER_SANITIZE_STRING); $customerEmail = filter_var($_POST["customer_email"], FILTER_SANITIZE_STRING); $customerMessage = filter_var($_POST["customer_message"], FILTER_SANITIZE_STRING); $to = 'Recipient email here'; $subject = 'Product enquiry'; $body = 'The customer details: <br/><br/>'; if (! empty($customerName)) { $body = 'Customer Name:' . $customerName . '<br/>'; $body .= 'Customer Email:' . $customerEmail . '<br/>'; $body .= 'Customer Message:' . '<br/>'; $body .= $customerMessage . '<br/>'; } $headers = array( 'Content-Type: text/html; charset=UTF-8' ); $emailSent = wp_mail($to, $subject, $body, $headers); print $emailSent; exit();

}

add_action("wp_ajax_nopriv_send_contact_email", "send_contact_email"); // Get contact form template and return the HTML response in a variable

function getContactHTML($slug, $name = null)

{ ob_start(); get_template_part($slug, $name); $content = ob_get_contents(); ob_end_clean(); return $content;

}
Also, this file contains the mail sending script with the send_contact_email() function. It mail sending and assets en-queueing scripts will be familiar. Because they are as same as that of creating for the last WooCommerce contact form articles.
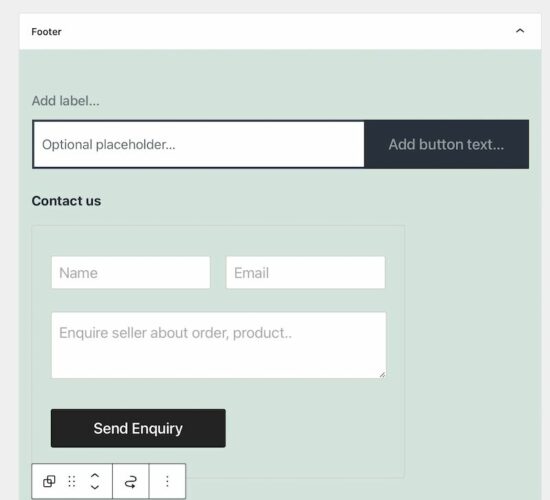
This contact form template contains inputs to collect customers’ details and messages.
template-parts/contact-form.php
<?php

/** * Template part for displaying posts * * @link https://developer.wordpress.org/themes/b...hierarchy/ * * @package WordPress * @subpackage Twenty_Twenty_One * @since Twenty Twenty-One 1.0 */ ?>

<div id="woocommerce-contact-form"> <form method="post" id="frmContactForm" action=""> <div class="display-flex"> <input name="customer_name" id="customer_name" placeholder="Name" /><input name="customer_email" id="customer_email" placeholder="Email" /> </div> <div> <textarea name="customer_message" id="customer_message" placeholder="Enquire seller about order, product.."></textarea> </div> <div> <input type="submit" name="send_mail" class="btn-send" value="Send Enquiry" /> </div> <div id="response"></div> </form>

</div>
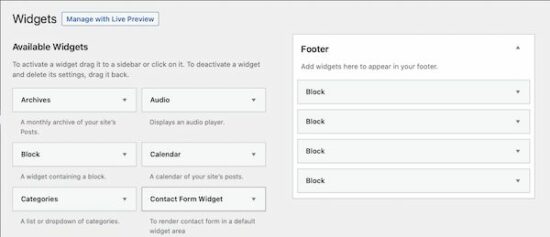
This is the WordPress default widget area to add the widget component. In this theme, it registers the footer panel as the default widget area. It is the drop area to render the chosen widget from the existing options.
Go to Appearance->widgets via the WordPress admin to this option. But, complete widgetising by using the register_widget() method to see this option.
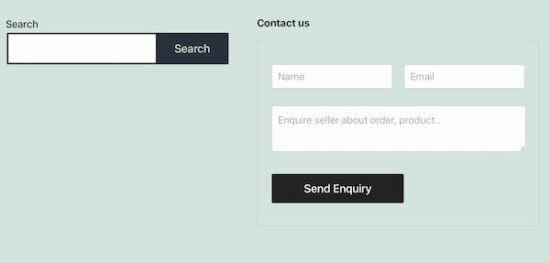
WordPress contact form widget plugin output
The below screenshot is the final output of the WordPress contact form plugin output. Thus, the WooCommerce footer panel displays the contact form component to send enquiry.
How to add a widget in the WordPress legacy editor
The above method uses blocks to render the registered contact form widgets. In a legacy editor, it contains a drag and drops area to move the widget components into the default widget area.
By navigating Appearance->Widgets it displays the draggable widget cards in the panel. Also, it shows the drop area to build the widget panel to be displayed on the front end.
If you want to test this in your widget editor, add the following code in the theme’s functions.php. There are also plugins to restore the legacy editor in the WordPress admin.
<?php

function example_theme_support() { remove_theme_support( 'widgets-block-editor' );

}

add_action( 'after_setup_theme', 'example_theme_support' );
3rd-party WordPress contact form plugin registers widgets
There are existing 3rd-party contact form widgets available. For example, the contact form widget plugin provides an easy-to-use component. It renders an enquiry form in the WooCommerce shop.
It contains 25+ features including a form builder. Instead of creating a custom code, an existing solution is preferable to get a quick output.
Conclusion
We have learned how to create a WordPress contact form plugin that uses widgets to render the HTML. I hope, the procedure is easy to follow and helps to create a custom widget on your own.
All the examples of the WooCommerce contact form cover all implementation methods. It will help to choose one among them on the need of the shop.
https://www.sickgaming.net/blog/2022/05/...th-widget/