FREE SKI..ID, Let's Go Bundle, Konami & Ubisoft Deals
SKIID Freebie
[freebies.indiegala.com]
Let's Go Bundle | 8 Steam Games | 91% OFF
[www.indiegala.com] New month, new bundle, new games..., the weekend's here, let's goooooooo! Grab the newest selection of indie Steam games brought by the Let's Go Bundle.
The inspiration behind it all returns to its 2D action roots! Castlevania's unforgettable characters & gothic setting meet the fast-paced combat of the award-winning roguelite Dead Cells in this unprecedented collaboration. A gateway to a striking castle has suddenly appeared, and an imposing warrior called Richter asks you to help him vanquish the great evil within.
Enticed by the promise of new loot rather than a sense of moral duty, you strike out through the grounds and corridors of the gothic castle to find and kill this mysterious Dracula...
Slay hordes of his supernatural minions as you progress through our biggest DLC yet, including two levels, three bosses and a new storyline!
Posted by: xSicKxBot - 03-09-2023, 02:28 AM - Forum: Python
- No Replies
Solidity Scoping – A Helpful Guide with Video
5/5 – (1 vote)
As promised in the previous article, we’ll get more closely familiar with the concept of scoping next. We’ll explain what scoping is, why it exists, and how it helps us in programming.
It’s part of our long-standing tradition to make this (and other) articles a faithful companion, or a supplement to the official Solidity documentation.
Scopes Overview
Scope refers to the context in which we can access a defined variable or a function. There are three main types of scope specific to Solidity:
global,
contract, and
function scope.
In the global scope, variables, and functions are defined at the global level, i.e., outside of any contract or function, and we can access them from any place in the source code.
In the contract scope, variables and functions are defined within a contract, but outside of any function, so we can access them from anywhere within the specific contract. However, these variables and functions are inaccessible from outside the contract scope.
In the function scope, variables and functions are defined within a function and we can access them exclusively from inside that function.
Note:
The concept of scopes in Solidity is similar and based on the concept of scopes in the C99 programming language. In both languages, a “scope” refers to the context in which a variable or function is defined and can be accessed.
In C99 (a C language standard from 1999), variables and functions can be defined at either the global level (i.e., outside of any function) or within a function. There is no “contract” scope in C99.
Global Scope
Let’s take a look at a simple example of the global scope:
pragma solidity ^0.6.12; uint public globalCounter; function incrementGlobalCounter() public { globalCounter++;

}
In this example, the globalCounter variable is defined at the global level and is, therefore, in the global scope. We can access it from anywhere in the code, including from within the incrementGlobalCounter(...) function.
Reminder: Global variables and functions can be accessed and modified by any contract or function that has access to them. We can find this behavior useful for sharing data across contracts or functions, but it can also present security risks if the global variables or functions are not properly protected.
Contract Scope
As explained above, variables and functions defined within a contract (but outside of any function) are in contract scope, and we can access them from anywhere within the contract.
Contract-level variables and functions are useful for storing and manipulating data that is specific to a particular contract and is not meant to be shared with other contracts or functions.
Let’s take a look at a simple example of the contract scope:
pragma solidity ^0.6.12; contract Counter { uint public contractCounter; function incrementContractCounter() public { contractCounter++; }

}
In this example, the contractCounter variable is defined within the Counter contract and is, therefore, in contract scope. It is available for access from anywhere within the Counter contract, including from within the incrementContractCounter() function.
Warning: We should be aware that contract-level variables and functions are only accessible from within the contract in which they are defined. They cannot be accessed from other contracts or from external accounts.
Function Scope
Variables and functions that are defined within a function are in the function scope and can only be accessed from within that function.
Function-level variables and functions are useful for storing and manipulating data that is specific to a particular function and is not meant to be shared with other functions or with the contract as a whole.
Let’s take a look at the following example of the function scope:
pragma solidity ^0.6.12; contract Counter { function incrementCounter(uint incrementAmount) public { uint functionCounter = 0; functionCounter += incrementAmount; }

}
In this example, the functionCounter variable is defined within the incrementCounter(...) function and is, therefore, in the function scope. It can only be accessed from within the incrementCounter function and is not accessible from other functions or from outside the contract.
C99 Scoping Rules
Now, let’s take a look at an interesting example showing minimal scoping by using curly braces:
// SPDX-License-Identifier: GPL-3.0

pragma solidity >=0.5.0 <0.9.0;

contract C { function minimalScoping() pure public { { uint same; same = 1; } { uint same; same = 3; } }

}
Each of the curly braces pair forms a distinct scope, containing a declaration and initialization of the variable same.
This example will compile without warnings or errors because each of the variable’s lifecycles is contained in its own disjoint scope, and there is no overlap between the two scopes.
Shadowing
In some special cases, such as this one demonstrating C99 scoping rules below, we’d come across a phenomenon called shadowing.
Shadowing means that two or more variables share their name and have intersected scopes, with the first one as the outer scope and the second one as the inner scope.
Let’s take a closer look to get a better idea of what’s all about:
// SPDX-License-Identifier: GPL-3.0

pragma solidity >=0.5.0 <0.9.0;

// This will report a warning

contract C { function f() pure public returns (uint) { uint x = 1; { x = 2; // this will assign to the outer variable uint x; } return x; // x has value 2 }

}
There are two variables called x; the first one is in the outer scope, and the second one is in the inner scope.
The inner scope is contained in or surrounded by the outer scope.
Therefore, the first and the second assignment assign the value 1, and then value 2 to the outer variable x, and only then will the declaration of the second variable x take place.
In this specific case, we’d get a warning from the compiler, because the first (outer) variable x is being shadowed by the second variable x.
Warning: in versions prior to 0.5.0, Solidity used the same scoping rules as JavaScript: a variable declared at any location within the function would be visible through the entire function’s scope. That’s why the example below could’ve been compiled in Solidity versions before 0.5.0:
// SPDX-License-Identifier: GPL-3.0

pragma solidity >=0.5.0 <0.9.0;

// This will not compile

contract C { function f() pure public returns (uint) { x = 2; uint x; return x; }

}
The code above couldn’t compile in today’s versions of Solidity because an assignment to variable x is attempted before the variable itself is declared. In other words, the inner variable x‘s scope starts with the line of its declaration.
Conclusion
In this article, we learned about variable and function scopes.
First, we made a scope overview, introducing ourselves to three different scopes in Solidity.
Second, we investigated the global scope by studying an appropriate example.
Third, we looked at the contract scope through an appropriate example.
Third, learned about the function scope on an appropriate example.
Fourth, we glanced at C99 scoping rules based on C99 – a C language standard.
Fifth, we also learned about shadowing and got an idea of why we should be careful about it.
What’s Next?
This tutorial is part of our extended Solidity documentation with videos and more accessible examples and explanations. You can navigate the series here (all links open in a new tab):
For the newcomers, Blockstorm is a fast-paced game that combines the classic elements of first-person shooters with the endless creativity of sandbox games. With an extensive collection of customizable weapons, maps, and game modes, Blockstorm offers endless hours of fun and excitement for both you and your friends.
From today onwards, players can download and play Blockstorm for free on Steam. This means that everyone can now experience the adrenaline rush of shooting and building their way through the game's dynamic levels without having to pay a penny.
Why go free to play?
We want to thank our dedicated community of players for their support and feedback over the years. We hope that going free-to-play, our gift to all of our loyal fans and involved community, will encourage even more players to join the Blockstorm community and enjoy the game.
So, what are you waiting for? Download Blockstorm for free on Steam today and start building, fighting, and creating your own adventure. We can't wait to see you on the battlefield! https://store.steampowered.com/app/1874190/Vorax/ And since we are on the topic of passion projects, our latest one is called Vorax. It’s an Open World Survival Horror game. Feel free to check it out, try it and even maybe wishlist it to stay updated on its release.
The ONLY Roguelike-Metroidvania fusion where you can mount and ride EVERY monster in the game! Get ready to Leap, Glide, Tunnel, Bite, Slither, Websling and Explode your way through a shuffling patchwork maze. Survival depends on bending the forces of nature to your own ends! Supports 2P Local coop.
I’ve come to realize this might become a rather long series. The main reason for that is that it documents two things. This is the birth of an application and my personal journey in developing that application. I know parts 1 and 2 have been very wordy. This will change now. I promise that you will see a lot of code in this episode :-).
Database Code
So after that slight philosophical tidbit, it is time to dive into the actual database code. As I mentioned in the previous article, I chose to use Deta Space as the database provider. There are two reasons for this. The first is the ease of use and the second are its similarities to my favorite NoSQL database MongoDB.
All the database code will live in the db.py file. For the Pydantic models, I’ll use models.py.
Database Functions
The database functions are roughly divided into three parts.
We first need functionality for everything related to users.
Next, we need to code that handles everything related to adding and managing friends.
The third part applies to all the code for managing thoughts. Thoughts are Peerbrain’s equal of messages/tweets.
The file will also contain some helper functions to aid with managing the public keys of users. I’ll go into a lot more detail on this in the article about encryption.
To set up our db.py file we first need to import everything needed. As before, I’ll show the entire list and then explain what everything does once we write code that uses it.
"""This file will contain all the database logic for our server module. It will leverage the Deta Base NoSQL database api.""" from datetime import datetime

import math

from typing import Union

import os

import logging

from pprint import pprint #pylint: disable=unused-import

from uuid import uuid4

from deta import Deta

from dotenv import load_dotenv

from passlib.context import CryptContext
The #pylint comment you can see above is used to make sure pylint skips this import. I use pprint for displaying dictionaries in a readable way when testing. As I don’t use it anywhere in the actual code, pylint would start to fuss otherwise.
Tip: For those interested, pylint is a great tool to check your code for consistency, errors and, code style. It is static, so it can’t detect errors occurring at runtime. I like it even so.
After having imported everything, I first initialize the database. The load_dotenv() below, first will load all my environment variables from the .env file.
Once the variables are accessible, I can use the Deta API key to initialize Deta. Creating Bases in Deta is as easy as defining them with deta.Base. I can now call the variable names to perform CRUD operations when needed.
Generate Password Hash
The next part is very important. It will generate our password hash so the password is never readable. Even if someone has control of the database itself, they will not be able to use it. Cryptcontext itself is part of the passlib library. This library can hash passwords in multiple ways..
#---PW ENCRYPT INIT---#

pwd_context = CryptContext(schemes =["bcrypt"], deprecated="auto")

#---#

def gen_pw_hash(pw:str)->str: """Function that will use the CryptContext module to generate and return a hashed version of our password""" return pwd_context.hash(pw)
User Functions
The first function of the user functions is the easiest. It uses Deta’s fetch method to retrieve all objects from a certain Base, deta.users, in our case.
#---USER FUNCTIONS---#

def get_users() -> dict: """Function to return all users from our database""" try: return {user["username"]: user for user in USERS.fetch().items} except Exception as e: # Log the error or handle it appropriately print(f"Error fetching users: {e}") return {}
The fact that the function returns the found users as a dictionary makes them easy to use with FastAPI. As we contact a database in this function and all the others in this block, a try–except block is necessary.
The next two functions are doing the same thing but with different parameters. They accept either a username or an email.
I am aware that these two could be combined into a single function with an if-statement. I still do prefer the two separate functions, as I find them easier to use. Another argument I will make is also that the email search function is primarily an end user function. I plan to use searching by username in the background as a helper function for other functionality.
def get_user_by_username(username:str)->Union[dict, None]: """Function that returns a User object if it is in the database. If not it returns a JSON object with the message no user exists for that username""" try: if (USERS.fetch({"username" : username}).items) == []: return {"Username" : "No user with username found"} else: return USERS.fetch({"username" : username}).items[0] except Exception as error_message: logging.exception(error_message) return None def get_user_by_email(email:str)->Union[dict, None]: """Function that returns a User object if it is in the database. If not it returns a JSON object with the message no user exists for that email address""" try: if (USERS.fetch({"email" : email}).items) == []: return {"Email" : "No user with email found"} else: return USERS.fetch({"email" : email}).items[0] except Exception as error_message: logging.exception(error_message) return None
The functions above both take a parameter that they use to filter the fetch request to the Deta Base users.
If that filtering results in an empty list a proper message is returned. If the returned list is not empty, we use the .items method on the fetch object and return the first item of that list. In both cases, this will be theuser object that contains the query string (email or username).
The entire sequence is run inside a try-except block as we are trying to contact a database.
Reset User Password
When working with user creation and databases, a function to reset a user’s password is required. The next function will take care of that.
def change_password(username, pw_to_hash): """Function that takes a username and a password in plaintext. It will then hash that password> After that it creates a dictionary and tries to match the username to users in the database. If successful it overwrites the previous password hash. If not it returns a JSON message stating no user could be found for the username provided.""" hashed_pw = gen_pw_hash(pw_to_hash) update= {"hashed_pw": hashed_pw } try: user = get_user_by_username(username) user_key = user["key"] if not username in get_users(): return {"Username" : "Not Found"} else: return USERS.update(update, user_key), f"User {username} password changed!" except Exception as error_message: logging.exception(error_message) return None
This function will take a username and a new password. It will first hash that password and then create a dictionary. Updates to a Deta Base are always performed by calling the update method with a dictionary. As in the previous functions, we always check if the username in question exists before calling the update. Also, don’t forget the try-except block!
Create User
The last function is our most important one :-). You can’t perform any operations on user objects if you have no way to create them! Take a look below to check out how we’ll handle that.
def create_user(username:str, email:str, pw_to_hash:str)->None: """Function to create a new user. It takes three strings and inputs these into the new_user dictionary. The function then attempts to put this dictionary in the database""" new_user = {"username" : username, "key" : str(uuid4()), "hashed_pw" : gen_pw_hash(pw_to_hash), "email" : email, "friends" : [], "disabled" : False} try: return USERS.put(new_user) except Exception as error_message: logging.exception(error_message) return None
The user creation function will take a username, email, and password for now. It will probably become more complex in the future, but it serves our purposes for now. Like the Deta update method, creating a new item in the database requires a dictionary. Some of the necessary attributes for the dictionary are generated inside the function.
The key needs to be unique, so we use Python’s uuid4 module. The friend’s attribute will contain the usernames of other users but starts as an empty list. The disabled attribute, finally, is set to false.
After finishing the initialization, creating the object is a matter of calling the Deta put method. I hear some of you thinking that we don’t do any checks if the username or email already exists in the database. You are right, but I will perform these checks on the endpoint receiving the post request for user creation.
Some Coding Thoughts and Learnings
GitHub Join the open-source PeerBrain development community!
One thing that never ceases to amaze me is the amount of documentation I like to add. I do this first in the form of docstrings as it helps me keep track of what function does what. I find it boring most of the time, but in the end, it helps a lot!
The other part of documenting that I like is type hints. I admit they sometimes confuse me still, but I can see the merit they have when an application keeps growing.
We will handle the rest of the database function in the next article. See you there!
Participate in Building the Decentralized Social Brain Network
As before, I state that I am completely self-taught. This means I’ll make mistakes. If you spot them, please post them on Discord so I can remedy them .
As always, feel free to ask me questions or pass suggestions! And check out the GitHub repository for participation!
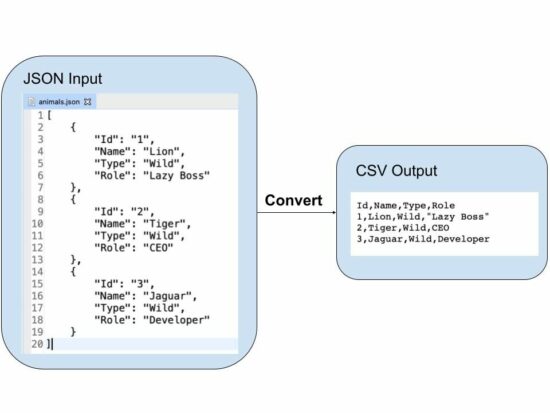
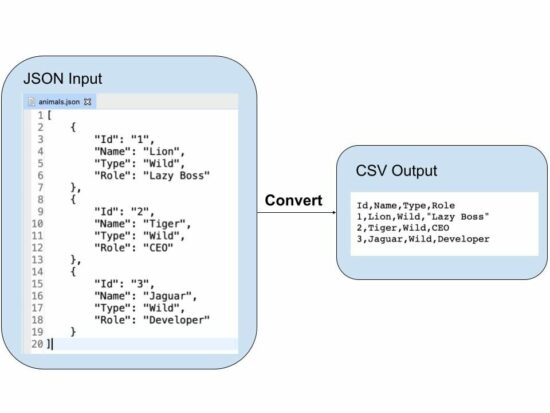
Note: The input JSON must be a one-dimensional associative array to get a better output.
JSON string to CSV in PHP
This example has a different approach to dealing with PHP JSON to CSV conversion.
It uses a JSON string as its input instead of reading a file. The JSON string input is initiated in a PHP variable and passed to the convertJSONtoCSV() function.
It reads the JSON string and converts it into a JSON array to prepare CSV. The linked article has an example of reading CSV using PHP.
Then, it iterates the JSON array and applies PHP fputcsv() to write the CSV row.
It reads the array_keys to supply the CSV header. And this will be executed only for the first time. It writes the column names as the first row of the output CSV.
This example is to perform the JSON to CSV with a file upload option.
This code will be helpful if you want to convert the uploaded JSON file into a CSV.
It shows an HTML form with a file input field. This field will accept only ‘.json’ files. The restriction is managed with the HTML ‘accept’ attribute. It can also be validated with a server-side file validation script in PHP.
The $_FILES[‘csv-file’][‘tmp_name’] contains the posted CSV file content. The JSON to CSV conversion script uses the uploaded file content.
Then, it parses the JSON and converts it into CSV. Once converted, the link will be shown to the browser to download the file.
For the newcomers, Blockstorm is a fast-paced game that combines the classic elements of first-person shooters with the endless creativity of sandbox games. With an extensive collection of customizable weapons, maps, and game modes, Blockstorm offers endless hours of fun and excitement for both you and your friends.
From today onwards, players can download and play Blockstorm for free on Steam. This means that everyone can now experience the adrenaline rush of shooting and building their way through the game's dynamic levels without having to pay a penny.
Why go free to play?
We want to thank our dedicated community of players for their support and feedback over the years. We hope that going free-to-play, our gift to all of our loyal fans and involved community, will encourage even more players to join the Blockstorm community and enjoy the game.
So, what are you waiting for? Download Blockstorm for free on Steam today and start building, fighting, and creating your own adventure. We can't wait to see you on the battlefield! https://store.steampowered.com/app/1874190/Vorax/ And since we are on the topic of passion projects, our latest one is called Vorax. It’s an Open World Survival Horror game. Feel free to check it out, try it and even maybe wishlist it to stay updated on its release.
Grim Guardians: Demon Purge centers around two demon hunters who return to their school after a mission only to find a demonic castle where it once stood.
Players control both of the demon hunting sisters in this 2D side-scrolling action game. Players must master each of the sisters' unique abilities and attributes to overcome the challenging stages with bosses awaiting their arrival. They'll also be able to find new routes through each stage using the two characters' abilities, keeping play throughs fresh.
Other features include two-player co-op with special actions, extensive difficulty options with the "Style System," unique changes on repeat plays, and most importantly the quality and challenge players have come to expect from Inti Creates titles, this time with a new gothic horror aesthetic.



 Note:
Note: 
 Reminder: Global variables and functions can be accessed and modified by any contract or function that has access to them. We can find this behavior useful for sharing data across contracts or functions, but it can also present security risks if the global variables or functions are not properly protected.
 Warning: We should be aware that contract-level variables and functions are only accessible from within the contract in which they are defined. They cannot be accessed from other contracts or from external accounts.


 Prev Tutorial
 Syllabus
 Next Tutorial
 .
.