Sandwiched between two great powers, the city of Crossbel is the place where the Uroboros group carry out their biggest and darkest schemes. A mysterious drug is spreading its poison across the city, the mafia and the mercenary groups seem to have a role in the crimes. Add a break down to the political order to the mix, and you have complete chaos in your hands. The world becomes more real and the battles become more dangerous in Ao no Kiseki. Feel the rain patter on your skin and enemies creep up to you in the dark.
Posted by: xSicKxBot - 03-12-2023, 05:27 AM - Forum: Python
- No Replies
PIP Install Django – A Helpful Illustrated Guide
5/5 – (1 vote)
As a Python developer, I love using Django for web development. Its built-in features and clear code structure make building scalable and robust web applications fast and efficient. In fact, I used Django to build my own web app for Python testing and training.
Here’s how you can install Django:
pip install django
Alternatively, you may use any of the following commands to install django, depending on your concrete environment. One is likely to work!
If you have only one version of Python installed: pip install djangoIf you have Python 3 (and, possibly, other versions) installed: pip3 install djangoIf you don't have PIP or it doesn't work python -m pip install django
python3 -m pip install djangoIf you have Linux and you need to fix permissions (any one): sudo pip3 install django
pip3 install django--userIf you have Linux with apt sudo apt install djangoIf you have Windows and you have set up the py alias py -m pip install djangoIf you have Anaconda conda install -c anaconda djangoIf you have Jupyter Notebook !pip install django !pip3 install django
Let’s dive into the installation guides for the different operating systems and environments!
How to Install Django on Windows?
To install the updated Django framework on your Windows machine, run the following code in your command line or Powershell:
I really think not enough coders have a solid understanding of PowerShell. If this is you, feel free to check out the following tutorials on the Finxter blog.
The simplest way to install Django in PyCharm is to open the terminal tab and run the pip install django command.
This is shown in the following code:
pip install django
Here’s a screenshot of the two steps:
Open Terminal tab in Pycharm
Run pip install django in the terminal to install Django in a virtual environment.
As an alternative, you can also search for Django in the package manager.
However, this is usually an inferior way to install packages because it involves more steps.
How to Install Django in Anaconda?
You can install the Django package with Conda using the command conda install -c anaconda django in your shell or terminal.
Like so:
conda install -c anaconda django
This assumes you’ve already installed conda on your computer. If you haven’t check out the installation steps on the official page.
How to Install Django in VSCode?
You can install Django in VSCode by using the same command pip install django in your Visual Studio Code shell or terminal.
pip install django
If this doesn’t work — it may raise a No module named 'django' error — chances are that you’ve installed it for the wrong Python version on your system.
To check which version your VS Code environment uses, run these two commands in your Python program to check the version that executes it:
import sys

print(sys.executable)
The output will be the path to the Python installation that runs the code in VS Code.
Now, you can use this path to install Django, particularly for that Python version:
/path/to/vscode/python -m pip install django
Wait until the installation is complete and run your code using django again. It should work now!
Learning is a continuous process and you’d be wise to never stop learning and improving throughout your life.
What to learn? Your subconsciousness often knows better than your conscious mind what skills you need to reach the next level of success.
I recommend you read at least one tutorial per day (only 5 minutes per tutorial is enough) to make sure you never stop learning!
If you want to make sure you don’t forget your habit, feel free to join our free email academy for weekly fresh tutorials and learning reminders in your INBOX.
Also, skim the following list of tutorials and open 3 interesting ones in a new browser tab to start your new — or continue with your existing — learning habit today!
Piano bridges, dancing plants and musical showdowns, ready to dive into The Mind? Nightmares have shattered the Moral Compass, making The Mind unable to function properly. Dusty and his ever-optimistic sidekick, Piper, must travel to Creed Valley, where The Mind's ideals are formed to restore peace.
Figment 2: Creed Valley is an action-adventure game set in the human mind. Nightmares are spreading chaos and have overrun once-peaceful lands. Join Dusty, The Mind's courage, as you make your way through puzzles, musical boss fights and unique environments.
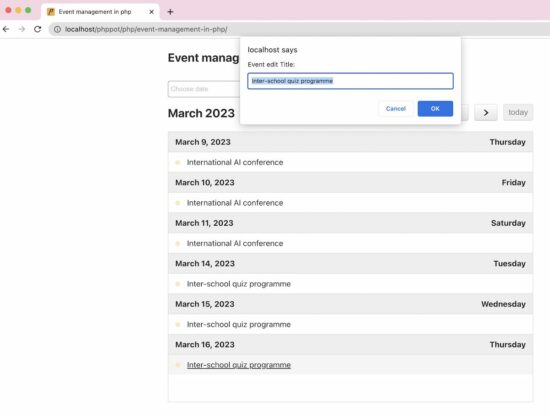
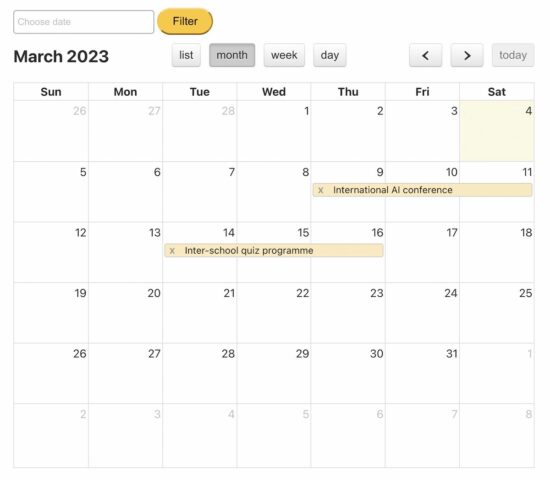
When managing events, the date and time come into the picture. So, the calendar component is the best to render events in a viewport. It is convenient compared to other views like card-view or list-view.
This example uses the JavaScript library FullCalendar to render and manage events. The events are from the database by using PHP and MySQL.
The following script gives you a simple event management system in PHP with AJAX. The AJAX handlers connect the PHP endpoint to manage events with the database.
This example creates a persistent event management system in PHP. The newly created or modified event data are permanently stored in the database.
This script has the CREATE STATEMENT and indexes of the tbl_events database. Do the following steps to set up this database in a development environment.
Create a database and import the below SQL script into it.
Configure the newly created database in config/db.php of this project.
Database script
sql/structure.sql
--

-- Database: `full_calendar`

-- -- -------------------------------------------------------- --

-- Table structure for table `tbl_events`

-- CREATE TABLE `tbl_events` ( `id` int(11) NOT NULL, `title` varchar(255) CHARACTER SET utf8 COLLATE utf8_bin DEFAULT NULL, `start` date DEFAULT NULL, `end` date DEFAULT NULL

) ENGINE=InnoDB DEFAULT CHARSET=latin1; --

-- Indexes for dumped tables

-- --

-- Indexes for table `tbl_events`

--

ALTER TABLE `tbl_events` ADD PRIMARY KEY (`id`); --

-- AUTO_INCREMENT for dumped tables

-- --

-- AUTO_INCREMENT for table `tbl_events`

--

ALTER TABLE `tbl_events` MODIFY `id` int(11) NOT NULL AUTO_INCREMENT;
Database configuration
db.php
<?php

$conn = mysqli_connect("localhost", "root", "", "full_calendar"); if (! $conn) { echo "Failed to connect to MySQL: " . mysqli_connect_error();

}

?>
Step 3: Initiate Fullcalendar and create listeners to manage events
This section initiates the JavaScript calendar library with suitable settings. For example, the below script enables the following directives to allow mouse events to make changes in the calendar.
editable – It will enable event editing on the calendar by switching it on.
droppable – It supports event drag and drops to change the date.
eventResize – It supports inline extending or reducing the event period by resizing.
eventLimit – It allows limiting the number of events displayed on a date instance.
displayEventTime – It shows event time if added.
The Fullcalendar property “events” specifies the array of events rendered download. In this example, it has the PHP endpoint URL to read calendar events dynamically from the database.
This script maps the calendar event’s select, drag, drop, and resize with the defined AJAX handlers.
$(document).ready(function() { var calendar = $('#calendar').fullCalendar({ editable: true, eventLimit: true, droppable: true, eventColor: "#fee9be", eventTextColor: "#232323", eventBorderColor: "#CCC", eventResize: true, header: { right: 'prev, next today', left: 'title', center: 'listMonth, month, basicWeek, basicDay' }, events: "ajax-endpoint/fetch-calendar.php", displayEventTime: false, eventRender: function(event, element) { element.find(".fc-content").prepend("<span class='btn-event-delete'>X</span>"); element.find("span.btn-event-delete").on("click", function() { if (confirm("Are you sure want to delete the event?")) { deleteEvent(event); } }); }, selectable: true, selectHelper: true, select: function(start, end, allDay) { var title = prompt('Event Title:'); if (title) { var start = $.fullCalendar.formatDate(start, "Y-MM-DD HH:mm:ss"); var end = $.fullCalendar.formatDate(end, "Y-MM-DD HH:mm:ss"); addEvent(title, start, end); calendar.fullCalendar('renderEvent', { title: title, start: start, end: end, allDay: allDay }, true ); } calendar.fullCalendar('unselect'); }, eventClick: function(event) { var title = prompt('Event edit Title:', event.title); if (title) { var start = $.fullCalendar.formatDate(event.start, "Y-MM-DD HH:mm:ss"); var end = $.fullCalendar.formatDate(event.end, "Y-MM-DD HH:mm:ss"); editEvent(title, start, end, event); } }, eventDrop: function(event) { var title = event.title; if (title) { var start = $.fullCalendar.formatDate(event.start, "Y-MM-DD HH:mm:ss"); var end = $.fullCalendar.formatDate(event.end, "Y-MM-DD HH:mm:ss"); editEvent(title, start, end, event); } }, eventResize: function(event) { var title = event.title; if (title) { var start = $.fullCalendar.formatDate(event.start, "Y-MM-DD HH:mm:ss"); var end = $.fullCalendar.formatDate(event.end, "Y-MM-DD HH:mm:ss"); editEvent(title, start, end, event); } } }); $("#filter").datepicker();

});

function addEvent(title, start, end) { $.ajax({ url: 'ajax-endpoint/add-calendar.php', data: 'title=' + title + '&start=' + start + '&end=' + end, type: "POST", success: function(data) { displayMessage("Added Successfully"); } });

} function editEvent(title, start, end, event) { $.ajax({ url: 'ajax-endpoint/edit-calendar.php', data: 'title=' + title + '&start=' + start + '&end=' + end + '&id=' + event.id, type: "POST", success: function() { displayMessage("Updated Successfully"); } });

} function deleteEvent(event) { $('#calendar').fullCalendar('removeEvents', event._id); $.ajax({ type: "POST", url: "ajax-endpoint/delete-calendar.php", data: "&id=" + event.id, success: function(response) { if (parseInt(response) > 0) { $('#calendar').fullCalendar('removeEvents', event.id); displayMessage("Deleted Successfully"); } } });

}

function displayMessage(message) { $(".response").html("<div class='success'>" + message + "</div>"); setInterval(function() { $(".success").fadeOut(); }, 5000);

} function filterEvent() { var filterVal = $("#filter").val(); if (filterVal) { $('#calendar').fullCalendar('gotoDate', filterVal); $("#filter").val(""); }

}
Step 4: Create AJAX endpoints to create, render and manage event data
This section shows the PHP code for the AJAX endpoint. The Fullcalendar callback handlers call these endpoints via AJAX.
This endpoint receives the event title, start date, and end date. It processes the requested database operation using the received parameters.
ajax-endpoint/fetch-calendar.php
<?php

require_once "../config/db.php"; $json = array();

$sql = "SELECT * FROM tbl_events ORDER BY id"; $statement = $conn->prepare($sql);

$statement->execute();

$dbResult = $statement->get_result(); $eventArray = array();

while ($row = mysqli_fetch_assoc($dbResult)) { array_push($eventArray, $row);

}

mysqli_free_result($dbResult); mysqli_close($conn);

echo json_encode($eventArray);

?>
[www.indiegala.com] [www.indiegala.com] This month, celebrate one of the most beautiful & revered groups from our planet: the ladies. Show your appreciation and respect this March, and grab a bundle with one strong focal point: your heart.
Fatal Frame (aka Project Zero): Mask of the Lunar Eclipse takes place a decade after five girls mysteriously disappeared at a festival on Rogetsu Isle, an island in southern Japan. While all of the girls were eventually rescued, their memories were lost, with only the faint remembrance of a single melody and a seemingly possessed masked woman dancing in the moonlight.
Now, ten years later, with still no memory of the events surrounding their disappearance, two of the five girls have died - discovered with covered faces and found in a tragic, crying pose. The remaining three girls now head off to the eerie island to solve the mystery of their friends' death, while also unlocking the mystery of the memories left behind.
The remastered game features an all-new Photo Mode, along with new and altered costumes, and enhanced graphics including the improved rendering of shadows and light, delivering a more immersive and frightening experience. In addition, in-game movies and character models have been brushed-up to deliver a story that shines, both narratively and aesthetically as the three remaining girls attempt to rediscover their past before becoming victims once again.
I Created My First DALL·E Image in Python OpenAI Using Four Easy Steps
5/5 – (1 vote)
I have a problem. I’m addicted to OpenAI. Every day I find new exciting ways to use it. It’s like somebody gave me a magic stick and I use it for stupid things like cleaning the kitchen. But I cannot help it! So, how to create images with OpenAI in Python? Easy, follow these four steps!
Step 1: Install the OpenAI Python Library
The first step to using OpenAI’s DALL·E in Python is to install the OpenAI Python library. You can do this using pip, a package manager for Python.
Open your terminal and enter the following command:
pip install openai
I have written a whole tutorial on this topic in case this doesn’t work instantly.
OpenAI is not free for coders — but it’s almost free. I only pay a fraction of a cent for a request, so no need to be cheap here.
Visit the page https://platform.openai.com/account/api-keys and create a new OpenAI key you can use in your code. Copy&paste the API key because you’ll need it in your coding project!
Step 3: Authenticate with OpenAI API Key
Next, you’ll need to authenticate with OpenAI’s API key. You can do this by importing the openai_secret_manager module and calling the get_secret() function. This function will retrieve your OpenAI API key from a secure location, and you can use it to authenticate your API requests.
import openai_secret_manager

import openai secrets = openai_secret_manager.get_secret("openai") # Authenticate with OpenAI API Key

openai.api_key = secrets["api_key"]
If this sounds too complex, you can also use the following easier code in your code script to try it out:
import openai # Authenticate with OpenAI API Key

openai.api_key = 'sk-...'
The disadvantage is that the secret API key is plainly visible to anybody with access to your code file. Never load this code file into a repository such as GitHub!
Step 4: Generate Your DALL·E Image
Now that you’re authenticated with OpenAI, you can generate your first DALL·E image. To do this, call the openai.Image.create() function, passing in the model name, prompt, and size of the image you want to create.
import openai # Authenticate with OpenAI API Key

openai.api_key = 'sk-...' # Generate images using DALL-E

response = openai.Image.create( model="image-alpha-001", prompt="a coder learning with Finxter", size="512x512"

) print(response.data[0]['url'])
In the code above, we specified the DALL·E model we wanted to use (image-alpha-001), provided a prompt for the image we wanted to create (a coder learning with Finxter), and specified the size of the image we wanted to create (512x512).
"a coder learning with Finxter"
Once you’ve generated your image, you can retrieve the image URL from the API response and display it in your Python code or in a web browser.
print(response.data[0]['url'])
Conclusion
Using OpenAI’s DALL·E to generate images is a powerful tool that can be used in various applications. So exciting!
With just a few lines of Python code, you can create unique images that match specific text descriptions. By following the four easy steps outlined in this article, you can get started generating your own DALL·E images today.
[freebies.indiegala.com] Daphne, the protagonist from our own game, Die Young, is a strong woman. Firstly, Daphne is incredibly resourceful, and she uses her wits and survival skills to navigate the dangerous environment. She must climb, jump, and run her way through obstacles, all while avoiding deadly traps and enemies. Daphne’s ability to adapt to new situations and find solutions to problems makes her a formidable opponent.
From her resourcefulness and adaptability, to her physical strength and emotional resilience, Daphne is a powerful example of what it means to be a strong and capable woman in today’s world. And, that’s why, in her honor and the amazing ladies on this planet, we are offering for FREE for a limited time only Die Young from our website. Feel free to wishlist it on Steam too. https://store.steampowered.com/app/433170/Die_Young/
Shogo Okiie, an ordinary office worker, visits Kinshibori Park in the dead of night with his friend, Yoko Fukunaga, to investigate a well-known local ghost story: The Seven Mysteries of Honjo. Shogo doesn't quite believe Yoko when she talks about how the Mysteries are connected to the Rite of Resurrection and doesn't pay it much mind - that is, until strange events begin to unfold before his very eyes.
Meanwhile, several others are making their own investigations into The Seven Mysteries...
Detectives investigating a series of strange deaths, a high-school girl seeking the truth behind her classmate's suicide, and a mother who has sworn revenge for her lost son.
Their desires and motives intertwine and interplay, with the Seven Mysteries of Honjo at the core, leading the story towards a battle of wits and curses.



 If you have only one version of Python installed:


 Recommended: