Create an account


Welcome, Guest
You have to register before you can post on our site.

Username
  

Password


Search Forums

(Advanced Search)

Forum Statistics
» Members: 20,114
» Latest member: gfhfhfh
» Forum threads: 21,715
» Forum posts: 22,581

Full Statistics

Online Users
There are currently 502 online users.
» 0 Member(s) | 497 Guest(s)
Applebot, Baidu, Bing, Google, Yandex

 
  [Oracle Blog] Solving modern application development challenges with Java
Posted by: xSicKxBot - 01-19-2023, 01:30 AM - Forum: Java Language, JVM, and the JRE - No Replies

Solving modern application development challenges with Java

Organizations are modernizing their business applications to remain competitive in today’s digital economy. To keep up, developers need tools that ensure business applications are portable, adaptable, and perform as expected. Read and find out how Java helps organizations meet the challenges faced when modernizing business applications for today’s business needs.


https://blogs.oracle.com/java/post/solvi...-with-java

Print this item

  News - Fortnite Falcon Scout Explained And How To Get It
Posted by: xSicKxBot - 01-19-2023, 01:29 AM - Forum: Lounge - No Replies

Fortnite Falcon Scout Explained And How To Get It

Fortnite Chapter 4 Season 1 is littered with creative items that have quickly become fan favorites, so it stands to reason that Epic would want to continue pumping out more exciting ways to keep players engaged. And with the brand-new Falcon Scout item, it has added a whole new layer to recon, combat, and looting all at once. Read on to find out about this remotely controlled "caw" machine.

How to get Falcon Scouts in Fortnite and how they work

Falcon Scouts have unlimited uses and can be found on the ground, in chests, or in supply drops. But if you're really desperate to find one, you're likely to have the best luck with getting them to pop out of Oathbound Chests. These large, white chests can be found in the medieval sections of the map in the west and southeast, which are characterized by an autumn vibe with colorful, fallen leaves and old-timey structures.

You can use Falcon Scouts to pick up loot and bring it back to you.

Once you've obtained a Falcon Scout, you can equip it and use the fire button to deploy the mechanical bird into the sky. Your view will shift to behind the falcon, granting you full control of where it goes. While in this mode, you can fly around to open containers, pick up loot, or even grab a downed teammate and fly them to safety--or just snag their reboot card, if they're already eliminated. Additionally, you can provide recon to your team by pinging locations or "cawing" to ping all nearby enemies in a certain radius.

Continue Reading at GameSpot

https://www.gamespot.com/articles/fortni...01-10abi2f

Print this item

  PC - River City Girls 2
Posted by: xSicKxBot - 01-19-2023, 01:29 AM - Forum: New Game Releases - No Replies

River City Girls 2


The River City Girls are ready for round 2! When an old foe resurfaces, Misako, Kyoko, Kunio, and Riki - joined by newcomers Marian and Provie - hit the streets for an all-new beat-'em-up adventure packed with new abilities, enemies, environments, and more!

Team up for local or online co-op, then pound punks into the dirt with brand-new guard-crush attacks, lift-off combos, double-team maneuvers, and other knuckle-busting techniques!

Level-up to earn new moves, buy items and accessories in more than 30 shops, and recruit defeated foes and hired heavies to help you on your way!

River City is bigger than ever, with more locations to explore, more objects to destroy, and a day-night cycle! With nonlinear gameplay, a dynamic story system, and another epic soundtrack by Megan McDuffee, River City Girls 2 will keep you brawling until all your enemies yell "BARF!"

Publisher: Arc System Works

Release Date: Dec 14, 2022


https://www.metacritic.com/game/pc/river-city-girls-2

Print this item

  [Oracle Blog] JDK 16.0.2, 11.0.12, 8u301, and 7u311 Have Been Released!
Posted by: xSicKxBot - 01-18-2023, 03:08 AM - Forum: Java Language, JVM, and the JRE - No Replies

JDK 16.0.2, 11.0.12, 8u301, and 7u311 Have Been Released!

The Java SE 16.0.2, 11.0.12, 8u301, and 7u311 update releases are now available. You can download these latest JDK releases from the Java SE Downloads page. OpenJDK 16.0.2 is also available on http://jdk.java.net/16/. New Features, Changes, and Notable Bug Fixes For information about the new feature...


https://blogs.oracle.com/java/post/jdk-1...n-released

Print this item

  [Tut] Bitcoin – Trading Moving Averages or HODL? A Python Script Uncovers the Answer!
Posted by: xSicKxBot - 01-18-2023, 03:08 AM - Forum: Python - No Replies

Bitcoin – Trading Moving Averages or HODL? A Python Script Uncovers the Answer!

5/5 – (1 vote)

I’ve always wondered if a slow and high-level trading strategy focusing on long-term trends could outperform a buy-and-hold strategy.

To answer this question, I created a Python script that would utilize a momentum-based strategy to tell me when to buy and when to sell Bitcoin.

Despite my busy life and doubts that day trading would be a successful venture, I was eager to find out if this simple program could beat the market. I can run the Python code daily to decide whether to buy or sell BTC.

What would have happened if I had used the following strategy between the turbulent years 2020 and 2022 in Bitcoin? Read on to find out! ?

General Idea


The idea of this algorithm is to allow traders to automate their Bitcoin trading decisions using two moving averages.

? Finxter Academy: Complete Python Trading Course (Binance) — Simple Moving Average

The algorithm will enter buy positions when the shorter-term moving average (MA1) is higher than the longer-term moving average (MA2) indicating a positive momentum of the Bitcoin price, and enter sell positions when the shorter-term moving average is lower than the longer-term moving average indicating a negative momentum of the Bitcoin price.

When the moving averages cross, the algorithm will close any existing positions and reverse the trading direction.

Algorithm Steps


My strategy follows these simple steps:

  1. Initialize two moving averages, MA1 and MA2, with different lookback periods.
  2. Calculate the current value of each moving average.
  3. If MA1 > MA2, enter a buy position in the Bitcoin market.
  4. If MA1 < MA2, enter a sell position in the Bitcoin market.
  5. Monitor the market for any changes in the moving averages.
  6. When the moving averages cross, close any existing positions and reverse the trading direction (buy if previously selling, sell if previously buying).
  7. Repeat steps 2 to 6.

Python Program to Automate It


The following program implements these steps in practice by pulling the Bitcoin price data from an online API, calculating the moving averages (short- and long-term), and trading based on whether the short-term MA is below or above the long-term MA.

I’ll explain the code in a minute!

import pandas as pd
import numpy as np
import matplotlib.pyplot as plt
import requests # Get Bitcoin Price Data
URL = 'https://www.alphavantage.co/query?function=DIGITAL_CURRENCY_DAILY&symbol=BTC&market=USD&apikey=APIKEY'
response = requests.get(URL) data = response.json() daily_data = data["Time Series (Digital Currency Daily)"] # Convert JSON to DataFrame
df = pd.DataFrame(daily_data)
df = df.T # Create two Moving Averages
MA1 = 20
MA2 = 50
df['MA1'] = df['1a. open (USD)'].rolling(MA1).mean()
df['MA2'] = df['1a. open (USD)'].rolling(MA2).mean() # Initialize variables
position = 0
my_usd = 10000
my_btc = 0 print('Initial balance:', str(my_usd), 'USD') # Backtest Algorithm
for i in range(len(df)): # Get price price = float(df['1a. open (USD)'].iloc[i]) # Buy position if df['MA1'].iloc[i] > df['MA2'].iloc[i] and position == 0: position = 1 my_btc = price / my_usd my_usd = 0 print('Buying at', price, 'on', df.index[i]) # Sell position elif df['MA1'].iloc[i] < df['MA2'].iloc[i] and position == 1: position = 0 my_usd = price * my_btc my_btc = 0 print('Selling at', price, 'on', df.index[i]) print('Final balance:', str(my_usd + my_btc * price)) initial_btc = float(df['1a. open (USD)'].iloc[0]) / 10000
value_today = initial_btc * float(df['1a. open (USD)'].iloc[-1])
print('Final balance (buy and hold):', str(value_today))

Code Explanation


This code implements the algorithm described above.

The first portion of the code is getting the daily Bitcoin price data from the API and converting it into a DataFrame.

Next, the code creates two moving averages, MA1 and MA2, based on the open price of Bitcoin. Then, the code initializes the position variable to 0.

The backtest algorithm then runs a loop to iterate through the DataFrame to identify when conditions are met to buy or sell. If the shorter-term MA1 is higher than the longer-term MA2, the code will enter a buy position.

Similarly, if the shorter-term MA1 is lower than the longer-term MA2, the code will enter a sell position. We don’t assume short selling so “selling” on an empty position just means waiting for the next buy opportunity.

Finally, if the MA1 and MA2 cross, the code will close any existing position and reverse the trading direction.

Backtesting the Strategy


Let’s have a look at an example run — note to read this from bottom to top! ?

Initial balance: 10000 USD
Buying at 20905.58 on 2022-11-07
Selling at 18809.13 on 2022-09-26
Buying at 21826.87 on 2022-09-12
Selling at 19331.28 on 2022-07-13
Buying at 28424.71 on 2022-06-12
Selling at 41941.7 on 2022-03-10
Buying at 42380.87 on 2022-02-07
Selling at 36660.35 on 2022-01-25
Buying at 41566.48 on 2022-01-08
Selling at 57471.35 on 2021-10-12
Buying at 47674.01 on 2021-08-25
Selling at 44572.54 on 2021-08-08
Buying at 40516.28 on 2021-06-15
Selling at 57351.56 on 2021-03-22
Buying at 57641.0 on 2021-03-19
Selling at 56900.74 on 2021-03-17
Buying at 11318.42 on 2020-08-26
Selling at 9538.1 on 2020-07-25
Buying at 9772.44 on 2020-06-10
Selling at 9315.96 on 2020-05-16
Final balance: 14806.674822101442
Final balance (buy and hold): 15095.029852800002

So, you see, in the period between May 2020 and November 2022, trading wouldn’t have been more profitable than simply buying and holding Bitcoin — even when ignoring trading fees and higher tax burden.

And ignoring the fact that Bitcoin has had huge up and down volatility, which should be great for trading. That is — in theory.

Conclusion


Buy and HODL!


https://www.sickgaming.net/blog/2023/01/...he-answer/

Print this item

  (Indie Deal) Cashback, Move or Die & Orcs Must Die!
Posted by: xSicKxBot - 01-18-2023, 03:08 AM - Forum: Deals or Specials - No Replies

Cashback, Move or Die & Orcs Must Die!

Cashback Sale is LIVE
[www.indiegala.com]
Guess who's back? Back again? Cashback's back, tell a friend.
Time is ticking, any purchase made on IndieGala, be it store deals or bundles, will be rewarding you instantly and handsomely, directly and instantly, into your IndieGala wallet.

https://www.youtube.com/watch?v=HMbCdCTE4bc
Those Awesome Guys Sale, up to 80% OFF
[www.indiegala.com]
Robot Entertainment Sale, up to 82% OFF
[www.indiegala.com]


https://steamcommunity.com/groups/indieg...2060237413

Print this item

  News - Destiny 2 Season Of The Seraph: Seasonal Challenges Guide Week 7
Posted by: xSicKxBot - 01-18-2023, 03:08 AM - Forum: Lounge - No Replies

Destiny 2 Season Of The Seraph: Seasonal Challenges Guide Week 7

As Season of the Seraph starts to wind down its main story, the weekly challenges list usually gets smaller in Destiny 2. Like previous seasons, there's only a handful of objectives to pursue in Week 7, but they're worth doing for the XP and Bright Dust that you can earn.

For your Exo Frame modules this week, you'll want to continue the seasonal storyline and grab a few games of Heist Battlegrounds. Don't forget to equip your favorite glaive, trace rifle, or linear fusion rifle for Gambit, use seasonal gear to take out enemies, and try the more competitive side of PvP to rack up some in-game currencies.

Grandmaster Nightfalls are back this week, so if you have a fireteam ready to roll, now is a good time to head into one of the more challenging PvE areas of the game.

Continue Reading at GameSpot

https://www.gamespot.com/articles/destin...01-10abi2f

Print this item

  PC - Persona 3 Portable
Posted by: xSicKxBot - 01-18-2023, 03:08 AM - Forum: New Game Releases - No Replies

Persona 3 Portable


Terrible creatures lurk in the dark, preying on those who wander into the hidden hour between one day and the next. As a member of a secret school club, you must wield your inner power--Persona--and protect humanity from impending doom. Will you live to see the light of day?

Publisher: Sega

Release Date: Jan 19, 2023


https://www.metacritic.com/game/pc/persona-3-portable

Print this item

  [Tut] How I Built a Readability and Grammar Checker App Using Streamlit
Posted by: xSicKxBot - 01-17-2023, 09:51 AM - Forum: Python - No Replies

How I Built a Readability and Grammar Checker App Using Streamlit

5/5 – (1 vote)

I will show you the steps I took to create a readability and grammar checker app using Streamlit. You can use it to improve your programming skills and add to your portfolio.

? Info: Streamlit is a popular open-source app framework among data scientists as it’s used for developing and deploying Machine Learning and Data Science web apps in minutes.

As we will see, Streamlit goes beyond turning data scripts into shareable web apps. Programmers use it to create anything within its capabilities. A quiz app, an anagram app, and a currency converter app are some of them.

Project Overview


A readability checker tool provides a quick way to assess the readability of a text and how readers can understand your work. This is especially helpful if you are writing a book or a blog and want to know where you need to work to improve readability for various audiences.

The Python ecosystem consists of third-party libraries and frameworks that support a particular application.

There’s no need to reinvent the wheel, as the heavy lifting is already done for us. Hence with a few libraries coupled with a bit of finishing touch from us, we will get our readability and grammar checker app up and running in no distant time.

Try It! You can check out my app here: click this link to view my app live on Streamlit Cloud.

Prerequisites


This tutorial assumes nothing more than a basic knowledge of Python programming, including functions, ifelse, and for loops.

? Recommended: Python Crash Course on the Finxter Blog

Although I try my best to explain the procedures, I encourage you to wrap your head around the basics because it’s not every step I have to explain. I expect you to have background knowledge already.

Importing Libraries


Before we get started, let’s import the libraries we will be using in this project.

import streamlit as st
import textstat as ts
from pdfminer.high_level import extract_text
from pdfminer.layout import LTTextContainer
from io import StringIO
import docx2txt
import requests
from bs4 import BeautifulSoup as bs
import language_tool_python

Everything above is self-explanatory. We will use textstat to check the readability of a text. We will also use io to extract text from a TXT document. The library anguage_tool_python will help us check spelling and grammar. I will explain other libraries as we proceed.

Our project is a combination of several functions and callback functions we define, which are all linked together to get the job done. So, without further ado, let’s get started.

The Main Function


Our project started with what we call the main() function which contains several options that, when selected, caused the execution of another function.

def main(): mode = st.sidebar.selectbox('Select your option', ['Text', '.pdf', '.txt', '.docx', 'Online']) # a function is called depending on the mode selected if mode == 'Text': text_result() elif mode == '.pdf': upload_pdf() elif mode == '.txt': upload_txt() elif mode == '.docx': upload_docx() else: get_url()
… if __name__ == '__main__': main()

We want to give our app users the option to select what form their document is, whether they want to copy and paste into the textbox or upload an e-book, or even select from a webpage. We call Streamlit to display these options as a sidebar.

At the very last of our script, we set the __name__ variable as __main__ , which is the main() function. This is to ensure it is running as soon as we open Streamlit, and not run when imported into another program.

? Recommended: Python __name__ == '__main__' Explained

The Textbox


If our user selects ‘Text’, the text_result() function will execute. The function calls on Streamlit to display a textbox using st.text_area labeled ‘Text Field’, and the placement stored in the text variable will appear in the textbox.

def text_result(): text = 'Your text goes here...' #displaying the textbox where texts will be written box = st.text_area('Text Field', text, height=200) scan = st.button('Scan File') # if button is pressed if scan: # display statistical results st.write('Text Statistics') st.write(readability_checker(box))

The function also calls on Streamlit to insert a button which when pressed causes Streamlit to display readability results using st.write.

The text_result() function sends your texts in the box variable to a callback function, readability_checker() function, and st.write() displays the result.

def readability_checker(w): stats = dict( flesch_reading_ease=ts.flesch_reading_ease(w), flesch_kincaid_grade=ts.flesch_kincaid_grade(w), automated_readability_index=ts.automated_readability_index(w), smog_index=ts.smog_index(w), coleman_liau_index=ts.coleman_liau_index(w), dale_chall_readability_score=ts.dale_chall_readability_score(w), linsear_write_formula=ts.linsear_write_formula(w), gunning_fog=ts.gunning_fog(w), word_count=ts.lexicon_count(w), difficult_words=ts.difficult_words(w), text_standard=ts.text_standard(w), sentence_count=ts.sentence_count(w), syllable_count=ts.syllable_count(w), reading_time=ts.reading_time(w) ) return stats

So what this text_result() does is to accept input and, when prompted, send the input to the readability_checker() function to scan and return results in the form of a dictionary.

? Recommended Tutorial: Python Dictionary – Ultimate Guide


That’s all it takes to set up our readability checker app.

Had it been we had only this option in our main function, we would have called it a day. But we want to give our users more options to make a choice. But, the more features we add, the more Python scripts we need to write to execute such features.

PDF Mode


Back to our main() function. if our users select the pdf option, the upload_pdf() function will execute.

def upload_pdf(): file = st.sidebar.file_uploader('Choose a file', type='pdf') if file is not None: pdf = extract_text(file) #sending the text to textbox document_result(pdf)

This function calls Streamlit to produce a file uploader to enable us to upload a PDF file. And when we upload the file, the extract_text() function from pdfminer does the heavy lifting for us. By default, Streamlit accepts all file extensions. By specifying the type, it allows only such.

The Setback


I wanted to make this process as seamless as possible.

What I wanted to do was to call on pdfminer library to extract the text, and send it to the readability_checker() which scans and produces the result that will appear using st.write() without ever seeing the content of the file.

I wasn’t able to do so. Hence, I will appreciate anyone who can reach out to me with a solution to this problem.

A Workaround


I wasn’t deterred, though.

Since there are so many ways to kill a rat, I found a workaround with a little help from Streamlit. I benefited from Streamlit’s ability to display text as a placement in a textbox, as seen in our text_result() function.

So, I created a function like text_result() but with a parameter that will collect the very text extracted from the PDF file and have it displayed in the textbox.


Give me a round of applause. That’s my feat of engineering! Alright, let’s implement it.

def document_result(file): #displaying the textbox where texts will be written box = st.text_area('Text Field', file, height=200) scan = st.button('Scan Text') # if button is pressed if scan: # display statistical results st.write('Text Statistics) st.write(readability_checker(box))

Make sure you are using the latest version of pdfminer installed using PIP as ‘pip install pdfminer.six’.

Alright, we have passed that setback but have our PDF displayed inside the textbox, which is not bad after all.

The only downside comes from the pdfminer library. It takes time to process bulky files. You may want to try other libraries in your project.

When users choose other options in our main() function, the respective functions get executed in the same way using the libraries imported and send to the document_result() function, which, in turn, passes the file to the readability_checker() to scan. Finally, it displays the result.

You may want to check the documentation to know more about the imported libraries that help to extract the files.

The ‘Online’ Option


This option allows our users to check the readability of content found on web pages.

def get_url(): url = st.sidebar.text_input("Paste your url") if url: get_data(url)

As usual, when we select the option, it triggers the execution of the get_url() function.

The get_url() function uses st.sidebar.text_input to provide a small-size box where you can paste your URL. Once you hit the Enter key, it sends the URL to the get_data() function.

def get_data(url): page = requests.get(url) if page.status_code != 200: print('Error fetching page') exit() else: content = page.content soup = bs(content, 'html.parser') document_result(soup.get_text())

What the get_data() function is doing is web scraping.

It requests to get the content of the URL.

? Recommended Tutorial: How to Get the URL Content in Python

If it is successful, it returns the content of the web page. The function then calls the BeautifulSoup library to parse the content in pure HTML form.

Using the get_text() method from BeautifulSoup, the get_data() extracts the content without any HTML tags and sends it to the document_result() function which I have explained before.

The downside of using this option is that it scrapes whatever it sees on the webpage, navigation bar, header, footer, and comments that may not be relevant for readability checking

Grammar Checker


If you have been following along, you will notice, from the above image, another button besides the readability checker button.

That is our grammar checker button. Alright, let me show you how I did it.

I erased it from the Python scripts above, so we can focus on one thing at a time. The below script is now our updated test_result() function.

def text_result(): text = 'Your text goes here...' box = st.text_area('Text Field', text, height=200) left, right = st.columns([5, 1]) scan = left.button('Check Readability') grammar = right.button('Check Gramamar') # if button is pressed if scan: # display statistical results st.write('Text Statistics') st.write(readability_checker(box)) elif grammar: st.write(grammar_checker(box))

Streamlit’s columns() method enables us to display our buttons side by side.

By passing it a list of [5, 1], we specify the position we want the buttons to appear. Also, notice how we used left.button() instead of st.button(). This is because we want to apply the buttons to the position we have specified using the st.columns.

The if statement makes the app look flexible and neat. If we press the grammar checker button, it erases the readability result if it is already there, so it can display the grammar result.

Let us also update the document_result() function.

def document_result(file): box = st.text_area('Text Field', file, height=200) left, right = st.columns([3, .75]) with left: scan = st.button('Check Readability') with right: grammar = st.button('Check Gramamar') # if button is pressed if scan: # display statistical results st.write('Text Statistics') st.write(readability_checker(box)) elif grammar: st.write(grammar_checker(box))

Again, notice another way we use the st.columns to achieve the same result. The ‘with’ notation inserts any element in a specified position. Then comes the grammar_checker() function.

def grammar_checker(text): tool = language_tool_python.LanguageTool('en-US', config={'maxSpellingSuggestions': 1}) check = tool.check(text) result = [] for i in check: result.append(i) result.append(f'Error in text => {text[i.offset : i.offset + i.errorLength]}') result.append(f'Can be replaced with => {i.replacements}') result.append('--------------------------------------') return result

The LanguageTool() function checks grammatical expressions. It comes bundled in language_tool_python module but it’s also used in other programming languages.

To use it, make sure you have Java installed on your system. Once we call and save it in the tool variable, it will download everything necessary to enable your text checked for American English only. The size is 225MB excluding Java.

This is to enable you to use it offline. To use it online, please check the documentation. We added maxSpellingSuggestions to speed up the checking process, especially when dealing with millions of characters.

We appended to the ‘result’ variable to display it when called by the st.write() function. To know more about how to use the language_tool_python module, please consult the documentation.

Deployment


It would be nice to have our new app visible for others with little or no programming knowledge to see and use. Deploying the app makes that possible

If you want to deploy on Streamlit Cloud, it’s very easy. Set up a GitHub account if you have not already done so. Create and upload files to your GitHub repository.

Then, you set up a Streamlit Cloud account. Create a New App and link your GitHub account. Streamlit will do the rest.

Any changes made will reflect in the app. To avoid encountering errors while deploying your app, go to my GitHub page and observe other files I included to enable easy deployment on Streamlit Cloud.

Conclusion


This is how we come to the end of this tutorial on how I built a readability and grammar checker app using Streamlit.

I explained it in a way you can understand. You can visit my GitHub page to view the full project. Also, click this link to view my app live on Streamlit Cloud. Alright, that’s it. Go on, give it a try and create awesome apps.

References



https://www.sickgaming.net/blog/2023/01/...streamlit/

Print this item

  [Tut] phpMyAdmin – How to Export a Database?
Posted by: xSicKxBot - 01-17-2023, 09:51 AM - Forum: PHP Development - No Replies

phpMyAdmin – How to Export a Database?

by Vincy. Last modified on January 16th, 2023.

Do you want to take a backup of your database? Are you a beginner at using the phpMyAdmin application?

This article will guide you with straightforward bullet points to achieve this.

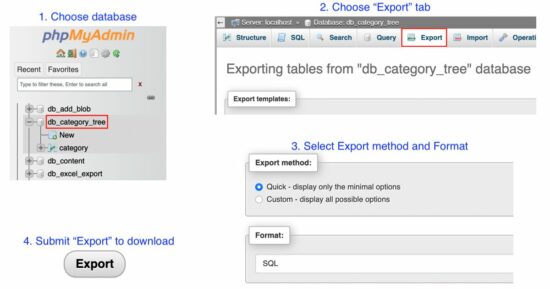
The phpMyAdmin provides an “Export” operation to take a backup with a few clicks.

How to export databases and tables using phpMyAdmin?


  1. Log in to the phpMyAdmin interface.
  2. Choose the database from the left-side menu.
  3. Click the “Export” tab that exists below the phpMyAdmin header.
  4. Choose “Export Method” and “Format” of the exported to be in.
  5. Click “Go” to see or download the exported data.

Note:

phpmyadmin export database

Export methods allowed by phpMyAdmin


There are two export methods allowed by the phpMyAdmin interface.

  1. Quick – Minimal and quick option to export the database and it is the default option.
  2. Custom – This method allows more customization.

The “Quick” method exports the selected database or table structure and data entirely.

But, the “Custom” method provides more options. Some of them are listed below.

  • It allows selecting one are more tables from the list.
  • It allows exporting of either structure or data or both.
  • It provides the “Save-as” option to mention how to output the exported data. The phpMyAdmin can deliver the exported output in the below ways.
    • It will save it as a file if the user selects “Save output to a file”.
    • It will show as text on the interface if the user selects “View output as text”.

Export formats provided by phpMyAdmin


It supports numerous formats in which the output exported data. Some of them are listed below.

  • SQL (default option)
  • CSV
  • JSON
  • XML

Export a database to another database


To export a database to another database, we have to perform the phpMyAdmin “Import” after the “Export” action.

In a previous tutorial, we have seen how to import a database using phpMyAdmin.

↑ Back to Top

Share this page


https://www.sickgaming.net/blog/2023/01/...-database/

Print this item

 
Latest Threads
Forza Horizon 5 Game Save...
Last Post: poxah56770
9 hours ago
(Xbox One) Vantage - Mod ...
Last Post: levihaxk
Today, 03:59 AM
News - Christopher Nolan’...
Last Post: xSicKxBot
Today, 03:31 AM
News - GameStop Is Not Hu...
Last Post: xSicKxBot
Yesterday, 11:06 AM
Lemfi Rebrand + World Cup...
Last Post: Sazzy01
Yesterday, 07:48 AM
World Cup 2026 Lemfi Foun...
Last Post: Sazzy01
Yesterday, 07:46 AM
World Cup 2026 Nigeria Le...
Last Post: Sazzy01
Yesterday, 07:45 AM
World Cup 2026 Canada Off...
Last Post: Sazzy01
Yesterday, 07:44 AM
World Cup 2026 Lemfi UK C...
Last Post: Sazzy01
Yesterday, 07:42 AM
Lemfi Wiki + World Cup 20...
Last Post: Sazzy01
Yesterday, 07:39 AM

Forum software by © MyBB Theme © iAndrew 2016