The jsPDF with html2canvas library is one of the best choices which gives the best output PDF from HTML.
You need to understand the dependent libraries to get better out of it. Effort-wise it is easier to create a PDF from HTML.
Before getting into the theory part, I want to give the solution directly to save your time :-). Then, I will highlight the area to strengthen the basics of jsPDF and html2canvas.
Quick solution
window.jsPDF = window.jspdf.jsPDF;

function generatePdf() { let jsPdf = new jsPDF('p', 'pt', 'letter'); var htmlElement = document.getElementById('doc-target'); // you need to load html2canvas (and dompurify if you pass a string to html) const opt = { callback: function (jsPdf) { jsPdf.save("Test.pdf"); // to open the generated PDF in browser window // window.open(jsPdf.output('bloburl')); }, margin: [72, 72, 72, 72], autoPaging: 'text', html2canvas: { allowTaint: true, dpi: 300, letterRendering: true, logging: false, scale: .8 } }; jsPdf.html(htmlElement, opt);

}
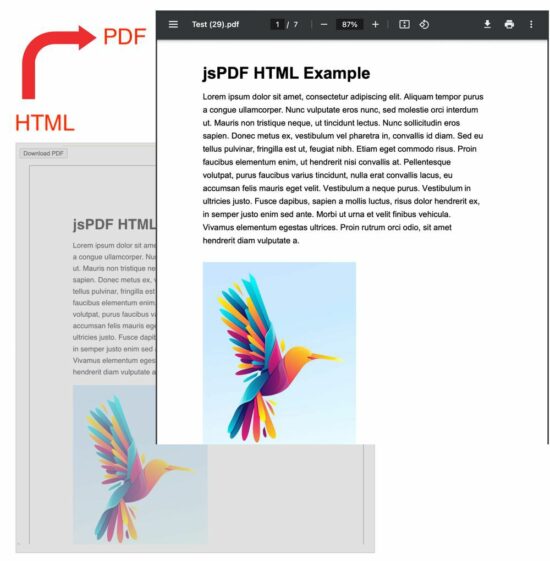
This example HTML has the content target styled with internal CSS properties. These styles are for setting fonts, and spacing while converting this HTML to PDF.
The #doc-target is the PDF’s content target in this HTML. But, the #outer is the outer container to take care of the UI perception.
That means the PDF will reflect the styles from the #doc-target level of the HTML DOM. The #outer is for synchronizing the UI preview and the PDF result for the sake of the perception.
If you want to show a preview before PDF generation, there is an example for it before generating an invoice PDF.
These styles are
<HTML>
<HEAD> <TITLE>jsPDF HTML Example with html2canvas for Multiple Pages PDF</TITLE> <style> #doc-target { font-family: sans-serif; -webkit-font-smoothing: antialiased; color: #000; line-height: 1.6em; margin: 0 auto; } #outer { padding: 72pt 72pt 72pt 72pt; border: 1px solid #000; margin: 0 auto; width: 550px; } </style>
</HEAD>
<BODY> <div id="container"> <p> <button class="btn" onclick="generatePdf()">Download PDF</button> </p> <div id="outer"> <div id="doc-target"> <h1>jsPDF HTML Example</h1> <div id="lipsum"> <p> Lorem ipsum dolor sit amet, consectetur adipiscing elit. Aliquam tempor purus a congue ullamcorper. Nunc vulputate eros nunc, sed molestie orci interdum ut. Mauris non tristique neque, ut tincidunt lectus. Nunc sollicitudin eros sapien. Donec metus ex, vestibulum vel pharetra in, convallis id diam. Sed eu tellus pulvinar, fringilla est ut, feugiat nibh. Etiam eget commodo risus. Proin faucibus elementum enim, ut hendrerit nisi convallis at. Pellentesque volutpat, purus faucibus varius tincidunt, nulla erat convallis lacus, eu accumsan felis mauris eget velit. Vestibulum a neque purus. Vestibulum in ultricies justo. Fusce dapibus, sapien a mollis luctus, risus dolor hendrerit ex, in semper justo enim sed ante. Morbi ut urna et velit finibus vehicula. Vivamus elementum egestas ultrices. Proin rutrum orci odio, sit amet hendrerit diam vulputate a. </p> </div> </div> </div> </div> <script src="https://cdnjs.cloudflare.com/ajax/libs/jspdf/2.5.1/jspdf.umd.min.js"></script> <script src="https://cdnjs.cloudflare.com/ajax/libs/html2canvas/1.4.1/html2canvas.min.js" integrity="sha512-BNaRQnYJYiPSqHHDb58B0yaPfCu+Wgds8Gp/gU33kqBtgNS4tSPHuGibyoeqMV/TJlSKda6FXzoEyYGjTe+vXA==" crossorigin="anonymous" referrerpolicy="no-referrer"></script>
</BODY>
</HTML>
JavaScript jsPDF options for getting a multi-page PDF
In this example code, the JavaScript jsPDF code sets some options or properties. These are required for the below purposes
It sets the PDF content’s display properties
It defines the callback function to save or open the output PDF.
The below list has a short description of each option and its properties used in this example.
callback – It is a client-side method that is invoked when the output PDF is ready.
margin – It is the jsPDF option to specify the top, right, bottom and left margins of the PDF.
autoPaging – It is required when creating a multi-page PDF from HTML with the auto page break.
html2canvas – The jsPDF depends on html2canvas library. Knowing how to use these properties will help to get a satisfactory PDF output.
allowTaint – It allows the cross-origin images to taint the canvas if it is set as true. The default is false.
dpi – It is dots per inch. Giving 300 will be good which is a printing quality.
letterRendering – It allows rendering the letter properly with specified or supported fonts.
logging – It writes a log to the developer’s console while creating a PDF. The default is true, but this example disables it.
scale – Without specifying this option, it takes the browser’s device pixel ratio.
More references for the available options of creating a full-fledged jsPDF example
These are the library documentation links that guide to creating PDFs from HTML.
The jsPDF core alone has many features to create PDF documents on the client side. But, for converting HTML to a multi-page PDF document, the core jsPDF library is enough.
The latest version replaces the fromHTML plugin with the html.js plugin to convert HTML to PDF.
Above all the jsPDF depends on html2canvas for generating a PDF document. It hooks the html2canvas by supplying enough properties for creating a PDF document.
We used the html2canvas library to capture a screenshot of a webpage. It is a reputed and dependable library to generate and render canvas elements from HTML.
Call Of Duty: Modern Warfare 2 is getting a free content update on December 14, which will include a new Raid mode.
Announced during The Game Awards 2022, players can expect Season One: Reloaded to feature Raids next week, starting with Episode 1: Atomgrad, with even more Raid episodes on the way.
Get ready for a whole new way to experience Call of Duty ? Put your precision ? teamwork ? and mind ? to the test in Raid Episode 1: Atomgrad, coming to #MWII on Dec 14 #TheGameAwardspic.twitter.com/FCPQlEUdfW
Activision has previously confirmed that the first raid will be narrative-focused as it continues the Modern Warfare 2 storyline. Season One will also add a brand-new Spec Ops mission, as well as a new seasonal prestige system with more challenges for players and plenty of rewards.
Divine Knockout DKO (for some reason this game says its a free 2 play game, but it costs money) Activating the game this way will add +1 to your account, just click Install Store Page
Capcom Arcade Stadium:FINAL FIGHT This is a dlc for Capcom Arcade (f2p) First activate Capcom Arcade Then Activate the DLC Final Fight
We are welcoming everyone to join our discord[discord.gg]. We are more active there on finding giveaways, small or large, and there are daily raffles you can participate.
Follow OpenJDK on Twitter Download Oracle OpenJDK Download Oracle JDK Oracle is proud to announce the general availability of Java 14 representing the fifth feature release as part of the six-month cadence. This level of predictability, for over two years now, allows developers to more easily manage...
Posted by: xSicKxBot - 12-09-2022, 06:12 AM - Forum: Python
- No Replies
Creating an Advent Calendar App in Python with AI Image Creation
5/5 – (2 votes)
Example: AI-Generated Image
This blog describes a fun mini Python project using AI image creation for creating artwork for an advent calendar implemented using PyGame.
Context
It’s December 1st, and my daughter has just opened the first door on her physical advent calendar, counting down the days of the festival of general consumerism that some people call Christmas. Out pops a small chocolate with a festive robin embossed onto it.
I don’t really recall when the chocolate treat became ubiquitous. Back in my childhood days, advent calendar doors just opened to reveal an image.
Example: AI-Generated Image
This article describes a mini project to generate a virtual old-school Advent calendar using royalty-free bespoke images generated from Python using a third-party AI service through an API.
All code and some AI-generated image samples are available on GitHub.
Painting the Images
There are now many AI engines for creating images from a text description. This project uses deepai. Creating an image with the deepai API is pretty simple. They provide code samples for several languages on their site.
I further selected the engine for producing art in the impressionism style but you can choose from a range of other styles at https://api.deepai.org.
Note that the AI artist style forms parts of the end-point URL.
An API key is used to control access to the API service. The quickstart api-key below is only good for about 10 free requests. You can pay $5 for a new API key and 100 more request calls if you so wish.
def aipaint(description): r = requests.post( "https://api.deepai.org/api/impressionism-painting-generator", data={ 'text': description, }, headers={'api-key': 'quickstart-QUdJIGlzIGNvbWluZy4uLi4K'} ) ret = r.json() return ret
The aipaint()function will return a JSON object, including an element called output_urlfrom which the image can be viewed.
The following is an example AI painting created, in the impressionist style, for the description "Christmas presents under tree":
Be warned when you read this – the above URL will no longer exist. The created image is only hosted by deepai for a few hours, so our advent calendar code will need to download to a local folder.
The original hope was to create images on the fly as an advent door is opened, but as there is a cost for each API request and up to 30 seconds is required for each image to be generated by the AI engine and downloaded, an alternative approach was adopted in writing a prepaint.py script to create and download 25 images.
prepaint.py
import urllib.request

import config

import requests

import urllib.request

from os.path import exists def aipaint(description): r = requests.post( "https://api.deepai.org/api/impressionism-painting-generator", data={ 'text': description, }, headers={'api-key': 'quickstart-QUdJIGlzIGNvbWluZy4uLi4K'} ) ret = r.json() return ret count=1 while count<=25: # pop off the first image description description=config.descriptions.pop(0) # push it back on at end (this ensures we cycle through descriptions and never run out ) # obviously best if there are 25 descriptions though config.descriptions.append(description) filename='./images/image'+ (f"{count:02d}") +".jpg" if(exists(filename)): print(filename + " already exists") else: print("Painting: "+description) try: painting=aipaint(description) if(len(painting)<2): if(painting['status']): print("You've probably run out of deepai (free) credits.") print("Status returned "+painting['status']) else: print("Storing as "+filename) urllib.request.urlretrieve(painting['output_url'], filename) print("Paint now dried on "+filename) except Exception as ex: print("Paint "+filename+" failed") print(ex) count+=1 print("Paintings complete and paint has dried!")

print("Now run main.py to access the Advent calendar")
config.descriptions is a list of Christmas image descriptions.
Ideally, there should be 25 descriptions, but we treat the array as a circular queue so that every time we pop an item off the front, we push back at the end of the queue.
This just ensures we can generate 25 images even without 25 descriptions. My experimentation suggests you will not get the same image back from two requests with the same image description anyway!
Images are cached in an images folder with 25 filenames image01.jpg through image25.jpg
The script first checks whether an image already exists – if yes we just loop through to the next image.
With the code in GitHub I’ve included 25 images. If you want to generate your own just delete some or all from the images folder and edit the descriptions in config.py.
If you don’t yet want to purchase deepai credits – I recommend you just delete a few to experiment.
Sample output from the prepaint.py script
The Advent app
I chose to use the PyGame library to produce the virtual Advent app.
Runningmain.py launches a window with a grid of 25 doors.
Red doors indicate available doors to open based on the current date of the month. When a red labeled door is opened, a festive image is displayed along with a short promotion text that can be customized in config.py
A click on the image re-displays the grid of calendar doors.
A click on the lower portion of the screen opens a browser with the configured URL.
The PyGame script itself is fairly straightforward. Just one interesting snippet to highlight: To arrange the doors in a ‘random’ order. An array of the numbers 1 to 25 is created (constants HEIGHT and WIDTH are both defined as 5 in config.py).
This array is shuffled using random.shuffle. By pre-setting the random seed to a set figure (here 1 was chosen), the same random shuffle is produced every time the main.py is run.
HEIGHT = 5
WIDTH = 5 descriptions=["Christmas presents under tree", "Santas Elf", "Santa in sleigh flying over a town delivering gifts on christmas eve", "candy cane on an christmas tree", "a festive robin redbreast", "a snowman with carrot nose and presents", "fairy on top of a christmas tree", "children playing with christmas presents", "christmas lunch", "christmas carol singers", "christmas bells in a christmas tree", "rudolph the red nosed reindeer", "Santa in sleigh", "two snowmen with presents", "snowy village scene", "christmas decoration", "christmas bells", "christmas snowflake", "christmas pudding with custard", "christmas feast with turkey", "father christmas laughing", "christmas baby in a manger", "christmas mulled wine", "children enjoying playing with a new toy train", ] gifts=[('8 python cheat sheets','https://blog.finxter.com/python-cheat-sheets/'),
('the finxter academy','https://academy.finxter.com/'),
('the finxter app','https://app.finxter.com/learn/computer/science/'),
('the finxster freelancer course','https://finxter.gumroad.com/l/python-freelancer/'),
('The Ultimate Guide to Start Learning Python','https://blog.finxter.com/start-learning-python/'),
('Coffee Break Numpy book','https://www.amazon.com/gp/product/B07WHB8FWC/ref=as_li_tl?ie=UTF8&tag=finxter-20&camp=1789&creative=9325&linkCode=as2&creativeASIN=B07WHB8FWC&linkId=447a5019492081d1b2892d9470bb29fc'),
('Leaving the Rat Race with Python book','https://www.amazon.com/Leaving-Rat-Race-Python-Developing-ebook/dp/B08G1XLDNB/ref=sr_1_5?qid=1670149592&refinements=p_27%3AChristian+Mayer&s=digital-text&sr=1-5&text=Christian+Mayer'),
('Coffee break Python book','https://www.amazon.com/Coffee-Break-Python-Kickstart-Understanding-ebook/dp/B07GSTJPFD/ref=sr_1_4?qid=1670149592&refinements=p_27%3AChristian+Mayer&s=digital-text&sr=1-4&text=Christian+Mayer'),
('Coffee Break Python Slicing','https://www.amazon.com/Coffee-Break-Python-Slicing-Workouts-ebook/dp/B07KSHLLG5/ref=sr_1_8?qid=1670149592&refinements=p_27%3AChristian+Mayer&s=digital-text&sr=1-8&text=Christian+Mayer'),
('Coffee Break Pandas','https://www.amazon.com/Coffee-Break-Pandas-Puzzles-Superpower-ebook/dp/B08NG8QHW7/ref=sr_1_9?qid=1670149592&refinements=p_27%3AChristian+Mayer&s=digital-text&sr=1-9&text=Christian+Mayer'),
('',''),
main.py:
import pygame
import sys
import time
import random
import datetime
import webbrowser
import config HEIGHT = config.HEIGHT
WIDTH = config.WIDTH
LINEHEIGHT = 30
CLICKABLEHEIGHT = 150
FONT = 'verdana' # Colors
BLACK = (0, 0, 0)
GRAY = (200, 200, 200)
WHITE = (255, 255, 255)
RED = (200, 0, 0) # use a seeded random shuffle on numbers 1 to 25 # specify seed to always generate the same random sequence of door labels for our 5x5 grid
doormap=list(range(1,HEIGHT*WIDTH+1))
random.seed(1) random.shuffle(doormap) #get current time
d = datetime.datetime.now()
#get the day of month
datemax=int(d.strftime("%d")) #lambda function to convert eg 1 to 1st, 2 to 2nd
ordinal = lambda n: "%d%s" % (n,"tsnrhtdd"[(n//10%10!=1)*(n%10<4)*n%10::4]) # Create game
pygame.init()
size = width, height = 500, 500
screen = pygame.display.set_mode(size)
pygame.display.set_caption('Finxter Advent Calendar') #font_name = 'calibr'#pygame.font.get_default_font()
bigfont = pygame.font.SysFont(FONT, 20)
hugefont = pygame.font.SysFont(FONT, 40) # Compute board size
BOARD_PADDING = 10
board_width = width - (BOARD_PADDING * 2)
board_height = height - (BOARD_PADDING * 2)
cell_size = int(min(board_width / WIDTH, board_height / HEIGHT))
halfcell_size=cell_size/2+10
board_origin = (BOARD_PADDING, BOARD_PADDING) # utility function to add text to screen
def addText(text, position, color): giftText = bigfont.render(text, True, color) giftRect = giftText.get_rect() giftRect.center = position screen.blit(giftText, giftRect) # start from the main grid when dooropen>0 it indicate the door/image to display
dooropen=0 while True: # Check if game quit for event in pygame.event.get(): if event.type == pygame.QUIT: sys.exit() screen.fill(BLACK) if dooropen: # paint the correct image onto the screen filename='images/image'+ (f"{dooropen:02d}") +".jpg" image = pygame.image.load(filename) rect = image.get_rect() screen.blit(image, rect) # going to create a semi transparent clickable area which can link to a URL # the URL 'gifts' are stored in the imported config giftlabel,gifturl = config.gifts[dooropen%len(config.gifts)] s = pygame.Surface((width,CLICKABLEHEIGHT)) s.set_alpha(200) s.fill(GRAY) screen.blit(s, (0,height-CLICKABLEHEIGHT)) clickable = pygame.Rect(0,height-CLICKABLEHEIGHT,width,CLICKABLEHEIGHT) # add text to the clickable area if(dooropen==25): addText("It's Christmas!", ((width / 2), 4*cell_size+LINEHEIGHT), RED) else: addText("On the "+ ordinal(25-dooropen) +" night before xmas", ((width / 2), 4*cell_size), WHITE) addText("Finxter brought unto me:", ((width / 2), 4*cell_size+LINEHEIGHT), WHITE) addText(giftlabel, ((width / 2), 4*cell_size+(2*LINEHEIGHT)), RED) # open URL in browser if clickable area clicked # otherwise close the door by setting dooropen to 0 click, _, _ = pygame.mouse.get_pressed() if click == 1: mouse = pygame.mouse.get_pos() if clickable.collidepoint(mouse) : time.sleep(0.2) webbrowser.open(gifturl, new=dooropen, autoraise=True) else: dooropen = 0 time.sleep(0.2) pygame.display.flip() continue # Draw board cells = [] for i in range(HEIGHT): row = [] for j in range(WIDTH): # Draw rectangle for cell rect = pygame.Rect( board_origin[0] + j * cell_size, board_origin[1] + i * cell_size, cell_size, cell_size ) pygame.draw.rect(screen, GRAY, rect) pygame.draw.rect(screen, WHITE, rect, 3) doornumber=doormap[(j*HEIGHT)+i] label = hugefont.render(str(doornumber), True, RED if doornumber<=datemax else WHITE) labelRect = label.get_rect() labelRect.center = (j * cell_size+halfcell_size, i * cell_size+halfcell_size) screen.blit(label, labelRect) row.append(rect) cells.append(row) left, _, right = pygame.mouse.get_pressed() if left: mouse = pygame.mouse.get_pos() for i in range(HEIGHT): for j in range(WIDTH): if cells[i][j].collidepoint(mouse) and dooropen==0: dooropen=doormap[(j*HEIGHT)+i] # did they attempt to open a door ahead of current date # dont allow that! if dooropen>datemax: dooropen=0 time.sleep(0.2) pygame.display.flip()
prepaint.py:
import urllib.request

import config

import requests

from os.path import exists def aipaint(description): r = requests.post( "https://api.deepai.org/api/impressionism-painting-generator", data={ 'text': description, }, headers={'api-key': 'quickstart-QUdJIGlzIGNvbWluZy4uLi4K'} ) ret = r.json() return ret count=1 while count<=25: # pop off the first image description description=config.descriptions.pop(0) # push it back on at end (this ensures we cycle through descriptions and never run out ) # obviously best is there are 25 descriptions though config.descriptions.append(description) filename='./images/image'+ (f"{count:02d}") +".jpg" if(exists(filename)): print(filename+" already exists") else: print("Painting: "+description) try: painting=aipaint(description) if(len(painting)<2): if(painting['status']): print("You've probably run out of deepai (free) credits.") print("Status returned "+painting['status']) else: print("Storing as "+filename) urllib.request.urlretrieve(painting['output_url'], filename) print("Paint now dried on "+filename) except Exception as ex: print("Paint "+filename+" failed") print(ex) count+=1 print("Paintings complete and paint has dried!")

print("Now run main.py to access the Advent calendar")
That's right - we're doing this again. The baa has been raised, and Pilgor is joined by other goats too. You can invite up to three friends in local or online co-op, create carnage as a team, or compete in mini-games and then not be friends anymore.
Get ready for another round of udder mayhem. Lick, headbutt, and ruin your way through a brand new open world in the biggest waste of your time since Goat Simulator! We won't tell you how to play (except in the tutorial), but merely provide the means to be the goats of your dreams.
JDK 14 is live! Download it from the Java SE Downloads page. See the JDK 14 Release Notes for detailed information about this release. The following are some of the important additions and updates in Java SE 14 and JDK 14: Switch Expressions is now a permanent feature. See JEP 361: Switch Expression...
How to Convert an Octal Escape Sequence in Python – And Vice Versa?
5/5 – (1 vote)
This tutorial will show you how to convert an
octal escape sequence to a Python string, and a
Python string to an octal escape sequence.
But let’s quickly recap what an octal escape sequence is in the first place!
This is you and your friend celebrating after having solved this problem!
What Is An Octal Escape Sequence?
An Octal Escape Sequence is a backslash followed by 1-3 octal digits (0-7) such as \150 which encodes the ASCII character 'h'. Each octal escape sequence encodes one character (except invalid octal sequence \000). You can chain together multiple octal escape sequences to obtain a word.
Problem Formulation
Question: How to convert an octal escape sequence to a string and vice versa in Python?
You don’t need to “convert” an octal escape sequence to a Unicode string if you already have it represented by a bytes object. Python automatically resolves the encoding.
See here:
>>> b'\101\102\103'

b'ABC'

>>> b'101\040\102\040\103'

b'101 B C'

>>> b'\101\040\102\040\103'

b'A B C'

>>> b'\141\142\143'

b'abc'

>>> b'\150\145\154\154\157'

b'hello'

>>> b'\150\145\154\154\157\040\167\157\162\154\144'

b'hello world'
Python Octal to String Explicit Conversion
The bytes.decode('unicode-escape') function converts a given bytes object represented by an (octal) escape sequence to a Python string. For example, br'\101'.decode('unicode-escape') yields the Unicode (string) character 'A'.
def octal_to_string(x): ''' Converts an octal escape sequence to a string''' return x.decode('unicode-escape')
Example: Convert the octal representations presented above:
octals = [br'\101\102\103', br'\101\040\102\040\103', br'\141\142\143', br'\150\145\154\154\157', br'\150\145\154\154\157\040\167\157\162\154\144'] for octal in octals: print(octal_to_string(octal))
The result uses octal representation such as '0o123'. You can do string manipulation, such as slicing and string concatenation, to bring it into the final version '\123', for instance.
Here’s the function that converts string to octal escape sequence format:
The ord() function takes a character (=string of length one) as an input and returns the Unicode number of this character. For example, ord('a') returns the Unicode number 97. The inverse function of ord() is the chr() function, so chr(ord('a')) returns the original character 'a'.
The oct() function takes one integer argument and returns an octal string with prefix "0o".
Let’s check how our strings can be converted to the octal escape sequence representation using this function:
strings = ['ABC', 'A B C', 'abc', 'hello', 'hello world'] for s in strings: print(string_to_octal(s))
If you want to train your Python one-liner skills instead, check out my book!
Python One-Liners Book: Master the Single Line First!
Python programmers will improve their computer science skills with these useful one-liners.
Python One-Linerswill teach you how to read and write “one-liners”: concise statements of useful functionality packed into a single line of code. You’ll learn how to systematically unpack and understand any line of Python code, and write eloquent, powerfully compressed Python like an expert.
The book’s five chapters cover (1) tips and tricks, (2) regular expressions, (3) machine learning, (4) core data science topics, and (5) useful algorithms.
Detailed explanations of one-liners introduce key computer science concepts and boost your coding and analytical skills. You’ll learn about advanced Python features such as list comprehension, slicing, lambda functions, regular expressions, map and reduce functions, and slice assignments.
You’ll also learn how to:
Leverage data structures to solve real-world problems, like using Boolean indexing to find cities with above-average pollution
Use NumPy basics such as array, shape, axis, type, broadcasting, advanced indexing, slicing, sorting, searching, aggregating, and statistics
Calculate basic statistics of multidimensional data arrays and the K-Means algorithms for unsupervised learning
Create more advanced regular expressions using grouping and named groups, negative lookaheads, escaped characters, whitespaces, character sets (and negative characters sets), and greedy/nongreedy operators
Understand a wide range of computer science topics, including anagrams, palindromes, supersets, permutations, factorials, prime numbers, Fibonacci numbers, obfuscation, searching, and algorithmic sorting
By the end of the book, you’ll know how to write Python at its most refined, and create concise, beautiful pieces of “Python art” in merely a single line.





 Question: How to convert an octal escape sequence to a string and vice versa in Python?
 Background:
