The Advanced Management Console (AMC) 2.17 release is now available!
AMC 2.17 offers system administrators greater and easier control in managing Java version compatibility and security updates for desktops within their enterprise and for ISVs with Java-based applications and solutions. Key Benefits Key benefits of using AMC include: Usage Tracking: The Advanced Mana...
Summary:maxsplit is one of the optional parameters used in the split() function. If maxsplit is specified within the split function, then the maximum number of splits done will be given by the specified maxsplit. Thus, the list will have at most maxsplit + 1 elements. If maxsplit is not specified or set to -1, then there is no limit on the number of splits (all the possible splits are made).
In this comprehensive guide, you will learn everything you need to know about maxsplit in Python.
What is Maxsplit Anyways?
Before you understand what maxsplit does, it is important to understand what the split function does. The split() function in Python splits the string at a given separator and returns a split list of substrings.
Syntax and Explanation: str.split(sep = None, maxsplit = -1)
maxsplit is an optional parameter that defines the maximum number of splits (the list will have at most maxsplit + 1 elements). If maxsplit is not provided or defined as -1, then there is no limit on the number of splits (all the possible splits get made).
How Many Elements will The List Contain when Maxsplit is Specified?
When the maxsplit is specified, the list will have a maximum of maxsplit + 1 items. Look at the following examples to understand this better.
text = 'Python Java C Ruby' # Example 1

print(text.split(' ', 0))

# ['Python Java C Ruby'] # Example 2

print(text.split(' ', 2))

# ['Python', 'Java', 'C Ruby'] # Example 3

print(text.split(' ', -1))

# ['Python', 'Java', 'C', 'Ruby']
Explanation: In the first example, the maxsplit gets set to 0. Hence the list will have a maximum of one item. In the second example, maxsplit is set to 2, therefore the resultant list will have 2+1 = 3 items. Note that in the third example, maxsplit gets specified as -1; hence by default all the possible splits have been made.
Will the split() Function Work if You Don’t Specify Any Parameter?
Example:
txt = 'Welcome to the world of Python'

print(txt.split())

# ['Welcome', 'to', 'the', 'world', 'of', 'Python']
The split() function works perfectly fine even when no arguments are specified. In the above example, no separator and no maxsplit has been specified. It takes the default separator (space) to split the string. By default, the maxsplit value is -1. So the string gets split wherever a space is found. Meaning the maximum number of splits will be performed.
Split a List up to a Maximum Number of Elements
Problem: Given a list; How will you split the list up to a maximum number of elements?
Example: Let’s visualize the problem with a real problem asked in StackOverflow.
Discussion: The question essentially requires you to split the first and the second item/row into 7 columns such that the expected output resembles the following: [['6697', '1100.0', '90.0', '0.0', '0.0', '6609', '!'], ['701', '0.0', '0.0', '83.9', '1.5', '000', '!AFR-AHS IndHS-AFR']]
Explanation: Use the split() method and specify the maxsplit argument as the maximum number of elements in the list that you want to group. In this case, you need seven splits. Hence, the maxsplit can be set to 6 to achieve the final output.
Exercise
Given: text = “abc_kjh_olp_xyz” Challenge: Split the given string only at the first occurrence of the underscore “_” Expected Output: [‘abc’, ‘kjh_olp_xyz’]
Solution
text = "abc_kjh_olp_xyz"

print(text.split("_", maxsplit=1))
That was all about the maxsplit parameter from the split() function in Python. I hope this article helped you to gain an in-depth insight into the maxsplit parameter. Please subscribe and stay tuned for more interesting articles! Happy coding.
Python One-Liners Book: Master the Single Line First!
Python programmers will improve their computer science skills with these useful one-liners.
Python One-Linerswill teach you how to read and write “one-liners”: concise statements of useful functionality packed into a single line of code. You’ll learn how to systematically unpack and understand any line of Python code, and write eloquent, powerfully compressed Python like an expert.
The book’s five chapters cover (1) tips and tricks, (2) regular expressions, (3) machine learning, (4) core data science topics, and (5) useful algorithms.
Detailed explanations of one-liners introduce key computer science concepts and boost your coding and analytical skills. You’ll learn about advanced Python features such as list comprehension, slicing, lambda functions, regular expressions, map and reduce functions, and slice assignments.
You’ll also learn how to:
Leverage data structures to solve real-world problems, like using Boolean indexing to find cities with above-average pollution
Use NumPy basics such as array, shape, axis, type, broadcasting, advanced indexing, slicing, sorting, searching, aggregating, and statistics
Calculate basic statistics of multidimensional data arrays and the K-Means algorithms for unsupervised learning
Create more advanced regular expressions using grouping and named groups, negative lookaheads, escaped characters, whitespaces, character sets (and negative characters sets), and greedy/nongreedy operators
Understand a wide range of computer science topics, including anagrams, palindromes, supersets, permutations, factorials, prime numbers, Fibonacci numbers, obfuscation, searching, and algorithmic sorting
By the end of the book, you’ll know how to write Python at its most refined, and create concise, beautiful pieces of “Python art” in merely a single line.
[www.indiegala.com] Face the upcoming winter blizzard with a cool Match3 treat! A selection of casual match3 puzzle games with distinctive elements are waiting to be solved
The latest adventure in the Spider-Man universe will build on and expand 'Marvel's Spider-Man' through an all-new story. Players will experience the rise of Miles Morales as he masters new powers to become his own Spider-Man.
Java SE 14.0.1, 11.0.7, 8u251 and 7u261 Have Been Released!
The Java SE 14.0.1, 11.0.7, 8u251 and 7u261 update releases are now available. You can download the latest JDK releases from the Java SE Downloads page. OpenJDK 14.0.1 is available on http://jdk.java.net/14/. New Features, Changes, and Notable Bug Fixes For information about the new features, change...
When Google was founded in 1998, Wallstreet investors laughed at their bold vision of finding data efficiently in the web. Very few people actually believed that finding things can be at the heart of a sustainable business — let alone be a long-term challenge worth pursuing.
We have learned that searching — and finding — things is crucial wherever data volumes exceed processing capabilities. Every computer scientist knows about the importance of search.
And even non-coders don’t laugh about Google’s mission anymore!
This article will be the web’s most comprehensive guide on FINDING stuff in a Python list.
It’s a living document where I’ll update new topics as I go along — so stay tuned while this article grows to be the biggest resource on this topic on the whole web!
Let’s get started with the very basics of finding stuff in a Python list:
Finding an Element in a List Using the Membership Operator
You can use the membership keyword operator in to check if an element is present in a given list. For example, x in mylist returns True if element x is present in my_list using the equality== operator to compare all list elements against the element x to be found.
Here’s a minimal example:
my_list = ['Alice', 'Bob', 'Sergey', 'Larry', 'Eric', 'Sundar'] if 'Eric' in my_list: print('Eric is in the list')
The output is:
Eric is in the list
Here’s a graphical depiction of how the membership operator works on a list of numbers:
Figure 1: Check the membership of item 42 in the list of integers.
To dive deeper into this topic, I’d love to see you watch my explainer video on the membership operators here:
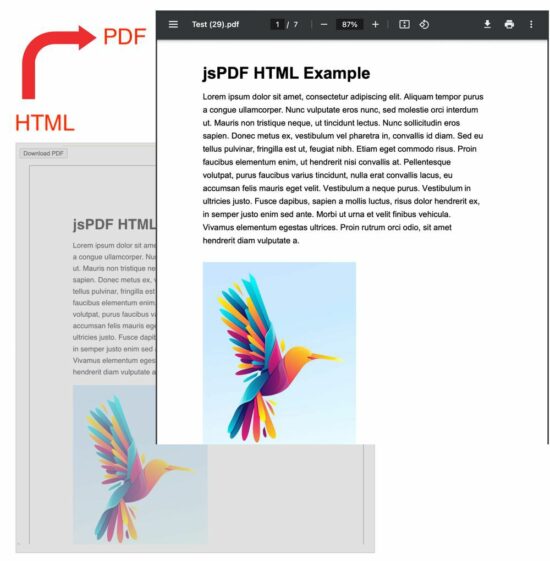
The jsPDF with html2canvas library is one of the best choices which gives the best output PDF from HTML.
You need to understand the dependent libraries to get better out of it. Effort-wise it is easier to create a PDF from HTML.
Before getting into the theory part, I want to give the solution directly to save your time :-). Then, I will highlight the area to strengthen the basics of jsPDF and html2canvas.
Quick solution
window.jsPDF = window.jspdf.jsPDF;

function generatePdf() { let jsPdf = new jsPDF('p', 'pt', 'letter'); var htmlElement = document.getElementById('doc-target'); // you need to load html2canvas (and dompurify if you pass a string to html) const opt = { callback: function (jsPdf) { jsPdf.save("Test.pdf"); // to open the generated PDF in browser window // window.open(jsPdf.output('bloburl')); }, margin: [72, 72, 72, 72], autoPaging: 'text', html2canvas: { allowTaint: true, dpi: 300, letterRendering: true, logging: false, scale: .8 } }; jsPdf.html(htmlElement, opt);

}
This example HTML has the content target styled with internal CSS properties. These styles are for setting fonts, and spacing while converting this HTML to PDF.
The #doc-target is the PDF’s content target in this HTML. But, the #outer is the outer container to take care of the UI perception.
That means the PDF will reflect the styles from the #doc-target level of the HTML DOM. The #outer is for synchronizing the UI preview and the PDF result for the sake of the perception.
If you want to show a preview before PDF generation, there is an example for it before generating an invoice PDF.
These styles are
<HTML>
<HEAD> <TITLE>jsPDF HTML Example with html2canvas for Multiple Pages PDF</TITLE> <style> #doc-target { font-family: sans-serif; -webkit-font-smoothing: antialiased; color: #000; line-height: 1.6em; margin: 0 auto; } #outer { padding: 72pt 72pt 72pt 72pt; border: 1px solid #000; margin: 0 auto; width: 550px; } </style>
</HEAD>
<BODY> <div id="container"> <p> <button class="btn" onclick="generatePdf()">Download PDF</button> </p> <div id="outer"> <div id="doc-target"> <h1>jsPDF HTML Example</h1> <div id="lipsum"> <p> Lorem ipsum dolor sit amet, consectetur adipiscing elit. Aliquam tempor purus a congue ullamcorper. Nunc vulputate eros nunc, sed molestie orci interdum ut. Mauris non tristique neque, ut tincidunt lectus. Nunc sollicitudin eros sapien. Donec metus ex, vestibulum vel pharetra in, convallis id diam. Sed eu tellus pulvinar, fringilla est ut, feugiat nibh. Etiam eget commodo risus. Proin faucibus elementum enim, ut hendrerit nisi convallis at. Pellentesque volutpat, purus faucibus varius tincidunt, nulla erat convallis lacus, eu accumsan felis mauris eget velit. Vestibulum a neque purus. Vestibulum in ultricies justo. Fusce dapibus, sapien a mollis luctus, risus dolor hendrerit ex, in semper justo enim sed ante. Morbi ut urna et velit finibus vehicula. Vivamus elementum egestas ultrices. Proin rutrum orci odio, sit amet hendrerit diam vulputate a. </p> </div> </div> </div> </div> <script src="https://cdnjs.cloudflare.com/ajax/libs/jspdf/2.5.1/jspdf.umd.min.js"></script> <script src="https://cdnjs.cloudflare.com/ajax/libs/html2canvas/1.4.1/html2canvas.min.js" integrity="sha512-BNaRQnYJYiPSqHHDb58B0yaPfCu+Wgds8Gp/gU33kqBtgNS4tSPHuGibyoeqMV/TJlSKda6FXzoEyYGjTe+vXA==" crossorigin="anonymous" referrerpolicy="no-referrer"></script>
</BODY>
</HTML>
JavaScript jsPDF options for getting a multi-page PDF
In this example code, the JavaScript jsPDF code sets some options or properties. These are required for the below purposes
It sets the PDF content’s display properties
It defines the callback function to save or open the output PDF.
The below list has a short description of each option and its properties used in this example.
callback – It is a client-side method that is invoked when the output PDF is ready.
margin – It is the jsPDF option to specify the top, right, bottom and left margins of the PDF.
autoPaging – It is required when creating a multi-page PDF from HTML with the auto page break.
html2canvas – The jsPDF depends on html2canvas library. Knowing how to use these properties will help to get a satisfactory PDF output.
allowTaint – It allows the cross-origin images to taint the canvas if it is set as true. The default is false.
dpi – It is dots per inch. Giving 300 will be good which is a printing quality.
letterRendering – It allows rendering the letter properly with specified or supported fonts.
logging – It writes a log to the developer’s console while creating a PDF. The default is true, but this example disables it.
scale – Without specifying this option, it takes the browser’s device pixel ratio.
More references for the available options of creating a full-fledged jsPDF example
These are the library documentation links that guide to creating PDFs from HTML.
The jsPDF core alone has many features to create PDF documents on the client side. But, for converting HTML to a multi-page PDF document, the core jsPDF library is enough.
The latest version replaces the fromHTML plugin with the html.js plugin to convert HTML to PDF.
Above all the jsPDF depends on html2canvas for generating a PDF document. It hooks the html2canvas by supplying enough properties for creating a PDF document.
We used the html2canvas library to capture a screenshot of a webpage. It is a reputed and dependable library to generate and render canvas elements from HTML.
Call Of Duty: Modern Warfare 2 is getting a free content update on December 14, which will include a new Raid mode.
Announced during The Game Awards 2022, players can expect Season One: Reloaded to feature Raids next week, starting with Episode 1: Atomgrad, with even more Raid episodes on the way.
Get ready for a whole new way to experience Call of Duty ? Put your precision ? teamwork ? and mind ? to the test in Raid Episode 1: Atomgrad, coming to #MWII on Dec 14 #TheGameAwardspic.twitter.com/FCPQlEUdfW
Activision has previously confirmed that the first raid will be narrative-focused as it continues the Modern Warfare 2 storyline. Season One will also add a brand-new Spec Ops mission, as well as a new seasonal prestige system with more challenges for players and plenty of rewards.
Divine Knockout DKO (for some reason this game says its a free 2 play game, but it costs money) Activating the game this way will add +1 to your account, just click Install Store Page
Capcom Arcade Stadium:FINAL FIGHT This is a dlc for Capcom Arcade (f2p) First activate Capcom Arcade Then Activate the DLC Final Fight
We are welcoming everyone to join our discord[discord.gg]. We are more active there on finding giveaways, small or large, and there are daily raffles you can participate.



 maxsplit is an optional parameter that defines the maximum number of splits (the list will have at most maxsplit + 1 elements). If maxsplit is not provided or defined as -1, then there is no limit on the number of splits (all the possible splits get made).
 Related Read: