[www.indiegala.com] A new day, a new opportunity to explore the vast anime universe through videogames with a fresh new selection of titles: Project Heartbeat, Skautfold: Usurper, Jester / King, Neko Journey, My Inner Darkness Is A Hot Anime Girl!, Twilight Town: A Cyberpunk Day In Life.
Posted by: xSicKxBot - 10-23-2022, 01:45 AM - Forum: Lounge
- No Replies
Kerbal Space Program 2 Blasts Off Into Early Access February 2023
Kerbal Space Program 2 is finally releasing into early access February 24 next year, after experiencing numerous delays.
The sequel to the 2015 space flight simulator was meant to launch in early 2021, but was delayed, then delayed again to 2022, and finally a third time to 2023. But a specific date is now locked in, with players able to dig into the game on PC via Steam or the Epic Games Store early next year.
Developer Intercept Games released a 14-minute-long video going into some more detail about the game, announcing the early access release, and explaining why it's decided to take this route. "I cannot overstate how important it is for me to hear what people think about this thing we're creating," explained creative director Nate Simpson. "We've been working in a vacuum for quite a while, this is a rare opportunity to actually find out how we've been doing."
The Last Oricru is a story-driven action RPG, that puts you in the middle of an ongoing conflict between two races, on a partly terraformed planet, isolated from outer space by a protective barrier. Your decisions will bring interesting twists into the gameplay, as you can heavily influence the conflict and its outcome. You will experience hundreds of intense fights in a brutal medieval meets sci-fi world, where every decision has its consequences.
Level up your hero, improve your skills before facing one of many boss fights and get ready for an unprecedented amount of possibilities.
Posted by: xSicKxBot - 10-22-2022, 02:35 AM - Forum: Python
- No Replies
Python | Split String into Characters
Rate this post
Summary: Use the list("given string") to extract each character of the given string and store them as individual items in a list. Minimal Example: print(list("abc"))
Problem: Given a string; How will you split the string into a list of characters?
Example: Let’s visualize the problem with the help of an example:
Approach: One of the simplest ways to solve the given problem is to use the list constructor and pass the given string into it as the input.
list() creates a new list object that contains items obtained by iterating over the input iterable. Since a string is an iterable formed by combining a group of characters, hence, iterating over it using the list constructor yields a single character at each iteration which represents individual items in the newly formed list.
Another way to split the given string into characters would be to use a list comprehension such that the list comprehension returns a new list containing each character of the given string as individual items.
Code:
text = "finxter"

print([x for x in text]) # ['f', 'i', 'n', 'x', 't', 'e', 'r']
Prerequisite: To understand what happened in the above code, it is essential to know what a list comprehension does. In simple words, a list comprehension in Python is a compact way of creating lists. The simple formula is [expression + context], where the “expression” determines what to do with each list element. And the “context” determines what elements to select. The context can consist of an arbitrary number of for and if statements. To learn more about list comprehensions, head on to this detailed guide on list comprehensions.
Explanation: Well! Now that you know what list comprehensions are, let’s try to understand what the above code does. In our solution, the context variable x is used to extract each character from the given string by iterating across each character of the string one by one with the help of a for loop. This context variable x also happens to be the expression of our list comprehension as it stores the individual characters of the given string as separate items in the newly formed list.
Multi-line Solution: Another approach to formulating the above solution is to use a for loop. The idea is pretty similar; however, we will not be using a list comprehension in this case. Instead, we will use a for loop to iterate across individual characters of the given string and store them one by one in a new list with the help of the append method.
text = "finxter"

res = []

for i in text: res.append(i)

print(res) # ['f', 'i', 'n', 'x', 't', 'e', 'r']
Yet another way of solving the given problem is to use a lambda function within the map function. Now, this is complex and certainly not the best fit solution to the given problem. However, it may (or may not ;P) be appropriate when you are handling really complex tasks. So, here’s how to use the two built-in Python functions to solve the given problem:
import re

text = "finxter"

print(list(map(lambda c: c, text))) # ['f', 'i', 'n', 'x', 't', 'e', 'r']
Explanation: The map() function is used to execute a specified function for each item of an iterable. In this case, the iterable is the given string and each character of the string represents an individual item within it. Now, all we need to do is to create a lambda function that simply returns the character passed to it as the input. That’s it! However, the map method will return a map object, so you must convert it to a list using the list() function. Silly! Isn’t it? Nevertheless, it works!
Conclusion
Hurrah! We have successfully solved the given problem using as many as three different ways. I hope you enjoyed this article and it helps you in your Python coding journey. Please subscribe and stay tuned for more interesting articles!
Your grandfather, a genius inventor, has called you for help! His beloved amusement park is about to close as the mayor is threatening to shut everything down and seize the land if the necessary repairs aren't made to bring it up to code. With the help of your powerful little robot buddy, you can restore it using a mysterious device based on alien technology.
As a source of power, the device needs happiness crystals, which you can harvest by making people happy and solving their problems. With the aid of a portal, travel to different locations all around the world to help people and collect their happiness crystals.
Strap in for the ultimate building adventure and save your grandfather's amusement park!
In this puzzle-adventure, use an intuitive brick-by-brick building mechanic to solve puzzles and bring your creations to life! Experience a charming story as you explore beautiful LEGO dioramas and help the people inhabiting them.
Posted by: xSicKxBot - 10-22-2022, 02:35 AM - Forum: Lounge
- No Replies
The Best Metal Gear Games, Ranked
Few video game franchises have been as revolutionary as Metal Gear over the decades, a series that has consistently reinvented itself to offer fresh and exciting twists on tactical espionage action. From the original game that prioritized stealth in an era where action games ruled supreme, to the groundbreaking rebirth of the series that paved the way for cinematic video games, the brainchild of Hideo Kojima has never been short on surprises.
35 years later, the Metal Gear series is a legendary showcase of creative design, intense showdowns, and storylines that helped prove that video games could be cinematic powerhouses. Grab your favorite cardboard box, sneak in for a covert op, and grab some intel on the best Metal Gear Solid games to make the cut in GameSpot's list. Our list is organized from worst to best. We excluded a couple of mobile games and the non-canon Snake's Revenge, but almost the entire franchise is represented here.
The GraalVM 22.3 release delivers several new features including much anticipated support for Java 19 along with preview support for Project Loom virtual threads in both JVM JIT and Native Image ahead-of-time compiled applications. The release also includes compiler performance improvements, new monitoring and debugging features in Native Image, Python enhancements, and a new name for GraalPython!
Posted by: xSicKxBot - 10-21-2022, 09:47 AM - Forum: Python
- No Replies
How to Return a File From a Function in Python?
5/5 – (1 vote)
Do you need to create a function that returns a file but you don’t know how? No worries, in sixty seconds, you’ll know! Go!
A Python function can return any object such as a file object. To return a file, first open the file object within the function body, handle all possible errors if the file doesn’t exist, and return it to the caller of the function using the keyword operation return open(filename, mode='r').
Here’s a minimal example that tries to open a filename that was provided by the user via the input() function. If it fails, it prints an error message and asks for a different user input:
def open_file(): while True: filename = input('filename: ') try: return open(filename, mode='r') except: print('Error. Try again') f = open_file()

print(f.read())
If I type in the correct file right away, I get the following output when storing the previous code snippet in a file named code.py—the code reads itself (meta ):
Note that you can open the file in writing mode rather than reading mode by replacing the line with the return statement with the following line:
open(filename, mode='w')
A more Pythonic way, in my opinion, is to follow the single-responsibility pattern whereby a function should do only one thing. In that case, provide the relevant input values into the function like so:
def open_file(filename, mode): try: return open(filename, mode=mode) except: return None def ask_user(): f = open_file(input('filename: '), input('mode: ')) while not f: f = open_file(input('filename: '), input('mode: ')) return f f = ask_user() print(f.read())
Notice how the file handling of a single instance and the user input processing are separated into two functions. Each function does one thing only. Unix style.
If you want to improve your programming skills and coding productivity creating massive success with your apps and coding projects, feel free to check out my book on the topic:
The Art of Clean Code
Most software developers waste thousands of hours working with overly complex code. The eight core principles in The Art of Clean Coding will teach you how to write clear, maintainable code without compromising functionality. The book’s guiding principle is simplicity: reduce and simplify, then reinvest energy in the important parts to save you countless hours and ease the often onerous task of code maintenance.
Concentrate on the important stuff with the 80/20 principle — focus on the 20% of your code that matters most
Avoid coding in isolation: create a minimum viable product to get early feedback
Write code cleanly and simply to eliminate clutter
Avoid premature optimization that risks over-complicating code
Balance your goals, capacity, and feedback to achieve the productive state of Flow
Apply the Do One Thing Well philosophy to vastly improve functionality
Design efficient user interfaces with the Less is More principle
Tie your new skills together into one unifying principle: Focus
The Python-based The Art of Clean Coding is suitable for programmers at any level, with ideas presented in a language-agnostic manner.
Q: How do you tell an introverted computer scientist from an extroverted computer scientist? A: An extroverted computer scientist looks at your shoes when he talks to you.
Editor.js is a JavaScript solution to create a web text editor. It is a WYSIWYG editor that allows inline editing of web text content.
Online-hosted editors provide more features to create and format content in an enriched manner. The Editor.js JavaScript library helps to create our own editor in an application.
There are numerous online editors with advanced tools. But, having a custom editor can be sleeker to use and maintain.
The Editor.js has many features to embed rich text content by creating placeholders in the editor with the help of its tools. Tools are enabled by using the external libraries developed for Editor.js.
Those library tools enrich the capability of this web text editor plugin. The following table shows the tools enabled with this Editor.js JavaScript initiation. These tools are used to create different types of rich text content in different formats.
This demo allows you to experience the features of an online editor by integrating this library.
Creates the H1, H2, H3, H4, H5 and H6 heading blocks for the web editor.
Link embeds
It lets pasting URL and extracts content from the link pasted into this input.
Raw HTML blocks
It allows embedding raw HTML codes to the web text editor.
Simple image
It accepts the image full path or allows to paste of copied image content to render images without server-side processing.
Image
It supports choosing files, pasting URLs, pasting images or dragging and dropping images to the rich text content area.
Checklist
It is used to create checklist items.
List
It adds ordered and unordered list items.
Embeds
It embeds content by loading iFrame to the content.
Quote
It creates quote blocks that have a toolbar to format rich text content and add links.
The official getting started tutorial has detailed usage documentation about this JavaScript editor. The list of the above tools is described with appropriate linking to their 3-party library manual.
How to install and initiate Editor.js
The Editor.js and its libraries can be integrated by using one of the several ways listed below.
Node package modules.
By using the available CDN URLs of this JavaScript library.
By including the local minified library files downloaded to the application folder.
After including the required library files, the Editor.js has to be instantiated.
const editor = new EditorJS('editorjs');
[OR]
const editor = new EditorJS({ holder: 'editorjs'

});
Here, the “editorjs” is used as the holder which is referring the HTML target to render the web text editor.
Fill the editor with the initial data
If the editor has to display some default template, it requires creating a landing template to render into this. This web editor plugin class accepts rich text content template via a data property. The format will be as shown below.
Example: Integrate Editor.js with Raw HTML block, Image, Link embeds and more
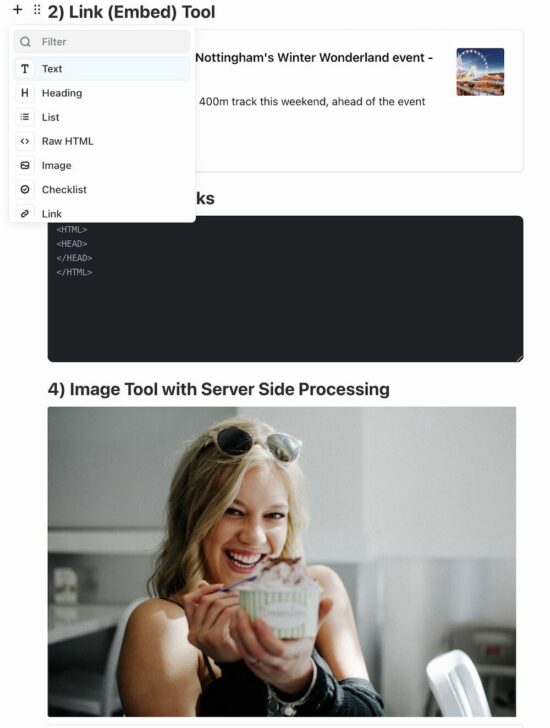
This example has the code that teaches how to configure the most used tools of the Editor.js library. It renders HTML code blocks and embeds images, and link extracts.
The image upload and link extract tools are configured with the server-side endpoint. It handles backend action on the upload or the extract events.
On saving the composing rich text content, the Editor.js data will be saved to the database. The data shown in the web editor is dynamic from the database.
<?php
require_once __DIR__ . '/dbConfig.php';
$content = "''";
$sql = "SELECT * FROM editor";
$stmt = $conn->prepare($sql);
$stmt->execute();
$result = $stmt->get_result();
$row = $result->fetch_assoc();
if(!empty($row["content"])) { $content = $row["content"];
}
?>
<html>
<head>
<title>Create Web Text Editor using JavaScript with Editor.js</title>
<link href="style.css" rel="stylesheet" type="text/css" />
<link href="form.css" rel="stylesheet" type="text/css" />
<style>
#loader-icon { display: none; vertical-align: middle; width: 100px;
}
</style>
</head>
<body> <div class="phppot-container"> <h1>Create Web Text Editor using JavaScript with Editor.js</h1> <div id="editorjs" name="editor"></div> <input type="submit" onClick=save() value="save"> <div id="loader-icon"> <img src="loader.gif" id="image-size" /> </div> </div> <script src="https://cdn.jsdelivr.net/npm/@editorjs/editorjs@latest"></script> <script src="https://cdn.jsdelivr.net/npm/@editorjs/header@latest"></script> <script src="https://cdn.jsdelivr.net/npm/@editorjs/list@latest"></script> <script src="https://cdn.jsdelivr.net/npm/@editorjs/image@latest"></script> <script src="https://cdn.jsdelivr.net/npm/@editorjs/raw"></script> <script src="https://cdn.jsdelivr.net/npm/@editorjs/checklist@latest"></script> <script src="https://cdn.jsdelivr.net/npm/@editorjs/link@latest"></script> <script src="editor-tool.js"></script> <script> const editor = new EditorJS({ /** * Id of Element that should contain Editor instance */ holder: 'editorjs', tools: { header: Header, list: List, raw: RawTool, image: { class: ImageTool, config: { endpoints: { byFile: 'http://localhost/phppot/javascript/create-web-text-editor-javascript/ajax-endpoint/upload.php', // Your backend file uploader endpoint byUrl: 'http://localhost/phppot/javascript/create-web-text-editor-javascript/ajax-endpoint/upload.php', // Your endpoint that provides uploading by Url } } }, checklist: { class: Checklist }, linkTool: { class: LinkTool, config: { endpoint: 'http://localhost/phppot/jquery/editorjs/extract-link-data.php', // Your backend endpoint for url data fetching, } } }, data: <?php echo $row["content"]; ?>, });
</script>
</body>
</html>
It has the ladder of six tools of Editor.js with JavaScript code. In this example, it creates images, link embeds and more types of rich text content. Some of them are basic like header, list, the default text tool and more.
The Image and Link embed tools depend on the PHP endpoint URL to take action on the back end.
Image tool configuration keys and endpoint script
The image tool requires the PHP endpoint URL to save the uploaded files to the target folder. The JavaScript editor keys to configure the endpoint are listed below.
byFile – This endpoint is used while pasting the file.
byUrl – This endpoint is used while choosing the file, dragging and dropping files and all.
This is simple and straightforward that performs the image upload operation in PHP. The image file is posted via JavaScript links to this server-side script.
This tool is configured like below to set the PHP endpoint to extract the content.
In this example, it extracts contents like title, image, and text description from the embedded link.
tools: { linkTool: { class: LinkTool, config: { endpoint: 'http://localhost/phppot/jquery/editorjs/extract-link-data.php', // Your backend endpoint for url data fetching, } }

}
PHP endpoint to extract content from the remote file
It creates a cURL post request in the endpoint PHP file to extract the data from the link. After getting the cURL response, the below code parses the response and creates a DOM component to render the rich text content into the WYSIWYG web editor.
It uses the GET method during the cURL request to extract rich text content and image from the link. In a previous tutorial, we used the GET and POST methods on PHP cURL requests.
On clicking the “Save” button below the web text editor, it gets the editor output data and saves it to the database.
It calls the editor.save() callback to get the WYSIWYG web editor output. An AJAX call sends this data to the PHP to store it in the database.
function save() { editor.save().then((outputData) => { document.getElementById("loader-icon").style.display = 'inline-block'; var xmlHttpRequest = new XMLHttpRequest(); xmlHttpRequest.onreadystatechange = function() { if (xmlHttpRequest.readyState == XMLHttpRequest.DONE) { document.getElementById("loader-icon").style.display = 'none'; if (xmlHttpRequest.status == 200) { // on success get the response text and // insert it into the ajax-example DIV id. document.getElementById("ajax-example").innerHTML = xmlHttpRequest.responseText; } else if (xmlHttpRequest.status == 400) { // unable to load the document alert('Status 400 error - unable to load the document.'); } else { alert('Unexpected error!'); } } }; xmlHttpRequest.open("POST", "ajax-endpoint/save-editor.php", true); xmlHttpRequest.setRequestHeader('Content-type', 'application/x-www-form-urlencoded'); xmlHttpRequest.send("btnValue=" + JSON.stringify(outputData)); }).catch((error) => { console.log('Saving failed: ', error) });

}
PHP code to save Editor.js data
This is the endpoint PHP file to process the editor’s rich text output in the backend. It creates the query to prepare and execute the insert operation to save the rich text content to the database.
<?php

require_once __DIR__ . '/../dbConfig.php'; $sql = "SELECT * FROM editor";

$stmt = $conn->prepare($sql);

$stmt->execute();

$result = $stmt->get_result();

$row = $result->fetch_assoc();

if (isset($_POST['btnValue'])) { $editorContent = $_POST['btnValue']; if (empty($row["content"])) { $query = "INSERT INTO editor(content,created)VALUES(?, NOW())"; $statement = $conn->prepare($query); $statement->bind_param("s", $editorContent); $statement->execute(); } else { $query = "UPDATE editor SET content = ? WHERE id = ?"; $statement = $conn->prepare($query); $statement->bind_param("si", $editorContent, $row["id"]); $statement->execute(); }

}

?>



 Related Tutorial:


 ):
):