Posted by: xSicKxBot - 09-25-2022, 03:41 AM - Forum: Lounge
- No Replies
Sly Cooper Celebrates 20 Years With Art Prints, Merch, And More
PlayStation and Sucker Punch are celebrating the Sly Cooper franchise's 20th anniversary by creating some merchandise for fans to purchase.
Sony provided details over at the PlayStation Blog and the most notable piece of merchandise is a tribute art piece drawn by original Sly Cooper art director Dev Madan. It includes plenty of Easter eggs and references to the franchise and those who purchase the art print will receive a certificate of authenticity signed by Madan himself.
Madan also created a 20th-anniversary T-shirt showing off the main characters of the franchise: Sly, Bentley, Murray, and Carmelita Fox. Lastly, there is also a 9-inch tall plushie of Sly being manufactured too, which will start shipping next year. The doll comes with a magnetic cane that attaches to Sly's hand.
Ferocious Alpine warfare will test your tactical skills in this authentic WW1 FPS. Battle among the scenic peaks, rugged valleys and idyllic towns of northern Italy. The Great War on the Italian Front is brought to life and elevated to unexpected heights!
Posted by: xSicKxBot - 09-24-2022, 10:31 AM - Forum: Python
- No Replies
How to Delete a Line from a File in Python?
5/5 – (1 vote)
Problem Formulation and Solution Overview
This article will show you how to delete a line from a file in Python.
To make it more interesting, we have the following running scenario:
Rivers Clothing has a flat text file, rivers_emps.txt containing employee data. What happens if an employee leaves? They would like you to write code to resolve this issue.
Contents of rivers_emps.txt
100:Jane Smith
101:Daniel Williams
102:Steve Markham
103:Howie Manson
104:Wendy Wilson
105:Anne McEvans
106:Bev Doyle
107:Hal Holden
108:Mich Matthews
109:Paul Paulson
Question: How would we write code to remove this line?
We can accomplish this task by one of the following options:
This example uses List Comprehension to remove a specific line from a flat text file.
orig_lines = [line.strip() for line in open('rivers_emps.txt')]

new_lines = [l for l in orig_lines if not l.startswith('102')] with open('rivers_01.txt', 'w') as fp: print(*new_lines, sep='\n', file=fp)
The above code uses List Comprehension to read in the contents of a flat text file to a List, orig_lines. If output to the terminal, the following displays.
Then, List Comprehension is used again to append each element to a new List only if the element does not start with 102. If output to the terminal, the following displays.
As you can see, the element starting with 102 has been removed.
Next, a new file, rivers_01.txt, is opened in write (w) mode and the List created above is written to the file with a newline (\n) character appended to each line. The contents of the file are shown below.
100:Jane Smith
101:Daniel Williams
103:Howie Manson
104:Wendy Wilson
105:Anne McEvans
106:Bev Doyle
107:Hal Holden
108:Mich Matthews
109:Paul Paulson
orig_lines = [line.strip() for line in open('rivers_emps.txt')]

new_lines = orig_lines[0:2] + orig_lines[3:] with open('rivers_02.txt', 'w') as fp: fp.write('\n'.join(new_lines))
The above code uses List Comprehension to read in the contents of a flat text file to a List, orig_lines. If output to the terminal, the following displays.
Then Slicing is used to extract all elements, except element two (2). The results save to new_lines. If output to the terminal, the following displays.
100:Jane Smith
101:Daniel Williams
103:Howie Manson
104:Wendy Wilson
105:Anne McEvans
106:Bev Doyle
107:Hal Holden
108:Mich Matthews
109:Paul Paulson
As you can see, element two (2) has been removed.
Next, a new file, rivers_02.txt, is opened in write (w) mode and the List created above is written to the file with a newline (\n) character appended to each line. The contents of the file are shown below.
100:Jane Smith
101:Daniel Williams
103:Howie Manson
104:Wendy Wilson
105:Anne McEvans
106:Bev Doyle
107:Hal Holden
108:Mich Matthews
109:Paul Paulson
Before moving forward, please ensure that the NumPy library is installed to ensure this code runs error-free.
import numpy as np orig_lines = [line.strip() for line in open('rivers_emps.txt')]

new_lines = orig_lines[0:2] + orig_lines[3:] np.savetxt('rivers_03.txt', new_lines, delimiter='\n', fmt='%s')
The following line uses List Comprehension to read the contents of a flat text file to the List, orig_lines. If output to the terminal, the following displays.
Then Slicing is applied to extract all elements, except element two (2). The results save to new_lines. If output to the terminal, the following displays.
100:Jane Smith
101:Daniel Williams
103:Howie Manson
104:Wendy Wilson
105:Anne McEvans
106:Bev Doyle
107:Hal Holden
108:Mich Matthews
109:Paul Paulson
As you can see, element two (2) has been removed.
The last code line calls np.savetxt() and passes it three (3) arguments:
100:Jane Smith
101:Daniel Williams
103:Howie Manson
104:Wendy Wilson
105:Anne McEvans
106:Bev Doyle
107:Hal Holden
108:Mich Matthews
109:Paul Paulson
Method 4: Use pop()
This example uses the pop() function to remove a specific line from a flat text file.
import numpy as np orig_lines = [line.strip() for line in open('rivers_emps.txt')]

orig_lines.pop(2)

np.savetxt('rivers_04.txt', orig_lines, delimiter='\n', fmt='%s')
The following line uses List Comprehension to read in the contents of a flat text file to the List, orig_lines. If output to the terminal, the following displays.
Then, the pop() method is called and passed one (1) argument, the element’s index to remove.
In this case, it is the second element.
If this List was output to the terminal, the following would display.
100:Jane Smith
101:Daniel Williams
103:Howie Manson
104:Wendy Wilson
105:Anne McEvans
106:Bev Doyle
107:Hal Holden
108:Mich Matthews
109:Paul Paulson
As shown in Method 3, the results save to a flat text file. In this case, rivers_04.txt. The contents are the same as in the previous examples.
Note: The pop() function removes the appropriate index and returns the contents to capture if necessary.
Method 5: Use remove()
This example uses the remove()function to remove a specific line from a flat text file.
import numpy as np orig_lines = [line.strip() for line in open('rivers_emps.txt')]

orig_lines.remove('102:Steve Markham')

np.savetxt('rivers_05.txt', orig_lines, delimiter='\n', fmt='%s')
This code works exactly like the code in Method 4. However, instead of passing a location of the element to remove, this function requires the contents of the entire line you to remove.
Then, the remove() function is called and passed one (1) argument, the index to remove. In this case, it is the second element. If this List was output to the terminal, the following would display.
100:Jane Smith
101:Daniel Williams
103:Howie Manson
104:Wendy Wilson
105:Anne McEvans
106:Bev Doyle
107:Hal Holden
108:Mich Matthews
109:Paul Paulson
As shown in the previous examples, the results save to a flat text file. In this case, rivers_05.txt.
Bonus: Remove row(s) from a DataFrame
CSV files are also known as flat-text files. This code shows you how to easily remove single or multiple rows from a CSV file
Finxter Challenge Find 2 Additional Ways to Remove Lines
Summary
This article has provided five (5) ways to delete a line from a file to select the best fit for your coding requirements.
Good Luck & Happy Coding!
Programmer Humor – Blockchain
“Blockchains are like grappling hooks, in that it’s extremely cool when you encounter a problem for which they’re the right solution, but it happens way too rarely in real life.”source – xkcd
Export data to an excel file is mainly used for taking a backup. When taking database backup, excel format is a convenient one to read and manage easily. For some applications exporting data is important to take a backup or an offline copy of the server database.
This article shows how to export data to excel using PHP. There are many ways to implement this functionality. We have already seen an example of data export from MySQL.
This article uses the PHPSpreadSheet library for implementing PHP excel export.
It is a popular library that supports reading, and writing excel files. It will smoothen the excel import-export operations through its built-in functions.
The complete example in this article will let create your own export tool or your application.
About this Example
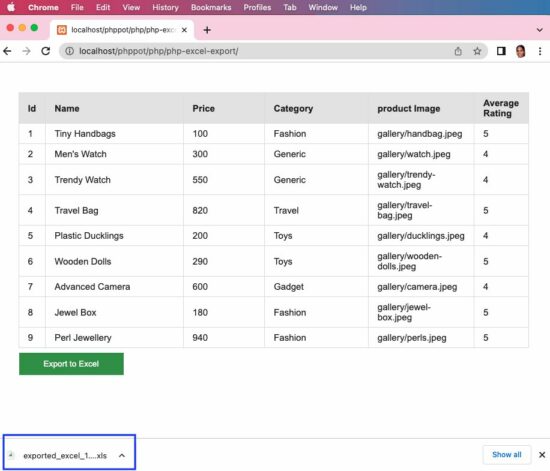
It will show a minimal interface with the list of database records and an “Export to Excel” button. By clicking this button, it will call the custom ExportService created for this example.
This service instantiates the PHPSpreadsheet library class and sets the column header and values. Then it creates a writer object by setting the PHPSpreadsheet instance to output the data to excel.
Follow the below steps to let this example run in your environment.
Create and set up the database with data exported to excel.
Download the code at the end of this article and configure the database.
Add PHPSpreadSheet library and other dependencies into the application.
1) Create and set up the database with data exported to excel
Create a database named “db_excel_export” and import the below SQL script into it.
structure.sql
--

-- Table structure for table `tbl_products`

-- CREATE TABLE `tbl_products` ( `id` int(8) NOT NULL, `name` varchar(255) NOT NULL, `price` double(10,2) NOT NULL, `category` varchar(255) NOT NULL, `product_image` text NOT NULL, `average_rating` float(3,1) NOT NULL

); --

-- Dumping data for table `tbl_products`

-- INSERT INTO `tbl_products` (`id`, `name`, `price`, `category`, `product_image`, `average_rating`) VALUES

(1, 'Tiny Handbags', 100.00, 'Fashion', 'gallery/handbag.jpeg', 5.0),

(2, 'Men\'s Watch', 300.00, 'Generic', 'gallery/watch.jpeg', 4.0),

(3, 'Trendy Watch', 550.00, 'Generic', 'gallery/trendy-watch.jpeg', 4.0),

(4, 'Travel Bag', 820.00, 'Travel', 'gallery/travel-bag.jpeg', 5.0),

(5, 'Plastic Ducklings', 200.00, 'Toys', 'gallery/ducklings.jpeg', 4.0),

(6, 'Wooden Dolls', 290.00, 'Toys', 'gallery/wooden-dolls.jpeg', 5.0),

(7, 'Advanced Camera', 600.00, 'Gadget', 'gallery/camera.jpeg', 4.0),

(8, 'Jewel Box', 180.00, 'Fashion', 'gallery/jewel-box.jpeg', 5.0),

(9, 'Perl Jewellery', 940.00, 'Fashion', 'gallery/perls.jpeg', 5.0); --

-- Indexes for dumped tables

-- --

-- Indexes for table `tbl_products`

--

ALTER TABLE `tbl_products` ADD PRIMARY KEY (`id`); --

-- AUTO_INCREMENT for dumped tables

-- --

-- AUTO_INCREMENT for table `tbl_products`

--

ALTER TABLE `tbl_products` MODIFY `id` int(8) NOT NULL AUTO_INCREMENT, AUTO_INCREMENT=10;
2) Download the code and configure the database
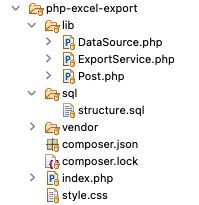
The source code contains the following files. This section explains the database configuration.
Once you download the excel export code from this page, you can find DataSource.php file in the lib folder. Open it and configure the database details in it as below.
PHP model calls prepare queries to fetch data to export
This is a PHP model class that is called to read data from the database. The data array will be sent to the export service to build the excel sheet object.
The getColumnName() reads the database table column name array. This array will supply data to form the first row in excel to create a column header.
The getAllPost() reads the data rows that will be iterated and set the data cells with the values.
lib/Post.php
<?php

class Post

{ private $ds; public function __construct() { require_once __DIR__ . '/DataSource.php'; $this->ds = new DataSource(); } public function getAllPost() { $query = "select * from tbl_products"; $result = $this->ds->select($query); return $result; } public function getColumnName() { $query = "select * from INFORMATION_SCHEMA.COLUMNS where TABLE_NAME=N'tbl_products'"; $result = $this->ds->select($query); return $result; }

}

?>
PHP excel export service
This service helps to export data to the excel sheet. The resultant file will be downloaded to the browser by setting the PHP header() properties.
The $postResult has the row data and the $columnResult has the column data.
This example instantiates the PHPSpreadSheet library class and sets the column header and values. Then it creates a writer object by setting the spreadsheet instance to output the data to excel.
Posted by: xSicKxBot - 09-24-2022, 10:30 AM - Forum: Lounge
- No Replies
Pierce Brosnan Doesn't Care Who The Next James Bond Is, But Wishes Him Well
While the search continues for the next actor to play James Bond, Pierce Brosnan--the fifth actor to play the British superspy--spoke with GQ about his indifference about who will step into the role after Daniel Craig.
"Who should do it? I don't care," Brosnan said. "It'll be interesting to see who they get, who the man shall be… whoever he be, I wish him well." Adds GQ writer Alex Pappademas, describing Brosnan's tone as "indicating it's maybe not actually that interesting."
Brosnan further adds, "I saw the last one, and I saw Skyfall. I love Skyfall. I'm not so sure about the last one [No Time to Die]. Daniel always gives of his heart. Very courageous, very strong. But…" And then, notes Pappademas, "the thought goes unfinished."
When Elise and her fiance decided to leave urban life and settle near the French coast, she could not imagine that she would end up completely alone.
Now, surrounded by strange phenomena in a dark, post-Cold War climate, Elise will have to investigate and unravel the mysteries surrounding the region of Saint-Exil, its ritualistic cult, and its lighthouse overlooking the coast.
Broken Pieces is an action-packed investigative and adventure video game set in France. The game puts you in the shoes of Elise, a woman in her thirties who finds herself in the village of Saint-Exil in an imaginary region reminiscent of Brittany. Following an unexplained paranormal phenomenon, Elise is stuck, completely alone and out of time.
Also, you’ll learn how to solve a variant of this challenge.
Bonus challenge: Find only the length of the longest list in the list of lists.
Here are some examples:
[[1], [2, 3], [4, 5, 6]]3
[[1, [2, 3], 4], [5, 6], [7]]3
[[[1], [2], [3]], [4, 5, [6]], [7, 8, 9, 10]]4
So without further ado, let’s get started!
Method 1: max(lst, key=len)
Use Python’s built-in max() function with a key argument to find the longest list in a list of lists. Call max(lst, key=len) to return the longest list in lst using the built-inlen() function to associate the weight of each list, so that the longest inner list will be the maximum.
A beautiful one-liner solution, isn’t it? Let’s have a look at a slight variant to check the length of the longest list instead.
Method 2: len(max(lst, key=len))
To get the length of the longest list in a nested list, use the len(max(lst, key=len)) function. First, you determine the longest inner list using the max() function with the key argument set to the len() function. Second, you pass this longest list into the len() function itself to determine the maximum.
A Pythonic way to check the length of the longest list is to combine a generator expression or list comprehension with the max() function without key. For instance, max(len(x) for x in lst) first turns all inner list into length integer numbers and passes this iterable into the max() function to get the result.
Here’s this approach on the same examples as before:
A not so Pythonic but still fine approach is to iterate over all lists in a for loop, check their length using the len() function, and compare it against the currently longest list stored in a separate variable. After the termination of the loop, the variable contains the longest list.
Note: If you need the length of the longest list, you could simply replace the last line of the function with return len(longest) , and you’re done!
Summary
You have learned about four ways to find the longest list and its length from a Python list of lists (nested list):
Method 1: max(lst, key=len)
Method 2: len(max(lst, key=len))
Method 3: max(len(x) for x in lst)
Method 4: Naive For Loop
I hope you found the tutorial helpful, if you did, feel free to consider joining our community of likeminded coders—we do have lots of free training material!
We are going to see three different ways of capturing screenshots of a webpage using JavaScript. These three methods give solutions to take screenshots with and without using libraries.
Using html2canvas JavaScript library.
Using plain HTML5 with JavaScript.
Using WebRTC’s getDisplayMedia method.
1) Using the html2canvas JavaScript library
This method uses the popular JS library html2canvas to capture a screenshot from a webpage.
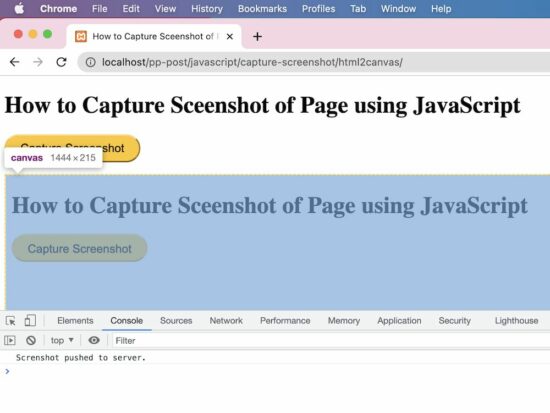
This script implements the below steps to capture a screenshot from the page HTML.
It initializes the html2canvas library class and supplies the body HTML to it.
It sets the target to append the output screenshot to the HTML body.
Generates canvas element and appends to the HTML.
It gets the image source data URL from the canvas object.
Push the source URL to the PHP via AJAX to save the screenshot to the server.
capture-screenshot/index.html
Quick example
<!DOCTYPE html>

<html>

<head>

<title>How to Capture Screenshot of Page using JavaScript</title>

<link rel='stylesheet' href='form.css' type='text/css' />

</head>

<body> <div class="phppot-container"> <h1>How to Capture Screenshot of Page using JavaScript</h1> <p> <button id="capture-screenshot">Capture Screenshot</button> </p> </div> <script src="https://ajax.googleapis.com/ajax/libs/jquery/3.2.1/jquery.min.js"></script> <script type="text/javascript" src="https://html2canvas.hertzen.com/dist/html2canvas.min.js"></script> <script type="text/javascript"> $('#capture-screenshot').click(function() { const screenshotTarget = document.body; html2canvas(screenshotTarget).then(canvas => { // to image as png use below line // const base64image = canvas.toDataURL("image/png"); // show the image in window use below line // window.location.href = base64image; // screenshot appended to the body as canvas document.body.appendChild(canvas); dataURL = canvas.toDataURL(); // to print the screenshot in console use below line // console.log(dataURL); // following line is optional and it is to save the screenshot // on the server side. It initiates an ajax call pushScreenshotToServer(dataURL); }); }); function pushScreenshotToServer(dataURL) { $.ajax({ url: "push-screenshot.php", type: "POST", data: { image: dataURL }, dataType: "html", success: function() { console.log('Screenshot pushed to server.'); } }); } </script>

</body>

</html>
This PHP script reads the screenshot binaries posted via AJAX. It prepares the screenshot properties in a JSON format.
capture-screenshot/push-screenshot.php
<?php

if (isset($_POST['image'])) { // should have read and write permission to the disk to write the JSON file $screenshotJson = fopen("screenshot.json", "a") or die("Unable to open screenshot.json file."); $existingContent = file_get_contents('screenshot.json'); $contentArray = json_decode($existingContent, true); $screenshotImage = array( 'imageURL' => $_POST['image'] ); $contentArray[] = $screenshotImage; $fullData = json_encode($contentArray); file_put_contents('screenshot.json', $fullData); fclose($screenshotJson);

}

?>
This will output a “screenshot.json” file with the image data URL and store it in the application. Video Demo
2) Using plain HTML5 with JavaScript
This JavaScript code includes two functions. One is to generate an image object URL and the other is to take screenshots by preparing the blob object from the page.
It prepares a blob object URL representing the output screenshot image captured from the page. It takes screenshots by clicking the “Capture Screenshot” button in the UI.
It controls the style properties and scroll coordinates of the node pushed to the screenshot object. This is to stop users have the mouse controls on the BLOB object.
This code will show the captured screenshot on a new page. The new page will have the generated blob URL as blob:http://localhost/0212cfc1-02ab-417c-b92f-9a7fe613808c
This method uses the JavaScript MediaServices class to capture the screenshot from the page content.
This example uses the getDisplayMedia() of this class to return the media stream of the current page content.
Note: It needs to grant permission to get the whole or part of the page content on the display.
It prepares an image source to draw into the canvas with the reference of its context. After writing the media stream object into the context, this script converts the canvas into a data URL.
This data URL is used to see the page screenshot captured on a new page.
After reading the media stream object to a screenshot element object, it should be closed. The JS MediaStreamTrack.stop() is used to close the track if it is not needed.
<!DOCTYPE html>
<html>
<head>
<title>How to Capture Sceenshot of Page using JavaScript</title>
<link rel='stylesheet' href='form.css' type='text/css' />
</head>
<body> <div class="phppot-container"> <p>This uses the WebRTC standard to take screenshot. WebRTC is popular and has support in all major modern browsers. It is used for audio, video communication.</p> <p>getDisplayMedia() is part of WebRTC and is used for screen sharing. Video is rendered and then page screenshot is captured from the video.</p> <p> <p> <button id="capture-screenshot" onclick="captureScreenshot();">Capture Screenshot</button> </p> </div> <script> const captureScreenshot = async () => { const canvas = document.createElement("canvas"); const context = canvas.getContext("2d"); const screenshot = document.createElement("screenshot"); try { const captureStream = await navigator.mediaDevices.getDisplayMedia(); screenshot.srcObject = captureStream; context.drawImage(screenshot, 0, 0, window.width, window.height); const frame = canvas.toDataURL("image/png"); captureStream.getTracks().forEach(track => track.stop()); window.location.href = frame; } catch (err) { console.error("Error: " + err); } }; </script>
</body>
</html>
Apex Legends' Throwing Knife Isn't Here To Stay, But More LTMs Are On The Way
Apex Legends developer Respawn Entertainment recently hosted two Reddit AMAs to answer questions from players regarding various aspects of the game. The first AMA took place on Tuesday, shortly after the launch of the Beast of Prey Collection Event, and featured lead game designer Robert West (/u/RoboB0b). West answered questions concerning the event's new Gun Run LTM and some of Apex's other limited-time modes. The second AMA was held yesterday, with the discussion focused on the game's weapons, legends, and overall meta. Weapons designer Eric Canavese (/u/RV-Eric) and lead legends designer Devan McGuire (/u/RV-Devan) teamed up to answer questions about game balance.
Both AMAs revealed some interesting facts about the game's development (and some hints at upcoming features). With so many questions and answers in both massive threads, it's easy to lose track of what's what, so we took a deep dive into both AMA sessions to uncover every interesting tidbit of information we could find. Keep reading for a summary of everything we learned from Respawn's Apex Legends AMA series.
AMA #1: Gun Run & LTMs
The first AMA was focused solely on questions pertaining to limited-time modes, including Gun Run.



 This article will show you how to delete a line from a file in Python.
 Question: How would we write code to remove this line?


 Finxter Challenge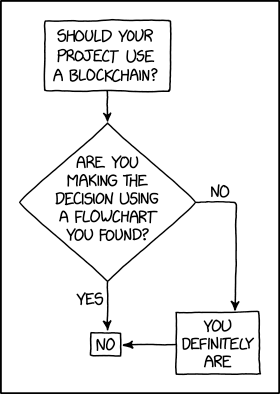


 Let’s have a look at a slight variant to check the length of the longest list instead.
 At least does the approach also work when passing in an empty list due to the ternary operator used in the first line.
 Note: If you need the length of the longest list, you could simply replace the last line of the function with