Whateverland is a hand-painted point-n-click adventure game with a branching dialogue system, non-linear gameplay, various endings and unique in-game turn-based strategy sport simulator.
Vincent is a skilled thief who decides to steal a precious necklace from a mansion of a lonely old woman named Beatrice. His plan would have gone perfectly well, but when she catches him red-handed, she turns out to be an ancient powerful witch.
As a punishment, Beatrice sends him to the parallel world she has created, where the witch traps those she considers her enemies. The first inhabitants of this bizarre world called it Whateverland, and since then it kind of stuck.
Vincent teams up with a weird guy named Nick and together they are willing to find their way out. Are they going to make it? That's for you to decide!
Posted by: xSicKxBot - 09-27-2022, 10:20 AM - Forum: Python
- No Replies
3 Best Ways to Generate a Random Number with a Fixed Amount of Digits in Python
5/5 – (1 vote)
Coding Challenge
Challenge: Given an integer d representing the number of digits. How to create a random number with d digits in Python?
Here are three examples:
my_random(2) generates 12
my_random(3) generates 389
my_random(10) generates 8943496710
I’ll discuss three interesting methods to accomplish this easily in Python—my personal favorite is Method 2!
Shortest Solution with randint()
Let’s start with an easy hand-coded observation:
The easiest way to create a random number with two digits is to use random‘s randint(10, 99), with three digits is randint(100,999), and with four digits is randint(1000,9999).
Here’s the same example in Python code:
from random import randint # Create random number with two digits (d=2):

print(randint(10, 99)) # Create random number with three digits (d=3):

print(randint(100, 999)) # Create random number with three digits (d=3):

print(randint(1000, 9999))
This solution can be generalized by using the one-liner random.randint(int('1'+'0'*(d-1)), int('9'*d)) that generates the start and end values on the fly, based on the number of digits d.
I used simple string arithmetic to define the start and end index of the random range:
int('1'+'0'*(d-1)) creates the start index such as 100 for d=3.
int('9'*d)) creates the end index that’s included in randint() such as 999 for d=3.
Here’s the basic Python example:
import random def my_random(d): ''' Generates a random number with d digits ''' return random.randint(int('1'+'0'*(d-1)), int('9'*d)) for i in range(1, 10): print(my_random(i)) '''

Output:

8

82

296

5909

90957

227691

1348638

61368798

160959002 '''
Cleanest Solution with randrange()
The cleanest solution is based on the randrange() function from the random module that takes the start and end index as input and generates a random number in between.
Unlike randint(), the end index is excluded in randrange(), so we have an easier way to construct our range for the d-digit random number problem: random.randrange(10**(d-1), 10**d).
Here’s an example:
import random def my_random(d): ''' Generates a random number with d digits ''' return random.randrange(10**(d-1), 10**d) for i in range(1, 10): print(my_random(i)) '''

Output:

7

64

872

2440

39255

979369

6897920

83589118

707920991 '''
An Iterative Solution Aggregating Outputs of Single-Digit Random Function Calls
You can also use a one-liner to repeatedly execute the random.randint() function for each digit. To combine the digits, you convert each digit to a string, pass them into the string.join() function to get one string with d characters, and convert this string back to an integer:
int(''.join(str(random.randint(0,9)) for _ in range(d)))
Here’s this exact approach in a Python code snippet:
import random def my_random(d): ''' Generates a random number with d digits ''' return int(''.join(str(random.randint(0,9)) for _ in range(d))) for i in range(1, 10): print(my_random(i)) '''

Output:

6

92

135

156

95865

409722

349673

31144072

439469934 '''
Summary
Thanks for reading through the whole article—I hope you got some value out of it.
Here’s again a summary of how to best generate a random number with d digits in Python:
random.randint(int('1'+'0'*(d-1)), int('9'*d))
random.randrange(10**(d-1), 10**d)
int(''.join(str(random.randint(0,9)) for _ in range(d)))
Personally, I like Method 2 the most because it’s short, concise, and very efficient!
This is a pure JavaScript solution to use AJAX without jQuery or any other third-party plugins.
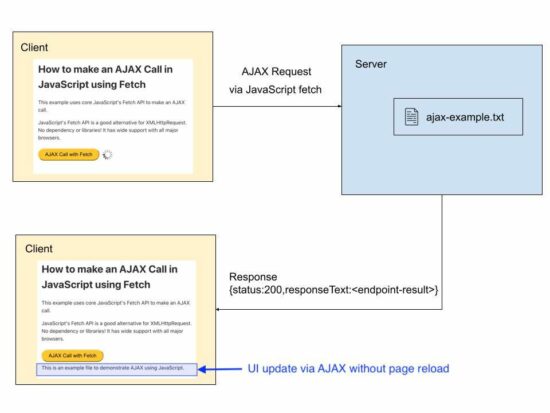
The AJAX is a way of sending requests to the server asynchronously from a client-side script. In general, update the UI with server response without reloading the page.
I present two different methods of calling backend (PHP) with JavaScript AJAX.
via XMLHTTPRequest.
using JavaScript fetch prototype.
This tutorial creates simple examples of both methods. It will be an easy start for beginners of AJAX programming. It simply reads the content of a .txt file that is in the server via JavaScript AJAX.
The below script has the following AJAX lifecycle to get the response from the server.
It instantiates XMLHttpRequest class.
It defines a callback function to handle the onreadystatechange event.
It prepares the AJAX request by setting the request method, server endpoint and more.
Calls send() with the reference of the XMLHttpRequest instance.
In the onreadystatechange event, it can read the response from the server. This checks the HTTP response code from the server and updates the UI without page refresh.
During the AJAX request processing, it shows a loader icon till the UI gets updated with the AJAX response data.
ajax-xhr.php
<!DOCTYPE html>
<html>
<head>
<title>How to make an AJAX Call in JavaScript with Example</title>
<link rel='stylesheet' href='style.css' type='text/css' />
<link rel='stylesheet' href='form.css' type='text/css' />
<style>
#loader-icon { display: none;
}
</style>
</head>
<body> <div class="phppot-container"> <h1>How to make an AJAX Call in JavaScript</h1> <p>This example uses plain JavaScript to make an AJAX call.</p> <p>It uses good old JavaScript's XMLHttpRequest. No dependency or libraries!</p> <div class="row"> <button onclick="loadDocument()">AJAX Call</button> <div id="loader-icon"> <img src="loader.gif" /> </div> </div> <div id='ajax-example'></div> <script> function loadDocument() { document.getElementById("loader-icon").style.display = 'inline-block'; var xmlHttpRequest = new XMLHttpRequest(); xmlHttpRequest.onreadystatechange = function() { if (xmlHttpRequest.readyState == XMLHttpRequest.DONE) { document.getElementById("loader-icon").style.display = 'none'; if (xmlHttpRequest.status == 200) { // on success get the response text and // insert it into the ajax-example DIV id. document.getElementById("ajax-example").innerHTML = xmlHttpRequest.responseText; } else if (xmlHttpRequest.status == 400) { // unable to load the document alert('Status 400 error - unable to load the document.'); } else { alert('Unexpected error!'); } } }; xmlHttpRequest.open("GET", "ajax-example.txt", true); xmlHttpRequest.send(); }
</script> </body>
</html>
Using JavaScript fetch prototype
This example calls JavaScript fetch() method by sending the server endpoint URL as its argument.
This method returns the server response as an object. This response object will contain the status and the response data returned by the server.
As like in the first method, it checks the status code if the “response.status” is 200. If so, it updates UI with the server response without reloading the page.
ajax-fetch.php
<!DOCTYPE html>
<html>
<head>
<title>How to make an AJAX Call in JavaScript using Fetch API with Example</title>
<link rel='stylesheet' href='style.css' type='text/css' />
<link rel='stylesheet' href='form.css' type='text/css' />
<style>
#loader-icon { display: none;
}
</style>
</head>
<body> <div class="phppot-container"> <h1>How to make an AJAX Call in JavaScript using Fetch</h1> <p>This example uses core JavaScript's Fetch API to make an AJAX call.</p> <p>JavaScript's Fetch API is a good alternative for XMLHttpRequest. No dependency or libraries! It has wide support with all major browsers.</p> <div class="row"> <button onclick="fetchDocument()">AJAX Call with Fetch</button> <div id="loader-icon"> <img src="loader.gif" /> </div> </div> <div id='ajax-example'></div> <script> async function fetchDocument() { let response = await fetch('ajax-example.txt'); document.getElementById("loader-icon").style.display = 'inline-block'; console.log(response.status); console.log(response.statusText); if (response.status === 200) { document.getElementById("loader-icon").style.display = 'none'; let data = await response.text(); document.getElementById("ajax-example").innerHTML = data; } }
</script> </body>
</html>
An example use case scenarios of using AJAX in an application
AJAX is a powerful tool. It has to be used in an effective way wherever needed.
The following are the perfect example scenarios of using AJAX in an application.
To update the chat window with recent messages.
To have the recent notification on a social media networking website.
To update the scoreboard.
To load recent events on scroll without page reload.
Posted by: xSicKxBot - 09-27-2022, 10:19 AM - Forum: Lounge
- No Replies
Disney Reportedly Wants Two Star Wars Games Per Year
Disney is betting big on Star Wars video games. The publisher is reportedly planning to put out two new Star Wars games every year, consisting of one big AAA game and one smaller game every fiscal year. That includes several games that have already been announced as part of its upcoming slate.
Insider Gaming reports that Lucasfilm is on-board for the plan as well, as reflected in several of its upcoming projects. Those include Jedi: Survivor from Respawn, Star Wars Eclipse from Quantic Dream, the competitive shooter Star Wars Hunters, and untitled games from Skydance Media, Respawn, and Ubisoft. The game from Skydance was long rumored as Amy Hennig's next project.
Insider also reports that several more games are also in pre-development. It's not clear which of these are smaller projects, or if anything in the currently announced slate fits that designation. This also suggests some of the games are still years away, like Star Wars Eclipse.
While sitting at the office during yet another boring meeting, you come across an ad for an old food truck for sale. The entrepreneur in you sees a chance to make cash and change up your life while at it. Embark on quite a different type of business venture and take control of every single aspect of it.
Create menus, cook the food and serve customers across an entire city. Customize and upgrade your food truck to reach more customers and expand your menu.
In this tutorial, we’ll have a quick look at each of them and give you a link to a more detailed resource so you can set up your Solidity compiler as quickly and efficiently as possible.
Video: For your convenience, I embedded the video tutorial provided by our Solidity expert Matija so you don’t even need to leave this page.
Without further ado, let’s get started!
Method 1: Install Solidity Compiler via npm
As you watch the video or go through this tutorial, feel free to download the following slides as well — for your convenience:
Before we go into details about the Docker installation of solc, let’s first get introduced to what Docker is.
Docker is an open platform for developing, shipping, and running applications… Docker provides the ability to package and run an application in a loosely isolated environment called a container… Containers are lightweight and contain everything needed to run the application, so you do not need to rely on what is currently installed on the host.
There are some parts of the description I’ve deliberately left out (separated by the symbol …) because they’re not essential to our understanding of the technology.
Method 3: Install Solidity Compiler via Source Code Compilation
This is a very complex way to install the Solidity compiler and I wouldn’t recommend it for most people. Due to the complexity, I’ll only give a quick overview of the associated article (tutorial).
Feel free to dive into it after scanning through these three contributions:
First, we listed and explained the software prerequisites needed for compiling a Solidity compiler. In some cases, we reached a complete explanation, and in others, we just gave a brief introductory explanation and announced an entire topic, such as in the case of the Satisfiability Modulo Theorem, SMT.
Second, we installed the prerequisites by following the first part of a step-by-step tutorial. All the examples have been checked and validated at the time of writing the article, so I expect that we’ll be able to follow them without issues. We also concluded that a compilation process can in some cases take a substantial amount of time; it took almost 40 minutes to compile the z3 SMT solver on my machine.
Third, we compiled a Solidity compiler following a step-by-step tutorial. I explained for each command example to broaden our learning process even outside of the strict scope of Solidity, to Linux (as far as we needed to go). Finally, when the compilation ended, we confirmed that our home-compiled Solidity compiler works at least as charming as the ones we’ve simply downloaded or installed in a precompiled state.
Method 4: Install Solidity Compiler via Static Binary and Linux Packages
You’ll just download the compiler’s static binary, or in short, binary, and simply run it, without any additional prerequisites or preparations required.
First, downloading the file solc-static-linux and giving it an executable privilege:
$ ~/solc-static-linux 1_Storage.sol -o output – abi – bin

Compiler run successful. Artifact(s) can be found in directory "output".
When checking our solidity_src directory, we’ll discover a new directory output, created by the Solidity compiler, containing both .abi and .bin files.
Solidity is the programming language of the future.
It gives you the rare and sought-after superpower to program against the “Internet Computer”, i.e., against decentralized Blockchains such as Ethereum, Binance Smart Chain, Ethereum Classic, Tron, and Avalanche – to mention just a few Blockchain infrastructures that support Solidity.
In particular, Solidity allows you to create smart contracts, i.e., pieces of code that automatically execute on specific conditions in a completely decentralized environment. For example, smart contracts empower you to create your own decentralized autonomous organizations (DAOs) that run on Blockchains without being subject to centralized control.
NFTs, DeFi, DAOs, and Blockchain-based games are all based on smart contracts.
This course is a simple, low-friction introduction to creating your first smart contract using the Remix IDE on the Ethereum testnet – without fluff, significant upfront costs to purchase ETH, or unnecessary complexity.
[freebies.indiegala.com] SAMOLIOTIK is a stylish shoot-em-up with different enemies, bosses, colour palettes, power-ups, set in different eras. Get it for FREE today!
The year is 1962 and NASA are trying to put a man on the moon. In a remote corner of Siberia, a Soviet cosmonaut is heading in the other direction. Comrade Ivan Ivanovich is dropped into an extinct volcano in his exploration capsule, Little Orpheus, to explore the center of the earth. He promptly vanishes.
Join our bold yet hapless hero as he explores lost civilizations, undersea kingdoms, prehistoric jungles and lands beyond imagination. Gasp as he battles the subhuman tribe of the Menkv and escapes the clutches of dreadful monsters! Cheer as he triumphs over impossible odds and brings socialism to the subterranean worlds!
Little Orpheus is a technicolor side-scrolling adventure game inspired by classic movies like Flash Gordon, Sinbad and The Land that Time Forgot. Delivered in eight bite-size, commute-friendly episodes, Little Orpheus is simple enough for casual players but rich enough for seasoned adventure fans.
All The Free Games For Xbox, PlayStation, PC, And Switch (September 2022)
While gaming can get quite pricey, these days there's almost always something great that you can add to your library without spending a dime. Entirely free games pop up every single week thanks to the Epic Games Store, and with the help of bargain friendly subscription services, there are literally hundreds of games out there that come as perks with services on Xbox, PlayStation, Switch, and PC. We've rounded up all of the free games (or free with subscriptions) that you can play now. We'll continue to keep this list updated weekly.
Our free games list focuses on full experiences that you can play without the pressure of microtransactions, so you won't find popular free-to-play games like Fortnite, Warzone, or Apex Legends here. We also aren't including free-to-start games such as Destiny 2 or Hitman 2's Starter Pack. But if you are looking for free-to-play games, we have lists rounding up the best options on PS5, PS4, Xbox Series X|S, Xbox One, PC, and Nintendo Switch.
Also, you’ll learn how to solve a variant of this challenge.
Bonus challenge: Find only the length of the shortest list in the list of lists.
Here are some examples:
[[1], [2, 3], [4, 5, 6]]1
[[1, [2, 3], 4], [5, 6], [7]]1
[[[1], [2], [3]], [4, 5, [6]], [7, 8, 9, 10]]3
So without further ado, let’s get started!
Method 1: min(lst, key=len)
Use Python’s built-in min() function with a key argument to find the shortest list in a list of lists. Call min(lst, key=len) to return the shortest list in lst using the built-inlen() function to associate the weight of each list, so that the shortest inner list will be the minimum.
A beautiful one-liner solution, isn’t it? Let’s have a look at a slight variant to check the length of the shortest list instead.
Method 2: len(min(lst, key=len))
To get the length of the shortest list in a nested list, use the len(min(lst, key=len)) function. First, you determine the shortest inner list using the min() function with the key argument set to the len() function. Second, you pass this shortest list into the len() function itself to determine the minimum.
A Pythonic way to check the length of the shortest list is to combine a generator expression or list comprehension with the min() function without key. For instance, min(len(x) for x in lst) first turns all inner list into length integer numbers and passes this iterable into the min() function to get the result.
Here’s this approach on the same examples as before:
A not so Pythonic but still fine approach is to iterate over all lists in a for loop, check their length using the len() function, and compare it against the currently shortest list stored in a separate variable. After the termination of the loop, the variable contains the shortest list.
Here’s a simple example:
def get_shortest_list(lst): shortest = lst[0] if lst else None for x in lst: if len(x) < len(shortest): shortest = x return shortest print(get_shortest_list([[1], [2, 3], [4, 5, 6]]))

# [1] print(get_shortest_list([[1, [2, 3], 4], [5, 6], [7]]))

# [7] print(get_shortest_list([[[1], [2], [3]], [4, 5, [6]], [7, 8, 9, 10]]))

# [[1], [2], [3]] print(get_shortest_list([]))

# None
So many lines of code! At least does the approach also work when passing in an empty list due to the ternary operator used in the first line.
lst[0] if lst else None
If you need a refresher on the ternary operator, you should check out our blog tutorial.
Note: If you need the length of the shortest list, you could simply replace the last line of the function with return len(shortest) , and you’re done!
Summary
You have learned about four ways to find the shortest list and its length from a Python list of lists (nested list):
Method 1: min(lst, key=len)
Method 2: len(min(lst, key=len))
Method 3: min(len(x) for x in lst)
Method 4: Naive For Loop
I hope you found the tutorial helpful, if you did, feel free to consider joining our community of likeminded coders—we do have lots of free training material!



 Challenge: Given an integer
 Video: For your convenience, I embedded the video tutorial provided by our Solidity expert


 Docker is an open platform for developing, shipping, and running applications… Docker provides the ability to package and run an application in a loosely isolated environment called a container… Containers are lightweight and contain everything needed to run the application, so you do not need to rely on what is currently installed on the host.
 This is a very complex way to install the Solidity compiler and I wouldn’t recommend it for most people. Due to the complexity, I’ll only give a quick overview of the associated article (tutorial).


 Programming Challenge: Given a
  Let’s have a look at a slight variant to check the length of the shortest list instead.
 At least does the approach also work when passing in an empty list due to the ternary operator used in the first line.
 Note: If you need the length of the shortest list, you could simply replace the last line of the function with
