Posted by: xSicKxBot - 08-12-2022, 01:58 AM - Forum: Python
- No Replies
3 Simple Steps to Convert calendar.ics to CSV/Excel in Python
Rate this post
Step 1: Install csv-ical Module with PIP
Run the following command in your command line or PowerShell (Windows) or shell or terminal (macOS, Linux, Ubuntu) to install the csv-ical library:
pip install csv-ical
In some instances, you need to modify this command a bit to make it work. If you need more assistance installing the library, check out my detailed guide.
Create a new Python code file with the extension .py or a Jupyter Notebook with the file extension .ipynb. This creates a Python script or Jupyter Notebook that can run the code in Step 3 to conver the .ics.
Now, put the .ics file to be converted in the same folder as the newly-created Python script.
Use Jupyter Notebook to create a new .ipynb file
Step 3: Convert
This step consists of running the code doing these three things:
Create and initialize a Convert object
Read the .ics file
Create the CSV object and save it at the specified location
Here’s the full code:
from csv_ical import Convert # Create and initialize a Convert object

convert = Convert()

convert.CSV_FILE_LOCATION = 'my_file.csv'

convert.SAVE_LOCATION = 'my_file.ics' # Read the .ics file

convert.read_ical(convert.SAVE_LOCATION) # Create the CSV object and save it at the specified location

convert.make_csv()

convert.save_csv(convert.CSV_FILE_LOCATION)
Google reCaptcha V3 is the latest version provided with the highest security in comparison. Google contains different captcha services with reCaptcha V2. There are the (I am not a Robot) checkbox, invisible captcha and etc.
With the V3, Google guarantees zero friction while predicting the score for the website interactions. The score and the response report returned by the reCaptcha V3 is a very good security measure. It helps to take action accordingly to safeguard the website.
Like other Google reCaptcha concepts, the V3 also has more than one method to integrate the captcha challenge. Those are two as listed below.
Programmatic invocation of the challenge.
Automatic binding of the challenge with the form button.
This article explains to implement both methods by creating examples.
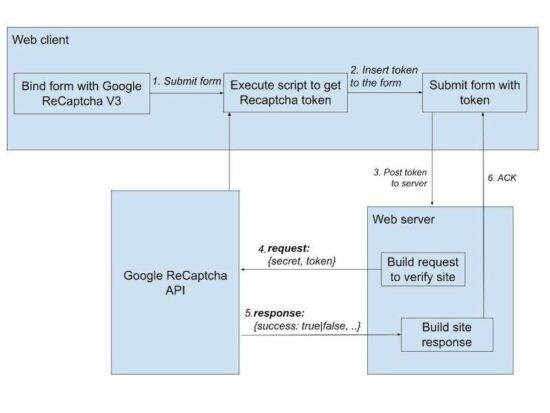
The below diagram will help to have a quick look at the Google reCaptcha V3 process flow. Continue reading to learn how to get the API keys and integrate reCaptcha for your website.
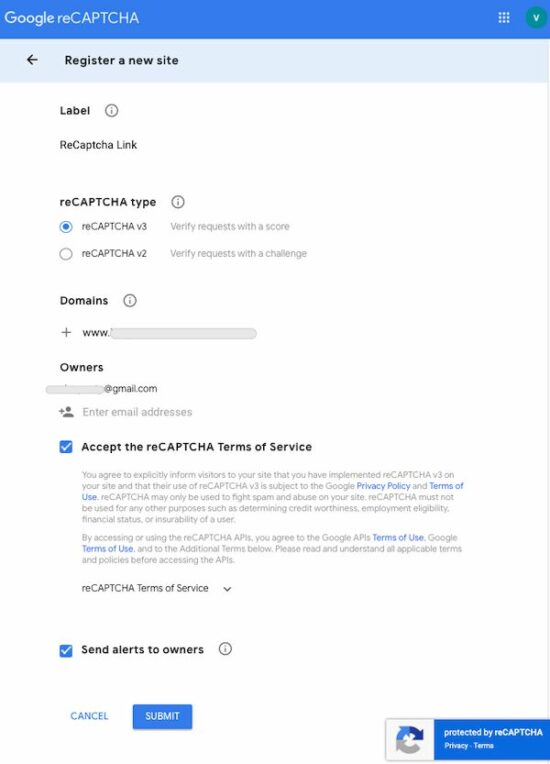
The below screenshot masked the data related to the domain and site owner details. Enter your site details in the place of the masked data.
Step2: Copy the reCaptcha site key and the secret key.
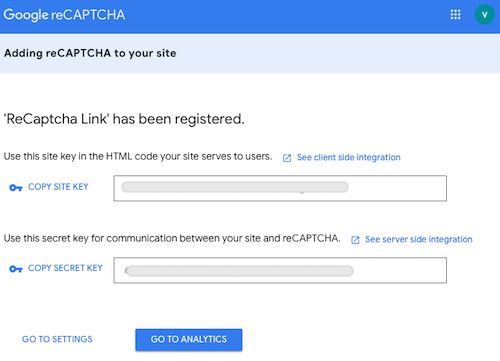
Once registration is done, the reCaptcha V3 keys are displayed below. Copy these details and configure them into the website code.
The site key is used to render the Google reCaptcha on the client side. And, the secret key is used for server-side verification.
The following example contains an application configuration file for this. Continue reading to know how to configure.
About this example
This example renders the reCaptcha script and element in the landing UI. It has the configuration to make the website reCaptcha ready with the API keys.
It gets the token from the Google reCaptcha API and appends it to the form. On submit, the server-side PHP script receives the token to send the siteverify request to the API.
It integrates the Google reCaptcha V3 programmatic challenge in the root. If you want to implement the “automatic binding” method, then it is in a separate folder.
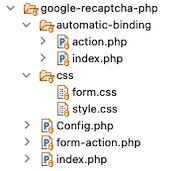
The below structure shows the reCaptcha example files order and location. It will be helpful to set up this code correctly in a development environment.
Application configuration file
It configures the Google reCaptcha V3 site and the secret keys used in the examples below.
The site key is used to render the Google recaptcha element on the client side. The secret key is used in the PHP files to build the site verification request parameters.
Method 1: Programatically invoking Google reCaptcha token via script
This method is used when the developer wants to have more programming control over the reCaptcha token.
During the explicit execution, it sets parameters to the request. These parameters can be returned with the Google reCaptcha V3 response. This will be helpful for additional verification.
HTML page renders form with reCaptcha JS
This landing page loads the JavaScript API while rendering the form UI. It uses the Google reCaptcha site key while loading the JavaScript.
// Execute Google reCaptcha v3 to get token function getToken(event) { event.preventDefault(); grecaptcha.ready(function() { grecaptcha.execute('<?php echo Config::GOOGLE_RECAPTCHA_SITE_KEY; ?>', { action: 'submit' }).then(function(token) { var button = document.createElement('input'); button.type = 'hidden'; button.name = 'recaptcha_token'; button.id = 'recaptcha_token'; button.value = token; var form = document.getElementById("frm"); form.appendChild(button); submitForm(); });; });

} // Submit reCaptcha token to the PHP

function submitForm() { const form = document.getElementById('frm'); const formData = new FormData(form); var xhttp = new XMLHttpRequest(); xhttp.open('POST', 'form-action.php', true); xhttp.send(formData); xhttp.onreadystatechange = function() { if (xhttp.readyState == 4 && xhttp.status == 200) { document.getElementById("ack-message").innerHTML = xhttp.responseText; document.getElementById('recaptcha_token').remove(); } }

}
Verify website interaction using Google reCaptcha V3 API
The form submits action calls this PHP script by sending the reCaptcha token. It builds the post parameters with the Google reCaptcha v3 secret key and token.
It returns the score about the interaction made on the website. This score will be between 0.0 (lower) and 1.1(higher) ranking. It helps to predict the necessary steps to make to protect the site.
Method 2: Automatic binding callback with the submit button
This is a basic and simple method of integrating Google reCaptcha V3 for a site. In this automatic binding of the reCaptcha challenge, it gets the token in the callback.
Site HTML to bind the reCaptcha challenge automatically
It loads the Google reCaptcha JavaScript API as we did in method 1.
The g-recaptcha field binds the callback, action, and reCaptcha site key with the HTML5 data attributes.
JavaScript callback to append token field to the form
This callback function is linked with the Google reCaptcha element, which is the send button of the form. So, on clicking the send button, it calls the onSubmit JavaScript function.
This callback has the reCaptcha token to be appended to the form data.
automatic-binding/index.php (JavaScript callback)
// JavaScript

function onSubmit(token) { var button = document.createElement('input'); button.type = 'hidden'; button.name = 'recaptcha_token'; button.value = token; var form = document.getElementById("frm"); form.appendChild(button); form.submit();

}
PHP action to predict Google reCaptcha score
In PHP, it verifies the site and checks the interaction score. It contains the same code as the form-action.php we used in method 1.
The difference is that the response is sent via session instead of printing it to AJAX callback.
The games are free to keep until August 18 2022 - 15:00 UTC.
Next week's freebie: Next one: Rumbleverse™️ - Boom Boxer Content Pack
We are welcoming everyone to join our discord[discord.gg]. We are more active there on finding giveaways, small or large, and there are daily raffles you can participate.
Join Renata as she adventures across a world of mystical ruins with the titular FROGUN! Frogun is an old-school platformer with the soul of the PS1/N64 era, in which your frog-shaped grappling hook is a your best friend!. Renata's parents are world-renown explorers, archeologists and inventors that travel all over the world uncovering the secrets of the past, bringing her with them in their expeditions. However, in their latest adventure, they decide to leave her at the base camp - the Beelzebub ruins are said to be too dangerous. For three whole days she waits, her pride hurt and bored out of her mind, until she realized: if they haven't returned yet, something must have happened to them! In a hurry she grabs her parents' last invention, the Frogun, and heads to the ruins to rescue them, and prove that she's as capable as them!
Posted by: xSicKxBot - 08-11-2022, 06:51 AM - Forum: Python
- No Replies
How to Sort Words Alphabetically in Python?
5/5 – (1 vote)
Problem Formulation and Solution Overview
In this article, you’ll learn how to sort words alphabetically in Python.
To make it more fun, we have the following running scenario:
Some English sayings, also known as Tongue-Twisters, are fun to try and say quickly. They are also used to improve non-English speaking individuals and small children’s fluency and pronunciation of the English language.
Imagine how challenging tongue twisters would be if sorted in alphabetical order!
Question: How would we write code to sort a string in alphabetical order?
We can accomplish this task by one of the following options:
This method uses Python’s built-in string library to reference split() and sort() to display the words in ascending alphabetical order.
twister = 'how much wood would a woodchuck chuck if a woodchuck could chuck wood?'.lower().split()

twister.sort()

print(twister)
Above declares a tongue twister, converts the entire string to lowercase (lower()) and breaks it apart (split()) by default, on the space (' ') character. The results save to twister in a List format. If output to the terminal, the following displays.
This method uses Python’s built-in string library to reference split() and sorted() to display the words in descending alphabetical order.
twister = 'I scream, you scream, we all scream for ice cream!'.lower()

twister = ' '.join(sorted(twister.split(), reverse=True)) print(twister)
Above declares a tongue twister, then converts the string to lowercase (lower()). The results save to twister in a List format. If output to the terminal, the following would display.
The following line breaks it apart (split()) by default, on the space (' ') character. Then, twister is sorted (sorted()) in descending alphabetical order (reverse=True).
The words are combined using the join() function, saved to twister and output to the terminal.
This method uses the famous Bubble Sort Algorithm. This function accepts a List and loops through each element, comparing two (2) values, the current element value and the next element value. The greater element floats to the top, and the loop continues until the List is sorted.
twister = 'Which wristwatches are Swiss wristwatches?'.lower().split() def bubblesort(lst): for passesLeft in range(len(lst)-1, 0, -1): for i in range(passesLeft): if lst[i] > lst[i + 1]: lst[i], lst[i + 1] = lst[i + 1], lst[i] return ' '.join(lst) print(bubblesort(twister))
Above declares a tongue twister, converts the entire string to lowercase (lower()) and breaks it apart (split()) by default, on the space (' ') character. The results save to twister in a List format. If output to the terminal, the following displays.
Then, the finxter.csv file is read in, omitting blank lines, selecting the three (3) stated columns and saving to df.
Next, sort is applied to the Rank column, which contains the words pertaining to a user’s achievement level. The DataFrame (df) is sorted based on this column and the results save to rank_sort and output to the terminal.
Below a snippet of the results displays.
FID
Username
Rank
0
30022145
wildone92
Authority
45
3002481
Moon_Star2
Authority
9
30022450
Gar_man
Authority
4
30022359
AliceM
Authority
24
3002328
Wall_2021
Authority
49
3002573
jJonesing
Authority
47
3002521
KerrStreet
Autodidact
Summary
These four (4) methods of sorting words alphabetically should give you enough information to select the best one for your coding requirements.
Good Luck & Happy Coding!
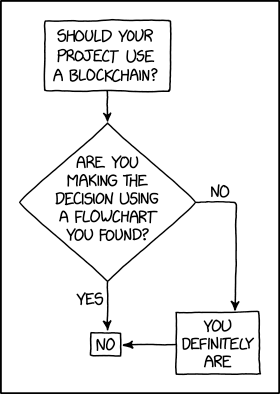
Programmer Humor – Blockchain
“Blockchains are like grappling hooks, in that it’s extremely cool when you encounter a problem for which they’re the right solution, but it happens way too rarely in real life.”source – xkcd
Class is in session! Be a good (or bad) student, join after-school activities, explore aesthetics, start trends, find your identity, and make the most of being a teenager with The Sims 4: High School Years Expansion Pack!
KEY FEATURES:
* Vibing Streamer Gear -- Transform your bedroom into a gaming paradise, streaming studio, or a platform to influence trends with a new gaming chair, wireless speaker, and LED panels.
* Experience High School -- Experience all the ups and downs of high school. Attend classes in person, get to know your teachers, hang out in the cafeteria, and even decorate your locker! Your most treasured moments might happen while loitering around with your friends after school.
* Iconic Teen Moments -- Dance the night away at prom and celebrate your graduation ceremony (if you keep up with your schoolwork!). In addition to those big moments, Sims can make lifelong friends, be asked out by other teens, participate in after-school activities and teams, and experience the rollercoaster of puberty.
* Shake Things Up -- High school is a time of self-discovery! Find the confidence to ask your crush out or the guts to skip class (don't let the principal catch you). Teen Sims will explore their own likes and dislikes, and have new opportunities to cause mischief. Pranks and sneaking out after dark can have consequences, so be careful you don't get caught.
* Explore Your Style -- Make your bedroom your own, plan outfits with clothes designed by Depop sellers, and become a Simfluencer! Teen Sims can earn money by selling outfits and hyping up looks they design on Trendi right from their bedrooms, which are now more interactive than ever. Use a laptop, read a book in bed, or even have a pillow fight!
Posted by: xSicKxBot - 08-11-2022, 06:51 AM - Forum: Lounge
- No Replies
Edgar Allan Poe Horror Biopic Raven's Hollow Gets Disturbing First Trailer
Shudder has released an official trailer for its upcoming original film, Raven's Hollow. The movie, a film that explores the early days of Edgar Allan Poe's life in 1830 while serving in the military, will arrive September 22 on the horror streaming service.
A synopsis is as follows: "West Point military Cadet Edgar Allan Poe and four other cadets on a training exercise in upstate New York come upon a man eviscerated on a bizarre wooden rack. His dying words direct them to a forgotten community, which they believe is guarding sinister secrets. Enthralled by the Innkeeper's beautiful and mysterious daughter Charlotte and fueled by the town resident's refusal to speak to the murder, Poe determines to uncover the truth. Risking his life and more, Poe ultimately comes face to face with the terror that will haunt him forever."
William Moseley (Chronicles of Narnia) stars as Poe, supported by a cast of British talent that includes Melanie Zanetti (Young Rock), Kate Dickie (Game of Thrones), David Hayman (The Nest), Oberon K. A. Adjepong (The Dark Tower), and Callum Woodhouse (All Creatures Great and Small). Writer-director Christopher Hatton (Star Trek: The Next Generation) co-wrote the film with Chuck Reeves (Ogre).
Announcing GraalVM Enterprise in OCI Code Editor and Cloud Shell
Today, we are announcing that you can use GraalVM Enterprise directly in Oracle Cloud Infrastructure (OCI) Code Editor and Cloud Shell, at no additional cost. This means you can now edit and deploy high-performance Java, Spring Boot, and Micronaut application code from a browser, without any installation and configuration.
Solidity is the programming language of the future.
It gives you the rare and sought-after superpower to program against the “Internet Computer”, i.e., against decentralized Blockchains such as Ethereum, Binance Smart Chain, Ethereum Classic, Tron, and Avalanche – to mention just a few Blockchain infrastructures that support Solidity.
In particular, Solidity allows you to create smart contracts, i.e., pieces of code that automatically execute on specific conditions in a completely decentralized environment. For example, smart contracts empower you to create your own decentralized autonomous organizations (DAOs) that run on Blockchains without being subject to centralized control.
NFTs, DeFi, DAOs, and Blockchain-based games are all based on smart contracts.
This course is a simple, low-friction introduction to creating your first smart contract using the Remix IDE on the Ethereum testnet – without fluff, significant upfront costs to purchase ETH, or unnecessary complexity.
AutoComplete is a feature to suggest relevant results on typing into a textbox. For example, Google search textbox autosuggest search phrases on keypress.
It can be enabled using client-side tools and attributes. The data for the autosuggest textbox can be static or dynamic.
For loading remote data dynamically, the source possibility is either files or databases. This article uses the database as a source to have dynamic results at the backend.
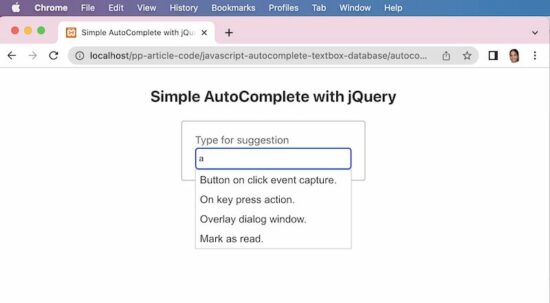
The below example has an idea for a quick script for enabling the autocomplete feature. It uses JavaScript jQuery and jQuery UI libraries to implement this easily.
The jQuery autocomplete() uses the PHP endpoint autocomplete.php script. Then, load the remote data into the textbox on the UI.
This PHP endpoint script reads the database results and forms the output JSON for the autocomplete textbox.
It receives the searched term from the UI and looks into the database for relevant suggestions.
autocomplete.php
<?php

$name = $_GET['term'];

$name = "%$name%";

$conn = mysqli_connect('localhost', 'root', '', 'phppot_autocomplete');

$sql = "SELECT * FROM tbl_post WHERE title LIKE ?";

$statement = $conn->prepare($sql);

$statement->bind_param('s', $name);

$statement->execute();

$result = $statement->get_result();

$autocompleteResult = array();

if (! empty($result)) { while ($row = $result->fetch_assoc()) { $autocompleteResult[] = $row["title"]; }

}

print json_encode($autocompleteResult);

?>
This database is for setting up the database created for this quick example. The next example also needs this database for displaying the autosuggest values.
Run the below database queries for getting a good experience with the above code execution.
CREATE TABLE `tbl_post` ( `id` int(11) UNSIGNED NOT NULL, `title` text DEFAULT NULL

) ENGINE=InnoDB DEFAULT CHARSET=utf8mb4; --

-- Dumping data for table `tbl_post`

-- INSERT INTO `tbl_post` (`id`, `title`) VALUES

(1, 'Button on click event capture.'),

(2, 'On key press action.'),

(3, 'Overlay dialog window.);
Example 2: Load autocomplete with ID
The AutoComplete function sends an additional parameter with the default term argument. That is to limit the number of results shown in the autocomplete textbox.
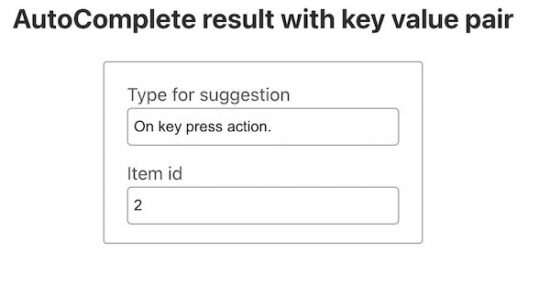
It returns the database results based on the searched term as a key-value pair. A JavaScript callback iterates the result and maps the key-value as label-value pair.
It is helpful when the result id is required while selecting a particular item from the autosuggest list.
The below screenshot shows the item value and id is populated. This data is put into the textbox on selecting the autocomplete list item.
The below JavaScript code has two textboxes. One textbox is enabled with the autocomplete feature.
On typing into that textbox, the JavaScript autocomplete calls the server-side PHP script. The callback gets the JSON output returned by the PHP script.
This JSON data contains an association of dynamic results with their corresponding id. On selecting the autocomplete result item, the select callback function access the UI.item object.
Using this object, it gets the id and post title from the JSON data bundle. Then this JavaScript callback function targets the UI textboxes to populate the title and id of the selected item.
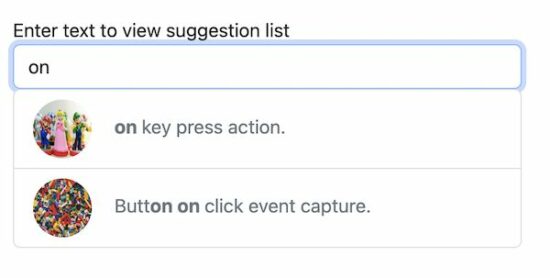
This example shows the autocomplete box with text and image data. The database for this example contains additional details like description and featured_image for the posts.
If you want a sleek and straightforward autocomplete solution with text, then use the above two examples.
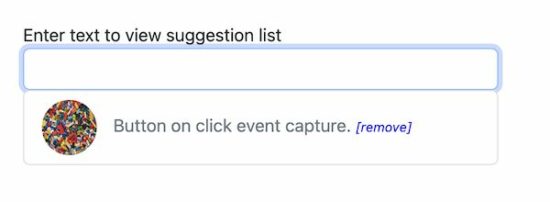
This example uses BootStrap and plain JavaScript without jQuery. It displays recent searches on focusing the autocomplete textbox.
Create AutoComplete UI with Bootstrap and JavaScript Includes
See this HTML loads the autocomplete textbox and required JavaScript and CSS assets for the UI. The autocomplete.js handles the autosuggest request raised from the UI.
The autocomplete textbox has the onKeyPress and onFocus attributes. The onKeyPress attribute calls JavaScript to show an autosuggest list. The other attribute is for displaying recent searches on the focus event of the textbox.
Get the autosuggest list from the tbl_post database table
The below JavaScript function is called on the keypress event of the autocomplete field. In the previous examples, it receives a JSON response to load the dynamic suggestion.
In this script, it receives the HTML response from the endpoint. This HTML is with an unordered list of autosuggest items.
function showSuggestionList(searchInput) { if (searchInput.length > 1) { var xhttp = new XMLHttpRequest(); xhttp.open('POST', 'ajax-endpoint/get-auto-suggestion.php', true); xhttp.setRequestHeader("Content-type", "application/x-www-form-urlencoded"); xhttp.send("formData=" + searchInput); xhttp.onreadystatechange = function() { if (xhttp.readyState == 4 && xhttp.status == 200) { document.getElementById('auto-suggestion-box').innerHTML = xhttp.responseText; } } } else { document.getElementById('auto-suggestion-box').innerHTML = ''; }

}
ajax-endpoint/get-auto-suggestion.php
<?php
require_once __DIR__ . '/../lib/DataSource.php';
$dataSource = new DataSource(); if (isset($_POST["formData"])) { $searchInput = filter_var($_POST["formData"], FILTER_SANITIZE_STRING); $highlight = '<b>' . $searchInput . '</b>'; $query = "SELECT * FROM tbl_post WHERE title LIKE ? OR description LIKE ? ORDER BY id DESC LIMIT 15"; $result = $dataSource->select($query, 'ss', array( "%" . $searchInput . "%", "%" . $searchInput . "%" )); if (! empty($result)) { ?>
<ul class="list-group">
<?php foreach ($result as $row) { ?> <li class="list-group-item text-muted" data-post-id="<?php echo $row["id"]; ?>" onClick="addToHistory(this)" role="button"><img class="post-icon" src="<?php echo $row["featured_image"]; ?>" /><span> <?php echo str_ireplace($searchInput, $highlight, $row["title"]); ?> </span></li>
<?php } ?>
</ul>
<?php }
}
?>
Add to search history
When selecting the suggested list item, it triggers this JavaScript function on click.
This function reads the post id and title added to the HTML5 data attribute. Then passes these details to the server-side PHP script.
This PHP code removes the search instances stored in the tbl_search_history database. The delete request posts the record id to fire the delete action.


 Full Guide:

 Question: How would we write code to sort a string in alphabetical order?


 A code linter is a static code analysis tool to find programming errors, bugs, style mistakes, and suspicious constructs.