Google API client library for JavaScript-based API access.
Added to that, create the API app and get the credentials.
Enable the Google Drive API.
Get the API key and Web client id from the Google developer console.
Go to the Google developer console and click “Create Credentials” to set the API key and web client id. We have seen how to get the Google API keys from the developer console in previous articles.
Steps to upload files to Google Drive with JavaScript
These are the steps to implement uploading files from an application to Google Drive using JavaScript.
Authorize by proving the identity via Google sign-in API (GSI) library challenge.
Get the access token.
Prepare the upload request by specifying the Google drive directory target (optional).
The below code shows the landing page interface in HTML and the JavaScript asset created for uploading the files to Google Drive.
HTML code to display controls for requesting authorization and upload
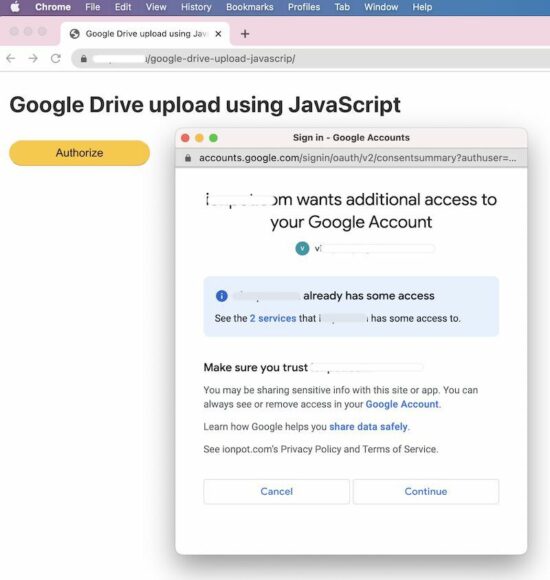
When landing on the home page, it displays an Authorize button in the UI. On clicking this button, it shows the Google sign-in overlay dialog to proceed with the authorization request.
In this step, the user must prove their identity to have access to upload to the Drive directory.
JavaScript to handle user authorization and file upload sequence
This JavaScript code initializes the gapi and gsi on a callback of loading these Google JavaScript libraries.
It also contains the handlers to trigger API requests for the following actions.
Google authorization with identity proof.
Upload files with the access token.
Refresh gapi upload action once authorized.
Signout.
This JavaScript code requires the authorization credentials to be configured. Set the CLIENT_ID and API_KEY in this script before running this example.
In this example, it sets the Google Drive folder id to upload the file via JavaScript. This configuration is optional. If no target is needed, remove the parameter from the file meta array.
js/gapi-upload.js
// TODO: Set the below credentials

const CLIENT_ID = 'SET-YOUR-CLIENT-ID';

const API_KEY = 'SET-YOUR-API-KEY'; // Discovery URL for APIs used by the quickstart

const DISCOVERY_DOC = 'https://www.googleapis.com/discovery/v1/apis/drive/v3/rest'; // Set API access scope before proceeding authorization request

const SCOPES = 'https://www.googleapis.com/auth/drive.file';

let tokenClient;

let gapiInited = false;

let gisInited = false; document.getElementById('authorize_button').style.visibility = 'hidden';

document.getElementById('signout_button').style.visibility = 'hidden'; /** * Callback after api.js is loaded. */

function gapiLoaded() { gapi.load('client', initializeGapiClient);

} /** * Callback after the API client is loaded. Loads the * discovery doc to initialize the API. */

async function initializeGapiClient() { await gapi.client.init({ apiKey: API_KEY, discoveryDocs: [DISCOVERY_DOC], }); gapiInited = true; maybeEnableButtons();

} /** * Callback after Google Identity Services are loaded. */

function gisLoaded() { tokenClient = google.accounts.oauth2.initTokenClient({ client_id: CLIENT_ID, scope: SCOPES, callback: '', // defined later }); gisInited = true; maybeEnableButtons();

} /** * Enables user interaction after all libraries are loaded. */

function maybeEnableButtons() { if (gapiInited && gisInited) { document.getElementById('authorize_button').style.visibility = 'visible'; }

} /** * Sign in the user upon button click. */

function handleAuthClick() { tokenClient.callback = async (resp) => { if (resp.error !== undefined) { throw (resp); } document.getElementById('signout_button').style.visibility = 'visible'; document.getElementById('authorize_button').value = 'Refresh'; await uploadFile(); }; if (gapi.client.getToken() === null) { // Prompt the user to select a Google Account and ask for consent to share their data // when establishing a new session. tokenClient.requestAccessToken({ prompt: 'consent' }); } else { // Skip display of account chooser and consent dialog for an existing session. tokenClient.requestAccessToken({ prompt: '' }); }

} /** * Sign out the user upon button click. */

function handleSignoutClick() { const token = gapi.client.getToken(); if (token !== null) { google.accounts.oauth2.revoke(token.access_token); gapi.client.setToken(''); document.getElementById('content').style.display = 'none'; document.getElementById('content').innerHTML = ''; document.getElementById('authorize_button').value = 'Authorize'; document.getElementById('signout_button').style.visibility = 'hidden'; }

} /** * Upload file to Google Drive. */

async function uploadFile() { var fileContent = 'Hello World'; // As a sample, upload a text file. var file = new Blob([fileContent], { type: 'text/plain' }); var metadata = { 'name': 'sample-file-via-js', // Filename at Google Drive 'mimeType': 'text/plain', // mimeType at Google Drive // TODO [Optional]: Set the below credentials // Note: remove this parameter, if no target is needed 'parents': ['SET-GOOGLE-DRIVE-FOLDER-ID'], // Folder ID at Google Drive which is optional }; var accessToken = gapi.auth.getToken().access_token; // Here gapi is used for retrieving the access token. var form = new FormData(); form.append('metadata', new Blob([JSON.stringify(metadata)], { type: 'application/json' })); form.append('file', file); var xhr = new XMLHttpRequest(); xhr.open('post', 'https://www.googleapis.com/upload/drive/v3/files?uploadType=multipart&fields=id'); xhr.setRequestHeader('Authorization', 'Bearer ' + accessToken); xhr.responseType = 'json'; xhr.onload = () => { document.getElementById('content').innerHTML = "File uploaded successfully. The Google Drive file id is <b>" + xhr.response.id + "</b>"; document.getElementById('content').style.display = 'block'; }; xhr.send(form);

}
Google Drive JavaScript Upload Response
Once authorized, the JavaScript calls the uploadFile() function to hit the Google Drive V3 API to post the file binary.
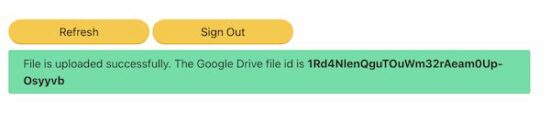
The below screenshot shows the uploaded Google Drive file id in the success message.
After sign-in, the landing page UI will display the signout option. It also shows a Refresh button to trigger upload action again in case of any issues on uploading.
Information in our possession is conflicting, but it seems that the infection has spread very quickly within a few days, perhaps even in a few hours. It seems that in the hours immediately following the outbreak of the infection, 43rd NATO airborne battalion was sent to the island but all contacts were lost after only 8 hours.
PMCW considers this matter with the utmost importance. Objectives of team W1 are:
Locate the biolab
Take in vitro samples of the pathogen (codename: "Vorax")
Liquidate surviving medical personnel (optionally) and any witnesses.
In NO case must the presence of the PMCW be revealed.
Every W1 squad member is equipped with cyanide capsules. Squad commander is authorized to start liquidation procedure in case of emergency.
Proceed with the utmost caution.
THE ENVIRONMENT
The island is vast and offers a wide variety of natural resources. There are also several settlements, a main village, a hotel and tourist attractions. In the event of an emergency landing, or loss of tactical equipment, each squad member is trained to survive in a hostile environment. As a good mercenary of a private military company, you know how to use local plants and herbs to make ointments and medications to treat state effects such as burns, bleeding, relieve your stress or simply restore your health. But more importantly, you can use building materials provided by nature to make rudimentary melee weapons, traps, barricades and much more. Even a silent bow, very useful for knocking out the infected without being detected.
THE INFECTION
It seems that the infected are the side effect of the virus grown in the bio-laboratory. Probably when a security flaw opened, the virus spread to the island.
It is not yet clear whether it spreads by air or through aquifers but what is certain is that biomass, similar to fleshy appendages that are sometimes glimpsed in the environment, are one of the final stages of the virus. The biomass therefore seems to be responsible for the mutations that occurred to the civilian inhabitants and to the military personnel who rushed to contain the first stages of the infection. Contact with non-bottled liquids or non-canned food is therefore strictly prohibited.
Mutates are fast, extremely aggressive and above all voracious. The first to be devoured were the breeding animals of the surrounding farms and estates. For this reason, any living being, human or animal, is for them a prey.
Apparently they do not devour each other ( to be confirmed ).
Finally, it seems that they are photosensitive. At least the infected humans. Our drones have in fact observed the absence of external diurnal activity by the mutants, even if some animal species that have come into contact with the pathogen, such as stray dogs, wolves, wild boars and bears, do not seem to suffer from photosensitivity.
It is therefore recommended to exercise extreme caution at night.
OPERATIONAL INFO
You will land in the North area, a few hundred meters from the bio-laboratory, at 4.30 in the morning. The helicopter will wait 25 minutes and then will take off.
Recipe for Disaster is a restaurant management and social simulation game that puts you in the shoes of an inexperienced, but ambitious, head chef working towards fulfilling your lifelong dream of becoming an internationally renowned restaurateur. Along this journey you will be tasked with carefully designing restaurants, hiring and managing the right staff, customising food menus, and experimenting with ingredients to create tasty new dishes that will impress your customers. Sounds idyllic right?
Wrong.
Blazing a trail through the highly competitive, fast-paced and stress-inducing world of the food-service industry will be anything but straightforward. After all, this is an industry built around people, and keeping everyone happy, motivated, and fulfilled will require nothing short of a miracle!
Recipe for Disaster is a restaurant management sim with a devious social twist. Contend with wilful staff, questionable cooking skills, demanding customers, and unreliable suppliers as you embark on a culinary misadventure to become the ultimate head chef!
Call Of Duty: Modern Warfare 2 Beta Dates, Early Access, And Details
Call of Duty: Modern Warfare 2 will launch on October 28, rebooting the title in 2022 and reuniting players with the series' iconic characters from Task Force 141. Here is everything you need to know in order to get hands-on with the game before launch.
Modern Warfare 2 MP beta platforms and dates
Activision has announced that Modern Warfare 2's multiplayer beta will be open to everyone, regardless of platform or whether you've preordered the game. However, PlayStation users will get first access to the beta, and those who preorder the game will get early access as well.
Artificial neural networks have become a powerful tool providing many benefits in our modern world. They are used to filter out spam, to perform voice recognition, and are even being developed to drive cars, among many other things.
As remarkable as these tools are, they are readily within the grasp of almost anyone. If you have technical interest and have some experience with computer programming you can build your own neural networks.
But before you learn the hands-on details of building neural networks you should learn some of the fundamentals of how they work. This article will cover one of those fundamentals – how neural networks learn.
Note: This article includes some algebra and calculus. If you’re not comfortable with algebra, you should still be able to understand the content from the graphs and descriptions. The calculus is not done in any detail. Again you should still be able to follow along from the descriptions. You will not learn the details of how the calculations are done. Instead, you will gain an intuitive understanding of what is going on.
Before learning this, you should be familiar with the basics of how neural networks are structured and how they operate. The article “The Magic of Neural Networks: History and Concepts” covers these basics. Still, we offer the following brief refresher.
Basic Fundamentals: How Neural Networks Work
Figure 1 shows an artificial neuron.
Figure 1: artificial neuron
Signals from other neurons come in through multiple inputs, each multiplied by its corresponding weight (Weights express the connection strengths between the neuron and each of its upstream neurons.).
A bias is input as well (bias expresses a neuron’s inherent activation, independent of its input from other neurons.). All these inputs add together, and the resulting total signal is then processed through the activation function (A sigmoid function is shown here.).
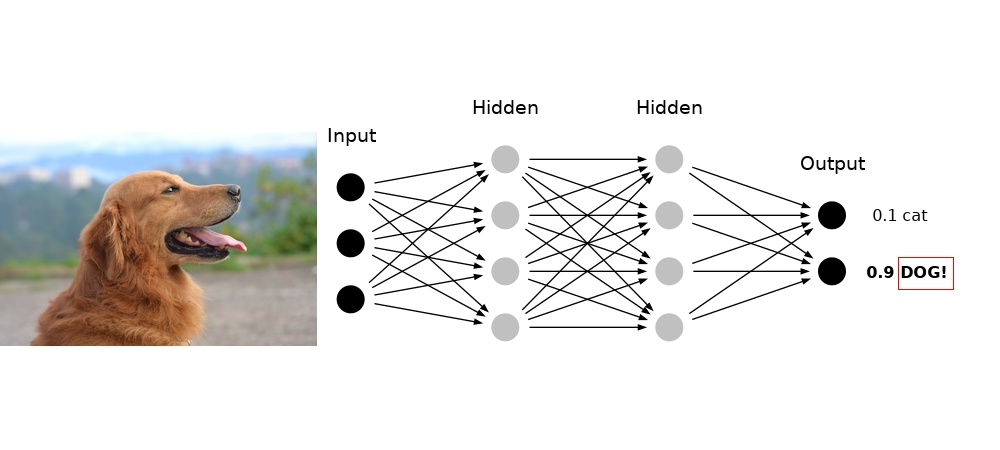
Figure 2: neural network classifying an image (Dog photo by Garfield Besa)
Figure 2 shows a network of these neurons. Signals are introduced on the input side, and they progress through the network, passing through neurons and along their connections, getting processed by the calculations described above. How the signals are processed, depends on the weights and biases among all the neurons.
The key takeaway is that it is the settings of the weights and biases that establish how the network as a whole computes. In other words, the learning and memory of the network is encoded by the weights and biases.
So how does one program these weights and biases?
They are set by training the network with samples and letting it learn by example. The details of how that is done is the subject of this article.
Overview of How Neural Networks Learn
As mentioned, a neural network’s learning and memory is encoded by the connection weights and biases of the neurons throughout the network.
These weights and biases are set by training the network on examples by following this six-step training procedure:
Provide a sample to the network.
Since the network is untrained, it will probably get the wrong answer.
Compute how far this answer is from the correct answer. This error is known as loss.
Calculate what changes in the weights and biases will make the loss smaller.
Make adjustments to those weights and biases as determined by those calculations.
Repeat this again and again with numerous samples until the network learns to answer the samples correctly.
Presenting Samples and Calculating Loss
Let’s review some of this in more detail while considering a use case.
Imagine we want to train a network to estimate crowd size.
To do this we must first train the network with a large set of images of crowds. For each image the number of people are counted. We then include labels indicating correct crowd size for each picture. This is known as a training set.
The pictures are submitted to the network, which then indicates its crowd estimate for each picture. Since the network is not trained, it surely gets the estimate wrong for each image.
For each image/label pair, the network calculates the loss for that sample.
Multiple possible choices can be used for calculating loss. One can choose any calculation that appropriately expresses how far the network’s answer is from the correct answer.
An appropriate choice for crowd-size loss estimate is the square error:
where:
Suppose we submit an image showing a crowd size of 500 people. Figure 3 shows how the error varies for crowd estimates around the true crowd size of 500 people.
Figure 3
If the Network guesses 350 people the loss is 22500. If the network guesses 600 people the loss is 10000.
Clearly, the loss is minimized when the network guesses the correct crowd size of 500 people.
But recall we said it is the weights and biases in the network that encode its learning and memory, so it is the weights and biases that determine if the network gets the right answer. So we need to adjust the weights and biases so that the network gets closer to the correct answer for this image.
In other words, we need to change the weights and biases to minimize the loss. To do that, we need to figure out how the loss varies when we vary the weights and biases.
Minimizing Loss: Calculus and the Derivative
So how do we calculate how loss changes when we vary weights and biases?
This is where calculus comes in.
(Don’t worry if you don’t know calculus, we’ll show you everything you need to know, and we’ll keep it intuitive.)
Calculus is all about determining how one variable is affected by changes in another variable.
(Strictly speaking there’s more to calculus than that, but this idea is one of the core ideas of calculus.)
The loss L depends on network output y, but y depends on input, and on weights w and biases b. So there is a somewhat long and complicated chain of dependencies we have to go through to figure out how L varies when w and b vary.
However, for the sake of learning, let’s instead start by just examing how L varies when y varies, since this is simpler and will help develop an intuition for calculus.
How L depends on y is somewhat easy – we saw the equation for it earlier, and we saw the graph of that equation in Figure 3. We can tell by looking at the graph that if the network guesses 350 then we need to increase the output y in order to reduce the loss, and that if the network guesses 600 then we need to decrease the output y in order to reduce the loss.
But with neural networks, we never have the luxury of being able to examine the graph of the loss to figure it out.
We can, however, use calculus to get our answer. To do this, we do what is called taking the derivative.
Here is the derivative of the equation for the graph in Figure 3 (note, we will not explain how this is calculated, that is the domain of a calculus course.):
This is typically referred to as “taking the derivative of L with respect to y”. You can read that dL/dy as saying “this is how L changes when y changes”. Now let’s calculate how L changes when y changes at the point y = 350:
So at y = 350, for every bit y increases, L decreases by 300. That implies that when we increase y the loss will decrease.
Now let’s calculate how L changes when y changes at the point y = 600:
So at y = 600, for every bit y increases, L increases by 200. Since we want to decrease L, that means we need to decrease y.
These calculations match what we concluded from looking at the graph.
You can also read dL/dy as saying “this is the slope of the graph”.
This makes sense: at point y = 350 the slope of the graph is -300 (sloping down steeply), while at point y = 600 the slope of the graph is 200 (sloping up, not quite so steeply).
So by using calculus and taking the derivative, we can figure out which way to change y to reduce the loss L, even when we can’t see the graph to figure it out.
Recall, however, that we want to figure out how to change the weights and biases to reduce the loss L. Also recall there is a chain of dependencies, of L depending on y, which itself depends on w and b (for several layers worth of w and b!), and on input.
So a full description could result in some rather complicated equations and some difficult derivatives. For those curious about the math details, the method for figuring out derivatives when there is such dependencies is called the chain rule.
Fortunately, with modern neural network software, the computer takes care of calculating derivatives and keeping track of and resolving the chains of dependencies in the derivatives. Just understand that, even if we can’t see its graph:
there is some relationship between the loss L and the weights w and biases b (a “graph”)
there is some set of weights and biases where the loss L is at a minimum for a given input
we can use calculus to figure out how to adjust the weights and biases to minimize loss
The Loss Surface and Gradient Descent
Let’s consider a very simple case where there are just two weights, w1 and w2, and no biases. The graph of L as a function of w1 and w2 might look like figure 4.
Figure 4: bowl-shaped error graph
In this example, with two independent weights, we end up with a bowl-shaped surface for the loss graph. In this case, the loss is minimized when w1 = 4 and w2 = 3. In the beginning, when the network is not yet trained the weights (initially set to small random numbers) are almost certainly not at the correct values for the loss to be at a minimum.
We still figure out which direction to change the weights to reduce the loss by taking the derivative.
Only this time, since there are two independent variables, we take the derivative with respect to each independently.
Important: The result is, for any given point on the loss surface, a direction (a vector, or an arrow) pointing in which direction the loss increases the fastest (“uphill”). This is known as the gradient (instead of derivative). Since we want to reduce loss, we move in the opposite direction, the negative of the gradient.
The larger point is we are still using calculus to figure out which direction to change weights to reduce loss. Repeatedly doing this moves the weights closer to the values which make the network give the correct answer for a given input. This is known as gradient descent.
However, most neural networks have many more than two weights, typically dozens for any given layer.
But the same ideas still apply: if we have a layer consisting of 16 weighted connections, the loss is a 16-dimensional surface! You can’t visualize it but it still exists mathematically, and the same principles apply!
You can still calculate the gradient, that is the derivative with respect to all 16 w’s, and figure out which direction to change the w’s to minimize the loss.
So how much do we adjust the weights and biases?
Typically they are adjusted just a small amount. This is because large adjustments can cause problems.
Refer to the loss surface shown in Figure 4. If too large a step is made, you could jump right across the loss surface bowl, even going so far as to make the loss worse!
The adjustment step size is known as the learning rate. Figuring out the best learning rate is one of the tricks to optimizing your network that a neural network engineer has to work out.
Backpropagation
Ultimately all of the weights and biases throughout the network have to be adjusted to minimize loss. This is done back from the loss, working back layer by layer to the beginning of the network, a process called backpropagation.
It has to be done this way because you can’t figure out how the first layer’s weights and biases affect loss until you know how the second layer’s weights and biases affect loss; you can’t tell how the second layer’s weights and biases effect loss until you know how the third layer’s weights and biases effect loss, and so on.
So calculations and adjustments are done starting with the last layer, then working back to the second to the last layer, and so on back to the first layer.
So that’s the core algorithm of training a neural network:
Present example image.
Calculate the loss.
Adjust the network weights and biases through backpropagation, calculating gradient descent, and making adjustments layer by layer.
Batch Size
However, recall that the objective of the training is to adjust the weights and biases for all of the images, not just one.
So how does one train the network, one image at a time, or using the entire set of all training images? Either choice is a possibility.
Ultimately the loss we want to minimize is the loss for the entire set of training samples, so a natural choice might be to run all samples through the network before making adjustments to the weights and biases. This is known as batch processing.
However performing so many calculations before making adjustments can be very demanding on computer resources and can slow the training process down.
How about adjusting weights and biases for each individual training sample? Optimum weights and biases will be different for each training sample, and this variation can introduce large randomness into the gradient descent. This is known as stochastic gradient descent.
To better understand the importance of this refer to the hypothetical loss curve in figure 5:
Figure 5: local and global minimum
Notice that there is more than one minimum: there is a local minimum at point B, which is not quite the lowest loss, and a global minimum at point A that is truly the minimum where the loss is lowest.
It is truly possible (even likely) to get loss curves like this, with multiple local minima, and it’s also possible for the network to get stuck in one of these local minima.
The randomness of single sample training can help knock the network out of a local minimum if it gets stuck in one, so there is some benefit to stochastic gradient descent.
However, the randomness can be so extreme that it can actually knock the network out of the true global minimum if it happens to reach it before a training cycle ends. This can slow the training as the network has to work back down to minimize the loss again.
So in practice, it turns out the best approach is to use minibatches. These are batch sizes of perhaps a few hundred samples that are run through the network, and then adjustments are made.
The network runs through mini batch after many batch until the entire set of training samples has been processed. This has enough randomness to it that it has the same benefit as stochastic gradient descent of pushing the network out of local minima, but not so much randomness that the loss can get worse.
Running through the entire set of training samples once is called an epoch.
Typically networks must run through many epochs to become fully trained. Also the ordering and grouping of training samples within and between batches is randomized from epoch to epoch. This is to avoid overfitting.
Overfitting is when the network performs successfully on the training samples, but fails on samples it has not seen before. This is like a person memorizing a set of samples, rather than generalizing characteritics from those samples so that it can be successful on new samples.
After training the network is then tested on a test set. This is a set of samples the network has not seen before. This allows one to assess how well the trained network performs. It checks to see how effective the network is on unknown samples, and checks to make sure overfitting has not occurred.
How Neural Networks Learn
So that is the full process of how neural networks learn:
Train the network by presenting it minibatches of samples from the training set.
The training algorithm calculates the loss for the minibatch.
The algorithm calculates the gradient of the loss.
The network adjusts weights and biases according to the gradient calculations, through the process of backpropagation and gradient descent.
Running this sequence through all training samples is called an epoch.
This is then repeated for multiple epochs, until the network is successfully trained on the training set.
Finally the network is tested on a test set to make sure it works successfully and does not suffer from overfitting.
We hope you have found this lesson on how neural networks learn informative.
Example 1 – Disabling cut, copy, paste and mouse right-click events
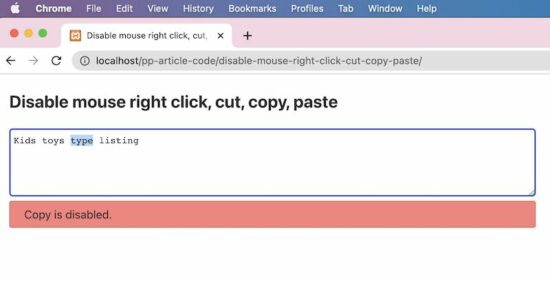
This JavaScript disables the cut, copy, paste and right-click on a textarea content.
It defines a callback invoked on document ready event. It uses jQuery.
In this callback, it listens to the cut, copy, paste and the mouse right-click action requests.
When these requests are raised this script prevents the default behavior. Hence, it stops the expected action based on the cut, copy, and other requests mentioned above.
This example is a thin version of the above. It also uses the jQuery library to disable the cut, copy paste and right-click events.
This binds all the events to be disabled. It has a single-line code instead of creating exclusive listeners for each event.
This method has a slight disadvantage. That is, it shows a generic message while stopping any one of the cut, copy, paste and right-click events.
In the first method, the acknowledgment message is too specific. That message gives more clarity on what is triggered and what is disabled and prevented.
But, the advantage of the below example is that it is too thin to have it as a client-side feature in our application.
$(document).ready(function() { $('textarea').bind('cut copy paste contextmenu', function(e) { e.preventDefault(); $("#phppot-message").text('The Cut copy paste and the mouse right-click are disabled.'); $("#phppot-message").show(); });

});
Example 3 – For JavaScript lovers
Do you want a pure JavaScript solution for this example? The below script achieves this to disable cut, copy, paste and right-click.
It has no jQuery or any other client-side framework or libraries. I believe that the frameworks are for achieving a volume of effects, utils and more.
If the application is going to have thin requirements, then no need for any framework.
HTML with onCut, onCopy, onPaste and onContextMenu attributes
The Textarea field in the below HTML has the following callback attributes.
onCut
OnCopy
onPaste
onContextMenu
In these event occurrences, it calls the disableAction(). It sends the event object and a string to specify the event occurred.
JavaScript function called on cut, copy, paste and on right click
In the JavaScript code, it reads the event type and disables it.
The event.preventDefault() is the common step in all the examples to disable the cut, copy, paste and right click.
function disableAction(event, action) { event.preventDefault(); document.getElementById("phppot-message").innerText = action + ' is disabled.'; document.getElementById("phppot-message").style.display = 'block';

}
Disclaimer
The keyboard or mouse event callbacks like onMouseDown() or onKeyDown lags in performance. Also, it has its disadvantages. Some of them are listed below.
The keys can be configured and customized. So, event handling with respect to the keycode is not dependable.
On clicking the mouse right, it displays the menu before the onMouseDown() gets and checks the key code. So, disabling mouse-right-click is failed by using onMouseDown() callback.
Above all, an user can easily disable JavaScript in his browser and use the website.
[www.indiegala.com] This weekend only, you will not find a better Paradox Steam deal than this! Get Age of Wonders: Planetfall (Premium Edition), BATTLETECH (Mercenary Collection & Shadow Hawk Pack), Pillars of Eternity (Definitive Edition), Knights of Pen and Paper + 1 & 2 Deluxiest Edition + the Haunted Fall & Here Be Dragons expansions & more in the exclusive PDX Mini Legacy Bundle (while stocks last). BONUS: Get 5% CashBack for any purchase immediately.
Echo of the Wilds FREEbie
[freebies.indiegala.com] Check out the newest summer FREEbie: Echo of the Wilds, a puzzle narrative adventure, featuring randomized wilderness survival elements.
Fortnite Dragon Ball: Where To Find Kamehameha, Nimbus Cloud, And Capsules
Fortnite's long-awaited Dragon Ball crossover is now underway with a massive event absolutely packed full of new POIs, skins and cosmetics to snag, and a fresh batch of utility items to check out. Those looking to find the brand new Dragon Ball-themed items to use on the battle royale island should look no further, as we'll tell you all about where you can score Kamehameha and Nimbus Cloud below.
Where to get Kamehameha and Nimbus Cloud
There are multiple methods to obtain the new Mythic-level Dragon Ball items.
Capsules
The most consistent way to get Kamehameha and Nimbus Cloud items is to loot Capsule Corp capsules which fall from the sky throughout the match. These function similarly to supply drops, except they're much more prevalent, and they'll fall more and more often as the storm ring closes in.
What if the physical objects of everyday life, the possessions we hold close, were actual windows to the past? Peer into distant memories and unseen futures in Hindsight.
A Simple Guide for Using Command Line Arguments in Python
5/5 – (2 votes)
In this lesson, we will learn several methods for using arguments in the command line and how we can manipulate them to run in our pre-written Python scripts.
The three methods we will explore and compare are:
sys.argv
argparse
getopt
These are ordered for ease of use and simplicity.
I’ve added thegetopt() method for demonstration purposes and have included it at the end because I find it the least useful of the three – you may have a different opinion, so check it out and make your own conclusions.
Method 1- sys.argv
First, we will need to import the sys module – “System- specific parameters and functions.”
argv stands for “argument vector”, and is basically a variable that contains arguments passed through the command line.
I’m using the VScode text editor for my scripts, as you can see in the file path, and then follow that by calling “Python” before the actual file name and arguments. This will be the same with each method.
You can abbreviate Python as py after vscode if you wish to save on typing and that will work fine.
import sys print('What is the name of the script?', sys.argv[0])

print('How many arguments?', len(sys.argv))

print('What are the arguments?', str(sys.argv))
# Adding arguments on command line

(base) PS C:\Users\tberr\.vscode> python test_command.py 3 4 5 6
Output:
What is the name of the Script? test_command.py

How many arguments? 5

What are the arguments? ['test_command.py', '3', '4', '5', '6']
We can see that the file name is the first argument located at the [0] index position and the four integers are located at index[1:] (1, 2, 3, 4) in our list of strings.
Now let’s do some code that is a little more involved.
Simple script for adding numbers with the numbers entered on the command line.
import sys # total arguments

n = len(sys.argv)

print("Total arguments passed:", n) # Arguments passed

print("\nName of Python script:", sys.argv[0]) print("\nArguments passed:", end = " ")

for i in range(1, n): print(sys.argv[i], end = " ") # Addition of numbers

Sum = 0

# Using argparse module (we will talk about argparse next)

for i in range(1, n): Sum += int(sys.argv[i]) print("\n\nResult:", Sum)
Output with arguments entered on command line:
(base) PS C:\Users\tberr\.vscode> python test_command.py 4 5 7 8

Total arguments passed: 5 Name of Python script: test_command.py Arguments passed: 4 5 7 8 Result: 24
This gives the user the total arguments passed, the name of the script, arguments passed (not including script name), and the “Sum” of the integers. Now let’s get to the argparse method.
Note: If you are getting an ‘error’ or different results than expected when you pass arguments on the command line, make sure that the file you’re calling has been saved. If your Python file has been changed or is new it will not work until you do so.
Method 2 – argparse
Parser for command-line options, arguments, and sub-commands.
argparse is recommended over getopt because it is simpler and uses fewer lines of code.
Code:
import argparse # Initialize the parser

parser = argparse.ArgumentParser(description = 'process some integers.') # Adding Arguments

parser.add_arguments('integers', metavar = 'N', type = int, nargs = '+', help = 'an integer for the accumulator') parser.add_arguments(dest = 'accumulate', action = 'store_const", const = sum, help = 'sum the integers') args = parser.parse_args()

print(args.accumulate(args.integers))
We see that first, we initialize the parser and then add arguments with the ‘parser.add_arguments’ section of the code.
We also add some help messages to guide the user on what is going on with the script. This will be very clear when we enter arguments on the command line and see our output.
Output:
# Add arguments on the command line. -h (for help) and four integers (base) PS C:\Users\tberr\.vscode> python argparse.py -h 5 3 6 7

usage: argparse.py [-h] N [N ...] Process some integers. positional arguments: N an integer for the accumulator accumulate sum the integers optional arguments: -h, – help show this help message and exit # Run code again without the help argument, just sum the integers.

(base) PS C:\Users\tberr\.vscode> python argParse.py 5 3 6 7

21
This is an excellent, clean way to pass arguments on the command line, and the addition of the ‘help’ argument can make this very clear for the user.
For more details on arguments like [‘metavar’], [‘const’], [‘action’], and [‘dest’], check out this LINK
Method 3 – getopt
A method for parsing command line options and parameters, very similar to the getopt() function in the C language. This is some basic code to get the name of the user on the command line.
Code:
import sys

import getopt def full_name(): first_name = None last_name = None argv = sys.argv[1:] try: opts, args = getopt.getopt(argv, "f:l:") except: print("Error") for opt, arg in opts: if opt in ['-f']: first_name = arg elif opt in ['-l']: last_name = arg print( first_name +" " + last_name) full_name()
We have set arguments ‘f’ and ‘l’ for first and last name, and will pass them in the command line arguments.
Output in command line:
(base) PS C:\Users\tberr\.vscode> py getOpt.py -f Tony -l Berry Tony Berry
This is certainly a lot of code to get such a simple result as ‘Full Name’, and is the reason I prefer both the sys.argv and argparse modules over getopt. That doesn’t mean you won’t find some value in the getopt module, this is simply my preference.
Summary
These are all powerful Python tools that can be helpful when users want to interact with your code and can make the process simple and clear.
We have covered the basics here to get you started and give you an idea of a few built-in modules of Python.






 The key takeaway is that it is the settings of the weights and biases that establish how the network as a whole computes. In other words, the learning and memory of the network is encoded by the weights and biases.