Take control of Hel, one of the original games’ bosses, as she descends Dharma Tower on a bloody quest of her own. Designed to appeal to new players and veterans, she’s more combat-oriented and can survive an additional attack compared to the Ghostrunner. Run on walls, soar through neon cityscapes, and slice through six levels while mastering Hel’s powers through her own ability progression system. Battle new enemies and bosses to the beat of six fresh tracks courtesy of electronic musician Daniel Deluxe.
Using Kubernetes ConfigMaps to define your Quarkus application’s properties
So, you wrote your Quarkus application, and now you want to deploy it to a Kubernetes cluster. Good news: Deploying a Quarkus application to a Kubernetes cluster is easy. Before you do this, though, you need to straighten out your application’s properties. After all, your app probably has to connect with a database, call other services, and so on. These settings are already defined in your application.properties file, but the values match the ones for your local environment and won’t work once deployed onto your cluster.
So, how do you easily solve this problem? Let’s walk through an example.
Create the example Quarkus application
Instead of using a complex example, let’s take a simple use case that explains the concept well. Start by creating a new Quarkus app:
You can keep all of the default values while creating the new application. In this example, the application is named hello-app. Now, open the HelloResource.java file and refactor it to look like this:
@Path("/hello") public class HelloResource { @ConfigProperty(name = "greeting.message") String message; @GET @Produces(MediaType.TEXT_PLAIN) public String hello() { return "hello " + message; } }
In your application.properties file, now add greeting.message=localhost. The @ConfigProperty annotation is not in the scope of this article, but here we can see how easy it is to inject properties inside our code using this annotation.
Now, let’s start our application to see if it works as expected:
$ mvn compile quarkus:dev
Browse to http://localhost:8080/hello, which should output hello localhost. That’s it for the Quarkus app. It’s ready to go.
Deploy the application to the Kubernetes cluster
The idea here is to deploy this application to our Kubernetes cluster and replace the value of our greeting property with one that will work on the cluster. It is important to know here that all of the properties from application.properties are exposed, and thus can be overridden with environment variables. The convention is to convert the name of the property to uppercase and replace every dot (.) with an underscore (_). So, for instance, our greeting.message will become GREETING_MESSAGE.
At this point, we are almost ready to deploy our app to Kubernetes, but we need to do three more things:
Create a Docker image of your application and push it to a repository that your cluster can access.
Define a ConfgMap resource.
Generate the Kubernetes resources for our application.
To create the Docker image, simply execute this command:
Be sure to set the right Docker username and to also push to an image registry, like docker-hub or quay. If you are not able to push an image, you can use sebi2706/hello-app:latest.
Make sure that you are connected to a cluster and apply this file:
$ kubectl apply -f config-hello.yml
Quarkus comes with a useful extension, quarkus-kubernetes, that generates the Kubernetes resources for you. You can even tweak the generated resources by providing extra properties—for more details, check out this guide.
After installing the extension, add these properties to our application.properties file so it generates extra configuration arguments for our containers specification:
Then, browse to the public URL or do a curl. For instance, with Minikube:
$ curl $(minikube service hello-app --url)/hello
This command should output: hello Kubernetes.
Conclusion
Now you know how to use a ConfigMap in combination with environment variables and your Quarkus’s application.properties. As we said in the introduction, this technique is particularly useful when defining a DB connection’s URL (like QUARKUS_DATASOURCE_URL) or when using the quarkus-rest-client (ORG_SEBI_OTHERSERVICE_MP_REST_URL).
Posted by: xSicKxBot - 03-27-2022, 04:07 AM - Forum: Python
- No Replies
Python os.walk() – A Simple Illustrated Guide
According to the Python version3.10.3 official doc, the os module provides built-in miscellaneous operating system interfaces. We can achieve many operating system dependent functionalities through it. One of the functionalities is to generate the file names in a directory tree through os.walk().
If it sounds great to you, please continue reading, and you will fully understand os.walk through Python code snippets and vivid visualization.
In this article, I will first introduce the usage of os.walk and then address three top questions about os.walk, including passing a file’s filepath to os.walk, os.walk vs. os.listdir, and os.walk recursive.
top: accepts a directory(or file) path string that you want to use as the root to generate filenames.
2. Optional parameters:
topdown: accepts a boolean value, default=True. If True or not specified, directories are scanned from top-down. Otherwise, directories are scanned from the bottom-up. If you are still confused about this topdown parameter like I first get to know os.walk, I have a nicely visualization in the example below.
onerror: accepts a function with one argument, default=None. It can report the error to continue with the walk, or raise the exception to abort the walk.
followlinks: accepts a boolean value, default=False. If True, we visit directories pointed to by symlinks, on systems that support them.
Tip: Generally, you only need to use the first two parameters in bold format.
Output
Yields 3-tuples (dirpath, dirnames, filenames) for each directory in the tree rooted at directory top (including top itself).
Example
I think the best way to comprehend os.walk is walking through an example.
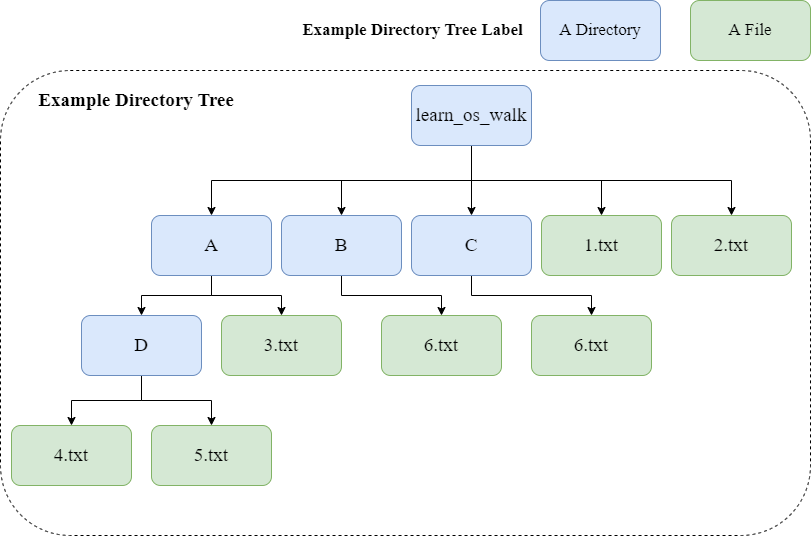
Our example directory tree and its labels are:
By the way, the difference between a directory and a file is that a directory can contains many files like the above directory D contains 4.txt and 5.txt.
Back to our example, our goal is to
Generate filenames based on the root directory, learn_os_walk
Understand the difference between topdown=True and topdown=False
To use the os.walk() method, we need to first import os module:
import os
Then we can pass the input parameters to the os.walk and generate filenames. The code snippet is:
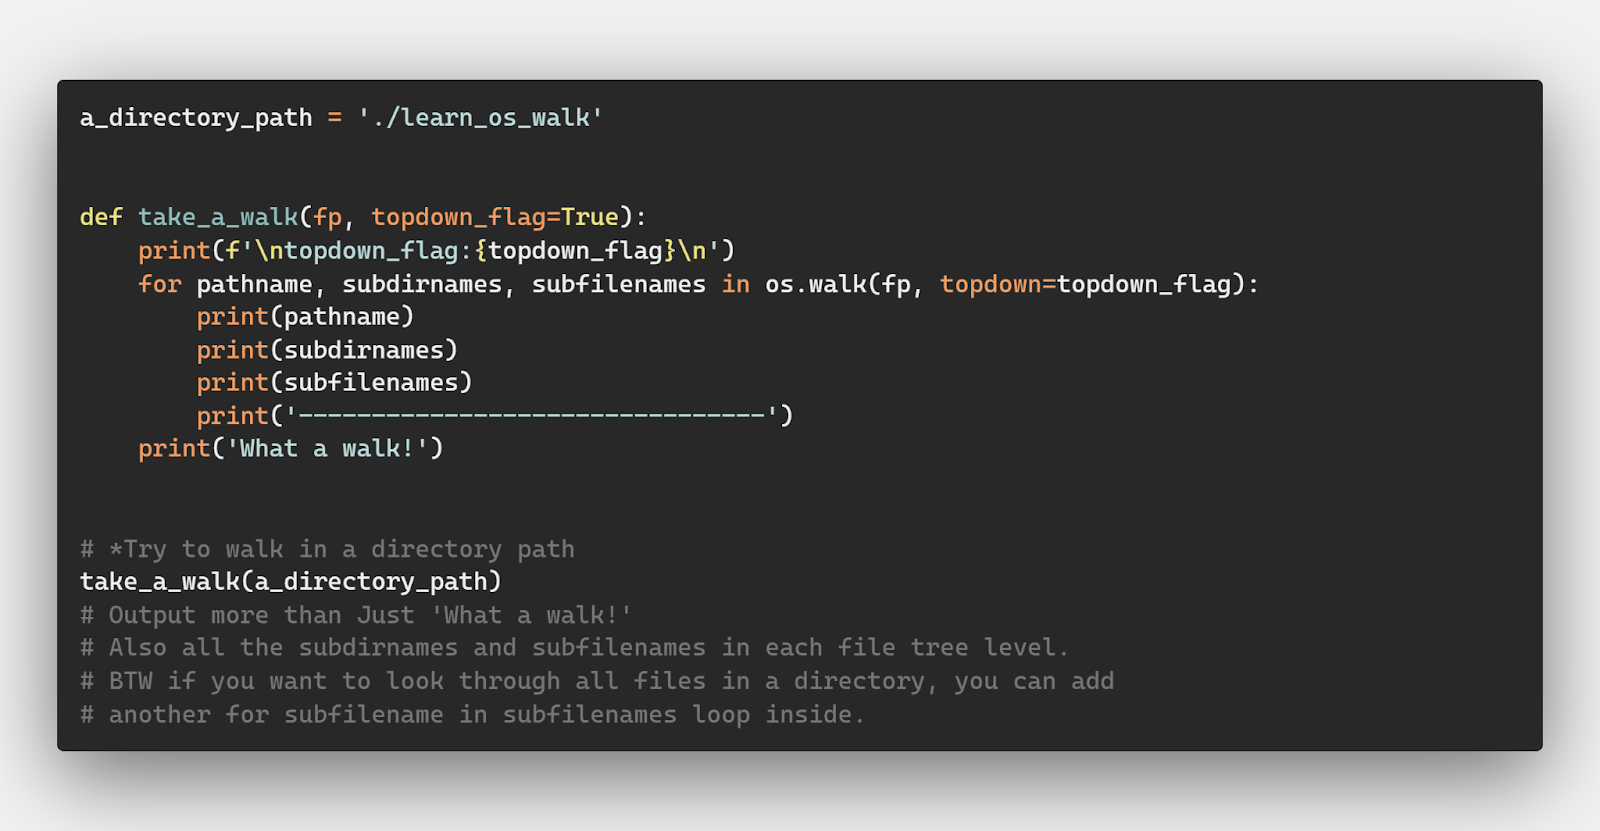
a_directory_path = './learn_os_walk' def take_a_walk(fp, topdown_flag=True): print(f'\ntopdown_flag:{topdown_flag}\n') for pathname, subdirnames, subfilenames in os.walk(fp, topdown=topdown_flag): print(pathname) print(subdirnames) print(subfilenames) print('--------------------------------') print('What a walk!') # *Try to walk in a directory path

take_a_walk(a_directory_path)

# Output more than Just 'What a walk!'

# Also all the subdirnames and subfilenames in each file tree level.

# BTW if you want to look through all files in a directory, you can add

# another for subfilename in subfilenames loop inside.
The above code has a function take_a_walk to use os.walk along with a for loop. This is the most often usage of os.walk so that you can get every file level and filenames from the root directory iteratively.
For those with advanced knowledge in Python’s generator, you would probably have already figured out that os.walk actually gives you a generator to yield next and next and next 3-tuple……
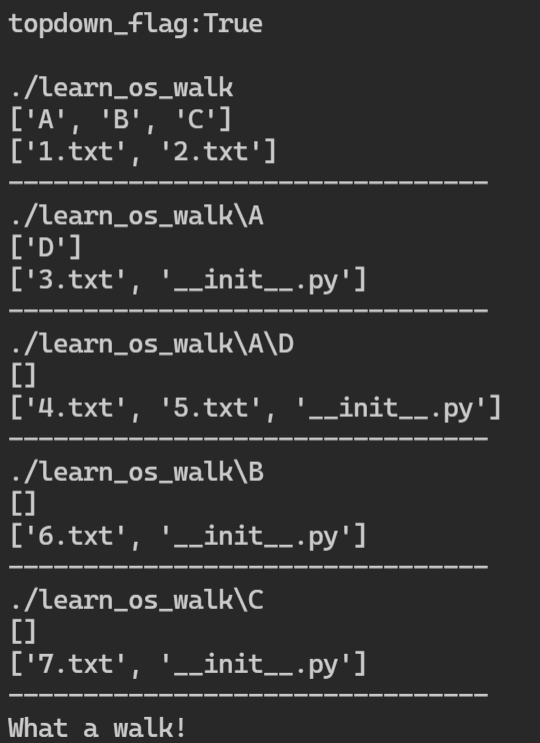
Back in this code, we set a True flag for the topdown argument. Visually, the topdown search way is like the orange arrow in the picture below:
And if we run the above code, we can the below result:
If we set the topdown to be False, we are walking the directory tree from its bottom directory D like this:
The corresponding code snippet is:
a_directory_path = './learn_os_walk' def take_a_walk(fp, topdown_flag=False): print(f'\ntopdown_flag:{topdown_flag}\n') for pathname, subdirnames, subfilenames in os.walk(fp, topdown=topdown_flag): print(pathname) print(subdirnames) print(subfilenames) print('--------------------------------') print('What a walk!') # *Try to walk in a directory path

take_a_walk(a_directory_path)

# Output more than Just 'What a walk!'

# Also all the subdirnames and subfilenames in each file tree level.

# BTW if you want to look through all files in a directory, you can add

# another for subfilename in subfilenames loop inside.
And if we run the above code, we can the below result:
Now, I hope you understand how to use os.walk and the difference between topdown=True and topdown=False.
Here’s the full code for this example:
__author__ = 'Anqi Wu' import os a_directory_path = './learn_os_walk'

a_file_path = './learn_os_walk.py' # same as a_file_path = __file__ def take_a_walk(fp, topdown_flag=True): print(f'\ntopdown_flag:{topdown_flag}\n') for pathname, subdirnames, subfilenames in os.walk(fp, topdown=topdown_flag): print(pathname) print(subdirnames) print(subfilenames) print('--------------------------------') print('What a walk!') # *Try to walk in a file path

take_a_walk(a_file_path)

# Output Just 'What a walk!'

# Because there are neither subdirnames nor subfilenames in a single file !

# It is like:

# for i in []:

# print('hi!') # We are not going to execute this line. # *Try to walk in a directory path

take_a_walk(a_directory_path)

# Output more than Just 'What a walk!'

# Also all the subdirnames and subfilenames in each file tree level.

# BTW if you want to look through all files in a directory, you can add

# another for subfilename in subfilenames loop inside. # *Try to list all files and directories in a directory path

print('\n')

print(os.listdir(a_directory_path))

print('\n')
How to Pass a File’s filepath to os.walk?
Of course, you might wonder what will happen if we pass a file’s filepath, maybe a Python module filepath string like './learn_os_walk.py' to the os.walk function.
This is exactly a point I was thinking when I started using this method. The simple answer is that it will not execute your codes under the for loop.
For example, if you run a code in our learn_os_walk.py like this:
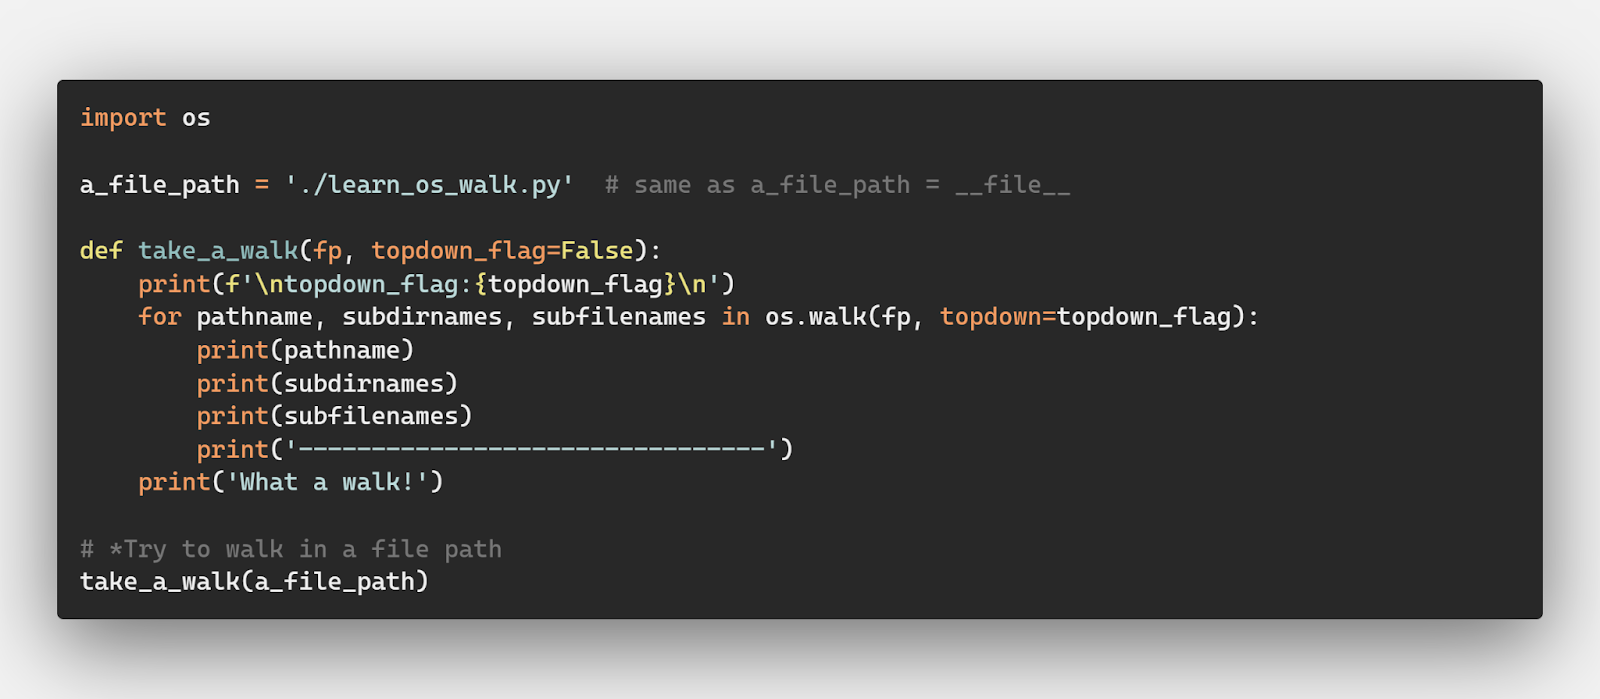
import os a_file_path = './learn_os_walk.py' # same as a_file_path = __file__ def take_a_walk(fp, topdown_flag=False): print(f'\ntopdown_flag:{topdown_flag}\n') for pathname, subdirnames, subfilenames in os.walk(fp, topdown=topdown_flag): print(pathname) print(subdirnames) print(subfilenames) print('--------------------------------') print('What a walk!') # *Try to walk in a file path

take_a_walk(a_file_path)
The only output would be like this:
Why is that?
Because there are neither subdirnames nor subfilenames in a single file! It is like you are writing the below code:
for i in []: print('hi!')
And you will not get any 'hi' output because there is no element in an empty list.
Now, I hope you understand why the official doc tells us to pass a path to a directory instead of a file’s filepath
os.walk vs os.listdir — When to Use Each?
A top question of programmers concerns the difference between os.walk vs os.listdir.
The simple answer is:
The os.listdir() method returns a list of every file and folder in a directory. The os.walk() method returns a list of every file in an entire file tree.
Well, if you feel a little bit uncertain, we can then use code examples to help us understand better!
We will stick to our same example directory tree as below:
In this case, if we call os.listdir() method and pass the directory path of learn_os_walk to it like the code below:
import os a_directory_path = './learn_os_walk' # *Try to list all files and directories in a directory path

print('\n')

print(os.listdir(a_directory_path))

print('\n')
And we will get an output like:
That’s it! Only the first layer of this entire directory tree is included. Or I should say that the os.listdir() cares only about what is directly in the root directory instead of searching through the entire directory tree like we see before in the os.walk example.
Summary
Summary: If you want to get a list of all filenames and directory names within a root directory, go with the os.listdir() method. If you want to iterate over an entire directory tree, you should consider os.walk() method.
Now, I hope you understand when to use os.listdir and when to use os.walk
os.walk() Recursive — How to traverse a Directory Tree?
Our last question with os.walk is about how to literally iterate over the entire directory tree.
Concretely, we have some small goals for our next example:
Iterate over all files within a directory tree
Iterate over all directories within a directory tree
All examples below are still based on our old friend, the example directory tree:
Iterate over all files within a directory tree
First, let’s head over iterating over all files within a directory tree. This can be achieved by a nested for loop in Python.
The potential application could be some sanity checks or number counts for all files within one folder. How about counting the number of .txt files within one folder? Let’s do it!
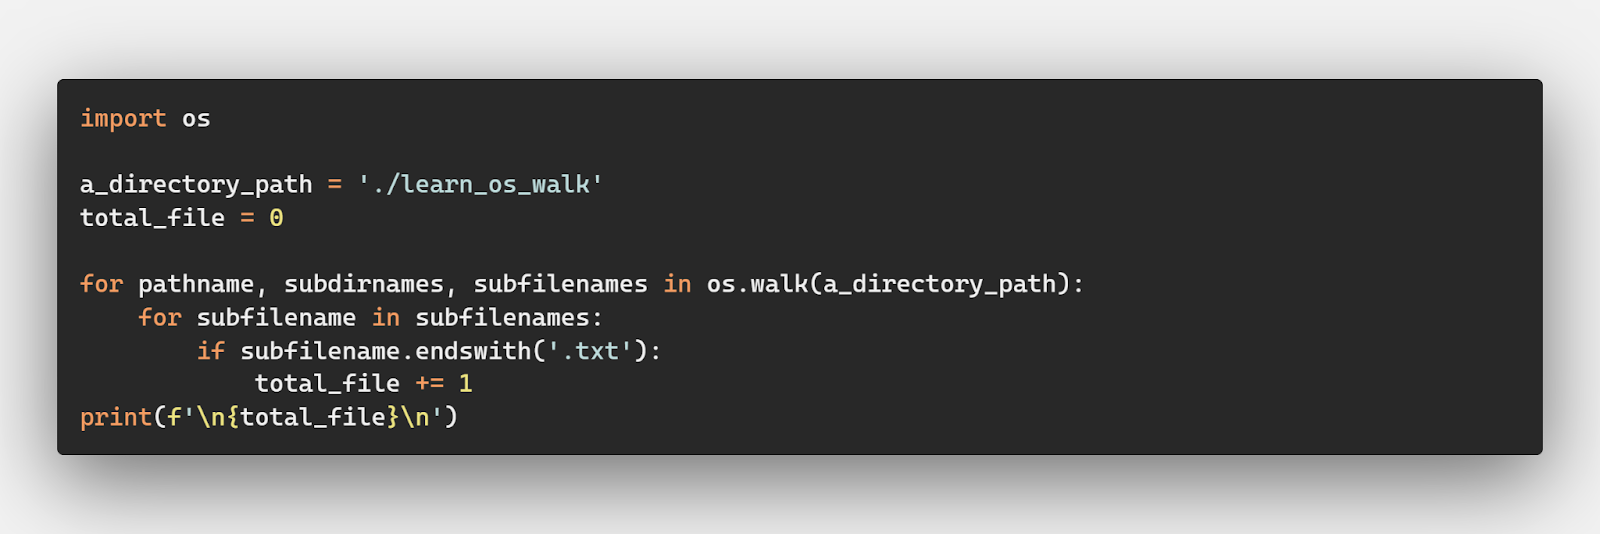
The code for this application is:
import os a_directory_path = './learn_os_walk'

total_file = 0 for pathname, subdirnames, subfilenames in os.walk(a_directory_path): for subfilename in subfilenames: if subfilename.endswith('.txt'): total_file += 1

print(f'\n{total_file}\n')
As you can see, we use another for loop to iterate over subfilenames to get evey file within a directory tree. The output is 7 and is correct according to our example directory tree.
Iterate over all directories within a directory tree
Last, we can also iterate over all directories within a directory tree. This can be achieved by a nested for loop in Python.
The potential application could be also be some sanity checks or number counts for all directories within one folder. For our example, let’s check if all directories contains __init__.py file and add an empty __init__.py file if not.
Idea: The __init__.py file signifies whether the entire directory is a Python package or not.
The code for this application is:
import os a_directory_path = './learn_os_walk' for pathname, subdirnames, subfilenames in os.walk(a_directory_path): for subdirname in subdirnames: init_filepath = os.path.join(pathname, subdirname, '__init__.py') if not os.path.exists(init_filepath): print(f'Create a new empty [{init_filepath}] file.') with open(init_filepath, 'w') as f: pass
As you can see, we use another for loop to iterate over subdirnames to get evey directory within a directory tree.
Before the execution, our directory tree under the take_a_walk function mentioned before looks like this:
After the execution, we can take a walk along the directory tree again and we get result like:
Hooray! We successfully iterate every directory within a directory tree and complete the __init__.py sanity check.
In summary, you can use os.walk recursively traverse every file or directory within a directory tree through a nested for loop.
Conclusion
That’s it for our os.walk() article!
We learned about its syntax, IO relationship, and difference between os.walk and os.listdir.
We also worked on real usage examples, ranging from changing the search direction through topdown parameter, .txt file number count, and __init__.py sanity check.
Hope you enjoy all this and happy coding!
About the Author
Anqi Wu is an aspiring Data Scientist and self-employed Technical Consultant. She is an incoming student for a Master’s program in Data Science and builds her technical consultant profile on Upwork.
Anqi is passionate about machine learning, statistics, data mining, programming, and many other data science related fields. During her undergraduate years, she has proven her expertise, including multiple winning and top placements in mathematical modeling contests. She loves supporting and enabling data-driven decision-making, developing data services, and teaching.
Here is a link to the author’s personal website: https://www.anqiwu.one/. She uploads data science blogs weekly there to document her data science learning and practicing for the past week, along with some best learning resources and inspirational thoughts.
With Java 11 around the corner, and release candidate builds available at http://jdk.java.net/11 , it’s time to look back at the effect the new release cadence has had on adoption of new releases. Changing the Pace of Change New Java releases used to take quite a while to get adopted by developers. ...
Sendmail in PHP is possible with just single line of code. PHP contains built-in mail functions to send mail.
There are reasons why I am feeling embraced with this PHP feature. Because I write lot of code for sending mails regularly. PHP really saves our time with its built-ins.
Quick Example
<?php

mail('recipient@domain.com', 'Mail Subject', 'Mail test content'); ?>
In this tutorial, we will see how to add code to sendmail in PHP. We will see several examples in this to enrich the features with more support.
The below list examples we are going to see below. It will cover basic to full-fledged support to sendmail in PHP.
The PHP mail() is to sendmail from an application. Let’s see the PHP configurations required to make the mail() function work. Also, we will see the common syntax and parameters of this PHP function below.
$recipient_email One or more comma-separated value that is the target mail addresses. The sample format of the values are,
name@domain.com
Name <name@domain.com>
name@domain.com, name2.domain.com
Name <name@domain.com>, Name2 <name2@domain.com>
$subject Mail subject. It should satisfy RFC 2047.
$message Mail content body. It uses \r\n for passing a multi-line text. It has a character limit of 70 for a line. It accepts various content types depends on the specification in the extra header.
$headers This is an extra string or array append to the mail header. Use to pass the array of specifications like content-type, charset and more. It’s an optional parameter. It uses \r\n to append multiple headers. The header array contains key-value pair to specify header name and specification respectively.
$additional_params This is also optional. It is to pass extra flags like envelope sender address with a command-line option.
Return Values
This function returns boolean true or false based on the sent status of the mail. By receiving boolean true that doesn’t mean the mail was sent successfully. Rather, it only represents that the mail sending request is submitted to the server.
PHP sendmail – configurations
We have to configure some directives to make the mail script work in your environment.
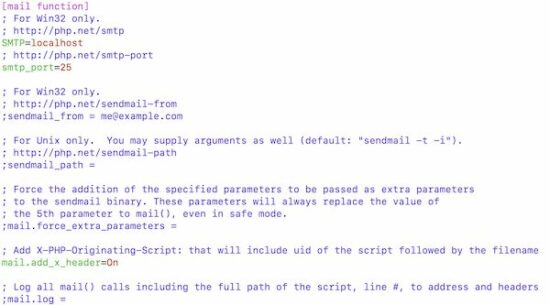
Locate your php.ini file and set the mail function attributes. The below image shows the PHP configuration of the mail function.
Set the mail server configuration and the sendmail path with this php.ini section. Then restart the webserver and ensure that the settings are enabled via phpinfo().
Examples to Sendmail in PHP
Sendmail in PHP to send plaintext content
This is a short example of sending plain text content via PHP Script. It sets the mail subject, message and recipient email parameter to sendemail in PHP.
This program print response text based on the boolean returned by the mail() function.
sendmail-with-plain-text.php
<?php

$to = 'recipient@email.com';

$subject = 'Mail sent from sendmail PHP script';

$message = 'Text content from sendmail code.';

// Sendmail in PHP using mail()

if (mail($to, $subject, $message,)) { echo 'Mail sent successfully.';

} else { echo 'Unable to send mail. Please try again.';

}

?>
PHP Sendmail code to send HTML content
Like the above example, this program also uses the PHP mail() function to send emails. It passes HTML content to the mail function.
For sending HTML content, it sets the content type and other header values with the mail header.
php-mail-with-html-content.php
<?php

$to = 'recipient@email.com'; $subject = 'Mail sent from sendmail PHP script'; $from = 'test@testmail.com';

$headers = "From: $from";

$headers .= "MIME-Version: 1.0\r\n";

$headers .= "Content-Type: text/html; charset=UTF-8\r\n"; $message = '<p><strong>Sendmail in PHP with HTML content. </strong></p>'; if (mail($to, $subject, $message, $headers)) { echo 'Mail sent successfully.';

} else { echo 'Unable to send mail. Please try again.';

}

?>
Sendmail in PHP to attach files
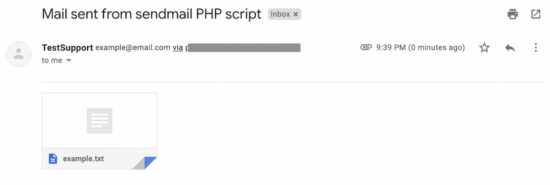
This program attaches a text file with the email content. It reads a source file using PHP file_get_contents(). It encodes the file content and prepares a mail header to attach a file.
It sets content-type, encoding with the message body to make it work. This script uses the optional $header variable on executing sendmail in PHP.
Instead of static values, we can also pass user-entered values to the PHP sendmail. An HTML form can get the values from the user to send mail. We have already seen how to send a contact email via the form.
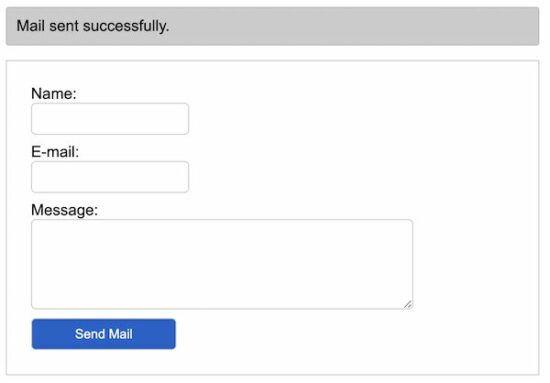
This example shows a form that collects name, from-email and message from the user. It posts the form data to the PHP on the submit action.
The PHP reads the form data and uses them to prepare mail sending request parameters. It prepares the header with the ‘from’ email. It sets the mail body with the message entered by the user.
All the form fields are mandatory and the validation is done by the browser’s default feature.
PHP mail() function has some limitation. To have a full-fledge functionality to sendmail in PHP, I prefer to use the PHPmailer library.
This library is one of the best that provides advanced mailing utilities. We have seen examples already to sendmail in PHP using PHPMailer via SMTP. If you are searching for the code to sendmail using OAuth token, the linked article has an example.
This example uses a minimal script to sendmail in PHP with PHPMailer via SMTP. It loads the PHPMailer library to create and set the mail object.
The mail object is used to configure the mail parameters. Then it invokes the send() method of the PHPMailer class to send mail.
Download PHPMailer from Github and put it into the vendor of this example directory. Replace the SMTP configurations in the below script to make this mail script working.
sendmail-in-php-via-smtp.php
<?php

use PHPMailer\PHPMailer\PHPMailer;

use PHPMailer\PHPMailer\SMTP;

use PHPMailer\PHPMailer\Exception; require_once __DIR__ . '/vendor/phpmailer/phpmailer/src/Exception.php';

require_once __DIR__ . '/vendor/phpmailer/phpmailer/src/PHPMailer.php';

require_once __DIR__ . '/vendor/phpmailer/phpmailer/src/SMTP.php'; $mail = new PHPMailer(true);

$mail->SMTPDebug = 0;

$mail->isSMTP();

$mail->Host = 'smtp.gmail.com';

$mail->SMTPAuth = true;

$mail->Username = "";

$mail->Password = "";

$mail->SMTPSecure = "ssl";

$mail->Port = 465; $mail->From = "test@testmail.com";

$mail->FromName = "Full Name"; $mail->addAddress("recipient@email.com", "recipient name"); $mail->isHTML(true); $mail->Subject = "Mail sent from php send mail script.";

$mail->Body = "<i>Text content from send mail.</i>";

$mail->AltBody = "This is the plain text version of the email content"; try { $mail->send(); echo "Message has been sent successfully";

} catch (Exception $e) { echo "Mailer Error: " . $mail->ErrorInfo;

}

?>
Related function to sendmail in PHP
The PHP provides alternate mail functions to sendmail. Those are listed below.
mb_send_mail() – It sends encoded mail based on the language configured with mb_language() setting.
imap_mail() – It allows to sendmail in PHP with correct handling of CC, BCC recipients.
Conclusion
The mail sending examples above provides code to sendemail in PHP. It supports sending various types of content, file attachments in the mail.
The elaboration on PHP in-built mail() function highlights the power of this function.
Hope this article will be helpful to learn more about how to sendmail in PHP. Download
This is a recurring promotion, making it the second time being given away on the Epic Store (Dec 17th 2020). The game is free to keep until Mar 17th 2022 - 16:00 UTC.
Next week's freebie: In Sound Mind
We are welcoming everyone to join our discord[discord.gg]. We are more active there on finding giveaways, small or large, and there are daily raffles you can participate.
The treacherous wizard Thoth-Amon has devised a plan to resurrect the ancient evil that is Xaltotun. If he succeeds, he will condemn the world to an eternity of darkness and enslavement. Only you can stop him, but in order to do so you must use all your cunning. All your guile. You must summon all your courage and swordsmanship. You must Chop Chop!
Conan Chop Chop is the most epic and realistic stick figure game ever to be set in the world of Conan the Barbarian, thus there will be an excessive amount of gore and flying limbs. Be warned that this may in turn lead to uncontrollable outbursts of joy and/or profanities, usually depending on which end of the sword you are on.
1-4 players
Play solo for the ultimate thrill of a roguelike or have your buddies along with you in online or couch co-op mode.
Become Conan or someone else!
All brawns, no brain? No worries! Choose between a diverse cast of badass warrior gods, and add weapons and items to match your style!
Embark on quests of pure epicness!
You are about to save the world! The merchants are still going to charge you for their wares, and some townsfolk may even pester you with tasks of their own. But fear not, some of them will make it worth your while.
Explore in every direction!
Brave the shifting sands of Koth, explore the dark woods in Darkwood, move valiantly through the searing land of Hyperboria and see the icy world of Vanaheim. Conan® Chop Chop lets you explore to the left, right, up and down! A skilled player may even find himself jumping, dashing, or moving diagonally, resulting in the ultimate 3D experience.
Loot, loot and more loot!
Master the fine art of delicately bashing your enemies' heads in with a broom and turning them into chop suey with a bastard sword. Conan® Chop Chop contains a wide variety of different weapons, trinkets and legendary items, each suited to tailor any kind of violent playstyle you can think of.
Master astonishing combos!
Perform the breathtaking 360° spin-attack to crack skulls all around you. Dash forward with the speed of light. Swing your sword both longways and sideways in a game that will have you gasping for air as you struggle to grasp the pure awesomeness of your fighting moves.
Ruthless bosses!
Before facing Thoth-Amon, you must defeat bosses such as The Giant Sand Worm of Koth and The Frost Giant of Vanaheim, neither of which are particularly sympathetic to your cause. Instead they will attempt to destroy you with killer moves like Lava Reflux, Tail Whip and Loogie Glob.
Infinite replayability!
Completely random maps and tons of weapons and abilities to try out ensure that every new game will be a whole new experience. You are bound to die more than once, but you can unlock new weapons that will be available for your next play-through.
Decoupling microservices with Apache Camel and Debezium
The rise of microservices-oriented architecture brought us new development paradigms and mantras about independent development and decoupling. In such a scenario, we have to deal with a situation where we aim for independence, but we still need to react to state changes in different enterprise domains.
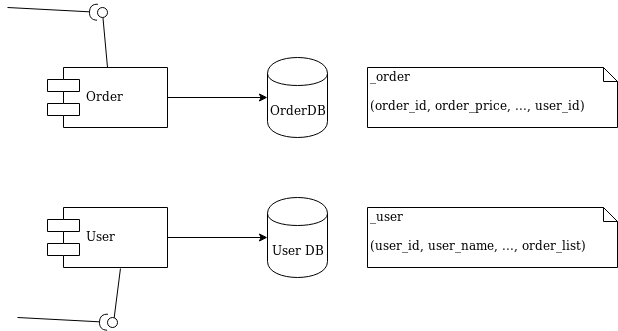
I’ll use a simple and typical example in order to show what we’re talking about. Imagine the development of two independent microservices: Order and User. We designed them to expose a REST interface and to each use a separate database, as shown in Figure 1:
Figure 1: Order and User microservices.
We must notify the User domain about any change happening in the Order domain. To do this in the example, we need to update the order_list. For this reason, we’ve modeled the User REST service with addOrder and deleteOrder operations.
Solution 1: Queue decoupling
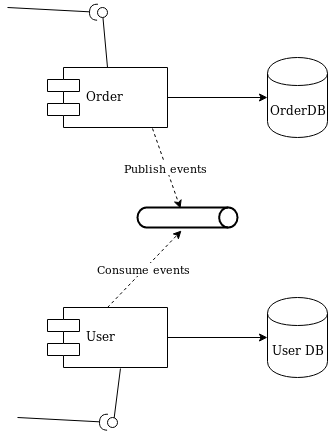
The first solution to consider is adding a queue between the services. Order will publish events that User will eventually process, as shown in Figure 2:
Figure 2: Decoupling with a queue.
This is a fair design. However, if you don’t use the right middleware you will mix a lot of infrastructure code into your domain logic. Now that you have queues, you must develop producer and consumer logic. You also have to take care of transactions. The problem is to make sure that every event ends up correctly in both the Order database and in the queue.
Solution 2: Change data capture decoupling
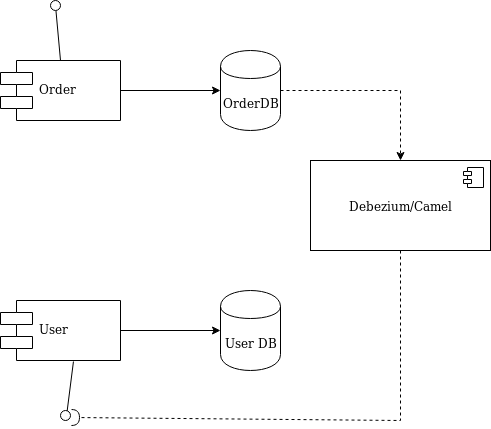
Let me introduce an alternative solution that handles all of that work without your touching any line of your microservices code. I’ll use Debezium and Apache Camel to capture data changes on Order and trigger certain actions on User. Debezium is a log-based data change capture middleware. Camel is an integration framework that simplifies the integration between a source (Order) and a destination (User), as shown in Figure 3:
Figure 3: Decoupling with Debezium and Camel.
Debezium is in charge of capturing any data change happening in the Order domain and publishing it to a topic. Then a Camel consumer can pick that event and make a REST call to the User API to perform the necessary action expected by its domain (in our simple case, update the list).
Decoupling with Debezium and Camel
I’ve prepared a simple demo with all of the components we need to run the example above. You can find this demo in this GitHub repo. The only part we need to develop is represented by the following source code:
Apache Camel has a Debezium component that can hook up a MySQL database and use Debezium embedded engine. The source endpoint configuration provides the parameters needed by Debezium to note any change happening in the debezium._order table. Debezium streams the events according to a JSON-defined format, so you know what kind of information to expect. For each event, you will get the information as it was before and after the event occurs, plus a few useful pieces of meta-information.
Thanks to Camel’s content-based router, we can either call the addOrderUsingPOST or deleteOrderUsingDELETE operation. You only have to develop a message translator that can convert the message coming from Debezium:
public class AfterStructToOrderTranslator implements Processor { private static final String EXPECTED_BODY_FORMAT = "{\"userId\":%d,\"orderId\":%d}"; public void process(Exchange exchange) throws Exception { final Map value = exchange.getMessage().getBody(Map.class); // Convert and set body int userId = (int) value.get("user_id"); int orderId = (int) value.get("order_id"); exchange.getIn().setHeader("userId", userId); exchange.getIn().setHeader("orderId", orderId); exchange.getIn().setBody(String.format(EXPECTED_BODY_FORMAT, userId, orderId)); } }
Notice that we did not touch any of the base code for Order or User. Now, turn off the Debezium process to simulate downtime. You will see that it can recover all events as soon as it turns back on!
The example illustrated here uses Debezium’s embedded mode. For more consistent solutions, consider using the Kafka connect mode instead, or tuning the embedded engine accordingly.
Java Mission Control - Now serving OpenJDK binaries too!
Oracle plans to make the open source JDK Mission Control (JMC) technology available as a separate download to serve both OpenJDK and Oracle JDK users. Here are some of the reasons why: To make it available to all Java users Java Flight Recorder (JFR) is open source now. JFR will be included in both ...




 Tip: Generally, you only need to use the first two parameters in bold format.