Create an account


Welcome, Guest
You have to register before you can post on our site.

Username
  

Password


Search Forums

(Advanced Search)

Forum Statistics
» Members: 20,407
» Latest member: nimiseh
» Forum threads: 21,716
» Forum posts: 22,619

Full Statistics

Online Users
There are currently 1590 online users.
» 1 Member(s) | 1584 Guest(s)
Applebot, Baidu, Bing, Google, Yandex, SickProdigy

 
  [Minecraft] How to Use Auction House | Commands and Guide
Posted by: xSicKx - 06-07-2020, 03:54 PM - Forum: Minecraft - Replies (1)

AuctionHouse

[Image: 0795791b099e16577a3125ec70cce9b2bee223f1...house1.png]

Overview:

AuctionHouse allows players to list items for sale on an auction house accessible with the /ah command. The plugin is new code and only shares a similar look and feel as the inactive plugin resource AuctionHouse.

[Image: 26f5ba689eadfa1ec290c5b92c750af64f00e585...house2.png]


Server ip: mcecon.sickgaming.net

Commands:

/ah reload - reloads the auctionhouse configuration
/ah - open the auction house
/ah - open the auction house for a player (console only)
/ah menu - open the auction house in menu mode
/ah menu - open the auction house in menu mode for a player (console only)
/ah search - view items matching search filter
/ah help - show help for all the commands
/ah sell - sell the item you are holding in hand
/ah selling - view the items you are selling
/ah sold - view the items you have sold recently
/ah expired - view your expired items to return
/ah cancel - cancel all your auctions
/ah return - return all your cancelled/expired items

Features:

  • FREE!
  • List items in the auction house
  • View items matching a search filter based on name, type, lore, enchants, or seller
  • Sort chronologically or by price
  • Show items you are selling
  • Cancel items
  • Collect cancelled/expired items
  • Drop unclaimed items at player's feet
  • Automatically clean up abandoned items
  • Show and clear recently sold items
  • Hover over item to show time remaining and enchants
  • Charge a flat and/or percentage based fee for listing an item (with confirmation menu)
  • Tax sellers a percentage of revenue for each sale with a cap
  • Set min and max prices
  • Blacklist items by name, type, lore, enchants, damage and unbreakable flag
  • Wildcard blacklisting of all items/blocks by omitting the item type and specifying lore, or enchants (can ban selling soulbound and cursed items)
  • Regex blacklisting on item names with regex:
  • Optional Back/Exit button calls a command to return to another menu
  • Click on a special sign to open the auction house
  • Click on certain named block entities to open the auction house (chests, shulker boxes, dispensers, droppers, hoppers, furnaces, enchanting tables, brewing stands)
  • Click on custom named entities to open the auction house
  • Console command support for custom menu and NPC plugins
  • Internationalization Support
  • Customize messages, button materials and sounds
  • Support for HeadDatabase heads as buttons with hdb:
  • Support for custom skull textures as buttons with texture:<base64 data>
  • Supports player head for the player listings button with auctionhouse player_head
  • Logging all transactions to separate log file
  • Announce listings to all players
  • Discord integration
  • Rewriting of String UUIDs in NBT (Seller -> Buyer)
  • Multi-world support with simple world grouping
  • Set cooldown between listings
  • Supports Minecraft 1.13+
Server ip: mcecon.sickgaming.net

Print this item

  [Minecraft] How to use Land Claim, Set Home, and Trust Users
Posted by: xSicKx - 06-07-2020, 03:22 PM - Forum: Minecraft - No Replies

Hello everyone, just wanted to give a tutorial to everyone on how to properly land claim.

Server Ip: mcecon.sickgaming.net

in chat type

Quote:/kit claim

This will give you a golden shovel to create your land claim.

Head out to the farthest corner of your base. I choose the outside so people cant build around my base. Right click the ground with the shovel and now you should see this. The block should change diamond.

[Image: cpGG7Nk.png]

Proceed to the opposite corner of your structure and right click the block to present a square/rectangle around your base

Should look like this after your second right click on a block while using the golden shovel. A glow stone with 2 gold blocks pointing to the other corners of your Landclaim.
[Image: A3KGZDv.png]

Now your Land is Claimed and all yours. This helps prevent griefers from blocking in your base or building around it.

To add someone to your Land Claim type in chat


Quote:/trust UsernameHere

[Image: gtod1i7.png]

And now you are set to go.

Don't forget to
Quote:/sethome HomeNameHere


in chat so you can teleport home with


Quote:/home HomeNameHere

Print this item

Wink How to Play Minecraft Java Edition with a Controller! Xbox, ps4, joypad, joystick
Posted by: SickProdigy - 06-07-2020, 01:23 PM - Forum: Minecraft - No Replies

Hello everyone so first thing i did was go over and download Minecraft forge. Through forge you can install mods. There are a few different controller mods but in this tutorial we will only be using the most well known.
You need minecraft java already installed

Minecraft Java Download:

Hidden Content


Reply to this thread to unlock the contents
Run it, sign in, so the files will configure correctly within it's root folder.

Now go over and get minecraft forge.
[Image: wBXQ3jY.png]

Minecraft Forge Download link:
Hidden Content


Reply to this thread to unlock the contents

Grab the installer to make it simple and automatically install to your minecraft directory.

Once installed startup Minecraft. In the launcher menu bottom left, you can click the down arrow to start minecraft with forge.

[Image: CCzU9bc.png]

After you click forge, click play to start the games and it will fix Minecrafts file system again. (here it will add the "Mods" folder for later use)

Usually minecraft is found C:/Users/yourusername/AppData/Roaming/.minecraft

If you don't see AppData you need to change some options in your setting to show this
[Image: Vv5mUzv.png]


Once you are in the Minecraft directory, you should see a new folder called "Mods"

[Image: 5Whm92s.png]

In this folder you will drop our forge mod "Controllable"
This will enable controller support for minecraft java edition.

head over to curseforge and grab the mod or
Download here:
Hidden Content


Reply to this thread to unlock the contents

Make sure to click "Download" and not "install"

It should look like this now in your mods folder:
[Image: XsncDpn.png]

and there you are.

You xbox 360, xbox one, ps3, ps4, joypad and any other controller will now work with Minecraft!

Print this item

  News - The Emulation Experts At M2 Developed The Namcot Collection
Posted by: xSicKxBot - 06-07-2020, 11:37 AM - Forum: Nintendo Discussion - No Replies

The Emulation Experts At M2 Developed The Namcot Collection

Namco Museum

Earlier this week, we found out Bandai Namco would be releasing the Namcot Collection in the west on 18th June, after a listing was discovered on the Microsoft Store. Locally, it’ll be known as the Namco Museum Archives Vol. 1 and Namco Museum Archives Vol. 2.

Perhaps the most exciting news of all, though, is the fact M2 – the company behind the Sega Ages line and many other releases on Switch – is responsible for this collection. It made this information official on its Twitter account, stating how it was in charge of development:


Given M2’s excellent track record with various other retro collections in the past, we’re now even more excited than we previously were about this collection.

When it does arrive in the west, each volume will contain 11 games (see the full list of games in our previous post). There’ll also be save states and various other modern enhancements to make your play sessions easier.


Will you be checking these out? Comment down below.


Further reading:


https://www.sickgaming.net/blog/2020/06/...ollection/

Print this item

  News - Talking Point: What Are You Playing This Weekend? (June 6th)
Posted by: xSicKxBot - 06-07-2020, 11:37 AM - Forum: Nintendo Discussion - No Replies

Talking Point: What Are You Playing This Weekend? (June 6th)

Clubhouse

Congratulations on making it through another week! This week brought us a surprise launch from Konami, some unorthodox Animal Crossing weddings and release date news for Pokémon Sword and Shield’s first DLC, but it’s finally time to take a breather from all that and chat about our gaming plans.

Members of Team Nintendo Life have gathered together to do just that, and we’d love for you to join in via our poll and comment sections below. Enjoy!

PJ O’Reilly, reviewer


Hey. This weekend I’ve lined up an evening sampling the delights of 51 Worldwide Games, a chance for me to prove once and for all to my wife and kids that you can put any card or board game in front of me and I will absolutely lose at it. I’m also in the midst of reviewing Buckshot Software’s Project Warlock, so keep an eye out for that review on the 11th of this month, am mopping up a few side quests that I’ve got left to do in The Outer Worlds and have got both the Bioshock and Borderlands collections sat waiting for me to get stuck into.

I’m genuinely not sure where I’m going to get the time to be honest. Have a good weekend whatever you’re up to and stay safe out there!

Ryan Craddock, news editor


Inspired by all the Pokémon Sword and Shield Expansion Pass news this week, I’ve finally gotten back into catching ’em all to chip away at my Pokédex. I’ve also finally downloaded Pokémon Home – just the free version, mind – and suddenly feel the need to work towards completing that Pokédex too. What can I say? There’s just something about seeing all those silhouettes that makes me need to complete it.

Other than that, I’m also hoping to get some time in with 51 Worldwide Games this weekend. It feels like it’ll be the perfect game to jump into every now and then to pass the time during lockdown, and I can’t wait to fluke a win in chess and declare myself the absolute genius mastermind of the household. Bring it on.


Austin Voigt, contributing writer


This weekend, my younger brother is coming into town, and we plan to play a few games together. We’ll chill in Animal Crossing: New Horizons, battle a bit in Pokémon Sword and Shield, race in Mario Kart 8 Deluxe, brawl in Super Smash Bros. Ultimate, burn a few things in Overcooked 2, whip out Mancala in Clubhouse Games: 51 Worldwide Classics, and maybe even mess around a bit in The Legend of Zelda: Breath of the Wild for old time’s sake.

These are the game franchises we grew up playing, so we just play them as standard whenever we’re together now. Should be a good distraction from the past stressful few weeks.

Gavin Lane, features editor


This week I shall be avoiding the Switch eShop sale and settling down to some Witcher 3. I’m only 3 or so hours into the game—not even out of the tutorial section yet—but I’ve loved every second I’ve played so far. I had readied myself for some ropey combat, but everything I’ve played so far has been pleasantly, surprisingly good.

I also eyed GRID Autosport on sale but, like I said, I’m going to be strong. Oh yes! Let’s hope I can make it through the evening without enjoying a frosty beverage that’ll loosen the old purse strings.


Gonçalo Lopes, contributing writer


Another great handful of eShop releases means I am again spoiled for choice this weekend. Liberated, the surprise release of Skelattack, the long-awaited The TakeOver and Bridge Strike will ensure plenty of varied gameplay to sink my teeth into. No microSD cards arrived this week so I still can’t touch the 2K re-releases, opting instead for another dose of Mortal Kombat 11 Aftermath and 51 Worldwide Games.

My game of the week is Rigid Force Redux! I have literally waited years for this one to jump from Steam to the Switch and the wait was very much worthwhile.

As always, thanks for reading! Make sure to leave a vote in the poll above and a comment below with your gaming choices over the next few days…


https://www.sickgaming.net/blog/2020/06/...-june-6th/

Print this item

  News - Pokemon Sword & Shield: Free Galar Starters Available Via Pokemon Home
Posted by: xSicKxBot - 06-07-2020, 11:37 AM - Forum: Lounge - No Replies

Pokemon Sword & Shield: Free Galar Starters Available Via Pokemon Home

A few more free Pokemon are up for grabs for Pokemon Sword and Shield. Players who transfer a monster from either title to Pokemon Home will be able to claim the three Galar starters: Grookey, Scorbunny, and Sobble. What makes these particular Pokemon special is that they each have their Hidden Abilities, which up until now have not been available in Sword and Shield.

Grookey's Hidden Ability is Grassy Surge, which sets up Grassy Terrain as soon as the Pokemon enters the field. Scorbunny's is Libero; this changes the Pokemon's type to match whatever move it is using. Finally, Sobble's Hidden Ability is Sniper, which increases the amount of damage critical hits inflict.

Grookey, Scorbunny, and Sobble

Continue Reading at GameSpot

https://www.gamespot.com/articles/pokemo...01-10abi2f

Print this item

  [Tut] How to Join a List of Lists? You Don’t. You Flatten It!
Posted by: xSicKxBot - 06-07-2020, 08:09 AM - Forum: Python - No Replies

How to Join a List of Lists? You Don’t. You Flatten It!

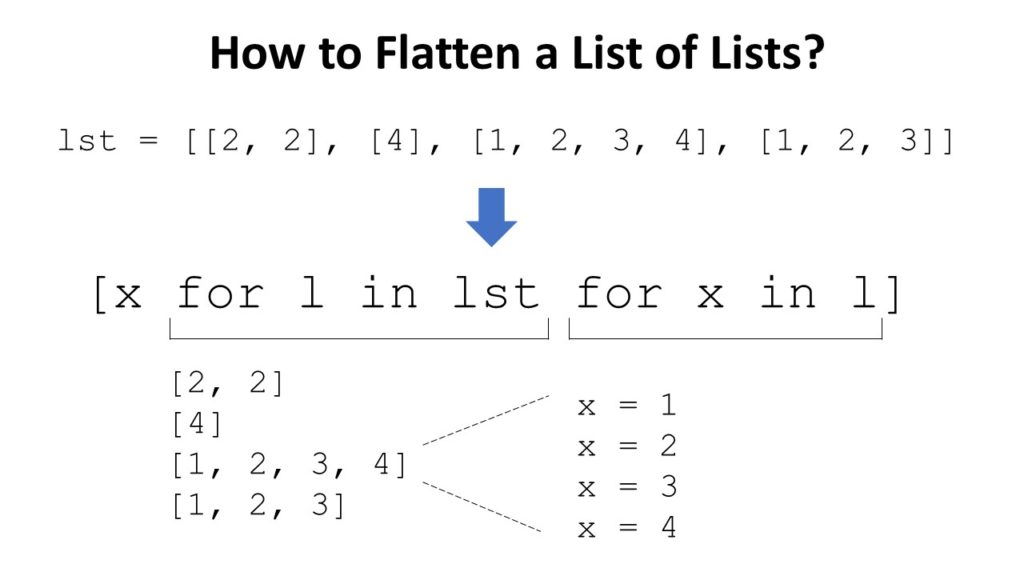
Short answer: To flatten your list of list lst, use the nested list comprehension [x for l in lst for x in l] to iterate over all nested lists (for l in lst) and over all their elements (for x in l). Each element x, you just place in the outer list, unchanged.

When browsing StackOverflow, I stumble upon this question from time to time: “How to Join a List of Lists?“. My first thought is that the asking person is referring to the join() function that converts an iterable (such as a list) to a string by concatenating its elements.

But nothing can be further from the truth! The question is usually about “flattening” the list: to transform a nested list of lists such as [[1, 2, 3], [4, 5, 6]] to a flat list [1, 2, 3, 4, 5, 6]. So, the real question is:

How to Flatten a List of Lists in Python?


Problem: Given a list of lists. How to flatten the list of lists by getting rid of the inner lists—and keeping their elements?

Example: You want to transform a given list into a flat list like here:

lst = [[2, 2], [4], [1, 2, 3, 4], [1, 2, 3]] # ... Flatten the list here ... print(lst)
# [2, 2, 4, 1, 2, 3, 4, 1, 2, 3]
Flatten a List of Lists with List Comprehension

Solution: Use a nested list comprehension statement [x for l in lst for x in l] to flatten the list.

lst = [[2, 2], [4], [1, 2, 3, 4], [1, 2, 3]] # ... Flatten the list here ...
lst = [x for l in lst for x in l] print(lst)
# [2, 2, 4, 1, 2, 3, 4, 1, 2, 3]

Explanation: In the nested list comprehension statement [x for l in lst for x in l], you first iterate over all lists in the list of lists (for l in lst). Then, you iterate over all elements in the current list (for x in l). This element, you just place in the outer list, unchanged, by using it in the “expression” part of the list comprehension statement [x for l in lst for x in l].

Try It Yourself: You can execute this code snippet yourself in our interactive Python shell. Just click “Run” and test the output of this code.

Exercise: How to flatten a three-dimensional list (= a list of lists of lists)? Try it in the shell!

Video: List Comprehension Python List of Lists


Watch the video to learn three ways how to apply list comprehension to a list of lists:

  • to flatten a list of lists,
  • to create a list of lists, and
  • to iterate over a list of lists.

Well, if you really want to learn how to join() a list in Python, visit this detailed tutorial on the Finxter blog.

Where to Go From Here?


Enough theory, let’s get some practice!

To become successful in coding, you need to get out there and solve real problems for real people. That’s how you can become a six-figure earner easily. And that’s how you polish the skills you really need in practice. After all, what’s the use of learning theory that nobody ever needs?

Practice projects is how you sharpen your saw in coding!

Do you want to become a code master by focusing on practical code projects that actually earn you money and solve problems for people?

Then become a Python freelance developer! It’s the best way of approaching the task of improving your Python skills—even if you are a complete beginner.

Join my free webinar “How to Build Your High-Income Skill Python” and watch how I grew my coding business online and how you can, too—from the comfort of your own home.

Join the free webinar now!


https://www.sickgaming.net/blog/2020/06/...latten-it/

Print this item

  [Tut] Shipping API Integration in PHP with Australia Post Example
Posted by: xSicKxBot - 06-07-2020, 08:09 AM - Forum: PHP Development - No Replies

Shipping API Integration in PHP with Australia Post Example

Last modified on January 22nd, 2020 by Vincy.

In an eCommerce website, we use the shipping API to calculate shipping cost. We calculate based on the items added to the shopping cart.

Integrating Shipping API with an eCommerce website will optimize the logistics cost. It takes care of the shipping needs in an effective way.

Shipping API integration helps eCommerce website by charging the right amount for shipping. Imagine when we add a random fixed cost to each checkout. What will happen is that, we will either overcharge the customer or end up in direct loss.
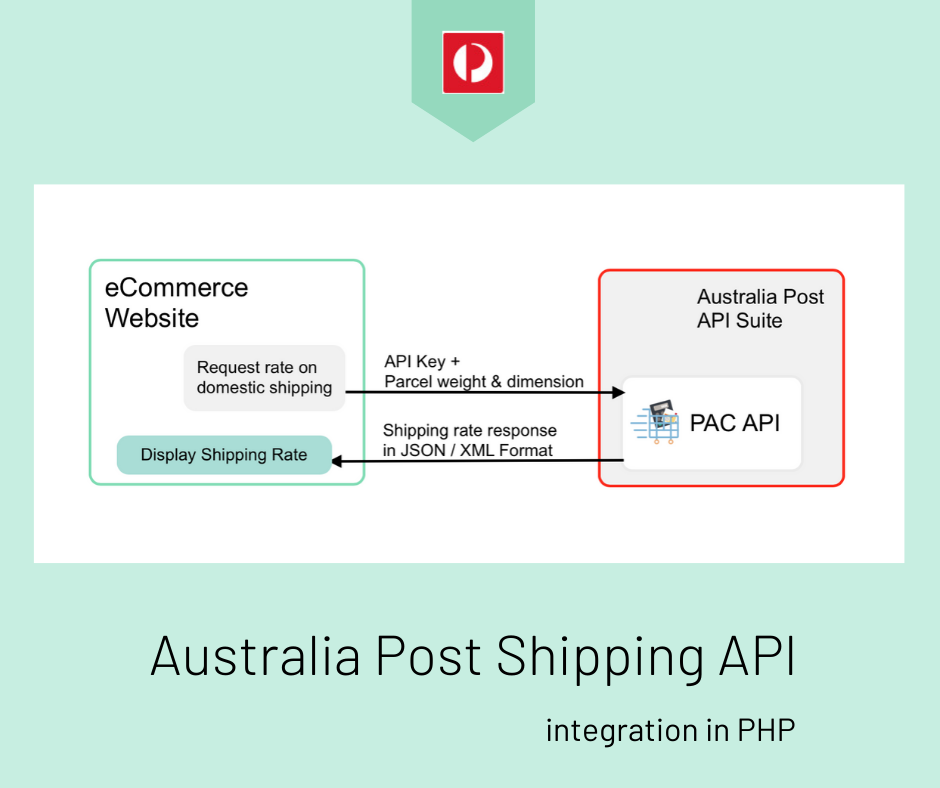
Australia Post Shipping API Integration in PHP

In this article, we will see how to integrate Australia Post shipping API in a PHP application. You can use this code in a shopping cart checkout page to calculate shipping rates.

I have created code to request the Australia Post API to calculate the shipping rates. This rate is for the products on domestic shipping.

What is inside?


  1. What is Shipping API?
  2. Utilities of third-party shipping API
  3. Existing shipping API available
  4. About Australia Post API
  5. About this example
  6. File Structure
  7. Australia Post shipping API integration steps
  8. Web interface to get data to calculate shipping rates
  9. PHP code with Australia Post shipping API request-response handlers
  10. Australia Post shipping API integration output

What is Shipping API?


Shipping API – a digital intermediate as like as other APIs. It resolves eCommerce website shipping needs.

Integratable extern responds to the queries generated by the application.

With the available services and capabilities, it help build the eCommerce website’s shipping needs.

This ready-made solution will smoothen the customer’s buying experience with your online store.

Capabilities of Shipping APIs


For each eCommerce website, the motive to integrate Shipping API differs. This variation depends on the utilities required by the shopping cart.

In general, the capabilities of Shipping APIs are,

  1. Verifying shipping zone
  2. Multi-carrier support
  3. Tracking the order traces during shipment.

With these capability limit, the Shipping APIs provides ultimate services. And, they are huge in number. For example,

  1. Ensuring the shipping destination and thereby calculate the success probability of the delivery.
  2. Request a quote for the carrier or shipment.
  3. Receiving notification about tracking updates.

The Australia Post shipping API provides services like,

  • Postage assessment calculation
  • Postal code search
  • SecurePay online payments and more.

Existing shipping API available


Postal carrier APIs like DHL, USPS, Australia Post provides services for the eCommerce website. It offers services like calculating shipping rates, tracking shipped parcel and more.

There are numerous third-party shipping APIs available.  For example Postmen, EasyPost, Shippo and more.

The third-party shipping API has a RESTful interface that connects postal service APIs. It creates a channel to read the API to access its functionalities.

About Australia Post API


Australia Post API suite has the following list APIs. All these APIs help to fulfil the transactional needs of your eCommerce website.

  1. Postage assessment calculator – To get the cost for shipping a document or parcel.
  2. Shipping and tracking – To get service on product dispatch and tracking.
  3. SecurePay online payments – Payment solutions for an eCommerce website via SecurePay integration.
  4. Delivery choices API – gives the delivery choices to the user to choose location, speed, day, date, time.

For accessing the API, it requires the corresponding API key. As per the Australia Post API access requirements it asks to register with the API  to get the key.

Australia Post provides an interface to explore the APIs. You may generate live API requests via this explorer to see how it works.

About this example


In this example, it uses the Postage assessment calculator API  or PAC of the Australia Post API suite.

This API provides services to calculate the shipping cost. This cost varies based on the parcel weight, dimension, and more parameters.

This API includes various endpoints returning resources data based on the access requests.

I am creating a request for calculating the shipping cost for a domestic parcel. This request needs the corresponding API key. In the next section, we will see how to get the API key for accessing the PAC API.

For this calculation, the API requires the parcel dimension, height, width. And also, it needs the shipping zone’s origin and destination postal codes. These are all common considering any eCommerce website.

I get the parameters from the user via an HTML form and send it with the API request.

This example uses PHP CURL to access the Australia Post Postage assessment calculator API.

File Structure


The below screenshot shows the Australia Post shipping rate calculation example files.
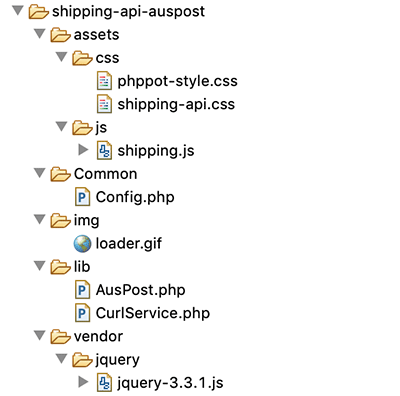
Shipping API AusPost Files Structure

Australia Post shipping API integration steps


The steps to integrate Australia Post in an eCommerce website are,

  1. Choose API from the Australia Post API suite.
  2. Create a new account to get the API key.
  3. Choose the postage service and set the endpoint.
  4. Set the API key as the HTTP header AUTH-KEY.
  5. Generate the PAC API request with the header set in step 4.

How to get the Australia Post PAC API key


There are many APIs provided by the Australia Post in API suite. The first step is to choose the API based on the need of your eCommerce website.

As discussed in the last section, I choose PAC API for calculating the shipping cost.

The PAC API access requirements state that it need the API key. This key is for authenticating the service request generated from the application.
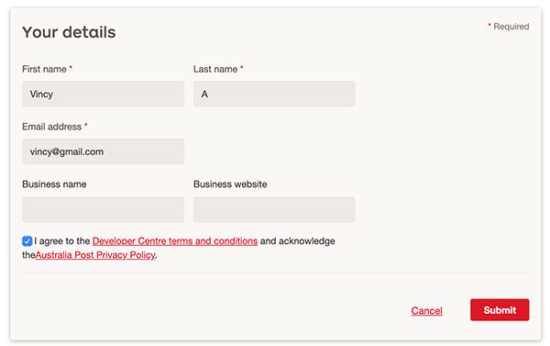
Aus Post PAC API Registration

On submitting valid information, it will send the API key to the registered email address. You can use this API then, to access the PAC API services.
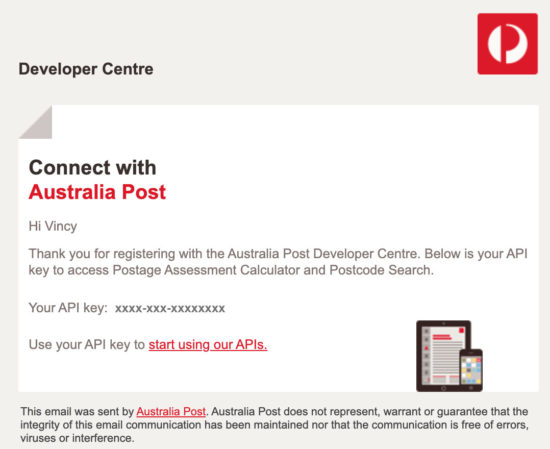
Getting API Key from Auspost

Web interface to enter details to calculate shipping rates


This is the code to show a form to collect the product and shipping details.

It has the fields to collect the width, height, weight, and length of the parcel. The form will show the units of these parameters to the user.

 Also, it collects the shipping address. This is the shipping destination address. The zip code is a mandatory field among the shipping address fields.

The shipping origin and destination postal codes are mandatory to calculate the rates.

In this example, the postal code of the shipping origin is configurable. You can also move it to the HTML form to let the user enter the data.

index.php

<HTML> <HEAD> <TITLE>Shipping API</TITLE> <link href="./assets/css/phppot-style.css" type="text/css" rel="stylesheet" /> <link href="./assets/css/shipping-api.css" type="text/css" rel="stylesheet" /> <script src="./vendor/jquery/jquery-3.3.1.js" type="text/javascript"></script> </HEAD> <BODY> <div class="phppot-container"> <div class="australian-api"> <div class="page-heading">Australian Shipping API</div> <form name="australian-api" id="australian-api" action="" method="post" on‌submit="return formValidation()"> <div class="sub-heading">Product Details</div> <div class="row"> <div class="inline-block"> <div class="form-label"> Length<span class="units-style">(cm)</span><span class="required error" id="length-info"></span> </div> <input class="input-box-110" type="text" name="length" id="length" value="<?php if(! empty($_POST["length"])){ echo $_POST["length"];}?>"> </div> <div class="inline-block input-right-margin"> <div class="form-label"> Width<span class="units-style">(cm)</span><span class="required error" id="width-info"></span> </div> <input class="input-box-110" type="text" name="width" id="width" value="<?php if(! empty($_POST["width"])){ echo $_POST["width"];}?>"> </div> <div class="inline-block"> <div class="form-label"> Height<span class="units-style">(cm)</span><span class="required error" id="height-info"></span> </div> <input class="input-box-110" type="text" name="height" id="height" value="<?php if(! empty($_POST["height"])){ echo $_POST["height"];}?>"> </div> <div class="inline-block input-right-margin"> <div class="form-label"> Weight<span class="units-style">(kg)</span><span class="required error" id="weight-info"></span> </div> <input class="input-box-110" type="text" name="weight" id="weight" value="<?php if(! empty($_POST["weight"])){ echo $_POST["weight"];}?>"> </div> </div> <div class="row"> <div class="inline-block"> <div class="form-label"> Quantity<span class="required error" id="quantity-info"></span> </div> <input class="input-box-110" type="number" name="quantity" id="quantity" value="<?php if(! empty($_POST["quantity"])){ echo $_POST["quantity"];}else{echo 1;}?>"> </div> </div> <div class="sub-heading">Shipping Address</div> <div class="row"> <div class="inline-block input-right-margin"> <div class="form-label">Address1</div> <input class="input-box-330" type="text" name="address1" id="address1" value="<?php if(! empty($_POST["address1"])){ echo $_POST["address1"];}?>"> </div> <div class="inline-block"> <div class="form-label">Address2</div> <input class="input-box-330" type="text" name="address2" id="address2" value="<?php if(! empty($_POST["address2"])){ echo $_POST["address2"];}?>"> </div> </div> <div class="row"> <div class="inline-block input-right-margin"> <div class="form-label">Country</div> <input class="input-box-330" type="text" name="country" id="country" value="<?php if(! empty($_POST["country"])){ echo $_POST["country"];}?>"> </div> <div class="inline-block"> <div class="form-label">State</div> <input class="input-box-330" type="text" name="state" id="state" value="<?php if(! empty($_POST["state"])){ echo $_POST["state"];}?>"> </div> </div> <div class="row"> <div class="inline-block input-right-margin"> <div class="form-label">City</div> <input class="input-box-330" type="text" name="city" id="city" value="<?php if(! empty($_POST["city"])){ echo $_POST["city"];}?>"> </div> <div class="inline-block"> <div class="form-label"> Zip Code<span class="required error" id="to-postcode-info"></span> </div> <input class="input-box-330" type="text" name="to-postcode" id="to-postcode" value="<?php if(! empty($_POST["to-postcode"])){ echo $_POST["to-postcode"];}?>"> </div> </div> <div class="row"> <div id="inline-block"> <input type="submit" class="submit-button" name="submit-btn" id="submit-btn" value="Get Quote"><span><img src="img/loader.gif" class="loader-ic" id="loader-icon"></span> </div> </div> </form> <?php if (! empty($shippingPrice)) { ?><div> <div class="sub-heading">Shipping Details</div> <div class="row"> <label class="shipping-result">Address1:</label> <?php echo $address1;?></div> <div class="row"> <label class="shipping-result">Address2:</label> <?php echo $address2;?></div> <div class="row"> <label class="shipping-result">Country:</label> <?php echo $country;?></div> <div class="row"> <label class="shipping-result">State:</label> <?php echo $state;?></div> <div class="row"> <label class="shipping-result">City:</label> <?php echo $city;?></div> <div class="row"> <label class="shipping-result">Quantity:</label> <?php echo $quantity;?></div> <div class="row"> <label class="shipping-result">Shipping price:</label> $<?php echo $quantity * $shippingPrice;?></div> </div> <?php }else if(!empty($errorMsg)){?> <div class="error-message"><?php echo $errorMsg;?></div> <?php }?> </div> </div> <script src="./assets/js/shipping.js"></script> </BODY> </HTML> 

CSS created to present the payment form


This CSS includes basic styles to show the shipping form to the user. It has exclusive styles related to this example.

Apart from that, this example contains a generic CSS phppot-styles.css. It contains common template styles with a list of selectors. You can find this generic CSS in the downloadable source.

assets/css/shipping-api.css

.australian-api { background: #fff; border-radius: 4px; padding: 10px; width: 85%; margin: 20px 40px; } .page-heading { font-size: 2em; font-weight: bold; } .sub-heading { font-size: 1.2em; font-weight: bold; margin: 20px 0px; } .inline-block { display: inline-block; } .row { margin: 15px 0px; } .form-label { margin-bottom: 5px; text-align: left; } input.input-box-330 { width: 250px; } input.input-box-110 { width: 120px; margin-right: 5px; } .australian-api .error { color: #ee0000; padding: 0px; background: none; border: #ee0000; } .australian-api .error-field { border: 1px solid #d96557; } .australian-api .error:before { content: '*'; padding: 0 3px; color: #D8000C; } input.submit-button { background-color: #ffb932; border-color: #ffc87a #e2a348 #da9d0a; text-align: center; cursor: pointer; color: #000; width: 100px; } .input-right-margin { margin-right: 30px; } .shipping-result { font-weight: bold; color: #737171; padding: 15px 0px; } .error-message { color: #D8000C; } .units-style { font-size: 0.8em; color: #666; margin-left: 2px; } .loader-ic { display: none; } 

jQuery script to validate the shipping details


The shipping.js file contains the form validation function. It validates the mandatory fields and makes sure that they are not empty.

It returns boolean based on which the form-post carried forward to PHP. While returning false, it highlights what’s wrong with the entered data.

After successful validation, PHP will validate the shipping attributes sent via the form.

assets/js/shipping.js

function formValidation() { var valid = true; $("#length").removeClass("error-field"); $("#width").removeClass("error-field"); $("#height").removeClass("error-field"); $("#weight").removeClass("error-field"); $("#quantity").removeClass("error-field"); $("#to-postcode").removeClass("error-field"); var Length = $("#length").val(); var Width = $("#width").val(); var Height = $("#height").val(); var Weight = $("#weight").val(); var Quantity = $("#quantity").val(); var toPostcode = $("#to-postcode").val(); if (Length.trim() == "") { $("#length-info").html("").css("color", "#ee0000").show(); $("#length").addClass("error-field"); valid = false; } if (Width.trim() == "") { $("#width-info").css("color", "#ee0000").show(); $("#width").addClass("error-field"); valid = false; } if (Height.trim() == "") { $("#height-info").css("color", "#ee0000").show(); $("#height").addClass("error-field"); valid = false; } if (Weight.trim() == "") { $("#weight-info").css("color", "#ee0000").show(); $("#weight").addClass("error-field"); valid = false; } if (Quantity.trim() == "" || Quantity < 1) { $("#quantity-info").css("color", "#ee0000").show(); $("#quantity").addClass("error-field"); valid = false; } if (toPostcode.trim() == "") { $("#to-postcode-info").css("color", "#ee0000").show(); $("#to-postcode").addClass("error-field"); valid = false; } if (valid == false) { $('.error-field').first().focus(); valid = false; } if (valid == true) { $("#submit-btn").hide(); $("#loader-icon").show(); } return valid; } 

PHP code with Australia Post shipping API request-response handlers


This is the configuration file of this example code. It has the constants defined for keeping the API key and shipping origin.

Common/Config.php

<?php namespace Phppot; class Config { const AUSTRALIAN_POST_API_KEY = 'REPLACE_WITH_THE_API_KEY'; const SHIPPING_ORIGION = '1000'; } ?> 

This is an exclusive service class for executing curl script. The execute() function is receiving URL, API KEY as its parameters.

It initiates curl object and set the URL. It sets the header with the API key to call the Australia Post live URL.

The rawBody will receive the API response in JSON format. You can use this as a sample to build an eCommerce website backed by a shopping cart with shipping API integration.

lib/CurlService.php

<?php namespace Phppot; class CurlService { public function execute($url, $apiKey, $ch = null) { if (is_null($ch)) { $ch = curl_init(); } curl_setopt($ch, CURLOPT_URL, $url); curl_setopt($ch, CURLOPT_RETURNTRANSFER, 1); curl_setopt($ch, CURLOPT_SSL_VERIFYHOST, 0); curl_setopt($ch, CURLOPT_SSL_VERIFYPEER, false); curl_setopt($ch, CURLOPT_HTTPHEADER, array( 'AUTH-KEY: ' . $apiKey )); return $rawBody = curl_exec($ch); } } ?> 

The AusPost.php PHP class handles the operation for preparing the API request.

The getShipmentPrice() function set the API key and form data to the PHP variables. It prepares the query parameters with these variables.

The class constructor instantiates the curlService created for this example.

Using the curl instance, it hits the Australia Post live PAC API URL. The API will validate the shipping criteria passed with the query parameters.

The request and response can be of either JSON or XML.

lib/AusPost.php

<?php namespace Phppot; class AusPost { private $curlService; private $api_url = 'https://digitalapi.auspost.com.au/postage/parcel/domestic/calculate?'; public function __construct() { require_once __DIR__ . '/CurlService.php'; $this->curlService = new CurlService(); } public function getShipmentPrice() { require_once __DIR__ . '/../Common/Config.php'; $con = new Config(); $apiKey = $con::AUSTRALIAN_POST_API_KEY; $fromPostcode = $con::SHIPPING_ORIGION; $toPostcode = $_POST["to-postcode"]; $length = $_POST["length"]; $width = $_POST["width"]; $height = $_POST["height"]; $weight = $_POST["weight"]; $queryParams = array( "from_postcode" => $fromPostcode, "to_postcode" => $toPostcode, "length" => $length, "width" => $width, "height" => $height, "weight" => $weight, "service_code" => "AUS_PARCEL_REGULAR" ); // here use $curlService and execute $url = $this->api_url . http_build_query($queryParams); $result = $this->curlService->execute($url, $apiKey); $shippingResult = json_decode($result); return $shippingResult; } } ?> 

index.php (PHP Code)

<?php namespace Phppot; if (! empty($_POST["submit-btn"])) { require_once __DIR__ . '/lib/AusPost.php'; $shippingApi = new AusPost(); $result = $shippingApi->getShipmentPrice(); if (isset($result->postage_result)) { $shippingPrice = $result->postage_result->total_cost; } else { $errorMsg = $result->error->errorMessage; } $quantity = $_POST["quantity"]; $address1 = $_POST["address1"]; $address2 = $_POST["address2"]; $state = $_POST["state"]; $country = $_POST["country"]; $city = $_POST["city"]; } ?> 

Australia Post shipping API integration output


The output screenshot below shows the payment and shipping form. It is to get the shipping details from the user.

It also has the fields to collect parameters like height, width and the dimension of the products.

You can also integrate this form into your shopping cart checkout page to calculate rates. For a shopping cart, it requires only the shipping address.

Because, the height, width, height will be a part of a product entity. And the quantity can be read from the cart session or database. The below form is generic and with little customization can be used for any eCommerce website.
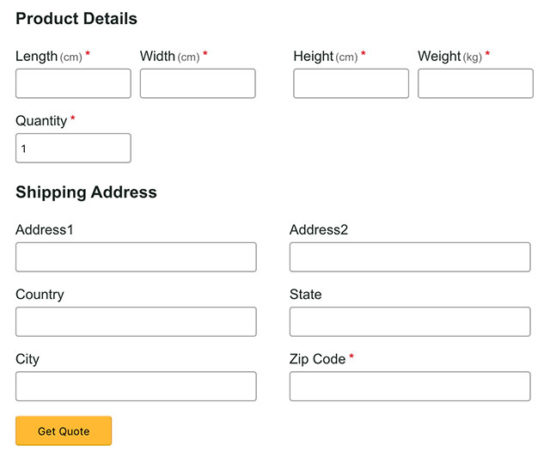
Shipping API Australia Post User Interface

Download

↑ Back to Top


https://www.sickgaming.net/blog/2020/01/...t-example/

Print this item

  News - Destiny 2 Hotfix 2.8.1.3
Posted by: xSicKxBot - 06-07-2020, 08:09 AM - Forum: Lounge - No Replies

Destiny 2 Hotfix 2.8.1.3

Destiny 2 Hotfix 2.8.1.3 > News | Bungie.net News | Bungie.net”> News | Bungie.net”>

JavaScript is required to use Bungie.net

language

Deutsch

English

Español

Español (México)

Français

Italiano

日本語

한국어

Polski

Português (Brasil)

Русский

繁體中文

arrow_back

Chat 0″>{{messageCount}}

Notifications 0″>{{notificationCount}}

New Message

0″>

No items found

{{messageItem.iconCoin.text}} {{messageItem.iconCoin.iconName}}

{{messageItem.flairCoin.text}}

Loading…

{{whoIsTyping}}

New Messages

0″>

No notifications

PlayStation Xbox Live Steam Stadia Twitch Battle.net

  • Fixed an issue blocking progress of “The Lie” quest.

preload icon
preload icon
preload icon


https://www.sickgaming.net/blog/2020/05/...x-2-8-1-3/

Print this item

  News - 11 Years of Minecraft! Mojang’s Stylish New Rebrand
Posted by: xSicKxBot - 06-07-2020, 08:08 AM - Forum: Minecraft - No Replies

11 Years of Minecraft! Mojang’s Stylish New Rebrand

Where has the time gone?  How long have you been playing Minecraft?  I may not have been there from the beginning but I have fallen in love with this game and it has opened up a new genre of survival crafting games that range all age ranges.  Did you start out playing creative?  What are some of your favorite builds?

As 11 years have gone by Minecraft has hit some record highs in terms of sales.  No one could ever expect this game would grow to what it has become today.  11 years of updates, 11 years of development, 11 years of belonging to a great and creative community!  Over 200 million, yes over 200 MILLION copies have sold for Minecraft across all platforms and I can’t see that slowing down any time soon.

With over a decade under the belt, Moajng also announced their rebranding.  Say hello to Mojang Studios!

What are your thoughts?  What are your fondest memories over the last year or Minecraft?  What made you start playing Minecraft?  Share in the comments below!


https://www.sickgaming.net/blog/2020/05/...w-rebrand/

Print this item

 
Latest Threads
News - Starfield Remains ...
Last Post: xSicKxBot
3 hours ago
News - Call Of Duty: Mode...
Last Post: xSicKxBot
Yesterday, 09:13 PM
Black Ops (BO1, T5) DLC's...
Last Post: Brenox
Yesterday, 09:44 AM
(Free Game Key) The Life ...
Last Post: xSicKxBot
Yesterday, 04:49 AM
Black Ops (BO1, T5) DLC's...
Last Post: imp132509
Yesterday, 12:01 AM
(Free Game Key) Catch Me!...
Last Post: xSicKxBot
07-19-2026, 12:15 PM
News - Call Of Duty: MW4 ...
Last Post: xSicKxBot
07-19-2026, 12:15 PM
(Free Game Key) Steam | P...
Last Post: xSicKxBot
07-18-2026, 07:50 PM
News - Former Rockstar De...
Last Post: xSicKxBot
07-18-2026, 07:50 PM
(Free Game Key) Steam | W...
Last Post: xSicKxBot
07-18-2026, 03:25 AM

Forum software by © MyBB Theme © iAndrew 2016