EA have just released the game client source code for Command and Conquer, both Red Alert and Tiberian Dawn versions. This code is used to generate a DLL that is then hosted in the game engine and will enable modders to create new content for the about to be released Command & Conquer Remastered.
The source code is available on GitHub under the GPLv3 license. This is not a complete release, it does not include game assets, nor does it ship with the game engine itself. Instead you can use this source to create game DLLs that are run in the engine. The code however is extremely well documented and is a nice peek behind the curtain of a successful commercial game.
You can learn more about the code release in the video below.
Project Tye is an experimental developer tool that makes developing, testing, and deploying microservices and distributed applications easier.
When building an app made up of multiple projects, you often want to run more than one at a time, such as a website that communicates with a backend API or several services all communicating with each other. Today, this can be difficult to setup and not as smooth as it could be, and it’s only the very first step in trying to get started with something like building out a distributed application. Once you have an inner-loop experience there is then a, sometimes steep, learning curve to get your distributed app onto a platform such as Kubernetes.
The project has two main goals:
Making development of microservices easier by:
Running many services with one command
Using dependencies in containers
Discovering addresses of other services using simple conventions
Automating deployment of .NET applications to Kubernetes by:
Automatically containerizing .NET applications
Generating Kubernetes manifests with minimal knowledge or configuration
Using a single configuration file
If you have an app that talks to a database, or an app that is made up of a couple of different processes that communicate with each other, then we think Tye will help ease some of the common pain points you’ve experienced.
Tye makes it very easy to run single applications. To demonstrate this:
1. Make a new folder called microservices and navigate to it:
mkdir microservices
cd microservices
2. Then create a frontend project:
dotnet new razor -n frontend
3. Now run this project using tye run:
tye run frontend
The above displays how Tye is building, running, and monitoring the frontend application.
One key feature from tye run is a dashboard to view the state of your application. Navigate to http://localhost:8000 to see the dashboard running.
The dashboard is the UI for Tye that displays a list of all of your services. The Bindings column has links to the listening URLs of the service. The Logs column allows you to view the streaming logs for the service.
Services written using ASP.NET Core will have their listening ports assigned randomly if not explicitly configured. This is useful to avoid common issues like port conflicts.
Running multiple services
Instead of just a single application, suppose we have a multi-application scenario where our frontend project now needs to communicate with a backend project. If you haven’t already, stop the existing tye run command using Ctrl + C.
1. Create a backend API that the frontend will call inside of the microservices/ folder.
dotnet new webapi -n backend
2. Then create a solution file and add both projects:
dotnet new sln
dotnet sln add frontend backend
You should now have a solution called microservices.sln that references the frontend and backend projects.
3. Run tye in the folder with the solution.
tye run
The dashboard should show both the frontend and backend services. You can navigate to both of them through either the dashboard of the url outputted by tye run.
The backend service in this example was created using the webapi project template and will return an HTTP 404 for its root URL.
Getting the frontend to communicate with the backend
Now that we have two applications running, let’s make them communicate.
To get both of these applications communicating with each other, Tye utilizes service discovery. In general terms, service discovery describes the process by which one service figures out the address of another service. Tye uses environment variables for specifying connection strings and URIs of services.
The simplest way to use Tye’s service discovery is through the Microsoft.Extensions.Configuration system – available by default in ASP.NET Core or .NET Core Worker projects. In addition to this, we provide the Microsoft.Tye.Extensions.Configuration package with some Tye-specific extensions layered on top of the configuration system.
If you want to learn more about Tye’s philosophy on service discovery and see detailed usage examples, check out this reference document.
1. If you haven’t already, stop the existing tye run command using Ctrl + C. Open the solution in your editor of choice.
2. Add a file WeatherForecast.cs to the frontend project.
using System; namespace frontend { public class WeatherForecast { public DateTime Date { get; set; } public int TemperatureC { get; set; } public int TemperatureF => 32 + (int)(TemperatureC / 0.5556); public string Summary { get; set; } } }
This will match the backend WeatherForecast.cs.
3. Add a file WeatherClient.cs to the frontend project with the following contents:
using System.Net.Http;
using System.Text.Json;
using System.Threading.Tasks; namespace frontend
{ public class WeatherClient { private readonly JsonSerializerOptions options = new JsonSerializerOptions() { PropertyNameCaseInsensitive = true, PropertyNamingPolicy = JsonNamingPolicy.CamelCase, }; private readonly HttpClient client; public WeatherClient(HttpClient client) { this.client = client; } public async Task<WeatherForecast[]> GetWeatherAsync() { var responseMessage = await this.client.GetAsync("/weatherforecast"); var stream = await responseMessage.Content.ReadAsStreamAsync(); return await JsonSerializer.DeserializeAsync<WeatherForecast[]>(stream, options); } }
}
4. Add a reference to the Microsoft.Tye.Extensions.Configuration package to the frontend project
5. Now register this client in frontend by adding the following to the existing ConfigureServices method to the existing Startup.cs file:
...
public void ConfigureServices(IServiceCollection services)
{ services.AddRazorPages(); /** Add the following to wire the client to the backend **/ services.AddHttpClient<WeatherClient>(client => { client.BaseAddress = Configuration.GetServiceUri("backend"); }); /** End added code **/
}
...
This will wire up the WeatherClient to use the correct URL for the backend service.
6. Add a Forecasts property to the Index page model under Pages\Index.cshtml.cs in the frontend project.
... public WeatherForecast[] Forecasts { get; set; }
...
7. Change the OnGet method to take the WeatherClient to call the backend service and store the result in the Forecasts property:
9. Run the project with tye run and the frontend service should be able to successfully call the backend service!
When you visit the frontend service you should see a table of weather data. This data was produced randomly in the backend service. The fact that you’re seeing it in a web UI in the frontend means that the services are able to communicate. Unfortunately, this doesn’t work out of the box on Linux right now due to how self-signed certificates are handled, please see the workaround here
Tye’s configuration schema
Tye has a optional configuration file (tye.yaml) to enable customizing settings. This file contains all of your projects and external dependencies. If you have an existing solution, Tye will automatically populate this with all of your current projects.
To initalize this file, you will need to run the following command in the microservices directory to generate a default tye.yaml file:
tye init
The contents of the tye.yaml should look like this:
The top level scope (like the name node) is where global settings are applied.
tye.yaml lists all of the application’s services under the services node. This is the place for per-service configuration.
To learn more about Tye’s yaml specifications and schema, you can check it out here in Tye’s repository on Github.
We provide a json-schema for tye.yaml and some editors support json-schema for completion and validation of yaml files. See json-schema for instructions.
Adding external dependencies (Redis)
Not only does Tye make it easy to run and deploy your applications to Kubernetes, it’s also fairly simple to add external dependencies to your applications as well. We will now add redis to the frontend and backend application to store data.
Tye can use Docker to run images that run as part of your application. Make sure that Docker is installed on your machine.
1. Change the WeatherForecastController.Get() method in the backend project to cache the weather information in redis using an IDistributedCache.
2. Add the following using‘s to the top of the file:
using Microsoft.Extensions.Caching.Distributed;
using System.Text.Json;
3. Update Get():
[HttpGet]
public async Task<string> Get([FromServices]IDistributedCache cache)
{ var weather = await cache.GetStringAsync("weather"); if (weather == null) { var rng = new Random(); var forecasts = Enumerable.Range(1, 5).Select(index => new WeatherForecast { Date = DateTime.Now.AddDays(index), TemperatureC = rng.Next(-20, 55), Summary = Summaries[rng.Next(Summaries.Length)] }) .ToArray(); weather = JsonSerializer.Serialize(forecasts); await cache.SetStringAsync("weather", weather, new DistributedCacheEntryOptions { AbsoluteExpirationRelativeToNow = TimeSpan.FromSeconds(5) }); } return weather;
}
This will store the weather data in Redis with an expiration time of 5 seconds.
4. Add a package reference to Microsoft.Extensions.Caching.StackExchangeRedis in the backend project:
cd backend/
dotnet add package Microsoft.Extensions.Caching.StackExchangeRedis
cd ..
5. Modify Startup.ConfigureServices in the backend project to add the redis IDistributedCache implementation.
We’ve added 2 services to the tye.yaml file. The redis service itself and a redis-cli service that we will use to watch the data being sent to and retrieved from redis.
The "${host}:${port}" format in the connectionString property will substitute the values of the host and port number to produce a connection string that can be used with StackExchange.Redis.
7. Run the tye command line in the solution root
Make sure your command-line is in the microservices/ directory. One of the previous steps had you change directories to edit a specific project.
tye run
Navigate to http://localhost:8000 to see the dashboard running. Now you will see both redis and the redis-cli running listed in the dashboard.
Navigate to the frontend application and verify that the data returned is the same after refreshing the page multiple times. New content will be loaded every 5 seconds, so if you wait that long and refresh again, you should see new data. You can also look at the redis-cli logs using the dashboard and see what data is being cached in redis.
The "${host}:${port}" format in the connectionString property will substitute the values of the host and port number to produce a connection string that can be used with StackExchange.Redis.
Deploying to Kubernetes
Tye makes the process of deploying your application to Kubernetes very simple with minimal knowlege or configuration required.
Tye will use your current credentials for pushing Docker images and accessing Kubernetes clusters. If you have configured kubectl with a context already, that’s what tye deploy is going to use!
Prior to deploying your application, make sure to have the following:
Docker installed based off on your operating system
A container registry. Docker by default will create a container registry on DockerHub. You could also use Azure Container Registry (ACR) or another container registry of your choice.
A Kubernetes Cluster. There are many different options here, including:
If you choose a container registry provided by a cloud provider (other than Dockerhub), you will likely have to take some steps to configure your kubernetes cluster to allow access. Follow the instructions provided by your cloud provider.
Deploying Redis
tye deploy will not deploy the redis configuration, so you need to deploy it first by running:
This will create a deployment and service for redis.
Tye deploy
You can deploy your application by running the follow command:
tye deploy --interactive
Enter the Container Registry (ex: example.azurecr.io for Azure or example for dockerhub):
You will be prompted to enter your container registry. This is needed to tag images, and to push them to a location accessible by kubernetes.
If you are using dockerhub, the registry name will be your dockerhub username. If you are using a standalone container registry (for instance from your cloud provider), the registry name will look like a hostname, eg: example.azurecr.io.
You’ll also be prompted for the connection string for redis.
Enter the following to use the instance that you just deployed:
redis:6379
tye deploy will create Kubernetes secret to store the connection string.
–interactive is needed here to create the secret. This is a one-time configuration step. In a CI/CD scenario you would not want to have to specify connection strings over and over, deployment would rely on the existing configuration in the cluster.
Tye uses Kubernetes secrets to store connection information about dependencies like redis that might live outside the cluster. Tye will automatically generate mappings between service names, binding names, and secret names.
tye deploy does many different things to deploy an application to Kubernetes. It will:
Create a docker image for each project in your application.
Push each docker image to your container registry.
Generate a Kubernetes Deployment and Service for each project.
Apply the generated Deployment and Service to your current Kubernetes context.
You should now see three pods running after deploying.
kubectl get pods NAME READY STATUS RESTARTS AGE
backend-ccfcd756f-xk2q9 1/1 Running 0 85m
frontend-84bbdf4f7d-6r5zp 1/1 Running 0 85m
redis-5f554bd8bd-rv26p 1/1 Running 0 98m
You can visit the frontend application, you will need to port-forward to access the frontend from outside the cluster.
kubectl port-forward svc/frontend 5000:80
Now navigate to http://localhost:5000 to view the frontend application working on Kubernetes.
Currently tye does not automatically enable TLS within the cluster, and so communication takes place over HTTP instead of HTTPS. This is typical way to deploy services in kubernetes – we may look to enable TLS as an option or by default in the future.
Adding a registry to tye.yaml
If you want to use tye deploy as part of a CI/CD system, it’s expected that you’ll have a tye.yaml file initialized. You will then need to add a container registry to tye.yaml. Based on what container registry you configured, add the following line in the tye.yaml file:
registry: <registry_name>
Now it’s possible to use tye deploy without --interactive since the registry is stored as part of configuration.
This step may not make much sense if you’re using tye.yaml to store a personal Dockerhub username. A more typical use case would storing the name of a private registry for use in a CI/CD system.
For a conceptual overview of how Tye behaves when using tye deploy for deployment, check out this document.
Undeploying your application
After deploying and playing around with the application, you may want to remove all resources associated from the Kubernetes cluster. You can remove resources by running:
tye undeploy
This will remove all deployed resources. If you’d like to see what resources would be deleted, you can run:
tye undeploy --what-if
If you want to experiment more with using Tye, we have a variety of different sample applications and tutorials that you can walk through, check them out down below:
We have been diligently working on adding new capabilities and integrations to continuously improve Tye. Here are some integrations below that we have recently released. There is also information provided on how to get started for each of these:
Ingress – to expose pods/services created to the public internet.
Redis – to store data, cache, or as a message broker.
Dapr – for integrating a Dapr application with Tye.
While we are excited about the promise Tye holds, it’s an experimental project and not a committed product. During this experimental phase we expect to engage deeply with anyone trying out Tye to hear feedback and suggestions. The point of doing experiments in the open is to help us explore the space as much as we can and use what we learn to determine what we should be building and shipping in the future.
Project Tye is currently commited as an experiment until .NET 5 ships. At which point we will be evaluating what we have and all that we’ve learnt to decide what we should do in the future.
Our goal is to ship every month, and some new capabilities that we are looking into for Tye include:
More deployment targets
Sidecar support
Connected development
Database migrations
We are excited by the potential Tye has to make developing distributed applications easier and we need your feedback to make sure it reaches that potential. We’d really love for you to try it out and tell us what you think, there is a link to a survey on the Tye dashboard that you can fill out or you can create issues and talk to us on GitHub. Either way we’d love to hear what you think.
Apple slashes iPhone prices in China ahead of online shopping festival
Apple, in partnership with Chinese internet vendors Tmall and JD.com, has slashed iPhone prices ahead of a regional online shopping festival dubbed “6.18.”
As noted by CNBC, iPhone prices on Apple’s official Tmall store have dropped significantly in the lead-up to 6.18. Identical rates are reflected by authorized Apple reseller JD.com.
For example, a 64GB iPhone 11 is now going for 4,779 yuan ($669.59) on Tmall, a 13% savings off the original 5,499 yuan price tag. The flagship iPhone 11 Pro starts at 7,579 yuan, down from 8,699 yuan, while the iPhone 11 Pro Max can be had for 8,359 yuan, a 13% savings on the original 9,599 yuan. Apple’s budget-minded iPhone SE also benefits from a price drop from 3,299 yuan to 3,099 yuan.
JD.com is offering more aggressive discounts starting with the 64GB iPhone 11, which sells for 4,599 yuan. Apple’s iPhone 11 Pro and Pro Max are priced at 6,99 yuan and 7,499, respectively, while the iPhone SE is down to 3,069 yuan with discount. Prices may vary as the online seller might change discount offerings on a daily basis.
Other third-party resellers are also slashing prices on Apple hardware, products that rarely go on sale, let alone new devices like iPhone 11 and iPhone SE.
Beyond its official Tmall store, Apple itself is not participating in the festivities and prices remain constant on the Chinese online Apple Store.
The surprise savings event comes as Apple and other manufacturers scramble to rebuild sales momentum after a dismal first quarter was plagued by complications stemming from the ongoing coronavirus pandemic. From the supply chain to retail, the virus severely impacted Apple’s business strategy during the three-month period ending in March.
According to Apple, iPhone generated $28.96 billion in revenue during the company’s second fiscal quarter of 2020, down from $31 billion in 2019. Poor demand in China was partially to blame for the contraction, executives said during a conference call in April.
The tech giant managed to beat expectations and finish the punishing quarter up 1% year-over-year in large part thanks to services and wearables, two categories that are becoming increasingly important to the company’s bottom line.
rideOS, a technology platform designed to accelerate the safe, global rollout of next-generation transportation fleets, today launched its new Ridehail Platform — including a Ridehail API and open-source mobile apps. The Ridehail API offers an easy way for automotive original equipment manufacturers (OEMs), autonomous vehicle (AV) companies, and transportation network companies (TNCs) to create and manage their own ridehailing network using rideOS’ underlying technology. (Yahoo!)
Fedora Silverblue provides a useful workstation build on an immutable operating system. In “What is Silverblue?“, you learned about the benefits that an immutable OS provides. But what pieces go into making it? This article examines some of the technology that powers Silverblue.
The filesystem
Fedora Workstation users may find the idea of an immutable OS to be the most brain-melting part of Silverblue. What does that mean? Find some answers by taking a look at the filesystem.
At first glance, the layout looks pretty much the same as a regular Fedora file system. It has some differences, like making /home a symbolic link to /var/home. And you can get more answers by looking at how libostree works. libostree treats the whole tree like it’s an object, checks it into a code repository, and checks out a copy for your machine to use.
libostree
The libostree project supplies the goods for managing Silverblue’s file system. It is an upgrade system that the user can control using rpm-ostree commands.
libostree knows nothing about packages—an upgrade means replacing one complete file system with another complete file system. libostree treats the file system tree as one atomic object (an unbreakable unit). In fact, the forerunner to Silverblue was named Project Atomic.
The libostree project provides a library and set of tools. It’s an upgrade system that carries out these tasks.
Pull in a new file system
Store the new file system
Deploy the new file system
Pull in a new file system
Pulling in a new file system means copying an object (the entire file system) from a remote source to its own store. If you’ve worked with virtual machine image files, you already understand the concept of a file system object that you can copy.
Store the new file system
The libostree store has some source code control qualities—it stores many file system objects, and checks one out to be used as the root file system. libostree’s store has two parts:
a repository database at /sysroot/ostree/repo/
file systems in /sysroot/ostree/deploy/fedora/deploy/
libostree keeps track of what’s been checked in using commit IDs. Each commit ID can be found in a directory name, nested deep inside /sysroot .A libostree commit ID is a long checksum, and looks similar to a git commit ID.
$ ls -d /sysroot/ostree/deploy/fedora/deploy/*/

/sysroot/ostree/deploy/fedora/deploy/c4bf7a6339e6be97d0ca48a117a1a35c9c5e3256ae2db9e706b0147c5845fac4.0/
rpm-ostree status gives a little more information about that commit ID. The output is a little confusing; it can take a while to see this file system is Fedora 31.
$ rpm-ostree status

State: idle

AutomaticUpdates: disabled

Deployments:

● ostree://fedora:fedora/31/x86_64/silverblue Version: 31.1.9 (2019-10-23T21:44:48Z) Commit: c4bf7a6339e6be97d0ca48a117a1a35c9c5e3256ae2db9e706b0147c5845fac4 GPGSignature: Valid signature by 7D22D5867F2A4236474BF7B850CB390B3C3359C4
Deploy the new filesystem
libostree deploys a new file system by checking out the new object from its store. libostree doesn’t check out a file system by copying all the files—it uses hard links instead. If you look inside the commit ID directory, you see something that looks suspiciously like the root directory. That’s because it is the root directory. You can see these two directories are pointing to the same place by checking their inodes.
$ ls -di1 / /sysroot/ostree/deploy/fedora/deploy/*/

260102 /

260102 /sysroot/ostree/deploy/fedora/deploy/c4bf7a6339e6be97d0ca48a117a1a35c9c5e3256ae2db9e706b0147c5845fac4.0/
This is a fresh install, so there’s only one commit ID. After a system update, there will be two. If more copies of the file system are checked into libostree’s repo, more commit IDs appear here.
Upgrade process
Putting the pieces together, the update process looks like this:
libostree checks out a copy of the file system object from the repository
DNF installs packages into the copy
libostree checks in the copy as a new object
libostree checks out the copy to become the new file system
You reboot to pick up the new system files
In addition to more safety, there is more flexibility. You can do new things with libostree’s repo, like store a few different file systems and check out whichever one you feel like using.
Silverblue’s root file system
Fedora keeps its system files in all the usual Linux places, such as /boot for boot files, /etc for configuration files, and /home for user home directories. The root directory in Silverblue looks much like the root directory in traditional Fedora, but there are some differences.
The filesystem has been checked out by libostree
Some directories are now symbolic links to new locations. For example, /home is a symbolic link to /var/home
/usr is a read-only directory
There’s a new directory named /sysroot. This is libostree’s new home
Juggling file systems
You can store many file systems and switch between them. This is called rebasing, and it’s similar to git rebasing. In fact, upgrading Silverblue to the next Fedora version is not a big package install—it’s a pull from a remote repository and a rebase.
You could store three copies with three different desktops: one KDE, one GNOME, and one XFCE. Or three different OS versions: how about keeping the current version, the nightly build, and an old classic? Switching between them is a matter of rebasing to the appropriate file system object.
The Flatpak project provides a way of installing applications like LibreOffice. Applications are pulled from remote repositories like Flathub. It’s a kind of package manager, although you won’t find the word package in the docs. Traditional Fedora variants like Fedora Workstation can also use Flatpak, but the sandboxed nature of flatpaks make it particularly good for Silverblue. This way you do not have to do the entire ostree update process every time you wish to install an application.
Flatpak is well-suited to desktop applications, but also works for command line applications. You can install the vim editor with the command flatpak install flathub org.vim.Vim and run it with flatpak run org.vim.Vim.
toolbox
The toolbox project provides a traditional operating system inside a container. The idea is that you can mess with the mutable OS inside your toolbox (the Fedora container) as much as you like, and leave the immutable OS outside your toolbox untouched. You pack as many toolboxes as you want on your system, so you can keep work separated. Behind the scenes, the executable /usr/bin/toolbox is a shell script that uses podman.
A fresh install does not include a default toolbox. The toolbox create command checks the OS version (by reading /usr/lib/os-release), looks for a matching version at the Fedora container registry, and downloads the container.
$ toolbox create

Image required to create toolbox container.

Download registry.fedoraproject.org/f31/fedora-toolbox:31 (500MB)? [y/N]: y

Created container: fedora-toolbox-31

Enter with: toolbox enter
Hundreds of packages are installed inside the toolbox. The dnf command and the usual Fedora repos are set up, ready to install more. The ostree and rpm-ostree commands are not included – no immutable OS here.
Each user’s home directory is mounted on their toolbox, for storing content files outside the container.
Put the pieces together
Spend some time exploring Fedora Silverblue and it will become clear how these components fit together. Like other Fedora variants, all these of tools come from open source projects. You can get as up close and personal as you want, from reading their docs to contributing code. Or you can contribute to Silverblue itself.
The latest Nintendo Download update for North America has arrived, and it’s bringing new games galore to the eShop in your region. As always, be sure to drop a vote in our poll and comment down below with your potential picks for the week. Enjoy!
Nintendo Switch
Clubhouse Games: 51 Worldwide Classics(Nintendo, Fri 5th June, $39.99) Play and discover 51 board games, tabletop games, and more all in one package – Clubhouse Games: 51 Worldwide Classics. This diverse collection includes games from all over the world across multiple genres, from familiar favorites like Chess to international hits like Mancala that have been around for 100s of years! Read our Clubhouse Games: 51 Worldwide Classics review.
The Outer Worlds(Private Division, Fri 5th June, $59.99) Lost in transit while on a colonist ship bound for the furthest edge of the galaxy, you awake decades later than you expected only to find yourself in the midst of a deep conspiracy threatening to destroy the Halcyon colony. As you explore the furthest reaches of space and encounter a host of factions all vying for power, who you decide to become will determine the fate of everyone in Halcyon. In the corporate equation for the colony, you are the unplanned variable. Read our The Outer Worlds review.
Switch eShop
1971 Project Helios(RECOTECHNOLOGY, Tue 9th June, $39.99) 1971 Project Helios is a turn-based strategy game which combines modern warfare military tactics and close combat. Firearms and vehicles are scarce, conflicts and hostilities have no end, and the terrible freezing cold annihilates friends and foes in its path. The campaign sets in a frozen world, in which eight people – each one with its own problems and interests – join in a sort of temporary alliance, to find one particular person: Dr Margaret Blythe.
Ant-Gravity: Tiny’s Adventure(QUByte Interactive, Thu 28th May, $0.99) Ant-gravity is a 2D Platform game with puzzle elements in which you control Tiny, an ant with the power to control gravity. Use your powers to explore the ever-changing levels, avoid threats, overcome obstacles and find secrets in this classic 2D game.
Aqua Lungers(WarpedCore Studio, Thu 21st May, $14.99) Race your way through challenging stages while contending with deadly creatures and dastardly opponents to collect the most treasure. While everyone’s goal is the same, each player is afforded several options to get an edge over their competitors. Players can use their speed and agility to outpace and evade their opponents, while others might use devastating attacks to slow them down and steal their hard-earned goods.
Arcade Archives CRAZY CLIMBER2(HAMSTER, Thu 28th May, $7.99) “CRAZY CLIMBER2” is an action game released by Nichibutsu in 1988. It was a well-received sequel to the popular first instalment in the CRAZY CLIMBER franchise. This time the game takes place in America, with even better traps and troublemakers standing in your way as you climb up the building.
Bridge Strike(Drageus Games, Fri 5th June, $6.99) Sometimes, you have to fight for peace. These green valleys, safe for many years, are now threatened. Answer this threat by force: stay undetected and strike hard! The gameplay, chiptune soundtrack and pixel-art graphics were polished with care and a nostalgic love for the classic arcade games. But the action isn’t like your typical SHMUP mayhem. In Bridge Strike, you need to think while you fly.
Demon’s Tier+(Tue 9th June, $9.99) Enter the dungeons of King Thosgar and destroy his demonic minions! Combining the best elements from Xenon Valkyrie+ and Riddled Corpses EX, this is the latest game in the Diabolical Mind trilogy!
Depth of Extinction(HOF Studios, Today, $14.99) In a flooded future world, killer machines are plotting mankind’s demise. As the sole defender of humanity’s last government, only you can create the ultimate squad and save humanity in this turn-based, tactical RPG with roguelike elements.
Food Truck Tycoon – Asian Cuisine(Baltoro Games, Fri 29th May, $4.99) Time to explore Asian Food and become the best gourmet cooking master at your brand new food truck! Take orders, make delicious dishes and be fast to serve the hordes of hungry customers who will line up in front of your counter! Be careful not to burn the food! Fulfil your dream of becoming the best food truck tycoon in the city!
Jump King(UKIYO Publishing, Tue 9th June, $12.99) Tactical Leaping Adventure – Jump King: There is a Smoking Hot Babe at the Top! is a platforming challenge about struggling upwards in search of the legendary Smoking Hot Babe! This lonely adventure to reach The Top will demand your full mastery of the technique of jumping.
Knight Squad(Chainsawesome, Fri 5th June, $14.99) Knight Squad is an insane 1-to-8 player chaotic arena friendship destroyer. Take on current friends and future frenemies in any of the incredibly fun game modes, ranging from Last Man Standing to Medieval soccer. All of that using only weapons from the middle age… and laser guns… and miniguns.
Match(Sabec, Today, $9.99) Match is now available on Nintendo Switch. Simply clear all fruits of the same colour and try to cause a chain reaction for that mind-blowing victory. Match is jam-packed with 30 levels to complete and many power-ups for that unlimited gameplay experience. Every level in Match has a different goal that must be completed within a fixed number of moves and with so many different fruit blocks to be discovered you will have a fun and exciting experience playing Match.
Outbuddies DX(Headup, Fri 5th June, $17.99) Enter Bahlam, a sunken city of the Old Gods, located deep in the South Atlantic Ocean. Following a shipwreck, adventurer and maritime archaeologist Nikolay Bernstein regains consciousness 36. 000 feet under the sea. He’s severely wounded and unwillingly connected to a supernatural Buddy-unit. Searching for answers about his displacement our main protagonist digs deep into the lost undercity, gradually realizing an ominous presence hollowing in its shadowed caverns.
Pinball Lockdown(Onteca, Fri 5th June, $5.99) Play Pinball Lockdown, a unique exciting collection of pinball tables with a variety of themes. No hidden extras, 5 tables available from day one.
Potata: Fairy Flower(OverGamez, Sat 6th June, $12.00) Potata is a puzzle-platformer adventure story about a little girl’s magical journey through a world filled with good and evil. Play as the oddly-named Potata, a novice witch who is still getting a handle on her powers. Help Potata save her village from stinky spores, evil mushrooms, spiders, and other dark forest spirits. The game world is inhabited by fantastic creatures, each with their own personality and story.
Skelattack(Konami, Tue 2nd June, $19.99) Play Skelattack and save the Underworld in this fun and unique action platformer! Being dead is not so bad when you have the Underworld to live in. A magical and expansive world inhabited by quirky, charming and sometimes deadly inhabitants of the afterlife, the Underworld also includes Aftervale. Aftervale is a happy hub where the dead come to spend eternity and come to terms with their time alive through a Remembrance.
Snakes & Ladders(Fri 29th May, $9.99) Snakes & Ladders is a worldwide classic fun and easy to play board game for family and friends of all ages. The rules of the game are simple, navigate one’s game piece from the start square 1 to the finish square 100 by rolling the dice turn by turn.
Strawberry Vinegar(Ratalaika Games, Fri 5th June, $9.99) Sakuraba Rie, aged nine, is a cynical and grumpy girl who cares little for her fellow classmates and does not have a single friend. That is until a self-proclaimed demon from the deepest, darkest pits of Hell suddenly appears in Rie’s kitchen and steals a tray of cookies. What will happen between these two young girls? Will friendship blossom between them, or perhaps something more?
Super Holobunnies: Pause Café(Nkidu, Sat 6th June, $4.99) The Holobunnies (a group of hologram bunnies) pass the time on their sweet little home planet by battling each other to see who’s the strongest in Brawler mode. They challenge themselves in boss battle simulations to hone their fighting skills in Boss Rush mode.
Taxi Sim 2020(SC Ovilex Soft, Wed 3rd June, $14.99) Experience the life of a taxi driver in our latest taxi simulator game. Complete different types of driving missions as a taxi or private taxi driver and pick your favorite car from a selection of over 30 amazing vehicles, with more new cars being added weekly.
The TakeOver(Antonios Pelekanos, Today, $19.99) The TakeOver is a side-scrolling beat’em up inspired by the genre-defining classic games of the ’90s. Battle solo or alongside a friend in local co-op while listening to awesome tunes from Little V Mills, Richie Branson, James Ronald and industry legend Yuzo Koshiro! Read our The TakeOver review.
They Came From the Sky(Nestor Yavorskyy, Fri 5th June, $2.99) They Came From the Sky is tiny, retro-styled, highly-addictive and fast-paced arcade game wherein you take the role of one of the Flying Saucers in the 1950s with one and only one Mission: Make a delicious juicy “Human Smoothie”! Your mission is to “rescue” all humans from earth. Some humans will try to take your ship down, so be careful!
So that’s your lot for this week’s North American Nintendo Download. Go on, be a sport and drop a vote in the poll above, and comment below with your hot picks!
The latest Nintendo Download update for Europe has arrived, and it’s bringing new games galore to the eShop in your region.As always, be sure to drop a vote in our poll and comment down below with your potential picks for the week. Enjoy!
Switch Retail eShop – New Releases
51 Worldwide Games(Nintendo, £34.99 / €39.99) – A world of games awaits! Clear the table and settle down with friends and family to enjoy a diverse collection of timeless favourites, in person or online*, in 51 Worldwide Games. From ancient board games to modern classics, relaxing solitaire games to fast-paced toy sports, experience the games that have shaped cultures around the world! – Read our Clubhouse Games: 51 Worldwide Classics review.
The Outer Worlds(Private Division, £49.99 / €59.99) – Lost in transit while on a colonist ship bound for the furthest edge of the galaxy, you awake decades later than you expected only to find yourself in the midst of a deep conspiracy threatening to destroy the Halcyon colony. As you explore the furthest reaches of space and encounter a host of factions all vying for power, who you decide to become will determine the fate of everyone in Halcyon. In the corporate equation for the colony, you are the unplanned variable. – Read our The Outer Worlds review
Switch eShop – New Releases
Aqua Lungers(WarpedCore Studio, 4th Jun, £12.99 / €13.99) – Race your way through challenging stages while contending with deadly creatures and dastardly opponents to collect the most treasure. While everyone’s goal is the same, each player is afforded several options to get an edge over their competitors. Players can use their speed and agility to outpace and evade their opponents, while others might use devastating attacks to slow them down and steal their hard-earned goods.
Awesome Pea 2(Sometimes You, 3rd Jun, £4.49 / €4.99) – Greedy Pea is back in the game! Now with even more dark dungeons, deadly traps and gold! What you will definitely find in this game (again): Pixel Game Boy-style graphics (when everything is green), 25 different levels, retro soundtrack (sounds like your old computer), lots of shiny coins.
Bridge Strike(£6.29 / €6.99) – Sometimes, you have to fight for peace. These green valleys, safe for many years, are now threatened. Answer this threat by force: stay undetected and strike hard! The gameplay, chiptune soundtrack and pixel-art graphics were polished with care and a nostalgic love for the classic arcade games. But the action isn’t like your typical SHMUP mayhem. In Bridge Strike, you need to think while you fly. Make the best use of the hi-tech hardware installed in your aircraft to destroy the threats while staying out of their radars. It won’t just be a simple mission: you’ll need to deal with numerous enemies and harsh weather conditions while trying not to crash into canyon walls! Show off your combat and flying skills to gather more points and unlock new vehicles: chopper, boat and hovercraft! Enjoy two game modes, with great replayability value.
Depth of Extinction(HOF Studios, 4th Jun, £11.99 / €13.49) – In a flooded future world, killer machines are plotting mankind’s demise. As the sole defender of humanity’s last government, only you can create the ultimate squad and save humanity in this turn based, tactical RPG with roguelike elements.
Do Not Feed the Monkeys(£11.69 / €12.99) – You are invited to join “The Primate Observation Club”, where you will observe the lives of caged monkeys and carefully analyze the information obtained. THE PRIMATE OBSERVATION CLUB: a shadowy group that observes other people through surveillance cameras and compromised webcams. YOU: the newest member of the CLUB, tired of your run-down apartment, dull existence, and boring job. MONKEYS: dozens of strangers who have fallen prey to your surveillance. PRIVACY: Something that the monkeys think they have. PC (PERSONAL COMPUTER): Yep, we put a PC in your game that’s on your Nintendo Switch so that you can work on a PC while you’re playing the game that’s on your Nintendo Switch console! FEEDING THE MONKEYS: Interacting or interfering with the subjects in any way. Feeding the monkeys is strictly prohibited. Oddly enough, club members keep feeding the monkeys as though they just can’t abide by this very simple rule! How about you?
Knight Squad(£12.14 / €13.49) – Knight Squad is an insane 1-to-8 player chaotic arena friendship destroyer. Take on current friends and future frenemies in any of the incredibly fun game modes, ranging from Last Man Standing to Medieval soccer. All of that using only weapons from the middle age… and laser guns… and miniguns.
Liberated(Walkabout Games, 2nd Jun, £14.39 / €15.99) – Welcome to a brave new world. Undeniable truth and personal freedoms are dying. Revolution is near. Rise up in the bloodstained struggle for a land of the free. Forget everything you know about comics. Immerse yourself in a dark, rain-soaked city. Use your wits, hack the system, sneak and solve puzzles. And when the going gets good, dispense picturesque headshots for great justice. Let the stunning hand-drawn art and action unite on the pages of this noir cyberpunk story. You are watched every minute of every hour of every day. Accept it. Or start a fire. – Read our Liberated review
Match(Sabec, 4th Jun, £8.09 / €8.99) – Match is now available on Nintendo Switch. Simply clear all fruits of the same colour and try to cause a chain reaction for that mind-blowing victory. Match is jam-packed with 30 levels to complete and many power-ups for that unlimited gameplay experience. Every level in Match has a different goal that must be completed within a fixed number of moves and with so many different fruit blocks to be discovered you will have a fun and exciting experience playing Match.
Outbuddies DX(£13.49 / €16.19) – Enter Bahlam, a sunken city of the Old Gods, located deep in the South Atlantic Ocean. Following a shipwreck, adventurer and maritime archaeologist Nikolay Bernstein regains consciousness 36,000 feet under the sea. He’s severely wounded and unwillingly connected to a supernatural Buddy-unit. Searching for answers about his displacement our main protagonist digs deep into the lost undercity, gradually realizing an ominous presence hollowing in its shadowed caverns.
Pinball Lockdown(Onteca, 28th May, £4.99 / €5.99) – Play Pinball Lockdown, a unique exciting collection of pinball tables with a variety of themes. No hidden extras, 5 tables available from day one. Tables include: Alice’s Adventures in WonderlandVegasDragon LandSpace RibbonZen Garden.
Potata: Fairy Flower(£8.24 / €8.99) – Potata is a puzzle-platformer adventure story about a little girl’s magical journey through a world filled with good and evil. Play as the oddly-named Potata, a novice witch who is still getting a handle on her powers. Help Potata save her village from stinky spores, evil mushrooms, spiders, and other dark forest spirits. The game world is inhabited by fantastic creatures, each with their own personality and story. Learn what secrets your village is hiding and make new friends — or maybe new enemies. Gameplay involves traditional platformer mechanics, puzzles, boss battles, conversations with village inhabitants and forest exploration. Some careful thought is necessary, and the hardest moments may leave you racking your brain to find the solution.
Shantae and the Seven Sirens(WayForward, 4th Jun, £25.19 / €27.99) – Shantae is back in an all-new tropical adventure! In her fifth outing, the Half-Genie hero gains new Fusion Magic abilities to explore a vast sunken city, makes new Half-Genie friends, and battles the Seven Sirens in her biggest, most thrilling quest yet! Featuring multiple towns and more labyrinths than ever before, an awesome aquatic journey full of danger and discovery awaits! – Read our Shantae and the Seven Sirens review
Skelattack(Konami Digital Entertainment, Inc., 2nd Jun, £15.99 / €19.99) – Being dead is not so bad when you have the Underworld to live in. A magical and expansive world inhabited by quirky, charming and sometimes deadly inhabitants of the afterlife, the Underworld also includes Aftervale. Aftervale is a happy hub where the dead spend eternity and begin to come to terms with their time alive through a Remembrance.
Star-Crossed Myth – The Department of Punishments –(Voltage, 4th Jun, £21.99 / €29.99) – Your days are dreamless and mundane until, one night, you notice a star sparkling in the heavens. Suddenly, the beautiful gods of the stars appear before you. Their goal? To erase their sins. This exquisite, heartrending true love…all began with a sin.
Star-Crossed Myth – The Department of Wishes –(Voltage, 4th Jun, £21.99 / €29.99) – Your days are dreamless and mundane until, one night, you notice a star sparkling in the heavens. Suddenly, the beautiful gods of the stars appear before you. Their goal? To erase their sins. This exquisite, heartrending true love. . . all began with a sin.
Strawberry Vinegar(£9.99 / €9.99) – Sakuraba Rie, aged nine, is a cynical and grumpy girl who cares little for her fellow classmates, and does not have a single friend. That is until a self-proclaimed demon from the deepest, darkest pits of Hell suddenly appears in Rie’s kitchen and steals a tray of cookies. What will happen between these two young girls? Will friendship blossom between them, or perhaps something more?
Super Holobunnies: Pause Café(£4.49 / €4.99) – The Holobunnies (a group of hologram bunnies) pass the time on their sweet little home planet by battling each other to see who’s the strongest in Brawler mode. They challenge themselves in boss battle simulations to hone their fighting skills in Boss Rush mode.
The TakeOver(Antonios Pelekanos, 4th Jun, £16.19 / €17.99) – The TakeOver is a side-scrolling beat’em up inspired by the genre-defining classic games of the ’90s. Battle solo or alongside a friend in local co-op while listening to awesome tunes from Little V Mills, Richie Branson, James Ronald and industry legend Yuzo Koshiro! – Read our The TakeOver review
They Came From the Sky(£0.99 / €0.99) – They Came From the Sky is tiny, retro-styled, highly-addictive and fast-paced arcade game wherein you take the role of one of the Flying Saucers in the 1950s with one and only one Mission: Make a delicious juicy “Human Smoothie”! Your mission is to “rescue” all humans from earth. Some humans will try to take your ship down, so be careful!
Switch eShop – Demos
DLC / Add-On Content
Nintendo Switch games with new DLC this week:
So that’s your lot for this week’s Nintendo Download. Go on, be a sport and drop a vote in the poll above, and comment below with your hot picks!
Posted by: xSicKxBot - 06-05-2020, 05:05 AM - Forum: Python
- No Replies
Scrum vs. Waterfall vs. Agile – What’s Right for You?
In this article, we will completely ignore the coding technicalities and syntax for a change. We’ll focus on time and work management, which represents a significant portion of a skillset of well-rounded and successful companies and individuals.
Disclaimer: A clear distinction between project and product management might be blurred in some organizations, and could be a topic for another short blog. Therefore, without further ado, we shall be using “project management” terminology for this blog.
Software engineering consists of creative problem solving and innovation. Almost daily, coders and developers face new challenges or problems that they’ve never solved before.
Software engineering as a filed involves minimal routine and, therefore, a higher degree of uncertainty or variety not only towards HOW to solve a specific problem but often also about WHAT exactly needs to be solved.
To be successful, good time and work management are essential. Let’s begin with a few statements which we will expand on as we go along:
Time and work management is a skill. And, as with any other skill, you can learn it.
Even the world’s best coder is useless without good work or time management—regardless whether they’re working as a freelancer or an employee in a development team).
Management is a highly transferable skill: you can apply it in almost any field.
Overview
You can use and take advantage of several project management frameworks, approaches, and concrete techniques. Their advantages and disadvantages are a common topic for debate, which we’ll try and avoid addressing in this blog. The topic quickly becomes highly complex, and very rarely is there an ultimate right answer as to which approaches, techniques, or methods are the best. In reality, it depends on a wide variety of factors such as type of the project, spectrum of personalities of people involved, management skills, company policies, etc.
There are three ultimate truths to keep in mind:
Each method possesses certain elements that are suitable to adopt or use in a particular project.
No plan and no structure leads to anarchy.
If you have to apply any method because the framework you’ve chosen tells you so, you’re doing it wrong! Every management method you choose to implement should be at your service and help you optimize your workflow.
Many would argue that project management approaches are “brand-named common sense”: recently, names were put to processes that happened naturally.
In this sense, we mostly speak of three approaches:
Traditional or “waterfall” model,
Agile methodologies, and
Lean software development methods.
Related: You can read more about the most common methodologies in this article, which includes summaries and also links to external resources.
Traditional Waterfall Methodology
Waterfall is the most traditional approach and is mainly plan-driven, meaning that a substantial amount of time is spent on planning at first.
Once all requirements are well-defined, there comes a design phase. There, all requirements are translated into technical language, meaning how they would be implemented or accomplished.
This is followed by an implementation phase, where all functionalities are actually implemented according to what’s been outlined so far.
Once all is implemented, there is a verification and testing phase takes place where all functionalities are double-checked and verified.
Upon completion, the product is deployed, which is followed by a maintenance phase. This approach is very well established, repeatedly proving itself as the most useful in projects where the goal is apparent, and the team knows how to get there.
Agile Methodologies
A whole family of agile methodologies and frameworks are all designed around the same baseline, challenging the high rigidity (or lack of flexibility) of the waterfall model. Agile approaches are designed to accommodate changes that inevitably happen as we learn new things during development. Agile approaches allow for re-planning and strongly rely on people’s communication, transparency, commitment, common goals, and values over a fixed plan.
Agile methodologies mostly apply in projects where the degree of uncertainty and complexity are high.
To this category, we can attach projects that are on the high end of innovation, where we don’t know what they will become, what impact they will have, and we might need to re-direct or focus as we go along so we can match the audience’s expectations.
On the other hand, we have highly complex projects that are out of our scope of skills. We are attempting to develop something we’ve never done before, which makes our early planning highly inaccurate.
According to Google trends, the term “Scrum framework” has undergone an increasing interest over the past decade.
Scrum is a variant of an agile approach that puts the development team on its front page. It assumes that the most efficient way of working is having small, “self-officiating” and self-organizing teams (up to 9 people) with a few key roles. The development process relies on incremental work of short periods (“sprints”), where the goal of each period (sprint) is to come up with a concluded deliverable (“increment”) that maximizes the final product’s value.
Scrum is people-oriented and assumes small groups working together. It is purposefully defined in a lightweight way, and it highly relies on people’s character. The values that are promoted are values of commitment, courage, focus, openness, and respect. It is assumed that people in organizations that practice scrum framework would in time adopt those values and live by them: commit to a common goal, always do the right thing and maintain transparent and respectful relationships with their fellow team members. It is also assumed that a scrum team consists of people with all necessary relevant skills to complete the work.
Following this principle, the size of the scrum team is strictly limited to between 3 and 9 people. Fewer than three would increase the probability of lacking skills to complete the work, whereas having more than nine people makes the communication too complicated.
The main roles defined in a scrum team are:
The product owner is responsible for maximizing the product’s value under development, managing the product backlog, and ensuring the development team understands it. The product owner is NOT a part of the development team.
The Scrum master: facilitates the scrum principles among the scrum team by promoting the rules, values, and practices of Scrum. Scrum master is also a part of the development team.
The development team: professionals who deliver a potentially releasable increment at the end of each sprint (what those can be read in the next section)
No member of the Scrum team is superior on inferior to another in this core definition.
Scrum Events
Scrum frameworks have clearly defined events during work execution. All product features are kept and prioritized in a product backlog (managed by the product owner).
Activities are executed through sprints, a max. 4 weeks long periods during which an increment is designed, developed, tested, and delivered. In this case, the increment represents a small enough feature or development step that can be completed and declared as “done” in one sprint. Bigger chunks of work are sensibly broken down into smaller pieces.
Every sprint begins with a sprint planning session where a sprint backlog is created. The development team then performs daily scrum/stand-up where they plan the work for the next 24h. When the sprint comes to an end, and an increment is developed, the sprint review session is held. There, all stakeholders (also external ones) review what was done and together refine the product backlog. The development team on their own finally hold a sprint retrospective where the point of debate is to answer questions like “how can we function better as a team?” or “what would make our work more enjoyable?”. It’s more work-oriented rather than product-oriented.
How formal are these roles, and how much are they worth? According to Glassdoor, a Scrum product owner’s annual salary is between 90k and 120k USD, whereas the Scrum Master’s salary is between 90k and 100k USD (source).
Conclusion
Any organization you will be involved with will practice a different methodology. Mastering the skill of using the values, structures, or disciplines promoted in any of these frameworks is highly transferable. Values promoted in Scrum can be useful in any other environment, even in your private life.
There are much doubt and debate about whether scrum principles are too vague. It is being argued that they have to be so vastly modified to be implemented in a work environment among different organizations, that they are often largely decoupled from the “rulebook” of Scrum. Secondly, some organizations had trouble translating principles of scrum framework into reality, arguing that it took a very long time. It can be hard to make it work with the people who are not open to changes. Many people don’t want to alter their well-functioning ways of working just to fit the model.
In reality, scrum practice is as challenging to master as any other. Clearly, lack of understanding or competence in this field can adversely affect your business. To function properly, Scrum must be adopted corporate-wide.
All of these models put the messiness of reality into a model or framework of actions and relationships that might fit your business. It is up to you to decide whether to adopt them or not and to what extent. Adhering to the principles of one is the most useful step to make at a certain point. The ultimate goal is to tweak and tune your project management to make it the most compatible with your technical skills, marketing, and all other skills that complete you as a freelancer, business owner, or team member in general.
About the Author
Luka Banović is a full-time engineering project manager at IRNAS LTD in Slovenia (and also a Finxter). A line of experience in engineering project leading has taught him many perks of this job, and he is happy to share some ideas with the Finxter community.
PHP Pagination MySQL Database Example Script with Previous Next like Google
Last modified on December 5th, 2019 by Vincy.
Do you want to implement PHP pagination using core PHP with lightweight script? Jump in, this tutorial is all about it.
The pagination functionality is for stacking a list of items on many pages. It helps to fetch and display a huge volume of records in an effective way.
If you want to implement a simple PHP pagination, then it is very easy and straight forward.
There is just one thing that you should keep in mind when you work on pagination. Do not pull the complete result set and filter it to display to the users.
SELECT only records using LIMIT from database. It can be done via AJAX or on page submit depending on your use case. We will see more about it in the example below.
There are scenarios to create pagination with AJAX. For example, an online quiz with a paginated question board. We have seen more examples to create PHP pagination with AJAX.
In this example code, it has two types of control to navigate with the paginated results.
One is the pagination links to redirect us to the corresponding page. The other is an input to enter the page number. By submitting this page number we can jump into the target page from the current page.
I have implemented PHP pagination with a simple page refresh. We have already seen examples for achieving this with AJAX using jQuery.
I have enabled pagination for the list of database results displaying Animal names. The pagination links count varies based on the animal database record count.
A SELECT query with a specification of start and end limit fetch the page result. The per-page result count is configurable as a Config class constant.
There are many plugins available to create pagination easily. Pagination.js and jqPaginator are examples of 3-party plugins available in the market.
The Datatables is one of the popular library used for managing tabular data. It has an in-built search, pagination, sort, and more features. In an old article, we had seen how to integrate Datatables to list records with pagination.
Having said all these, better to go with custom code. Because external plugins, libraries will slow down the application.
File structure
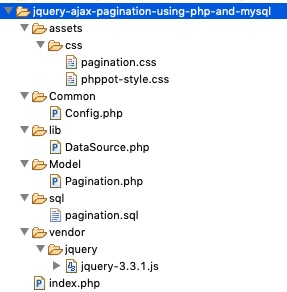
The working example code contains the following files in the below hierarchical order.
The index.php file is a landing page. It contains the HTML to display pagination links and the current page results.
Two CSS used in this example. The phppot-style.css has generic layout styles. The pagination.css has the exclusive styles created for this example.
Model/Pagination.php includes functions to fetch the MySQL data. It receives parameters to set the limit for the SELECT query.
The file structure includes a SQL script to set up the database for running this example.
It contains table rows created in a loop on iterating the data array. Below this table, it shows pagination links with previous next navigation. This navigation allows moving back and forth from the current page.
This example also contains a HMTL form to enter the target page number. If you enter a number within the number of pages, then it will get the appropriate page result.
The pageValidation() is a JavaScript method to confirm the entered page number. If the page number input contains invalid data, then this script will return false. Then it stops form submit and thereby preventing the page-jump action.
<script> function pageValidation() { var valid=true; var pageNo = $('#page-no').val(); var totalPage = $('#total-page').val(); if(pageNo == ""|| pageNo < 1 || !pageNo.match(/\d+/) || pageNo > parseInt(totalPage)){ $("#page-no").css("border-color","#ee0000").show(); valid=false; } return valid; } </script>
The following styles are from the pagination.css. It defines the CSS for the table view and the pagination elements.
This PHP script is for reading the database results and get the record count, pages count. The pages count varies based on the record count and the LIMIT_PER_PAGE configuration.
If there are more pages, this example will show only limited pages as like as Google pagination. This feature will help to make the pagination block to fit into the viewport.
On successive page navigation, you will get more pagination links to browse further.
This is the config file added for this example. I kept the per-page record limit as an application constant. I used this for setting the SELECT query limit.
You can add more constants and fine-tune the PHP pagination script to work based on them. For example, create new constant SHOW_ALL_LINKS. Set it on/off to enable/disable the Google-like feature to show limited links.
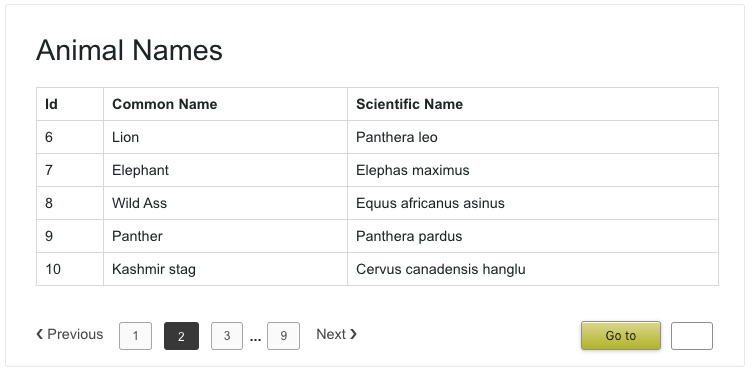
This screenshot shows the output of the PHP pagination example code. It shows five records per page.
On the left, it shows usual pagination with previous next and separate page links. On the right side, it is a HMTL form to allow the user to enter the page number.
Thus, we created PHP pagination with Google-like limited links and previous next links. We have seen the interlinking of older PHP pagination script along with this article.
We have discussed the third-party libraries that contain in-built pagination feature. It will be helpful to have a choice if are searching for such plugins.
In this custom PHP pagination example, we have provided an option to jump into a target page directly via a form. Sometimes, it itself is enough with previous next navigation.
Hope this article and the example help you to build a nice simple PHP pagination for your web application.
Posted by: xSicKxBot - 06-05-2020, 05:05 AM - Forum: Lounge
- No Replies
Community Focus: Aviixe
From time to time, I scour the depths of the community looking for pieces of art to inspire different builds in Destiny. Some pieces inspire my Gunslinger to embrace a darker vibe, or my Warlock to adorn the bones of a slain Ahamkara to enhance their Void abilities. Not only does this push me to some role-playing, it also improves my fashion game as I search for the perfect look for an Arc-charged Titan.
Our designers also frequently reference concept pieces to guide their hand on the feel of a season or activity. It’s pretty magical what a piece of art can do, and the subject of this week’s Community Focus has created some great content that, as a Destiny player, you can feel in your heart.
Please give a warm welcome to our friend, Aviixe.
Good morning! Hope you’re doing well. Let’s get you introduced to our wonderful community. Tell us a bit about yourself.
Aviixe: My name is Stephen, most people on the internet know me as Aviixe. I spend much of my time as a “self-taught” artist, always pushing to improve my skills, and I do commissions alongside that as well.
I played videogames pretty early into my childhood, my earliest memories being dominated by Halo and the LEGO games. My other siblings and I enjoyed playing four-person split-screen multiplayer on Halo CE, Halo 2, and Halo 3. I was always a pretty avid artist, drawing on anything and everything I could, but it wasn’t until shortly after the original Destiny came out that I decided to take art seriously. The game itself and its concept art looked beautiful, to put it simply.
You’ve got strong beginnings, Guardian. Let’s talk more about your art. When creating new pieces of Destiny art, how do you usually get started? What’s the spark of inspiration that gets you going?
A: I find just about every visual aspect of Destiny equally inspirational, whether it be a set of armor, a fun, new exotic, or a grand, gorgeous vista. But I think what I like most about Destiny are those moments of camaraderie between fellow players, strangers or friends.
Whether it’s a moment like having a dance party with some random players in the Tower, successfully completing a Seraph Towers public event without failing a charge cycle and everyone in the local chat is excited over getting the Triumph, or making a nerve-wracking comeback in the Trials of Osiris and your fireteam is recalling the highs and lows of the match. Those kinds of feelings are what I want to instill in my art.
Let’s talk gear. What Exotic have you been using lately?
A: Guardian Games has made me rediscover my love for the Sunbracers Exotic. It was actually the first Exotic armor I got back in Destiny 1, and the ornament that was introduced for it in the Black Armory season made me love it even more. The normal appearance and the ornament both look beautiful and I think it’s difficult to find an armor combination where they don’t look good. It’s also obviously very fun to be able to spam a ton of grenades with the right armor perks equipped, which made it super handy to quickly farm laurels in the Guardian Games. I don’t use Sunbracers as often as I’d like to, simply because different activities demand different loadouts, but they definitely stand out as my favorite Exotic.
Good on you for helping Warlocks secure the Silver bond from Guardian Games. Where do you find yourself most often when playing Destiny?
A: Honestly, my favorite mode is patrol. I really enjoy walking through the different beautifully crafted environments, looking through all the nooks and crannies, taking in all the little details, watching the clouds roll over or the sun setting.
I could spend hours with the HUD turned off, sitting against rocks, and taking screenshots from various vantage points. It’s kind of more fun than having an actual photo mode, though it’d be super awesome if that could be introduced to Destiny!
A true Wayfarer. You have my respect. If people wanted to follow you or your artistic endeavors, where would they find you?
Anything you’d want to say to the community while you’re in the spotlight?
A: The Destiny artists community is insanely supportive and I’m grateful for all the friends I’ve made over the life of the game. Their art is incredibly inspirational and they help me strive to be a better artist every day. Shout-outs to IanPesty, PlainBen, Lucero, Matt Oishi, COSMICraven, Lazesummerstone, Lilly, Lintu, Faysal Mekki, Dulcamarra, Marou and countless more wonderful community members. Lots of love and appreciation to my Destiny playmates as well, past and current, for providing a myriad of fun memories. Shout-outs to Gabe, Phil, Ethan, Nate, Tim, Matt, Dillon, Paul, and both Jons. Also, thanks to Bungie for all the work you do on Destiny. <3
Thank you for spending time with us, Aviixe. It’s always a pleasure to have artists in focus. Have a great weekend, and we’ll see you starside!
If you have any recommendations for future Community Focus articles, feel free to let us know! Additionally, if you’re an artist in the Destiny community, be sure to submit your pieces to the Community Creations page on Bungie.net. We frequently share content from this portal, and grant a unique emblem, created specifically for artists, to those who are featured.