Posted by: xSicKxBot - 06-03-2020, 11:49 AM - Forum: Lounge
- No Replies
Dragon Ball Legends Mobile Game Celebrates 2nd Anniversary With 5 New Fighters
Dragon Ball Legends, the mobile RPG with a card-based battle mechanic, has turned two years old, and it's celebrating with multiple new characters. These new fighters come from the two separate Dragon Ball Z sequel series--Dragon Ball GT and Dragon Ball Super.
From GT, Legends is adding Omega Shenron and Super Saiyan 4 Goku. Shenron was the final villain of the Dragon Ball spin-off series, and now players of the mobile game can unleash his fearsome power. Super Saiyan 4 was one of the better-received elements of GT, so it's good to see Goku in this form joining the game.
From Dragon Ball Super, the game is adding three characters from the Future Trunks arc. Super Saiyan Rage Trunks, Fusion Zamasu, and Super Saiyan Blue Vegito are all coming to the game, letting you relive their intense battles from the series.
Posted by: xSicKxBot - 06-03-2020, 11:18 AM - Forum: Python
- No Replies
Python Convert Set to List [Interactive Guide]
Do you want to convert a Python set to a list? Use the list(...) constructor and pass the set object as an argument. For example, to convert a set of strings friends into a list, use the code expression list(friends).
Here’s an example code snippet that converts the set to a list using the list(...) constructor:
# Create the set of strings

friends = {'Alice', 'Ann', 'Bob'} # Convert the set to a list

l = list(friends) # Print both

print(friends)

print(l) '''

{'Ann', 'Alice', 'Bob'}

['Alice', 'Ann', 'Bob'] '''
Try it in our interactive Python shell:
Exercise: Add more elements to the set. Does the list always have the same order as the set?
Python Set to List Order
A set is defined as an unordered collection of unique elements. The keyword is “unordered” here. Python does not guarantee any particular order of the elements in the resulting list. If you convert a set to a list, the elements can have an arbitrary order.
Python Set to List Keep Order
But what if you want to preserve the order when converting a set to a list (and, maybe, back)?
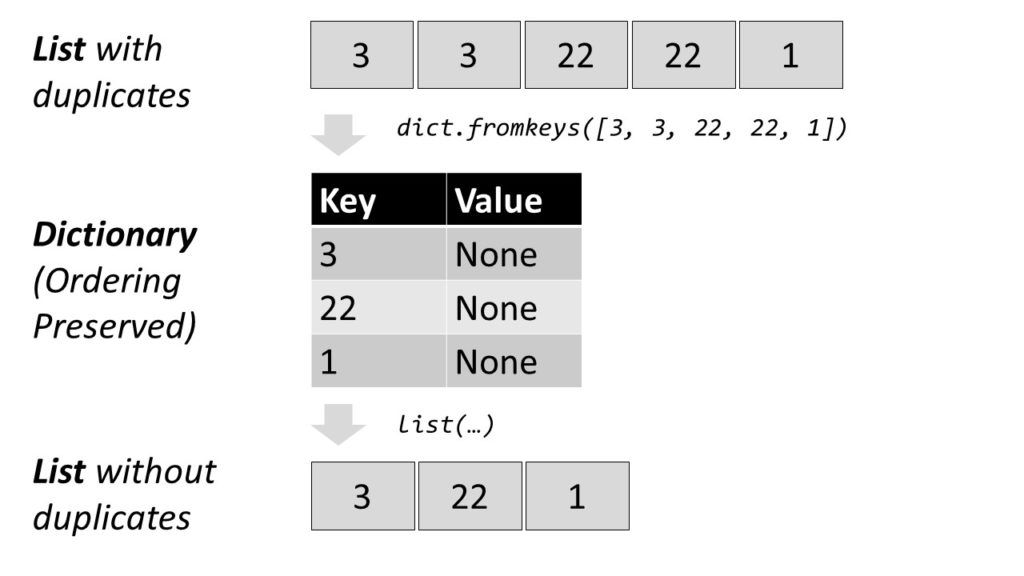
Create a dictionary from the elements in the list to remove all duplicates and convert the dictionary back to a list. This preserves the order of the original list elements.
Convert the list to a dictionary with dict.fromkeys(lst).
Convert the dictionary into a list with list(dict).
Each list element becomes a new key to the dictionary. For example, the list [1, 2, 3] becomes the dictionary {1:None, 2:None, 3:None}. All elements that occur multiple times will be assigned to the same key. Thus, the dictionary contains only unique keys—there cannot be multiple equal keys.
As dictionary values, you take dummy values (per default).
Then, you convert the dictionary back to a list, throwing away the dummy values.
Example: Convert set {0, 9, 8, 3} to the sorted list [0, 3, 8, 9].
Solution: Use the sorted(...) method that creates a new list from any iterable you pass as an argument.
Code: Let’s have a look at the source code that solves the problem!
s = {0, 9, 8, 3}

l = sorted(s)

print(l)

# [0, 3, 8, 9]
Exercise: Can you modify the code so that the elements are sorted in descending order?
Python Set to List Unpacking
An alternative method to convert a set to a list is unpacking with the asterisk operator *. You can simply unpack all elements in set s into an empty list by using the asterisk as a prefix within an empty list like this [*s]. It’s a fast and Pythonic way of converting a set to a list. And it has the advantage that you can also convert multiple sets into a single list like this: [*s1, *s2, ..., *sn].
Exercise: Play with the following code unpacking a fourth set into a new list l4.
Python Set to List Complexity
The time complexity of converting a set to a list is linear in the number of list elements. So, if the set has n elements, the asymptotic complexity is O(n). The reason is that you need to iterate over each element in the set which is O(n), and append this element to the list which is O(1). Together the complexity is O(n) * O(1) = O(n * 1) = O(n).
Here’s the pseudo-code implementation of the set to list conversion method:
def set_to_list(s): l = [] # Repeat n times --> O(n) for x in s: # Append element to list --> O(1) l.append(x) return s friends = {'Alice', 'Bob', 'Ann', 'Liz', 'Alice'}

l = set_to_list(friends)

print(l)

# {'Alice', 'Liz', 'Ann', 'Bob'}
Need help understanding this code snippet? Try visualizing it in your browser—just click “Next” to see what the code does in memory:
Python Add Set to List
Problem: Given a list l and a set s. Add all elements in s to list l.
Example: Given is list ['Alice', 'Bob', 'Ann'] and set {42, 21}. You want to get the resulting list ['Alice', 'Bob', 'Ann', 42, 21].
Solution: Use the list.extend(iterable) method to add all elements in the iterable to the list.
Code: The following code accomplishes this.
l = ['Alice', 'Bob', 'Ann']

s = {42, 21}

l.extend(s)

print(l)

# ['Alice', 'Bob', 'Ann', 42, 21]
Sometimes you can see the following seemingly strange behavior (e.g., here):
s = set([1, 2, 3])

l = list(s)
The output may give you the following cryptic error message:
TypeError: 'set' object is not callable
The reason is—in all likelihood—that you overwrote the name set in your namespace. This happens if you assign a value to a variable called ‘set’. Python will assume that set is a variable—and tells you that you cannot call variables.
Here’s code that will cause this issue:
set = {1, 2}

lst = [1, 2, 3]

s = set(lst) '''

Traceback (most recent call last): File "C:\Users\xcent\Desktop\code.py", line 3, in <module> s = set(lst)

TypeError: 'set' object is not callable '''
You can fix it by using another variable name so that the built-in function set() is not overshadowed:
s0 = {1, 2}

lst = [1, 2, 3]

s = set(lst)
Now, no such error is thrown because the set name correctly points to the Python built-in constructor function.
Where to Go From Here?
Enough theory, let’s get some practice!
To become successful in coding, you need to get out there and solve real problems for real people. That’s how you can become a six-figure earner easily. And that’s how you polish the skills you really need in practice. After all, what’s the use of learning theory that nobody ever needs?
Practice projects is how you sharpen your saw in coding!
Do you want to become a code master by focusing on practical code projects that actually earn you money and solve problems for people?
Then become a Python freelance developer! It’s the best way of approaching the task of improving your Python skills—even if you are a complete beginner.
Double Opt-In Subscription Form with Secure Hash using PHP
Last modified on September 24th, 2019 by Vincy.
Do you know that the opening rate of emails by double opt-in confirmed subscribers is a staggering 40%? According to CampaignMonitor, email marketing generates $38 in ROI for every $1 spent.
Email marketing delivers the highest among any channel for marketing. Even in comparison with channels like print, TV and social media.
Email marketing is the way to go. The primary mode to build your list is using a double opt-in subscription form.
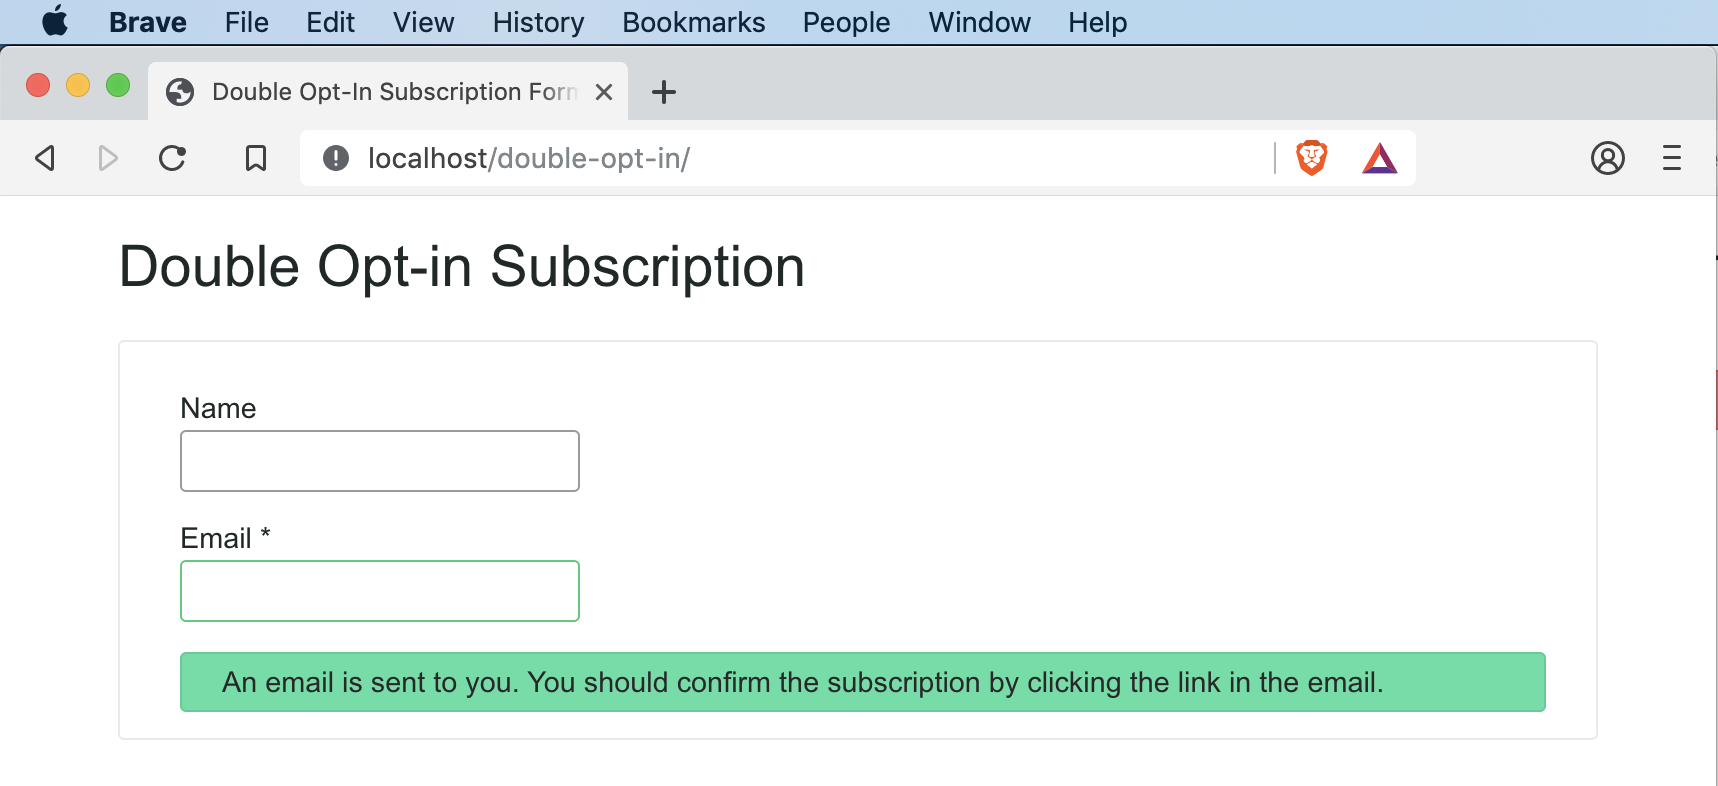
Use a double opt-in subscription form to signup to a newsletter, blog or a similar service. It has a two-step subscription process.
In the first step, the user will submit his name and email. Then the site will send an email to the user.
In the second step, the user will click the link in the received email. This will confirm his subscription to the site or service.
We call it the double opt-in because the users consent to the subscription twice. First by submitting the information and second by confirming to in by clicking the link in email.
Why do we need double opt-in?
It is the mechanism used to verify if the subscriber owns the input email. You need to do this verification because there is a chance for misuse by submitting emails that they do not own.
Double opt-in vs single opt-in is well debated and results arrived at. Double opt-in wins hands-on in every critical aspect.
What is the role of a secure hash?
In the confirmation email received by the user, there will be a link. This is the second and important step in the opt-in process. The link should be secure.
It should be unique for every user and request.
It should not be predictable.
It should be immune to a brute-force attack.
Double opt-in subscription form in PHP
I will present you a step by step detail on how to build a double opt-in subscription form with a secure hash using PHP.
You will get a production-grade code which you can use real-time in your live website. You can use this to manage your newsletter subscription.
I am releasing this code to you under MIT license. You can use it free even in commercial projects.
Sequence flow for double opt-in subscription
Show a subscription form to the user.
On AJAX submit, insert a new record in the database.
Send an email to the user with a secure hash link.
On click, the of the link, update the subscription status.
On every step, there will be appropriate validations in place.
Double opt-in Subscription form UI
This is where developers get it wrong. Keep it simple and unobtrusive. For the high conversion, you must keep in minimal.
One field email is enough for the subscription. To address the user in a personal way, you need their name. That’s it. Do not ask for much information on a subscription form.
If you ask for much information, it will drive your users away. The same principle applies when you build a contact form. More or less these two behave in a similar aspect. Check how to build a contact form to know more on it.
You should leave the name field can as optional and only the email field should be as required. This will encourage the user to submit the form and subscribe for the newsletter.
Needless to say, the form should be responsive. Any page or form you build should work in mobile, tablet, laptop and desktop devices. You should optimize to work on any viewport.
Google parses webpages in mobile mode for indexing in the search result. The desktop is an old story and gone are those days. You should always design for the mobile. Make it mobile-first!
PHP AJAX for subscription form submission
I have used AJAX to manage the submission. This will help the user to stay on the page after subscription. You can position this subscription form in a sidebar or the footer.
This is a classic example of where you should use the AJAX. I have seen instances where people use AJAX in inappropriate places, for the sake of using it.
Subscription AJAX endpoint
The AJAX endpoint has three major steps:
Verify the user input.
Insert a record in the database.
Send an email with a link for subscription.
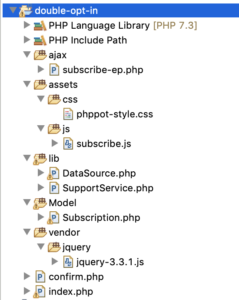
subscribe-ep.php is the AJAX endpoint. It starts with an if condition to check if the submit is via the POST method. It is always good to program for POST instead of the GET by default.
<?php use Phppot\Subscription; use Phppot\SupportService; /** * AJAX end point for subscribe action. * 1. validate the user input * 2. store the details in database * 3. send email with link that has secure hash for opt-in confirmation */ session_start(); // to ensure the request via POST if ($_POST) { require_once __DIR__ . './../lib/SupportService.php'; $supportService = new SupportService(); // to Debug set as true $supportService->setDebug(false); // to check if its an ajax request, exit if not $supportService->validateAjaxRequest(); require_once __DIR__ . './../Model/Subscription.php'; $subscription = new Subscription(); // get user input and sanitize if (isset($_POST["pp-email"])) { $userEmail = trim($_POST["pp-email"]); $userEmail = filter_var($userEmail, FILTER_SANITIZE_EMAIL); $subscription->setEmail($userEmail); } else { // server side fallback validation to check if email is empty $output = $supportService->createJsonInstance('Email is empty!'); $supportService->endAction($output); } $memberName = ""; if (isset($_POST["pp-name"])) { $memberName = filter_var($_POST["pp-name"], FILTER_SANITIZE_STRING); } $subscription->setMemberName($memberName); // 1. get a 12 char length random string token $token = $supportService->getToken(12); // 2. make that random token to a secure hash $secureToken = $supportService->getSecureHash($token); // 3. convert that secure hash to a url string $urlSecureToken = $supportService->cleanUrl($secureToken); $subscription->setSubsriptionKey($urlSecureToken); $subscription->setSubsciptionSatus(0); $currentTime = date("Y-m-d H:i:s"); $subscription->setCreateAt($currentTime); $result = $subscription->insert(); // check if the insert is success // if success send email else send message to user $messageType = $supportService->getJsonValue($result, 'type'); if ('error' != $messageType) { $result = $subscription->sendConfirmationMessage($userEmail, $urlSecureToken); } $supportService->endAction($result); }
I have used the SupportService class to perform common functions.
Input sanitisation is a must. When you collect information using a public website, you should be careful. You could get infected without your knowledge. There are many bots foraging around the Internet and they click on all links and buttons.
To sanitise, do not invent a new function. Use the function provided by PHP and that is safe to use.
URL with secure hash
Generate a unique url for each user subscription. Use this url to confirm the user’s subscription in the second step. Remember, that’s why we call this double opt-in.
I have used a three step process:
Generate a random string token.
Convert the token to secure hash.
Convert the secure hash to safe url.
I have used hexdec, bin2hex and openssl_random_pseudo_bytes to generate random bits. Which forms a random string.
Then to make the random string a secure hash, I have used the PHP’s built-in password_hash function. Never every try to do something on your own. Go with the PHP’s function and it does the job very well.
Before PHP 7, we had the option to supply a user generated salt. Now PHP 7 release has deprecated it. It is a good move because, PHP can generate a better salt than what you will generate. So stick to PHP 7 and use it without supplying your own salt.
The secure hash will contain all sort of special characters. . You can keep those special characters but need to url encode it. But I always wish to keep urls clean and the encoded chars do not look nice.
So no harm in removing them. So I cleanup those and leave only the safe characters. Then as a secondary precaution, I also encode the resultant string.
Thus after going through multi step process, we get a random, hash secure, safe, encoded URL token. Save the user submitted information in database record along with this token.
A PHP utility class for you
This is a utility class which I use in my projects. I am giving it away free for you all. It has functions that I reuse quite often and will be handy in situations. Every method has detailed comments that explain their purpose and usage method.
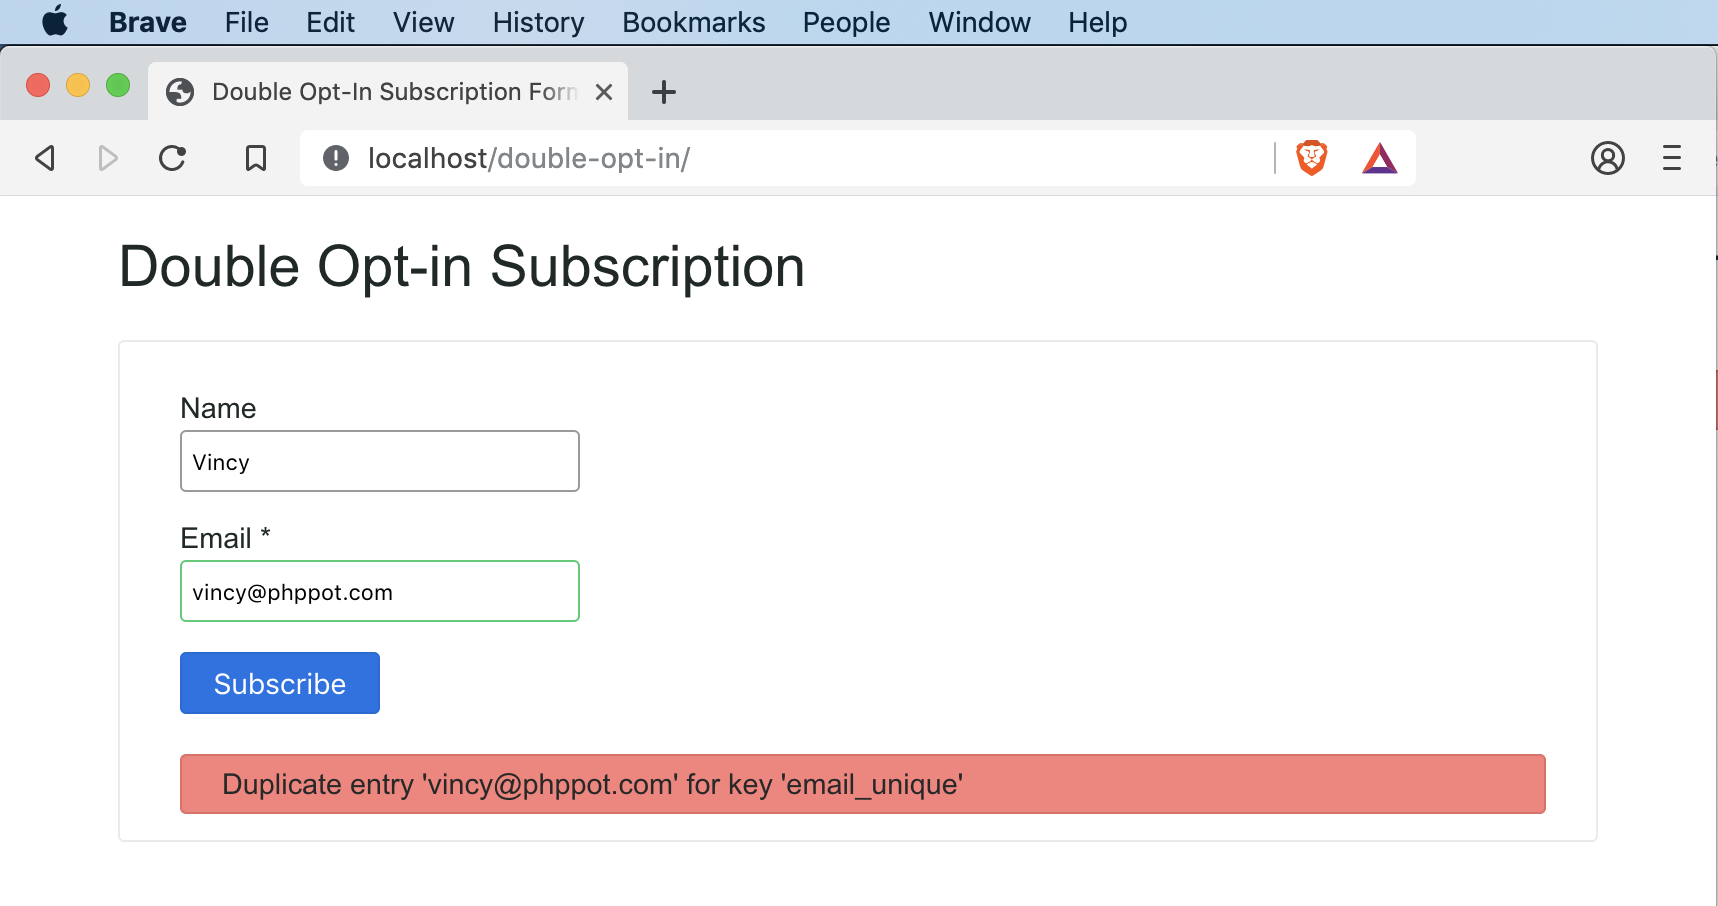
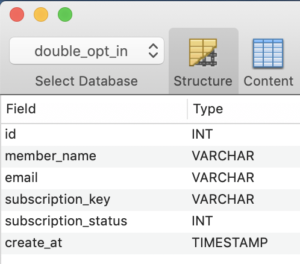
Insert a record to the database on submission of the subscription form. We get the user’s name, email, generate a secure hash token, current time, subscription status.
The reason for storing the current time is to have an expiry for every link. We can set a predefined expiry for the double opt-in process.
For example, you can set one week as expiry for a link from the moment you generate it. The user has to click and confirm before that expiry period.
Subscription status is by default stored as ‘0’ and on confirmation changed to ‘1’.
A database abstraction layer for you
It is my PHP abstraction for minor projects. This works as a layer between controller, business logic and the database. It has generic methods using which we can to the CRUD operations. I have bundled it with the free project download that is available at the end of this tutorial.
Send confirmation email to users
After you insert the record, send an email will to the user to perform the double opt-in confirmation. The user will have a link in the email which he has to click to confirm.
Keep the email simple. It is okay to have text instead of fancy HTML emails. PHP is capable of generating any email and you can code complex email templates. But the spam engines may not like it.
If you wish to go with HTML emails, then keep the HTML code ratio to as least as possible. As this is also one factor using which the spam engines flag the emails.
Then remember not to use the spam stop words. There are words like “free”, “win”, “cash”, “promo” and “income”. There is a long list and you can get it on the Internet by searching for “email spam filter word list”.
I have used PHP’s mail() function to send the email. I recommend you to change it to PHPMailer to send SMTP based email if you plan to use this code in production.
Subscription confirmation
Create a public landing page and you may use .htaccess for a neat URL mapping. This URL should map with the URL sent to the user and the PHP file that is going to process the request.
As a first step, GET the token and to verify the user against the database. Check,
if such a token exists,
it is not expired,
the user is not already subscribed
add more validation as you deem fit.
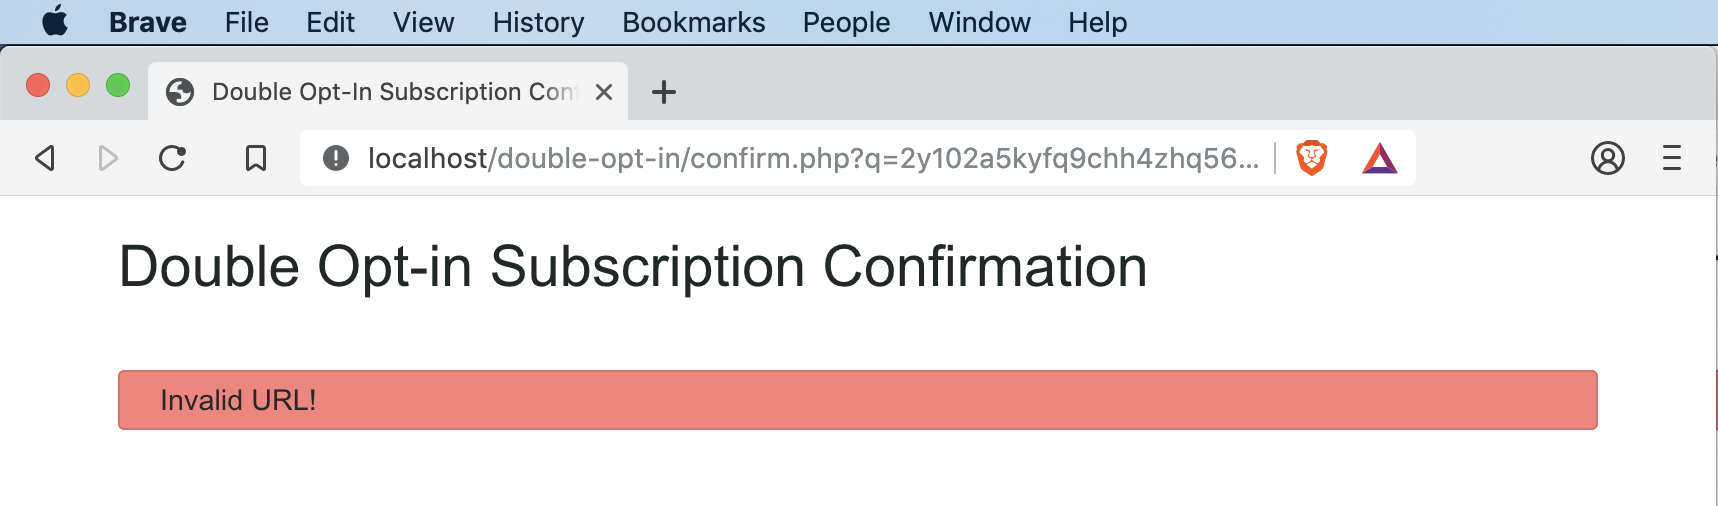
<?php use Phppot\Subscription; use Phppot\SupportService; /** * For confirmation action. * 1. Get the secure has from url * 2. validate it against url * 3. update the subscription status in database accordingly. */ session_start(); // to ensure the request via POST require_once __DIR__ . '/lib/SupportService.php'; $supportService = new SupportService(); // to Debug set as true $supportService->setDebug(true); $subscriptionKey = $_GET['q']; require_once __DIR__ . '/Model/Subscription.php'; $subscription = new Subscription(); $result = $subscription->getMember($subscriptionKey, 0); if (count($result) > 0) { // member found, go ahead and update status $subscription->updateStatus($subscriptionKey, 1); $message = $result[0]['member_name'] . ', your subscription is confirmed.'; $messageType = 'success'; } else { // securiy precaution: do not reveal any information here // play subtle with the reported message $message = 'Invalid URL!'; $messageType = 'error'; } ?> <!doctype html> <html lang="en"> <head> <meta charset="utf-8"> <meta name="viewport" content="width=device-width, initial-scale=1, shrink-to-fit=no"> <meta name="author" content="Vincy"> <link rel="stylesheet" type="text/css" href="assets/css/phppot-style.css"> <title>Double Opt-In Subscription Confirmation</title> </head> <body> <div class="phppot-container"> <h1>Double Opt-in Subscription Confirmation</h1> <div class="phppot-row"> <div id="phppot-message" class="<?php echo $messageType; ?>"><?php echo $message;?></div> </div> </div> </body> </body> </html>
If validation fails, do not reveal any information to the user. You should only say that it has failed.
More important do not say, not such email found. This will allow finding who has subscribed to your service. Whenever a validation fails, the displayed message should not reveal internal information.
On validation success, update the subscription status. Then show a happy success message to the user.
Conclusion
I have presented you with a production-grade double opt-in subscription form. I have followed a most secure hash generation method for confirmation URL email. I present it to you under the MIT license. The intention is to be the most permissible. You can download it free and change the code. You can even use it in your commercial projects. I have used the most secure code as possible. You can use this in your live site to manage newsletter subscription. In the coming part, I will include unsubscribe and enhance it further. Leave your comments below with what sort of enhancements you are looking for.
[www.indiegala.com] Marvel and Capcom join forces to deliver the most frenetic 3 vs. 3 tag battles ever with Ultimate Marvel vs. Capcom 3. Coming fully loaded, including all previous DLC, and the Marvel vs. Capcom: Official Complete Works. Check out all the various Capcom Deals
Earlier today, Krita just launched the first beta releases of Krita on Android and Chrome OS. Unfortunately for now it only works for Android tablets and the UI still has many desktop requirements so it may not work as expected, at least without a mouse and keyboard attached.
This beta, based on Krita 4.2.9, is the full desktop version of Krita, so it doesn’t have a special touch user interface. But it’s there, and you can play with it.
Unlike the Windows and Steam store, we don’t ask for money for Krita in the store, since it’s the only way people can install Krita on those devices, but you can buy a supporter badge from within Krita to support development.
Install
Notes
Supports: Android tablets & Chromebooks.
Currently not compatible with: Android phones.
If you have installed one of Sharaf’s builds or a build you’ve signed yourself, you need to uninstall that first, for all users!
Do to the limited number of Android tablets and the massive size of some Android phones, it’s unfortunate a phone release isn’t also available. Do keep in mind this is early access software, so expect all the bugs that come with that.
Blazor WebAssembly 3.2.0 Preview 4 release now available
Daniel
April 16th, 2020
A new preview update of Blazor WebAssembly is now available! Here’s what’s new in this release:
Access host environment during startup
Logging improvements
Brotli precompression
Load assemblies and runtime in parallel
Simplify IL linker config for apps
Localization support
API docs in IntelliSense
Get started
To get started with Blazor WebAssembly 3.2.0 Preview 4 install the latest .NET Core 3.1 SDK.
NOTE: Version 3.1.201 or later of the .NET Core SDK is required to use this Blazor WebAssembly release! Make sure you have the correct .NET Core SDK version by running dotnet --version from a command prompt.
Once you have the appropriate .NET Core SDK installed, run the following command to install the updated Blazor WebAssembly template:
dotnet new -i Microsoft.AspNetCore.Components.WebAssembly.Templates::3.2.0-preview4.20210.8
If you’re on Windows using Visual Studio, we recommend installing the latest preview of Visual Studio 2019 16.6. For this preview you should still install the template from the command-line as described above to ensure that the Blazor WebAssembly template shows up correctly in Visual Studio and on the command-line.
That’s it! You can find additional docs and samples on https://blazor.net.
Upgrade an existing project
To upgrade an existing Blazor WebAssembly app from 3.2.0 Preview 3 to 3.2.0 Preview 4:
Update all Microsoft.AspNetCore.Components.WebAssembly.* package references to version 3.2.0-preview4.20210.8.
Update any Microsoft.AspNetCore.Components.WebAssembly.Runtime package references to version 3.2.0-preview5.20210.1
Replace package references to Microsoft.AspNetCore.Blazor.HttpClient with System.Net.Http.Json and update all existing System.Net.Http.Json package references to 3.2.0-preview5.20210.3.
Add @using System.Net.Http.Json to your _Imports.razor file and update your code as follows:
Microsoft.AspNetCore.Blazor.HttpClient
System.Net.Http.Json
GetJsonAsync
GetFromJsonAsync
PostJsonAsync
PostAsJsonAsync
PutJsonAsync
PutAsJsonAsync
Calls to PostAsJsonAsync and PutAsJsonAsync return an HttpResponseMessage instead of the deserialized response content. To deserialize the JSON content from the response message, use the ReadFromJsonAsync<T> extension method: response.content.ReadFromJsonAsync<WeatherForecast>().
Replace calls to AddBaseAddressHttpClient in Program.cs with builder.Services.AddSingleton(new HttpClient { BaseAddress = new Uri(builder.HostEnvironment.BaseAddress) });.
You’re all set!
Access host environment during startup
The WebAssemblyHostBuilder now exposes IWebAssemblyHostEnvironment through the HostEnvironment property, which surfaces details about the app environment (Development, Staging, Production, etc.) during startup. If the app is hosted in an ASP.NET Core app, the environment reflects the ASP.NET Core environment. If the app is a standalone Blazor WebAssembly app, the environment is specified using the blazor-environment HTTP header, which is set to Development when served by the Blazor dev server. Otherwise, the default environment is Production.
New convenience extension methods on IWebAssemblyHostEnvironment make it easy to check the current environment: IsProduction(), IsDevelopment(), IsStaging(). We’ve also added a BaseAddress property to IWebAssemblyHostEnvironment for getting the app base address during startup when the NavigationManager service isn’t yet readily available.
Logging improvements
The WebAssemblyHostBuilder now exposes a Logging property of type ILoggingBuilder that can be used to configure logging for the app, similar to how you would configure Logging in an ASP.NET Core app on the server. You can use the ILoggingBuilder to set the minimum logging level and configure custom logging providers using extension methods in the Microsoft.Extensions.Logging namespace.
Brotli precompression
When you publish a Blazor WebAssembly app, the published and linked output is now precompressed using Brotli at the highest level to further reduce the app size and remove the need for runtime compression. ASP.NET Core hosted apps seamlessly take advantage of these precompressed files. For standalone apps, you can configure the host server to redirect requests to the precompressed files. Using the precompressed files, a published Blazor WebAssembly is now 1.8MB, down from 2MB in the previous preview. A minimal app without Bootstrap CSS reduces to 1.6MB.
Load assemblies and runtime in parallel
Blazor WebAssembly apps now load the assemblies and runtime in parallel saving some precious milliseconds off the app load time.
Simplify .NET IL linker config for apps
You can optionally provide a .NET IL linker config file for a Blazor WebAssembly app to customize the behavior of the linker. Previously, specifying a linker config file for your app would override the customizations built into Blazor that are necessary for apps to function property. App specific linker configuration is now treated as additive to the linker configuration provided by Blazor.
Localization support
Blazor WebAssembly apps now support localization using .NET resource files (.resx) and satellite assemblies. Blazor WebAssembly apps set the current culture using the user’s language preference. The appropriate satellite assemblies are then loaded from the server. Components can then be localized using the ASP.NET Core localization APIs, like IStringLocalizer<TResource> and friends. For more details on localizing Blazor WebAssembly apps, see Globalization and localization.
API docs in IntelliSense
The API docs for the various Blazor WebAssembly APIs are now available through IntelliSense:
Known issues
Debugging limitations
Thank you everyone who has been trying out the new Blazor WebAssembly debugging support and sending us your feedback! We’ve made some progress in this release, but there are still a number of limitations with the current debugging experience in Visual Studio and Visual Studio Code. The following debugging features are still not yet fully implemented:
Inspecting arrays
Hovering to inspect members
Step debugging into or out of managed code
Full support for inspecting value types
Breaking on unhandled exceptions
Hitting breakpoints during app startup
We expect to continue to improve the debugging experience in future releases.
Help improve the Blazor docs!
We’ve received a some feedback from the in-product Blazor survey that the Blazor docs could use some improvement. Thank you for this feedback! We know that docs are a critical part of any software development framework, and we are committed to making the Blazor docs as helpful as we can.
We need your help to understand how to best improve the Blazor docs! If you’d like to help make the Blazor docs better, please do the following:
As you read the Blazor docs, let us know where we should focus our efforts by telling us if you find a topic helpful or not using the helpfulness widget at the top of each doc page:
Use the Feedback section at the bottom of each doc page to let us know when a particular topic is unclear, inaccurate, or incomplete.
Comment on our Improve the Blazor docs GitHub issue with your suggestions for new content and ways to improve the existing content.
Feedback
We hope you enjoy the new features in this preview release of Blazor WebAssembly! Please let us know what you think by filing issues on GitHub.
Posted by: xSicKxBot - 06-03-2020, 05:20 AM - Forum: Windows
- No Replies
Looking back at 10 years of learning at the annual Ability Summit
Today kicks off the 10th Microsoft Ability Summit! With over 80 speakers, 22 breakout sessions, 20+ non-profit organizations, and product fair demos over two days, this is our first all-virtual summit that is fully open to the public. We’re excited to welcome speakers from Microsoft, industry and members of the accessibility and disability communities — many of whom have been alongside us this last decade and whose feedback has made the journey of accessibility possible.
The Ability Summit started in 2010 with a simple premise: to bring together employees with disabilities to share their best practices, pain points, and dreams. While our employee disability groups have been around since the 90’s, the Microsoft Disability Employee Resource Group was in its infancy at the time. I remember being as nervous then as I am today! Would there be value? Would people find the similarities that I was seeing across each of the groups? Would we walk away frustrated or excited? Approximately 80 people attended throughout the course of the short one-day event, and each of them said to me on the way out of the door “Jenny, we must do this again.” So, we did.
The goals of the Ability Summit have evolved over the years but remained true at the core. To bring together people with disabilities, experts in their domains, along with designers, engineering, marketeers, HR professions and nerds together to talk, share, connect and learn how we Build, Imagine, Include and Empower. To identify where we can speed up implementation of accessibility and innovation for people with disabilities – both in the company and outside of the company – on the pathway to driving for a more inclusive society. Lastly, to create best practice in how to build an accessible and inclusive event. Last year 2,500 people joined us for two days, this year – well, we’re about to find out!
Above all else, the Ability Summit has taught us the critical importance of collaboration. It’s the key to accelerating our accessibility journey. Its why we host this annual event, and it’s also why are sharing the Microsoft Accessibility Evolution Model (AEM). Many have asked in the last few years what ‘secret sauce’ has powered Microsoft’s approach to accessibility and inclusion. There is no secret sauce, but we do manage accessibility like a business. The AEM is a maturity model built on the foundation of two existing models – one from Carnegie Mellon, and the other from accessibility specialists at Level Access. The Microsoft Accessibility Leadership Team, which spans the breadth of the company, expanded on the wisdom of these models by creating a series of dimensions with five levels of maturity. We leverage the structure to gain an understanding of our progress and build upon the dimension definitions as our learning grows. It’s a cultural model that starts with inclusion of people with disabilities, strives for inclusive design in product development, and emphasizes the skilling of employees on about accessibility and importance of authentic representation in sales, marketing, and accessibility supplier/procurement.
We also learned the importance of disability and accessibility education. Last year we created an Accessibility in Action Badge for our employees to help shine a spotlight on how technology can empower everyone. After receiving great feedback, we created a similar accessibility in action certification for other employers, nonprofits, and consumers to take alongside our employees. Get your own badge and complete the accessibility fundamentals learning path today!
During this time, it’s especially crucial to adapt to listen to feedback and to insight from the community. Over the last several weeks we have been responding to questions in a series of blogs that highlight accessibility hints, tips, and product features that can power you to work, learn and play in the stay-at-home world. We’ve had a 175% increase in calls to our Disability Answer Desk, from customers looking for assistance from experts on accessibility. We’ve also seen a huge uptick in the use of AI-powered accessibility tools, such as Immersive Reader and captioning in Office 365. While AI captions do not replace human provided captions (CART) they do offer independence, flexibility and strong quality captions thanks to the AI and machine learning behind them. I’m thrilled to share that Microsoft Teams Free edition will soon support live captions, allowing everyone to give them a try. Just last week, Microsoft Edge shared that they have committed over 150 changes on accessibility features into their open source project with the support of the Google Chrome team, and recently embedded features such as Immersive Reader, Picture Dictionary, Microsoft Translator , Read aloud and more. We also highlighted new accessibility functions coming to Windows 10, including Narrator and Magnifier improvements to provide users who are blind or low vision a better experience across applications.
One project that particularly excites me is Project Tokyo, which leverages AI and AR with the power of HoloLens to power children who are blind and low vision to develop social interaction skills, giving these kids the understanding of not just ‘who’ is at the dinner table but where, their expressions and more. Its research and early, but a beautiful illustration of everything Ability Summit stands for – bringing together people with disabilities with experts to open doors with technology.
Excited to get this show on the road – virtually! We’ve been moving fast these last few weeks to pivot to a virtual event and incredibly grateful for the support of Microsoft Teams to power this year’s summit as well as all of the non-profits, companies and speakers who will be joining us. While registration is now closed, videos will be posted on the Microsoft Enable YouTube channel!
Thank you for powering our journey, for keeping us grounded and motivated. If you need any assistance at any time, remember Disability Answer Desk is open 24/7 and all information on accessibility is at www.microsoft.com/accessibility.
Look forward to seeing how we can Include, Build, Imagine, Empower people with disabilities around the world – together. Let’s get this party started!
Posted by: xSicKxBot - 06-03-2020, 05:20 AM - Forum: Windows
- No Replies
10 tips to use tech to manage your well-being
10 tips to use technology to manage your well-being
Have you heard the saying, “We’re all in the same storm, but we’re in different boats?” People are experiencing a variety of challenges right now, trying to work, learn, and connect with others. May is Mental Health Awareness Month, and we wanted to share some best practices and technology-related tips to help reduce stress and anxiety.
1. Keep a schedule.
Having a set schedule during the week can be a comfort, giving your days structure, balance, and purpose. Use a basic schedule template, Outlook, or the Microsoft To-Do app(it syncs with Outlook) to plan your day and include self-care. Here are some things to consider including in your schedule:
Shower and get dressed. This simple ritual can help kick-start your day.
Focus time. This is time when you’re not on conference calls and you can get your work done.
Daily movement. It could be an intense workout, stretching, or just a relaxing walk—listen to your body to see what it needs that day.
Social time. Time to catch up with friends and family over video calls.
“Me time.” Maybe it’s your morning coffee, or a soak in the tub at the end of the day, but make sure you carve out some time just for yourself.
Non-screen time to read a book, play a game, do a puzzle, enjoy your hobby, and more.
Mental health is a family practice. Get your kids involved in creating a shared family schedule in Outlook so they have a sense of ownership and control. Help your children find the right kind of self-care to learn best practices for a lifetime.
2. Check in on how people are doing.
Not every poll needs to be about people’s emotions. To add some fun, try creating polls on music, food, TV shows, or whatever you want.
Check in on yourself, too. Stress less, move more, and sleep more soundly with meditations, exercises, and tips available in the Headspace app. And if you have a Microsoft 365 Family or Personal subscription (formerly Office 365), you can get one month free. Learn more about the offer.
3. Keep kids on track.
Use Family Safety app preview or website to help make sure your kids are finding balance, too. Set screen-time limits for specific apps, sites, and games, make sure they’re viewing sites appropriate for their age, and review Family Safety reports to see how much time they’re really spending on their devices.
4. Get things done.
There’s something to be said about checking things off your to-do list, like cleaning out the basement or garage, finally dialing in the backyard or deck space (or your indoor plants), digitizing the family photos, or any other projects that have been on the back burner. Joy can come from accomplishing things. The Microsoft To-Do app is free and is perfect for keeping track, plus it syncs with Outlook so you can easily track to-dos for work and home.
5. Connect with friends and family . . . remotely.
If you’re feeling isolated, get some fun Skype video calls on your calendar like a happy hour with friends or a family call over the weekend.For more ideas, read about creative ways to connect.
6. Learn something new.
If you don’t already have a hobby or pastime to pursue, now’s a great time to try something new that’s piqued your interest. Not sure what you want to try? Here are some places to start:
7. If the future seems uncertain, plan it out.
When things are very much up in the air, it can be comforting to write out your thoughts or even a plan for the future. Instead of letting your mind spin, open Word for the web or OneNote and type up some mitigation plans for whatever you’re worrying about. Use broad strokes here—no one can predict the future, so there’s no need to describe every detail or option. Rest easier knowing that you have a plan you can refer to later, if needed.
Try to write 3 things that you are grateful for every day. These journaling templates can help you get your thoughts down:
8. Keep presentation anxiety at bay.
You may find yourself steeped in new methods of working from home and having to adapt quickly to technologies. Help reduce any remote presentation and online jitters with Presenter Coach and PowerPoint. Get in the habit of taking practice runs through your slides and Presenter Coach will give you a report and suggestions for improvements on things like packing, pitch, filler words, euphemisms, and culturally sensitive terms.
9. When you’re done working, be done.
It can be so tempting to check that email one more time in the evening or over the weekend, just to make sure you’ve taken care of everything and no one is left hanging until tomorrow. Instead, set up an automatic reply in Outlook to let your coworkers know you’re done for the day and will get back to them later. That way, people know what to expect, and you can relax knowing that you’ve set expectations.
Want a way to track how successful you are at unplugging? Use My Analytics Wellbeing to keep track of the days you disconnect after work. My Analytics provides several useful statistics about your work habits that can help you with well-being, focus, network, and collaboration.
10. Disconnect and recharge.
With so many online meetings, happy hours, calls with friends, and binge watching, screen fatigue is a real thing. Put down the devices every day for a while. Doing this at night is a great way to wind down before bed. Here are some ideas on what to do instead:
Read a book or printed magazine
Work on a project
Sit outside (deck, yard) and enjoy the birds, plants, sky, trees
See recommendations on how Microsoft technology can support you in daily activities. Learn more
These tips are a starting point for using tech to help bring some calm during these times. If you or a loved one is in crisis, there’s help available now.
Posted by: xSicKxBot - 06-03-2020, 05:20 AM - Forum: Windows
- No Replies
New app lets people contribute photos to help developers build AI models
Every day, developers and researchers are finding creative ways to leverage AI to augment human intelligence and solve tough problems. Whether they’re training a computer vision model that can spot endangered snow leopards or help us do our business expenses more easily when we scan pictures of receipts, they need a lot of quality pictures to do it. Developers usually crowd source these large batches of pictures by enlisting the help of gig workers to submit photos, but often, these calls for photos feel like a black box. Participants have little insight into why they’re submitting a photo and can feel like their time was lost when their submissions are rejected without explanation. At the same time, developers can find that these sourcing projects take a long time to complete due to lower quality and less diverse inputs.
We’re excited to announce that Trove, a Microsoft Garage project, is exploring a solution that can enhance the experience and agency for both parties. Trove is a marketplace app that allows people to contribute photos to AI projects that developers can then use to train machine learning models. Interested parties can request an invite to join the experiment as a contributor or developer. Trove is currently accepting a small number of participants in the United States on both Android and iOS.
A marketplace that puts transparency and choice first
Today, most data collection is passive, with many people unaware that their data is being collected or not making a real-time, active choice to contribute their information. And even those who contribute more directly to model training projects are often not provided the greater context and purpose of the project; there’s little to no feedback loop to correct and align data submissions to better fit the needs of project.
For people who rely on this data gig work as an important source of income, this rejection experience can leave them feeling frustrated and without any agency to contribute better submissions and a higher return on their time investment. With machine learning being a critical step in unlocking advancements from speech to image recognition, there’s an important opportunity to increase the quality of data, while making sure that contributors have the clarity and choice they need to participate in the process.
The Trove team has found a way to overcome these tough tradeoffs in a marketplace solution that emphasizes greater communication, context, and feedback between developers and project participants. “There’s a better way we can do this. You can have the transparency of how your data is being used and actually want to opt in to contribute to these projects and advance science and AI,” shares Krishnan Raghupathi, the Senior Program Manager for Trove. “We’d love to see this become a community where people are a key part of the project.”
To read more about key features and how Trove works for developers and contributors, check it out on the Garage Workbench.
Aspiring to higher quality data and increased contributor agency
The team behind Trove was originally inspired by thought leaders exploring how we can embrace the need for a large volume of data to enable AI advancements, while providing more agency to contributors and recognizing the value of their data. “We wanted to explore these concepts through something concrete,” shared Christian Liensberger, the lead Principal Program Manager on the project. “We decided to form an incubation team and build something that could show how things could be different.”
In creating Trove, the incubation team had to think through principles that would guide them as they brought such an experience to life. They believe that the best framework to produce the higher quality data needed to train these AI models involves connecting content creators to AI developers more directly. Trove was built with a design and approach that focuses on four core principles:
Transparency See all the projects available, details about who is posting them, and how your data will be used
Control Decide which projects you want to contribute to, and control when and how much you contribute
Enrichment Learn directly from AI developers how your contributions are valuable, and see how your participation will advance AI projects
Connection Communicate with AI developers to stay informed on projects you contributed to
“I love working on this project, it’s a continuous shift between the user need for privacy and control, and professionals’ need for data to innovate and create new products,” said Devis Lucato, Principal Engineering Manager for Trove. “We’re pushing the boundaries of all the technologies that we touch, exploring new features and challenging decisions determined by the status quo.”
Before releasing this experiment to external users, the team piloted Trove with Microsoft employees from across the US. While Trove is still in an experimental phase, the team is excited for even more feedback. “Our solution is still a bit rough around the edges, but we want to hear from the community about what we should focus on next,” shares Christian. Trinh Duong, the Marketing Manager on the project added, “My favorite part about working on this has been how much the app incorporates users into the experience. We want to invite our users to reach out and join us as true participants in the creation of this concept.”
The team is welcoming feedback from experiment participants here, and is enthusiastic for the input of users who are as passionate about the principles of transparency, control, enrichment, and connection as they are.
It’s here! We’re proud to announce the release of Fedora 32. Thanks to the hard work of thousands of Fedora community members and contributors, we’re celebrating yet another on-time release.
If you just want to get to the bits without delay, head over to https://getfedora.org/ right now. For details, read on!
All of Fedora’s Flavors
Fedora Editions are targeted outputs geared toward specific “showcase” uses.
Fedora Workstation focuses on the desktop. In particular, it’s geared toward software developers who want a “just works” Linux operating system experience. This release features GNOME 3.36, which has plenty of great improvements as usual. My favorite is the new lock screen!
Fedora Server brings the latest in cutting-edge open source server software to systems administrators in an easy-to-deploy fashion. For edge computing use cases, Fedora IoT provides a strong foundation for IoT ecosystems.
Fedora CoreOS is an emerging Fedora Edition. It’s an automatically-updating, minimal operating system for running containerized workloads securely and at scale. It offers several update streams that can be followed for automatic updates that occur roughly every two weeks. Currently the next stream is based on Fedora 32, with the testing and stable streams to follow. You can find information about released artifacts that follow the next stream from the download page and information about how to use those artifacts in the Fedora CoreOS Documentation.
Of course, we produce more than just the editions. Fedora Spins and Labs target a variety of audiences and use cases, including the Fedora Astronomy Lab, which brings a complete open source toolchain to both amateur and professional astronomers, and desktop environments like KDE Plasma and Xfce. New in Fedora 32 is the Comp Neuro Lab, developed by our Neuroscience Special Interest Group to enable computational neuroscience.
And, don’t forget our alternate architectures: ARM AArch64, Power, and S390x. Of particular note, we have improved support for Pine64 devices, NVidia Jetson 64 bit platforms, and the Rockchip system-on-a-chip devices including the Rock960, RockPro64, and Rock64.
General improvements
No matter what variant of Fedora you use, you’re getting the latest the open source world has to offer. Following our “First” foundation, we’ve updated key programming language and system library packages, including GCC 10, Ruby 2.7, and Python 3.8. Of course, with Python 2 past end-of-life, we’ve removed most Python 2 packages from Fedora. A legacy python27 package is provided for developers and users who still need it. In Fedora Workstation, we’ve enabled the EarlyOOM service by default to improve the user experience in low-memory situations.
We’re excited for you to try out the new release! Go to https://getfedora.org/ and download it now. Or if you’re already running a Fedora operating system, follow the easy upgrade instructions. For more information on the new features in Fedora 32, see the release notes.
In the unlikely event of a problem….
If you run into a problem, check out the Fedora 32 Common Bugs page, and if you have questions, visit our Ask Fedora user-support platform.
Thank you everyone
Thanks to the thousands of people who contributed to the Fedora Project in this release cycle, and especially to those of you who worked extra hard to make this another on-time release during a pandemic. Fedora is a community, and it’s great to see how much we’ve supported each other. I invite you to join us in the Red Hat Summit Virtual Experience 28-29 April to learn more about Fedora and other communities.
Edited 1800 UTC on 28 April to add a link to the release notes.