


Datatrans is one of the popular payment gateway systems in Europe for e-commerce websites. It provides frictionless payment solutions.
The Datatrans Payment gateway is widely popular in European countries. One of my clients from Germany required this payment gateway integrated into their online shop.
In this tutorial, I share the knowledge of integrating Datatrans in a PHP application. It will save the developers time to do research with the long-form documentation.
There are many integration options provided by this payment gateway.
- Redirect and lightbox
- Secure fields
- Mobile SDK
- API endpoints
In this tutorial, we will see the first integration option to set up the Datatrans payment gateway. We have seen many payment gateway integration examples in PHP in the earlier articles.
A working example follows helps to understand things easily. Before seeing the example, get the Datatrans merchant id and password. It will be useful for authentication purposes while accessing this payment API.

Get Datatrans merchant id and password
The following steps lead to getting the merchant id and password of your Datatrans account.
-
- Open a Datatrans sandbox account and verify it via email.
- Set up your account by selecting the username, group name(Login) and password.
- After Set up it will show the following details
- Login credentials.
- Sandbox URL of the admin dashboard.
- Datatrans Merchant Id for Web, Mobile SDK.
- Visit the sandbox URL and log in using the credential got in step 3.
- Click Change Merchant and Choose merchant to see the dashboard.
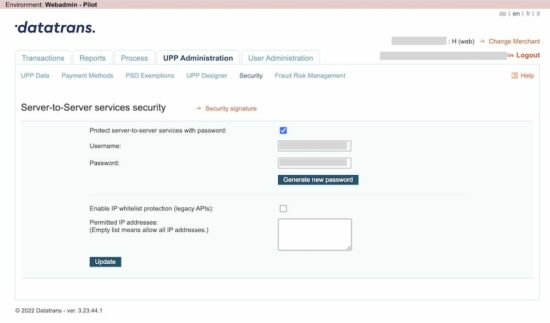
- Go to UPP Administration -> Security to copy the (Marchant Id)Username and Password for API access.
When we see CCAvenue payment integration, it also listed a few steps to get the merchant id from the dashboard.
Application configuration
This config file is created for this example to have the API keys used across the code.
It configures the URL that has to be called by the DataTrans server after the payment.
Config.php (Configure Datatrans authentication details)
<?php

class Config { const WEB_ROOT = 'http://localhost/pp-article-code/data-trans/'; const MERCHANT_ID = 'YOUR_MERCHANT_ID'; const PASSWORD = 'YOUR_MERCHANT_DASHBOARD_PASSWORD'; const SUCCESS_URL = Config::WEB_ROOT . 'return.php'; const CANCEL_URL = Config::WEB_ROOT . 'return.php?status=cancelled'; const ERROR_URL = Config::WEB_ROOT . 'return.php?status=error';

}

?>
Show the “Pay now” option
First, a landing page shows a product tile with a payment option. It will show a “Pay via DataTrans” button in the browser.
On clicking this button, it will call the AJAX script to get the transaction id.
This page includes the Datatrans JavaScript library to start payment with the transaction id.
index.php (Product tile with pay button)
<HTML>
<HEAD>
<TITLE>Datatrans Payments API for Secure Payment</TITLE>
<link rel="stylesheet" type="text/css" href="css/style.css">
<script src="https://code.jquery.com/jquery-3.6.0.min.js" integrity="sha256-/xUj+3OJU5yExlq6GSYGSHk7tPXikynS7ogEvDej/m4=" crossorigin="anonymous"></script> </HEAD>
<BODY> <div class="container"> <h1>Datatrans Payments API for Secure Payment</h1> <div class="outer-container"> <img src="image/camera.jpg" alt="camera image"> <div class="inner-container"> <p class="text-style">A6900 MirrorLess Camera</p> <p class="price-color-align"> $289.61<input type="hidden" name="amount" id="amount" value="289.61" /> </p> <input type="button" id="pay-now" class="pay-button" value="Pay via DataTrans" onClick="initiate()" /> </div> </div> </div> <script src="https://pay.sandbox.datatrans.com/upp/payment/js/datatrans-2.0.0.js"></script>
</BODY>
</HTML>
Get transaction id and proceed with payment via API
The initiate() function posts the amount to the PHP file to initiate Datatrans payment.
As the result, the PHP will return the transaction id to process the payment further.
The proceedPayment() function calls the Datatrans JavaScript API to start the payment. It will show a Datatrans overlay with card options to choose payment methods.
index.php (AJAX script to call Datatrans initiation)
function initiate() { $.ajax({ method: "POST", url: "initialize-datatrans-ajax.php", dataType: "JSON", data: { "amount": $("#amount").val() } }) .done(function(response) { if (response.responseType == 'success') { proceedPayment(response.transactionId); } else { alert(response.responseType + ": " + response.message); } }); }; function proceedPayment(transactionId) { Datatrans.startPayment({ transactionId: transactionId, 'opened': function() { console.log('payment-form opened'); }, 'loaded': function() { console.log('payment-form loaded'); }, 'closed': function() { console.log('payment-page closed'); }, 'error': function() { console.log('error'); } });

}
Initiate payment transaction to get the Datatrans payment transaction id
This file is the PHP endpoint called via AJAX script to get the Datatrans transaction id.
It invokes the DatatransPaymentService to post the cURL request to the Datatrans API. It requested to initiate the payment and receives the transaction id from the Datatrans server.
This output will be read in the AJAX success callback to start the payment via the JavaScript library.
initialize-datatrans-ajax.php
<?php

require_once 'DatatransPaymentService.php';

$dataTransPaymentService = new DatatransPaymentService();

$amount = $_POST["amount"];

$orderId = rand();

$result = $dataTransPaymentService->initializeTransaction($amount, $orderId);

print $result;

?>
Datatrans payment transaction service to call API via PHP cURL
This service call contains the initializeTransaction() method which prepares the cURL request in PHP to the Datatrans API.
It passed the amount, currency and more details to the API endpoint to request the transaction id.
DatatransPaymentService.php
<?php class DatatransPaymentService

{ public function initializeTransaction($amount, $orderId) { $url = 'https://api.sandbox.datatrans.com/v1/transactions'; require_once __DIR__ . '/Config.php'; $amount = $amount * 100; $postFields = json_encode(array( 'amount' => $amount, 'currency' => "USD", 'refno' => $orderId, 'redirect' => [ 'successUrl' => Config::SUCCESS_URL, "cancelUrl" => Config::CANCEL_URL, "errorUrl" => Config::ERROR_URL ] )); $key = Config::MERCHANT_ID . ':' . Config::PASSWORD; $keyBase64 = base64_encode($key); $ch = curl_init(); curl_setopt_array($ch, array( CURLOPT_URL => $url, CURLOPT_RETURNTRANSFER => true, CURLOPT_CUSTOMREQUEST => "POST", CURLOPT_POSTFIELDS => $postFields, CURLOPT_HTTPAUTH => CURLAUTH_BASIC, CURLOPT_HTTPHEADER => array( "Authorization: Basic " . $keyBase64, "Content-Type: application/json" ) )); $curlResponse = curl_exec($ch); $curlJSONObject = json_decode($curlResponse); if (empty($curlResponse)) { $curlError = curl_error($ch); } else if (! empty($curlJSONObject->error)) { $curlError = $curlJSONObject->error->code . ": " . $curlJSONObject->error->message; } curl_close($ch); if (empty($curlJSONObject->transactionId)) { $result = array( 'responseType' => "Error", 'message' => $curlError ); } else { $result = array( 'responseType' => "success", 'transactionId' => $curlJSONObject->transactionId ); } $result = json_encode($result); return $result; }

}

?>
Call application URL after payment
return.php
<HTML>

<HEAD>

<TITLE>Datatrans payment status notice</TITLE>

</HEAD>

<BODY> <div class="text-center">

<?php

if (! empty($_GET["status"])) { ?> <h1>Something wrong with the payment process!</h1> <p>Kindly contact admin with the reference of your transaction id <?php echo $_GET["datatransTrxId"]; ?></p>

<?php

} else { ?> <h1>Your order has been placed</h1> <p>We will contact you shortly.</p>

<?php

}

?>

</div>

</BODY>

</HTML>
https://www.sickgaming.net/blog/2022/09/...e-payment/