


Last modified on November 27th, 2019 by Vincy.
Sales, revenue, ROI are the key metrics to measure a business growth. The payment gateway is a sensitive factor that affects these metrics directly. It is the first and foremost item on the checklist for any eCommerce business.
There are many Payment Gateway providers. PayPal being the popular provider and 2Checkout is catching out fast. Earlier I wrote about how to integrate PayPal checkout in ecommerce website. In this payment gateway integration series, now it is time to see about 2Checkout.
2Checkout is one of the best payment gateway provider to support card payments. It works similar to Stripe payment gateway. Card payments has less friction and will enable to increase the conversion rate in your eCommerce business.
2Checkout is growing everyday in popularity. It is available in more than 180 countries and used by 17,000 firms.
To integrate 2Checkout to your ecommerce application there are few simple steps. I have described those steps in this article to make your job easier.
Also, we will see the card validator script, payment request-response handlers and more.
What is inside?
- Existing payment gateway methods supporting card payment
- Advantages of 2Checkout payment
- File structure
- Steps to integrate 2Checkout payment gateway using PHP
- Database script
- Go live
- 2Checkout Payment gateway example output
Existing payment gateway methods supporting card payment
I have been writing about payment gateways for a while We have already seen many types of payment gateway integration using PHP. I already written tutorials for CCAvenue, PayPal, Stripe, SagePay and Authorize.Net.
2Checkout, Stripe, CCAvenue are some of the examples for the methods supporting card-payments. There are many methods like InstaMojo, Cashfree, EBS and Paytm support card-payments.
Advantages of 2Checkout payment
- Easy to integrate using payment API libraries in PHP, PYTHON and more languages.
- It allows customers to opt for a variety of payment methods via PayPal account or debit/credit cards.
- 2Checkout is a secured fraud-proof for selling products or subscription plans online.
- It provides a localized buying experience for the customer.
- It supports many currencies that supports global payments.
- Integratable with the eCommerce tools like Shopify, Bigcommerce.
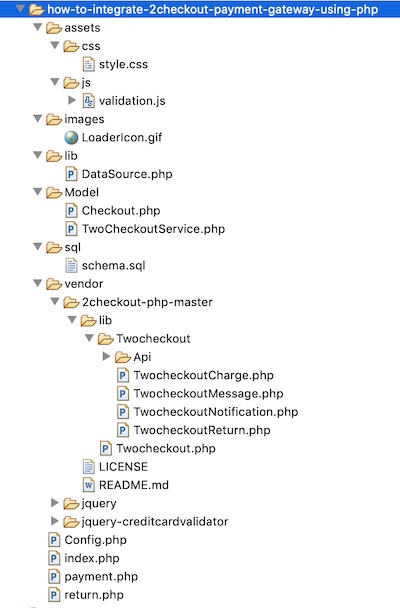
File structure
This image shows the file structure of the 2Checkout payment gateway PHP example. The root files index.php, payment.php, return.php are in a sequential flow during the payment.
While running this example, it lands with the index.php to show the payment form. Form targets payment.php that processes payment and redirects to the return page.
The redirect URL will have the payment response status parameter. It helps to create a response HTML on the return page.
The assets folder has the CSS, JS created for this example. TwoCheckoutService.php contains the library includes to verify card details and process payment.
You can see all the third-party components in the vendor directory.
Steps to integrate 2Checkout payment gateway using PHP
- Download the 2Checkout payment API library in PHP.
- Create a 2Checkout account and generate API keys.
- Create a payment form to collect the card details from the customer.
- Generate payment API token and transfer the card details in a secure way.
- Verify card details and process charges with 2Checkout Payment API.
Step 1: Download 2Checkout payment gateway
2Checkout payment API library has many features. It helps to manage purchase flow, orders, invoices, billing and more. It simplifies the integration process and reduces the developer’s effort.
Download the 2Checkout payment API library from GitHub. And then, put it into your application vendor directory.
While integrating Stripe Billing, we saw how to integrate third-party API for payment.
Include the TwoCheckout.php service before verifying card details and process payments. This file includes all other library dependencies. It handles card validation and charges on the server-side.
In this example, the Checkout.php use this library file to perform the payment operations.
Step 2: Creating 2Checkout sandbox account and generate API keys
2Checkout provides a sandbox environment to check payment flow using the API functions.
This is a common practice to go with a sandbox mode for testing purposes. Then we can go live after verifying the payment flow with this mode.
Let us create a 2Checkout sandbox account via the developer console. By logging into the console, we can get our API keys.
- Register and log in to the 2Checkout sandbox account.
- Select the API menu from the header and click the Start Integrating button.
- Go to the Settings tab to get the API keys.
- Copy the Publishable Key and Private Key in the key generation section of the page.
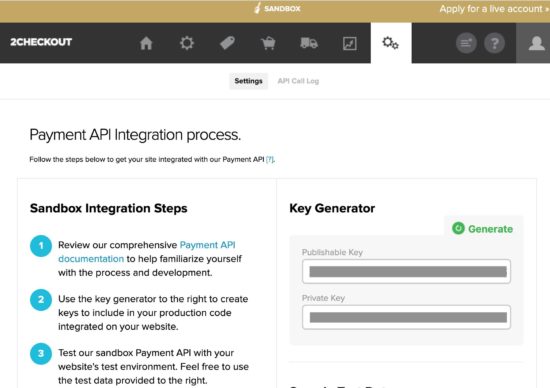
Click the Generate button if you are not able to see the API keys.
I have added the keys and seller account id in the application config name Config.php.
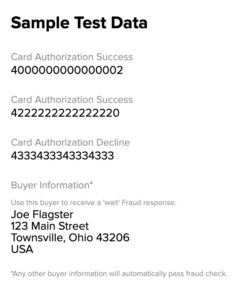
After configuring the API keys, use the test data to make the payment in the sandbox mode. You can get the test data from the API page as shown below.
Step 3: Create 2Checkout payment form in HTML
This form contains input fields to get the basic credit card details from the buyer. Those are the cardholder’s name and email, card number, CVC, card expiry tenure.
It will also ask the billing address from the buyer.
In this payment form, it has hidden fields for keeping the seller account id and product price, code.
<?php namespace Phppot; use Phppot\Config; require_once "Config.php"; $productCode = "WWPS235"; ?> <html> <head> <meta name="viewport" content="width=device-width, initial-scale=1"> <link href="./assets/css/style.css" rel="stylesheet" type="text/css"> <title>2checkout-payment-gateway-integration-using-PHP</title> </head> <body> <div id="formContainer"> <?php $productDetail = Config::productDetail(); $itemName = $productDetail[$productCode]["itemName"]; $itemPrice = $productDetail[$productCode]["itemPrice"]; ?> <div class="product-row"> <p class="product"><?php echo $itemName; ?></p> <div class="price float-right"><?php echo $itemPrice; ?> <?php echo Config::CURRENCY; ?> </div> </div> <form id="paymentForm" novalidate method="post" action="payment.php"> <input type="hidden" id="itemNumber" name="itemNumber" value="<?php echo $productCode; ?>" /> <input type="hidden" id="itemPrice" name="itemPrice" value="<?php echo $itemPrice; ?>" /> <input type="hidden" id="seller_id" value="<?php echo Config::SELLER_ID; ?>" /> <input type="hidden" id="publishable_key" value="<?php echo Config::PUBLISHABLE_KEY; ?>" /> <div class="field-row col2 float-left"> <label>Card Holder Name</label> <input type="text" class="demoInputBox required" name="cardHolderName" id="cardHolderName"> </div> <div class="field-row col2 float-right"> <label>Email</label> <input type="email" class="demoInputBox required" name="cardHolderEmail" id="cardHolderEmail"> </div> <div class="field-row"> <label>Card Number</label> <input type="text" class="demoInputBox required" name="cardNumber" id="cardNumber"> </div> <div class="field-row col2 float-left"> <label>Expiry Month / Year</label> <br /> <select name="expiryMonth" id="expiryMonth" class="demoSelectBox required"> <?php $months = Config::monthArray(); $count = count($months); for ($i = 0; $i < $count; $i ++) { $monthValue = $i + 1; if (strlen($i) < 2) { $monthValue = "0" . $monthValue; } ?> <option value="<?php echo $monthValue; ?>"><?php echo $months[$i]; ?></option> <?php } ?> </select> <select name="expiryYear" id="expiryYear" class="demoSelectBox required"> <?php for ($i = date("Y"); $i <= 2030; $i ++) { $yearValue = substr($i, 2); ?> <option value="<?php echo $yearValue; ?>"><?php echo $i; ?></option> <?php } ?> </select> </div> <div class="field-row"> <label>CVV</label><br /> <input type="text" name="cvv" id="cvv" class="demoInputBox cvv-input required"> </div> <p class="sub-head">Billing Address:</p> <div class="field-row col2 float-left"> <label>Address Line1</label> <input type="text" class="demoInputBox required" name="addressLine1" id="addressLine1"> </div> <div class="field-row col2 float-right"> <label>Address Line2</label> <input type="email" class="demoInputBox" name="addressLine2" id="addressLine2"> </div> <div class="field-row col2 float-left"> <label>Country</label> <input type="text" class="demoInputBox required" name="country" id="country"> </div> <div class="field-row col2 float-right"> <label>State</label> <input type="text" class="demoInputBox required" name="state" id="state"> </div> <div class="field-row col2 float-left"> <label>City</label> <input type="text" class="demoInputBox required" name="city" id="city"> </div> <div class="field-row col2 float-right"> <label>Zip</label> <input type="text" class="demoInputBox required" name="zip" id="zip"> </div> <div class="clear-float"> <input id="token" name="token" type="hidden" value=""> <input type="button" id="submit-btn" class="btnAction" value="Send Payment"> <div id="loader"> <img alt="loader" src="./images/LoaderIcon.gif" /> </div> </div><div id="error-message"></div> </form> </div> </body> </html>
Javascript for credit card validation
Most of the fields are mandatory. The form validation script helps to verify user’s input before payment.
I have used the jQuery CreditCardValidator script to validate the card details. It will check the card number format, CVC, card expiration and more.
Note: To pass the card validation, any three-digit code for CVC and a future date for card expiry.
function validate() { var valid = true; $(".demoInputBox").css('background-color', ''); var message = ""; var cardHolderNameRegex = /^[a-z ,.'-]+$/i; var cvvRegex = /^[0-9]{3,3}$/; var cardHolderName = $("#cardHolderName").val(); var cardHolderEmail = $("#cardHolderEmail").val(); var cardNumber = $("#cardNumber").val(); var cvv = $("#cvv").val(); $(".required").each(function() { if($(this).val()=='') { $(this).css('background-color', '#FFFFDF'); valid = false; } }); if(!valid) { message += "<div> Highlighted fields are required.</div>"; } if (cardHolderName != "" && !cardHolderNameRegex.test(cardHolderName)) { message += "<div>Card Holder Name is invalid</div>"; $("#cardHolderName").css('background-color', '#FFFFDF'); valid = false; } if (!cardHolderEmail.match( /^([\w-\.]+@([\w-]+\.)+[\w-]{2,4})?$/)) { message += "<div>Email is invalid</div>"; $("#cardHolderEmail").css('background-color', '#FFFFDF'); valid = false; } if (cardNumber != "") { $('#cardNumber').validateCreditCard(function(result) { if (!(result.valid)) { message += "<div>Card Number is Invalid</div>"; $("#card-number").css('background-color', '#FFFFDF'); valid = false; } }); } if (cvv != "" && !cvvRegex.test(cvv)) { message += "<div>CVV is Invalid</div>"; $("#cvv").css('background-color', '#FFFFDF'); valid = false; } if (message != "") { $("#error-message").show(); $("#error-message").html(message); $("#submit-btn").show(); $("#loader").hide(); } return valid; }
Step 4: 2Checkout JS to request token
This HTML code contains the 2co.js include at the end. This JS script is for getting TCO token by hitting the API’s tokenRequestURL.
This request requires card details with seller account id, sandbox publishable key. It also specifies the name of the success/error callback functions.
The success callback gets the token and includes it to the HTML form. f anything went wrong, the error-callback handles the case and acknowledge the customer.
This token helps to authenticate the request before processing the payment. Without this token, the payment request will return error by saying unauthorized.
<!-- jQuery library --> <script src="vendor/jquery/jquery-3.2.1.min.js"></script> <script src="vendor/jquery-creditcardvalidator/jquery.creditCardValidator.js"></script> <script src="./assets/js/validation.js"></script> <!-- 2Checkout JavaScript library --> <script src="https://www.2checkout.com/checkout/api/2co.min.js"></script> <script> // A success callback of TCO token request var success = function (data) { // Set the token in the payment form $('#paymentForm #token').val(data.response.token.token); $("#error-message").hide(); $("#error-message").html(""); // Submit the form with TCO token $('#paymentForm').submit(); }; // A Error callback of TCO token request. var error = function (data) { var errorMsg = ""; if (data.errorCode === 200) { tokenRequest(); } else { errorMsg = data.errorMsg; $("#error-message").show(); $("#error-message").html(errorMsg); $("#submit-btn").show(); $("#loader").hide(); } }; function tokenRequest() { var valid = validate(); if (valid == true) { $("#submit-btn").hide(); $("#loader").css("display", "inline-block"); var args = { sellerId: $('#seller_id').val(), publishableKey: $('#publishable_key').val(), ccNo: $("#cardNumber").val(), cvv: $("#cvv").val(), expMonth: $("#expiryMonth").val(), expYear: $("#expiryYear").val() }; // Request 2Checkout token TCO.requestToken(success, error, args); } } $(function () { TCO.loadPubKey('sandbox'); $("#submit-btn").on('click', function (e) { tokenRequest(); return false; }); }); </script>
Step 5: Verify card details and process charges with 2Checkout payment API
After submitting the tokenized form data, then PHP will handle the payment process. There are two major steps during the payment process authorization and charging card.
The payment.php file is the endpoint that verifies payment and charges the card. The below code states how to receive payment form data and request payment.
Before processing payment, this PHP code inserts order into the database table. In this step, it saves the product, currency, customer and billing data into the database.
After placing the order, the inserOrder method will return a unique reference ID. This refers to the merchantOrderId parameter while charging the card.
With a success response, it will update the transaction id and payment status in the order table.
In case of error, the error message returned by the API will acknowledge the customers.
<?php use Phppot\Config; use Phppot\Model\Checkout; session_start(); require_once 'Config.php'; // Check if token is not empty if (! empty($_POST['token'])) { $token = $_POST['token']; $currency = Config::CURRENCY; // Card information $card_num = $_POST['cardNumber']; $card_cvv = $_POST['cvv']; $card_exp_month = $_POST['expiryMonth']; $card_exp_year = $_POST['expiryYear']; // Customer information $customerDetail['name'] = $_POST['cardHolderName']; $customerDetail['email'] = $_POST['cardHolderEmail']; $billingAddress['addrLine1'] = $_POST['addressLine1']; $billingAddress['addrLine2'] = $_POST['addressLine2']; $billingAddress['city'] = $_POST['city']; $billingAddress['state'] = $_POST['state']; $billingAddress['zipCode'] = $_POST['zip']; $billingAddress['country'] = $_POST['country']; // Product information $product['itemNumber'] = $_POST["itemNumber"]; $product['itemPrice'] = $_POST["itemPrice"]; require_once 'Model/Checkout.php'; $checkout = new Checkout(); $orderID = $checkout->insertOrder($customerDetail, $billingAddress, $product); require_once 'Model/TwoCheckoutService.php'; $twoCheckoutService = new TwoCheckoutService(); $twoCheckoutService->verifyAuthentication(); $successMessage = ""; $errorMessage = ""; $paymentResponse = $twoCheckoutService->chargeCard($orderID, $token, $currency, $customerDetail, $billingAddress, $product['itemPrice']); if (! empty($paymentResponse["charge"])) { $charge = $paymentResponse["charge"]; if ($charge['response']['responseCode'] == 'APPROVED') { $transactionId = $charge['response']['transactionId']; $status = $charge['response']['responseCode']; $checkout->updatePayment($transactionId, $status, $orderID); header("Location: return.php?status=success&itemNumber=".$orderID); } else { $_SESSION["transaction_error"] = "Payment is waiting for approval."; header("Location: return.php?status=transaction_failed"); } } else if($paymentResponse["message"]) { if(!empty($paymentResponse["message"])) { $_SESSION["transaction_error"] = $paymentResponse["message"]; } header("Location: return.php?status=transaction_failed"); } } else { header("Location: return.php?status=invalid_token"); } ?>
Model/Checkout.php
<?php /** * Copyright © 2019 Phppot * * Distributed under MIT license with an exception that, * you don’t have to include the full MIT License in your code. * In essense, you can use it on commercial software, modify and distribute free. * Though not mandatory, you are requested to attribute this URL in your code or website. */ namespace Phppot\Model; use Phppot\DataSource; use Phppot\Config; class Checkout { private $ds; function __construct() { require_once __DIR__ . './../lib/DataSource.php'; $this->ds = new DataSource(); } /** * to get the member record based on the subscription_key * * @param string $subscriptionKey * @return array result record */ public function getOrder($orderId) { $query = 'SELECT * FROM tbl_order where id = ?'; $paramType = 'i'; $paramValue = array( $orderId ); $result = $this->ds->select($query, $paramType, $paramValue); return $result; } public function insertOrder($customerDetail, $billingAddress, $product) { $current_time = date("Y-m-d H:i:s"); $query = 'INSERT INTO tbl_order (name, email, item_code, item_price, currency, address_line_1, address_line_2, country, state, city, zip, create_at) VALUES (?, ?, ?, ?, ?, ?, ?, ?, ?, ?, ?, ?)'; $paramType = 'sssissssssss'; $paramValue = array( $customerDetail["name"], $customerDetail["email"], $product["itemNumber"], $product["itemPrice"], Config::CURRENCY, $billingAddress['addrLine1'], $billingAddress['addrLine2'], $billingAddress['country'], $billingAddress['state'], $billingAddress['city'], $billingAddress['zipCode'], $current_time ); $insertStatus = $this->ds->insert($query, $paramType, $paramValue); return $insertStatus; } public function updatePayment($transactionId, $paymentStatus, $orderID) { $query = "UPDATE tbl_order set txn_id = ?, payment_status = ? WHERE id = ?"; $paramType = 'ssi'; $paramValue = array( $transactionId, $paymentStatus, $orderID ); $this->ds->execute($query, $paramType, $paramValue); } }
Model/TwoCheckoutService.php
<?php use Phppot\Config; require_once("vendor/2checkout-php-master/lib/Twocheckout.php"); class TwoCheckoutService { function verifyAuthentication() { Twocheckout::verifySSL(false); // Set API key Twocheckout::privateKey(Config::PRIVATE_KEY); // PRIVATE_KEY defined in config.php Twocheckout::sellerId(Config::SELLER_ID); // SELLER_ID defined in config.php Twocheckout::sandbox(true); } function chargeCard($orderID, $token, $currency, $customerDetail, $billingAddress, $itemPrice) { $successMessage = ""; $errorMessage = ""; try { // an array is created with customer sale parameters and passed it in auth() function of Twocheckout_Charge class for authorization. $charge = Twocheckout_Charge::auth(array( "merchantOrderId" => $orderID, "token" => $token, "currency" => $currency, "total" => $itemPrice, "billingAddr" => array( "name" => $customerDetail['name'], "addrLine1" => $billingAddress['addrLine1'], "city" => $billingAddress['city'], "state" => $billingAddress['state'], "zipCode" => $billingAddress['zipCode'], "country" => $billingAddress['country'], "email" => $customerDetail['email'] ) )); $paymentResponse = array( "message" => "", "charge" => $charge ); } catch (Twocheckout_Error $e) { $paymentResponse = array( "message" => $e->getMessage(), "charge" => "" ); } return $paymentResponse; } }
Config.php
<?php namespace Phppot; class Config { const CURRENCY = 'USD'; const SELLER_ID = ''; const PUBLISHABLE_KEY = ''; const PRIVATE_KEY = ''; public function productDetail() { $product = array( 'WWPS235' => array( "itemName" => 'Kindle Paperwhite (10th gen) - 6" 8GB, WiFi', 'itemPrice' => '130.00' ) ); return $product; } public function monthArray() { $months = array( 'January', 'February', 'March', 'April', 'May', 'June', 'July ', 'August', 'September', 'October', 'November', 'December' ); return $months; } }
Database script
This is a SQL with the CREATE statement of the tbl_order table. Import this script for your PHP environment to run this example.
-- -- Table structure for table `tbl_order` -- CREATE TABLE `tbl_order` ( `id` int(11) NOT NULL, `name` varchar(25) COLLATE utf8_unicode_ci NOT NULL, `email` varchar(25) COLLATE utf8_unicode_ci NOT NULL, `item_code` varchar(25) COLLATE utf8_unicode_ci NOT NULL, `item_price` float(10,2) NOT NULL, `currency` varchar(10) COLLATE utf8_unicode_ci NOT NULL, `address_line_1` text COLLATE utf8_unicode_ci NOT NULL, `address_line_2` text COLLATE utf8_unicode_ci NOT NULL, `country` varchar(255) COLLATE utf8_unicode_ci NOT NULL, `city` varchar(255) COLLATE utf8_unicode_ci NOT NULL, `state` varchar(255) COLLATE utf8_unicode_ci NOT NULL, `zip` varchar(20) COLLATE utf8_unicode_ci NOT NULL, `txn_id` varchar(50) COLLATE utf8_unicode_ci NOT NULL, `payment_status` varchar(10) COLLATE utf8_unicode_ci NOT NULL, `create_at` datetime NOT NULL, `edit_at` datetime NOT NULL DEFAULT CURRENT_TIMESTAMP ON UPDATE CURRENT_TIMESTAMP ); ALTER TABLE `tbl_order` ADD PRIMARY KEY (`id`); ALTER TABLE `tbl_order` MODIFY `id` int(11) NOT NULL AUTO_INCREMENT, AUTO_INCREMENT=110;
Go Live
After testing the payment flow in the Sandbox mode, we can move to production mode.
To go live, change the mode from sandbox to production in the following line.
TCO.loadPubKey('production');
Replace all the test API keys with the live keys in the application config. Also, disable the sandbox mode by setting it as false as shown below.
Twocheckout::privateKey('production-private-key'); Twocheckout::sellerId('production-seller-id'); Twocheckout::sandbox(false);
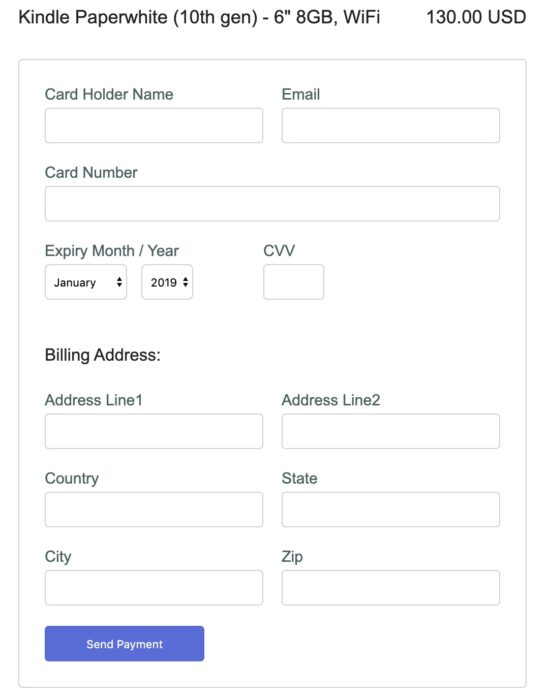
2Checkout Payment Form Output
The below screenshot shows the 2Checkout payment form. Most of the form fields are mandatory and so validated by JavaScript before payment.
The product name and price above the form are from the config. We can link your product database to display this information.
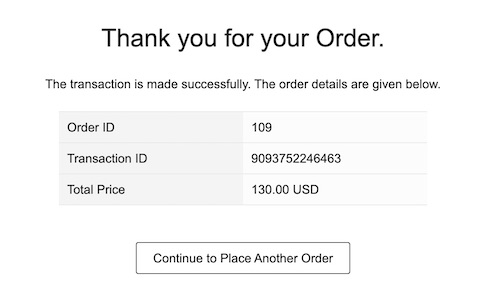
This screenshot shows the success response. The table shown in this screenshot has the basic details about the order placed.
https://www.sickgaming.net/blog/2019/11/...using-php/