Create an account


Thread Rating:
  • 0 Vote(s) - 0 Average
  • 1
  • 2
  • 3
  • 4
  • 5
News - Hardware Review: Should You Ditch Your GameCube Discs For The GC Loader?

#1
Hardware Review: Should You Ditch Your GameCube Discs For The GC Loader?

<div><div class="media_block"><a href="https://images.nintendolife.com/8a0e9eb5c9c14/large.jpg"><img src="https://images.nintendolife.com/8a0e9eb5c9c14/small.jpg" class="media_thumbnail"></a></div>
<figure class="picture strip">
<div class="img"><a title="GameCube GC Loader" href="https://images.nintendolife.com/8a0e9eb5c9c14/gamecube-gc-loader.original.jpg"><img src="https://images.nintendolife.com/8a0e9eb5c9c14/gamecube-gc-loader.900x.jpg" width="900" height="527" alt="GameCube GC Loader"></a><span class="image-credit" title="Image Credit">© Nintendo Life</span></div>
</figure>
<p>Back when cartridges were the main means of distributing video games on home consoles, the prospect of optical media was a technological revolution of sorts; these shiny discs promised greater storage at a cheaper cost (not that the consumer always saw the latter benefit), and carts were considered to be such a throwback in the mid-’90s that Nintendo was seen as ‘stuck in the past’ by using them for its N64 console.</p>
<p>As time has gone on, though, the industry’s switch to optical media has become something of a curse for retro players. Not only are discs easily scratched and far less robust that cartridges, but some of the older examples are also experiencing an unpleasant phenomenon known as <a href="https://www.nintendolife.com/news/2017/02/retro_this_is_">‘bit rot’</a>, rendering them unplayable – even when kept in mint condition. Then there’s the problem of the hardware required to actually read these discs; over time, optical drives become misaligned or fail completely.</p>
<p>Thankfully, there is something of a solution for those who which to experience games on original hardware but don’t want to take the software emulation route: optical drive emulators, or ODEs. These little devices act just like a proper optical disc drive – often using FPGA chips to simulate the original drive on a hardware level – but use SD cards for storage. They’re convenient, because you don’t need to swap discs as you can fit several games on a single SD card, and because there are no moving parts or lasers to clean, they’ll prolong the life of your hardware. They also allow you to play homebrew code on your machine, as well as access other cool settings and hacks. The drawbacks? Well, for purists and collectors, the idea of not <em>actually</em> playing their discs might be off-putting, and there’s also the obvious modification work required, too.
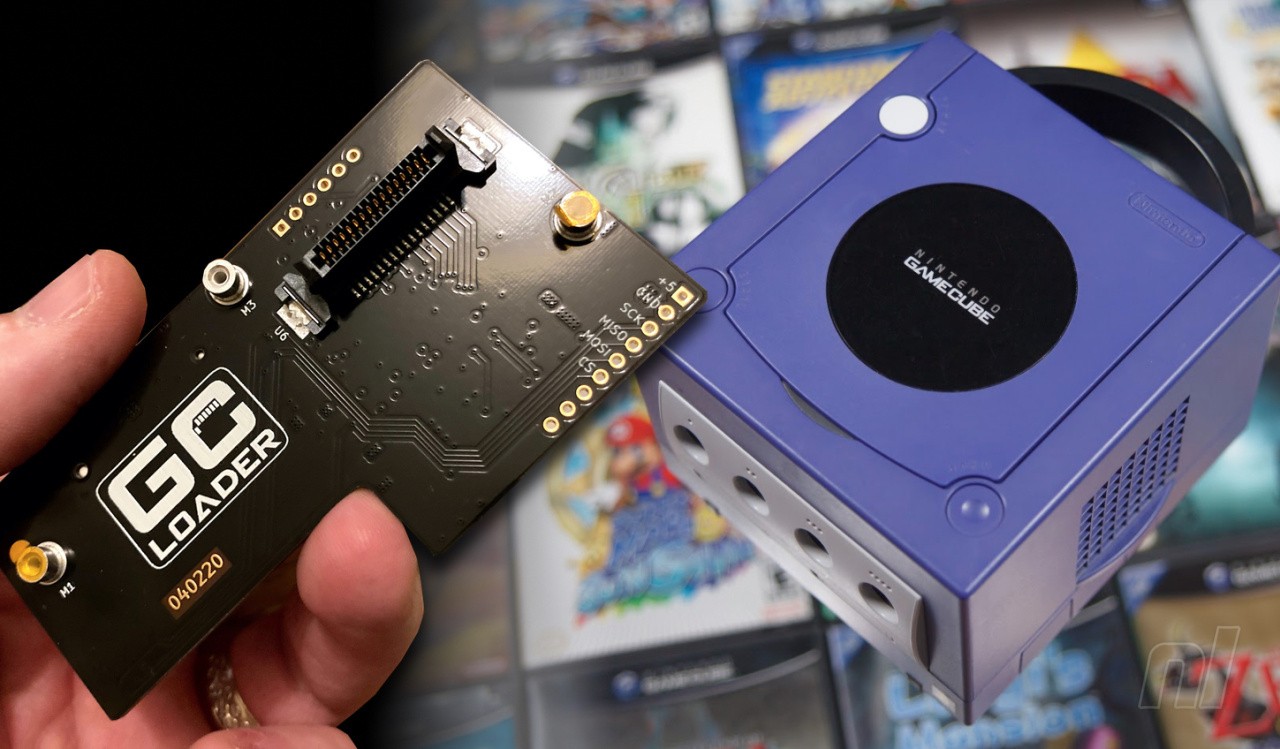
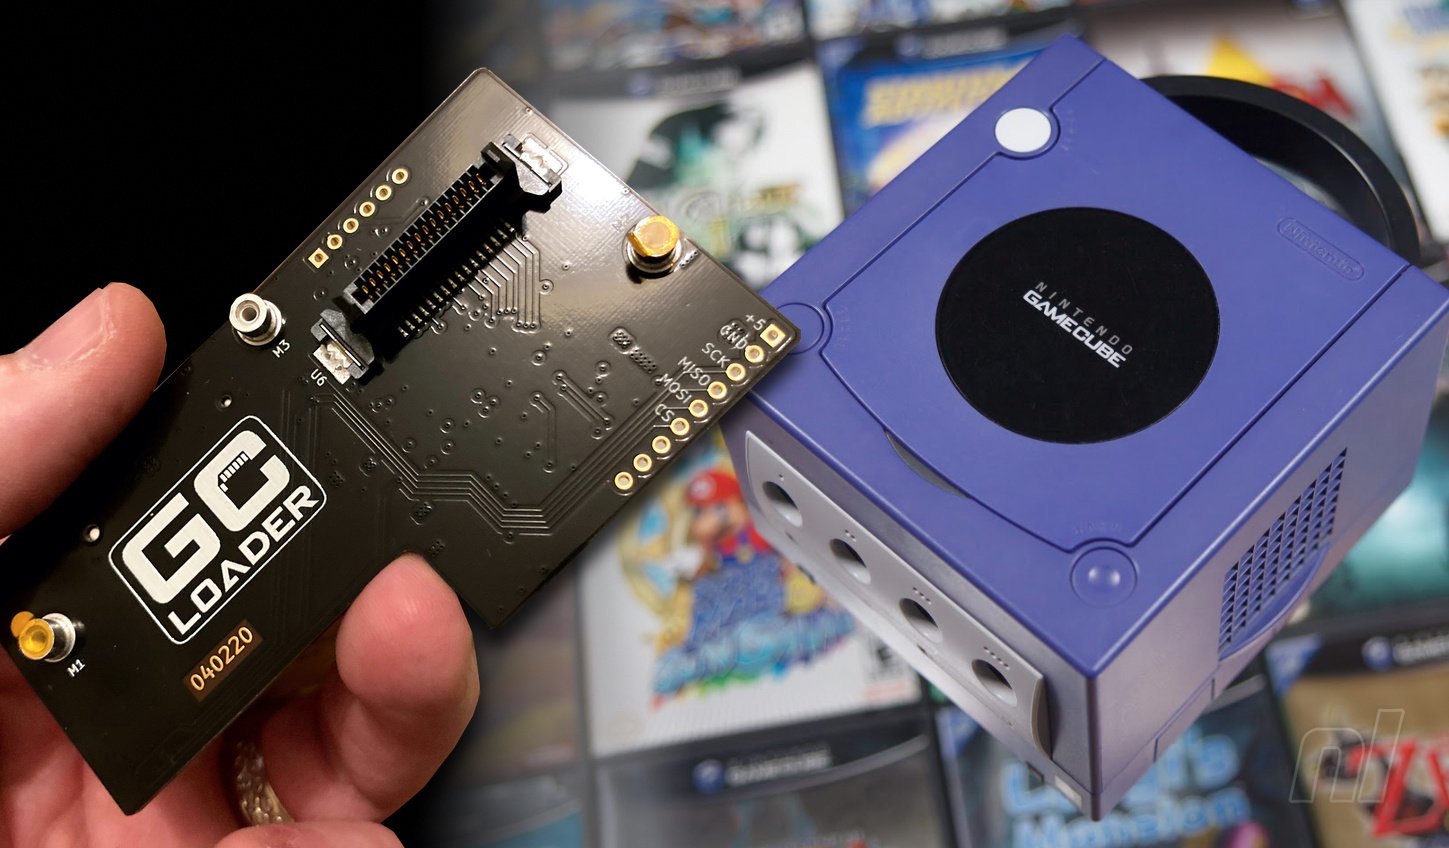
</p>
<aside class="gallery">
<div class="col">
<div class="img"><a title="Clockwise, from top left: 1) What you'll need for the mod. 2) Remove the lid and you'll find that there are lots of screws to remove in order to detach the GameCube's optical drive assembly. 3) Under the drive, you'll need to remove more screws to detach the actual optical drive – the GC Loader connects to the metal plate, which you'll need to retain. 4) The GC Loader slots into the connection which was used to link the drive to the mainboard." href="https://images.nintendolife.com/008e3f74a8450/clockwise-from-top-left-1-what-youll-need-for-the-mod-2-remove-the-lid-and-youll-find-that-there-are-lots-of-screws-to-remove-in-order-to-detach-the-gamecubes-optical-drive-assembly-3-under-the-drive-youll-need-to-remove-more-screws-to-detach-the-actual-optical-drive-n-the-gc-loader-connects-to-the-metal-plate-which-youll-need-to-retain-4-the-gc-loader-slots-into-the-connection-which-was-used-to-link-the-drive-to-the-mainboard.original.jpg"><img class="lazy" src="//www.w3.org/2000/svg' viewBox='0 0 445 245'%3E%3C/svg%3E" width="445" height="245" data-original="https://images.nintendolife.com/008e3f74a8450/clockwise-from-top-left-1-what-youll-need-for-the-mod-2-remove-the-lid-and-youll-find-that-there-are-lots-of-screws-to-remove-in-order-to-detach-the-gamecubes-optical-drive-assembly-3-under-the-drive-youll-need-to-remove-more-screws-to-detach-the-actual-optical-drive-n-the-gc-loader-connects-to-the-metal-plate-which-youll-need-to-retain-4-the-gc-loader-slots-into-the-connection-which-was-used-to-link-the-drive-to-the-mainboard.445x245.jpg" alt="Clockwise, from top left: 1) What you'll need for the mod. 2) Remove the lid and you'll find that there are lots of screws to remove in order to detach the GameCube's optical drive assembly. 3) Under the drive, you'll need to remove more screws to detach the actual optical drive – the GC Loader connects to the metal plate, which you'll need to retain. 4) The GC Loader slots into the connection which was used to link the drive to the mainboard."></a><span class="image-credit" title="Image Credit">© Nintendo Life</span></div>
<div class="img"><a title="Clockwise, from top left: 1) What you'll need for the mod. 2) Remove the lid and you'll find that there are lots of screws to remove in order to detach the GameCube's optical drive assembly. 3) Under the drive, you'll need to remove more screws to detach the actual optical drive – the GC Loader connects to the metal plate, which you'll need to retain. 4) The GC Loader slots into the connection which was used to link the drive to the mainboard." href="https://images.nintendolife.com/ee0e48298644c/clockwise-from-top-left-1-what-youll-need-for-the-mod-2-remove-the-lid-and-youll-find-that-there-are-lots-of-screws-to-remove-in-order-to-detach-the-gamecubes-optical-drive-assembly-3-under-the-drive-youll-need-to-remove-more-screws-to-detach-the-actual-optical-drive-n-the-gc-loader-connects-to-the-metal-plate-which-youll-need-to-retain-4-the-gc-loader-slots-into-the-connection-which-was-used-to-link-the-drive-to-the-mainboard.original.jpg"><img class="lazy" src="//www.w3.org/2000/svg' viewBox='0 0 445 245'%3E%3C/svg%3E" width="445" height="245" data-original="https://images.nintendolife.com/ee0e48298644c/clockwise-from-top-left-1-what-youll-need-for-the-mod-2-remove-the-lid-and-youll-find-that-there-are-lots-of-screws-to-remove-in-order-to-detach-the-gamecubes-optical-drive-assembly-3-under-the-drive-youll-need-to-remove-more-screws-to-detach-the-actual-optical-drive-n-the-gc-loader-connects-to-the-metal-plate-which-youll-need-to-retain-4-the-gc-loader-slots-into-the-connection-which-was-used-to-link-the-drive-to-the-mainboard.445x245.jpg" alt="Clockwise, from top left: 1) What you'll need for the mod. 2) Remove the lid and you'll find that there are lots of screws to remove in order to detach the GameCube's optical drive assembly. 3) Under the drive, you'll need to remove more screws to detach the actual optical drive – the GC Loader connects to the metal plate, which you'll need to retain. 4) The GC Loader slots into the connection which was used to link the drive to the mainboard."></a><span class="image-credit" title="Image Credit">© Nintendo Life</span></div>
</div>
<div class="col">
<div class="img"><a title="Clockwise, from top left: 1) What you'll need for the mod. 2) Remove the lid and you'll find that there are lots of screws to remove in order to detach the GameCube's optical drive assembly. 3) Under the drive, you'll need to remove more screws to detach the actual optical drive – the GC Loader connects to the metal plate, which you'll need to retain. 4) The GC Loader slots into the connection which was used to link the drive to the mainboard." href="https://images.nintendolife.com/d9db50dc34ed4/clockwise-from-top-left-1-what-youll-need-for-the-mod-2-remove-the-lid-and-youll-find-that-there-are-lots-of-screws-to-remove-in-order-to-detach-the-gamecubes-optical-drive-assembly-3-under-the-drive-youll-need-to-remove-more-screws-to-detach-the-actual-optical-drive-n-the-gc-loader-connects-to-the-metal-plate-which-youll-need-to-retain-4-the-gc-loader-slots-into-the-connection-which-was-used-to-link-the-drive-to-the-mainboard.original.jpg"><img class="lazy" src="//www.w3.org/2000/svg' viewBox='0 0 445 245'%3E%3C/svg%3E" width="445" height="245" data-original="https://images.nintendolife.com/d9db50dc34ed4/clockwise-from-top-left-1-what-youll-need-for-the-mod-2-remove-the-lid-and-youll-find-that-there-are-lots-of-screws-to-remove-in-order-to-detach-the-gamecubes-optical-drive-assembly-3-under-the-drive-youll-need-to-remove-more-screws-to-detach-the-actual-optical-drive-n-the-gc-loader-connects-to-the-metal-plate-which-youll-need-to-retain-4-the-gc-loader-slots-into-the-connection-which-was-used-to-link-the-drive-to-the-mainboard.445x245.jpg" alt="Clockwise, from top left: 1) What you'll need for the mod. 2) Remove the lid and you'll find that there are lots of screws to remove in order to detach the GameCube's optical drive assembly. 3) Under the drive, you'll need to remove more screws to detach the actual optical drive – the GC Loader connects to the metal plate, which you'll need to retain. 4) The GC Loader slots into the connection which was used to link the drive to the mainboard."></a><span class="image-credit" title="Image Credit">© Nintendo Life</span></div>
<div class="img"><a title="Clockwise, from top left: 1) What you'll need for the mod. 2) Remove the lid and you'll find that there are lots of screws to remove in order to detach the GameCube's optical drive assembly. 3) Under the drive, you'll need to remove more screws to detach the actual optical drive – the GC Loader connects to the metal plate, which you'll need to retain. 4) The GC Loader slots into the connection which was used to link the drive to the mainboard." href="https://images.nintendolife.com/ce6bd5d3592a7/clockwise-from-top-left-1-what-youll-need-for-the-mod-2-remove-the-lid-and-youll-find-that-there-are-lots-of-screws-to-remove-in-order-to-detach-the-gamecubes-optical-drive-assembly-3-under-the-drive-youll-need-to-remove-more-screws-to-detach-the-actual-optical-drive-n-the-gc-loader-connects-to-the-metal-plate-which-youll-need-to-retain-4-the-gc-loader-slots-into-the-connection-which-was-used-to-link-the-drive-to-the-mainboard.original.jpg"><img class="lazy" src="//www.w3.org/2000/svg' viewBox='0 0 445 245'%3E%3C/svg%3E" width="445" height="245" data-original="https://images.nintendolife.com/ce6bd5d3592a7/clockwise-from-top-left-1-what-youll-need-for-the-mod-2-remove-the-lid-and-youll-find-that-there-are-lots-of-screws-to-remove-in-order-to-detach-the-gamecubes-optical-drive-assembly-3-under-the-drive-youll-need-to-remove-more-screws-to-detach-the-actual-optical-drive-n-the-gc-loader-connects-to-the-metal-plate-which-youll-need-to-retain-4-the-gc-loader-slots-into-the-connection-which-was-used-to-link-the-drive-to-the-mainboard.445x245.jpg" alt="Clockwise, from top left: 1) What you'll need for the mod. 2) Remove the lid and you'll find that there are lots of screws to remove in order to detach the GameCube's optical drive assembly. 3) Under the drive, you'll need to remove more screws to detach the actual optical drive – the GC Loader connects to the metal plate, which you'll need to retain. 4) The GC Loader slots into the connection which was used to link the drive to the mainboard."></a><span class="image-credit" title="Image Credit">© Nintendo Life</span></div>
</div>
<p class="caption">Clockwise, from top left: 1) What you’ll need for the mod. 2) Remove the lid and you’ll find that there are lots of screws to remove in order to detach the GameCube’s optical drive assembly. 3) Under the drive, you’ll need to remove more screws to detach the actual optical drive – the GC Loader connects to the metal plate, which you’ll need to retain. 4) The GC Loader slots into the connection which was used to link the drive to the mainboard.</p>
</aside>
<p><a class="external" href="https://www.gc-loader.com/">GC Loader</a> is the ODE option for Nintendo GameCube console which costs around £100 and totally replaces the disc drive of the console; to fit it, you have to physically remove the optical drive, which means the console will no longer be capable of playing games the old-fashioned way. You then boot GameCube iso files directly from an SD card, or use the <a class="external" href="https://github.com/emukidid/swiss-gc/releases">‘Swiss’</a> menu system to give yourself a proper front-end which allows you to select iso files from the SD card and tinker with various other options.</p>
<p>Installing the GC Loader seems like an intimidating business, and might be one of the main things that puts people off investing in the device. However, absolutely no soldering is required and the GC Loader is an <a class="external" href="https://www.youtube.com/watch?v=m-1bD_Hud7c">easy install</a>; the biggest issue is the sheer volume of screws that need to be tackled to remove the optical drive in the first instance. The GameCube’s optical drive interfaces with the mainboard via a cartridge-like interface and this is the same connection into which the GC Loader inserts. It’s as easy as plugging in a cartridge, in all honesty.</p>
<p>Getting access to games to play on the GC Loader is perhaps a more difficult proposition. While a great many people will naturally take advantage of the many shady sites online which share game files, the makers of the GC Loader do not condone software piracy and encourage users to rip their own discs in order to use them with the device. This can be done with a program such as <a class="external" href="https://wiibrew.org/wiki/CleanRip">Clean Rip</a>. SD cards from 4GB to 1TB in size are supported (SDXC cards are highly recommended as there are reports of issues with ‘normal’ ones), as long as they’re formatted in FAT32.</p>
<aside class="gallery">
<div class="col">
<div class="img"><a title="GameCube GC Loader" href="https://images.nintendolife.com/2e41753dc561b/gamecube-gc-loader.original.jpg"><img class="lazy" src="//www.w3.org/2000/svg' viewBox='0 0 445 245'%3E%3C/svg%3E" width="445" height="245" data-original="https://images.nintendolife.com/2e41753dc561b/gamecube-gc-loader.445x245.jpg" alt="GameCube GC Loader"></a><span class="image-credit" title="Image Credit">© Nintendo Life</span></div>
<div class="img"><a title="GameCube GC Loader" href="https://images.nintendolife.com/32e656be92327/gamecube-gc-loader.original.jpg"><img class="lazy" src="//www.w3.org/2000/svg' viewBox='0 0 445 245'%3E%3C/svg%3E" width="445" height="245" data-original="https://images.nintendolife.com/32e656be92327/gamecube-gc-loader.445x245.jpg" alt="GameCube GC Loader"></a><span class="image-credit" title="Image Credit">© Nintendo Life</span></div>
</div>
<div class="col">
<div class="img"><a title="GameCube GC Loader" href="https://images.nintendolife.com/45d1af249c645/gamecube-gc-loader.original.jpg"><img class="lazy" src="//www.w3.org/2000/svg' viewBox='0 0 445 245'%3E%3C/svg%3E" width="445" height="245" data-original="https://images.nintendolife.com/45d1af249c645/gamecube-gc-loader.445x245.jpg" alt="GameCube GC Loader"></a><span class="image-credit" title="Image Credit">© Nintendo Life</span></div>
<div class="img"><a title="GameCube GC Loader" href="https://images.nintendolife.com/c717bb6e0a1b4/gamecube-gc-loader.original.jpg"><img class="lazy" src="//www.w3.org/2000/svg' viewBox='0 0 445 245'%3E%3C/svg%3E" width="445" height="245" data-original="https://images.nintendolife.com/c717bb6e0a1b4/gamecube-gc-loader.445x245.jpg" alt="GameCube GC Loader"></a><span class="image-credit" title="Image Credit">© Nintendo Life</span></div>
</div>
</aside>
<p>While Swiss offers a bunch of cool features – such as the ability to force games to run in 480p where supported – the GC Loader currently lacks the ability to ‘write’ data to the SD card so your Swiss settings cannot be stored on the SD card at the time of writing. Write-to-SD support <em>is</em> in development, and updating the GC Loader is simply a matter of placing the <a class="external" href="https://github.com/danielkraak/GC-Loader/releases">latest version</a> on the SD card and running it via Swiss, but to be honest, it’s a bit of a non-issue as your Swiss settings can be saved to a normal GameCube memory card anyway.</p>
<p>The other really cool thing about GC Loader is the fact that it massively reduces load times as data isn’t being pulled from an optical disc, which incurs seek time – it’s loaded from much faster solid-state media. This might seem like a relatively minor benefit, but you’d be surprised at how much of a difference it makes. Another bonus is the ability to load ‘patched’ games, such as Japanese regional exclusives that have had fan-made translation patches created for them.</p>
<p>At £99, the GC Loader certainty isn’t cheap, but if you have a GameCube in the house with a dead or dying optical drive, it could be the ideal way of saving it from the scrapheap – as well as allowing you to enjoy your library of games for many more years in a much more convenient fashion. Twin it with a <a href="https://www.nintendolife.com/news/2019/01/hardware_review_eon_gchd_mk-ii_gamecube_hdmi_adapter_-_the_best_just_got_better">GCHD Mk-II</a>, and you’ve got a highly portable device which can hook up to pretty much any modern TV. We’ve found that, since installing the GC Loader, we’ve been taking our GameCube with us on the road, as we don’t need to bring along a bunch of discs to play; turns out the console’s carry handle was a stroke of genius after all.</p>
<p class="disclaimer">Please note that some links on this page are affiliate links, which means if you click them and make a purchase we may receive a small percentage of the sale. Please read our <a rel="nofollow" href="https://www.nintendolife.com/ftc-disclosure">FTC Disclosure</a> for more information.</p>
<div class="article-products article-products-list">
<div class="items">
<div class="item">
<div class="image"><a class="external" rel="nofollow" href="https://nintendolife.com/p/12637"><img src="https://images.nintendolife.com/products/12637/100x100.jpg?v=2acb160346f6bcd27e75ae2d44dfa939" width="100" height="100" alt></a></div>
</p></div>
</div>
</div>
<div class="article-products article-products-list">
<div class="items">
<div class="item">
<div class="image"><a class="external" rel="nofollow" href="https://nintendolife.com/p/12628"><img src="https://images.nintendolife.com/products/12628/100x100.jpg?v=0831a8f7c4b51a1b39005522a45067fd" width="100" height="100" alt></a></div>
</p></div>
</div>
</div>
<div class="article-products article-products-list">
<div class="items">
<div class="item">
<div class="image"><a class="external" rel="nofollow" href="https://nintendolife.com/p/12636"><img src="https://images.nintendolife.com/products/12636/100x100.jpg?v=3a9db46a2ddc5c6d96442d9b782cbc82" width="100" height="100" alt></a></div>
</p></div>
</div>
</div>
<p><em>A GC Loader was supplied by its creator for the purpose of this review.</em></p>
</div>


https://www.sickgaming.net/blog/2020/07/...gc-loader/
Reply


Forum Jump:


Users browsing this thread:
1 Guest(s)

Forum software by © MyBB Theme © iAndrew 2016