Mojang has released 1.14.3. This release includes many bug fixes and some feature changes to make your lives easier… or harder depending on what they are.
A full summary of the content available in this snapshot can be found in the changelog on Minecraft.net.
Items can now be repaired by crafting them together again
Reverted the enchanting system to how it was before 1.14
Torches, lanterns and pressure plates can now be placed on glass panes and iron bars
Lanterns can now be attached below iron bars and glass panes
Saturation is no longer required for the “How did we get here?” advancement
You can now turn off raids with ‘/gamerule disableRaids true’
Patrol changes:
Vindicators are no longer part of patrols
Doubled the minimum time to spawn from 5 + (up to 1) minutes to 10 + (up to 1) minutes
Patrols no longer spawns if the block light level disallows monster spawning
Patrols are now allowed to spawn in any biome except mushroom biomes
Villagers that are panicking now have a bigger chance of spawning Iron Golems, assuming they can occasionally work and sleep
“Last slept” and “last worked” is now saved properly for Villagers
Farmers now spend more time farming when they are working
Farmers can now always give away food even if other villagers don’t need it
Improved performance
Fixed bugs
MC-47699 – Blazes are able to see a player through blocks
We know you’re busy and might miss out on all the exciting things we’re talking about on Xbox Wire every week. If you’ve got a few minutes, we can help remedy that. We’ve pared down the past week’s news into one easy-to-digest article for all things Xbox! Or, if you’d rather watch than read, you can feast your eyes on our weekly video show above. Be sure to come back every Friday to find out what’s happening This Week on Xbox!
Ghost Recon Breakpoint: Ghost War Multiplayer Hands On As we near the October 4 release of Ghost Recon Breakpoint, it’s worth looking back at the tremendous support Ubisoft has given to its predecessor, Ghost Recon Wildlands. Since its initial release in March 2017, we’ve seen new story content, Xbox One X enhancements… Read more
Free Play Days: The Elder Scrolls Online and Rainbow Six Siege This week, we have some exciting games to announce for the Free Play Days event! To make it even better, both games will be available for Xbox Live Gold and Xbox Game Pass Ultimate members to play for a whole week. Starting today, The Elder Scrolls Online… Read more
Be Forever Bound by Blood (and Ink) at our Global Gears Ink Pop-Up Events Tattoos are a long-held tradition in the Gears of War world; from the famous Marcus Fenix tattoo in the game world, to the thousands of Crimson Omens, Lancers and COG tags out in the real world, we are constantly inspired, awed and humbled by the culture of permanent… Read more
Support a Mixer Partner when you join Xbox Game Pass We consistently hear from gamers that streamers’ content helps motivate them to discover their next favorite game, whether it’s the latest AAA release, a puzzling indie platformer or even a must-play classic. It’s why we first built Mixer Direct Purchase back in 2018… Read more
10 Gameplay Tips for Control, Available Now on Xbox One We’re delighted to announce that Control is out now on Xbox One. For those unaware (where have you been?) Control is a 3rd person action-adventure supernatural developed by our friends at Remedy Entertainment and published here at 505 Games. You know these devs… Read more
Mega Man Zero/ZX Legacy Collection Lands on Xbox One January 21, 2020 Taking legendary Reploids into the far future alongside a new generation of heroes looking to carve out their own story, Mega Man Zero/ZX Legacy Collection brings intense action from all six games to Xbox One on January 21, 2020 and is available for pre-order today… Read more
The Bard’s Tale IV: Director’s Cut Arrives with Xbox Game Pass Today The definitive edition of The Bard’s Tale IV from inXile entertainment arrives today on Xbox One and Windows 10 PC with Xbox Game Pass! The studio founded by Brian Fargo – an Xbox Game Studios alum — invites you to return to Skara Brae to defeat a newly awakened… Read more
Break out the Bondo for Wreckfest, Available Now on Xbox One If you’ve ever daydreamed about wrenching on the engine of your very own classic muscle car and taking it online to dominate a high-speed racing circuit, then Wreckfest is for you. If the thought of converting your living room couch into a riding vehicle and tearing past… Read more
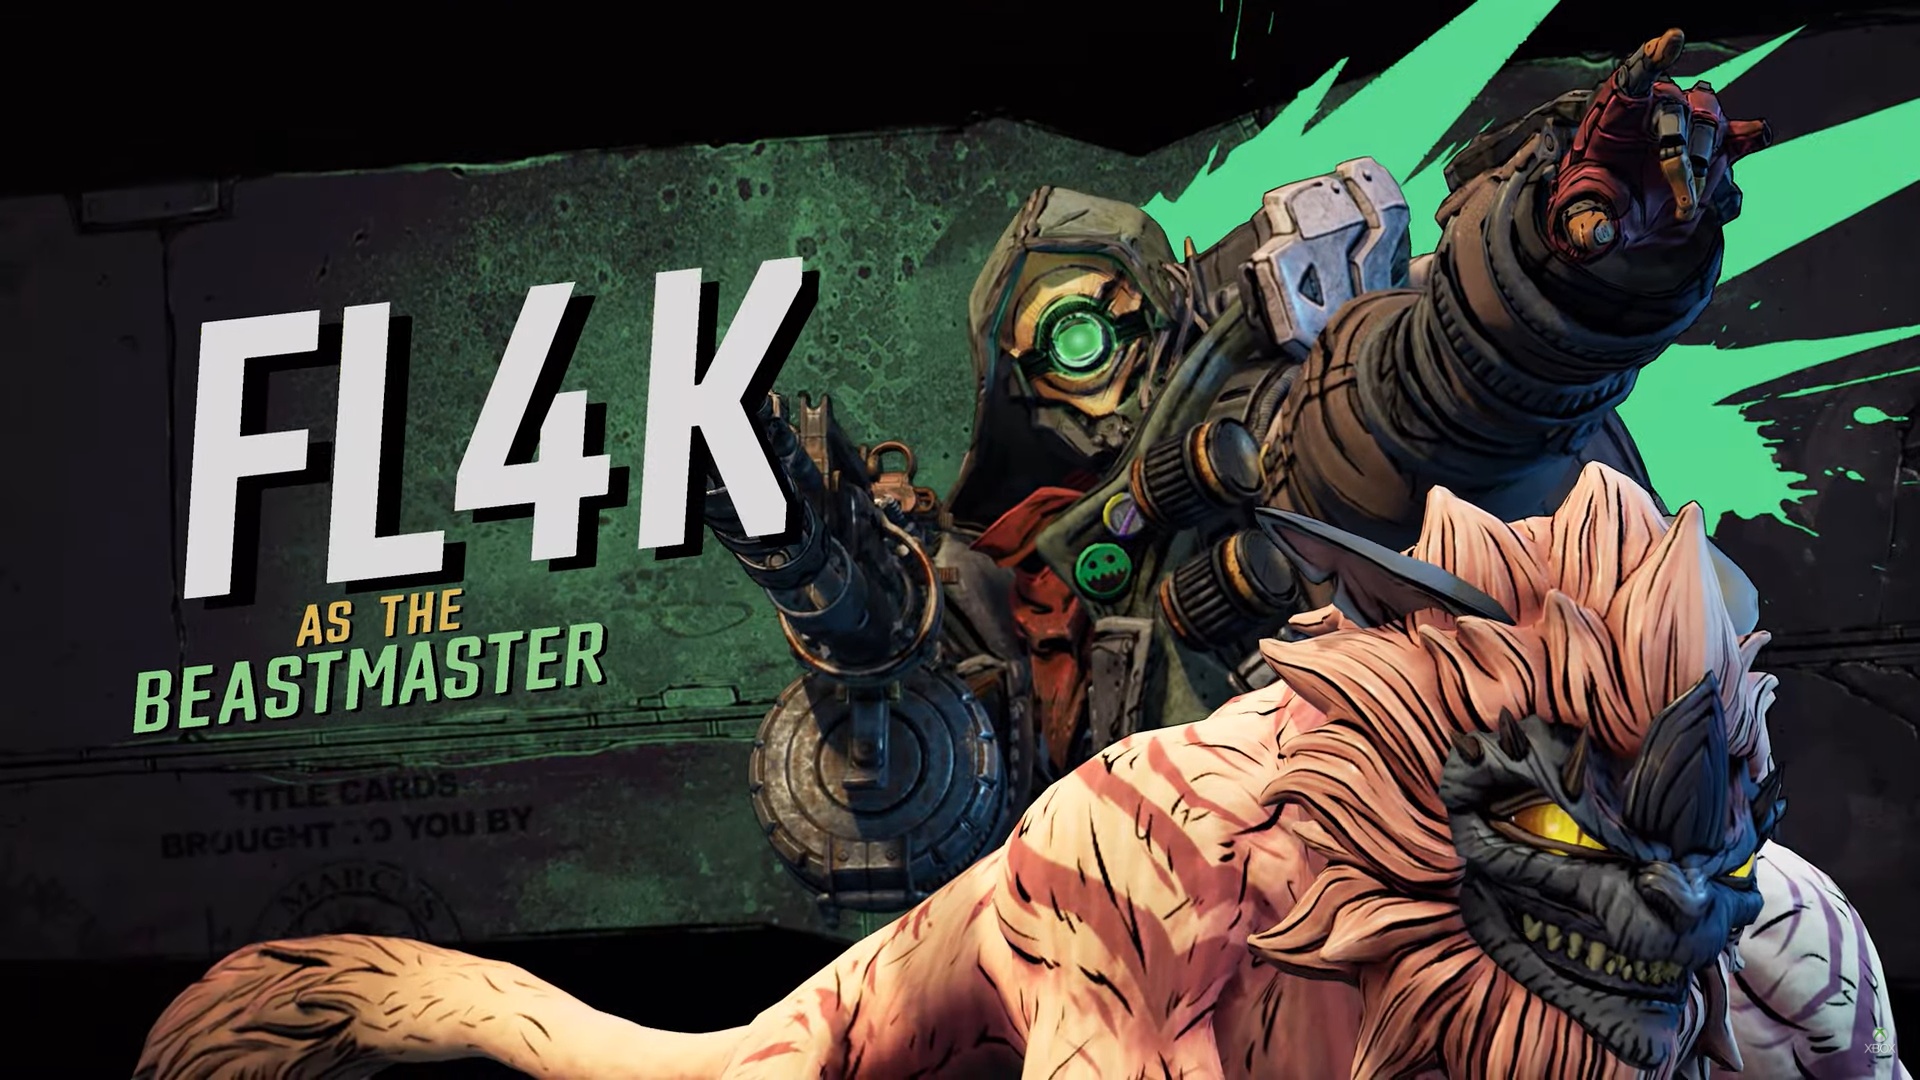
Borderlands 3 Hands On: Let’s Spec a Character! My hands-on preview of Borderlands 3 at gamescom 2019 began quite unusually, as these things go. No tutorial, no spiel from a game director or designer; just straight into the character selection screen, as if I were playing at home. For all the talk about millions, or even… Read more
New Steam Level Available Now for Human: Fall Flat on Xbox One Hello there, fellow Xbox humans! It’s been another incredible year for Human: Fall Flat. Since launching the spooky nighttime level Dark on Xbox One earlier this year, our quirky puzzle-puzzle platformer has gone from strength to strength – and it’s all thanks to you… Read more
ID@Xbox Launches a New YouTube Channel for Independent Gaming Today marks the launch of the ID@Xbox YouTube channel! Click here to give it a visit. With this channel, we are going to present the very best in Independent games coming to Xbox One and Windows PC, and maybe even some fun original programming along the way… Read more
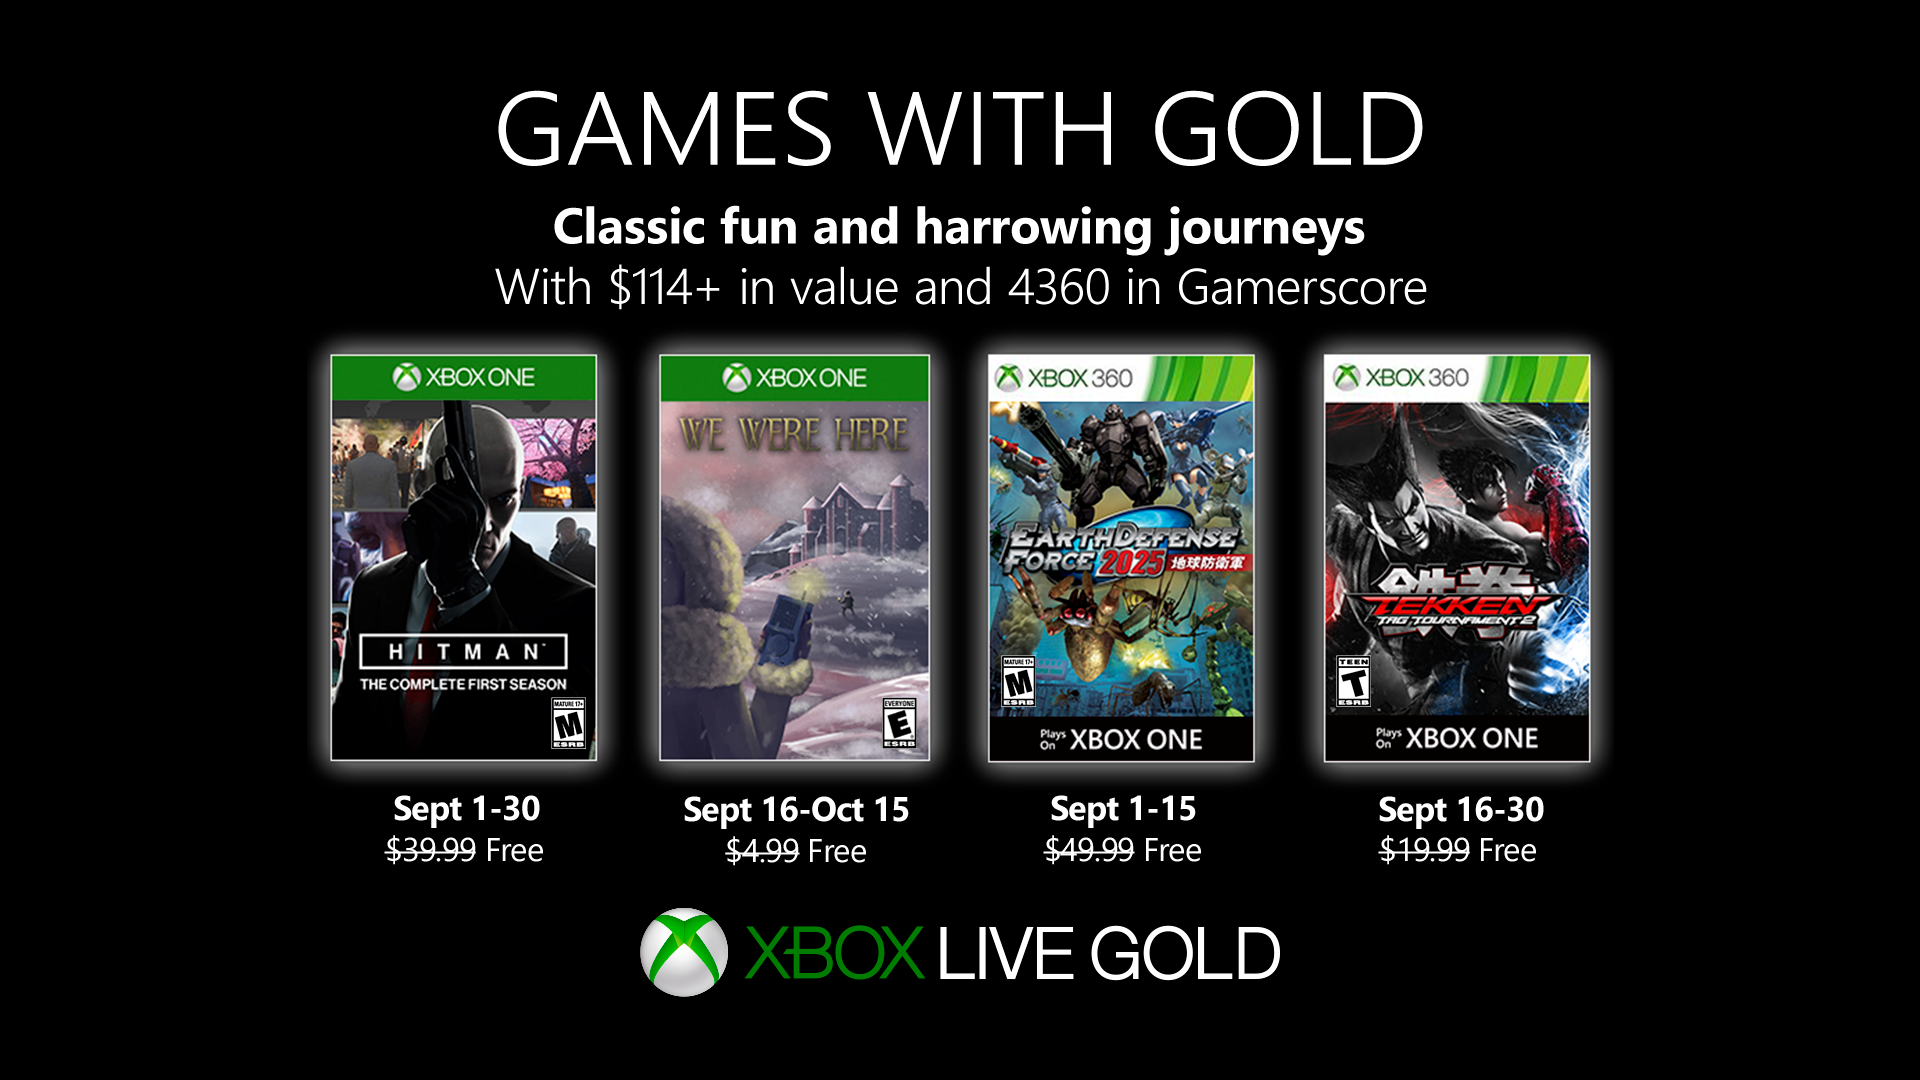
New Games with Gold for September 2019 In September on Xbox One, take out your targets on a global stage in Hitman: The Complete First Season and then collaboration is the key to escaping in We Were Here. On Xbox 360, and Xbox One via Backward Compatibility, save humanity once more in Earth Defense 2025… Read more
Blair Witch: How You Play Matters Blair Witch is a first-person, story-driven psychological horror game and it launches today with Xbox Game Pass and Xbox Game Pass for PC. While based on the iconic, cinematic lore of ”Blair Witch,” it tells a completely original story exploring human descent into darkness… Read more
Gears 5 Rockstar Energy Vending Machine Tour Starting today, The Coalition and Rockstar Energy are teaming up to reward Xbox Game Pass Ultimate members with free Gears 5 Collector’s Edition Rockstar Energy cans and exclusive giveaways as part of the Gears 5 Rockstar Energy Vending Machine Tour… Read more
Next Week on Xbox: New Games for September 3 to 6 Welcome to Next Week on Xbox, where we cover all the new games coming soon to Xbox One! Every week the team at Xbox aims to deliver quality gaming content for you to enjoy on your favorite gaming console. To find out what’s coming soon to Xbox One… Read more
Blog: How I discovered the world of user acquisition and advertising
The following blog post, unless otherwise noted, was written by a member of Gamasutras community. The thoughts and opinions expressed are those of the writer and not Gamasutra or its parent company.
I’ve been developing mobile games as a hobby for more than 5 years. My latest game (Tents and Trees) became quite successful and I decided to found my own company a few months ago. Tents and Trees has today about 800k downloads on Google Play and 100k on iOS (oh, and 112 downloads on Amazon App Store…).
I didn’t do any marketing beyond posting on social networks (and I don’t have many followers). I’ve been lucky to have as many organic downloads as I’ve had, but I wanted to try user acquisition, as the big guys do. It is a whole new topic for me, as I’ve been mainly focusing on development, and usually, when I release a game, I move on to the next one rapidly. Also, when this was all a hobby for me, I was a bit reluctant to inject “family money” into it. Now that it’s a company, I can invest more of my personal money and be at ease. My experience was very interesting, as I learned a lot, discovered many acronyms (UA, LTV, CPI, CPE, KPI…), and got many contacts from companies specialized in user acquisition or publishing. I’m sharing here my results, my process and some numbers obtained along the way. I hope you’ll find some use for the information presented here, and maybe apply some of these same strategies to your own experience.
With about 8 times more downloads on Google Play compared to iOS, I am heavily dependent on Google as my source of revenue. That’s a risk I want to lower, as I’ve already had games removed from the Play Store overnight and I can’t afford this risk. I also think the game has a potential to get more players on iOS. My main goal was to learn UA, but with a stronger focus on getting iOS players.
Until now, my downloads came from word of mouth or the Play Store algorithm. I had an initial spike on iOS on release because it was featured in some countries, but once the feature ended, downloads on iOS were terrible.
Obviously, organic downloads are free, but you don’t have much control over it. I’m just glad it happened. When you start to spend money in UA, you need information from your player base. Basically, you “purchase” players, and you want to measure their quality depending on the source (acquisition campaign). The quality of a user is basically its lifetime value (LTV), that is the money it brings back in the game. My revenue comes mostly from ads, and also from in-app purchases of virtual currency.
There are a few SDKs allowing you to perform user attribution. Attribution is being able to tell where the players found out about your game. It’s a complex topic, because you need to find the connection between the click on an ad, the download and the execution (possibly a few days later) of the game. Nearly all SDKs have a cost (usually a few cents per attributed player). I decided to go with FreeAppAnalytics, the light and free version of Kochava’s solution. I found the setup of the partners and campaigns quite complex, but their support was very good. I can then track installs, tutorial completion, level completion but more importantly, ad views and in-app purchases. And then, I was ready to track my UA campaigns!
One of the most frightening things in UA and, more generally, in analytics, is that depending on the source, you often get different results. I spent a lot of time trying to compute the LTV of my players. My most precise approach was to use data gathered from Game Analytics. However, the features of the dashboard were a bit light and couldn’t perform it directly on the website. I downloaded hundreds of gigabytes of raw data and wrote multiple computation scripts to gather interesting data. It’s a complex problem and there is a lot of things to consider, such as:
Some players play my game for more than a year, and it’s sometimes difficult to get all the data. For example, Game Analytics let me download only 6 months worth of data. I decided that instead of a lifetime value, I’m computing a “30 days value”.
Every country has a different eCPM (average revenue for 1000 impressions of ads).
When numbers are low, a single player purchasing the biggest pack of coins (worth $20) can really increase the average LTV by a lot. When dividing players by country or another category, how big should the sets be for it to be relevant?
Shown above : Capture of my google sheet used to compute the LTV
I used FreeAppAnalytics to have my own analytics. However, I was approached by some partners who wanted me to include other SDKs so that they can track the metrics directly on their end. The partner (I don’t know if they want to be named, therefore I’ll call them partner A) asked me to setup Appsflyer and Facebook SDKs in my game. They wanted to measure the retention and session length. If everything was good, they could push for more paid installs..
Numbers
They got me 206 installs for iOS, and concluded the retention was not good enough and didn’t want to continue. I didn’t get statistics about revenue, so I removed the SDKs in the next app udpate and moved on.
Conclusion
Failure. 0/1 (but I learned a lot about attribution SDKs)
Another partner that I had never heard of before offered to try to acquire users on iOS, too. I could then track data using FreeAppAnalytics.
Numbers
They got me 1296 iOS installs, which is great ! The retention was terrible (2.5% for 1 day retention, where I should expect something between 30% and 40%).
Players bought items for about $32 (raw money spent by players, before any store cuts, taxes and such), which is also very low, but not as bad as the retention rate. Players watched about 1400 ads, that’s an additional estimated raw revenue of $5 to $10.
Conclusion
Failure. 0/2 (but I learned a lot about using FreeAppAnalytics!) We’re still working together, they’re trying to improve their player sources to get higher quality users, but our cooperation is quite slow and I’m not sure we’ll get somewhere interesting.
A third partner contacted me to help me market my game. They basically wanted to test my game retention with their ads. If it was successful, they would make an offer to “take” my game, market it and split the revenue. I didn’t want to lose my IP and give away my game so I refused to work with them.
Another partner has basically the same approach than Partner C. However, they offered me to do this only for the Chinese market, on iOS. I was hesitant, but they offered me to make a test, while keeping the IP and later, if the test is successful, they’d make me an offer that I still can refuse. I decided to give it a try. I had to include some SDKs. They also created marketing materials (game description and screenshots) to improve marketing value of the game.
Numbers
They approximately brought me 900 iOS users. Retention was average and they considered it not good enough to continue our partnership. The process was very professional and interesting, however. They used their own tracking process, and I didn’t get much more information about revenues. I estimate about $20 in ad revenue and no purchases.
Conclusion
Failure. 0/3 (but I learned to work with a moderately big company and they were very professional).
I already had Apple Search Ads campaign set up months ago when Apple offered $100 for free to try the service. It only got me one or two installs per week for my previous game Thermometers Puzzles due to the low CPI (cost per install) I setup. I decided to setup a campaign for Tents and Trees and track it properly.
Numbers
In two months, I got beween 37 (FreeAppAnalytics source) and 39 (Search Ads source) iOS installs, which is very low. It cost me €31.07, which is 0.84 € per install. Even though numbers are probably too low to be relevant, the day 1 retention rate was very good (43.2%). No in-app purchase were made, and players watched about 600 ads.
Conclusion
Failure. 0/4. I’m losing money with this campaign (except that I’m still using promotional money for now).
I often see ads for mobile games in Facebook and decided to try it. The Facebook Ads Manager and Ads Reporting are really impressive tools. There are a lot of possibilities to setup your ads. You can try a lot of different configuration and compare results (testing different headlines, different screenshots), with the targeting and reporting being very precise (country, age, sex, interests…). In my tests, I targeted players above 26 years old, who like sudoku or mobile puzzle games. I made an ad for English-speaking countries (USA, UK, Hong Kong, New Zealand, Canada) and an ad for French-speaking countries (France, Switzerland, Luxembourg, Belgium). Also, I tried to create a campaign for Google Play, too. That’s the first time I tried to utilize UA on Google Play, and not only iOS. The tools are so good it feels like a game to create, analyze and tweak campaigns!
Shown above : Facebook statistics from my different campaigns (click to enlarge)
Numbers
As you can see, numbers are really different depending on the campaigns. CPI goes from €0.30 (a bit expensive for me) to €2.74 (!!).
iOS
I got between 421 (Facebook source) and 439 (FreeAppAnalytics source) installs. Day 1 retention rate was pretty good: 44.6%. It cost me € 236.76, which is € 0.56 per install. Players watched 7661 ads. Players bought items for about $20 (yes, I know I’m mixing US Dollars and Euros, but that’s the way it is ;)).
Google Play
I got between 18 (FreeAppAnalytics source) and 29 (Facebook source) installs. It cost me € 81.10, which is a huge cost to me. Players watched 7 ads and there were no purchases.
Conclusion
iOS
Failure. 0/5 (but I had a lot of fun with the Facebook tools)
Google Play
Failure. 0/6 (but I learned that Google Play acquisition is not always cheaper than iOS).
I set up Google AdWords for Google Play before installing any attribution SDK, because Google Play has tracking integrated into the Google Play Developer Console. Setting up a campaign is not as complete as it was with Facebook. You don’t create precise ads, but just give some hints and resources to create the ad. I setup multiple campaigns, one using CPI (cost per install), and another using CPA (cost per action, where it targets people that should purchase in the game). I have very low volumes for CPA. I tried multiple value for CPI, it’s actually 0.25 €. Funny story: one day, I decided to tweak my ad and to add more countries to the ad list. The next day, I was happy to see I had a lot of downloads. I then realized that I had mistakenly added Russia, and after analyzing my stats, Russian players are worth 10 times less than American players. I should have created another ad with a lower CPI if I had wanted to target Russia. I later tried also to create GoogleAds for iOS acquisition. As you will see with the numbers below, even with a CPI of €0.55, numbers are very low.
Numbers
iOS
6 downloads (this time, I have the same value with FreeAppAnalytics and GoogleAds). It cost me € 4.43 (€ 0.74 per install). Players watched 5 ads. No purchases.
Google Play
Between 2600 and 3009 (numbers from Google Play and Google Ads, I didn’t install FreeAppAnalytics immediately). It cost me €782. FreeAppAnalytics tracked 807 ad views. By interpolating, I estimate the total number of ad views to be about 8000.
I have weird numbers for purchases. I think some hackers can mess my numbers. Google Play tracked 0 purchases, which I think is the proper number. As you can see with the image below, FreeAppAnalytics tracks 56 purchases. Since these purchases occurred on a single day, it’s probably a hacker.
Conclusion
iOS
Failure. 0/7
Google Play
Failure. 0/8
Another important acronym is ROI: return on investment. It’s basically the percentage of revenue from any investment. At 0%, you don’t earn or lose money. In my case, my ROI is about -90%. Of course, I didn’t account for other factors, such as virality of the game. For example, an acquired player can talk about the game to some friends and bring more organic downloads (also called the k-factor). I recently made an update to my game to add a “share” button to help improve the virality of the game. I can even use FreeAppAnalytics to track installs coming from the share button.
Numbers
I had 8 installs and 9 ad views from this button.
I tried 8 different sources, and none of them was profitable. There can be multiple explanations for that:
My game is not monetizing well enough, even though it’s the most profitable game I ever made. The trends being hyper-casual games, bloated with ads. In my game, I only have rewarded ads, that are run and shown only when the players asks for it.
I’m not creating engaging ads. That’s highly probable, but when I let professionals do it, it still wasn’t good enough.
My audience is made up of players who can be considered difficult to target. That’s possible, being in a specific puzzle game market.
I spent quite a lot of time and put quite a bit of money into this, and it’s really interesting. I’m pretty sure there is something I can do to successfully implement UA, but it’s scary to see how far off I still am to be profitable with it. I’m currently rewriting entirely my previous game, Thermometers Puzzles, to improve its visual appeal, gameplay, monetization, and business model, and will try some more UA with this game in the following months, probably injecting at least € 5000 into the project. I found it quite difficult to find information for beginners on this topic. This blog post will hopefully give you some precious information if you plan to try UA. Feel free to comment, share and tweet (@Frozax) this article if you liked it! And if you have experience, ideas, useful tips, or if you are a user acquisition actor and want to work with me, I’d love to hear from you!
Pokemon Masters Tier List – Who Are the Best Sync Pairs?
By Josh Brown09 Sep 2019
Pokemon Masters, like many other popular mobile games at this point, feature dozens of units players can collect – with some being noticeably better than others. Weakness and resistance values can make identifying the best difficult at times, as each and every unit can be better or worse than another depending on the situation.
As the game lives and breathes with the introduction of new units over time, tier lists like this one are always subject to change. This Pokemon Masters tier list should be used as a guideline only, alerting you to some of the more versatile and sought-after units in the game with a brief explanation of how to get the most out of those pulls.
As Pokemon Masters splits units into different roles, we’ll highlight the three current “best” units of each.
Physical Strike Sync Pairs
The “sweeper” style of play has long been popular in competitive mainstream Pokemon titles, so we’re starting things off with the strongest physical attackers in the game.
Olivia & Lycanroc
Olivia’s Lycanroc takes the crown here thanks to its incredible raw attack and easy access to a 100% Crit Chance move. It’s a single target spammer, so it’s best to bring Lycanroc out for boss fights rather than easier trainer battles where AoE moves will speed things up. With plenty of access to self-buff techniques, Lycanroc can take care of itself so long as you take care of any Special Strikers before they can exploit the Sp. Def Lycanroc sacrifices while buffing up.
To get Lycanroc up to its full potential, you’ll need to unlock both Stone Edge and it’s Hard as Diamonds! buff to patch up Stone Edge’s middling accuracy and reach that 100% crit cap. If you have the extra items, unlocking the Amped Up! passive will let Lycanroc boost its Speed with each crit – a dangerous combination indeed. Rolling in with Support units can help buff its stats even further.
Noland & Mega Pinser
With similar power and buff potential, the only reason Mega Pinser isn’t above Lycanroc is the necessity to Mega Evolve in each match to reach its full potential. With the right set-up, this can be sped up considerably; but Noland & Mega Pinser still require a little time to get going. Once they do, they’re a force to be reckoned with.
As it takes some time to set up, pairing Mega Pinser with bulky support units it almost mandatory. Phoebe & Dusclops or Hilbert & Oshawott are fine choices due to their ability to further boost Pinser’s attack on the way there and can quickly replenish the move gauge to keep Pinser on the offensive.. You only really need to unlock Bring it On! for Pinser to shine, but X-Scissor will obviously have its benefits.
Brendan & Treeko
Despite confirming the odd decision for only female main protagonists to have starter evolutions, Brendan & Treeko have managed to climb to the top of the Physical Striker tier list. Treeko can burn through three chunks of the move gauge to boost its offensive stats to the max, with Leaf Storm, it’s choice move, eating up just as much. It’s a greedy creature, but one easily capable of taking down multiple targets and exploiting both Physical and Special defence gaps thanks to its moveset.
Getting the most out of Brendan & Treeko will depend on really committing to its growth through the move gauge, which requires unlocking No Turning Back! and Leaf Storm. Having Rosa & Serperior or Phoebe & Dusclops on your side can help keep things flowing. Buffing its Accuracy can help avoid wasting a large chunk of the move gauge on a bad Leaf Storm.
Special Striker Sync Pairs
Much like the Physical Striker, Special Strikers excel in dealing large amounts of damage – usually at the cost of personal bulk.
Blue & Mega Pidgeot
The introduction of Blue & Mega Pidgeot has shaken things up a tad since the beta release in August, earning the pair a top slot with ease. Mega Pidgeot isn’t entirely dependant on its mega evolution thanks to some powerful AoE strikes, but it certainly helps boost the creature above the competition. One AoE can inflict Confuse, while the other has a high natural crit rate.
Mega Pidgeon’s set-up lends to longer fights over shorter ones. Unlocking both Smell Ya Later! and Hurricane are essential. You can patch the latter’s low Accuracy by bringing a unit capable of making it rain if you’re unable to unlock the former.
Karen & Mega Houndoom
According to GamePress, Mega Houndoom can be bested by even some promoted 3-star units at times, but even normal Houndoom is all you’ll need to have a unit ready to take on the big leagues. This makes Houndoom a bit of a hybrid in terms of its role. As it can lower a target’s stats and potentially cause Flinch, it’s a powerful asset for stopping an opponent’s main Pokemon in its tracks.
You’ll want to unlock both Dark Pulse and Entertain Me! to allow Houndoom quick access to its mega evolution and interrupt targets with powerful strikes. Don’t worry about unlocking its passives.
Hau & Alolan Raichu
This decision might not be reflected on other tier lists, but Hau & Alolan Raichu were quite the powerhouse duo in early access. Alolan Raichu was frequently seen clearing the highest level content available at the time – its powerful AoE moves catapulting it up the usability list.
Maximizing Alolan Raichu depends on keeping your resident tank on the field. What Raichu lacks in HP it more than makes up for with Speed and overall DPS. Discharge is the main unlock here, but Feel the Alolan Breeze! can keep it fast on its feet and award the the evasiveness it’ll need to dodge death once a tank goes down. The earlier you pull this unit, the easier a vast majority of the content will be.
Tech Sync Pairs
Tech units specialize in punishing their targets with a barrage of status ailments. It isn’t unusual for them to then carve out extra damage with their sync moves against inflicted foes, but paired with a matching Striker, Tech units can pin strong targets in place while another knocks them out of the field.
Crasher Wake & Floatzel
By no means the single greatest Tech unit in the game, the exciting thing about Crasher Wake & Floatzel is their 3-star base potential. You’ll have to juice the pair up to push the envelope here, but having such easy access to a versatile tech unit can’t be ignored.
Floatzel can inflict a dizzying amount of ailments, with passives that can up the chance of these, too. After unlocking Water Pulse, Floatzel can inflict both Flinch and Confuse, with Aggravation 1 boosting those odds. If you really need to use its Flinch-punishing sync move on a target, its Crit and Attack buffs can allow for a devastating blow.
Koga & Crobat
Crobat isn’t the most exciting unit in the game, but semi-rare typing and access to the “Badly Poisoned” affliction opens up a few interesting strategies.
Having something be Badly Poisoned can break away large portions of a health pool once it gets going, making it great for melting through tougher targets like boss units. The evasiveness afforded with Move like a Shadow! and Speed boost of X Speed should allow Crobat to hang around as toss Poison at multiple targets. It can then take advantage of this with Venoshock or its sync move, but this shouldn’t be necessary unless you’re looking at a type advantage.
Agatha & Mega Gengar
Gengar shines even without its mega evolution due to the usefulness of its numerous applications. It can inflict Paralysis with Lick and Sleep with Hypnosis even before triggering a mega evolution, potentially saving a sync move for a more powerful unit on your team.
But Mega Gengar’s stat boosts make it a viable Tech/Striker able to rival even dedicated top-tier strikers. At 4-star base potential, it’s an uncommon pull that can fill in for any eventual 5-star once you unlock Shadow Ball.
Support Sync Pairs
Support units specialize in keeping the rest of the team fighting fit, not through healing traditionally, but tanking hits with their high bulk and buffing allies to hold their own.
Phoebe & Dusclops
Phoebe & Dusclops really shine in co-op, but they’re incredibly capable solo units, too. Access to Dire Hit All boosts the team’s crit rate, while Shadow Punch’s “Sure Hit” bonus can help get rid of any Pokemon that has been allowed to stockpile evasiness.
Dusclops really begins to shine once Unbreakable Bonds! is unlocked, gifting a bigger team Attack buff and move gauge replenish as its HP drops. Given its a natural tank, firing this off before Dusclops bows out can really turn the tables. If going co-op, be sure to unlock the Pass It On passive, which allows Dusclops to give half its buffs to whichever Pokemon replaces it in battle.
Rosa & Serperior
A unit everyone unlocks through the story, Rosa & Serperior simply need some love and attention to carry you to victory. You’ll need to evolve the base Snivy to reach peak performance, but it’s always worth the effort.
Serperior pairs well with Special Strike units due to its invaluable Sp. Atk. boosts, which are unlocked from the start. You’ll absolutely want to unlock “Time to Energize!” for the massive three move gauge replenishment, which will allow any team to rattle off powerful attacks or build up a sync move more easily. If you struggle to find an alternative tank, consider unlocking Giga Drain to keep it on the field a little longer.
Hilbert & Oshawott
While not actually available at the time of writing, Oshawott can be considered the Attack variant of Serperior. High bulk, Attack buffs based on lost HP, and X Speed All can push Physical Strikers beyond their base stats with ease.
Unlike Serperior, Oshawott has no way of healing itself, creating a time limit of sorts on the match. Where this helps is that Oshawott only needs a single unlock on In This Together to become a viable team asset. X Speed All should ramp up the time to victory, but you’ll need suitable physical attackers to make this most of this tiny sea creature.
So there you have it; a handy list of some of Pokemon Masters’ best units. As we mentioned above, each and every unit in the game has its uses, but we feel these are the Pokemon you’ll want to hunt down for the smoothest in-game experience. Some will need a spot of luck, whereas others will join you on the story, proving that no matter where they come from, every unit serves a distinct purpose with the right strategy.
Do you have any sync pair recommendations? Let us know in the comments!
rideOS, a technology platform designed to accelerate the safe, global rollout of next-generation transportation fleets, today launched its new Ridehail Platform — including a Ridehail API and open-source mobile apps. The Ridehail API offers an easy way for automotive original equipment manufacturers (OEMs), autonomous vehicle (AV) companies, and transportation network companies (TNCs) to create and manage their own ridehailing network using rideOS’ underlying technology. (Yahoo!)
MagicaVoxel, the cross platform completely free voxel editing application, just released a new version, 0.99.4 (and 0.99.4.1). The release is focused heavily on adding new rendering functionality.
Details of the release(s):
Renderer [0.99.4.1]
Sky->IBL: Image Based Lighting. use “.hdr” format panorama images to light the scene.
Fog: add Equi-angular sampling back to reduce noises. support fogs in othogonal views in a bounding volume.
Media: enable Sample->TR-Shadow to allow single direct lighting; enable Sample->MIS-Cloud to allow multiple direct lighting (very expensive).
Color all color options have their own color pickers which support HSV, RGB, H-Block and Hex values.
Palette Menu right click the palette view to show the pop-up menu.
Renderer [0.99.4]
Matter->Cloud: Media material which supports multiple scattering inside volume.
Sample->MIS-GGX: Multiple Importance Sampling (MIS) for GGX surfaces (Metal/Plastic/Glass) for better reflection.
Sample->TR-Shadow: Tranlsucent Shadow which allows light passing though glass and cloud voxels. Only Glass->Attenuation can affect the light color.
can adjust Bounce->Diffuse/Specular/Scatter path depths separately.
can assign glass/cloud materials to sphere/cylinder shape voxels (for experiments only).
the renderer pipeline is refactored, which needs more time to improve, optimize and fix bugs.
some features such as fog scattering requires more researches.
frame drops and noises are expected.
MagicaVoxel is available here. For the basics on getting started with MagicaVoxel check out our earlier video available here. If you are looking for an alternative Voxel editing application check out our list available here.
Please also see the full list of breaking changes in ASP.NET Core 3.0.
To upgrade an existing ASP.NET Core 3.0 Preview 7 project to Preview 8:
Update Microsoft.AspNetCore.* package references to 3.0.0-preview8.19405.7.
In Razor components rename OnInit to OnInitialized and OnInitAsync to OnInitializedAsync.
In Blazor apps, update Razor component parameters to be public, as non-public component parameters now result in an error.
In Blazor WebAssembly apps that make use of the HttpClient JSON helpers, add a package reference to Microsoft.AspNetCore.Blazor.HttpClient.
On Blazor form components remove use of Id and Class parameters and instead use the HTML id and class attributes.
Rename ElementRef to ElementReference.
Remove backing field declarations when using @ref or specify the @ref:suppressField parameter to suppress automatic backing field generation.
Update calls to ComponentBase.Invoke to call ComponentBase.InvokeAsync.
Update uses of ParameterCollection to use ParameterView.
Update uses of IComponent.Configure to use IComponent.Attach.
Remove use of namespace Microsoft.AspNetCore.Components.Layouts.
You should hopefully now be all set to use .NET Core 3.0 Preview 8.
Project template updates
Cleaned up top-level templates in Visual Studio
Top level ASP.NET Core project templates in the “Create a new project” dialog in Visual Studio no longer appear duplicated in the “Create a new ASP.NET Core web application” dialog. The following ASP.NET Core templates now only appear in the “Create a new project” dialog:
Razor Class Library
Blazor App
Worker Service
gRPC Service
Angular template updated to Angular 8
The Angular template for ASP.NET Core 3.0 has now been updated to use Angular 8.
Blazor templates renamed and simplified
We’ve updated the Blazor templates to use a consistent naming style and to simplify the number of templates:
The “Blazor (server-side)” template is now called “Blazor Server App”. Use blazorserver to create a Blazor Server app from the command-line.
The “Blazor” template is now called “Blazor WebAssembly App”. Use blazorwasm to create a Blazor WebAssembly app from the command-line.
To create an ASP.NET Core hosted Blazor WebAssembly app, select the “ASP.NET Core hosted” option in Visual Studio, or pass the --hosted on the command-line
dotnet new blazorwasm --hosted
Razor Class Library template replaces the Blazor Class Library template
The Razor Class Library template is now setup for Razor component development by default and the Blazor Class Library template has been removed. New Razor Class Library projects target .NET Standard so they can be used from both Blazor Server and Blazor WebAssembly apps. To create a new Razor Class Library template that targets .NET Core and supports Pages and Views instead, select the “Support pages and views” option in Visual Studio, or pass the --support-pages-and-views option on the command-line.
dotnet new razorclasslib --support-pages-and-views
Case-sensitive component binding
Components in .razor files are now case-sensitive. This enables some useful new scenarios and improves diagnostics from the Razor compiler.
For example, the Counter has a button for incrementing the count that is styled as a primary button. What if we wanted a Button component that is styled as a primary button by default? Creating a component named Button in previous Blazor releases was problematic because it clashed with the button HTML element, but now that component matching is case-sensitive we can create our Button component and use it in Counter without issue.
Notice that the Button component is pascal cased, which is the typical style for .NET types. If we instead try to name our component button we get a warning that components cannot start with a lowercase letter due to the potential conflicts with HTML elements.
We can move the Button component into a Razor Class Library so that it can be reused in other projects. We can then reference the Razor Class Library from our web app. The Button component will now have the default namespace of the Razor Class Library. The Razor compiler will resolve components based on the in scope namespaces. If we try to use our Button component without adding a using statement for the requisite namespace, we now get a useful error message at build time.
NavLink component updated to handle additional attributes
The built-in NavLink component now supports passing through additional attributes to the rendered anchor tag. Previously NavLink had specific support for the href and class attributes, but now you can specify any additional attribute you’d like. For example, you can specify the anchor target like this:
Improved reconnection logic for Blazor Server apps
Blazor Server apps require a live connection to the server in order to function. If the connection or the server-side state associated with it is lost, then the the client will be unable to function. Blazor Server apps will attempt to reconnect to the server in the event of an intermittent connection loss and this logic has been made more robust in this release. If the reconnection attempts fail before the network connection can be reestablished, then the user can still attempt to retry the connection manually by clicking the provided “Retry” button.
However, if the server-side state associated with the connect was also lost (e.g. the server was restarted) then clients will still be unable to connect. A common situation where this occurs is during development in Visual Studio. Visual Studio will watch the project for file changes and then rebuild and restart the app as changes occur. When this happens the server-side state associated with any connected clients is lost, so any attempt to reconnect with that state will fail. The only option is to reload the app and establish a new connection.
New in this release, the app will now also suggest that the user reload the browser when the connection is lost and reconnection fails.
Culture aware data binding
Data-binding support (@bind) for <input> elements is now culture-aware. Data bound values will be formatted for display and parsed using the current culture as specified by the System.Globalization.CultureInfo.CurrentCulture property. This means that @bind will work correctly when the user’s desired culture has been set as the current culture, which is typically done using the ASP.NET Core localization middleware (see Localization).
You can also manually specify the culture to use for data binding using the new @bind:culture parameter, where the value of the parameter is a CultureInfo instance. For example, to bind using the invariant culture:
The <input type="number" /> and <input type="date" /> field types will by default use CultureInfo.InvariantCulture and the formatting rules appropriate for these field types in the browser. These field types cannot contain free-form text and have a look and feel that is controller by the browser.
Other field types with specific formatting requirements include datetime-local, month, and week. These field types are not supported by Blazor at the time of writing because they are not supported by all major browsers.
Data binding now also includes support for binding to DateTime?, DateTimeOffset, and DateTimeOffset?.
Automatic generation of backing fields for @ref
The Razor compiler will now automatically generate a backing field for both element and component references when using @ref. You no longer need to define these fields manually:
<button @ref="myButton" @onclick="OnClicked">Click me</button> <Counter @ref="myCounter" IncrementAmount="10" /> @code { void OnClicked() => Console.WriteLine($"I have a {myButton} and myCounter.IncrementAmount={myCounter.IncrementAmount}");

}
In some cases you may still want to manually create the backing field. For example, declaring the backing field manually is required when referencing generic components. To suppress backing field generation specify the @ref:suppressField parameter.
Razor Pages support for @attribute
Razor Pages now support the new @attribute directive for adding attributes to the generate page class.
For example, you can now specify that a page requires authorization like this:
@page

@attribute [Microsoft.AspNetCore.Authorization.Authorize] <h1>Authorized users only!<h1> <p>Hello @User.Identity.Name. You are authorized!</p>
New networking primitives for non-HTTP Servers
As part of the effort to decouple the components of Kestrel, we are introducing new networking primitives allowing you to add support for non-HTTP protocols.
You can bind to an endpoint (System.Net.EndPoint) by calling Bind on an IConnectionListenerFactory. This returns a IConnectionListener which can be used to accept new connections. Calling AcceptAsync returns a ConnectionContext with details on the connection. A ConnectionContext is similar to HttpContext except it represents a connection instead of an HTTP request and response.
The example below show a simple TCP Echo server hosted in a BackgroundService built using these new primitives.
public class TcpEchoServer : BackgroundService

{ private readonly ILogger<TcpEchoServer> _logger; private readonly IConnectionListenerFactory _factory; private IConnectionListener _listener; public TcpEchoServer(ILogger<TcpEchoServer> logger, IConnectionListenerFactory factory) { _logger = logger; _factory = factory; } protected override async Task ExecuteAsync(CancellationToken stoppingToken) { _listener = await _factory.BindAsync(new IPEndPoint(IPAddress.Loopback, 6000), stoppingToken); while (true) { var connection = await _listener.AcceptAsync(stoppingToken); // AcceptAsync will return null upon disposing the listener if (connection == null) { break; } // In an actual server, ensure all accepted connections are disposed prior to completing _ = Echo(connection, stoppingToken); } } public override async Task StopAsync(CancellationToken cancellationToken) { await _listener.DisposeAsync(); } private async Task Echo(ConnectionContext connection, CancellationToken stoppingToken) { try { var input = connection.Transport.Input; var output = connection.Transport.Output; await input.CopyToAsync(output, stoppingToken); } catch (OperationCanceledException) { _logger.LogInformation("Connection {ConnectionId} cancelled due to server shutdown", connection.ConnectionId); } catch (Exception e) { _logger.LogError(e, "Connection {ConnectionId} threw an exception", connection.ConnectionId); } finally { await connection.DisposeAsync(); _logger.LogInformation("Connection {ConnectionId} disconnected", connection.ConnectionId); } }

}
Unix domain socket support for the Kestrel Sockets transport
We’ve updated the default sockets transport in Kestrel to add support Unix domain sockets (on Linux, macOS, and Windows 10, version 1803 and newer). To bind to a Unix socket, you can call the ListenUnixSocket() method on KestrelServerOptions.
In preview8, we’ve added support for CallCredentials allowing for interoperability with existing libraries like Grpc.Auth that rely on CallCredentials.
Diagnostics improvements for gRPC
Support for Activity
The gRPC client and server use Activities to annotate inbound/outbound requests with baggage containing information about the current RPC operation. This information can be accessed by telemetry frameworks for distributed tracing and by logging frameworks.
EventCounters
The newly introduced Grpc.AspNetCore.Server and Grpc.Net.Client providers now emit the following event counters:
total-calls
current-calls
calls-failed
calls-deadline-exceeded
messages-sent
messages-received
calls-unimplemented
You can use the dotnet counters global tool to view the metrics emitted.
We’ve added support in Visual Studio that makes it easier to manage references to other Protocol Buffers documents and Open API documents.
When pointed at OpenAPI documents, the ServiceReference experience in Visual Studio can generated typed C#/TypeScript clients using NSwag.
When pointed at Protocol Buffer (.proto) files, the ServiceReference experience will Visual Studio can generate gRPC service stubs, gRPC clients, or message types using the Grpc.Tools package.
SignalR User Survey
We’re interested in how you use SignalR and the Azure SignalR Service, and your opinions on SignalR features. To that end, we’ve created a survey we’d like to invite any SignalR customer to complete. If you’re interested in talking to one of the engineers from the SignalR team about your ideas or feedback, we’ve provided an opportunity to enter your contact information in the survey, but that information is not required. Help us plan the next wave of SignalR features by providing your feedback in the survey.
Give feedback
We hope you enjoy the new features in this preview release of ASP.NET Core and Blazor! Please let us know what you think by filing issues on GitHub.
Leaked Apple document says new Siri device is coming by fall 2021
By Malcolm Owen Friday, September 06, 2019, 06:13 am PT (09:13 am ET)
Leaked documents relating to Siri reveal upgrades to the digital assistant are coming in late 2021, aimed at supporting a new piece of hardware.
A list of Siri upgrades expected to arrive before “fall 2021” includes expected elements for “new hardware support” for a “new device,” though a report published on Friday is light on those details. Codenamed “Yukon,” the upgrades to Siri will introduce support for Find my Friends to the voice-based service, the documents claim. Siri will also include support for accessing the App Store, though the capabilities relating to that are not advised by a report.
Built-in machine translation could enable language interpreting capabilities within Siri, without needing a cellular or other network connection at all, a feature that could be handy for travelers.
A large section of the internal documents, provided to The Guardian by a former Siri “grader,” mentions how Siri could work with other devices in a variety of ways. At its simplest, features to enable Siri to read out message notifications to users wearing AirPods is suggested, while the ability to use Shazam via Siri on Apple Watch is also touted.
A bigger feature could be commanding Siri on one device to perform actions on another. One example given is to “Play Taylor Swift on my HomePod,” which could be said on an Apple Watch or iPhone remotely and interpreted to control the user’s smart speaker at home.
Arguably the biggest element is the ability to “have a back-and-forth conversation about health problems” with Siri. While this could take the form of Siri providing a basic diagnosis of the user to see if medical treatment is worth attaining, it is also possible that the conversations could form part of HealthKit or ResearchKit, Apple’s initiatives in the medical field.
Despite the lack of information relating to what kind of new Siri-equipped devices are on the way, one of the most likely candidates is the HomePod, which is enjoying success in reaching markets like China where rival systems from Google and Amazon aren’t available. It is plausible that Apple could produce a “mini” version of the HomePod, offering consumers a cheaper and smaller version in a similar vein to the Google Home Mini and the Amazon Echo Dot.
Apple has been rumored to be working on a new generation of the audio device for some time, with a cheaper variant also predicted by analyst Ming-Chi Kuo in April 2018, though such a model has yet to be launched.
In the previous article on RPM package building, you saw that source RPMS include the source code of the software, along with a “spec” file. This post digs into the spec file, which contains instructions on how to build the RPM. Again, this article uses fpaste as an example.
Understanding the source code
Before you can start writing a spec file, you need to have some idea of the software that you’re looking to package. Here, you’re looking at fpaste, a very simple piece of software. It is written in Python, and is a one file script. When a new version is released, it’s provided here on Pagure: https://pagure.io/releases/fpaste/fpaste-0.3.9.2.tar.gz
The current version, as the archive shows, is 0.3.9.2. Download it so you can see what’s in the archive:
fpaste.py: which should go be installed to /usr/bin/.
docs/man/en/fpaste.1: the manual, which should go to /usr/share/man/man1/.
COPYING: the license text, which should go to /usr/share/license/fpaste/.
README.rst, TODO: miscellaneous documentation that goes to /usr/share/doc/fpaste.
Where these files are installed depends on the Filesystem Hierarchy Standard. To learn more about it, you can either read here: http://www.pathname.com/fhs/ or look at the man page on your Fedora system:
Name: fpaste

Version: 0.3.9.2

Release: 3%{?dist}

Summary: A simple tool for pasting info onto sticky notes instances

BuildArch: noarch

License: GPLv3+

URL: https://pagure.io/fpaste

Source0: https://pagure.io/releases/fpaste/fpaste-0.3.9.2.tar.gz Requires: python3 %description

It is often useful to be able to easily paste text to the Fedora

Pastebin at http://paste.fedoraproject.org and this simple script

will do that and return the resulting URL so that people may

examine the output. This can hopefully help folks who are for

some reason stuck without X, working remotely, or any other

reason they may be unable to paste something into the pastebin
Name, Version, and so on are called tags, and are defined in RPM. This means you can’t just make up tags. RPM won’t understand them if you do! The tags to keep an eye out for are:
Source0: tells RPM where the source archive for this software is located.
Requires: lists run-time dependencies for the software. RPM can automatically detect quite a few of these, but in some cases they must be mentioned manually. A run-time dependency is a capability (often a package) that must be on the system for this package to function. This is how dnf detects whether it needs to pull in other packages when you install this package.
BuildRequires: lists the build-time dependencies for this software. These must generally be determined manually and added to the spec file.
BuildArch: the computer architectures that this software is being built for. If this tag is left out, the software will be built for all supported architectures. The value noarch means the software is architecture independent (like fpaste, which is written purely in Python).
This section provides general information about fpaste: what it is, which version is being made into an RPM, its license, and so on. If you have fpaste installed, and look at its metadata, you can see this information included in the RPM:
$ sudo dnf install fpaste

$ rpm -qi fpaste

Name : fpaste

Version : 0.3.9.2

Release : 2.fc30

...
RPM adds a few extra tags automatically that represent things that it knows.
At this point, we have the general information about the software that we’re building an RPM for. Next, we start telling RPM what to do.
Part 2: Preparing for the build
The next part of the spec is the preparation section, denoted by %prep:
%prep

%autosetup
For fpaste, the only command here is %autosetup. This simply extracts the tar archive into a new folder and keeps it ready for the next section where we build it. You can do more here, like apply patches, modify files for different purposes, and so on. If you did look at the contents of the source rpm for Python, you would have seen lots of patches there. These are all applied in this section.
Typically anything in a spec file with the % prefix is a macro or label that RPM interprets in a special way. Often these will appear with curly braces, such as %{example}.
Part 3: Building the software
The next section is where the software is built, denoted by “%build”. Now, since fpaste is a simple, pure Python script, it doesn’t need to be built. So, here we get:
%build

#nothing required
Generally, though, you’d have build commands here, like:
configure; make
The build section is often the hardest section of the spec, because this is where the software is being built from source. This requires you to know what build system the tool is using, which could be one of many: Autotools, CMake, Meson, Setuptools (for Python) and so on. Each has its own commands and style. You need to know these well enough to get the software to build correctly.
Part 4: Installing the files
Once the software is built, it needs to be installed in the %install section:
%install

mkdir -p %{buildroot}%{_bindir}

make install BINDIR=%{buildroot}%{_bindir} MANDIR=%{buildroot}%{_mandir}
RPM doesn’t tinker with your system files when building RPMs. It’s far too risky to add, remove, or modify files to a working installation. What if something breaks? So, instead RPM creates an artificial file system and works there. This is referred to as the buildroot. So, here in the buildroot, we create /usr/bin, represented by the macro %{_bindir}, and then install the files to it using the provided Makefile.
At this point, we have a built version of fpaste installed in our artificial buildroot.
Part 5: Listing all files to be included in the RPM
The last section of the spec file is the files section, %files. This is where we tell RPM what files to include in the archive it creates from this spec file. The fpaste file section is quite simple:
%files

%{_bindir}/%{name}

%doc README.rst TODO

%{_mandir}/man1/%{name}.1.gz

%license COPYING
Notice how, here, we do not specify the buildroot. All of these paths are relative to it. The %doc and %license commands simply do a little more—they create the required folders and remember that these files must go there.
RPM is quite smart. If you’ve installed files in the %install section, but not listed them, it’ll tell you this, for example.
Part 6: Document all changes in the change log
Fedora is a community based project. Lots of contributors maintain and co-maintain packages. So it is imperative that there’s no confusion about what changes have been made to a package. To ensure this, the spec file contains the last section, the Changelog, %changelog:
There must be a changelog entry for every change to the spec file. As you see here, while I’ve updated the spec as the maintainer, others have too. Having the changes documented clearly helps everyone know what the current status of the spec is. For all packages installed on your system, you can use rpm to see their changelogs:
$ rpm -q --changelog fpaste
Building the RPM
Now we are ready to build the RPM. If you want to follow along and run the commands below, please ensure that you followed the steps in the previous post to set your system up for building RPMs.
We place the fpaste spec file in ~/rpmbuild/SPECS, the source code archive in ~/rpmbuild/SOURCES/ and can now create the source RPM:
$ ls ~/rpmbuild/SRPMS/fpaste*

/home/asinha/rpmbuild/SRPMS/fpaste-0.3.9.2-3.fc30.src.rpm $ rpm -qpl ~/rpmbuild/SRPMS/fpaste-0.3.9.2-3.fc30.src.rpm

fpaste-0.3.9.2.tar.gz

fpaste.spec
There we are — the source rpm has been built. Let’s build both the source and binary rpm together:
$ cd ~/rpmbuild/SPECS

$ rpmbuild -ba fpaste.spec

..

..

..
RPM will show you the complete build output, with details on what it is doing in each section that we saw before. This “build log” is extremely important. When builds do not go as expected, we packagers spend lots of time going through them, tracing the complete build path to see what went wrong.
That’s it really! Your ready-to-install RPMs are where they should be:
$ ls ~/rpmbuild/RPMS/noarch/

fpaste-0.3.9.2-3.fc30.noarch.rpm
Recap
We’ve covered the basics of how RPMs are built from a spec file. This is by no means an exhaustive document. In fact, it isn’t documentation at all, really. It only tries to explain how things work under the hood. Here’s a short recap:
RPMs are of two types: source and binary.
Binary RPMs contain the files to be installed to use the software.
Source RPMs contain the information needed to build the binary RPMs: the complete source code, and the instructions on how to build the RPM in the spec file.
The spec file has various sections, each with its own purpose.
Here, we’ve built RPMs locally, on our Fedora installations. While this is the basic process, the RPMs we get from repositories are built on dedicated servers with strict configurations and methods to ensure correctness and security. This Fedora packaging pipeline will be discussed in a future post.














 There are a few SDKs allowing you to perform user attribution. Attribution is being able to tell where the players found out about your game. It’s a complex topic, because you need to find the connection between the click on an ad, the download and the execution (possibly a few days later) of the game. Nearly all SDKs have a cost (usually a few cents per attributed player). I decided to go with

 Another partner has basically the same approach than Partner C. However, they offered me to do this only for the Chinese market, on iOS. I was hesitant, but they offered me to make a test, while keeping the IP and later, if the test is successful, they’d make me an offer that I still can refuse. I decided to give it a try. I had to include some SDKs. They also created marketing materials (game description and screenshots) to improve marketing value of the game.
 I often see ads for mobile games in Facebook and decided to try it. The Facebook Ads Manager and Ads Reporting are really impressive tools. There are a lot of possibilities to setup your ads. You can try a lot of different configuration and compare results (testing different headlines, different screenshots), with the targeting and reporting being very precise (country, age, sex, interests…). In my tests, I targeted players above 26 years old, who like sudoku or mobile puzzle games. I made an ad for English-speaking countries (USA, UK, Hong Kong, New Zealand, Canada) and an ad for French-speaking countries (France, Switzerland, Luxembourg, Belgium).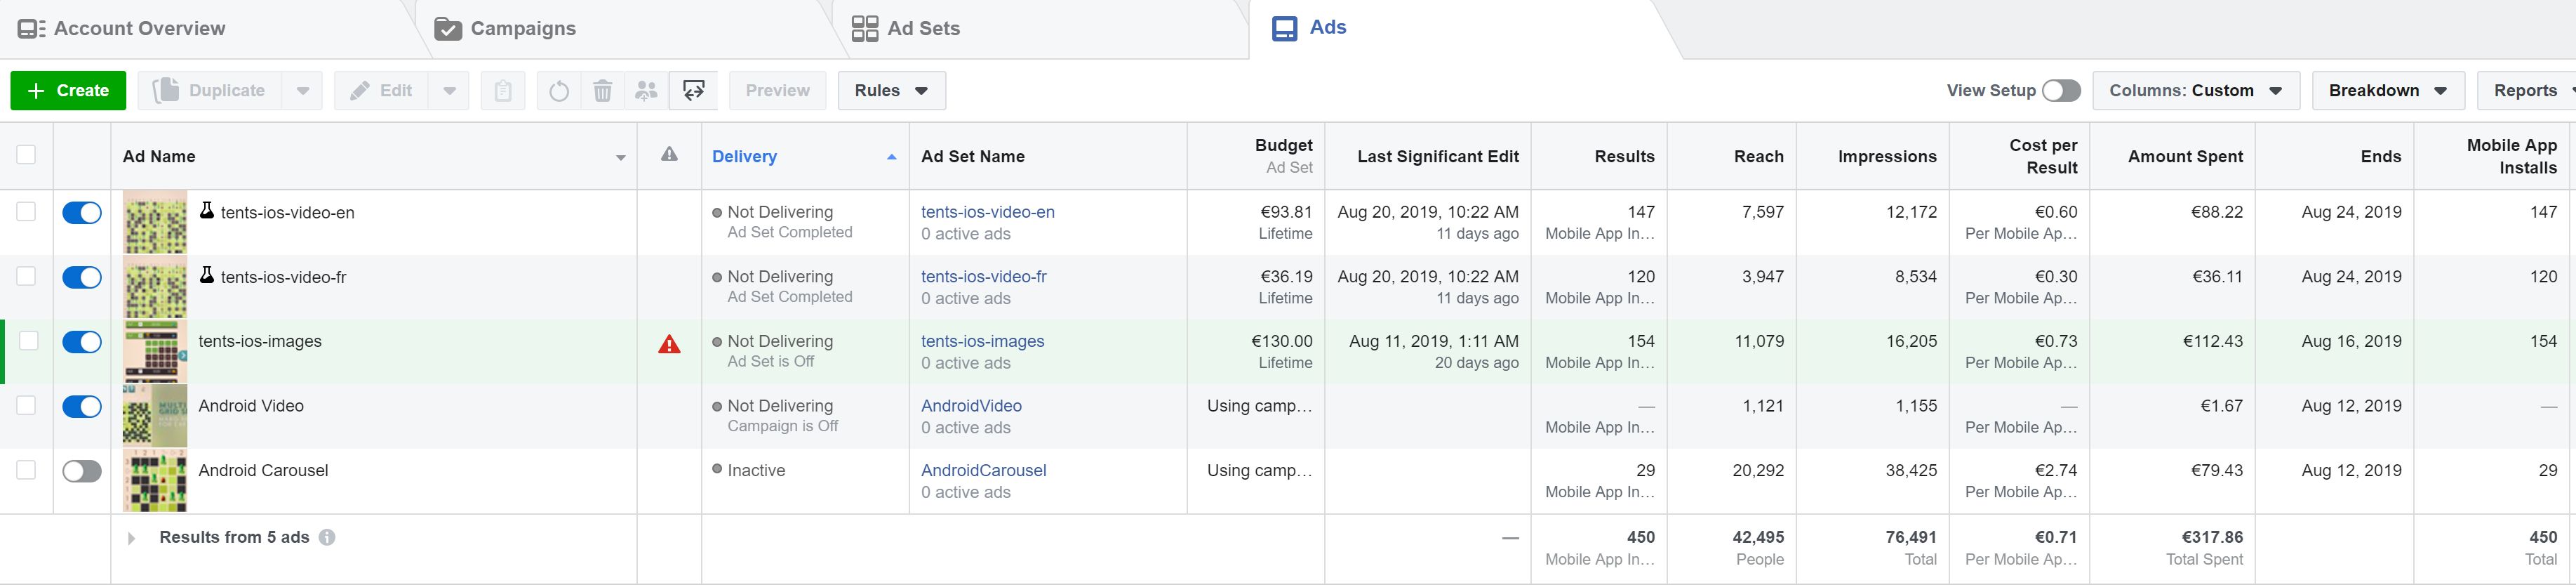
 I set up Google AdWords for Google Play before installing any attribution SDK, because Google Play has tracking integrated into the Google Play Developer Console. Setting up a campaign is not as complete as it was with Facebook. You don’t create precise ads, but just give some hints and resources to create the ad.


 Another important acronym is ROI: return on investment. It’s basically the percentage of revenue from any investment. At 0%, you don’t earn or lose money. In my case, my ROI is about -90%. Of course, I didn’t account for other factors, such as virality of the game. For example, an acquired player can talk about the game to some friends and bring more organic downloads (also called the k-factor). I recently made an update to my game to add a “share” button to help improve the virality of the game. I can even use FreeAppAnalytics to track installs coming from the share button.
 Blue & Mega Pidgeot
 Crasher Wake & Floatzel
 Phoebe & Dusclops


