The Whisperer - Free GOG Game Login / Register Visit the store page of The Whisperer https://www.gog.com/game/the_whisperer Click Add to cart Click Check out now Verify that the price is 0 Click Pay for your order now Thats it, the game will be added to your account
Posted by: SickProdigy - 08-13-2023, 12:27 AM - Forum: PC Mods
- No Replies
This scanner will read your animal population file and show what's in it.
Find out if your map is as empty as you think or if you've just been looking in the wrong places.
With live mode to see your kills and the resulting re-spawns in real time while you hunt.
Animal Population Scanner
This scanner will read your animal population file and show what's in it. The file is opened read-only, so the population is not changed. It is still a good idea to back up your save game files regularly.
Some things you should probably know:
Installation
This is a stand-alone utility. It does not modify the game and doesn't require the game to run. Extract the whole folder (not just the exe) to wherever you like and start the app.
Note1: You need to have an archive tool installed like 7zip.
Note2: Do extract it to you local drive. Don't run the app from inside the 7zip explorer window!
Where can I find the population files?
For most users they should be located in the save game folder:
The difficulty rating is based on the animals weight. I used the data available on the internet to map the weight to the difficulty rating as good as possible, but there will be mismatches. Please report those mismatches to help improve this software.
Trophy Rating
The trophy rating stored in the population file is used to predict the medal. However, for animals with TruRACS this value is slightly randomized when the TruRACS is generated. This can result in incorrect medal predictions for animals that are close to the threshold. This goes both ways, a predicted diamond might end up as Gold, but a Gold with a high TR can still turn out as a Diamond.
Anyway, for the vast majority of cases, the prediction is correct.
The Map
The map displays your already discovered need zones for the selected species using colored spots. It will even display need zones that are no longer visible in-game due to 'stacking'.
In live mode, the map will also display your current position. In addition, need zones that are active at the current time will be displayed with icons of the species. There is a filter available to display only specific species.
RePopulation List
The list labeled 'RePopulation' is used by the game to store animals that were killed. Perhaps it was originally intended to serve as a pool for re-populating the map. And sometimes when new animals spawn, some entries are removed from the RePopulation list. Most of the time, however, that's not the case, and the list just keeps getting longer. Maybe it's a bug, maybe they changed it intentionally. Make up your own mind.
Note that the list contains many duplicate entries. They are the games doing, not the scanner.
What do those green entries mean?
The green entries are:
1.) Animals that spawned in the current session (when live mode is active) and/or
2.) Animals spawned since a previous session (when you are comparing with an older population file).
You get a summary of those when you click on the "Spawned" label in the bottom left corner of the scanner.
Credits:
A big thank you to Rick Gibbed for sharing his work on the Just Cause 3 tools. It's been a tremendous help in understanding the ADF format.
Shout-out to u/Wingged whose post inspired me to start this project.
Kudos to 0xSthSth1337 for cracking the fur type algorithm.
A tool that allows anyone to change the animal population on all the reserves in the game.
WARNING:
If you use a mod that increases the chances of rare furs, then changing furs with this tool will not work.
OVERVIEW
A tool that allows anyone to change the animal population on all the reserves in theHunter: Call of the Wild (COTW).
This tool can make all species a diamond, the appropriate species a Great one, or have a rare fur.
The following mods are possible with this tool:
Make an animal a Great One.
Make an animal a Diamond.
Make an animal have a rare fur.
Make a female a male.
Make a male a female.
LIMITATIONS
This tool was tested on Windows 11 with the game installed via Steam. It is smart enough to also look where Epic Games saves its files too. If your game files are saved somewhere else besides where Steam or Epic saves them, use the "Configure Game Path" in the GUI.
The species that use the newer TruRACS trophy system may not become a diamond. This is an area where I am still doing research to figure out how exactly to manipulate.
INSTRUCTIONS
Use APC to mod the animal population.
Use the mod file manager built into the tool to load the mod or manually copy the population file.
That's it. Launch the game, and enjoy your modded animals.
The modded population files can be found in the "mods" folder in same directory that you are running the tool.
NOTES
This tool was tested on Windows 11 with the game installed via Steam. Moreover, this code was built and tested with Python 3.10.10.
You can find all the documentation for the tool on GitHub. In the files section, I will include the Python wheel file and a file containing an executable (exe) to be run on any Windows machine.
Posted by: SickProdigy - 08-12-2023, 07:25 PM - Forum: PC Mods
- No Replies
This is a save file of mine, which is a Level 60 female with (almost) empty storage for you to fill in as you desire.
I created this file for myself because I lost my save and along the way decided to clean out the guns I bought but seldom used as well.
When I was done, I thought that maybe other people might want something like this as well so I decided to share it.
I tried to copy what I already had as close as I can, so everything isn't unlocked for this save.
If you hunt with rifles/shotguns most of the time like me, you'll be fine because everything will be unlocked.
The handgun and bow hunters will however have to grind some more again.
Handgun score in here should be enough to at least get the handgun scope,
but you're going to grind to unlock almost every bow stuffs again if you like to hunt with bow.
The storage, as I've mentioned above is almost empty.
Counting out the .243, .270 and starter handgun/shotgun, the only weapons purchased in this save is 7mm Empress and Hudzik muzzleloader that I used to speed up the process.
To help you fill up the empty storage with ease, about 140k cash is also included which will be enough to buy a lot of guns.
How to install this save:
Go to My Documents > Avalanche Studios > COTW > Saves > 7XXXXX... (A random set of numbers that probably starts with 7 or 1),
and locate a file called "thp_player_profile_adf" <--- This is your profile file, and this is where your levels/weapons scores/etc. are kept. Copy that file to wherever you want to keep it as a backup (for your own safety), then copy my save file and write over the existing file.
Systems management can be a difficult task. Not only does one need to determine what the end state should be but, more importantly, how to ensure systems attain and remain at this state. Doing so in an automated fashion is just as critical, because there may be a large number of target instances. In regard to enterprise Java middleware application servers, these instances are typically configured using a set of XML based files. Although these files may be manually configured, most application servers have a command-line based tool or set of tools that abstracts the end user from having to worry about the underlying configuration. WebSphere Liberty includes a variety of tools to manage these resources, whereas JBoss contains the jboss-cli tool.
Although each tool accomplishes its utilitarian use case as it allows for proper server management, it does fail to adhere to one of the principles of automation and configuration management: idempotence. Ensuring the desired state does not equate to executing the same action with every iteration. Additional intelligence must be introduced. Along with idempotence, another core principle of configuration management is that values be expressed declaratively and stored in a version control system.
Jcliff is a Java-based utility that is built on top of the JBoss command-line interface and allows for the desired intent for the server configuration to be expressed declaratively, which in turn can be stored in a version control system. We’ll provide an overview of the Jcliff utility including inherent benefits, installation options, and several examples showcasing the use.
The problem space
Before beginning to work with Jcliff, one must be cognizant of the underlying JBoss architecture. The configuration of the JBoss server can be expressed using Dynamic Model Representation (DMR) notation. The following is an example of DMR:
The DMR example above describes several Java system properties that will be stored within the JBoss configuration. These properties can be added using the JBoss CLI by executing the following command:
Where Jcliff excels is that it includes the necessary intelligence to determine the current state of the JBoss configuration and then applying the appropriate configurations necessary. This is critical to adopting proper configuration management when working with JBoss.
Installing Jcliff
With a baseline understanding of Jcliff, let’s discuss the methods in which one can obtain the utility. First, Jcliff can be built from source from the project repository, given that it’s a freely open source project. Alternatively, Jcliff can be installed using popular software packaging tools in each of the primary operating system families.
Linux (rpm)
Jcliff can be consumed on a Linux package when capable of consuming an rpm using a package manager.
Once this repository has been added, JCliff can be installed by using Yum or Dnf:
Using yum:
$ sudo yum install jcliff
Or using dnf:
$ sudo dnf install jcliff
Manual installation
Jcliff can also be installed manually without the need to leverage a package manager. This is useful for those on Linux distributions that cannot consume rpm packages. Simply download and unpack the archive from the release artifact from the project repository.
Place the resulting Jcliff folder in the destination of your choosing. This location is known as JCLIFF_HOME. Add this environment variable and add it to the path as described below:
At this point, you should be able to execute the jcliff command.
OSX
While users on OSX can take advantage of the manual installation option, those making use of the brew package manager can use this tool as well.
Execute the following commands to install Jcliff using Brew:
$ brew tap redhat-cop/redhat-cop $ brew install redhat-cop/redhat-cop/jcliff
Windows
Fear not, Windows users; you can also make use of Jcliff without having to compile from source. Windows, in the same vein as OSX, does not have an official package manager, but Chocolatey has been given this role.
Execute the following command to install Jcliff using Chocolatey:
$ choco install jcliff
Using Jcliff
With Jcliff properly installed on your machine, let’s walk through a simple example to demonstrate the use of the tool. As discussed previously, Jcliff makes use of files that describe the target configuration. At this point, you may have questions like: What is the format of these configurations, and where do I begin?
Let’s take a simple example and look into adding a new system property to the JBoss configuration. Launch an instance of JBoss and connect using the JBoss command-line interface:
$ /bin/jboss-cli.sh --connect [standalone@localhost:9990 /] ls /system-property [standalone@localhost:9990 /]
Now, use Jcliff to update the configuration. First, we’ll need to create a Jcliff rule. The rule resembles DMR format and appears similar to the following:
To demonstrate how Jcliff handles repetitive executions, run the previous Jcliff command again. Inspect the output.
$ jcliff jcliff-prop Jcliff version 2.12.4 2019-10-02 17:05:34:0107: /core-service=platform-mbean/type=runtime:read-attribute(name=system-properties)
Notice that only 1 command was executed against the JBoss server instead of two? This action was a result of assessing the current state within JBoss and determining that no action was necessary to reach the desired state. Mission accomplished.
Next steps
Although the preceding scenario was not overly complex, you should now have the knowledge necessary to understand the capabilities and functionality of the Jcliff utility as well as the benefits afforded through declarative configurations and automation. When building out enterprise-grade systems, however, Jcliff would not be executed manually. You would want to integrate the utility into a proper configuration management tool that employs many of the automation and configuration principles described earlier. Fortunately, Jcliff has been integrated into several popular configuration management tools.
In an upcoming article, we’ll provide an overview of the configuration management options available with Jcliff, along with examples that will allow you to quickly build out enterprise-grade confidence with Jcliff.
[Oracle Blog] Optimize Java Applications and Simplify Uptaking New JDK Versions with
New Java Management Service (JMS) features help system administrators get the most value of their Java applications recommending performance optimizations and simplifying the uptake of new JDK versions
Posted by: xSicKxBot - 08-12-2023, 08:48 AM - Forum: Python
- No Replies
[Tut] Auto-GPT vs ChatGPT: Key Differences and Best Use Cases
5/5 – (1 vote)
Artificial intelligence has brought us powerful tools to simplify our lives, and among these tools are Auto-GPT and ChatGPT. While they both revolve around the concept of generating text, there are some key differences that set them apart.
Auto-GPT, an open-source AI project, is built on ChatGPT’s Generative Pre-trained Transformers, giving it the ability to act autonomously without requiring continuous human input. It shines in handling multi-step projects and demands technical expertise for its utilization.
On the other hand, ChatGPT functions as an AI chatbot that provides responses based on human prompts. Although it excels at generating shorter, conversational replies, it lacks the autonomy found in Auto-GPT.
In this article, we’ll dive deeper into the distinctions and possible applications of these two groundbreaking technologies.
Overview of Auto-GPT and ChatGPT
This section provides a brief overview of Auto-GPT and ChatGPT, two AI technologies based on OpenAI’s generative pre-trained transformer (GPT) models. We will discuss the differences between these AI tools and their functionalities.
Auto-GPT
Auto-GPT, an open-source AI project, harnesses the power of GPT-4 to operate autonomously, without requiring human intervention for every action.
Developed by Significant Gravitas and posted on GitHub on March 30, 2023, this Python application is perfect for completing tasks with minimal human oversight. Its primary goal is to create an AI assistant capable of tackling projects independently.
This sets it apart from its predecessor, ChatGPT, in terms of autonomy.
ChatGPT
ChatGPT, built on the GPT-3.5 and GPT-4 models, is a web app designed specifically for chatbot applications and optimized for dialogue. It’s developed by OpenAI, and its primary focus lies in generating human-like text conversationally.
By leveraging GPT’s potential in language understanding, it can perform tasks such as explaining code or composing poetry. ChatGPT mainly relies on AI agents to produce text based on input prompts given by users, unlike Auto-GPT, which operates autonomously.
TLDR; While both Auto-GPT and ChatGPT use OpenAI’s large language models, their goals and functionalities differ. Auto-GPT aims for independent task completion, while ChatGPT excels in conversational applications.
Main Features
Auto-GPT and ChatGPT, both AI-driven tools, have distinct features that cater to various applications. Let’s dive into the main features of these two innovative technologies.
Auto-GPT: Autonomy and Decision-Making
Auto-GPT is an open-source AI project designed for task-oriented conversations.
Its core feature is its ability to act autonomously without requiring constant prompts or input from human agents. This enables Auto-GPT to make decisions on its own and efficiently complete tasks.
It leverages powerful language models like GPT-3.5 and GPT-4 to generate detailed responses, making it ideal for applications where automation and decision-making are crucial.
For more information about Auto-GPT, check out this Finxter article:
ChatGPT, on the other hand, is an AI tool optimized for generating general-purpose responses in chatbot applications and APIs.
Although it shares some similarities with Auto-GPT, it requires more detailed prompts from human agents to engage in meaningful conversations. ChatGPT uses large language models (LLMs) like GPT-4 to produce accurate and relevant responses in various dialogue contexts.
Its flexibility and vast knowledge base make it an excellent choice for chatbot applications that need a more human-like touch. You can learn more about ChatGPT here.
While both Auto-GPT and ChatGPT offer unique advantages, their applications differ based on users’ needs. Auto-GPT suits those looking for more automation and autonomy, while ChatGPT caters to developers seeking a more interactive and human-like AI tool.
Technical Details
API and API Keys
Auto-GPT and ChatGPT both utilize OpenAI APIs to interact with their respective systems. To access these APIs, users need an OpenAI API key.
These keys ensure proper usage, security, and authentication for the applications making the requests to the systems. Make sure to obtain the necessary API keys from the service providers to use Auto-GPT or ChatGPT.
Python and Open-Source
Both Auto-GPT and ChatGPT are built on open-source frameworks, making it easier for developers to access and modify the code.
Python is the primary programming language for these projects, as it’s user-friendly and widely adopted in the AI and machine learning community. Using Python enables seamless integration and implementation in various applications.
GitHub and Experimental Projects
For those interested in the cutting-edge developments and experimental projects involving Auto-GPT and ChatGPT, GitHub is the place to go.
Many experimental projects reside on GitHub repositories, allowing users to explore and contribute to the ongoing advancements in these technologies.
Stay curious and engaged to stay ahead in the AI landscape . You can do so by following me regular email tech updates focused on exponential technologies such as ChatGPT and LLMs. Simply download our cheat sheets:
Architecture and Decision-Making
Auto-GPT and ChatGPT are both built on Generative Pre-trained Transformers (GPT), but there are differences in their decision-making abilities and autonomy levels. This section explores these aspects, showing how these AI models differ in terms of software and potential applications.
Auto-GPT is an open-source AI project focused on task-oriented conversations, with more decision-making powers than ChatGPT . It’s designed to break a goal into smaller tasks and use its decision-making abilities to accomplish the objective. Auto-GPT benefits from using GPT-3.5 and GPT-4 text-generating models, providing it with a higher level of autonomy compared to ChatGPT (source).
ChatGPT, on the other hand, is tailored for generating general-purpose responses in a conversational context . It is trained on extensive text data, including human-to-human conversations, and excels at producing human-like dialogue. ChatGPT relies on GPT architecture, but its focus is more on interaction than decision-making (source).
Auto-GPT’s enhanced decision-making capabilities position it as a possible contender in pursuing artificial general intelligence (AGI) . Its better memory and ability to construct and remember longer chains of information make it a formidable tool in more complex tasks (source).
Both Auto-GPT and ChatGPT have their unique strengths and areas of focus. Auto-GPT’s edge lies in its decision-making processes and task-oriented nature, while ChatGPT thrives in generating natural-sounding text for general conversation. The right choice depends on the specific application or requirement in hand.
User Interface and Experience
The user interface and experience allow users to interact with Auto-GPT and ChatGPT more efficiently and effectively. This section covers the various ways users can access and engage with these AI tools to ensure smooth interaction.
Browser Access
Both Auto-GPT and ChatGPT offer convenient browser-based access, enabling users to use these tools without the need for technical knowledge or any additional software installation.
Yeah, you shouldn’t try to install Auto-GPT on your own machine, frankly. You should access it via a browser-based website – just google “Auto-GPT browser” and take the latest one.
A simple visit to their respective websites allows users to start benefiting from the power of these AI models. Experience smooth and efficient conversation with these AI chatbots right on your browser.
Docker and Mobile Accessibility
For those seeking greater flexibility and customization, Docker containerization is an option.
Docker enables users to deploy and manage both Auto-GPT and ChatGPT more efficiently, meeting individual needs and configuration preferences. IN fact, Docker is the recommended way to install Auto-GPT as shown in my article here:
Additionally, mobile accessibility helps users on the go, with platforms like Google’s Android, ensuring personal assistant services are just a tap away.
User-Friendly Platforms
Understanding the importance of user-friendly interfaces, both Auto-GPT and ChatGPT developers emphasize creating straightforward and easily navigable platforms.
This focus on accessibility helps users, including those with limited technical expertise, to interact with the AI models successfully. Clear instructions, well-organized layouts, and intuitive design elements contribute to the overall positive experience.
Applications and Use Cases
Natural Language Processing and Content Creation
Auto-GPT and ChatGPT both excel in natural language processing tasks, making them powerful tools for content creation .
Auto-GPT is designed for multi-step projects and requires programming knowledge, while ChatGPT is more suitable for shorter, conversational prompts, making it a great chatbot solution.
With the help of the Pinecone API, both AI tools can efficiently generate high-quality content for creative and professional needs.
Social Media Management and Multi-Step Projects
In the realm of social media management, AI tools like Auto-GPT can streamline tasks, such as posting updates and engaging with followers .
Its ability to handle multi-step projects makes it an ideal choice for group projects needing assistance with task completion and workflow management.
ChatGPT, on the other hand, works best for fast and natural responses, engaging users and enhancing their experience.
Personal Assistants and Companion Robots
Both Auto-GPT and ChatGPT have the potential to bring personal assistant apps and companion robots to life .
Their language models can be used for password management, credit card information handling, and even Pinecone API key management. While
ChatGPT is driven by human prompts, Auto-GPT’s independence allows it to make decisions and simplify everyday tasks. As AI technology continues to improve, these tools can revolutionize the way we interact with the digital world.
Auto-GPT offers increased autonomy compared to ChatGPT as it doesn’t always require human input. This means it can be more useful for certain tasks where constant human guidance isn’t needed or feasible. However, this autonomy can also lead to an increased likelihood of inaccuracies and mistakes, since there is less human oversight to correct errors (source). Also, it quickly evolves as ChatGPT builds out the plugins functionality.
When it comes to complex projects, Auto-GPT has a slight edge as it is designed to handle more complex and multi-stage projects, unlike ChatGPT which is more suited for short projects and mid-length writing assignments (source).
In terms of ease of use, both Auto-GPT and ChatGPT can be user-friendly, but the level of required technical expertise may vary depending on the specific use case or implementation. Users may find one to be more accessible than the other depending on their technical background and familiarity with AI models. Auto-GPT is also way harder to install.
As for the technological limitations, both Auto-GPT and ChatGPT share similar constraints as they are both built on GPT-based models. These limitations include potential biases, inaccuracies, hallucinations, and issues that stem from the training data used in their development. The complexity of the autonomous Auto-GPT model also leads to specific technical limitations such as getting stuck in infinite loops.
Customer satisfaction may vary depending on the implementation and end-user needs. Users may find value in both models, but ultimately, the satisfaction level will depend on the specific requirements and desired outcomes of their AI-powered projects.
TLDR;
Auto-GPT and ChatGPT each have their pros and cons related to autonomy, scalability, ease of use, technological limitations, and customer satisfaction.
Auto-GPT builds on GPT and designs prompts, then tries to access information from the internet.
The additional complexity leads to possible issues such as infinite action-feedback loops or high costs but it cannot really be held against them—after all, the additional complexity brings a massive advantage: being able to act autonomously and for a long period of time unlike ChatGPT which needs a human prompt.
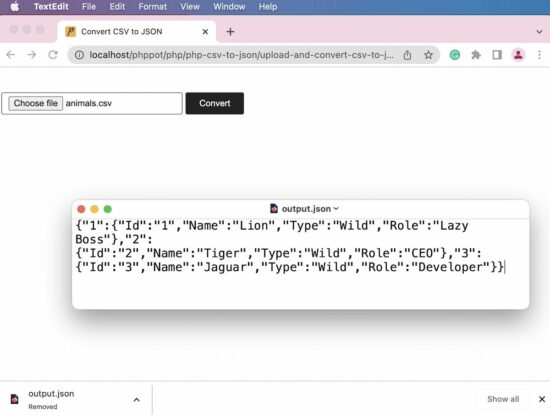
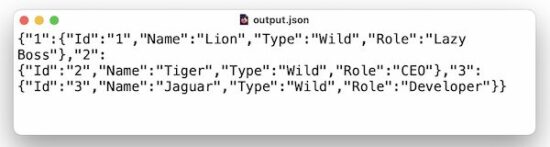
JSON format is a widely used format while working with API development. Most of the existing API responses are in JSON format.
Converting CSV content into a JSON format is simple in PHP. In this article, we will see different methods of achieving this conversion.
Quick example
<?php $csvFileContent= file_get_contents("animals.csv");

// Converts the CSV file content into line array $csvLineArray = explode("\n", $csvFileContent);

// Forms row results in an array format

$result = array_map("str_getcsv", $csvLineArray);

$jsonObject = json_encode($result);

print_r($jsonObject);

?>
The above quick example in PHP converts the CSV file content into JSON with few lines of code.
First, it reads the .csv file content using the PHP file_get_contents() function.
It explodes the CSV row by the new line (\n) escape sequence.
Then, it iterates the line array and reads the line data of the CSV row.
Finally, the resultant CSV row array is converted to JSON using the json_encode() function.
In step 3, the iteration happens with a single line of code. This line maps the array to call PHP str_getcsv to parse and convert the CSV lines into an array.
[www.indiegala.com] The beloved and critically acclaimed Ghostbusters video game is back! Join the Ghostbusters team, fight monsters, capture ghosts, search for artifacts and have a blast destroying almost everything around you in this Remastered version of the third-person adventure Ghostbusters: The Video Game. https://www.youtube.com/watch?v=CUHjGQy0XDs&ab_channel=SaberInteractive
(Free Game Key) Train Valley 2 - Free Epic Games Game
Train Valley 2
To grab the game for free: - Go to the store page of Train Valley 2 - https://store.epicgames.com/p/train-valley-2-3606da - Click on the GET Button - Verify that the price is zero - Click on the Place Order Button - That's it, the game will be added to you Epic Games Account



![[Image: 41-1690563368-61410226.png]](https://staticdelivery.nexusmods.com/mods/3158/images/41/41-1690563368-61410226.png)
![[Image: 248629158-47bec7aa-a978-4cc7-8fd0-dfeaea8e6777.gif]](https://user-images.githubusercontent.com/2107385/248629158-47bec7aa-a978-4cc7-8fd0-dfeaea8e6777.gif)




 Recommended:


 .
.  . You can do so by following me regular email tech updates focused on exponential technologies such as ChatGPT and LLMs. Simply download our cheat sheets:

 . It’s designed to break a goal into smaller tasks and use its decision-making abilities to accomplish the objective. Auto-GPT benefits from using GPT-3.5 and GPT-4 text-generating models, providing it with a higher level of autonomy compared to ChatGPT (
 . Its better memory and ability to construct and remember longer chains of information make it a formidable tool in more complex tasks (


 .
. 
 When it comes to complex projects, Auto-GPT has a slight edge as it is designed to handle more complex and multi-stage projects, unlike ChatGPT which is more suited for short projects and mid-length writing assignments (
 In terms of ease of use, both Auto-GPT and ChatGPT can be user-friendly, but the level of required technical expertise may vary depending on the specific use case or implementation. Users may find one to be more accessible than the other depending on their technical background and familiarity with AI models.
  As for the technological limitations, both Auto-GPT and ChatGPT share similar constraints as they are both built on GPT-based models. These limitations include potential biases, inaccuracies,