The game is free to keep if claimed by: Thursday, 9th March 2023 18:00 UTC
We are welcoming everyone to join our discord[discord.gg]. We are more active there in finding giveaways, small or large, and there are daily raffles you can participate.
Bigger and better than ever, Company of Heroes 3 combines heart-pounding combat with deeper strategic choices in a stunning Mediterranean theatre of war. In Company of Heroes 3, every battle tells a story...what's yours?
Brutal, crazy, tactical... this is BLOOD BOWL! The iconic death sport returns with the new video game of fantasy football faithfully using the latest board game rules and new content.Create your team, then crush, mulch and cheat your way to the top... leaving your opponents in the graveyard.
Posted by: xSicKxBot - 03-01-2023, 06:10 AM - Forum: Python
- No Replies
ModuleNotFoundError: No Module Named OpenAI
5/5 – (1 vote)
Quick Fix: Python raises the ImportError: No module named 'openai' when it cannot find the library openai. The most frequent source of this error is that you haven’t installed openai explicitly with pip install openai. Alternatively, you may have different Python versions on your computer, and openai is not installed for the particular version you’re using.
Before I dive into the tutorial, try out one of the following solutions (quick fix):
# ✅ Python 2 or Virtual Environment pip install openai # ✅ Python 3
pip3 install openai # ✅ Python 3.10
pip3.10 install openai # ✅ If you get a Permission Error
sudo pip3 install openai # ✅ If pip is not in your PATH environment variable
python -m pip install openai # ✅ Python 3 if pip is not in your PATH
python3 -m pip install openai # ✅ Python 3.10 if pip is not in your PATH
python3.10 -m pip install openai # ✅ Anaconda
conda install -c conda-forge openai
Problem Formulation
You’ve just learned about the awesome capabilities of the openai library and you want to try it out, so you start your code with the following statement:
import openai
This is supposed to import the OpenAI library into your (virtual) environment. However, it only throws the following ImportError: No module named 'openai':
>>> import openai

Traceback (most recent call last): File "<pyshell#6>", line 1, in <module> import openai

ModuleNotFoundError: No module named 'openai'
Solution Idea 1: Install Library OpenAI
The most likely reason is that Python doesn’t provide openai in its standard library. You need to install it first!
To fix this error, you can run the following command in your Windows shell:
$ pip install openai
This simple command installs openai in your virtual environment on Windows, Linux, and MacOS. It assumes that your pip version is updated. If it isn’t, use the following two commands in your terminal, command line, or shell (there’s no harm in doing it anyways):
Note: Don’t copy and paste the $ symbol. This just illustrates that you run it in your shell/terminal/command line.
Solution Idea 2: Fix the Path
The error might persist even after you have installed the openai library. This likely happens because pip is installed but doesn’t reside in the path you can use. Although pip may be installed on your system the script is unable to locate it. Therefore, it is unable to install the library using pip in the correct path.
To fix the problem with the path in Windows follow the steps given next.
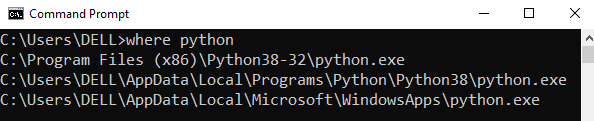
Step 1: Open the folder where you installed Python by opening the command prompt and typing where python
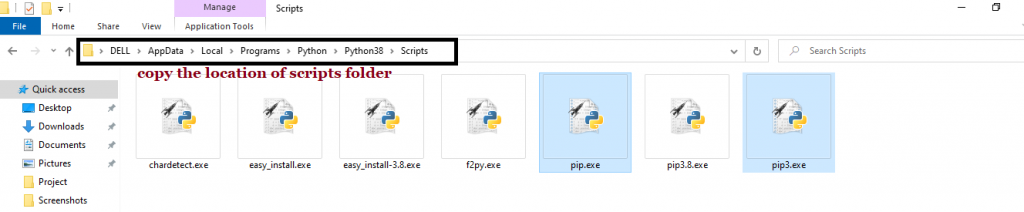
Step 2: Once you have opened the Python folder, browse and open the Scripts folder and copy its location. Also verify that the folder contains the pip file.
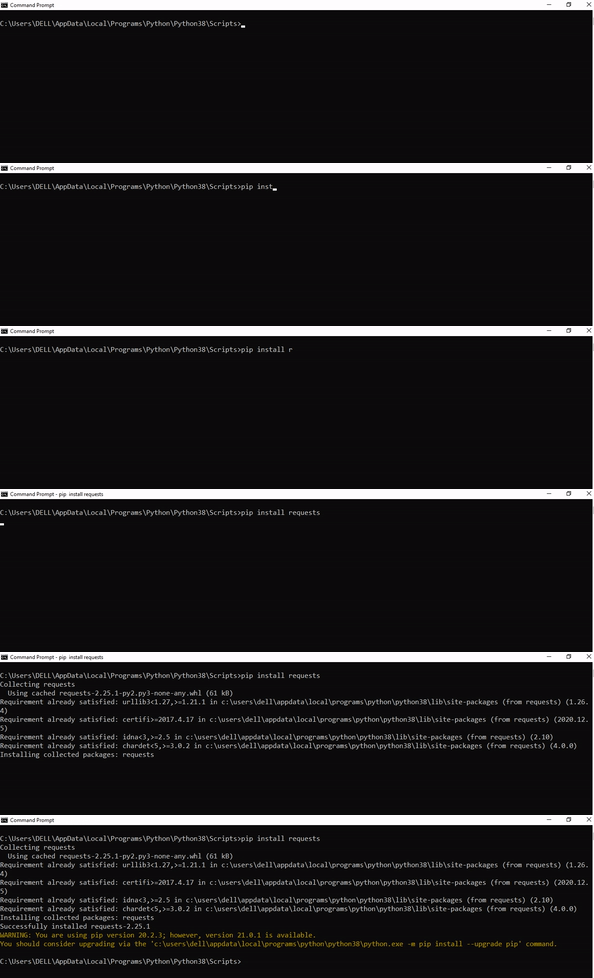
Step 3: Now open the Scripts directory in the command prompt using the cd command and the location that you copied previously.
Step 4: Now install the library using pip install openai command. Here’s an analogous example:
After having followed the above steps, execute our script once again. And you should get the desired output.
Other Solution Ideas
The ModuleNotFoundError may appear due to relative imports. You can learn everything about relative imports and how to create your own module in this article.
You may have mixed up Python and pip versions on your machine. In this case, to install openai for Python 3, you may want to try python3 -m pip install openai or even pip3 install openai instead of pip install openai
If you face this issue server-side, you may want to try the command pip install --user openai
If you’re using Ubuntu, you may want to try this command: sudo apt install openai
You can also check out this article to learn more about possible problems that may lead to an error when importing a library.
Understanding the “import” Statement
import openai
In Python, the import statement serves two main purposes:
Search the module by its name, load it, and initialize it.
Define a name in the local namespace within the scope of the import statement. This local name is then used to reference the accessed module throughout the code.
What’s the Difference Between ImportError and ModuleNotFoundError?
What’s the difference between ImportError and ModuleNotFoundError?
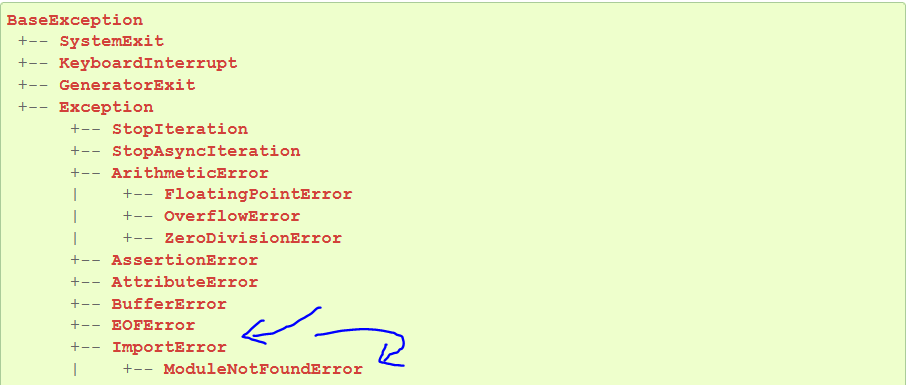
Python defines an error hierarchy, so some error classes inherit from other error classes. In our case, the ModuleNotFoundError is a subclass of the ImportError class.
You can see this in this screenshot from the docs:
You can also check this relationship using the issubclass() built-in function:
Specifically, Python raises the ModuleNotFoundError if the module (e.g., openai) cannot be found. If it can be found, there may be a problem loading the module or some specific files within the module. In those cases, Python would raise an ImportError.
If an import statement cannot import a module, it raises an ImportError. This may occur because of a faulty installation or an invalid path. In Python 3.6 or newer, this will usually raise a ModuleNotFoundError.
Related Videos
The following video shows you how to resolve the ImportError:
How to Fix “ModuleNotFoundError: No module named ‘openai’” in PyCharm
If you create a new Python project in PyCharm and try to import the openai library, it’ll raise the following error message:
Traceback (most recent call last): File "C:/Users/.../main.py", line 1, in <module> import openai

ModuleNotFoundError: No module named 'openai' Process finished with exit code 1
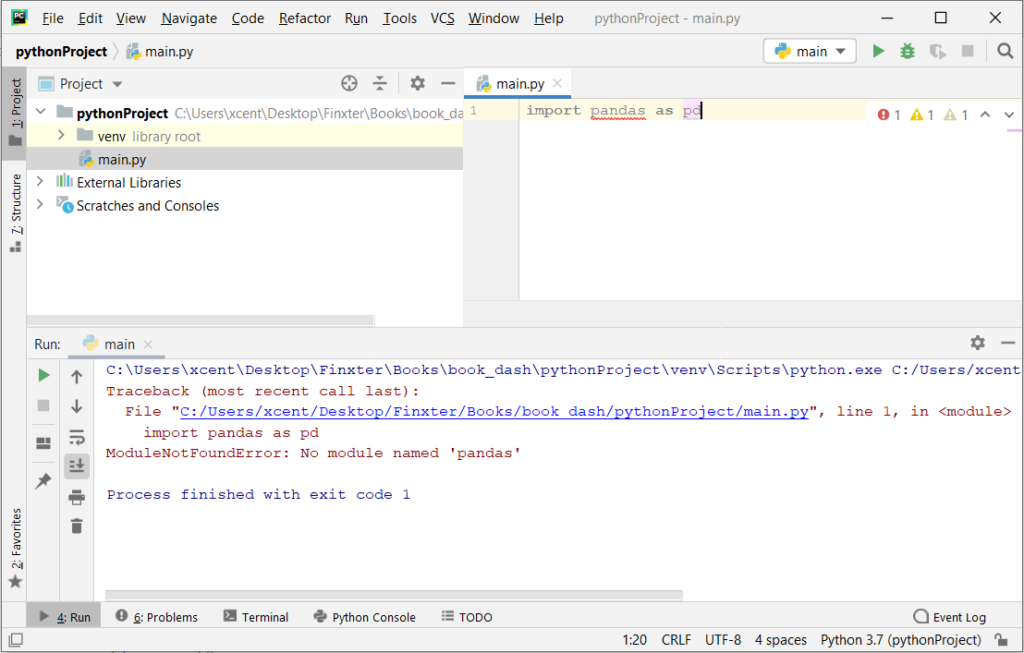
The reason is that each PyCharm project, per default, creates a virtual environment in which you can install custom Python modules. But the virtual environment is initially empty—even if you’ve already installed openai on your computer!
Here’s a screenshot exemplifying this for the pandas library. It’ll look similar for openai.
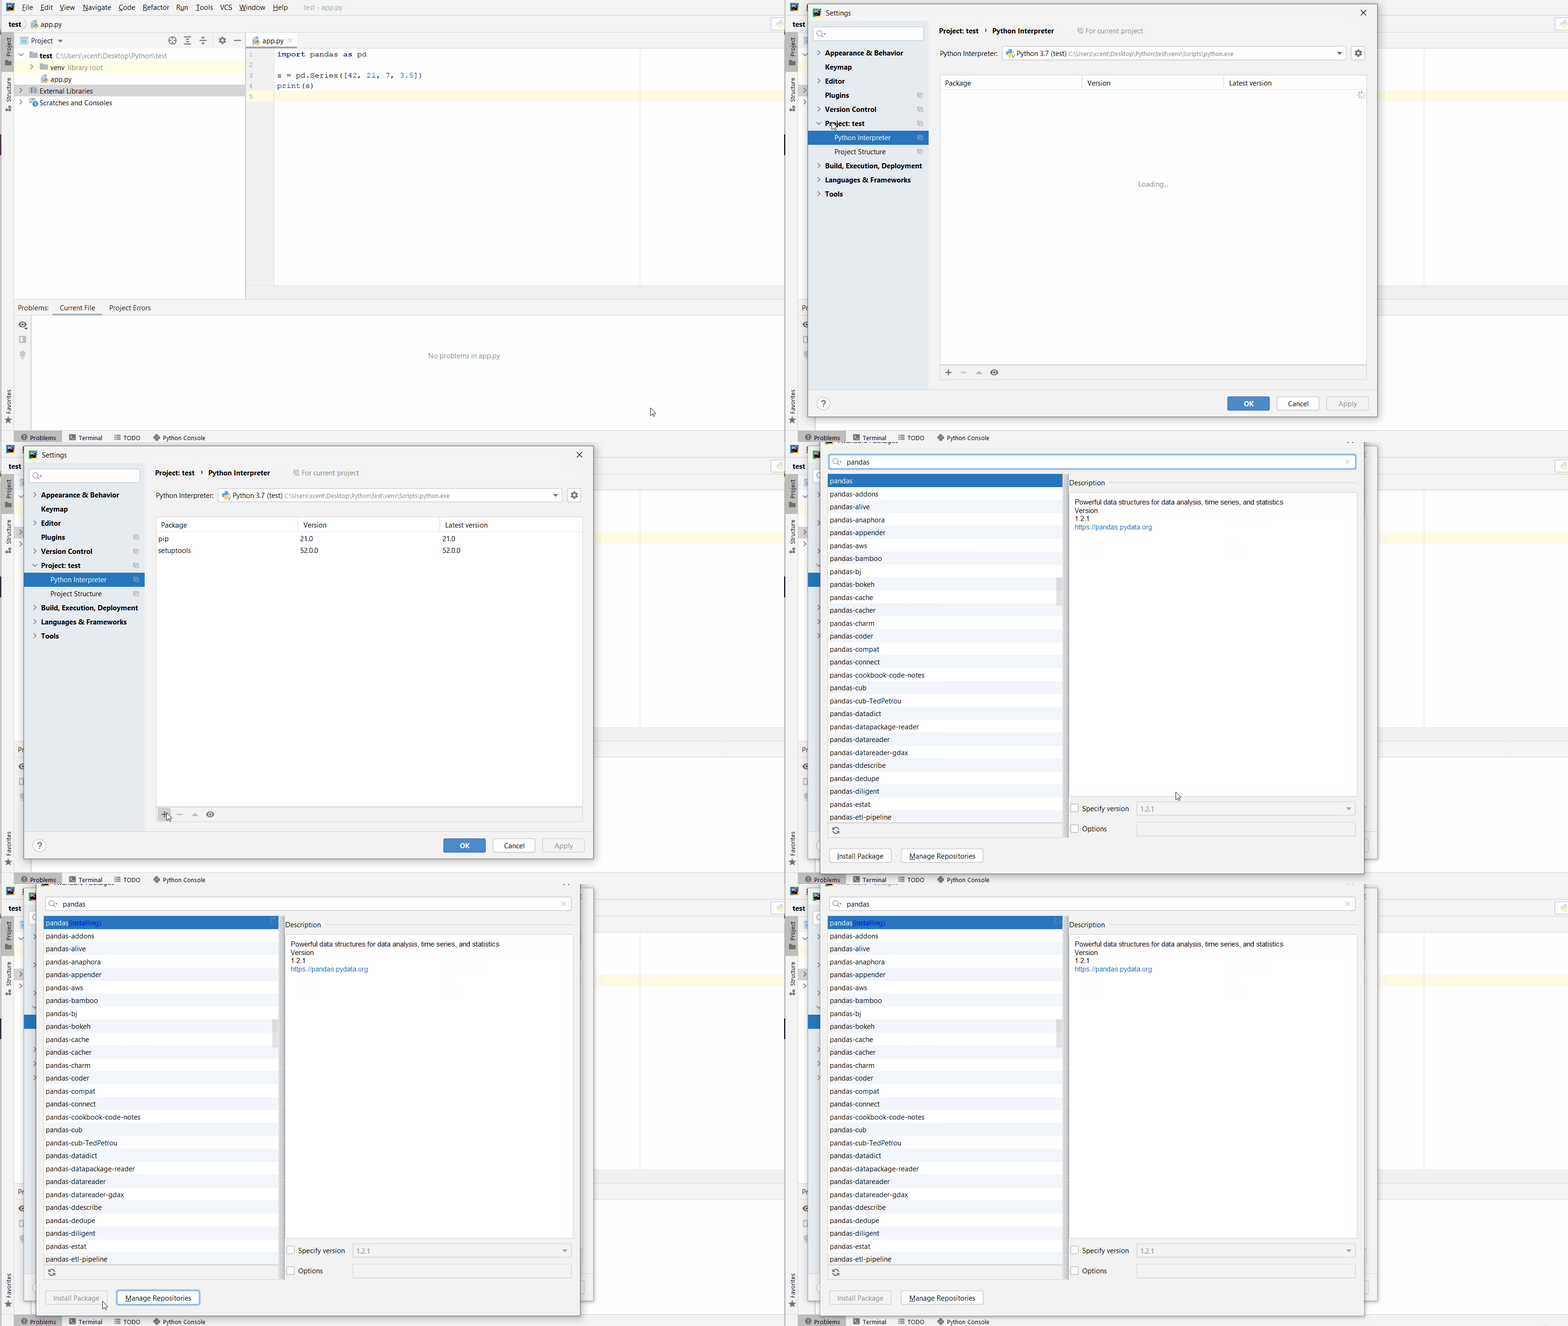
The fix is simple: Use the PyCharm installation tooltips to install OpenAI in your virtual environment—two clicks and you’re good to go!
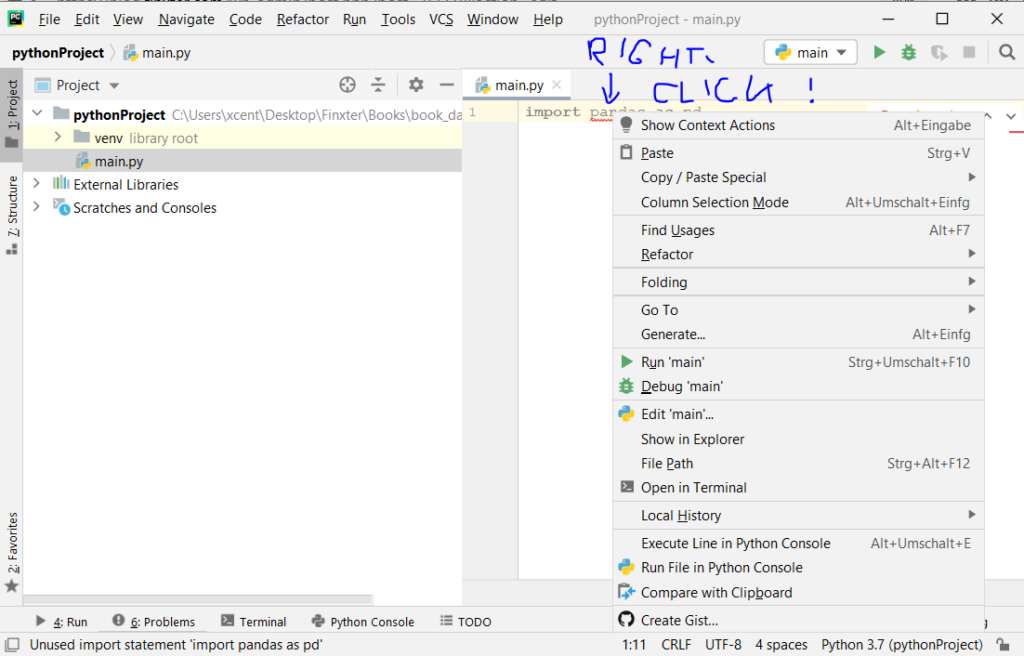
First, right-click on the openai text in your editor:
Second, click “Show Context Actions” in your context menu. In the new menu that arises, click “Install OpenAI” and wait for PyCharm to finish the installation.
The code will run after your installation completes successfully.
As an alternative, you can also open the Terminal tool at the bottom and type:
Descending suddenly on the world, the macabre Mort armies destroy nation after nation, leaving humanity decimated in their wake. Among the forces resisting the Mort is a small band of mercenaries known as the Ashen Hawk Brigade.
Redemption Reapers is a dark fantasy simulation game set in a medieval world. Be immersed in the tale of the desperate struggle between the Ashen Hawk Brigade and the terrifying Mort legions.
With despair looming as the menacing Mort horde marches ever closer, help your small resistance defeat the enemy masses by bringing together a rich variety of character builds and a meticulous strategy. Experience the exhilaration as you rise up to overcome the odds and achieve victory!
CrecenTech is a US based one stop creative company to cater to your marketing, software, support, and staffing solutions requirements Contact us now! Digital marketing services in USA
A key goal of version 3.1 is to ensure the availability of security services on a large range of secure hardware, including smartcards, embedded chips, secure enclaves within microprocessor units (MPUs) and microcontroller units (MCUs), and removable SIMs.
Posted by: xSicKxBot - 02-28-2023, 06:55 AM - Forum: Python
- No Replies
How to Install Pip? 5 Easy Steps
5/5 – (1 vote)
In this article, I’ll quickly guide you through the installation steps for Python’s package installer pip. But first things first:
What Is Pip?
pip is the package installer for Python used to install and manage software packages (also known as libraries or modules) written in Python. pip makes it easy to install, upgrade, and uninstall packages in your Python environment.
When you install a package with pip, it automatically downloads and installs any dependencies required by the package, making it very convenient for managing your Python projects. You can use pip from the command line but it also integrates with popular development environments like Jupyter, PyCharm, and Visual Studio Code.
Is Pip Already Included in Python?
pip is included with Python distributions from version 3.4 onwards, so if you have a recent version of Python installed, you should already have pip.
If you don’t have pip installed, you can easily install it using the steps outlined as follows:
5 Steps to Install Pip Easily
To install pip in Python, follow these steps:
Check if pip is already installed by running the command “pip -V” in your command prompt or terminal. If you see a version number, pip is already installed. If not, proceed to step 2.
Download the get-pip.py script from the official Python website (see below).
Open a command prompt or terminal and navigate to the directory where you downloaded the get-pip.py script.
Run the command python get-pip.py to install pip.
Verify that pip is installed by running the command pip -V.
That’s it! You should now have pip installed and ready to use in your Python environment.
In case you weren’t able to complete step 2, here’s how to do it quickly:
How to Download get-pip.py from Official Python?
To download the get-pip.py script from the official Python website, follow these steps:
This will download the get-pip.py file to your current working directory.
Are There Other Ways to Install Pip?
Yes, there are a few other ways to install pip depending on your operating system and Python distribution.
Here are the three most common methods:
Package managers: Many Linux distributions include pip in their package repositories, which means you can use your distribution’s package manager to install it. For example, on Ubuntu, you can use the following command: sudo apt-get install python-pip.
Python installers: Some Python distributions come with pip pre-installed, such as Anaconda and ActivePython. If you are using one of these distributions, you should already have pip installed.
Python package installer: Another way to install pip is by using the ensurepip module, which is included with Python since version 3.4. You can use the following command: python -m ensurepip --default-pip.
Regardless of the method you choose, it’s always a good idea to verify that pip is installed and working correctly by running the command pip -V.
How to Upgrade Pip?
To upgrade pip to the latest version, follow these steps:
Step 1: Open a command prompt or terminal and enter the following command to upgrade pip:
python -m pip install --upgrade pip
The previous command was for Linux or macOS. For Windows, you may want to use:
py -m pip install --upgrade pip
Step 2: Depending on your system configuration, you may need to run this command with administrator privileges. On Linux or macOS, you can use sudo to run the command as root, like this:
sudo python -m pip install --upgrade pip
Step 3: pip will download and install the latest version of itself. Once the upgrade is complete, you can verify that pip is up to date by running the command:
pip --version
This will display the version number of the newly installed pip.
That’s it! You should now have the latest version of pip installed on your system.
Note that it’s a good idea to keep pip up to date to take advantage of bug fixes, security updates, and new features. You can check for updates to individual packages installed with pip using the pip list --outdated command, and upgrade them with pip install --upgrade <package>.



 Note: Don’t copy and paste the