Posted by: xSicKxBot - 11-16-2022, 11:10 AM - Forum: Lounge
- No Replies
Get A Free $30 Gift Card With Costco Membership Ahead Of Black Friday
If you’re looking for some of the best Black Friday deals of 2022, you’ll need to keep an eye on Costco. The bulk retailer offers huge discounts on an assortment of popular tech--but only members are eligible for the best savings. Right now, however, you can pick up an annual Gold Star membership and a $30 Digital Costco Shop Card for just $60, making this a great time to join. Costco's early Black Friday sale is live now, so you can start shopping for deals immediately.
An annual Gold Star membership typically costs $60. But with a free $30 digital gift card thrown in with this bundle, you can now join the program for one of the lowest prices we’ve seen in 2022. Costco memberships are always a great way to save cash (thanks to generous discounts on bulk goods, gas stations, and various auxiliary perks), but with Black Friday around the corner, a Costco membership might be able to pay for itself by the time December rolls around.
While anyone can shop online at Costco, some of the best Black Friday deals will be restricted to members. Joining the Gold Star program will give you access to the entire Costco catalog--and with this bundle, you’ll also get $30 to spend on your first purchase. And believe it or not, the retailer often has some incredible price cuts on gaming and tech gadgets, including several laptops and MacBooks that are currently discounted. Expect to see things become even more exciting as we inch closer to Black Friday.
Iconic PlayStation hero Sackboy bursts back into breathtaking action with a huge, fun and frantic 3D multiplayer platforming adventure and a whole new edgy sackitude!
The dastardly Vex (a near-mythical being born of chaos and fear, no less) kidnaps Sackboy's friends and forces them to build his Topsy Turver.
Set off alone or with your bravest friends on a whirlwind of capers across the snowiest mountains, the leafiest jungles, the wettest underwater realms and the, uh, spaciest of space colonies.
Take down Vex. Save the sack-folk. Save the day. It's time to fulfil your destiny, Sackboy. From woolly wonderkid and hessian hero rise our Knitted Knight.
The GraalVM 22.3 release delivers several new features including much anticipated support for Java 19 along with preview support for Project Loom virtual threads in both JVM JIT and Native Image ahead-of-time compiled applications. The release also includes compiler performance improvements, new monitoring and debugging features in Native Image, Python enhancements, and a new name for GraalPython!
Posted by: xSicKxBot - 11-15-2022, 12:49 AM - Forum: Lounge
- No Replies
Meet The Experts Who Bring Your Old CRT TVs Back To Life
If you're a gamer of a certain age, you likely have fond memories of playing your favorite retro console in front of a boxy TV. However, while many gamers have kept their old consoles around--or bought them back from garage sales and eBay auctions--CRT (cathode ray tube) TVs are largely an abandoned relic of the past. You can likely find dozens of examples gathering dust at your local thrift store, garbage dump, or perhaps even your grandmother's house. But are they actually worse than your cheap LED replacement, or do they deserve a second chance at life? According to the enthusiasts who work tirelessly to repair them, they're more than just a relic--they're the best way to play decades of classic games.
When CRT enthusiast Steve Nutter plugged in his old consoles to show his young son the games he grew up on, he was utterly dismayed by the results. His beloved N64 games looked awful on his LCD TV, with washed-out colors, a flickering image, and a tremendous amount of input lag. He turned to the internet for advice, where he found out one of the worst-kept secrets in retro gaming--that an old TV is essentially required for any original console setup.
Luckily, Nutter had an old Toshiba lying around, which he was able to resurrect for his nostalgic purposes. As a trained engineer, he found himself compelled by the intricate machinery of these displays. He would watch YouTube videos made by hackers and phone "phreakers" who enjoyed playing around with the machines, slowly gathering his base of knowledge. Over time, Nutter's interest in CRTs grew to such an extent that he started scanning Craigslist and bidding on eBay auctions, searching for the truly desirable CRT displays like the Sony PVM and BVMs. And one day, his luck changed: a high-end PVM was on sale for a reasonable price only a short drive away. What he found changed his life almost overnight.
Awaken from slumber and explore a surreal retrotech world as Elster, a technician Replika searching for her lost partner and her lost dreams.
Discover terrifying secrets, challenging puzzles, and nightmarish creatures in a tense and melancholic experience of cosmic dread and classic psychological survival horror.
Posted by: xSicKxBot - 11-14-2022, 07:44 AM - Forum: Python
- No Replies
ModuleNotFoundError: No Module Named ‘gRPC’ in Python
4/5 – (1 vote)
Quick Fix: Python raises the ImportError: No module named 'grpc' when it cannot find the library grpc. The most frequent source of this error is that you haven’t installed grpc explicitly with pip install grpcio. Alternatively, you may have different Python versions on your computer, and grpc is not installed for the particular version you’re using.
In most cases, you actually want to pip install grpcio and not grpc. If you really want to install grpcio, replace all occurrences of pip install grpc (and variants) with pip install grpcio.
Here are some examples that may work depending on your environment:
You’ve just learned about the awesome capabilities of the grpc library and you want to try it out, so you start your code with the following statement:
import grpc
This is supposed to import the gRPC library into your (virtual) environment. However, it only throws the following ImportError: No module named grpc:
>>> import grpc

Traceback (most recent call last): File "<pyshell#6>", line 1, in <module> import grpc

ModuleNotFoundError: No module named 'grpc'
By the way, this graphic shows the purpose of gRPC and what it is:
Solution Idea 1: Install Library grpc
The most likely reason is that Python doesn’t provide grpc in its standard library. You need to install it first!
To fix this error, you can run the following command in your Windows shell:
$ pip install grpc
or
$ pip install grpcio
This simple command installs grpc in your virtual environment on Windows, Linux, and MacOS. It assumes that your pip version is updated. If it isn’t, use the following two commands in your terminal, command line, or shell (there’s no harm in doing it anyways):
Note: Don’t copy and paste the $ symbol. This is just to illustrate that you run it in your shell/terminal/command line.
Solution Idea 2: Fix the Path
The error might persist even after you have installed the grpc library. This likely happens because pip is installed but doesn’t reside in the path you can use. Although pip may be installed on your system the script is unable to locate it. Therefore, it is unable to install the library using pip in the correct path.
To fix the problem with the path in Windows follow the steps given next.
Step 1: Open the folder where you installed Python by opening the command prompt and typing where python
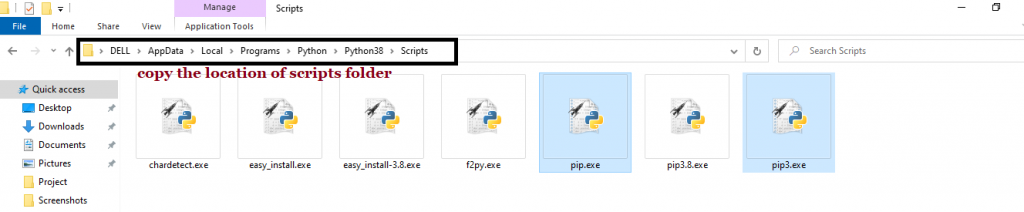
Step 2: Once you have opened the Python folder, browse and open the Scripts folder and copy its location. Also verify that the folder contains the pip file.
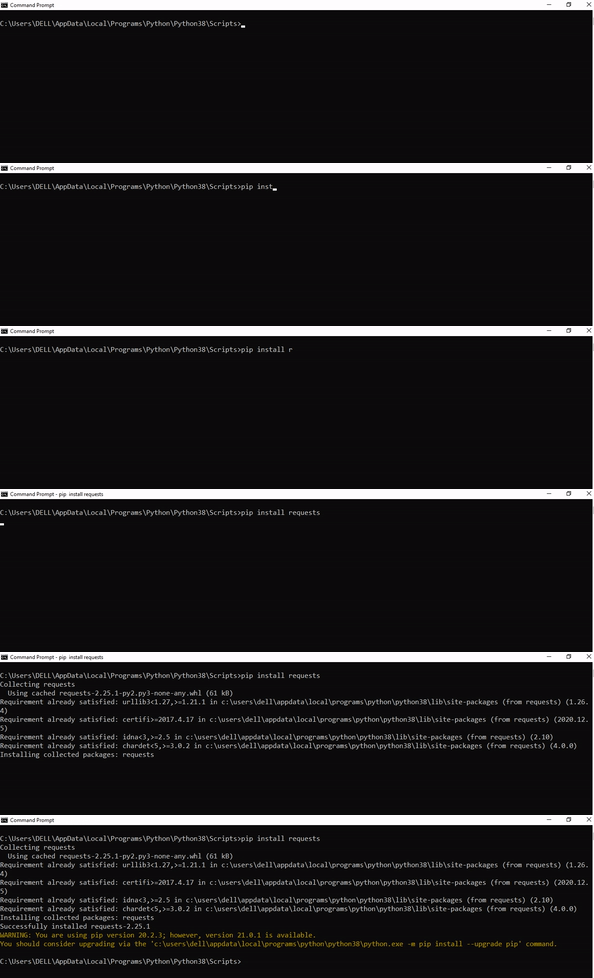
Step 3: Now open the Scripts directory in the command prompt using the cd command and the location that you copied previously.
Step 4: Now install the library using pip install grpcio command. Here’s an analogous example:
After having followed the above steps, execute our script once again. And you should get the desired output.
Other Solution Ideas
The ModuleNotFoundError may appear due to relative imports. You can learn everything about relative imports and how to create your own module in this article.
You may have mixed up Python and pip versions on your machine. In this case, to install grpc for Python 3, you may want to try python3 -m pip install grpcio or even pip3 install grpcio instead of pip install grpcio
If you face this issue server-side, you may want to try the command pip install – user grpcio
If you’re using Ubuntu, you may want to try this command: sudo apt install grpcio
You can also check out this article to learn more about possible problems that may lead to an error when importing a library.
Understanding the “import” Statement
import grpc
In Python, the import statement serves two main purposes:
Search the module by its name, load it, and initialize it.
Define a name in the local namespace within the scope of the import statement. This local name is then used to reference the accessed module throughout the code.
What’s the Difference Between ImportError and ModuleNotFoundError?
What’s the difference between ImportError and ModuleNotFoundError?
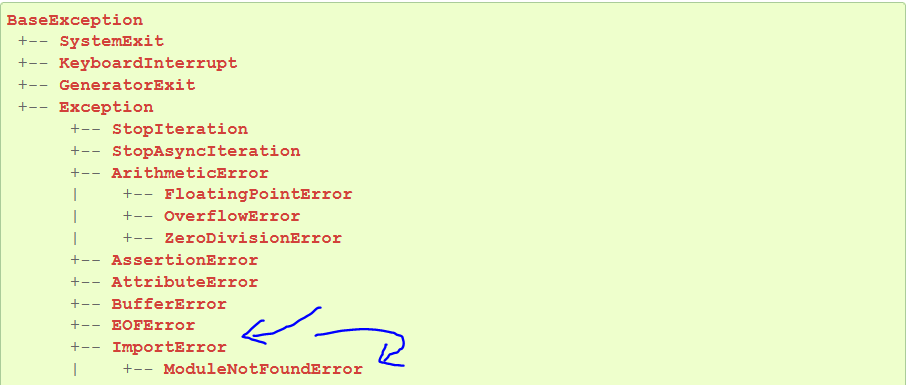
Python defines an error hierarchy, so some error classes inherit from other error classes. In our case, the ModuleNotFoundError is a subclass of the ImportError class.
You can see this in this screenshot from the docs:
You can also check this relationship using the issubclass() built-in function:
Specifically, Python raises the ModuleNotFoundError if the module (e.g., grpc) cannot be found. If it can be found, there may be a problem loading the module or some specific files within the module. In those cases, Python would raise an ImportError.
If an import statement cannot import a module, it raises an ImportError. This may occur because of a faulty installation or an invalid path. In Python 3.6 or newer, this will usually raise a ModuleNotFoundError.
Related Videos
The following video shows you how to resolve the ImportError:
How to Fix “ModuleNotFoundError: No module named ‘grpc’” in PyCharm
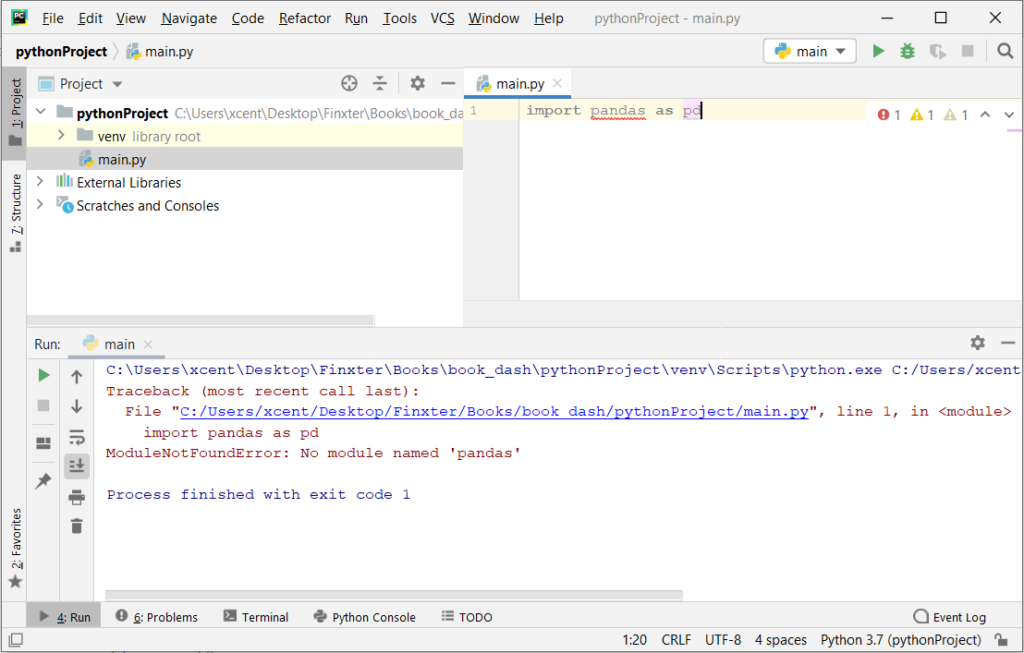
If you create a new Python project in PyCharm and try to import the grpc library, it’ll raise the following error message:
Traceback (most recent call last): File "C:/Users/.../main.py", line 1, in <module> import grpc

ModuleNotFoundError: No module named 'grpc' Process finished with exit code 1
The reason is that each PyCharm project, per default, creates a virtual environment in which you can install custom Python modules. But the virtual environment is initially empty—even if you’ve already installed grpc on your computer!
Here’s a screenshot exemplifying this for the pandas library. It’ll look similar for grpc.
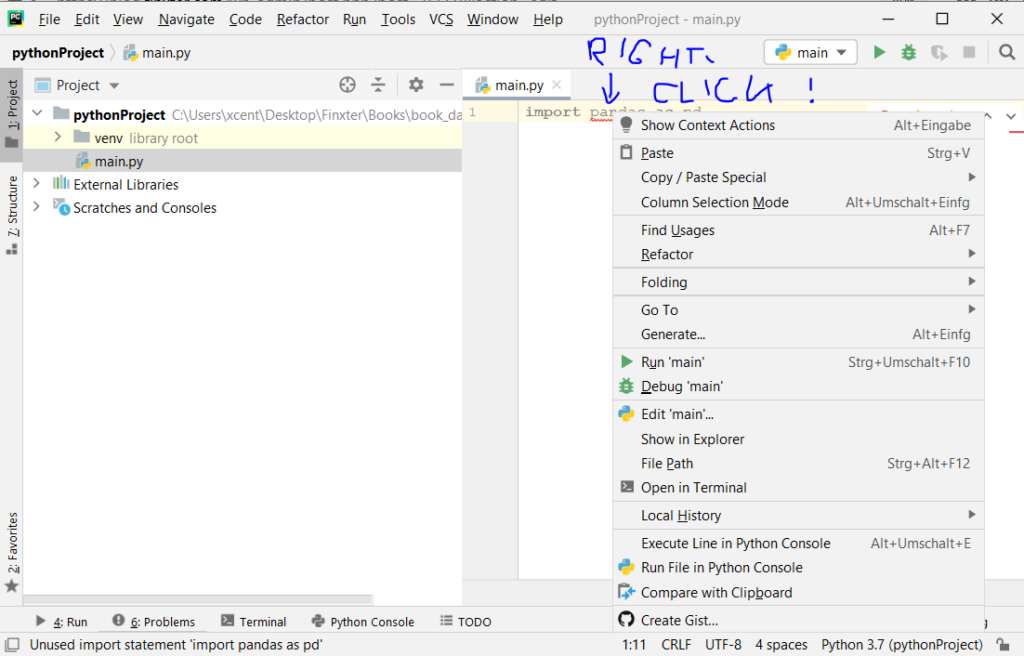
The fix is simple: Use the PyCharm installation tooltips to install Pandas in your virtual environment—two clicks and you’re good to go!
First, right-click on the pandas text in your editor:
Second, click “Show Context Actions” in your context menu. In the new menu that arises, click “Install Pandas” and wait for PyCharm to finish the installation.
The code will run after your installation completes successfully.
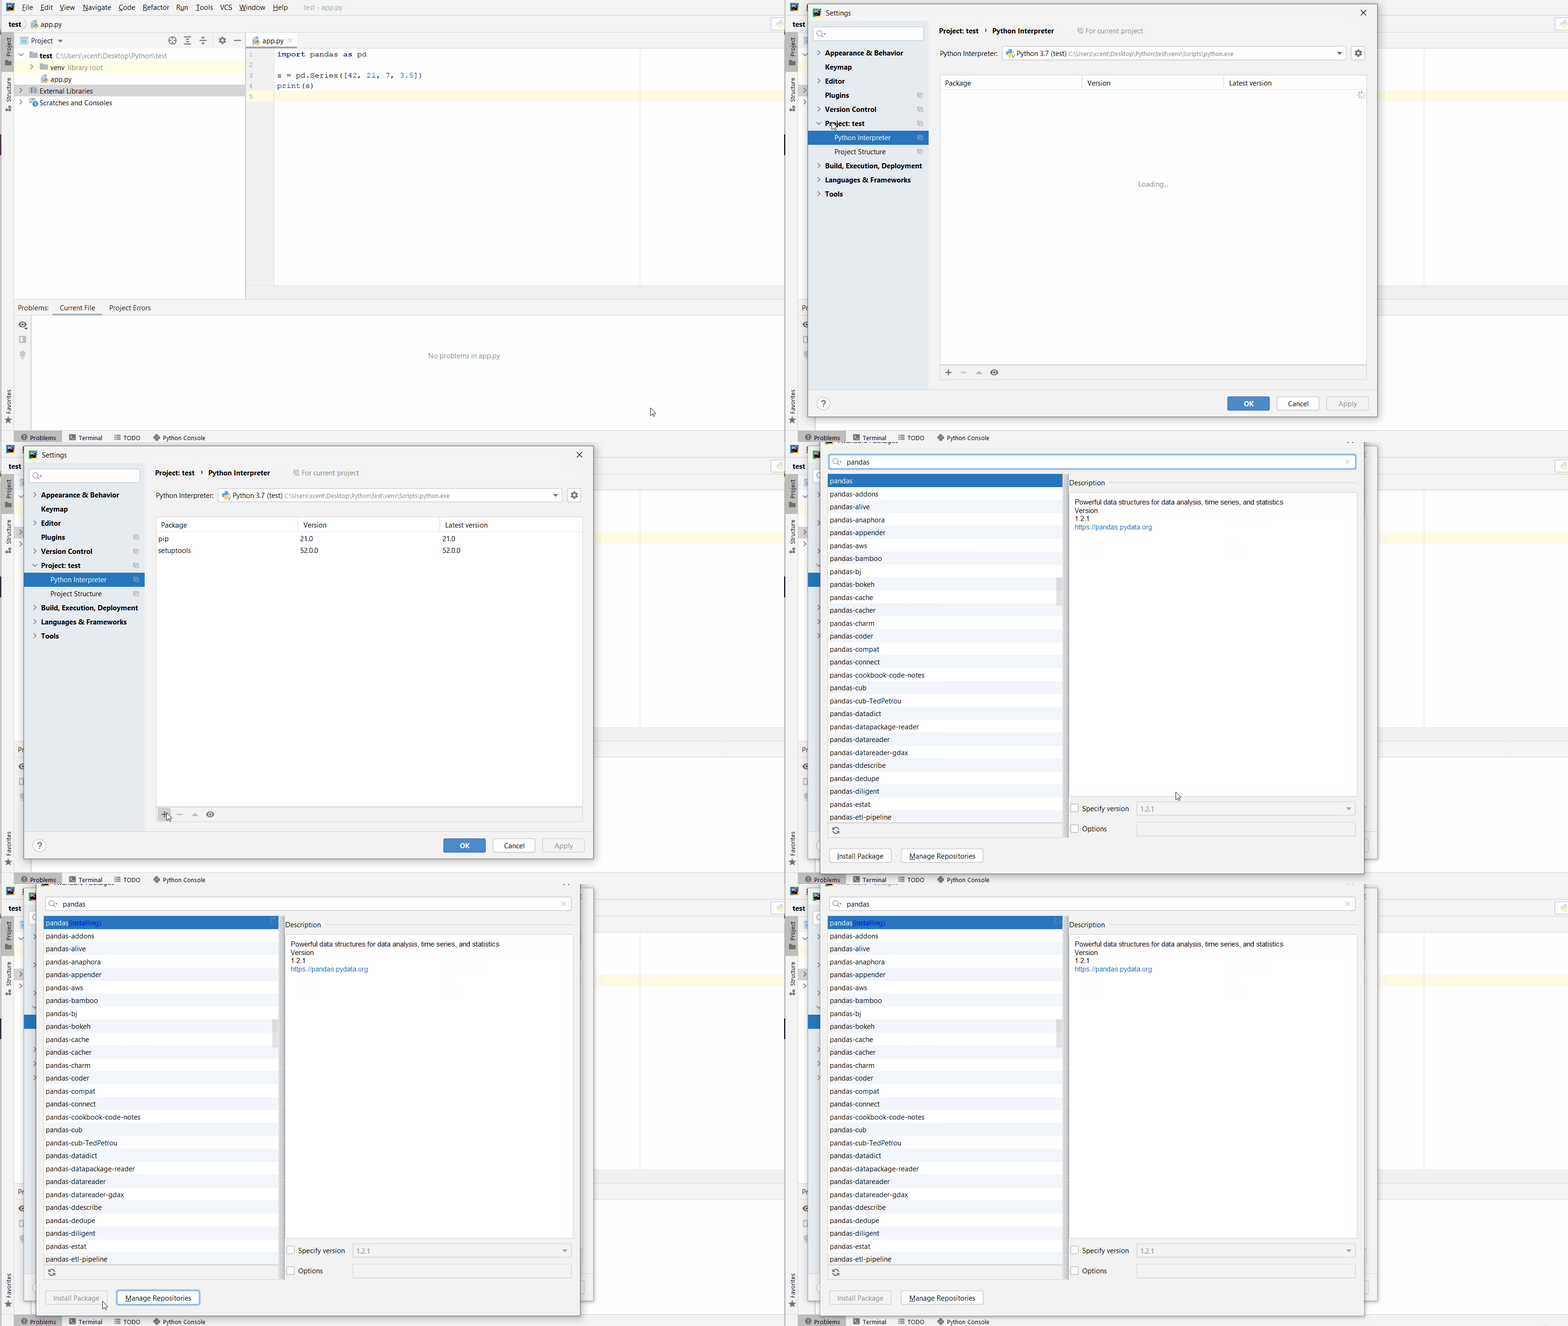
As an alternative, you can also open the Terminal tool at the bottom and type:
FREE SuperTotalCarnage, Uncharted, Anno & Tropico Deals
SuperTotalCarnage FREEbie
[supertotalcarnage.indiegala.com] Welcome to SuperTotalCarnage, our new a fast-paced time survival game where you face endless enemies! This new freebie is up for an indefinite period of time, in anticipation of the Steam early access release coming soon.
Posted by: xSicKxBot - 11-14-2022, 07:44 AM - Forum: Lounge
- No Replies
Battlefield 2042 Joining Game Pass Ultimate, Going Free For A Limited Time
Electronic Arts and DICE have released the latest development update video for Battlefield 2042, revealing what's next for the multiplayer shooter. This includes multiple free play opportunities to come in the future and the start of a new season for the game. Additionally, EA announced that Battlefield 2042 will join Xbox Game Pass Ultimate (via EA Access) with the start of Season 3 very soon.
Season 3 will introduce a new Specialist character, a new map that is described as being one that DICE "always wanted to realize," a new battle pass, more Portal content, and additional events. "We're only a few weeks away from the start of Season 3. This season will see us head to an all new Battlefield, in a location we've always wanted to realize, but haven't so far in our 20 years of creating Battlefield," DICE said in a blog post.
With Season 3 tipped to begin in the coming weeks, fans shouldn't have to wait much longer to find out more about what's on the way. EA also teased that Season 4 is also in the works, and that DICE is already in pre-production on "new content" to come after that in 2023.
The horns sound, the ravens gather. An empire is torn by civil war. Beyond its borders, new kingdoms rise. Gird on your sword, don your armour, summon your followers and ride forth to win glory on the battlefields of Calradia. Establish your hegemony and create a new world out of the ashes of the old.
Mount & Blade II: Bannerlord is the eagerly awaited sequel to the acclaimed medieval combat simulator and role-playing game Mount & Blade: Warband. Set 200 years before, it expands both the detailed fighting system and the world of Calradia. Bombard mountain fastnesses with siege engines, establish secret criminal empires in the back alleys of cities, or charge into the thick of chaotic battles in your quest for power.
Posted by: xSicKxBot - 11-13-2022, 10:49 AM - Forum: Python
- No Replies
Parsing XML Files in Python – 4 Simple Ways
5/5 – (1 vote)
Problem Formulation and Solution Overview
This article will show you various ways to work with an XML file.
XML is an acronym for Extensible Markup Language. This file type is similar to HTML. However, XML does not have pre-defined tags like HTML. Instead, a coder can define their own tags to meet specific requirements. XML is a great way to transmit and share data, either locally or via the internet. This file can be parsed based on standardized XML if structured correctly.
To make it more interesting, we have the following running scenario:
Jan, a Bookstore Owner, wants to know the top three (3) selling Books in her store. This data is currently saved in an XML format.
Question: How would we write code to read in and extract data from an XML file into a Python script?
We can accomplish this by performing the following steps:
In the current working directory, create a Python file called books.py. Copy and paste the code snippet below into this file and save it. This code reads in and parses the above XML file. If necessary, install the xmltodict library.
import xmltodict with open('books.xml', 'r') as fp: books_dict = xmltodict.parse(fp.read()) fp.close() for i in books_dict: for j in books_dict[i]: for k in books_dict[i][j]: print(f'Title: {k["title"]} \t Sales: {k["sales"]}')
The first line in the above code snippet imports the xmltodict library. This library is needed to access and parse the XML file.
The following highlighted section opens books.xml in read mode (r) and saves it as a File Object, fp. If fp was output to the terminal, an object similar to the one below would display.
Next, the xmltodict.parse() function is called and passed one (1) argument, fp.read(), which reads in and parses the contents of the XML file. The results save to books_dict as a Dictionary, and the file is closed. The contents of books_dict are shown below.
Note: The \t character represents the <Tab> key on the keyboard.
Method 2: Use minidom.parse()
This method uses the minidom.parse() function to read and parse an XML file. This example extracts the ID, Title and Sales for each book.
This example differs from Method 1 as this XML file contains an additional line at the top (<?xml version="1.0"?>) of the file and each <book> tag now has an id (attribute) assigned to it.
In the current working directory, create an XML file called books2.xml. Copy and paste the code snippet below into this file and save it.
In the current working directory, create a Python file called books2.py. Copy and paste the code snippet below into this file and save it.
from xml.dom import minidom doc = minidom.parse('books2.xml')

name = doc.getElementsByTagName('storename')[0]

books = doc.getElementsByTagName('book') for b in books: bid = b.getAttribute('id') title = b.getElementsByTagName('title')[0] sales = b.getElementsByTagName('sales')[0] print(f'{bid} {title.firstChild.data} {sales.firstChild.data}')
The first line in the above code snippet imports the minidom library. This allows access to various functions to parse the XML file and retrieve tags and attributes.
The first section of highlighted lines performs the following:
Reads and parse the books2.xml file and saves the results to doc. This action creates the Object shown as (1) below.
Retrieves the <storename> tag and saves the results to name. This action creates an Object shown as (2) below.
Retrieves the <book> tag for each book and saves the results to books. This action creates a List of three (3) Objects: one for each book shown as (3) below.
(1) <xml.dom.minidom.Document object at 0x0000022D764AFEE0> (2) <DOM Element: storename at 0x22d764f0ee0> (3) [<DOM Element: book at 0x22d764f3a30>, <DOM Element: book at 0x22d764f3c70>, <DOM Element: book at 0x22d764f3eb0>]
The last section of highlighted lines loop through the books Object and outputs the results to the terminal.
This method uses etree to read in and parses an XML file. This example extracts the Title and Sales data for each book.
The etree considers the XML file as a tree structure. Each element represents a node of said tree. Accessing elements is done on an element level.
This example reads in and parses the books2.xml file created earlier.
import xml.etree.ElementTree as ET xml_data = ET.parse('books2.xml')

root = xml_data.getroot() for books in root.findall('book'): title = books.find('title').text author = books.find('author').text sales = books.find('sales').text print(title, author, sales)
The first line in the above code snippet imports the etree library. This allows access to all nodes of the XML<tag> structure.
The following line reads in and parses books2.xml. The results save as an XML Object to xml_data. If output to the terminal, an Object similar to the one below displays.
<Element 'bookstore' at 0x000001E45E9442C0>
The following highlighted section uses a for loop to iterate through each <book> tag, extracting the <title>, <author> and <sales> tags for each book and outputting them to the terminal.
This example reads in and parses the books3.xml file shown below. If necessary, install the untangle library.
The untangle library converts an XML file to a Python object. This is a good option when you have a group of items, such as book names.
In the current working directory, create an XML file called books3.xml. Copy and paste the code snippet below into this file and save it. If necessary, install the untangle library.
In the current working directory, create a Python file called books3.py. Copy and paste the code snippet below into this file and save it.
import untangle book_obj = untangle.parse('books3.xml')

books = ','.join([book['name'] for book in book_obj.root.book]) for b in books.split(','): print(b)
The first line in the above code snippet imports the untangle library allowing access to the XML file structure.
The following line reads in and parses the books3.xml file. The results save to book_obj.
The next line calls the join() function and passes it one (1) argument: List Comprehension. This code iterates through and retrieves the name of each book and saves the results to books. If output to the terminal, the following displays:
Surrender,Going Rogue,Triple Cross
The next line instantiates a for loop, iterates through each book name, and sends it to the terminal.
Surrender
Going Rogue
Triple Cross
Summary
This article has shown four (4) ways to work with XML files to select the best fit for your coding requirements.
Good Luck & Happy Coding!
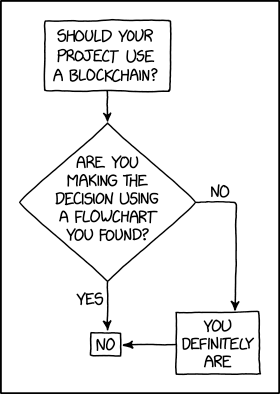
Programmer Humor – Blockchain
“Blockchains are like grappling hooks, in that it’s extremely cool when you encounter a problem for which they’re the right solution, but it happens way too rarely in real life.”source – xkcd



 Note: Don’t copy and paste the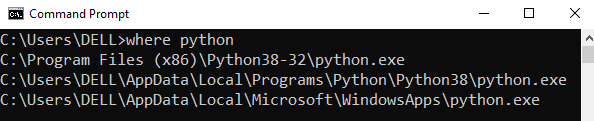






 Question: How would we write code to read in and extract data from an