[www.indiegala.com] The Crypto Sale is LIVE and it might be the ideal moment to use crypto! Save an EXTRA 15-30% Off your final price on cryptocurrency payments.
Chiptune Beats Bundle | 8 Music Albums | 88% OFF
[www.indiegala.com] Chillax to the newest collection of chiptune & 8bit tunes from Azureflux & Yoko Shimomura. The right vibe comes with the right song.
The war to end all wars is nearly upon Kratos and Atreus in God of War Ragnarok, giving them few options but to set out on a quest to uncover answers about how to put avert it--or at the very least, survive it. It's not going to be an easy task, but we trust that you're up for it. However, before you set off into this newest entry with the duo and their ever-growing cast of companions, make sure you've prepared yourself with our list of tips for the journey ahead. After dozens of hours, here are our God of War Ragnarok tips for players just starting out on their return adventure across the nine realms.
We've deliberately left out any story spoilers from this article, but if you want to know nothing about the game, then you can consider this beginner's guide to contain very light spoilers pertaining to the structure of the game and its massive hub world.
Explore thoroughly
As you explore each realm, you'll quickly notice that there is an abundance of secrets to find throughout each one--hidden chests, lore scrolls, buried treasure, and a myriad of events tied to side quests that unlock as you move forward in the main story. Many of these are off the beaten path and require you to be extremely thorough as you navigate a biome. If something looks interactive, there's a very good chance that it is, and the rewards you'll gain for being so meticulous can make a huge difference in combat and beyond. If you want to level up your gear and take on the hardest challenges in the game, you can't afford to miss any opportunity possible to earn some extra loot.
You should also accept that not every puzzle can be solved right away, however. Thankfully, your companion characters like Atreus and Mimir are good about voicing that to you.
Make use of Atreus' arrows during combat
Combat can get pretty hectic in God of War Ragnarok, so you'll need all the help you can get. By pressing the Square button, you can have Atreus fire arrows at your enemies for you, dealing some damage and building up an enemy's stun bar more rapidly. Arrows recharge pretty quickly, too, so consistently combo them with your own barrage of melee attacks and then follow up with devastating stun grabs to finish off your foes. Additionally, Atreus' ranged attacks come in handy against small creatures and flying enemies, both of which can be a little more difficult for Kratos to land melee hits on.
Check the lost items chest frequently
It doesn't matter how good you are about picking up the stuff enemies drop after battles, you're almost guaranteed to overlook something valuable here and there. Early in the game, Brok will introduce you to a chest beside his forge where he keeps all of the items you've left behind on your travels. Any time you approach a forge throughout the game, the chest will be closed and glow blue when there's something to snag from it--usually crafting materials you didn't see after a combat encounter. Be sure to check it regularly to be sure you're not missing anything that could be useful to you on your journey.
Always check the chest next to Brock and Sindri for any loot you may have missed.
Don't fret over skills too much
As you find weapon upgrades during exploration, you can use them at the forge to gain a new weapon level and unlock some new skills for each armament. Since you'll be leveling your weapons multiple times using Frozen Flame and Chaos Flame, there are plenty of skills for Kratos and Atreus to unlock throughout the game's lengthy campaign, and you can feel free to buy them in any order, really. As long as you're completing at least some of the side quests and exploring thoroughly, you'll have a constant influx of XP that will ensure that you can purchase most of the skills available at any one point in the story. Because of this, you're (usually) only ever an hour or so away from buying whichever skill you've got your eyes on--so spend your XP freely and don't worry too much.
Don't skimp on upgrades
The armor, relics, and weapon hilts that you pick will largely depend on your preferred playstyle, and you have the option to upgrade them using materials gained while exploring, completing quests, and defeating enemies. The further you progress in the game, the higher enemies' levels will become, so if you forget to keep up your gear levels, you may find yourself against foes who can kill you very quickly--even in a single hit sometimes. Check with Brock and Sindri at regular intervals to upgrade anything you've settled on. But don't be afraid to switch things up as needed, either, because you're quite likely to be overflowing with hacksilver and lower-tier materials throughout most of the game.
Nornir chests are always worth the hassle
You'll find Nornir Chests in most realms, which require you to engage with or destroy three nearby runes to open. These runes usually take a bit of ingenuity to find and may require you to position yourself somewhere specific, burn away branches, or engage with other mechanics that become available to you later in your journey. It's always worth the hassle to find them and unlock the chest, though, as doing so will provide you with the items needed to permanently upgrade your health and rage. Without routinely opening these chests, you'll be underpowered to take on the game's later challenges.
Upgrade your health and rage by opening Nornir Chests.
Compete in Muspelheim challenges
After obtaining two Muspelheim seed halves and combining them together, you'll be able to travel to Muspelheim. Like in the first game, this realm features a selection of combat challenges that reward you with loot when completed. If you want to max out your armor levels and earn some new ways to customize your build, this will be a necessary part of your adventure. And due to the fact that you'll need to complete and re-complete challenge rooms in specific orders to unlock the final six challenges, you're likely to spend quite a few hours here figuring it all out.
Sell your artifacts
As you move through each of the game's biomes, you're going to find artifacts, often in the form of books and poems, that can be sold to Brock and Sindri for a nice chunk of change. Most of them prompt some funny conversations with Mimir, and a few of them are even related to quests. Don't worry, though, selling them won't impact your progress with a collection, and that extra Hacksilver you'll pocket can aid you with upgrades and more.
Listen for ravens
Just like in the first game, Odin has sent ravens throughout the nine realms to keep an eye on you. These green spectral birds fly around or perch on objects in each realm, and they generally (though not always) take some pretty good awareness to spot. However, you can also identify when one is nearby due to the unique screeching they emit. When you hear one, start looking up and around to see if you can find and destroy it with your axe. As you destroy more and more of these, make sure you visit Niflheim and head over to the crow tree to unlock chests that contain some really great gear. If ever you can't find a particular crow, your map will list which region they're in so long as you've first crossed paths with them--even if you maybe missed them yourself. Destroy Odin's ravens to unlock chests in Niflheim.
Train in Niflheim
Speaking of Niflheim, you'll gain access to this realm relatively early in your adventure, and it can be a useful place to hang out if you're the type who likes to train and work on your moves. In addition to housing the aforementioned crow tree, it also sports a training arena where you can practice combos and learn the best ways of using any skills you've recently unlocked. With multiple types of enemies to fight against endlessly, you can master any goals you set your mind to here--but just remember that you won't gain XP for any of it.
Keep an eye out for loot in the water
There are a lot of sections in the game that see Kratos and Atreus take to the water in a canoe. During these segments, keep an eye out for barrels and shimmering golden areas, as these both will contain Hacksilver or crafting materials. Crashing into a barrel will net you the items immediately, while you'll need to press a button to pick up loot from the shimmering locations. Additionally, you may periodically notice dew drops hanging from tree limbs in the water, and interacting with these will earn you permanent stat boosts, so never pass them up.
Look over the accessibility features
There is a bevy of accessibility features that allow you to customize your experience to meet your unique needs, including options for low vision, hearing, motor, motion options, and much more. Even if you don't require some of the more in-depth features, you can use the menu to customize things like auto-pickup and whether you have to tap or hold a button during certain actions--so don't pass up an opportunity to improve your experience however you see fit.
As an aside, immersive mode returns and allows for a no-HUD presentation style. Given how Ragnarok is such a gorgeous game, this is a great way to play. You can always temporarily reactivate most HUD features by swiping the touchpad on your controller.
Take a stand against ruthless corporate overlords in this narrative-driven adventure! Within the perpetually war-torn metropolis of Promethea, you'll control Anu, Octavio, and Fran on the worst day of their lives. Help these three lovable losers as they endeavor to change the world (and maybe even save it)! Face down a planetary invasion, vicious vault monster, and cold-hearted capitalist in this cinematic thrill ride where what happens next is up to you! Meet a motley cast full of misfits, assassin bots, and talking guns in this race to the top! It's time to fight back against exploitation and corporate greed. It's time to make Mayhem your business.
Summary: Use given_string.rsplit('sep', 1)[-1] to split the string and get the last element. Another approach is to use given_string.rpartition('sep', 1)[-1]
Problem: Given a string. How will you split the string and get the last element?
Let’s try to understand the given problem with the help of an example:
Example 1
# Input:

text = 'Java_C++_C#_Golang_Python'

# Expected Output:

Split String: ['Java_C++_C#_Golang', 'Python']

Last Element: Python
In the above example, “_” is the separator. However, not the entire string has been split. Only the last substring that comes after the separator has been extracted.
Example 2
# Input:

text = 'Java_C++_C#_Golang_Python_'

# Expected Output:

Split String: ['Java_C++_C#_Golang', 'Python']

Last Element: Python
Unlike the previous example, the input string ends with the separator itself. However, the output is similar. So, you have a different input string, but you have to generate a similar output by eliminating the separator.
Let’s dive into the different ways of solving the given problems.
Prerequisite: Simply put, the rsplit method splits a given string based on a given separator and stores the characters/substrings into a list. For example, finxterx42'.rsplit('x') will return the list ['fin', 'ter', '42'] as an output. rsplit can take two arguments –
sep – The separator string on which it is split.
maxsplit – The number of times the string is split.
Thus, you can use the maxsplit argument to your advantage and solve the given question by setting maxsplit = 1. This means the string will be split along the specified separator only once from the right end. Once the string is split into two parts from the right end, all that you need to do is extract the second element from the list created by the rsplit method.
Split String: ['Java_C++_C#_Golang', 'Python']

Last Element: Python
Solution to Example 2: In the second scenario, you must get rid of the separator that comes at the end of the string. Otherwise, simply using rsplit with the maxsplit argument will create a list that will create a list that will contain an empty character as the last item as shown below –
To avoid this problem, you can use the strip() function to get rid of the separator and then use rsplit as shown in the snippet below.
text = 'Java_C++_C#_Golang_Python_'

text = text.strip('_')

print("Split String: ", text.rsplit('_', 1))

print("Last Element: ", text.rsplit('_', 1)[-1])
Output:
Split String: ['Java_C++_C#_Golang', 'Python'] Last Element: Python
You can also use the rpartition method to solve the given problem. The rpartition method searches for a separator substring and returns a tuple with three strings: (1) everything before the separator, (2) the separator itself, and (3) everything after it. For example: finxterx42'.rpartition('x') will return the following tuple: ('finxter', 'x', '42')
Thus, you can simply extract the last item from the tuple after the string has been cut by the rpartition method.
Code:
# Solution to Example 1

text = 'Java_C++_C#_Golang_Python'

print("Split String: ", text.rpartition('_'))

print("Last Element: ", text.rpartition('_')[-1]) # Solution to Example 2

text = 'Java_C++_C#_Golang_Python_'

text = text.strip('_')

print("Split String: ", text.rpartition('_'))

print("Last Element: ", text.rpartition('_')[-1])
Output:
Split String: ('Java_C++_C#_Golang', '_', 'Python')

Last Element: Python
Coding Challenge
Before we wrap up this tutorial, here’s a coding challenge for you to test your grip on the concept you just learned.
Input: Consider the following IP Address – ip = 110.210.130.140 Challenge: Extract the network bit from the given class A ip address and convert it to its binary form. Expected Output: 10001100 Hint: – 140 is the network bit! – How to Convert a String to Binary in Python?
Solution:
ip = '110.210.130.140'

nw_bit = int(ip.rpartition('.')[-1])

print(bin(nw_bit)[2:])
Explanation: The solution is pretty straightforward. You first have to extract the network bit, i.e., 140. This happens to be the last item after the “.“. So, you can use rpartition and feed “.” as the separator and extract the last item (the network bit) from the tuple returned by the rpartition method. Since this will be a string, you must convert it to an integer and then typecast this integer to a binary number using the bin function to generate the final output.
I hope you enjoyed the numerous scenarios and challenges used in this tutorial to help you learn the two different ways of splitting a string and getting the last item. Please subscribe and stay tuned for more interesting tutorials and solutions.
Apex Legends' Catalyst Is Giving Tarot Readings On Twitter
Apex Legends Season 15: Eclipse is finally underway, and to help players get to know this season's debut legend a little better, Respawn is allowing Catalyst to perform tarot readings for players. The announcement was made via a Tweet from the official Apex Legends Twitter account, inviting players to draw a card and (possibly) catch a glimpse of their future.
Well then, I think it’s time for a little light reading. Think of something happening in your life—a situation, a question that has occupied your mind—and LIKE ❤ this tweet to draw a card. Let’s see the future you could make. pic.twitter.com/z1RxPT5gfU
To get your free tarot reading, simply like the tweet. After doing so, you will automatically be tagged in a tweet from the Apex Legends Twitter account and shown a random tarot card along with its meaning. All of the cards are Apex-themed, with the Major Arcana featuring art of Apex Legends characters and locales. For instance, The Moon card depicts Boreas' partially destroyed moon (and the location of this season's new map), Cleo. Naturally, Death features Revenant holding his Heirloom Weapon, a scythe called Dead Man's Curve. The Magician card appropriately pictures Seer in a pose indicating he's about to put on a show.
We couldn't resist taking a crack at it ourselves, and decided to try out a reading. After liking the tweet, we pulled The Sun, a card that's generally regarded as positive, and sometimes indicates future luck or a positive state of mind. The card itself featured Crypto and Wattson, and our fortune read, "Well, well, looks like things are going … well. Move forward with confidence and optimism. There's a win in your future--don't let anyone tell you otherwise."
Avril never thought she'd have to step up and be a hero but after a mysterious and devastating event, her world was flipped upside down. With her homeworld on the brink of destruction, Avril has been gifted extraordinary powers and will have to journey across the universe to uncover ancient secrets and reckon with a series of life-changing decisions.
Embark on an epic adventure to save Earth in this interplanetary action RPG. Harness the ancient powers of Sun and Moon to take on a variety of unique enemies while solving diverse puzzles and exploring stunning sci-fi worlds, each with its own curious stories, inhabitants, and mysteries.
This article will show you how to create and work with markdown files using Python.
Markdown is an excellent tool with many features to spice up a flat-text file, such as changing text colors, adding bullet points, tables, and much more. A terrific way to add pizzazz to an otherwise dull file.
To make it more interesting, we have the following running scenario:
Acme Spinners, manufacturer of the Spinner Widgets, has contacted you to create a README.md file for their software. They would like you to format the flat-text file to make it easier to navigate and more professional.
Each section of this article builds on the previous one. In the end, an entire README.md file will be created.
Question: How would we write code to create and populate an md file?
We can accomplish this task by performing the following steps:
Install Required Library
Create a Python File
Create a Markdown File
Preview Markdown File
Add Logo Image
Add a Paragraph
Add Heading
Add Table
Add Bullet Points
Add Table of Contents
Install Required Library
Before running the code in this article, the mdutils library must be installed.
To install this library, navigate to the command prompt and run the following code.
pip install mdutils
This library contains tools to assist in the creation of markdown files in Python, transforming a bland flat-text file into a fantastic-looking one!
Create Python File
Let’s start by creating a Python file called acme.py and placing this file into the current working directory.
In the IDE, navigate to and open acme.py and add the following lines.
from mdutils.mdutils import MdUtils

from mdutils import Html
These lines allow access to and manipulation of markdown features.
Save this file.
Create a Markdown File
The next step is to create a markdown file.
Open the acme.py file created earlier. At this point, this file should only contain two (2) lines of code.
from mdutils.mdutils import MdUtils

from mdutils import Html
The following code snippet appends two (2) additional lines to acme.py.
The first highlighted line calls the Mdutils() function and passes one (1) argument: a filename. This creates an object and saves it to mdAcme. If output to the terminal, an object similar to the one below would display.
<mdutils.mdutils.MdUtils object at 0x00000257FEB64940>
from mdutils.mdutils import MdUtils

from mdutils import Html mdAcme = MdUtils(file_name='acme') mdAcme.create_md_file()
The following line appends the create_md_file() function to the mdAcme object. When this code is run, the acmd.md file is created and saved to the current working directory.
Typically, the above line is only called once all the file contents have been finalized. From hereon in, all additional code will be placed above this line.
Save the acme.py file.
Note: A file extension is not required when passing a filename to the Mdutils() function. By default, md is assumed.
Preview a Markdown File
During the progression of our markdown file, we can preview the file in our IDE. These instructions assume you are using the VSC IDE.
In the IDE, hover over the acme.md file and right-mouse click. This action displays a pop-up.
From this pop-up, select Open Preview (or CTRL+SHIFT+V). This action displays a preview of the acme.md file. At this point, there is no data to display.
No worries! We’ll fix this in the next sections!
Note: Depending on the IDE, the Preview option may differ.
Add Logo Image
Let’s add a logo to the top of the Markdown file. Save the logo at the top of this article and place it in the current working directory.
The highlighted line calls the new_line() function, which adds a new line to the file. Then, new_inline_image() is called and passed one (1) argument: path (the full path to the image).
from mdutils.mdutils import MdUtils

from mdutils import Html mdAcme = MdUtils(file_name='acme')

mdAcme.new_line(mdAcme.new_inline_image(path='as_logo.png')) mdAcme.create_md_file()
Update acme.py, save and run.
If we preview acme.md, the logo displays on a new line (size: 411×117) and is left-aligned.
Option 2:
To change the image size and/or alignment, use the Html. image() function.
from mdutils.mdutils import MdUtils

from mdutils import Html mdAcme = MdUtils(file_name='acme')

mdAcme.new_paragraph(Html.image(path='as_logo.png', size='250', align='center')) mdAcme.create_md_file()
The highlighted line calls the new_paragraph() function, which adds a new line to the file. Then, Html_image() is called and passed three (3) arguments: path (image location/name), size (image size) and align (image alignment).
Update acme.py, save and run.
If we preview acme. md, the logo displays in its modified size and is center-aligned.
For this article, Option 2 is used.
Add a Paragraph
Earlier, new_paragraph() was used to add a logo. However, we can also use this to add plain text. Let’s add a new paragraph.
The highlighted line creates a new string. This string is formatted to bold, italics and is center-aligned.
from mdutils.mdutils import MdUtils

from mdutils import Html mdAcme = MdUtils(file_name='acme')

mdAcme.new_paragraph(Html.image(path='as_logo.png', size='250', align='center'))

mdAcme.new_paragraph('License and Installation Instructions', bold_italics_code='bi', align='center') mdAcme.create_md_file()
Update acme.py, save and run.
If we preview acme.md, the paragraph displays in bold italics and is center-aligned.
Add Heading and Text
A Level 1 Heading (level=1) called Overview and text is added.
In the highlighted area below, an Overview section is created.
This section shows how to use the write() and new_paragraph() functions to display text, change text colors and add hyperlinks.
from mdutils.mdutils import MdUtils

from mdutils import Html mdAcme = MdUtils(file_name='acme')

mdAcme.new_paragraph(Html.image(path='as_logo.png', size='250', align='center'))

mdAcme.new_paragraph('License and Installation Instructions', bold_italics_code='bi', align='center') mdAcme.new_header(level=1, title='Overview')

mdAcme.write("Welcome to <font color='red'>Acme Spinners</font>!\n\n")

mdAcme.new_paragraph("Visit our website at <a href='#'>acmespinners.ca</a> to view our videos on the latest spinner techniques.\n") mdAcme.create_md_file()
Update acme.py, save and run.
If we preview acme.md, the Overview heading and text displays.
Let’s open acme.md to review the code when not in Preview Mode.
Notice that the code in the acme.py file was converted to HTML.
Note: If you are unfamiliar with HTML, click here to learn more!
Add Table
A Level 2 Heading (level=2) called License, and a table is added.
In the highlighted area below, a License section was created.
This section displays details about the license in a table format. This example adds a line for each entry. However, a loop could also be used to populate the table.
from mdutils.mdutils import MdUtils

from mdutils import Html mdAcme = MdUtils(file_name='acme')

mdAcme.new_paragraph(Html.image(path='as_logo.png', size='250', align='center'))

mdAcme.new_paragraph('License and Installation Instructions', bold_italics_code='bi', align='center') mdAcme.new_header(level=1, title='Overview')

mdAcme.write("Welcome to <font color='red'>Acme Spinners</font>!\n\n")

mdAcme.new_paragraph("Visit our website at <a href='#'>acmespinners.ca</a> to view our videos on the latest spinner techniques.\n") mdAcme.new_header(level=2, title='License')

data = ["Item", "Description"]

data.extend(["License #", "ACS-3843-34-2217"])

data.extend(["Purchase Date", "Nov. 1, 2022"])

data.extend(["", ""])

mdAcme.new_table(columns=2, rows=4, text=data, text_align='left')

mdAcme.new_line()
Update, save and run the acme.py file.
If we preview acme.md, the following displays.
Add Bullet Points
A Level 3 Heading (level=3) called Instructions, and two (2) sets of bullet points are added.
from mdutils.mdutils import MdUtils

from mdutils import Html mdAcme = MdUtils(file_name='acme')

mdAcme.new_paragraph(Html.image(path='as_logo.png', size='250', align='center'))

mdAcme.new_paragraph('License and Installation Instructions', bold_italics_code='bi', align='center') mdAcme.new_header(level=1, title='Overview')

mdAcme.write("Welcome to <font color='red'>Acme Spinners</font>!\n\n")

mdAcme.new_paragraph("Visit our website at <a href='#'>acmespinners.ca</a> to view our videos on the latest spinner techniques.\n") mdAcme.new_header(level=2, title='License')

data = ["Item", "Description"]

data.extend(["License #", "ACS-3843-34-2217"])

data.extend(["Purchase Date", "Nov. 1, 2022"])

data.extend(["", ""])

mdAcme.new_table(columns=2, rows=4, text=data, text_align='left') mdAcme.new_header(level=3, title='Instructions')

list1 = ['Getting Started', 'Remove Battery', ['Add 2 AAA Batteries', 'Close and lock']]

mdAcme.new_list(list1)

list2 = ['1. Set Level', ['1. Scroll to view levels', '2. Press Select'], '2. Press Start', ]

mdAcme.new_list(list2) mdAcme.create_md_file()
Update, save and run the acme.py file.
If we preview acme.md, the following displays.
Note: There are additional ways to configure bullet points. For this article, the most commonly used was selected.
Add a Table of Contents
This sections combines the three (3) headings created earlier (different level for each) and from these lines, creates a Table of Contents.
On the highlighted line, the Table of Contents is created. For this function, a title (‘Table of Contents‘), and depth (3) was passed.
A depth of 3 was selected as each heading in this article was assigned a different level (example, level=1, level=2, level=3).
from mdutils.mdutils import MdUtils

from mdutils import Html mdAcme = MdUtils(file_name='acme')

mdAcme.new_paragraph(Html.image(path='as_logo.png', size='250', align='center'))

mdAcme.new_paragraph('License and Installation Instructions', bold_italics_code='bi', align='center') mdAcme.new_header(level=1, title='Overview')

mdAcme.write("Welcome to <font color='red'>Acme Spinners</font>!\n\n")

mdAcme.new_paragraph("Visit our website at <a href='#'>acmespinners.ca</a> to view our videos on the latest spinner techniques.\n") mdAcme.new_header(level=2, title='License')

data = ["Item", "Description"]

data.extend(["License #", "ACS-3843-34-2217"])

data.extend(["Purchase Date", "Nov. 1, 2022"])

data.extend(["", ""])

mdAcme.new_table(columns=2, rows=4, text=data, text_align='left') mdAcme.new_header(level=3, title='Instructions')

list1 = ['Getting Started', 'Remove Battery', ['Add 2 AAA Batteries', 'Close and lock']]

mdAcme.new_list(list1)

list2 = ['1. Set Level', ['1. Scroll to view levels', '2. Press Select'], '2. Press Start', ]

mdAcme.new_list(list2) mdAcme.new_table_of_contents(table_title='Table of Contents', depth=3) mdAcme.create_md_file()
Update, save and run the acme.py file.
If we preview acme.md, the following displays.
Summary
This article has shown you how to construct a fantastic-looking flat-text file!
Good Luck & Happy Coding!
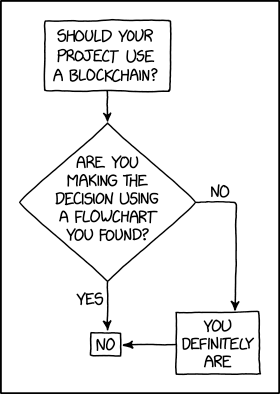
Programmer Humor – Blockchain
“Blockchains are like grappling hooks, in that it’s extremely cool when you encounter a problem for which they’re the right solution, but it happens way too rarely in real life.”source – xkcd
Simpsons Arcade1Up Cabinet Gets Massive Discount For Black Friday
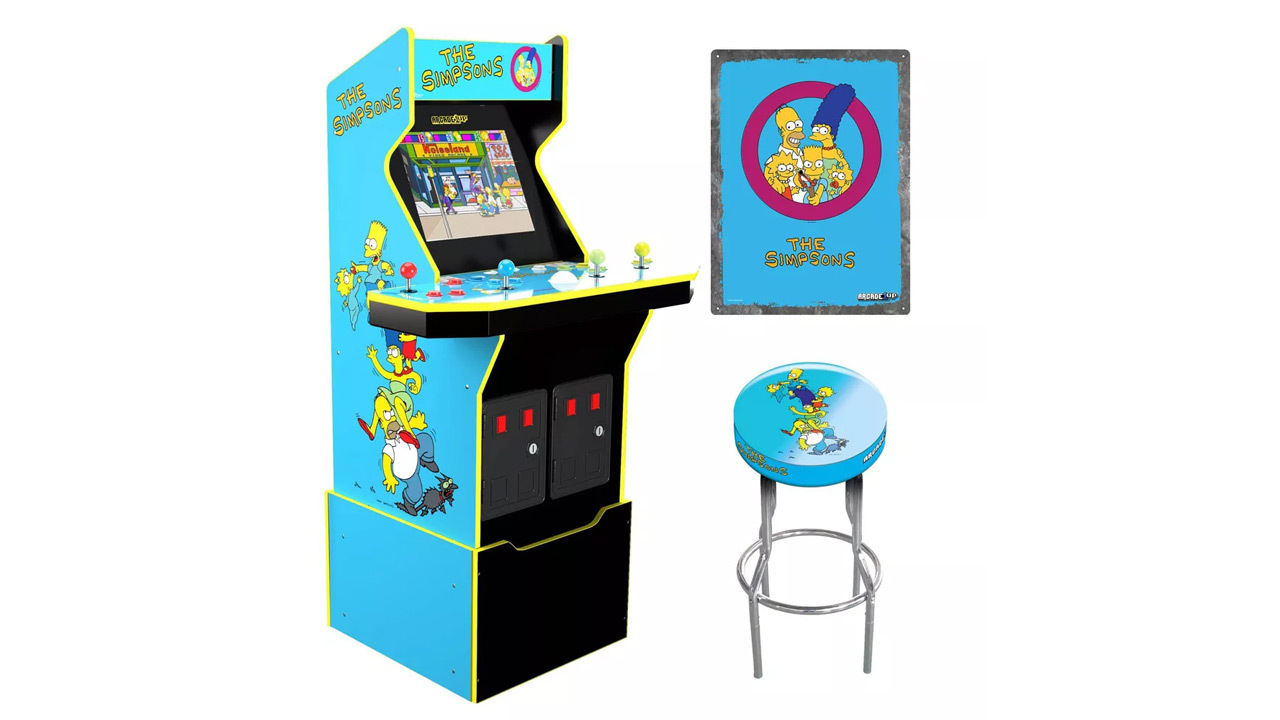
Arcades might be a rare sight these days, but that doesn't mean that you can't bring that magic to your home. As part of its Black Friday deals, Target has slashed the price on a true arcade classic, the coin-munching 1991 Simpsons game that recently got an authentic replica from specialist company Arcade1Up.
Like the original Simpsons arcade game, this one features the most famous family in Springfield busting heads all over town. You'll be able to play as either Homer, Marge, Bart, or Lisa, and there's room for four players to team up and save the day. Simpsons Bowling is also included in this cabinet, which comes complete with a custom riser, lit marquee sign, and a molded coin slot.
The Orks, a savage race commonly known as the 'Green Tide', sweep across the stars with unrivalled violence in frenzied crusades known as a Waaagh! They are savage, brutal and crude, outnumbering all other races that lay in their path of destruction.
Become the spearhead of an Ork invasion as you bash, smash and shoot your way through the hive city of Luteus Prime on a mission to retrieve your hair squig and claim vengeance on your warlord! And just maybe become the warboss of a WAAAGH! along the way? Survival of the strongest has never been so violently fun!
Never enough Dakka! Destroy your foes using a great arsenal of weapons and rain destruction down upon them. No one can stand in your way! Massive explosions and flying body parts ain't never been this fun!
WAAAGH! Feel the emotion and violence build up until it bursts out as a storm of bullets! Violence begets violence as the massive destruction you cause builds up into a full blown unstoppable WAAAGH! Because Orks are made for two things: fightingand winning!
Orks together strong! Grab your friends and take on the forces of the Astra Militarum, the Genestealer Cults and the Space Marines together. Or you know, bash their head in instead and determine who is the fiercest Ork in the clan!
The unittest module is part of Python’s standard library for a long time. So in most cases, there’s no need to install it using something like pip install unittest. Simply run import unittest in your Python code and it works without installation.
In your Python code:
import unittest
If you try to pip install it, you’ll get the following error Could not find a version that satisfies the requirement unittest that you can fix by not installing it in the first place (it already is)!
PS C:\Users\xcent> pip install unittest

ERROR: Could not find a version that satisfies the requirement unittest (from versions: none)

ERROR: No matching distribution found for unittest
If you’re using Python 2, you can try installing the unittest2 package that is a backport for unit testing in Python 2.7. Then
pip install unittest2
Then add the following line to your Python code instead of import unittest:
import unittest2
Legacy Solutions to Install UnitTest Module
For some very old Python versions, you may want to try this approach:
Quick Fix: Python raises the ImportError: No module named 'unittest' when it cannot find the library unittest. The most frequent source of this error is that you haven’t installed unittest explicitly with pip install unittest. Alternatively, you may have different Python versions on your computer, and unittest is not installed for the particular version you’re using.
To fix this error, you can run the following command in your Windows shell:
$ pip install unittest
This simple command installs unittest in your virtual environment on Windows, Linux, and MacOS. It assumes that your pip version is updated. If it isn’t, use the following two commands in your terminal, command line, or shell (there’s no harm in doing it anyways):
Note: Don’t copy and paste the $ symbol. This is just to illustrate that you run it in your shell/terminal/command line.
The error might persist even after you have installed the unittest library. This likely happens because pip is installed but doesn’t reside in the path you can use. Although pip may be installed on your system the script is unable to locate it. Therefore, it is unable to install the library using pip in the correct path.
To fix the problem with the path in Windows follow the steps given next.
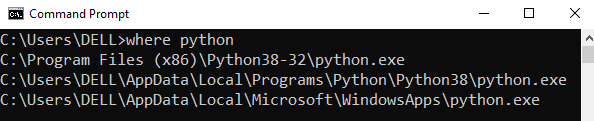
Step 1: Open the folder where you installed Python by opening the command prompt and typing where python
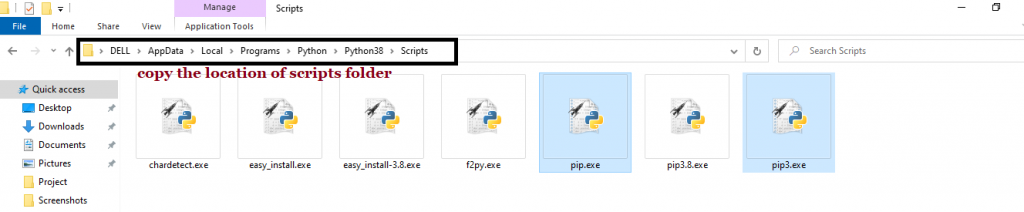
Step 2: Once you have opened the Python folder, browse and open the Scripts folder and copy its location. Also verify that the folder contains the pip file.
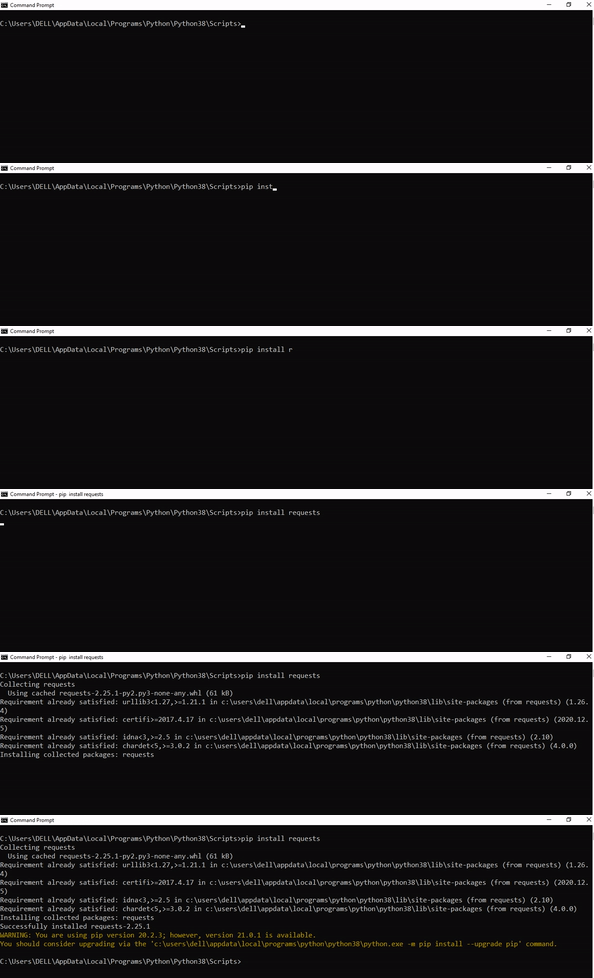
Step 3: Now open the Scripts directory in the command prompt using the cd command and the location that you copied previously.
Step 4: Now install the library using pip install unittest command. Here’s an analogous example:
After having followed the above steps, execute our script once again. And you should get the desired output.
Other Solution Ideas
The ModuleNotFoundError may appear due to relative imports. You can learn everything about relative imports and how to create your own module in this article.
You may have mixed up Python and pip versions on your machine. In this case, to install unittest for Python 3, you may want to try python3 -m pip install unittest or even pip3 install unittest instead of pip install unittest
If you face this issue server-side, you may want to try the command pip install – user unittest
If you’re using Ubuntu, you may want to try this command: sudo apt install unittest
You can also check out this article to learn more about possible problems that may lead to an error when importing a library.
Understanding the “import” Statement
import unittest
In Python, the import statement serves two main purposes:
Search the module by its name, load it, and initialize it.
Define a name in the local namespace within the scope of the import statement. This local name is then used to reference the accessed module throughout the code.
What’s the Difference Between ImportError and ModuleNotFoundError?
What’s the difference between ImportError and ModuleNotFoundError?
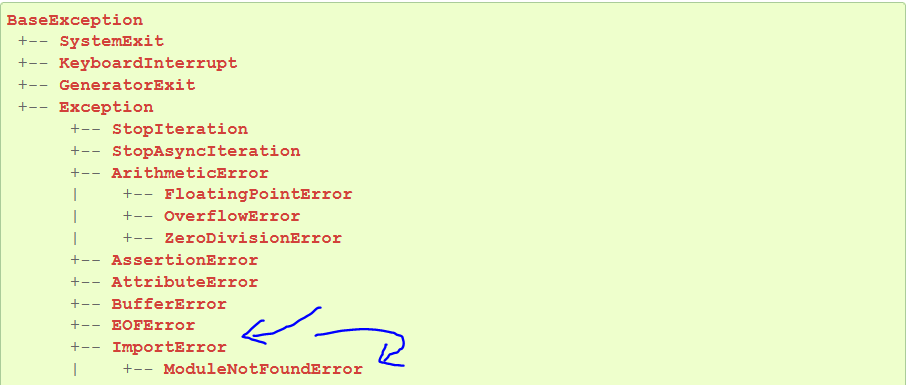
Python defines an error hierarchy, so some error classes inherit from other error classes. In our case, the ModuleNotFoundError is a subclass of the ImportError class.
You can see this in this screenshot from the docs:
You can also check this relationship using the issubclass() built-in function:
Specifically, Python raises the ModuleNotFoundError if the module (e.g., unittest) cannot be found. If it can be found, there may be a problem loading the module or some specific files within the module. In those cases, Python would raise an ImportError.
If an import statement cannot import a module, it raises an ImportError. This may occur because of a faulty installation or an invalid path. In Python 3.6 or newer, this will usually raise a ModuleNotFoundError.
Related Videos
The following video shows you how to resolve the ImportError:



![[Image: 4054965-lost-items.jpg]](https://www.gamespot.com/a/uploads/original/679/6794662/4054965-lost-items.jpg)
![[Image: 4054966-godofwarragnar%C3%B6k_20221021225126.jpg]](https://www.gamespot.com/a/uploads/original/679/6794662/4054966-godofwarragnar%C3%B6k_20221021225126.jpg)
![[Image: 4054968-godofwarragnar%C3%B6k_20221023130402.jpg]](https://www.gamespot.com/a/uploads/original/679/6794662/4054968-godofwarragnar%C3%B6k_20221023130402.jpg)
 Problem: Given a string. How will you split the string and get the last element?
 Coding Challenge
 Hint:
Hint: Related Read:
 Question: How would we write code to create and populate an md file?



 Recommended Tutorial: