Take a stand against ruthless corporate overlords in this narrative-driven adventure! Within the perpetually war-torn metropolis of Promethea, you'll control Anu, Octavio, and Fran on the worst day of their lives. Help these three lovable losers as they endeavor to change the world (and maybe even save it)! Face down a planetary invasion, vicious vault monster, and cold-hearted capitalist in this cinematic thrill ride where what happens next is up to you! Meet a motley cast full of misfits, assassin bots, and talking guns in this race to the top! It's time to fight back against exploitation and corporate greed. It's time to make Mayhem your business.
Summary: Use given_string.rsplit('sep', 1)[-1] to split the string and get the last element. Another approach is to use given_string.rpartition('sep', 1)[-1]
Problem: Given a string. How will you split the string and get the last element?
Let’s try to understand the given problem with the help of an example:
Example 1
# Input:

text = 'Java_C++_C#_Golang_Python'

# Expected Output:

Split String: ['Java_C++_C#_Golang', 'Python']

Last Element: Python
In the above example, “_” is the separator. However, not the entire string has been split. Only the last substring that comes after the separator has been extracted.
Example 2
# Input:

text = 'Java_C++_C#_Golang_Python_'

# Expected Output:

Split String: ['Java_C++_C#_Golang', 'Python']

Last Element: Python
Unlike the previous example, the input string ends with the separator itself. However, the output is similar. So, you have a different input string, but you have to generate a similar output by eliminating the separator.
Let’s dive into the different ways of solving the given problems.
Prerequisite: Simply put, the rsplit method splits a given string based on a given separator and stores the characters/substrings into a list. For example, finxterx42'.rsplit('x') will return the list ['fin', 'ter', '42'] as an output. rsplit can take two arguments –
sep – The separator string on which it is split.
maxsplit – The number of times the string is split.
Thus, you can use the maxsplit argument to your advantage and solve the given question by setting maxsplit = 1. This means the string will be split along the specified separator only once from the right end. Once the string is split into two parts from the right end, all that you need to do is extract the second element from the list created by the rsplit method.
Split String: ['Java_C++_C#_Golang', 'Python']

Last Element: Python
Solution to Example 2: In the second scenario, you must get rid of the separator that comes at the end of the string. Otherwise, simply using rsplit with the maxsplit argument will create a list that will create a list that will contain an empty character as the last item as shown below –
To avoid this problem, you can use the strip() function to get rid of the separator and then use rsplit as shown in the snippet below.
text = 'Java_C++_C#_Golang_Python_'

text = text.strip('_')

print("Split String: ", text.rsplit('_', 1))

print("Last Element: ", text.rsplit('_', 1)[-1])
Output:
Split String: ['Java_C++_C#_Golang', 'Python'] Last Element: Python
You can also use the rpartition method to solve the given problem. The rpartition method searches for a separator substring and returns a tuple with three strings: (1) everything before the separator, (2) the separator itself, and (3) everything after it. For example: finxterx42'.rpartition('x') will return the following tuple: ('finxter', 'x', '42')
Thus, you can simply extract the last item from the tuple after the string has been cut by the rpartition method.
Code:
# Solution to Example 1

text = 'Java_C++_C#_Golang_Python'

print("Split String: ", text.rpartition('_'))

print("Last Element: ", text.rpartition('_')[-1]) # Solution to Example 2

text = 'Java_C++_C#_Golang_Python_'

text = text.strip('_')

print("Split String: ", text.rpartition('_'))

print("Last Element: ", text.rpartition('_')[-1])
Output:
Split String: ('Java_C++_C#_Golang', '_', 'Python')

Last Element: Python
Coding Challenge
Before we wrap up this tutorial, here’s a coding challenge for you to test your grip on the concept you just learned.
Input: Consider the following IP Address – ip = 110.210.130.140 Challenge: Extract the network bit from the given class A ip address and convert it to its binary form. Expected Output: 10001100 Hint: – 140 is the network bit! – How to Convert a String to Binary in Python?
Solution:
ip = '110.210.130.140'

nw_bit = int(ip.rpartition('.')[-1])

print(bin(nw_bit)[2:])
Explanation: The solution is pretty straightforward. You first have to extract the network bit, i.e., 140. This happens to be the last item after the “.“. So, you can use rpartition and feed “.” as the separator and extract the last item (the network bit) from the tuple returned by the rpartition method. Since this will be a string, you must convert it to an integer and then typecast this integer to a binary number using the bin function to generate the final output.
I hope you enjoyed the numerous scenarios and challenges used in this tutorial to help you learn the two different ways of splitting a string and getting the last item. Please subscribe and stay tuned for more interesting tutorials and solutions.
Apex Legends' Catalyst Is Giving Tarot Readings On Twitter
Apex Legends Season 15: Eclipse is finally underway, and to help players get to know this season's debut legend a little better, Respawn is allowing Catalyst to perform tarot readings for players. The announcement was made via a Tweet from the official Apex Legends Twitter account, inviting players to draw a card and (possibly) catch a glimpse of their future.
Well then, I think it’s time for a little light reading. Think of something happening in your life—a situation, a question that has occupied your mind—and LIKE ❤ this tweet to draw a card. Let’s see the future you could make. pic.twitter.com/z1RxPT5gfU
To get your free tarot reading, simply like the tweet. After doing so, you will automatically be tagged in a tweet from the Apex Legends Twitter account and shown a random tarot card along with its meaning. All of the cards are Apex-themed, with the Major Arcana featuring art of Apex Legends characters and locales. For instance, The Moon card depicts Boreas' partially destroyed moon (and the location of this season's new map), Cleo. Naturally, Death features Revenant holding his Heirloom Weapon, a scythe called Dead Man's Curve. The Magician card appropriately pictures Seer in a pose indicating he's about to put on a show.
We couldn't resist taking a crack at it ourselves, and decided to try out a reading. After liking the tweet, we pulled The Sun, a card that's generally regarded as positive, and sometimes indicates future luck or a positive state of mind. The card itself featured Crypto and Wattson, and our fortune read, "Well, well, looks like things are going … well. Move forward with confidence and optimism. There's a win in your future--don't let anyone tell you otherwise."
Avril never thought she'd have to step up and be a hero but after a mysterious and devastating event, her world was flipped upside down. With her homeworld on the brink of destruction, Avril has been gifted extraordinary powers and will have to journey across the universe to uncover ancient secrets and reckon with a series of life-changing decisions.
Embark on an epic adventure to save Earth in this interplanetary action RPG. Harness the ancient powers of Sun and Moon to take on a variety of unique enemies while solving diverse puzzles and exploring stunning sci-fi worlds, each with its own curious stories, inhabitants, and mysteries.
This article will show you how to create and work with markdown files using Python.
Markdown is an excellent tool with many features to spice up a flat-text file, such as changing text colors, adding bullet points, tables, and much more. A terrific way to add pizzazz to an otherwise dull file.
To make it more interesting, we have the following running scenario:
Acme Spinners, manufacturer of the Spinner Widgets, has contacted you to create a README.md file for their software. They would like you to format the flat-text file to make it easier to navigate and more professional.
Each section of this article builds on the previous one. In the end, an entire README.md file will be created.
Question: How would we write code to create and populate an md file?
We can accomplish this task by performing the following steps:
Install Required Library
Create a Python File
Create a Markdown File
Preview Markdown File
Add Logo Image
Add a Paragraph
Add Heading
Add Table
Add Bullet Points
Add Table of Contents
Install Required Library
Before running the code in this article, the mdutils library must be installed.
To install this library, navigate to the command prompt and run the following code.
pip install mdutils
This library contains tools to assist in the creation of markdown files in Python, transforming a bland flat-text file into a fantastic-looking one!
Create Python File
Let’s start by creating a Python file called acme.py and placing this file into the current working directory.
In the IDE, navigate to and open acme.py and add the following lines.
from mdutils.mdutils import MdUtils

from mdutils import Html
These lines allow access to and manipulation of markdown features.
Save this file.
Create a Markdown File
The next step is to create a markdown file.
Open the acme.py file created earlier. At this point, this file should only contain two (2) lines of code.
from mdutils.mdutils import MdUtils

from mdutils import Html
The following code snippet appends two (2) additional lines to acme.py.
The first highlighted line calls the Mdutils() function and passes one (1) argument: a filename. This creates an object and saves it to mdAcme. If output to the terminal, an object similar to the one below would display.
<mdutils.mdutils.MdUtils object at 0x00000257FEB64940>
from mdutils.mdutils import MdUtils

from mdutils import Html mdAcme = MdUtils(file_name='acme') mdAcme.create_md_file()
The following line appends the create_md_file() function to the mdAcme object. When this code is run, the acmd.md file is created and saved to the current working directory.
Typically, the above line is only called once all the file contents have been finalized. From hereon in, all additional code will be placed above this line.
Save the acme.py file.
Note: A file extension is not required when passing a filename to the Mdutils() function. By default, md is assumed.
Preview a Markdown File
During the progression of our markdown file, we can preview the file in our IDE. These instructions assume you are using the VSC IDE.
In the IDE, hover over the acme.md file and right-mouse click. This action displays a pop-up.
From this pop-up, select Open Preview (or CTRL+SHIFT+V). This action displays a preview of the acme.md file. At this point, there is no data to display.
No worries! We’ll fix this in the next sections!
Note: Depending on the IDE, the Preview option may differ.
Add Logo Image
Let’s add a logo to the top of the Markdown file. Save the logo at the top of this article and place it in the current working directory.
The highlighted line calls the new_line() function, which adds a new line to the file. Then, new_inline_image() is called and passed one (1) argument: path (the full path to the image).
from mdutils.mdutils import MdUtils

from mdutils import Html mdAcme = MdUtils(file_name='acme')

mdAcme.new_line(mdAcme.new_inline_image(path='as_logo.png')) mdAcme.create_md_file()
Update acme.py, save and run.
If we preview acme.md, the logo displays on a new line (size: 411×117) and is left-aligned.
Option 2:
To change the image size and/or alignment, use the Html. image() function.
from mdutils.mdutils import MdUtils

from mdutils import Html mdAcme = MdUtils(file_name='acme')

mdAcme.new_paragraph(Html.image(path='as_logo.png', size='250', align='center')) mdAcme.create_md_file()
The highlighted line calls the new_paragraph() function, which adds a new line to the file. Then, Html_image() is called and passed three (3) arguments: path (image location/name), size (image size) and align (image alignment).
Update acme.py, save and run.
If we preview acme. md, the logo displays in its modified size and is center-aligned.
For this article, Option 2 is used.
Add a Paragraph
Earlier, new_paragraph() was used to add a logo. However, we can also use this to add plain text. Let’s add a new paragraph.
The highlighted line creates a new string. This string is formatted to bold, italics and is center-aligned.
from mdutils.mdutils import MdUtils

from mdutils import Html mdAcme = MdUtils(file_name='acme')

mdAcme.new_paragraph(Html.image(path='as_logo.png', size='250', align='center'))

mdAcme.new_paragraph('License and Installation Instructions', bold_italics_code='bi', align='center') mdAcme.create_md_file()
Update acme.py, save and run.
If we preview acme.md, the paragraph displays in bold italics and is center-aligned.
Add Heading and Text
A Level 1 Heading (level=1) called Overview and text is added.
In the highlighted area below, an Overview section is created.
This section shows how to use the write() and new_paragraph() functions to display text, change text colors and add hyperlinks.
from mdutils.mdutils import MdUtils

from mdutils import Html mdAcme = MdUtils(file_name='acme')

mdAcme.new_paragraph(Html.image(path='as_logo.png', size='250', align='center'))

mdAcme.new_paragraph('License and Installation Instructions', bold_italics_code='bi', align='center') mdAcme.new_header(level=1, title='Overview')

mdAcme.write("Welcome to <font color='red'>Acme Spinners</font>!\n\n")

mdAcme.new_paragraph("Visit our website at <a href='#'>acmespinners.ca</a> to view our videos on the latest spinner techniques.\n") mdAcme.create_md_file()
Update acme.py, save and run.
If we preview acme.md, the Overview heading and text displays.
Let’s open acme.md to review the code when not in Preview Mode.
Notice that the code in the acme.py file was converted to HTML.
Note: If you are unfamiliar with HTML, click here to learn more!
Add Table
A Level 2 Heading (level=2) called License, and a table is added.
In the highlighted area below, a License section was created.
This section displays details about the license in a table format. This example adds a line for each entry. However, a loop could also be used to populate the table.
from mdutils.mdutils import MdUtils

from mdutils import Html mdAcme = MdUtils(file_name='acme')

mdAcme.new_paragraph(Html.image(path='as_logo.png', size='250', align='center'))

mdAcme.new_paragraph('License and Installation Instructions', bold_italics_code='bi', align='center') mdAcme.new_header(level=1, title='Overview')

mdAcme.write("Welcome to <font color='red'>Acme Spinners</font>!\n\n")

mdAcme.new_paragraph("Visit our website at <a href='#'>acmespinners.ca</a> to view our videos on the latest spinner techniques.\n") mdAcme.new_header(level=2, title='License')

data = ["Item", "Description"]

data.extend(["License #", "ACS-3843-34-2217"])

data.extend(["Purchase Date", "Nov. 1, 2022"])

data.extend(["", ""])

mdAcme.new_table(columns=2, rows=4, text=data, text_align='left')

mdAcme.new_line()
Update, save and run the acme.py file.
If we preview acme.md, the following displays.
Add Bullet Points
A Level 3 Heading (level=3) called Instructions, and two (2) sets of bullet points are added.
from mdutils.mdutils import MdUtils

from mdutils import Html mdAcme = MdUtils(file_name='acme')

mdAcme.new_paragraph(Html.image(path='as_logo.png', size='250', align='center'))

mdAcme.new_paragraph('License and Installation Instructions', bold_italics_code='bi', align='center') mdAcme.new_header(level=1, title='Overview')

mdAcme.write("Welcome to <font color='red'>Acme Spinners</font>!\n\n")

mdAcme.new_paragraph("Visit our website at <a href='#'>acmespinners.ca</a> to view our videos on the latest spinner techniques.\n") mdAcme.new_header(level=2, title='License')

data = ["Item", "Description"]

data.extend(["License #", "ACS-3843-34-2217"])

data.extend(["Purchase Date", "Nov. 1, 2022"])

data.extend(["", ""])

mdAcme.new_table(columns=2, rows=4, text=data, text_align='left') mdAcme.new_header(level=3, title='Instructions')

list1 = ['Getting Started', 'Remove Battery', ['Add 2 AAA Batteries', 'Close and lock']]

mdAcme.new_list(list1)

list2 = ['1. Set Level', ['1. Scroll to view levels', '2. Press Select'], '2. Press Start', ]

mdAcme.new_list(list2) mdAcme.create_md_file()
Update, save and run the acme.py file.
If we preview acme.md, the following displays.
Note: There are additional ways to configure bullet points. For this article, the most commonly used was selected.
Add a Table of Contents
This sections combines the three (3) headings created earlier (different level for each) and from these lines, creates a Table of Contents.
On the highlighted line, the Table of Contents is created. For this function, a title (‘Table of Contents‘), and depth (3) was passed.
A depth of 3 was selected as each heading in this article was assigned a different level (example, level=1, level=2, level=3).
from mdutils.mdutils import MdUtils

from mdutils import Html mdAcme = MdUtils(file_name='acme')

mdAcme.new_paragraph(Html.image(path='as_logo.png', size='250', align='center'))

mdAcme.new_paragraph('License and Installation Instructions', bold_italics_code='bi', align='center') mdAcme.new_header(level=1, title='Overview')

mdAcme.write("Welcome to <font color='red'>Acme Spinners</font>!\n\n")

mdAcme.new_paragraph("Visit our website at <a href='#'>acmespinners.ca</a> to view our videos on the latest spinner techniques.\n") mdAcme.new_header(level=2, title='License')

data = ["Item", "Description"]

data.extend(["License #", "ACS-3843-34-2217"])

data.extend(["Purchase Date", "Nov. 1, 2022"])

data.extend(["", ""])

mdAcme.new_table(columns=2, rows=4, text=data, text_align='left') mdAcme.new_header(level=3, title='Instructions')

list1 = ['Getting Started', 'Remove Battery', ['Add 2 AAA Batteries', 'Close and lock']]

mdAcme.new_list(list1)

list2 = ['1. Set Level', ['1. Scroll to view levels', '2. Press Select'], '2. Press Start', ]

mdAcme.new_list(list2) mdAcme.new_table_of_contents(table_title='Table of Contents', depth=3) mdAcme.create_md_file()
Update, save and run the acme.py file.
If we preview acme.md, the following displays.
Summary
This article has shown you how to construct a fantastic-looking flat-text file!
Good Luck & Happy Coding!
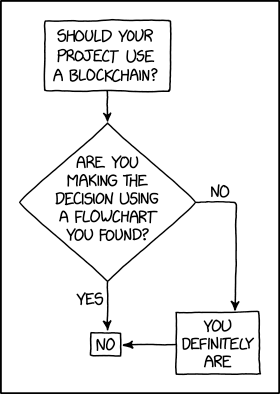
Programmer Humor – Blockchain
“Blockchains are like grappling hooks, in that it’s extremely cool when you encounter a problem for which they’re the right solution, but it happens way too rarely in real life.”source – xkcd
Simpsons Arcade1Up Cabinet Gets Massive Discount For Black Friday
Arcades might be a rare sight these days, but that doesn't mean that you can't bring that magic to your home. As part of its Black Friday deals, Target has slashed the price on a true arcade classic, the coin-munching 1991 Simpsons game that recently got an authentic replica from specialist company Arcade1Up.
Like the original Simpsons arcade game, this one features the most famous family in Springfield busting heads all over town. You'll be able to play as either Homer, Marge, Bart, or Lisa, and there's room for four players to team up and save the day. Simpsons Bowling is also included in this cabinet, which comes complete with a custom riser, lit marquee sign, and a molded coin slot.
The Orks, a savage race commonly known as the 'Green Tide', sweep across the stars with unrivalled violence in frenzied crusades known as a Waaagh! They are savage, brutal and crude, outnumbering all other races that lay in their path of destruction.
Become the spearhead of an Ork invasion as you bash, smash and shoot your way through the hive city of Luteus Prime on a mission to retrieve your hair squig and claim vengeance on your warlord! And just maybe become the warboss of a WAAAGH! along the way? Survival of the strongest has never been so violently fun!
Never enough Dakka! Destroy your foes using a great arsenal of weapons and rain destruction down upon them. No one can stand in your way! Massive explosions and flying body parts ain't never been this fun!
WAAAGH! Feel the emotion and violence build up until it bursts out as a storm of bullets! Violence begets violence as the massive destruction you cause builds up into a full blown unstoppable WAAAGH! Because Orks are made for two things: fightingand winning!
Orks together strong! Grab your friends and take on the forces of the Astra Militarum, the Genestealer Cults and the Space Marines together. Or you know, bash their head in instead and determine who is the fiercest Ork in the clan!
The unittest module is part of Python’s standard library for a long time. So in most cases, there’s no need to install it using something like pip install unittest. Simply run import unittest in your Python code and it works without installation.
In your Python code:
import unittest
If you try to pip install it, you’ll get the following error Could not find a version that satisfies the requirement unittest that you can fix by not installing it in the first place (it already is)!
PS C:\Users\xcent> pip install unittest

ERROR: Could not find a version that satisfies the requirement unittest (from versions: none)

ERROR: No matching distribution found for unittest
If you’re using Python 2, you can try installing the unittest2 package that is a backport for unit testing in Python 2.7. Then
pip install unittest2
Then add the following line to your Python code instead of import unittest:
import unittest2
Legacy Solutions to Install UnitTest Module
For some very old Python versions, you may want to try this approach:
Quick Fix: Python raises the ImportError: No module named 'unittest' when it cannot find the library unittest. The most frequent source of this error is that you haven’t installed unittest explicitly with pip install unittest. Alternatively, you may have different Python versions on your computer, and unittest is not installed for the particular version you’re using.
To fix this error, you can run the following command in your Windows shell:
$ pip install unittest
This simple command installs unittest in your virtual environment on Windows, Linux, and MacOS. It assumes that your pip version is updated. If it isn’t, use the following two commands in your terminal, command line, or shell (there’s no harm in doing it anyways):
Note: Don’t copy and paste the $ symbol. This is just to illustrate that you run it in your shell/terminal/command line.
The error might persist even after you have installed the unittest library. This likely happens because pip is installed but doesn’t reside in the path you can use. Although pip may be installed on your system the script is unable to locate it. Therefore, it is unable to install the library using pip in the correct path.
To fix the problem with the path in Windows follow the steps given next.
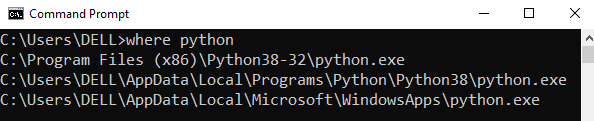
Step 1: Open the folder where you installed Python by opening the command prompt and typing where python
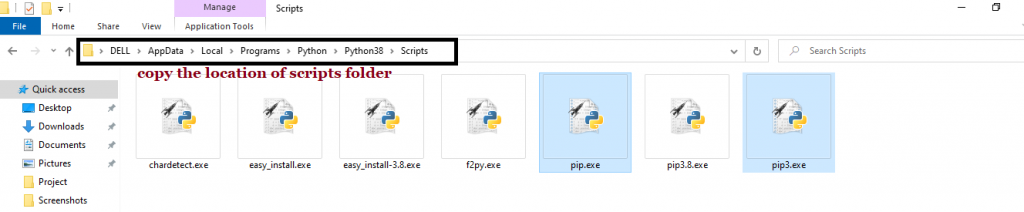
Step 2: Once you have opened the Python folder, browse and open the Scripts folder and copy its location. Also verify that the folder contains the pip file.
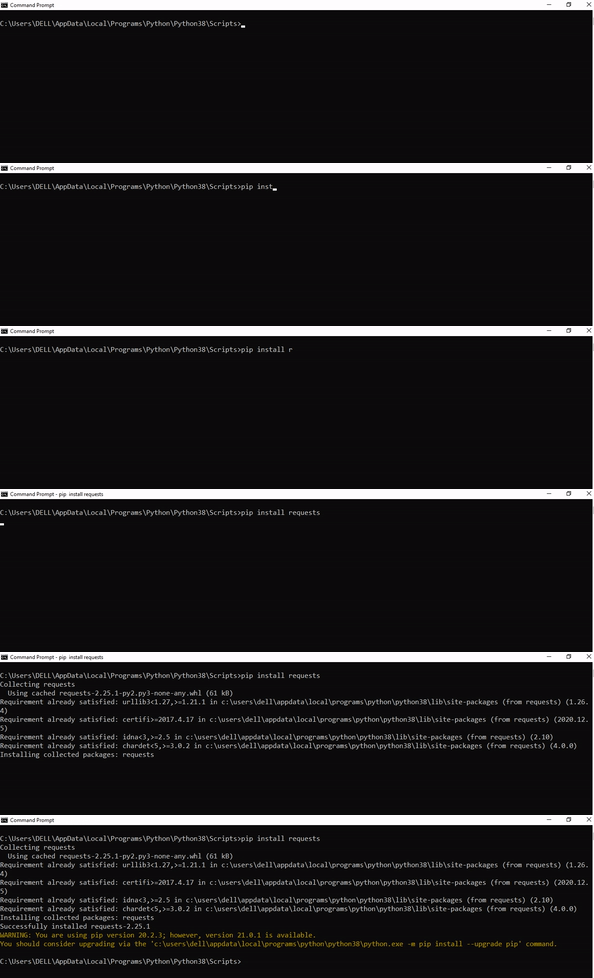
Step 3: Now open the Scripts directory in the command prompt using the cd command and the location that you copied previously.
Step 4: Now install the library using pip install unittest command. Here’s an analogous example:
After having followed the above steps, execute our script once again. And you should get the desired output.
Other Solution Ideas
The ModuleNotFoundError may appear due to relative imports. You can learn everything about relative imports and how to create your own module in this article.
You may have mixed up Python and pip versions on your machine. In this case, to install unittest for Python 3, you may want to try python3 -m pip install unittest or even pip3 install unittest instead of pip install unittest
If you face this issue server-side, you may want to try the command pip install – user unittest
If you’re using Ubuntu, you may want to try this command: sudo apt install unittest
You can also check out this article to learn more about possible problems that may lead to an error when importing a library.
Understanding the “import” Statement
import unittest
In Python, the import statement serves two main purposes:
Search the module by its name, load it, and initialize it.
Define a name in the local namespace within the scope of the import statement. This local name is then used to reference the accessed module throughout the code.
What’s the Difference Between ImportError and ModuleNotFoundError?
What’s the difference between ImportError and ModuleNotFoundError?
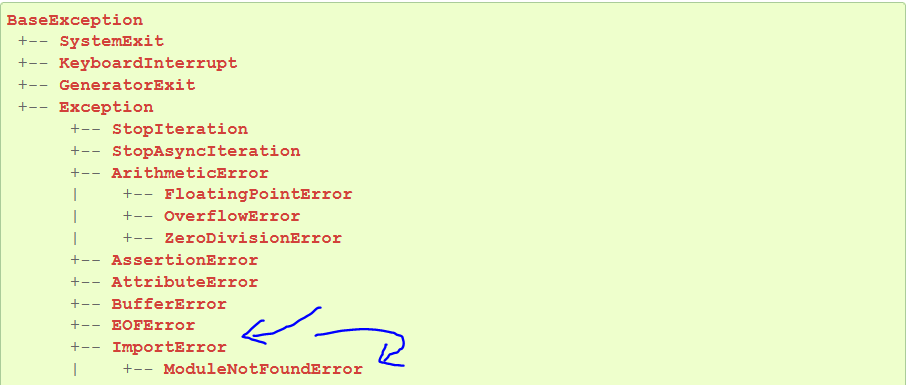
Python defines an error hierarchy, so some error classes inherit from other error classes. In our case, the ModuleNotFoundError is a subclass of the ImportError class.
You can see this in this screenshot from the docs:
You can also check this relationship using the issubclass() built-in function:
Specifically, Python raises the ModuleNotFoundError if the module (e.g., unittest) cannot be found. If it can be found, there may be a problem loading the module or some specific files within the module. In those cases, Python would raise an ImportError.
If an import statement cannot import a module, it raises an ImportError. This may occur because of a faulty installation or an invalid path. In Python 3.6 or newer, this will usually raise a ModuleNotFoundError.
Related Videos
The following video shows you how to resolve the ImportError:
Andy Serkis Reveals A New Lord Of The Rings Project He's Involved With
Veteran actor Andy Serkis, known in part for playing Gollum in Peter Jackson's The Lord of the Rings movie series, is set to return for another Middle-earth project, but it's not a new film or TV series.
Serkis told Collider that he will narrate an upcoming audiobook version of J.R.R. Tolkien's The Silmarillion. Serkis let this slip as part of a wider comment about his reaction to Amazon's The Lord of the Rings: The Rings of Power. Serkis said he wanted and enjoyed the series, calling it "incredibly engaging."
Serkis previously recorded the audiobook for The Lord of the Rings and The Hobbit, and he also read the appendices, from which The Rings of Power draws some of its material. In this comment specifically, Serkis revealed that he's working on an audiobook version of The Silmarillion as well.
Mow thousands of night creatures and survive until dawn! Vampire Survivors is a gothic horror casual game with rogue-lite elements, where your choices can allow you to quickly snowball against the hundreds of monsters that get thrown at you.



 Problem: Given a string. How will you split the string and get the last element?
 Coding Challenge
 Hint:
Hint: Related Read:
 Question: How would we write code to create and populate an md file?




 Recommended Tutorial: