(Fixed) Python TypeError ‘bool’ object is not subscriptable
5/5 – (1 vote)
Problem Formulation
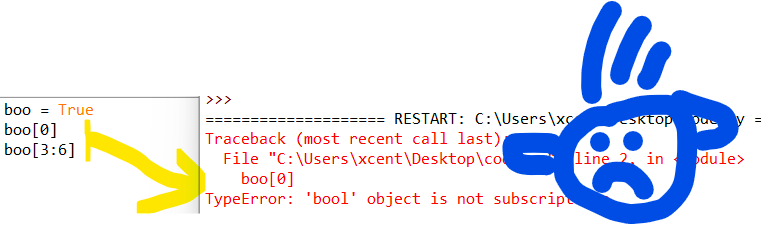
Consider the following minimal example where a TypeError: 'bool' object is not subscriptable occurs:
boo = True

boo[0]

# or:

boo[3:6]
This yields the following output:
Traceback (most recent call last): File "C:\Users\xcent\Desktop\code.py", line 2, in <module> boo[0]

TypeError: 'bool' object is not subscriptable
Solution Overview
Python raises the TypeError: 'bool' object is not subscriptable if you use indexing or slicing with the square bracket notation on a Boolean variable. However, the Boolean type is not indexable and you cannot slice it—it’s not iterable!
In other words, the Boolean class doesn’t define the __getitem__() method.
converting the Boolean to a string using the str() function because strings are subscriptable,
removing the indexing or slicing call,
defining a dummy __getitem__() method for a custom “Boolean wrapper class”.
Related Tutorials: Check out our tutorials on indexing and slicing on the Finxter blog to improve your skills!
Method 1: Convert Boolean to a String
If you want to access individual characters of the “Boolean” strings "True" and "False", consider converting the Boolean to a string using the str() built-in function. A string is subscriptable so the error will not occur when trying to index or slice the converted string.
A simple way to resolve this error is to put the Boolean into a list that is subscriptable—that is you can use indexing or slicing on lists that define the __getitem__() magic method.
You can also define your own wrapper type around the Boolean variable that defines a dunder method for __getitem__() so that every indexing or slicing operation returns a specified value as defined in the dunder method.
This hack is generally not recommended, I included it just for comprehensibility and to teach you something new.
Summary
The error message “TypeError: 'boolean' object is not subscriptable” happens if you access a boolean boo like a list such as boo[0] or boo[1:4]. To solve this error, avoid using slicing or indexing on a Boolean or use a subscriptable object such as lists or strings.
Final day, to check out the encore weekend freebies
[freebies.indiegala.com] "Encore, encore" we've been hearing and we listened. We've brought back for this weekend a few of your favorites. Keep an eye on for more.
December 2021, Tokyo district court. Akihiro Ehara stands accused of groping a woman on a crowded train. A bystander's video footage of his attempt to flee the scene and subsequent apprehension is all over the news, and public outcry demands a maximum sentence.
"Three days ago, a dead body was found in an abandoned building in Yokohama. Have you identified it yet?" he proclaims as confusion cuts through the court room. His defense lawyer, Saori Shirosaki , has no doubt that crucial details of the situation have been overlooked, as Ehara was not even tried for the murder. She contacts detective Takayuki Yagami to investigate this further.
How could Ehara have committed two crimes at once? Was the sexual battery just a cover up? Has Ehara gamed the entire justice system? As victims surface and Yagami digs farther into the truth, he is faced with a question: Defend the law, or enact justice? From just a single stumble, one can become a monster...
Hello everyone, looking to add thumbnails to your Retro Arch media? This works for generally all versions. Been done this way for quite some time.
First, let's check this directory for file that might already be there. (So you can get an idea how files should be named, hoping auto-update at least found something in your list)
RetroArch-1.10.3-64bit\thumbnails\
If you don't see anything, just continue with tutorial, we will be explaining everything that should be there.
Also, this works for just about every version of Retro Arch. Not just 1.10.3 but even the newest now 1.11.0
Find the box art you want by searching google "boxart {game name}"
Inside of the directory above, should be different consoles you have downloaded. You can see the image below for an example. Also check the github link below for massive lists already built up.
Inside each console folder is >> "Named_Boxarts", "Named_Snaps", and "Named_Titles"
Add the corresponding png in there and name it exactly as you have the game named in RA, and it will load up
It just scans the folders for corresponding images that match game title names.
If you add the wrong one, just changing the name will remove it, or removing it works normal. Pretty hard to mess this up.
Everything is CASE SENSITIVE. If it isn't name exactly the same as it shows in RA, the image WILL NOT SHOW UP.
Your Playlist name should look exactly the same in the RetroArch1.10.3>>thumbnails location. Make sure there isn't a missing dash between console creator - and the version.
Note**
If you check online https://github.com/libretro-thumbnails/l...thumbnails
They tend to name theirs like this also. So it's best practice to have the same.
If you want your thumbnails to auto grab, the names must match the github libretro link above.
Remember, everything is case-sensitive, so if you don't capitalize the right letters, nothing will pickup. Or forget a comma, not gonna work.
Checkout the image below for BAD EXAMPLES
Here is an example of a properly named and managed library.
The above is just examples showing you what to watch out for.
This library has everything right for auto-update to grab thumbnails, and the side images you see to the left. The pic of the console shows properly.
A lot of people tend to ask how to do this, so I have created a short tutorial to explain how.
Posted by: xSicKxBot - 10-01-2022, 09:43 AM - Forum: Python
- No Replies
Aave for DeFi Developers – A Simple Guide with Video
5/5 – (2 votes)
This is in continuation of our DeFi series. In this post, we look at yet another decentralized lending and borrowing platform Aave.
Full DeFi Course: Click the link to access our free full DeFi course that’ll show you the ins and outs of decentralized finance (DeFi).
Aave
Aave launched in 2017 is a DeFi protocol similar to Compound with a lot of upgrades.
Beyond what Compound provides, Aave gives several extra tokens for supply and borrowing. As of now, Compound offered nine different tokens (various ERC- 20 Ethereum- based assets).
Aave provides these nine besides an additional 13 that Compound does not.
Depositors give the market liquidity to generate a passive income, while borrowers can borrow if they have an over-collateralized token or can avail flash loans for under-collateralized (one-block liquidity).
Currently, we can see two major markets on Aave.
The first is for ERC-20 tokens that are more frequently used, like those of Compound, and their underlying assets, such as ETH, DAI and USDC.
The latter is only available with Uniswap LP tokens.
For instance, a user receives an LP token signifying market ownership when they deposit collateral into a liquidity pool on the Uniswap platform. To provide additional benefits, the LP tokens can be sold on the Uniswap market of Aave.
As per DeFi pulse, Aave has a TVL (Total Value Locked) of $4.09B as of today.
Fig: Defi Pulse for Aave
Aave Versions
Aave has released three versions (v1, v2 and v3) as of now and the Governance token of Aave is ‘AAVE’. Version 1 or v1 is the base version launched in 2017 and then there have been upgrades with multiple new features added. Below is a short comparison of when to use v2 or v3.
You must deposit any asset to be used as collateral before borrowing.
The amount you can borrow up to depends on the value you have deposited and the readily available liquidity.
For instance, if there isn’t enough liquidity or if your health factor (minimum threshold of the collateral = 1, below this value, liquidation of your collateral is triggered) prevents it, you can’t borrow an asset.
The loan is repaid with the same asset that you borrowed.
For instance, if you borrow 1 ETH, you’ll need to pay back 1 ETH plus interest.
In the updated Version 2 of the Aave Protocol, you can also use your collateral to make payments. You can borrow any of the stable coins like USDC, DAI, USDT, etc. if you want to repay the loan based on the price of the USD.
Stable vs Variable Interest Rate
In the short-term, stable rates function as a fixed rate, but they can be rebalanced in the long run in reaction to alterations in the market environment. Depending on supply and demand in Aave, the variable rate can change.
The stable rate is the better choice for forecasting how much interest you will have to pay because, as its name suggests, it will remain fairly stable. The variable rate changes over time and, depending on market conditions, could be the optimal rate.
Through your dashboard, you can switch between the stable and variable rate at any time.
Deposit/Lending
Lenders share the interest payments made by borrowers based on the utilization rate multiplied by the average borrowing rate. The yield for depositors increases as reserve utilization increases.
Lenders are also entitled to a portion of the Flash Loan fees, equal to .09% of the Flash Loan volume.
There is no minimum or maximum deposit amount; you may deposit any amount you choose.
Flash Loans in Aave
Flash Loans are unique business agreements that let you borrow an asset as long as you repay the borrowed money (plus a fee) before the deal expires (also called One Block Borrows). Users are not required to provide collateral for these transactions in order to proceed.
Flash Loans have no counterpart in the real world, so understanding how state is controlled within blocks in blockchains is a prerequisite.
Flash-loan enables users to access pool liquidity for a single transaction as long as the amount borrowed plus fees are returned or (if permitted) a debt position is opened by the end of the transaction.
For flash loans, Aave V3 provides two choices:
(1) “flashLoan”: enables borrowers to access the liquidity of several reserves in a single flash loan transaction. In this situation, the borrower also has the choice to open a fixed or variable-rate loan position secured by provided collateral.
The fee for flashloan is waived for approved flash borrowers.
(2) “flashLoanSimple”: enables the borrower to access a single reserve’s liquidity for the transaction. For individuals looking to take advantage of a straightforward flash loan with a single reserve asset, this approach is gas-efficient.
The fee for flashloanSimple is not waived for the flash borrowers. The Flashloan fee on Aave V3 is 0.05%.
Let’s Code a Simple Flash Loan
Let’s code a simple flash loan in Aave, where we buy and repay the asset in the same transaction without having to provide any collateral. First, we set up the environment for writing the code.
Note: It is recommended to follow the video along for a better understanding.
$npm install -g truffle # in case truffle not installed

$mkdir aave_flashloan $cd aave_flashloan

$truffle init

$npm install @aave/core-v3

$npm install @openzeppelin/contracts

$npm install @openzeppelin/test-helpers
Note: Aave3 is currently available on Polygon, Arbitrum, Avalanche, and other L2 chains. As of now, it is not available on the Ethereum mainnet. Thus, we will fork the Polygon mainnet for our tests.
Set up a new app in Alchemy with the chain as Polygon mainnet and note down the API key.
This should run the flash loan test case, and it must pass.
Conclusion
This tutorial discussed Aave, a leading Dapp lending and borrowing provider.
It covered some basic functionalities supported in Aave, such as lending, borrowing, and flash loans.
There are many other features Aave supports and it is not possible to cover it in one post, such as governance, liquidation, and advanced features such as Siloed Borrowing, Credit Delegation, and many more.
The post also examined a simple flash loan contract using Aave API.
You can explore more about borrowing and lending with Aave in this link. It has a full stack Defi Aave dapp with frontend to perform borrowing and lending.
❤️ The Drone Racing League Simulator Store Page[store.epicgames.com]
The games is free to keep until Thursday, September 22nd, 2022 15:00 UTC.
There is another game on GOG dont forget to claim it
We are welcoming everyone to join our discord[discord.gg]. We are more active there on finding giveaways, small or large, and there are daily raffles you can participate.
Posted by: xSicKxBot - 10-01-2022, 09:43 AM - Forum: Lounge
- No Replies
Horror And Romance Come Together In Bones And All First Trailer
Camille DeAngelis' 2015 novel Bones and All tells a romantic horror story between Lee and Marlene as they make their way through a road trip in Reagan-era America. Timothée Chalamet and Taylor Russell star in the adaptation as the bloody lovers, directed by Luca Guadagnino (2018's Suspiria). The first teaser was released Thursday and didn't give too much of the plot away, but will leave viewers with some visceral imagery.
Bones and All had its world premiere at the 79th Venice International Film Festival in early September, receiving a 10-minute standing ovation. You can check out the teaser below.
While it's a quick teaser, we can see Maren struggle with her appetite and desires and Lee's rage throughout it, and something very different from what we've seen from Chalamet in past years. Joining Russell and Chalamet are Mark Rylance, Michael Stuhlbarg, André Holland, Chloë Sevigny, Jessica Harper, and David Gordon Green. Chalamet is co-producing the feature.
From the makers of the acclaimed Yakuza series, Ryu Ga Gotoku Studio, Judgment is the dramatic tale of a disgraced lawyer seeking redemption in a world rife with corruption and despair. Investigate the seedy Red Light District of Kamurocho by stepping into the mind of private detective Takayuki Yagami and utilize innovative investigation systems to uncover the secrets that lie deep within Kamurocho's corrupt underbelly. Experience visceral combat with two unique combat styles. Take down groups of thugs with sweeping blows in Crane Style, then switch to Tiger to overwhelm a single foe with a series of powerful strikes. Practice mixing-and-matching styles in combat in conjunction with a wide variety of skills, weapons, and powerful (and hilarious) EX Actions to unlock a whole new dimension in combat.
Posted by: xSicKxBot - 09-30-2022, 11:20 AM - Forum: Python
- No Replies
How to Retrieve a Single Element from a Python Generator
5/5 – (2 votes)
This article will show you how to retrieve a single generator element in Python. Before moving forward, let’s review what a generator does.
Quick Recap Generators
Definition Generator: A generator is commonly used when processing vast amounts of data. This function uses minimal memory and produces results in less time than a standard function.
Definition yield: The yield keyword returns a generator object instead of a value.
Definition next(): This function takes an iterator and an optional default value. Each time this function is called, it returns the next iterator item until all items are exhausted. Once exhausted, it returns the default value passed or a StopIteration Error.
Problem Formulation and Solution Overview
Question: How would we write code to retrieve and return a single element from a Generator?
We can accomplish this task by one of the following options:
Let’s say we want to start a weekly in-house lottery called LottoOne (yeah — the lottery naming doesn’t care about Python’s naming conventions ).
The code below will generate and return one (1) random element (an integer): the winning number for the week.
import random def LottoOne(): num = random.randint(1, 50) yield print(f'The Winning Number for the Week is: {num}!') gen = LottoOne()

next(gen)
The first line in the above code imports the random library. This library allows the generation of random numbers using the random.randint() function.
On the following line, an instance of LottoOne is instantiated and saved to the variable gen. If output to the terminal, an object similar to that shown below will display.
<generator object LottoOne at 0x00000236B9686880>
Since we only want the first randomly generated number, the code calls the next() function once and passes it one (1) argument, the object gen. The results are output to the terminal.
If you know what number you need to return from a generator, it can be referenced directly, as shown in the code below.
import itertools

from itertools import islice gen = (x for x in range(1, 50))

res = next(itertools.islice(gen, 2, None))

print(res)
The first two (2) lines in the above code import the itertools library and its associated function islice()needed to achieve the desired result.
The following line creates a generator comprehension using the range() function and passing it a start and stop position (1, 50-1). The results save to gen as an object.
If output to the terminal, an object similar to that shown below will display.
The default value. In this case, the keyword None. Passing a default value prevents a StopIteration error from occurring when the end of the iterator has been reached.
The results save to res and are output to the terminal.
3
The value of 3 can be found at index 2 in gen.
Method 3: Use a List, Generator Comprehension and slicing
gen = (i for i in range(1, 50))

res = list(gen)[3]

print(res)
The first line in the above code creates a Generator Comprehension using the range() function and passing it a start and stop position (1, 50-1). The results save to gen as an object.
If output to the terminal, an object similar to that shown below will display.
<generator object at 0x00000295D4DB78F0>
The following line converts the object to a list. Slicing is then applied to retrieve the list element at position three (3).
The results save to res and are output to the terminal.
4
The value of 4 can be found at index 3 in gen.
Method 4: Use a Generator and a For Loop
This example creates a Generator whose content is output to the terminal until a specific number is found.
def my_func(): yield 10 yield 20 yield 30 gen = my_func() for item in gen: if item == 20: print(item) break
This first line of the above code declares the function my_func(). This function will return, via a yield statement, a number (one/iteration).
Next, an object is declared and saved to gen.
If output to the terminal, an object similar to that shown below will display.
<generator object my_func at 0x0000022DE93D59A0>
The following line instantiates a for loop. This loop iterates through each yield statement in gen until the item contains a value of 20.
This value is output to the terminal, and the loop terminates via the break statement.
20
Summary
This article has provided four (4) ways to retrieve a single element from a Generator to select the best fit for your coding requirements.
Good Luck & Happy Coding!
Programming Humor – Python
“I wrote 20 short programs in Python yesterday. It was wonderful. Perl, I’m leaving you.” — xkcd
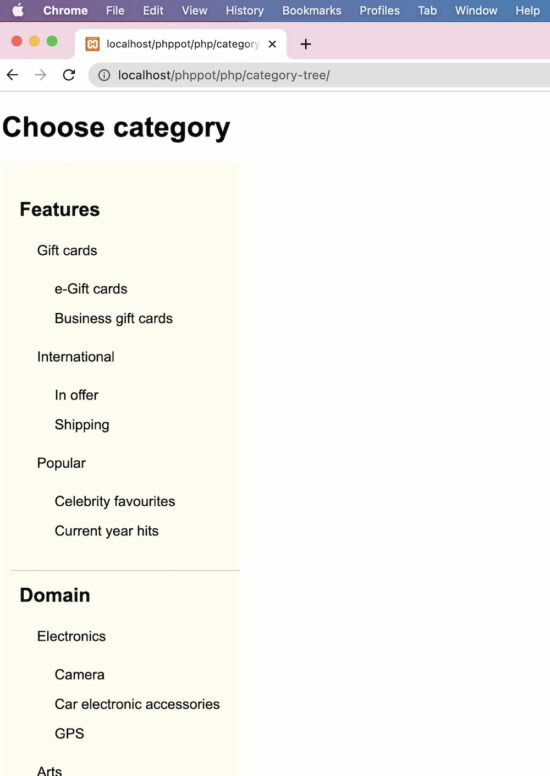
This PHP script will help if you want to display an Amazon-like product category tree. It will be useful for displaying the category menu in a hierarchical order, just like a tree.
The specialty of this PHP code is that it builds a multi-level category tree with infinite depth. It uses the recursion method to obtain this.
This is an initiator that calls the PHP recursive parsing to get the Category Tree HTML. In the PHP ZipArchive post, we used the same recursion concept to compress the contents of the enclosed directories.
Also, it has a UI holder to render the HTML hierarchical category menu.
A PHP class CategoryTree is created to read and parse the category array from the database.
This styles gives the category tree a pleasing look. Since it displays an infinite level of child categories, this CSS will help to rectify the default UI constraints.


 Related Tutorials: Check out our tutorials on


![[Image: h2epwXm.png]](https://i.imgur.com/h2epwXm.png)
![[Image: Zw7I4F4.png]](https://i.imgur.com/Zw7I4F4.png)
![[Image: EMnhcMy.png]](https://i.imgur.com/EMnhcMy.png)
![[Image: NnCu375.png]](https://i.imgur.com/NnCu375.png)


 The amount you can borrow up to depends on the value you have deposited and the readily available liquidity.
  The fee for flashloan is waived for approved flash borrowers.
 Note: It is recommended to follow the video along for a better understanding.
 Question: How would we write code to retrieve and return a single element from a
  ).
).