Madden 23 is now out for the entire community and every fan is diving into another year of virtual football. While a majority of the player base are returning veterans, there is a solid chunk of players that haven't played a Madden game before or are coming back after a lengthy hiatus. If you're in this camp or simply don't remember some controls, then you're going to need a crash course on how to perform some of the most basic, yet important, mechanics in Madden 23. One such mechanic that every player needs to know how to do is a QB slide.
The quarterback is the most important player on the field at any given time, and it's vital that players know the best ways to protect them. While a quarterback's job is usually to throw the ball to a receiver, sometimes a play doesn't work out that way, and you need to escape the pocket with the QB. Or, you could be playing as a team with a speedy quarterback, such as Lamar Jackson or Kyler Murray, and use QB run plays as a part of your offense. Either way, in order to maximize your potential with a mobile QB and ensure they don't get injured or fumble the ball, you need to know how to QB slide in Madden 23.
Doing a QB Slide
Fortunately, the controls for sliding with your quarterback are the same for any other ball carrier. However, there are some pitfalls to avoid when attempting to slide that players need to be aware of in Madden 23.
Leisure Suit Larry 5 - Passionate Patti Does a Little Undercover Work
[freebies.indiegala.com] Passionate Patti Does a Little Undercover Work! is (despite the number) the fourth game in Al Lowe's Leisure Suit Larry series.
VR Hope Bundle | 6 VR Steam Games | 93% OFF
[www.indiegala.com] Where's hope, there's life...virtual life. Enter a whole new reality with a whole new VR bundle including: The Great C, HOPE VR: Progressive Meditation, Dark Threads, VR Walking Simulator, Legendary Hunter VR & Dodo Adventures.
Go on a feel-good adventure with a brother and sister as they explore dreamscapes and befriend magical creatures. Lost in their imagination, Toto and Gal must stick together and solve puzzles to journey back home. This whimsical puzzle adventure game will make you feel like you're playing a cartoon!
JDK 16.0.1, 11.0.11, 8u291, and 7u301 Have Been Released!
The Java SE 16.0.1, 11.0.11, 8u291, and 7u301 update releases are now available. You can download the latest JDK releases from the Java SE Downloads page. OpenJDK 16.0.1 is available on http://jdk.java.net/16/. New Features, Changes, and Notable Bug Fixes For information about the new features, chan...
In this article, you’ll learn how to iterate over a 1D, 2D and 3D NumPy array using Python.
Whenworking with the NumPy library, you will encounter situations where you will need to iterate through a 1D, 2D and even a 3D array. This article will show you how to accomplish this task.
Question: How would we write code to iterate through a 1D, 2D or 3DNumPy array?
We can accomplish this task by one of the following options:
Before moving forward, please ensure the NumPy library is installed. Click here if you require instructions.
Then, add the following code to the top of each script. This snippet will allow the code in this article to run error-free.
import numpy as np
After importing the NumPy library, this library is referenced by calling the shortcode (np).
Method 1: Use a For Loop and np.array()
This method uses a Forloop combined with np.array() to iterate through a 1DNumPy array. The first five (5) Atomic Numbers from the Periodic Table are generated and displayed for this example.
atomic_els = np.array(np.arange(1,6)) for el in atomic_els: print(el, end=' ')
Above, calls the np.array() function and passes it np.arange(1,6) with two (2) arguments: a start position of one (1) and stop position of five (5) or (stop-1). The result is an arrayof integers and saves to atomic_els.
[1 2 3 4 5]
Next, a For loop is instantiated and iterates through each element of the 1DNumPy array atomic_els.
The output is sent to the terminal on one (1) line as an additional argument was passed to the print statement (end=' '). This argument replaces the default newline character with a blank space.
1 2 3 4 5
Method 2: Uses a For Loop and nditer()
This method uses a for loop combined with np.nditer() to iterate through a NumPy array. The first five (5) Atomic Numbers and Number of Neutrons data from the Periodic Table display for this example.
atomic_data = np.array([np.arange(1,6), [0, 2, 4, 5, 6]]) for dim in atomic_data: for d in dim: print(d, end=' ')
Above, calls the np.array() function and passes np.arange(1,6) as the first argument and an array of associated Number of Neutrons values as the second.
Next, an outer for loop is instantiated. This iterates through each array dimension.
Inside this loop, another for loop is instantiated. The inside loop iterates through each element of the above dimensions.
The output is sent to the terminal on one (1) line as an additional argument is passed to the print statement (end=' '). This argument replaces the default newline character with a blank space.
1 2 3 4 5 0 2 4 5 6
Note: The first dimension is highlighted to easily differentiate the dimensions.
Method 3: Use a For Loop and itertools
This method uses a for loop and Python’s built-in itertools library to iterate through a NumPy array. The first three (3) Atomic Numbers, Phase, and Group data from the Periodic Table display for this example.
import itertools atomic_num = np.arange(1,4)

atomic_phase = ['gas', 'gas', 'solid']

atomic_group = [1, 18, 1] for (a, b, c) in itertools.zip_longest(atomic_num, atomic_phase, atomic_group, fillvalue=0): print (a, b, c)
Then, three (3) arrays are declared containing the relevant data for the first three (3) elements from the Periodic Table. They save respectively to atomic_num, atomic_phase, and atomic_group.
Next, a for loop is instantiated and passed three (3) arguments inside the brackets (a, b, c) which reference the arguments inside the zip_longest(atomic_num, atomic_phase, atomic_group) function.
An additional argument (fillvalue=0) is also passed. This fills in any missing values for lists of unequal lengths with the stated value.
The loop iterates until the end of the arrays are reached, outputting to the terminal for each iteration.
1 gas 1
2 gas 18
3 solid 1
Method 4: Use a While Loop and Size
This method uses a while loop combined with np.size to iterate through a NumPy array. The first five (5) Atomic Numbers, Number of Neutrons, and Phase data from the Periodic Table display for this example.
Above, calls the np.array() function and passes a list containing the first five (5) element names of the Periodic Table. These results save to atomic_names.
Then, a variable, el_count, is declared with a start value of zero (0). This will be a counter variable and lets the While loop know when to stop iterating.
Next, a while loop is instantiated and iterates through the elements of atomic_names. This will continue while the value of el_count remains less than the value of atomic_names.size.
The output is sent to the terminal on one (1) line as an additional argument is passed to the print statement (end=' '). This argument replaces the default newline character with a blank space.
Hydrogen Helium Lithium Beryllium Boron
Method 5: Use a For Loop and np.ndenumerate()
This method uses a For loop and np.ndenumerate() to iterate through a NumPy array. The first five (5) Element Names from the Periodic Table display for this example.
atomic_names = np.array(['Hydrogen', 'Helium', 'Lithium', 'Beryllium', 'Boron']) for idx, x in np.ndenumerate(atomic_names): print(idx, x)
Above, calls the np.array() function and passes it an array containing the first five (5) element names from the Periodic Table. The results save to atomic_names.
Next, a for loop is instantiated referencing idx which is the index of the array, and x, which is the array element’s value.
The output is sent to the terminal. Then idx displays a Tuple containing the index value of the array and then the value of x for each iteration.
This method uses a for loop and range()) to iterate through a 3D NumPy array.
nums = np.array([[[1, 2], [3, 4], [5, 6]], [[7, 8], [9, 10], [11, 12]], [[13, 14], [15, 16], [17, 18]], [[19, 20], [21, 22], [23, 23]], [[24, 25], [26, 27], [28, 29]]]) for x in range(0, 5): for y in range(0, 3): for z in range(0, 2): print(nums[x][y][z])
Above declares a 3DNumPy array containing consecutive numbers from 1-29 inclusive. These save to nums.
Next, three (3) for loops are instantiated to loop through and output the contents of nums to the terminal one (1) number per line.
The range() function for each loop is based on the dimensions of the 3D Numpy array, for example:
The first loop (range(0,5) identifies the total number of tows in the array.
The next loop (range(0,3) identifies the number of columns in the array.
The final loop (range(0,2) identifies the elements in each column in the array.
Finally, the output is sent to the terminal (snippet only).
1
2
3
4
5
6
7
8
9
10
...
Bonus: Convert CSV to np.array()
This example reads in a snippet of the Periodic Table as a CSV file. This data is converted to a NumPy array and is output to the terminal.
The CSV file below contains the values of the Atomic Number, Atomic Mass, Number of Neutrons, and the Number of Electrons for the first seven (7) elements from the Periodic Table.
Above, imports the Pandas library and the CSV library. This is needed to work with DataFrames and read in the CSV file.
Then, a filename is declared and saves to file_name.
On the highlighted line, the np.array() function is called and passed the following arguments.
The csv.reader() function is passed as an argument and this argument passes the open() method to open the specified CSV file in read (r) mode, including the field delimiter (csv.reader(open(file_name, 'r'), delimiter=',')).
These seven (7) methods of iterating a NumPy array should give you enough information to select the best one for your coding requirements.
Good Luck & Happy Coding!
Programmer Humor – Blockchain
“Blockchains are like grappling hooks, in that it’s extremely cool when you encounter a problem for which they’re the right solution, but it happens way too rarely in real life.”source – xkcd
The games are free to keep until August 25th 2022 - 15:00 UTC. Pssst, There is also a DLC for Rumbleverse free for this week: Rumbleverse™️ - Boom Boxer Content Pack[store.epicgames.com]
Next week's freebie: Ring of Pain
We are welcoming everyone to join our discord[discord.gg]. We are more active there on finding giveaways, small or large, and there are daily raffles you can participate.
Grease Is Coming Back To Theaters To Celebrate Olivia Newton-John
With Olivia Newton-John's passing, Hollywood and fans mourned a legend, and now Grease is returning to theaters in honor of her. AMC will be showing the film at a discounted rate, and part of the proceeds will go to breast cancer research, which Newton-John was diagnosed with back in 1992.
AMC CEO Adam Aron announced the news on his Twitter with the plan of the rerelease and what percentage goes to the research. "To honor the late Olivia Newton-John: many of our U.S. [theaters] this weekend will show her classic 1978 hit movie Grease, again on the big screen," Aron tweeted. "An inexpensive $5 admission price, and through our charity AMC Cares we will donate $1 per sold ticket to breast cancer research."
The fan reaction was mostly positive with people sharing screenshots of their ticket orders, and what Newton-John's performance and the movie meant to them.
In Tower of Fantasy, dwindling resources and a lack of energy have forced mankind to leave earth and migrate to Aida, a lush and habitable alien world. There, they observed the comet Mara and discovered an unknown but powerful energy called "Omnium" contained in it. They built the Omnium Tower to capture Mara, but due to the influence of Omnium radiation, a catastrophic disaster occurred on their new homeworld.
Posted by: xSicKxBot - 08-18-2022, 10:44 AM - Forum: Python
- No Replies
How to Append a New Row to a CSV File in Python?
Rate this post
Python Append Row to CSV
To append a row (=dictionary) to an existing CSV, open the file object in append mode using open('my_file.csv', 'a', newline=''). Then create a csv.DictWriter() to append a dict row using DictWriter.writerow(my_dict).
Given the following file 'my_file.csv':
You can append a row (dict) to the CSV file via this code snippet:
import csv # Create the dictionary (=row)

row = {'A':'Y1', 'B':'Y2', 'C':'Y3'} # Open the CSV file in "append" mode

with open('my_file.csv', 'a', newline='') as f: # Create a dictionary writer with the dict keys as column fieldnames writer = csv.DictWriter(f, fieldnames=row.keys()) # Append single row to CSV writer.writerow(row)
After running the code in the same folder as your original 'my_file.csv', you’ll see the following result:
Append Multiple Rows to CSV
Given the following CSV file:
To add multiple rows (i.e., dicts) to an old existing CSV file, iterate over the rows and write each row by calling csv.DictWriter.writerow(row) on the initially created DictWriter object.
Here’s an example (major changes highlighted):
import csv # Create the dictionary (=row)

rows = [{'A':'Z1', 'B':'Z2', 'C':'Z3'}, {'A':'ZZ1', 'B':'ZZ2', 'C':'ZZ3'}, {'A':'ZZZ1', 'B':'ZZZ2', 'C':'ZZZ3'}] # Open the CSV file in "append" mode

with open('my_file.csv', 'a', newline='') as f: # Create a dictionary writer with the dict keys as column fieldnames writer = csv.DictWriter(f, fieldnames=rows[0].keys()) # Append multiple rows to CSV for row in rows: writer.writerow(row)
The resulting CSV file has all three rows added to the first row:
Python Add Row to CSV Pandas
To add a row to an existing CSV using Pandas, you can set the write mode argument to append 'a' in the pandas DataFrame to_csv() method like so: df.to_csv('my_csv.csv', mode='a', header=False).
df.to_csv('my_csv.csv', mode='a', header=False)
For a full example, check out this code snippet:
import pandas as pd # Create the initial CSV data

rows = [{'A':'Z1', 'B':'Z2', 'C':'Z3'}, {'A':'ZZ1', 'B':'ZZ2', 'C':'ZZ3'}, {'A':'ZZZ1', 'B':'ZZZ2', 'C':'ZZZ3'}] # Create a DataFrame and write to CSV

df = pd.DataFrame(rows)

df.to_csv('my_file.csv', header=False, index=False) # Create another row and append row (as df) to existing CSV

row = [{'A':'X1', 'B':'X2', 'C':'X3'}]

df = pd.DataFrame(row)

df.to_csv('my_file.csv', mode='a', header=False, index=False)
The output file looks like this (new row highlighted):
Alternatively, you can open the file in append mode using normal open() function with the append 'a' argument and pass it into the pandas DataFrame to_csv() method.
Here’s an example snippet for copy&paste:
with open('my_csv.csv', 'a') as f: df.to_csv(f, header=False)
Localhost is the web developer’s favorite home. Local development environment is always convenient to develop and debug scripts.
Mailing via a script with in-built PHP function. This may not work almost always in a localhost. You need to have a sendmail program and appropriate configurations.
If the PHP mail() is not working on your localhost, there is an alternate solution to sending email. You can use a SMTP server and send email from localhost and it is the popular choice for sending emails for PHP programmers.
This example shows code to use PHPMailer to send email using SMTP from localhost.
PHP Mail sending script with SMTP
This program uses the PHPMailer library to connect SMTP to send emails. You can test this in your localhost server. You need access to a SMTP server.
Before running this code, configure the SMTP settings to set the following details.
Authentication directive and security protocol.
Configure SMTP credentials to authenticate and authorize mail sending script.
Add From, To and Reply-To addresses using the PHPMailer object.
Build email body and add subject before sending the email.
The above steps are mandatory with the PHPMailer mail sending code. Added to that, this mailing library supports many features. Some of them are,
Set the SMTP Debug = 4 in development mode to print the status details of the mail-sending script.
<?php

use PHPMailer\PHPMailer\PHPMailer;

use PHPMailer\PHPMailer\SMTP;

use PHPMailer\PHPMailer\Exception; require_once __DIR__ . '/vendor/phpmailer/src/Exception.php';

require_once __DIR__ . '/vendor/phpmailer/src/PHPMailer.php';

require_once __DIR__ . '/vendor/phpmailer/src/SMTP.php'; $mail = new PHPMailer(true); $mail->SMTPDebug = 0;

$mail->isSMTP();

$mail->Host = 'SET-SMTP-HOST';

$mail->SMTPAuth = true;

$mail->SMTPSecure = "ssl";

$mail->Port = 465; $mail->mailer = "smtp"; $mail->Username = 'SET-SMTP-USERNAME';

$mail->Password = 'SET-SMTP-PASSWORD'; // Sender and recipient address

$mail->SetFrom('SET-SENDER-EMAIL', 'SET-SENDER_NAME');

$mail->addAddress('ADD-RECIPIENT-EMAIL', 'ADD-RECIPIENT-NAME');

$mail->addReplyTo('ADD-REPLY-TO-EMAIL', 'ADD-REPLY-TO-NAME'); // Setting the subject and body

$mail->IsHTML(true);

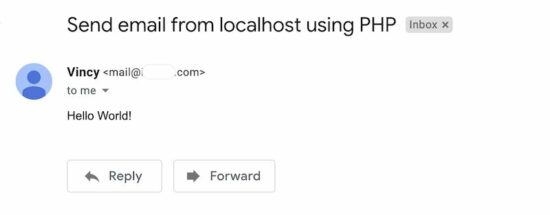
$mail->Subject = "Send email from localhost using PHP";

$mail->Body = 'Hello World!'; if ($mail->send()) { echo "Email is sent successfully.";

} else { echo "Error in sending an email. Mailer Error: {$mail->ErrorInfo}";

}

?>
Google and Microsoft disabled insecure authentication
Earlier, programmers conveniently used GMail’s SMTP server for sending emails via PHP. Now, less secure APPs configuration in Google is disabled. Google and Microsoft force authentication via OAuth 2 to send email.
There is ill-informed text going around in this topic. People say that we cannot send email via Google SMTP any more. That is not the case. They have changed the authentication method.
IMPORTANT: I have written an article to help you send email using xOAuth2 via PHP. You can use this and continue to send email using Google or other email service providers who force to use OAuth.
Alternate: Enabling PHP’s built-in mail()
If you do not have access to an email SMTP server.
If you are not able to use xOAuth2 and Google / Microsoft’s mailing service.
In the above situations, you may try to setup your own server in localhost. Yes! that is possible and it will work.
PHP has a built-in mail function to send emails without using any third-party libraries.
The mail() function is capable of simple mail sending requirements in PHP.
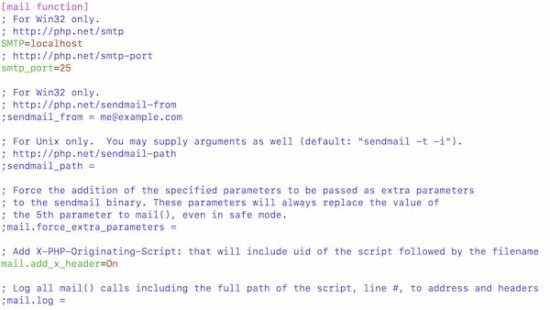
In localhost, it will not work without setting the php.ini configuration. Find the following section in your php.ini file and set the sendmail path and related configuration.






 Question: How would we write code to iterate through a 1D, 2D or 3D
 Note: The first dimension is highlighted to easily differentiate the dimensions.





 Learn More: If you want to learn about 7 Best Ways to Convert Dict to CSV in Python,