Posted by: xSicKxBot - 04-04-2022, 12:32 AM - Forum: Python
- No Replies
Python Regex – ¿Cómo contar el número de coincidencias?
Para contar un patrón de expresión regular varias veces en una cadena dada, usa el método len(re.findall(pattern, string)) que devuelve el número de subcadenas coincidentes o len([*re.finditer(pattern, text)]) que desempaqueta todas las subcadenas coincidentes en una lista y también devuelve la longitud de la misma.
Hace unas horas, escribí una expresión regular en Python que coincidía no una sino varias veces en el texto y me pregunté: ¿cómo contar el número de coincidencias?
Considera el ejemplo mínimo en el que buscas un número arbitrario de caracteres de palabras '[a-z]+' en una frase dada 'python is the best programming language in the world'.
Puedes ver mi vídeo explicativo a medida que lees el tutorial:
Los ingenieros de Google, Facebook y Amazon son auténticos maestros de expresiones regulares. Si quieres convertirte en uno también, echa un vistazo a nuestro nuevo libro: La forma más inteligente de aprender Python Regex(Amazon Kindle/Print, se abre en una nueva pestaña).
¿Cuántas coincidencias hay en la cadena? Para contar el número de coincidencias, puede usar varios métodos:
Método 1: Python re.findall()
Usa el método re.findall(pattern, string) que devuelve una lista de subcadenas coincidentes. Luego cuenta la longitud de la lista devuelta. Aquí hay un ejemplo:
>>> import re

>>> pattern = '[a-z]+'

>>> text = 'python is the best programming language in the world'

>>> len(re.findall(pattern, text))

9
¿Por qué es 9 el resultado? Debido a que hay nueve subcadenas coincidentes en la lista devuelta por el método re.findall():
Este método funciona muy bien si no hay coincidencias solapadas.
¿Quieres dominar el superpoder regex? Echa un vistazo a mi nuevo libro La forma más inteligente de aprender expresiones regulares en Python con el innovador enfoque de 3 pasos para el aprendizaje activo: (1) estudia un capítulo de libro, (2) resuelve un rompecabezas de código y (3) mira un video de capítulo educativo.
Método 2: Python re.finditer()
También puedes contar el número de veces que un patrón determinado coincide en un texto utilizando el método re.finditer(pattern, text):
Definición: devuelve un iterador que repasa todas las coincidencias no solapadas del patrón en el texto.
El argumento flags te permite personalizar algunas propiedades avanzadas del motor regex, como por ejemplo si se debe ignorar el uso de mayúsculas en los caracteres. Puedes saber más sobre el argumento flags en el tutorial detallado de mi blog.
Ejemplo: puedes usar el iterador para contar el número de coincidencias. A diferencia del método re.findall() descrito anteriormente, esto tiene la ventaja de que puedes analizar los propios objetos coincidentes que contienen mucha más información que la simple subcadena coincidente.
import re

pattern = '[a-z]+'

text = 'python is the best programming language in the world'

for match in re.finditer(pattern, text): print(match) '''

<re.Match object; span=(0, 6), match='python'>

<re.Match object; span=(7, 9), match='is'>

<re.Match object; span=(10, 13), match='the'>

<re.Match object; span=(14, 18), match='best'>

<re.Match object; span=(19, 30), match='programming'>

<re.Match object; span=(31, 39), match='language'>

<re.Match object; span=(40, 42), match='in'>

<re.Match object; span=(43, 46), match='the'>

<re.Match object; span=(47, 52), match='world'> '''
Si quieres contar el número de coincidencias, puedes utilizar una simple variable count:
import re

pattern = '[a-z]+'

text = 'python is the best programming language in the world' count = 0

for match in re.finditer(pattern, text): count += 1 print(count)

# 9
O una solución más pitónica:
import re

pattern = '[a-z]+'

text = 'python is the best programming language in the world' print(len([*re.finditer(pattern, text)]))

# 9
Este método funciona muy bien si no hay coincidencias solapadas. Utiliza el operador asterisco* para desempaquetar todos los valores del iterable.
Método 3: Coincidencias solapadas
Los dos métodos anteriores funcionan muy bien si no hay coincidencias solapadas. Si hay coincidencias solapadas, el motor regex simplemente las ignorará porque “consume” todas las subcadenas coincidentes y comienza a comparar el siguiente patrón sólo después del índice stop de la coincidencia anterior.
Así que si necesitas encontrar el número de coincidencias superpuestas, necesitas usar un enfoque diferente.
La idea es hacer un seguimiento de la posición inicial de la coincidencia precedente e incrementarla en uno después de cada coincidencia:
import re

pattern = '99'

text = '999 ways of writing 99 - 99999' left = 0

count = 0

while True: match = re.search(pattern, text[left:]) if not match: break count += 1 left += match.start() + 1

print(count)

# 7
Al hacer un seguimiento del índice start de la coincidencia anterior en la variable left, podemos controlar dónde hay que buscar la siguiente coincidencia en la cadena. Ten en cuenta que utilizamos la operación de rebanado de Python text[left:] para ignorar todos los caracteres a la izquierda que ya se han considerado en las coincidencias anteriores. En cada iteración del bucle, emparejamos otro patrón en el texto. Esto funciona incluso si esas coincidencias se solapan.
A dónde ir desde aquí
Has aprendido tres formas de encontrar el número de coincidencias de un patrón dado en una cadena.
¡Si tienes problemas con las expresiones regulares, echa un vistazo a nuestro tutorial de regex gratuito de 20.000 palabras en el blog de Finxter! ¡Te dará superpoderes de regex!
¿Quieres dominar el superpoder regex? Echa un vistazo a mi nuevo libro La forma más inteligente de aprender expresiones regulares en Python con el innovador enfoque de 3 pasos para el aprendizaje activo: (1) estudia un capítulo de libro, (2) resuelve un rompecabezas de código y (3) mira un video de capítulo educativo.
Los ingenieros de Google son maestros de expresiones regulares. El motor de búsqueda de Google es un motor de procesamiento de texto masivo que extrae valor de billones de páginas web.
Los ingenieros de Facebook son maestros de expresiones regulares. Las redes sociales como Facebook, WhatsApp e Instagram conectan a los humanos a través de mensajes de texto.
Los ingenieros de Amazon son maestros de expresiones regulares. Los gigantes del comercio electrónico envían productos basados en descripciones de productos textuales.Las expresiones regulares rigen el juego cuando el procesamiento de texto se encuentra con la informática.
“Dadme una palanca lo suficientemente larga […] y moveré el mundo”. – Arquímedes
¡Finxter pretende ser tu palanca! ¡Nuestro único propósito es aumentar la inteligencia colectiva de la humanidad a través de tutoriales de programación para que pueda aprovechar la inteligencia computacional infinita para su éxito!
The OpenJDK Community TCK License Agreement (OCTLA)
After launching the OpenJDK Community as the place to collaborate on open source implementations of the Java SE Platform back in 2006, the next logical step was to make the Java SE TCK (JCK) available to those working in and contributing to OpenJDK. Sun Microsystems did this via the “OpenJDK Communi...
Login form – an entry point of a website to authenticate users. PHP login system requires users to register with the application first to log in later.
The registered users are managed in a database at the back end. On each login attempt via the PHP login form, it verifies the database to find a match.
It is a very simple and essential job. At the same time, it should be designed with security to guard the site. It should filter anonymous hits 100% not to let unregistered users get in.
The PHP login form action stores the logged-in user in a session. It uses PHP $_SESSION one of its superglobals. It’s better to validate the existence of this session at the beginning of each page to be protected.
This PHP code can also be used to add an admin login for your control panel. Also, it can be used as a common authentication entry for both admin and user side of an application.
PHP login form code
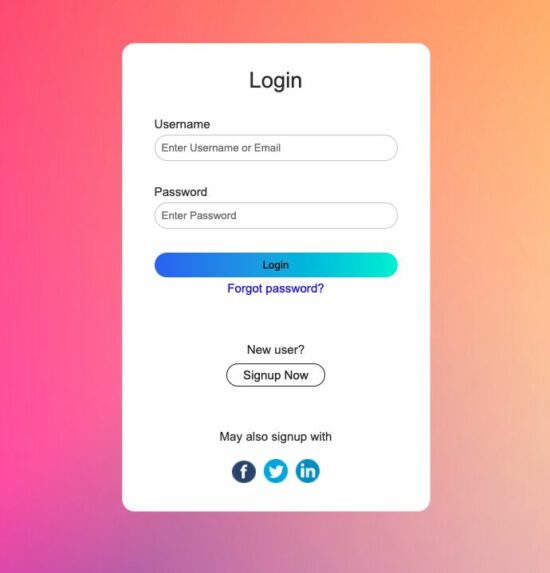
This example is to design a PHP login form working with backend processing. The login page in PHP shows the UI elements like social login, forgot password and etc.
It posts data to process a username/password-based login authentication. This example uses the database to authenticate the user login.
This PHP login system is capable of linking the following code to the additional login form controls.
The landing page renders this template into the UI to let the user log in. It will happen when there is no logged-in session.
This form accepts the user’s login details username or email and a secure password. The submit event triggers the PHP login form validation and posts the login data to the PHP.
It contains the processLogin() function to check the PHP login form data with the database. It uses PHP password_verify() function to validate the user-entered password. This PHP function compares the password with the hashed password on the database.
The getMemberById() function reads the member result by member id. After successful login, it is called from the case to display the dashboard. It returns the array of data to be displayed on the dashboard.
class/Member.php
<?php

namespace Phppot; use \Phppot\DataSource; class Member

{ private $dbConn; private $ds; function __construct() { require_once "DataSource.php"; $this->ds = new DataSource(); } function getMemberById($memberId) { $query = "select * FROM registered_users WHERE id = ?"; $paramType = "i"; $paramArray = array($memberId); $memberResult = $this->ds->select($query, $paramType, $paramArray); return $memberResult; } public function processLogin($username, $password) { $query = "select * FROM registered_users WHERE user_name = ? OR email = ?"; $paramType = "ss"; $paramArray = array($username, $username); $memberResult = $this->ds->select($query, $paramType, $paramArray); if(!empty($memberResult)) { $hashedPassword = $memberResult[0]["password"]; if (password_verify($password, $hashedPassword)) { $_SESSION["userId"] = $memberResult[0]["id"]; return true; } } return false; }

}
Show dashboard and logout link after PHP login
After successful login, the site says there exists a session of the logged-in user. It can be shown in different ways.
In most sites, the site header displays the logged-in user’s profile link. It can be a clickable avatar that slides down a profile menu.
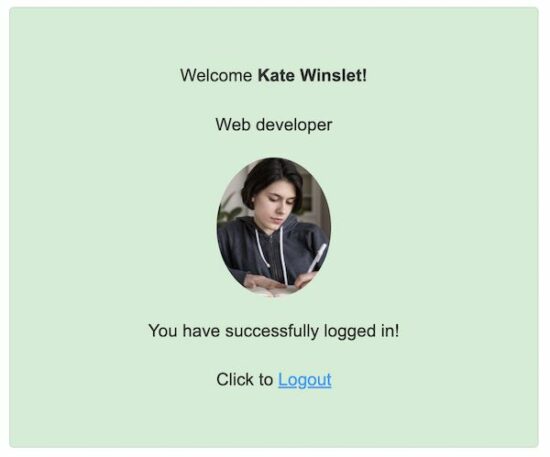
This PHP login system redirects the user to a dashboard page after login. This dashboard page shows a welcome message, about-user with an avatar.
The landing page checks the PHP session if any user has already login. If so, it will redirect to this dashboard page.
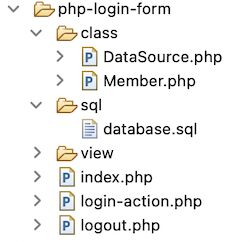
See the below image that shows the file structure of this simple PHP login form example. It contains a featured login form UI with the application view files.
The login action calls the PHP model on the submit event. It performs backend authentication with the database.
Database script
Look at this SQL script which contains the CREATE statement and sample row data.
By importing this SQL, it creates database requisites in your development environment.
The sample data helps to try a login that returns success response on the authentication.
Test data:username: kate_91password: admin123
sql/database.sql
--

-- Database: `blog_eg`

-- -- -------------------------------------------------------- --

-- Table structure for table `registered_users`

-- CREATE TABLE `registered_users` ( `id` int(8) NOT NULL, `user_name` varchar(255) NOT NULL, `display_name` varchar(255) NOT NULL, `password` varchar(255) NOT NULL, `email` varchar(255) NOT NULL, `photo` text DEFAULT NULL, `about` text DEFAULT NULL

) ENGINE=InnoDB DEFAULT CHARSET=utf8mb4; --

-- Dumping data for table `registered_users`

-- INSERT INTO `registered_users` (`id`, `user_name`, `display_name`, `password`, `email`, `photo`, `about`) VALUES

(1, 'kate_91', 'Kate Winslet', '$2y$10$LVISX0lCiIsQU1vUX/dAGunHTRhXmpcpiuU7G7.1lbnvhPSg7exmW', 'kate@wince.com', 'images/photo.jpeg', 'Web developer'); --

-- Indexes for dumped tables

-- --

-- Indexes for table `registered_users`

--

ALTER TABLE `registered_users` ADD PRIMARY KEY (`id`); --

-- AUTO_INCREMENT for dumped tables

-- --

-- AUTO_INCREMENT for table `registered_users`

--

ALTER TABLE `registered_users` MODIFY `id` int(8) NOT NULL AUTO_INCREMENT, AUTO_INCREMENT=2;
Secure DataSource using MySQL with prepared statements
This DataSource is a common file to be used in any stand-alone PHP application. It uses MySQLi with prepared statement to execute database queries. It works with PHP 8 and 7+
class/DataSource.php
<?php

namespace Phppot; /** * Generic datasource class for handling DB operations. * Uses MySqli and PreparedStatements. * * @version 2.3 */

class DataSource

{ // PHP 7.1.0 visibility modifiers are allowed for class constants. // when using above 7.1.0, declare the below constants as private const HOST = 'localhost'; const USERNAME = 'root'; const PASSWORD = ''; const DATABASENAME = 'blog_eg'; private $conn; /** * PHP implicitly takes care of cleanup for default connection types. * So no need to worry about closing the connection. * * Singletons not required in PHP as there is no * concept of shared memory. * Every object lives only for a request. * * Keeping things simple and that works! */ function __construct() { $this->conn = $this->getConnection(); } /** * If connection object is needed use this method and get access to it. * Otherwise, use the below methods for insert / update / etc. * * @return \mysqli */ public function getConnection() { $conn = new \mysqli(self::HOST, self::USERNAME, self::PASSWORD, self::DATABASENAME); if (mysqli_connect_errno()) { trigger_error("Problem with connecting to database."); } $conn->set_charset("utf8"); return $conn; } /** * To get database results * @param string $query * @param string $paramType * @param array $paramArray * @return array */ public function select($query, $paramType="", $paramArray=array()) { $stmt = $this->conn->prepare($query); if(!empty($paramType) && !empty($paramArray)) { $this->bindQueryParams($stmt, $paramType, $paramArray); } $stmt->execute(); $result = $stmt->get_result(); if ($result->num_rows > 0) { while ($row = $result->fetch_assoc()) { $resultset[] = $row; } } if (! empty($resultset)) { return $resultset; } } /** * To insert * @param string $query * @param string $paramType * @param array $paramArray * @return int */ public function insert($query, $paramType, $paramArray) { print $query; $stmt = $this->conn->prepare($query); $this->bindQueryParams($stmt, $paramType, $paramArray); $stmt->execute(); $insertId = $stmt->insert_id; return $insertId; } /** * To execute query * @param string $query * @param string $paramType * @param array $paramArray */ public function execute($query, $paramType="", $paramArray=array()) { $stmt = $this->conn->prepare($query); if(!empty($paramType) && !empty($paramArray)) { $this->bindQueryParams($stmt, $paramType="", $paramArray=array()); } $stmt->execute(); } /** * 1. Prepares parameter binding * 2. Bind prameters to the sql statement * @param string $stmt * @param string $paramType * @param array $paramArray */ public function bindQueryParams($stmt, $paramType, $paramArray=array()) { $paramValueReference[] = & $paramType; for ($i = 0; $i < count($paramArray); $i ++) { $paramValueReference[] = & $paramArray[$i]; } call_user_func_array(array( $stmt, 'bind_param' ), $paramValueReference); } /** * To get database results * @param string $query * @param string $paramType * @param array $paramArray * @return array */ public function numRows($query, $paramType="", $paramArray=array()) { $stmt = $this->conn->prepare($query); if(!empty($paramType) && !empty($paramArray)) { $this->bindQueryParams($stmt, $paramType, $paramArray); } $stmt->execute(); $stmt->store_result(); $recordCount = $stmt->num_rows; return $recordCount; }

}
In the most ambitious expansion in franchise history, Eivor must embrace their destiny as Odin, the Norse god of Battle and Wisdom. Unleash new divine powers as you embark on a desperate quest through a breathtaking world. Complete a legendary Viking saga and save your son in the face of the gods’ doom.
Posted by: xSicKxBot - 04-04-2022, 12:32 AM - Forum: Lounge
- No Replies
Elden Ring: Where To Get The Hookclaws
Elden Ring may have no shortage of cool weapons that you can find and equip, but let's be real--you're really just dying to get your hands on some claws and cosplay as Wolverine, right? Lucky for you, the Hookclaws are a solid option for mobility-focused players, and they can be found pretty early in the game. We'll tell you precisely where below.
Hookclaws explained
The Hookclaws are, as you might've guessed, a claw weapon that requires 8 Strength and 14 Dexterity to wield. You can use one claw alongside a shield, or you can two-hand the weapon to equip one claw on each hand for some frenetic and aggressive attacks that come along with some hefty bleed buildup--and they look cool doing it.
The Hookclaws' weapon skill is a fairly common one known as Quickstep. It functions similarly to the dodge from Bloodborne, allowing you to quickly maneuver around your enemies fluidly, even letting you get behind them quickly for some fast attacks.
Available until Apr 2nd. !addlicense asf s/705132 for ASF users.
We are welcoming everyone to join our discord[discord.gg]. We are more active there on finding giveaways, small or large, and there are daily raffles you can participate.
With the recent release of Java 11, it’s time to look back at the development of the second feature release in the new semi-annual release cadence. Let’s celebrate the many contributions in the OpenJDK Community from many individuals and organizations — we all built JDK 11, together! JDK 11 Fix Rati...
Summary: The struct module in Python, taken from the C programming language, lets you convert bytes to and from floating point numbers.
Table of Contents
Problem: How to convert bytes to floating point numbers?
A quick look at the solution:
A Brief Introduction to Struct
The struct module has three main methods for data conversion:
unpack(),
pack()
calcsize().
➦ You can use the unpack() method to convert bytes to floating point numbers. The method accepts data format and the byte to be converted.
struct.unpack("f", <byte>)
➦ On the other hand, the pack() method helps in converting data types to bytes.
struct.pack("f", <floating point number>)
Where f stands for floats. As you will see in other parts of this tutorial, the struct module handles different data types such as characters, integers and floats. But before that, you should understand bytes, floating point numbers, and the concept of structs.
Definition Of Bytes And Floating Point Numbers
This section focuses on the roots of bytes and data formats.
Unlike humans that represent numbers in base 10 (0 to 9 digits), computers understand the language of 1s and 0s. A pair of 1 and 0 is a binary digit, shortened as a bit. So, the computer converts data into a series of 1s and 0s (bits) before storing them in the memory.
Likewise, non-numerical data get stored as bytes. For instance, a character occupies 1 byte of memory. An array of characters forms a string.
Format
Type in C programming language
size in bytes
c
char
1
b
signed char
1
B
unsigned char
1
?
_Bool
1
h
short
2
H
unsigned short
2
i
int
4
I
unsigned int
4
l
long
4
L
unsigned long
4
q
long long
8
Q
unsigned long long
8
s
char[]
f
float
4
Now that you understand how a computer interprets various data types, it would be best to learn how the struct module uses them to convert bytes to floating point numbers. Since struct has been taken from the C programming language, hence, a deeper understanding of how it works in C is crucial.
Struct Padding vs Packing
In the C programming language, a struct is a user-defined data type. Unlike other variables, a struct combines different data types in a structure. Here is an example.
struct Fruit { char firstLetter; int total;

};
We are creating a blueprint of a Fruit with a firstLetter character, and total integer. We can create a banana from the Fruit model, assigning it b as firstLetter and 23 as total.
struct Fruit fruit1 = { 'b', 23 };
Printing the size of each attribute,
printf("firstLetter is %d bytes and total is %d bytes \n", sizeof(fruit1.firstLetter),sizeof(fruit1.number));
we get the result as
firstLetter is 1 bytes and total is 4 bytes
The size of fruit1 should be (1 + 4 =) 5 bytes, right? Let’s check.
Size of fruit1 is 8 bytes
It turns out our computer uses more memory to store smaller data quantities. That happens due to a concept called padding.
CPU reads 4 bytes of data per cycle. For the first cycle, it adds three bytes of space to the available (1) byte and returns the result. Next, it finds 4 bytes and returns them. In total, it records (4 + 4 =) 8 bytes.
Padding wastes memory while reducing CPU cycles. Struct packing comes in to store more bytes in less memory.
#include <stdio.h>

#pragma pack(1) struct Fruit { char firstLetter; int number;

}; int main () { struct Fruit fruit1 = { 'b', 23 }; // printf("firstLetter is %d bytes and total is %d bytes \n", sizeof(fruit1.firstLetter),sizeof(fruit1.number)); printf("Size of fruit1 is %d bytes \n", sizeof(fruit1)); return 0;

}
We include #pragma pack(1) header with pack function of value 1 to reduce the memory wastage when compiling and assembling data. This time around, the struct size is what we expect: 1 byte + 4 bytes = 5 bytes.
Size of fruit1 is 5 bytes
The key takeaway is that struct is a C programming language data structure for storing user-defined data types. Unlike other data types, it combines a continuous stream of different data types. The various data types consume more memory due to padding, something we can control using struct packing.
We can apply the concept of struct to convert data types to bytes in Python, as illustrated below.
How To Use The Struct Module In Python
Unlike C, which speaks to the memory through data types and compiling, Python is a high-level, dynamically-typed programming language. Most operations occur through modules (classes) that get translated and compiled to produce bytes. One such module is the struct module. The struct module has three methods: pack(), unpack(), and calcsize(). The pack method accepts two parameters: format and data to be converted to bytes. Like the struct blueprint in C, the format part of the pack function in Python accepts various data types. For example,
struct.pack('iif', 2, 4, 7.68)
This means converting integer 2, integer 4 and float 7.68 to a stream of bytes. i stands for an integer while f represents floats.
You can represent repeating integers by a numeral. For example, iii can map to 3i. Also, you can separate the data types with a space. For example, 3i f is another representation for 3if.
We can check the format size by importing the module,
import struct
and using its calcsize() method.
struct.calcsize('3if')
In the same way, we can convert a floating point number into bytes. Assume we want to convert 3.76 to bytes. We can do that using the following code.
byteData = struct.pack('f', 3.76) print(byteData)
Output:
b'\xd7\xa3p@'
Here, b stands for bytes. The other parts may differ as per computer depending on the memory address system and endianness. Let’s now find floating point numbers from bytes.
Convert Bytes To Floating Point Numbers
The unpack function accepts format, and the byte stream then converts it to a floating point number. For example, we can decode b'\xd7\xa3p@' as follows.
The result is a tuple containing a floating point number with a massive number of decimal points.
(3.759999990463257,)
We can extract the result by surrounding the input with square brackets.
[byteData] = struct.unpack('f', b'\xd7\xa3p@')
The result of printing the output is 3.759999990463257.
The extended decimal output from a reduced input size shows the essence of scientific notation in computing. It also proves the reason for the preference of floating point numbers over integers.
Apart from efficiency, handling floating point numbers comes with speed since much work has gone into building floating point numbers over the years.
Conclusion
The struct module with its unpack() method helps convert bytes to floating point numbers. It would help to understand other methods such as pack() and calcsize because, from them, you can generate bytes from various data types.
Another way to ease handling the conversion is understanding the ins and outs of the struct module, as explained in this tutorial.
File upload is an important component in building websites. This article will help you to implement a file upload to the server feature with PHP and a MySQL database.
Example use cases of where the file upload may be needed in a website,
Let us see how to code PHP file upload for a website. You can split this article into the following sections.
This quick example shows a simple code to achieve PHP file upload. It has an HTML form to choose a file to upload. Let the form with the following attributes for supporting file upload.
method=post
enctype=multipart/form-data
By choosing a file, it will be in a temporary directory. The $_FILES[“upload_file”][“tmp_name”] has that path. The PHP move_uploaded_file() uploads the file from this path to the specified target.
Check with the php.ini file if the file_uploads = on. Mostly, it will be on by default.
More optional directives to change the default settings
upload_tmp_dir – to change the system default.
upload_max_filesize – to exceed the default limit.
max_file_uploads – to break the per-request file upload limit.
post_max_size – to breaks the POST data size.
max_input_time – to set the limit in seconds to parse request data.
max_execution_time – time in seconds to run the file upload script.
memory_limit – to set the memory limit in bytes to be allocated.
File upload – server-side validation
When file uploading comes into the picture, then there should be proper validation. It will prevent unexpected responses from the server during the PHP file upload.
This code checks the following 4 conditions before moving the file to the target path. It validates,
If the file is not empty.
If the file does not already exist in the target.
If the file type is one of the allowed extensions.
If the file is within the limit.
It shows only the PHP script for validating the uploaded file. The form HTML will be the same as that of the quick example.
file-upload-validation.php
<?php

if (isset($_POST["upload"])) { // Validate if not empty if (!empty($_FILES['upload_file']["name"])) { $fileName = $_FILES["upload_file"]["name"]; $isValidFile = true; // Validate if file already exists if (file_exists($fileName)) { echo "<span>File already exists.</span>"; $isValidFile = false; } // Validate file extension $allowedFileType = array( 'jpg', 'jpeg', 'png' ); $fileExtension = strtolower(pathinfo($fileName, PATHINFO_EXTENSION)); if (! in_array($fileExtension, $allowedFileType)) { echo "<span>File is not supported. Upload only <b>" . implode(", ", $allowedFileType) . "</b> files.</span>"; $isValidFile = false; } // Validate file size if ($_FILES["upload_file"]["size"] > 200000) { echo "<span>File is too large to upload.</span>"; $isValidFile = 0; } if ($isValidFile) { move_uploaded_file($_FILES["upload_file"]["tmp_name"], $fileName); } } else { echo "No files have been chosen."; }

}

?>
Upload file to the server with database
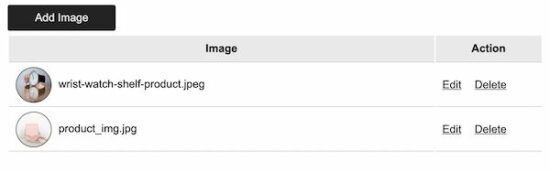
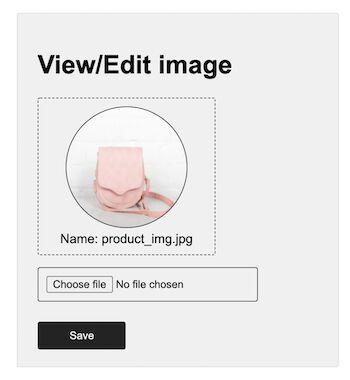
This section gives a full-fledged PHP file upload example. It is with add, edit, preview, list images features. The add/edit allows users to choose an image file to upload to the server.
The home page displays a list of uploaded images with edit, delete action controls. The edit screen will show the preview of the existing file.
PHP file upload and add a new row to the database
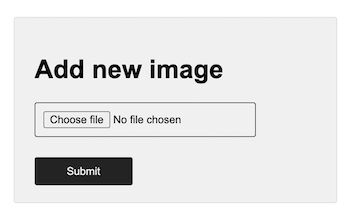
This code is for showing a HTML form with a file upload option. This allows users to choose files to upload to the server.
The PHP code receives the uploaded file data in $_FILES. In this code, it checks for basic file validation to make sure of its uniqueness.
Then, it calls functions to upload and insert the file path to the database.
The code specifies the parameter type as ‘b’ for the file blob data. First, it binds a NULL value for the blob field.
Then, it sends the file content using send_long_data() function. This function specifies the query parameter index and file blob to bind it to the statement.
This file is to read a blob from the database and show the preview. It will be specified in the <img> tag ‘src’ attribute with the appropriate image id.
Thus, we have seen a detailed article to learn file upload. I swear we have covered most of the examples on PHP file upload.
We saw code in all levels from simple to elaborate file upload components. I hope, this will be helpful to know how to build this on your own. Download


 – Arquímedes