[www.indiegala.com] Containing various Visual Novels including Otome, Mystery, Detective, Adventure, Dating, RPG, Strategy, Comedy elements, but not missing the cute/kawaii factor, this selection of interactive anime fiction video games brings: Little One, Detective Kobayashi, Heart Fragment, Takorita Meets Fries, How to Sing to Open Your Heart & Lotus Reverie: First Nexus.
If you're slinging magic as a sorcerer in Elden Ring, you'll probably want to keep a backup melee weapon for when you run out of FP. You have plenty of options from which to choose, but the Crystal Sword ranks among one of the most visually striking of the bunch. It may not necessarily be the best weapon you can find in the game, but if you'd like to rock it for those sweet looks and reasonable damage, we'll tell you where you can find it.
Crystal Sword explained
The Crystal Sword is a straight sword that requires 13 Strength, 10 Dexterity, and 15 Intelligence to wield. It's a decent melee option for sorcery builds, but unless you're really sold on its cool aesthetic, there are definitely some more powerful options available.
The weapon skill on the Crystal Sword is Spinning Slash. This is a pretty common weapon skill that does pretty much exactly what it says and deals some passable damage, though you'd probably benefit from a different Ash of War to make the most of the Crystal Sword.
We don't make these kind of announcements often, so i'd figure we should be honest with our community in regards with our standings. For a couple of months we have been struggling financially to meet our monthly upkeep to maintain our brand, from humbly paying all our moderators to keeping up with our servers.
Today we announce that GrabFreeGames has been officially acquired by EpicGames[i.imgur.com]! Our partnership was made final with the email[i.imgur.com]Igor received.
What Does This Mean?
Moving forward, our group will be primarily used as a promotional venue for the Epic Store and their products. We will stop posting any freebies related to other platforms aside for Epic (inb4 "but you already did that" joke). I understand there have been some contentious environment in the past with a small number of our users seeing so many Epic Store announcement freebies but less Steam or any other platforms.
We can assure you that Epic always had our best interest at heart and is looking to improve the gaming industry one at a time (After you post this message, make sure you delete this bolded text) - Eric (Epic Games PR Management)
We are encouraging everyone to not join our discord[discord.gg]. The place is currently transitioning under new management and we would like some privacy for the time being.
Some things are best left forgotten. Aztech Forgotten Gods is the cyber-stone action-adventure following Achtli, a young woman who battles the colossal Forgotten Gods. To uncover the truth behind her far-future Mesoamerican metropolis, she'll have to turn the Gods' power against them, as she soars through the city with power and grace.
This Minecraft tutorial explains how to set your spawn point (spawnpoint) in the game with screenshots and step-by-step instructions.
What is a Spawn Point?
Let's start by first explaining what a spawn point is.
When you die in Minecraft, you will respawn again in your world. The place that you respawn after you die is called your spawn point.
Where is your Spawn Point?
Initially your spawn point is where you started when the world was created but you can change your spawn point at any time.
There are 2 ways to change your spawn point:
Sleep in a bed. When you sleep in a bed at night, you will reset your spawn point. You can sleep in multiple beds but the last bed that you slept in before you die is where you will respawn.
Use the /spawnpoint command. This command allows you to quickly set your spawnpoint with a game command (ie: cheat).
For the purposes of this tutorial, we will explore how to use a bed to change your spawn point.
Steps to change your Spawn Point
1. Place a Bed
It is most common for you to sleep in your bed at night during your game. If you don't have a bed in your inventory, you can quickly make one with a crafting recipe for a bed.
Add the bed to your hotbar and make sure that it is the selected item in the hotbar.
Next, position your pointer (the plus sign) on the block where you want to place your bed. You need at least two blocks to place your bed. You should see the block become highlighted in your game window.
The game control to place the bed depends on the version of Minecraft:
For Java Edition (PC/Mac), right click on the block.
For Pocket Edition (PE), you tap on the block.
For Xbox 360 and Xbox One, press the LT button on the Xbox controller.
For PS3 and PS4, press the L2 button on the PS controller.
For Wii U, press the ZL button on the gamepad.
For Nintendo Switch, press the ZL button on the controller.
For Windows 10 Edition, right click on the block.
For Education Edition, right click on the block.
You should see your bed appear on the block that you selected. Congratulations, you have somewhere to sleep at night.
2. Sleep in the Bed
Now that you have placed your bed in your Minecraft world, you need to wait for night (or use a cheat to change to night).
Now that it is night, you can sleep in the bed.
TIP: You can not sleep in the bed during the day!
The game control to sleep in the bed depends on the version of Minecraft:
For Java Edition (PC/Mac), right click on the bed.
For Pocket Edition (PE), you tap on the bed.
For Xbox 360 and Xbox One, press the LT button on the Xbox controller.
For PS3 and PS4, press the L2 button on the PS controller.
For Wii U, press the ZL button on the gamepad.
For Nintendo Switch, press the ZL button on the controller.
For Windows 10 Edition, right click on the bed.
For Education Edition, right click on the bed.
While you are sleeping, you will see a Leave Bed button appear. If you click this button, it will return you to your world while it is still night.
If you wait, it will turn to morning and you will automatically wake up standing next to your bed.
Now that you have slept in your bed, your spawn point will be reset. If you die in the game, you will respawn in this location. That is a great way to not get lost in your Minecraft world.
Congratulations, you just learned how to set your spawn point in Minecraft.
Suppose you have a PDF file, but it’s too large and you’d like to compress it (perhaps you want to reduce its size to allow for faster transfer over the internet, or perhaps to save storage space).
Even more challenging, suppose you have multiple PDF files you’d like to compress.
Multiple online options exist, but these typically allow a limited number of files to be processed at a time. Also of course there is the extra time involved in uploading the originals, then downloading the results. And of course, perhaps you are not comfortable sharing your files with the internet.
Fortunately, we can use Python to address all these concerns. But before we learn how to do this, let’s first learn a little bit about PDF files.
About Compressing PDF Files
According to Dov Isaacs, former Adobe Principal Scientist (see his discussion here) PDF documents are already substantially compressed.
The text and vector graphics portions of the documents are already internally zip-compressed, so there is little opportunity for improvement there.
Instead, any file compression improvements are achieved through compression of image portions of PDF documents, along with potential loss of image quality.
So compression might be achievable, but the user must choose between how much compression versus how much image quality loss is acceptable.
Setup
A programmer going by the handle Theeko74 has written a Python script called “pdf_compressor.py”. This script is a wrapper for ghostscript functions that do the actual work of compressing PDF files.
This script is offered under the MIT license and is free to use as the user wishes.
Hint: make sure you have ghostscript installed on your computer. To install ghostscript, follow this detailed guide and come back afterward.
Ultimately we will be writing a Python script to perform the compression.
So we create a directory to hold the script, and use our preferred editor or IDE to create it (this example uses Linux command line to make the directory, and uses vim as the editor to make script “bpdfc.py”; use your preferred choice for creating the directory and creating the script within it):
$ mkdir batchPDFcomp

$ cd batchPDFcomp

$ vim bpdfc.py
We won’t write out the script just yet – we’ll show some details for the script a little later in this article.
When we do write the script, within it we’ll import “pdf_compressor.py” as a module.
To prepare for this we should create a subdirectory below our Python script directory.
Also, we’ll need to copy pdf_compressor.py into that subdirectory, and we’ll need to create a file __init__.py within the same subdirectory (those are double underscores each side of ‘init’):
$ mkdir pdfc

$ cp ~/Downloads/pdf_compressor.py ~/batchPDFcomp/pdfc/

$ cd pdfc

$ vim __init__.py
What we have done here is created a local package pdfc containing a module pdf_compressor.py.
Note: The presence of file __init__.py indicates to Python that that directory is part of a package, and to look there for modules.
Now we are ready to write our script.
The PDF Compression Python Script
Here is our script:
from pdfc.pdf_compressor import compress

compress('Finxter_WorldsMostDensePythonCheatSheet.pdf', 'Finxter_WorldsMostDensePythonCheatSheet_compr.pdf', power=4)
As you can see it’s a very short script.
First we import the “compress” function from “pdf_compressor” module.
Then we call the “compress” function. The function takes as arguments: the input file path, the output file path, and a ‘power’ argument that sets compression as follows, from least compression to most (according to the documentation in the script):
Compression levels:
0: default
1: prepress
2: printer
3: ebook
4: screen
Running the Script
Now we can run our script:
$ python bpdfc.py

Compress PDF...

Compression by 51%.

Final file size is 0.2MB

Done.

$
We have only compressed one PDF document in this example, but by modifying the script to loop through multiple PDF documents one can compress multiple files at once.
However, we leave that as an exercise for the reader!
We hope you have found this article useful. Thank you for reading, and we wish you happy coding!
JDK 11 is live! Download it from the Java SE Downloads page. See the JDK 11 Release Notes for detailed information about this release. Highlights include: Oracle JDK Migration Guide has been updated for JDK 11 with a description of the major differences between the JDK 10 and JDK 11 releases as well...
The Bootstrap navbar is a menu responsive header with navigation. Bootstrap supports enabling many UI effects with this navbar component. For example,
Sticky navbar on scrolling the content.
Slide-in effect by using Bootstrap expand-collapse
Mobile-friendly responsive menu navigation.
This article is for creating a Bootstrap sticky navbar on the page top header. It shows both static and dynamic content on the navigation header. Let us see how to display a sticky navbar on a page using Bootstrap.
This quick example shows code to display the stick navbar. It includes Boostrap into the code by using CDN URL. You can also install Bootstrap via composer into your application vendor directory.
It uses Bootstrap sticky-top to the .navbar element.
It is hidden for printing but can be overridden by adding .d-print to the .navbar.
It lets assistive mechanism to identify navbar by using <nav>. Bootstrap recommends to add role=”navigation” attribute for the <div> like containers.
Uses of Bootstrap sticky navbar
The Bootstrap sticky navbar provides a fixed header element mostly at the top. Sometimes, it will be used in the page and form footer.
The following list of items shows some of the uses of a sticky navbar in a website.
To create a fixed header menu. Eg: The header menu links like ‘Contact’, ‘Request a quote’ will be useful if they are sticky on scroll.
To create fixed footer links. Eg: The social media share option in the footer can be sticky to let the user to share the content at any time of reading.
To keep a HTML form footer sticky on scroll. The payment form with the ‘Pay now’ or ‘Buy now’ control should be fixed regardless of the page scroll. It reduces friction and allows users to buy the product easily.
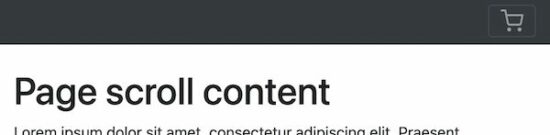
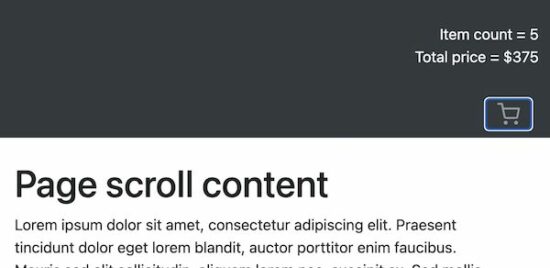
The below screenshot cart icon and the expanded cart info. It displays the number of items in the cart and the total amount.
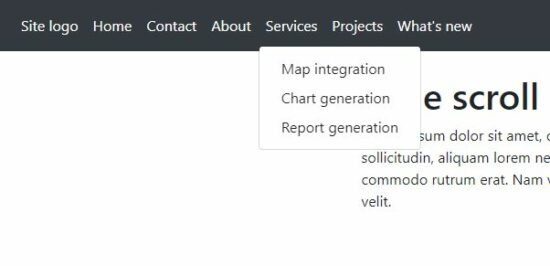
Dynamic menu in the sticky navbar
This example includes HTML as like as the static menu example. The difference is the menu items are from the database.
This code uses a PHP class DataSource.php to process the database operations. It uses MySqli with prepared-statement to access the database.
bootstrap-sticky-navbar-dynamic.php
<?php
namespace Phppot; use Phppot\DataSource;
require_once __DIR__ . '/DataSource.php';
$conn = new DataSource();
$query = "SELECT * FROM tbl_menu where parent = 0";
$mainresult = $conn->select($query);
?>
<!DOCTYPE html>
<html>
<head>
<meta name="viewport" content="width=device-width, initial-scale=1">
<link href="https://cdn.jsdelivr.net/npm/bootstrap@5.1.3/dist/css/bootstrap.min.css" rel="stylesheet">

<script src="https://cdn.jsdelivr.net/npm/bootstrap@5.1.3/dist/js/bootstrap.bundle.min.js"></script>
</head>
<style>
.container { height: 1000px;
}
</style>
<body> <nav class="navbar navbar-expand-lg navbar navbar-expand-sm sticky-top navbar-dark bg-dark"> <button class="navbar-toggler" type="button" data-toggle="collapse" data-target="#navbarSupportedContent" aria-controls="navbarSupportedContent" aria-expanded="false" aria-label="Toggle navigation"> <span class="navbar-toggler-icon"></span> </button> <div class="collapse navbar-collapse" id="navbarSupportedContent"> <ul class="navbar-nav mr-auto"> <?php foreach ($mainresult as $key => $val){?> <li class="nav-item dropdown active"><a class="nav-link " href="#" id="navbarDropdown" role="button" data-toggle="dropdown" aria-haspopup="true" aria-expanded="false"><?php echo $mainresult[$key]["menu_name"];?></a> <?php $query = "SELECT * FROM tbl_menu where parent= ?"; $paramType = "i"; $paramValue = array( $mainresult[$key]["id"] ); $subresult = $conn->select($query, $paramType, $paramValue); ?> <?php if (! empty($subresult)) {?> <div class="dropdown-menu" aria-labelledby="navbarDropdown"> <?php foreach ($subresult as $k => $v) {?> <a class="dropdown-item" href="#"><?php echo $subresult[$k]["menu_name"];?></a> <?php }?> </div> <?php } } ?> </li> </ul> <form class="form-inline my-2 my-lg-0"> <input class="form-control mr-sm-2" type="search" placeholder="Search" aria-label="Search"> <button class="btn btn-outline-success my-2 my-sm-0" type="submit">Search</button> </form> </div> </nav> <div class="container"> <div class="row"> <div class="col-12 py-4"> <h1>Page scroll content</h1> Lorem ipsum dolor sit amet, consectetur adipiscing elit. Praesent tincidunt dolor eget lorem blandit, auctor porttitor enim faucibus. Mauris sed elit sollicitudin, aliquam lorem nec, suscipit ex. Sed mollis rhoncus scelerisque. Morbi varius a est sed luctus. Morbi sapien velit, venenatis a sapien vitae, commodo rutrum erat. Nam volutpat diam ac convallis egestas. Nunc convallis tempor hendrerit. Aenean turpis quam, viverra eu eros quis, ornare tristique velit. </div> </div> </div>
</body>
</html>
Responsive Bootstrap sticky navbar
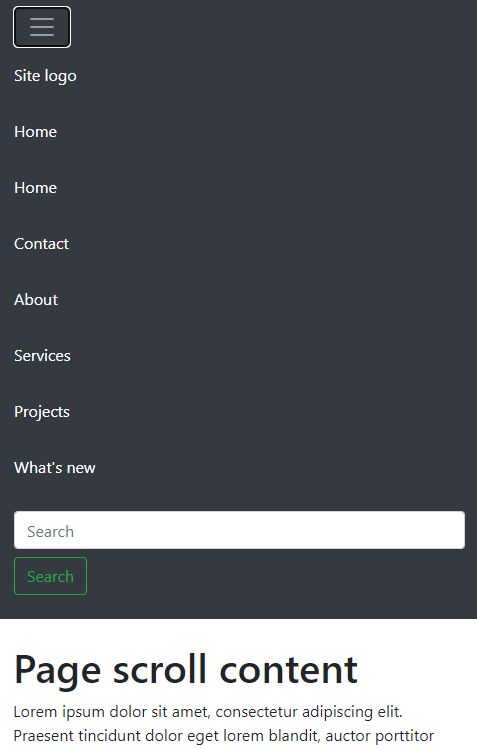
Bootstrap navbar is responsive by default. In a mobile viewport, it displays a slide-down responsive menu. On clicking the menu-expand icon it drops down the menu items.
[freebies.indiegala.com] As the top unhacker in Smash Security, join forces with the AI companion Weedy to become an unstoppable duo and hunt down the 5k Worm.
Capcom Sale, up to 83% OFF
[www.indiegala.com] Resident Evil, Monster Hunter, Devil May Cry, Street Fighter, Mega Man and more.
Save 73% on DRAGON BALL Z: KAKAROT
[www.indiegala.com] Relive the story of Goku and other Z Fighters in DRAGON BALL Z: KAKAROT! Beyond the epic battles, experience life in the DRAGON BALL Z world as you fight, fish, eat, and train with Goku, Gohan, Vegeta and others. Explore the new areas and adventures as you advance through the story and form powerful bonds with other heroes from the DRAGON BALL Z universe....



![[Image: completed_kill_command.png]](https://www.digminecraft.com/game_commands/images/completed_kill_command.png)
![[Image: how_to_use_bed1.png]](https://www.digminecraft.com/getting_started/images/how_to_use_bed1.png)
![[Image: how_to_use_bed2.png]](https://www.digminecraft.com/getting_started/images/how_to_use_bed2.png)
![[Image: how_to_use_bed3.png]](https://www.digminecraft.com/getting_started/images/how_to_use_bed3.png)
![[Image: how_to_use_bed4.png]](https://www.digminecraft.com/getting_started/images/how_to_use_bed4.png)
![[Image: how_to_use_bed5.png]](https://www.digminecraft.com/getting_started/images/how_to_use_bed5.png)
 Hint: make sure you have