This Minecraft tutorial explains how to open an iron door with screenshots and step-by-step instructions.
In Minecraft, an iron door does not open the same way as a wooden door. An iron door is a bit more complicated to open and involves using mechanisms. In this tutorial, we cover the 3 ways to open an iron door with a button, a lever, or a pressure plate. Let's explore how to open an iron door.
How to Open an Iron Door using a Button
The first way to open an iron door involves using a button. To open an iron door, there are 2 different kinds of buttons that you can use. You can choose either one.
First, craft either one of these buttons above and select it in the hotbar. In this example, we have selected a wooden button. You will want to place the button near the door, so position your pointer on a block next to the door.
The game control to place the button depends on the version of Minecraft:
For Java Edition (PC/Mac), right click on the block.
For Pocket Edition (PE), you tap on the block.
For Xbox 360 and Xbox One, press the LT button on the Xbox controller.
For PS3 and PS4, press the L2 button on the PS controller.
For Wii U, press the ZL button on the gamepad.
For Nintendo Switch, press the ZL button on the controller.
For Windows 10 Edition, right click on the block.
For Education Edition, right click on the block.
Now to open the iron door, you will need to use or activate the button. The game control to use the button depends on the version of Minecraft:
For Java Edition (PC/Mac), right click on the button.
For Pocket Edition (PE), you tap on the button.
For Xbox 360 and Xbox One, press the LT button on the Xbox controller.
For PS3 and PS4, press the L2 button on the PS controller.
For Wii U, press the ZL button on the gamepad.
For Nintendo Switch, press the ZL button on the controller.
For Windows 10 Edition, right click on the button.
For Education Edition, right click on the button.
The iron door should now open for a few seconds and then will close on its own.
TIP: To open your iron door, make sure you place two buttons - one button on the outside of the house and one button on the inside of the house. When the iron door shuts, you don't want to be trapped inside the house without a button to push to get out.
How to Open an Iron Door using a Lever
The second method uses a lever to open an iron door. When the lever is pulled down, the iron door opens. When the lever is pulled back up, the iron door will close. The door will not close automatically as it does with other methods.
First, craft a lever and select it in the hotbar. You will want to place the lever on the wall by the door, so position your pointer on a block next to the door.
The game control to place the lever depends on the version of Minecraft:
For Java Edition (PC/Mac), right click on the block.
For Pocket Edition (PE), you tap on the block.
For Xbox 360 and Xbox One, press the LT button on the Xbox controller.
For PS3 and PS4, press the L2 button on the PS controller.
For Wii U, press the ZL button on the gamepad.
For Nintendo Switch, press the ZL button on the controller.
For Windows 10 Edition, right click on the block.
For Education Edition, right click on the block.
Now to open the iron door, you will need to use or pull the lever down. The game control to use the lever depends on the version of Minecraft:
For Java Edition (PC/Mac), right click on the lever.
For Pocket Edition (PE), you tap on the lever.
For Xbox 360 and Xbox One, press the LT button on the Xbox controller.
For PS3 and PS4, press the L2 button on the PS controller.
For Wii U, press the ZL button on the gamepad.
For Nintendo Switch, press the ZL button on the controller.
For Windows 10 Edition, right click on the lever.
For Education Edition, right click on the lever.
The iron door should now open and will stay open until you pull the lever back up.
How to Open an Iron Door using a Pressure Plate
The third method involves using a pressure plate to open an iron door. There are 4 different types of pressure plates that you can use to open an iron door. You can choose any one of these.
First, craft any one of the pressure plates above and select it in the hotbar. In this example, we have selected a wooden pressure plate. You will want to place the pressure plate directly in front of the door, so position your pointer.
how to open an iron door
The game control to place the pressure plate depends on the version of Minecraft:
For Java Edition (PC/Mac), right click on the block.
For Pocket Edition (PE), you tap on the block.
For Xbox 360 and Xbox One, press the LT button on the Xbox controller.
For PS3 and PS4, press the L2 button on the PS controller.
For Wii U, press the ZL button on the gamepad.
For Nintendo Switch, press the ZL button on the controller.
For Windows 10 Edition, right click on the block.
For Education Edition, right click on the block.
Now to open the iron door, you will need to stand on the pressure plate.
When you are standing on the pressure plate, the iron door will open. It will stay open while you are on the pressure plate. Once you step off the pressure plate, the iron door will close.
TIP: To open your iron door, make sure you place two pressure plates - one pressure plate on the outside of the house and one pressure plate on the inside of the house. When the iron door shuts, you don't want to be trapped inside the house without a pressure plate to stand on to open the door.
Congratulations, you just learned the 3 ways to open an iron door in Minecraft.
Posted by: xSicKxBot - 03-30-2022, 08:12 AM - Forum: Python
- No Replies
Flask Developer – Income and Opportunity
Before we learn about the money, let’s get this question out of the way:
What Is Flask?
Let’s have a look at the definition from the Flask wiki page (highlights by me):
“Flask is a micro web framework written in Python. It is classified as a microframework because it does not require particular tools or libraries.
It has no database abstraction layer, form validation, or any other components where pre-existing third-party libraries provide common functions.
However, Flask supports extensions that can add application features as if they were implemented in Flask itself. Extensions exist for object-relational mappers, form validation, upload handling, various open authentication technologies and several common framework related tools.”
Now that you know about what it is, let’s have a look at what it earns next!
Annual Income
How much does a Flask Developer make per year?
The average annual income of a Flask Developer in the United States is between $79,000 (25th percentile) and $123,000 (75th percentile) with an average of $103,000 per year according to Ziprecruiter (source). Top earners make $151,000 and more in the US!
If you decide to go the route as a freelance Flask Developer, you can expect to make between $40 and $45 per hour on Upwork (source). Assuming an annual workload of 2000 hours, you can expect to make between $80,000 and $90,000 per year.
Note: Do you want to create your own thriving coding business online? Feel free to check out our freelance developer course — the world’s #1 best-selling freelance developer course that specifically shows you how to succeed on Upwork and Fiverr!
But is there enough demand? Let’s have a look at Google trends to find out how interest evolves over time (source):
Work Description
So, you may wonder: Flask Developer – what’s the definition?
Flask Developer Definition: A Flask Developer developer creates, edits, analyzes, debugs, and supervises the development of software written in the Flask programming language. You should have a basic understanding of web technologies such as HTML, CSS, JavaScript, and of course Python.
You can check out this free email academy to take care of the important Python skills:
Learning Path, Skills, and Education Requirements
Do you want to become a Flask Developer? Here’s a step-by-step learning path I’d propose to get started with Flask:
But don’t wait too long to acquire practical experience!
Even if you have little skills, it’s best to get started as a freelance developer and learn as you work on real projects for clients — earning income as you learn and gaining motivation through real-world feedback.
Tip: An excellent start to turbo-charge your freelancing career (earning more in less time) is our Finxter Freelancer Course. The goal of the course is to pay for itself!
Related Video
You can find more job descriptions for coders, programmers, and computer scientists in our detailed overview guide:
The following statistic shows the self-reported income from 9,649 US-based professional developers (source).
The average annual income of professional developers in the US is between $70,000 and $177,500 for various programming languages.
Question: What is your current total compensation (salary, bonuses, and perks, before taxes and deductions)? Please enter a whole number in the box below, without any punctuation. If you are paid hourly, please estimate an equivalent weekly, monthly, or yearly salary. (source)
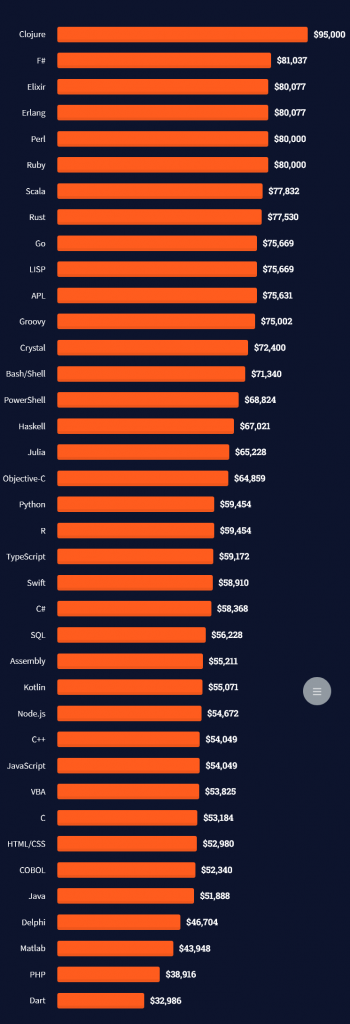
The following statistic compares the self-reported income from 46,693 professional programmers as conducted by StackOverflow.
The average annual income of professional developers worldwide (US and non-US) is between $33,000 and $95,000 for various programming languages.
Here’s a screenshot of a more detailed overview of each programming language considered in the report:
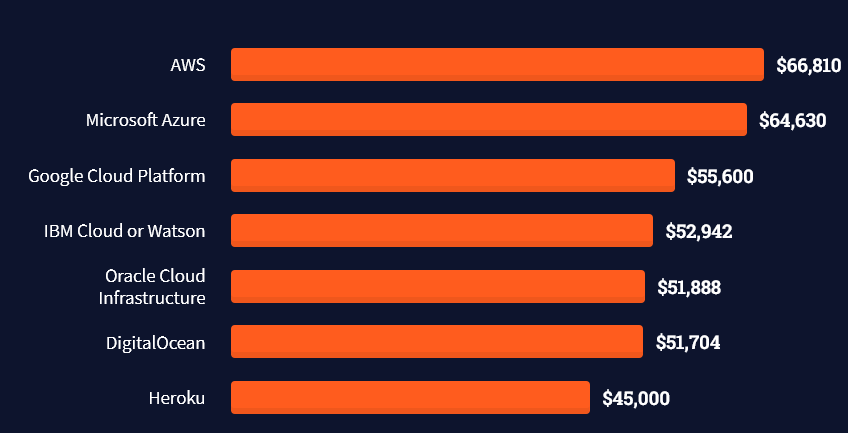
Here’s what different database professionals earn:
Here’s an overview of different cloud solutions experts:
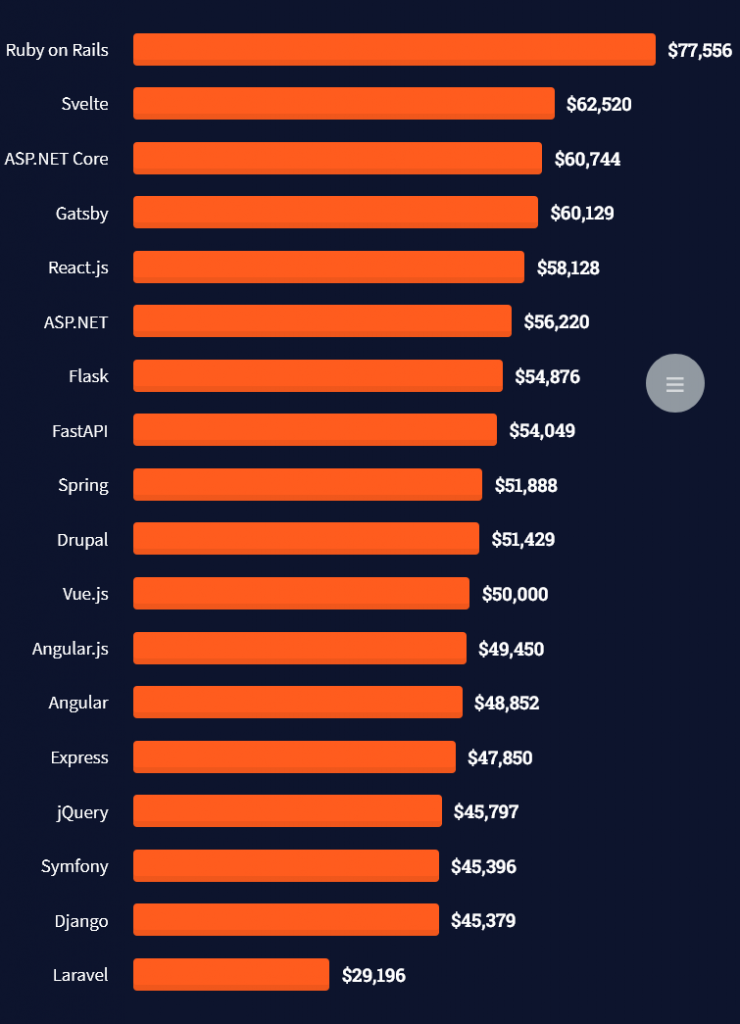
Here’s what professionals in web frameworks earn:
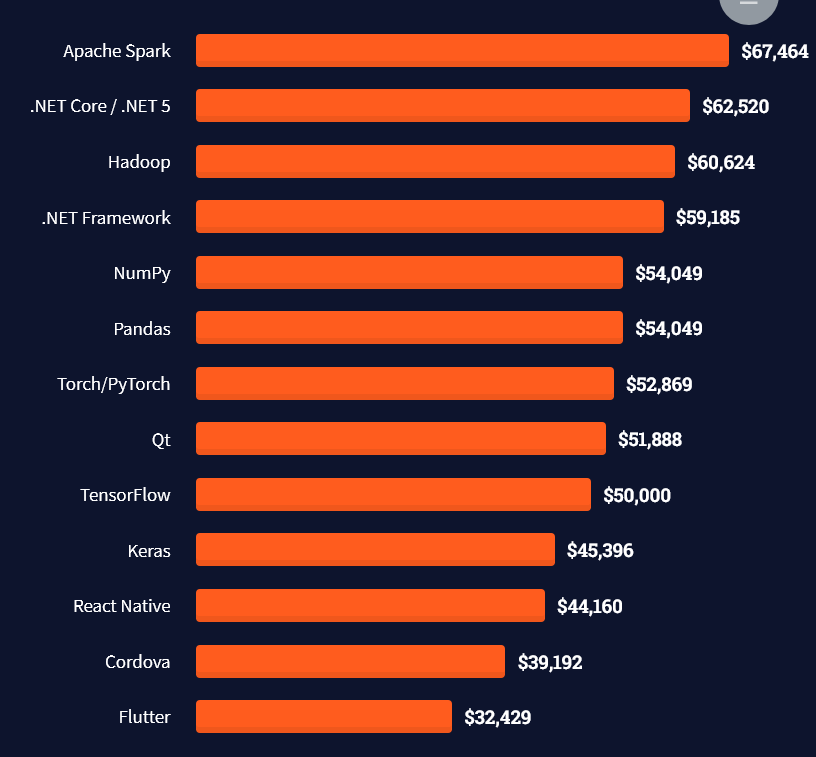
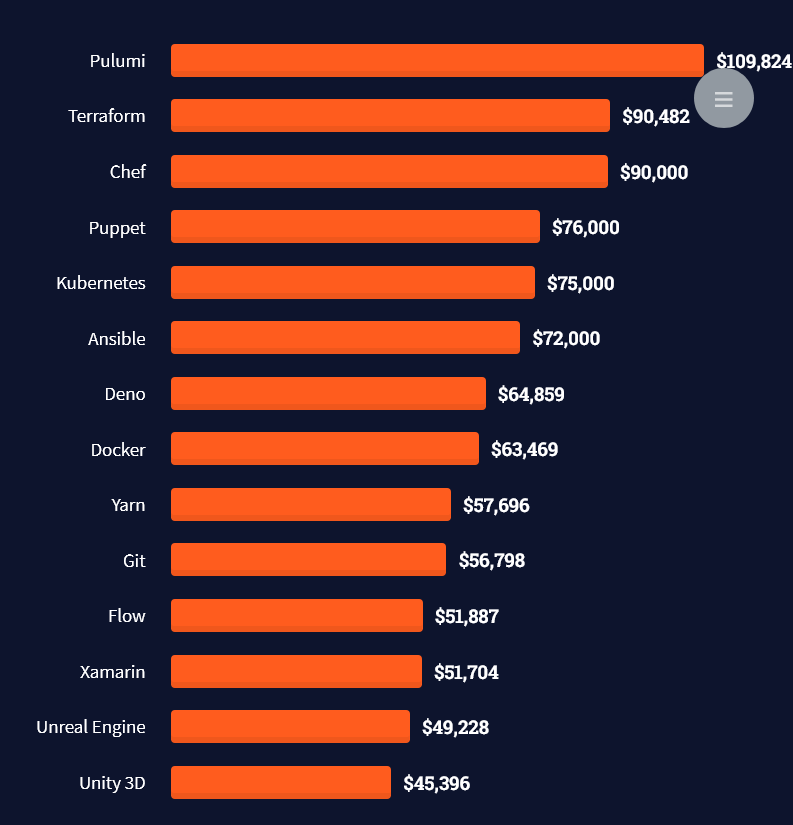
There are many other interesting frameworks—that pay well!
Look at those tools:
Okay, but what do you need to do to get there? What are the skill requirements and qualifications to make you become a professional developer in the area you desire?
Let’s find out next!
General Qualifications of Professionals
StackOverflow performs an annual survey asking professionals, coders, developers, researchers, and engineers various questions about their background and job satisfaction on their website.
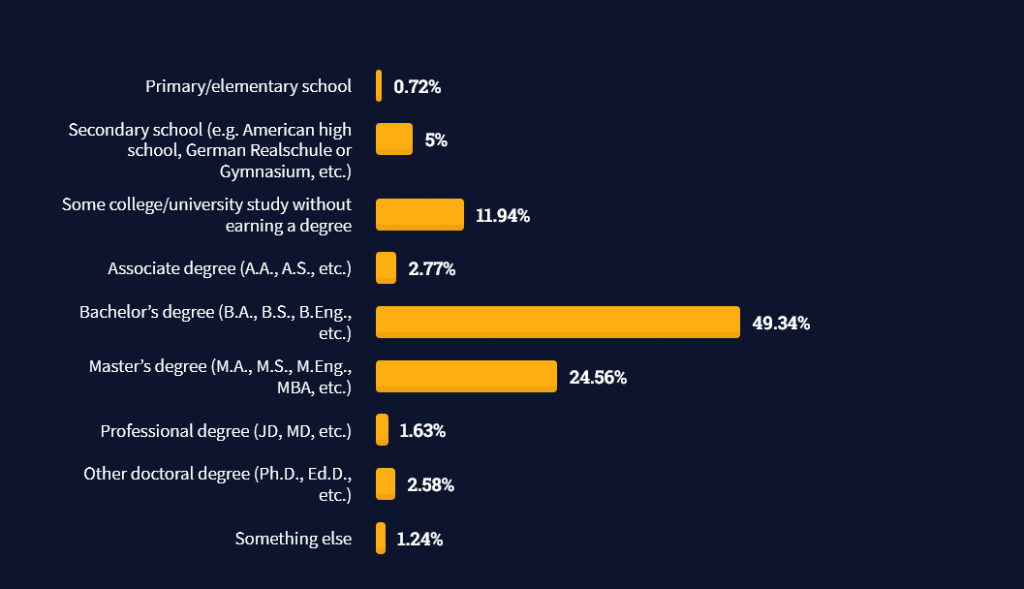
Interestingly, when aggregating the data of the developers’ educational background, a good three quarters have an academic background.
Here’s the question asked by StackOverflow (source):
Which of the following best describes the highest level of formal education that you’ve completed?
However, if you don’t have a formal degree, don’t fear! Many of the respondents with degrees don’t have a degree in their field—so it may not be of much value for their coding careers anyways.
Also, about one out of four don’t have a formal degree and still succeeds in their field! You certainly don’t need a degree if you’re committed to your own success!
Freelancing vs Employment Status
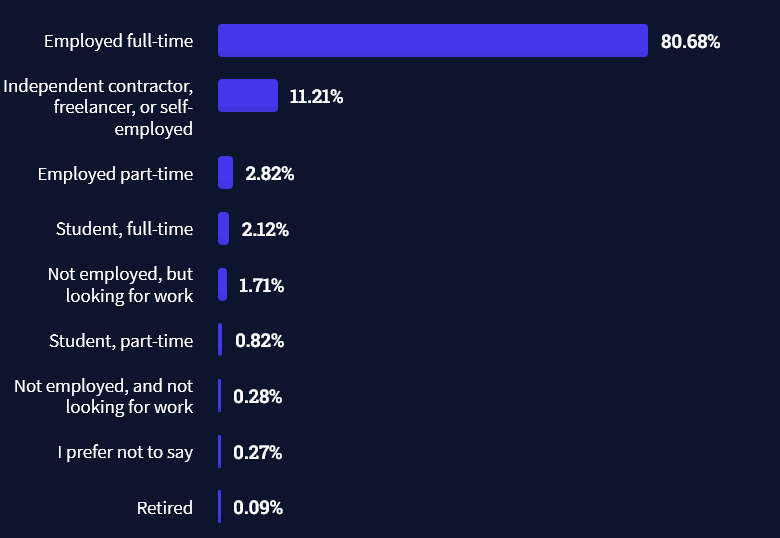
The percentage of freelance developers increases steadily. The fraction of freelance developers has already reached 11.21%!
This indicates that more and more work will be done in a more flexible work environment—and fewer and fewer companies and clients want to hire inflexible talent.
Here are the stats from the StackOverflow developer survey (source):
Do you want to become a professional freelance developer and earn some money on the side or as your primary source of income?
Resource: Check out our freelance developer course—it’s the best freelance developer course in the world with the highest student success rate in the industry!
Other Programming Languages Used by Professional Developers
The StackOverflow developer survey collected 58000 responses about the following question (source):
Which programming, scripting, and markup languages have you done extensive development work in over the past year, and which do you want to work in over the next year?
These are the languages you want to focus on when starting out as a coder:
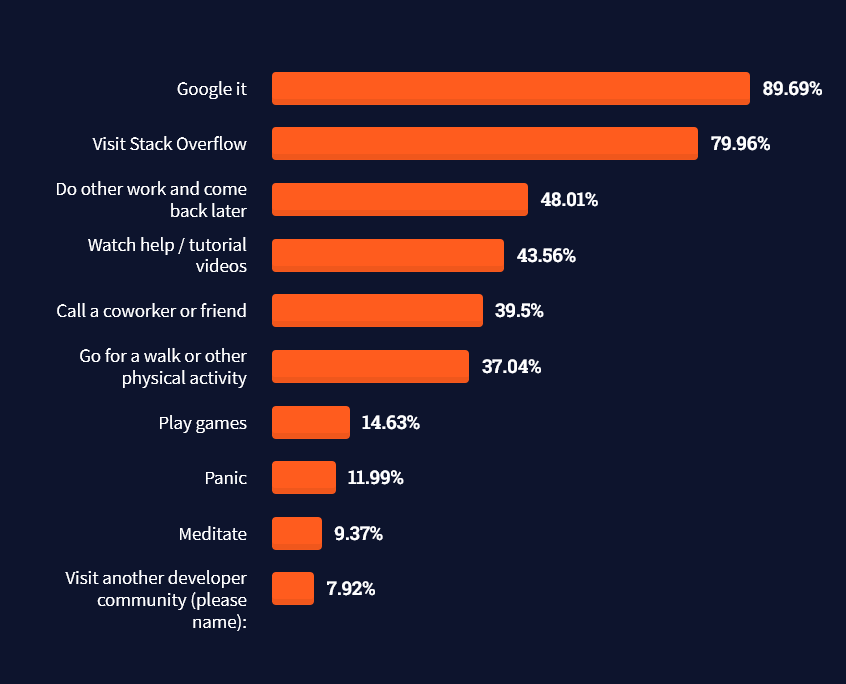
And don’t worry—if you feel stuck or struggle with a nasty bug. We all go through it. Here’s what SO survey respondents and professional developers do when they’re stuck:
What do you do when you get stuck on a problem? Select all that apply. (source)
Related Tutorials
To get started with some of the fundamentals and industry concepts, feel free to check out these articles:
Coders get paid six figures and more because they can solve problems more effectively using machine intelligence and automation.
To become more successful in coding, solve more real problems for real people. That’s how you polish the skills you really need in practice. After all, what’s the use of learning theory that nobody ever needs?
You build high-value coding skills by working on practical coding projects!
Do you want to stop learning with toy projects and focus on practical code projects that earn you money and solve real problems for people?
If your answer is YES!, consider becoming a Python freelance developer! It’s the best way of approaching the task of improving your Python skills—even if you are a complete beginner.
If you just want to learn about the freelancing opportunity, feel free to watch my free webinar “How to Build Your High-Income Skill Python” and learn how I grew my coding business online and how you can, too—from the comfort of your own home.
Few programming languages make it past 20 years and still retain high popularity. But Java has managed to remain widely used in many contexts because of its evolution—not just of the language, but of the larger direction of the ecosystem. None of this is clearer than in the advent of GraalVM, an ahe...
Integrating Stripe Apple pay into a web application is easy. It requires a few steps to achieve this integration. This article shows how to enable Apple or Google pay option using Stripe.
We can divide this article into 2 sections. It narrates the action items, prerequisites, and codes for the payment integration.
Preparing your web environment to display the payment request option.
Building PHP example for Stripe Apple Pay integration.
If you are new to the Stripe payment integration, check with the linked article. It explains how to get the Stripe API app credentials and other basic knowledge.
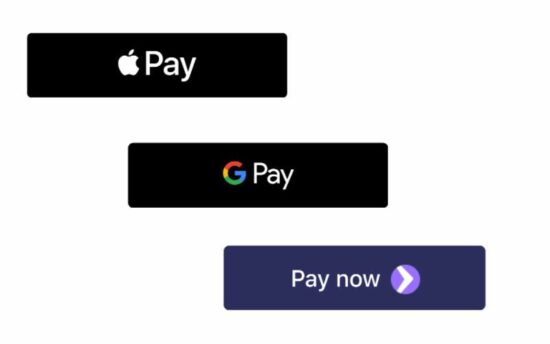
Stripe’s Payment Request Button method mounts a UI control to allow payment. This is a single point of integration for Apple Pay, Google Pay, and Microsoft Pay.
By ticking up the list of prerequisites in the documentation, we can see any one of the below buttons in the UI.
1. Preparing your web environment to display the payment request option
2. Building PHP example for Stripe Apple pay integration
These are the steps to integrate Stripe Apple pay in a PHP web application. Some of the below are similar as we have seen in the Stripe payment gateway integration example.
Download the Stripe API client.
Configure Stripe API keys and tokens.
Verify the payment request and mount the Stripe Apple pay button.
Request and Confirm payment.
Handle shipping/delivery address change events.
Creating PHP endpoints to prepare and initiate Stripe API requests.
Download the Stripe client
Download PHP stripe API client and add up in the application dependency. This will be helpful to create AppleDomain and PaymentIntent objects via API.
It is available on Github. You can install this via composer also. The command to install the Stripe-PHP library is,
composer require stripe/stripe-php
Configure Stripe API keys and tokens
This is the web application config file. It includes the keys used to access the payment request API for Stripe Apple pay integration.
It also contains the web application root and the payment or order endpoint URLs. It defines Product details and shipping amount to build the payment request.
This is a partial code of the payment.js file. It shows the script required for rendering the Stripe Apple pay button into the UI. It builds the Stripe payment request object by using the following details.
Customer details: name, email, address.
Amount
Currency
Shipping details: amount, description.
The data for these details are from the config file. The payment form HTML contains hidden fields and data attributes to hold the config. This script uses the data attributes and hidden data to prepare the request.
After preparing the request body, it calls canMakePayment() to verify the paymentRequest object. Once verified, then it will render the Apple pay button in the UI.
assets/js/payment.js
var publishableKey = document.querySelector('#payment-box').dataset.pk;

var returnURL = document.querySelector('#payment-box').dataset.returnUrl;

var unitPrice = document.querySelector('#unit-price').value;

unitPrice = Math.round((unitPrice * 100));

var productLabel = document.querySelector('#product-label').value;

var currency = document.querySelector('#currency').value;

var shippingAmount = document.querySelector('#shipping-amount').value;

shippingAmount = Math.round((shippingAmount * 100)); var stripe = Stripe(publishableKey, { apiVersion: "2020-08-27",

});

var paymentRequest = stripe.paymentRequest({ country: 'US', currency: currency, total: { label: productLabel, amount: unitPrice, }, requestPayerName: true, requestPayerEmail: true, requestShipping: true, shippingOptions: [ { id: 'Default Shipping', label: 'Default Shipping', detail: '', amount: shippingAmount, }, ],

}); var elements = stripe.elements();

var prButton = elements.create('paymentRequestButton', { paymentRequest: paymentRequest,

}); // Verify payment parameters with the the Payment Request API.

paymentRequest.canMakePayment().then(function(result) { if (result) { prButton.mount('#payment-request-button'); } else { document.getElementById('payment-request-button').style.display = 'none'; }

});
Request and Confirm payment
This section contains the rest of the payment.js code. It creates paymentIntent object by clicking the ‘pay’ button on the payment overlay.
Once paymentIntent is created, the endpoint returns the client-secret-key. Then, the script calls stripe.confirmCardPayment with the reference of the client-secret-key.
assets/js/payment.js
paymentRequest.on('paymentmethod', function(ev) { //Create Stripe payment intent var requestParam = { email: ev.payerEmail, unitPrice: unitPrice, currency: currency, name: ev.payerName, address: ev.shippingAddress.addressLine[0], country: ev.shippingAddress.country, postalCode: ev.shippingAddress.postalCode, shippingPrice: ev.shippingOption.amount, }; var createOrderUrl = "ajax-endpoint/create-stripe-order.php"; fetch(createOrderUrl, { method: "POST", headers: { "Content-Type": "application/json" }, body: JSON.stringify(requestParam) }).then(function(result) { return result.json(); }).then(function(data) { // Script to confirm payment stripe.confirmCardPayment( data.clientSecret, { payment_method: ev.paymentMethod.id }, { handleActions: false } ).then(function(confirmResult) { if (confirmResult.error) { // Report to the browser that the payment failed, prompting it to // re-show the payment interface, or show an error message and close // the payment interface. ev.complete('fail'); } else { // Report to the browser that the confirmation was successful, prompting // it to close the browser payment method collection interface. ev.complete('success'); // Check if the PaymentIntent requires any actions and if so let Stripe.js // handle the flow. If using an API version older than "2019-02-11" instead // instead check for: `paymentIntent.status === "requires_source_action"`. if (confirmResult.paymentIntent.status === "requires_action") { // Let Stripe.js handle the rest of the payment flow. stripe.confirmCardPayment(clientSecret).then(function(result) { if (result.error) { // The payment failed -- ask your customer for a new payment method. } else { // The payment has succeeded. window.location.replace(returnURL + "?orderno=" + data.orderHash); } }); } else { // The payment has succeeded. window.location.replace(returnURL + "?orderno=" + data.orderHash); } } }); });

});
Handle shipping/delivery address change events
This section deals with the shipping options on-change events. This code is applicable only if the payment object is enabled with shipping options.
It hits the PHP endpoint via AJAX and gets the JSON to change the shipping options. It passes the selected shipping address to the PHP.
Creating PHP endpoints to prepare and initiate Stripe API requests
The below PHP files contains the server-side code that hits API. It reads the request body and creates a payment object on sending the Stripe apple pay request.
The StripeService.php file sets the API secret key to the Stripe object. It contains a function captureResponse() function that updates orders and payment entity.
Stripe calls the webhook endpoint as configured in the config.php. This endpoint reads Stripe response. Then, it invokes the captureResponse() function to update the database.
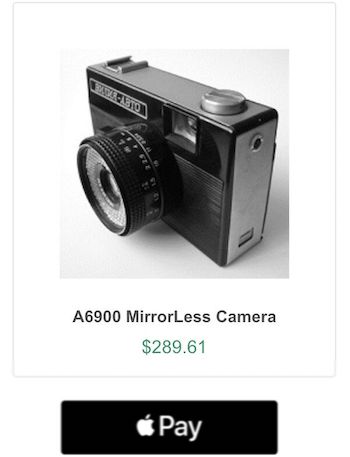
The below screenshot shows the product tile with the Stripe Apple pay button. The details are dynamic from the web application config.
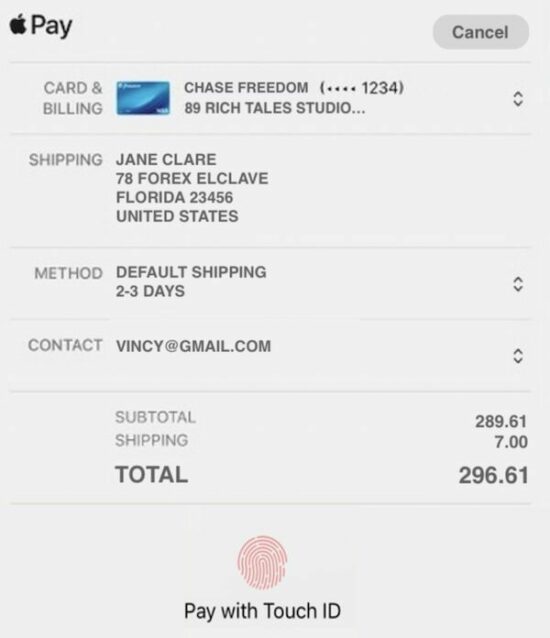
By clicking the Stripe Apple pay button in the above tile, the following payment dialog will pop up. It will have the option to proceed with payment by using the Apple touch id.
Conclusion
Thus, we have integrated Stripe Apple pay in a web application using PHP. We used the Stripe Payment Request Button to display the Apple pay option in the UI.
We have seen the pre-requisites and configuration steps needed for this integration. I hope, the example code helps to understand the steps easily. Download
Posted by: xSicKxBot - 03-30-2022, 08:12 AM - Forum: Lounge
- No Replies
Attack On Titan's Wit Studio Is Making A Vampire Anime For Netflix
Netflix has released the first trailer for Vampire in the Garden, which will hit the streaming service on May 16. The anime is a new, original series from Wit Studio, the Japanese animation company that produced the first three seasons of Attack on Titan.
Like Attack on Titan, Vampire in the Garden is another gorgeous-looking series about a struggling group of survivors waging war against fierce mythological creatures--this time, as the title suggests, it's vampires laying waste to humanity. According to an official synopsis, the series is less focused on the ravages of war and is instead "the story of a young girl and a vampire on a journey to find Paradise." (Regardless, the trailer features lots of carnage and gore.) IMDb's synopsis sounds somewhat more idyllic, reading: "In the divided world of the future, two girls want to do the forbidden: the human wants to play the violin, and the vampire wants to see a wider world." Check out the trailer below.
Attack on Titan Final Season Part 1 recently took Crunchyroll's Anime of the Year award earlier this year. The final episodes adapting the massively popular manga started streaming on Crunchyroll and Hulu back in January, with the series finale expected to air on April 4. It's the end of the road for the animated version, which--believe it or not--first started airing back in April 2013. However, the timing on this end of things has wound up working out quite nicely, since it won't be long for this series to end and Wit Studio's next to be available.
A Musical Story is a rhythm game set against a 70s backdrop. Explore the memories of Gabriel, a young man trying to come to terms with his situation through the connections to his musical memory. Each correctly played melody opens a new chapter into Gabriel's past, bringing him closer to the truth.
In the following article you will learn how to disable GUI on boot in Ubuntu 20.04 Focal Fossa Linux Desktop.
In this tutorial you will learn:
How to disable GUI on boot
How to enable GUI on boot
How to how to start GUI from command line
Disable GUI on boot in Ubuntu 20.04 Focal Fossa Linux Desktop
System Installed Ubuntu 20.04 or upgraded Ubuntu 20.04 Focal Fossa
Conventions
# – requires given linux commands to be executed with root privileges either directly as a root user or by use of sudo command
$ – requires given linux commands to be executed as a regular non-privileged user
How to disable GUI on boot in Ubuntu 20.04 step by step instructions
The following command will disable GUI on boot hence upon the reboot the system will boot into multi user target:
$ sudo systemctl set-default multi-user
Reboot or log out from a current session to exit GUI:
$ gnome-session-quit
How to enable GUI to start on boot
Given that you have installed GUI on your Ubuntu 20.04 Server/Desktop you can enable the system to start to GUI by execution of the following command:
$ sudo systemctl set-default graphical
Start GUI manually from a command line
For a GNOME GUI installations using GDM as a default display manager you can start GUI from a command line by executing the bellow command:
Requirements may change depending on the server software (like the OS), such as using Bukkit and/or mods.
A Java runtime (JRE), version 8 or higher. JDK contains JRE, so it will work too. As of version 1.17, JRE version 16 is required. For version 1.18, JRE version 17 is required.
At least 1 GB of RAM allocated for the server to run (-Xmn 128M -Xmx 1G).
- If you are using Windows or a desktop-based Linux distribution, you should have at least 1 GB of additional physical RAM in the computer, so the graphics on the desktop don't become laggy.- Depending on the specific java version, you may be able to set a "soft max RAM" amount for the server JAR program. The JDK will try to keep memory usage below the soft max, but will allow it to go above it to reach -Xmx if needed. Try -Xmn 128M -XX:SoftMaxHeapSize=1G -Xmx 2G.
A CPU with good single-core performance. The server (as of 1.14) does use additional cores for other operations, but typically three cores are used at most.
- Hyperthreading (HT) or simultaneous multithreading (SMT), i.e. a CPU providing 2 "threads" or "logical cores" for each physical core, does not seem to benefit Minecraft much. On the other hand, it does not really hurt either, and having the setting on does allow your CPU to do some extra work on the side. Just don't worry about it.
- The situation with third-party software is that while additional work (from plugins) do use additional cores, the core world mechanics (ticking, etc.) largely remain the same. Attempts to make the core mechanics multithreaded include Akarin, but do be warned this is very complex work and things get buggy very easily.
Here is a simple recommendation to help you get started and/or help decide which hosting option is best for you:
Running a LAN Party type Server (since 1.11.2)
Note that these requirements are for the server only. You need to allocate more resources to the OS!
Also note that these suggestion presume default settings in server.conf - i.e., a Draw Distance no higher than 10, and is also based on a new world; the bigger the world gets, especially if there's advanced redstone circuitry at work, the requirements - especially the RAM, or in the case of lots of redstone or mobs (in e.g. grinders), the CPU - increase significantly (to the point where a major world with several camps, redstone machinery, grinders, etc. can easily more than double the requirements).
Minimum
1-4 (Players)
Intel Core 2 Duo or AMD Athlon 64 x2 (Cpu)
1GB (RAM)
At least 150MB for world saves (Storage)
Recommended
5-10 (Players)
Intel Core 2 Duo or AMD Athlon 64 x2 (Cpu)
2GB (RAM)
At least 200MB for world saves (Storage)
Best
10+ (Players)
Intel Core i5-4690 or AMD Ryzen 5 1600 (Cpu)
4GB (RAM)
At least 200MB SSD (Storage)


![[Image: how_to_use_iron_door1.png]](https://www.digminecraft.com/getting_started/images/how_to_use_iron_door1.png)
![[Image: how_to_use_iron_door2.png]](https://www.digminecraft.com/getting_started/images/how_to_use_iron_door2.png)
![[Image: how_to_use_iron_door3.png]](https://www.digminecraft.com/getting_started/images/how_to_use_iron_door3.png)
![[Image: how_to_use_iron_door4.png]](https://www.digminecraft.com/getting_started/images/how_to_use_iron_door4.png)
![[Image: how_to_use_iron_door5.png]](https://www.digminecraft.com/getting_started/images/how_to_use_iron_door5.png)
![[Image: how_to_use_iron_door6.png]](https://www.digminecraft.com/getting_started/images/how_to_use_iron_door6.png)


 Note: Do you want to create your own thriving coding business online? Feel free to check out our
 Tip: An excellent start to turbo-charge your freelancing career (earning more in less time) is our
  The average annual income of professional developers in the US is between $70,000 and $177,500 for various programming languages.





![[Image: 01-how-to-disable-gui-on-boot-in-ubuntu-...esktop.png]](https://linuxconfig.org/wp-content/uploads/2019/12/01-how-to-disable-gui-on-boot-in-ubuntu-20-04-focal-fossa-linux-desktop.png)
