


Last modified on September 7th, 2020.
Bootstrap is the most popular solution to design an optimum, intuitive, mobile-ready UI components. It is easy to integrate the Bootstrap library for the application interface.
Often, many of my readers ask for a Bootstrap contact form code. So I thought of creating a basic example for a Bootstrap enabled PHP contact form.
Bootstrap provides in-built features to take care of UI responsiveness, form validation, and more. I used its SVG icon library to display the contact form fields with suitable icons.
A Bootstrap contact form looks enriched. UI attracts people and enables them to use it with ease. Also, the developers’ effort is reduced by using the Bootstrap framework.
I have created a secure feature-packed responsive contact form – Iris. This is one of the best and sleek contact form component you can ever get.
What is inside?
- Contact form with vs without Bootstrap
- Majority of the contact form fields
- About this example
- File Structure
- Slim UI layout with the Bootstrap contact from
- Contact form validation with plain JavaScript
- Processing contact form data in PHP code
- Bootstrap contact form UI output
A contact form collects a different type of user details like name, message and more. There are various popular templates for contact forms.
I have created various PHP contact form examples. And those form templates uses my own custom CSS.
Though it is straight forward to go with custom CSS, designing with Bootstrap gives irrefutable offer.
Bootstrap provides full-fledged styles to create various types of form layout. It includes more of element-specific, attribute-specific forms styles.
With a Bootstrap contact form, the responsiveness, the cross-browser compatibilities are an easy deal.
If you already use the Bootstrap framework, then also it would be natural not to choose the custom CSS UI option.
For a simple example to prepend icons to form inputs without Bootstrap needs a bunch of CSS and media queries. But, with Bootstrap it has input-group selector to achieve this.
In case if you want to render a thin, primitive contact form, then custom CSS is preferable.
Most of the contact forms have the name, email, subject, message fields. Some times it varies based on the applications’ purpose.
For example, site-admin may merge the user feedbacks and inquiries entry points. In such cases, the contact form may have a radio option group to choose between feedback and inquiry.
Sometimes, people may collect phone numbers with country code. Also, it may have checkbox options to receive GDPR consent as per the European legislation.
In a way, contact forms become complex in positioning fields, giving fluidity and more aspects.
Bootstrap supports a variety of layout options to create even a more complex form. Based on the complexity of the contact form layout, the Bootstrap is even dependable.
About this example
This example uses rebooted form styles with classes to create a Bootstrap contact form. It makes this form UI responsive and consistent in all browsers and viewports.
It includes a default contact form having vertically stacked form controls. Each form-control has a prepended icon suitable to the contact input. I downloaded the Bootstrap SVG icon library to have such icons.
The form validation with a plain JavaScript simplifies the effort of loading any external libraries.
In PHP, it handles the posted data for sending them via a contact email. Also, it stores the data into a database table if any. It is optional and can disable in code.
This code uses a simple PHP mail() function for sending the emails. In a previous example, I have added how to send email using Gmail SMTP. Replace the simple mail() function with the one using PhpMailer via Gmail SMTP.
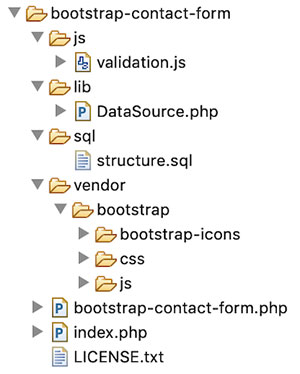
File Structure
The contact form code is a small integrative component of an application. This example contains a very minimal code of having a Bootstrap contact form.
The vendor directory includes the Bootstrap CSS and icon library.
The bootstrap-contact-form.phpfile contains the contact form HTML template. The landing page renders the contact form by including this template.
This section shows the Bootstrap contact form HTML code. This HTML shows a default vertically stacked contact form fields.
The Bootstrap form grid styles and CSS provides options to display a horizontal form.
In the below HTML, each form element is in a form-group container. It groups the form element label, form controls, validation and help-text properly.
The Email field has a help text that displays a note spaced as text-muted.
The input-group specific styles help to display icon-prepended form controls. These icons are from the Bootstrap SVG icon library.
bootstrap-contact-form.php
<html>

<head>

<meta name="viewport" content="width=device-width, initial-scale=1, shrink-to-fit=no">

<title>Bootstrap Contact Form</title>

<link rel="stylesheet" href="./vendor/bootstrap/css/bootstrap.min.css">

</head>

<body class="bg-light"> <div class="container"> <div class="row py-4"> <div class="col"> <h2>Bootstrap Contact Form</h2> </div> </div> <form name="frmContact" id="frmContact" method="post" action="" enctype="multipart/form-data" novalidate> <div class="row"> <div class="form-group col-md-4"> <label>Name</label> <span id="userName-info" class="invalid-feedback"></span> <div class="input-group"> <div class="input-group-prepend"> <span class="input-group-text"><?php require __DIR__ . '/vendor/bootstrap/bootstrap-icons/person.svg';?></span> </div> <input type="text" class="form-control" name="userName" id="userName" required> </div> </div> </div> <div class="row"> <div class="form-group col-md-4"> <label>Email</label> <span id="userEmail-info" class="invalid-feedback"></span> <div class="input-group"> <div class="input-group-prepend"> <span class="input-group-text"><?php require __DIR__ . '/vendor/bootstrap/bootstrap-icons/envelope.svg';?></span> </div> <input type="email" name="userEmail" id="userEmail" class="form-control" required> </div> <small id="emailHelp" class="form-text text-muted">Your email will not be shared.</small> </div> </div> <div class="row"> <div class="form-group col-md-8"> <label>Subject</label> <span id="subject-info" class="invalid-feedback"></span> <div class="input-group"> <div class="input-group-prepend"> <span class="input-group-text"><?php require __DIR__ . '/vendor/bootstrap/bootstrap-icons/question.svg';?></span> </div> <input type="text" name="subject" id="subject" class="form-control" required> </div> </div> </div> <div class="row"> <div class="form-group col-md-8"> <label>Message</label> <span id="content-info" class=" invalid-feedback"></span> <div class="input-group"> <div class="input-group-prepend"> <span class="input-group-text"><?php require __DIR__ . '/vendor/bootstrap/bootstrap-icons/pencil.svg';?></span> </div> <textarea class="form-control" rows="5" name="message" id="message" required></textarea> </div> </div> </div> <div class="row"> <div class="col"> <input type="submit" name="send" class="btn btn-primary" value="Send Message" /> </div> </div>

<?php

if (! empty($displayMessage)) { ?> <div class="row"> <div class="col-md-8"> <div id="statusMessage" class="alert alert-success mt-3" role="alert"><?php echo $displayMessage; ?> </div> </div> </div>

<?php

}

?> </form> </div> <script type="text/javascript" src="./js/validation.js"></script>

</body>

</html>
The above HTML template imports the Bootstrap CSS from the vendor location.
After submitting the contact details, users will receive an acknowledgment message. The bootstrap success alert box displays a positive response on successful mail sending.
All the fields are mandatory in this Bootstrap contact form example.
The js/validation.js file has the validation script. On the window load event, this script sets the submit event listener to check the form validity.
Once it found invalid form fields, it will prevent the form to submit. Added to that it will add Bootstrap custom validation styles to highlight the invalid fields.
It adds the .was-validated class to the parent form element. It highlights the form fields with respect to the :valid and :invalid pseudo-classes.
Apart from the red-bordered invalid field highlighting, the script displays a text-based error message. The setValidationResponse() checks the form data and insert the error message into the target.
This custom function invokes markAsValid() and markAsInvalid() to show the error messages. These functions set the element’s display property and the innerText.
js/validation.js
(function() { 'use strict'; window.addEventListener('load', function() { var form = document.getElementById('frmContact'); form.addEventListener('submit', function(event) { if (form.checkValidity() === false) { event.preventDefault(); event.stopPropagation(); setValidationResponse(); } form.classList.add('was-validated'); }, false); }, false);

})(); function setValidationResponse() { var emailRegex = /^([a-zA-Z0-9_.+-])+\@(([a-zA-Z0-9-])+\.)+([a-zA-Z0-9]{2,4})+$/; var userName = document.getElementById("userName").value; var userEmail = document.getElementById("userEmail").value; var subject = document.getElementById("subject").value; var content = document.getElementById("message").value; if (userName == "") { markAsInvalid("userName", "required"); } else { markAsValid("userName"); } if (userEmail == "") { markAsInvalid("userEmail", "required"); } else if(!emailRegex.test(userEmail)) { markAsInvalid("userEmail", "invalid"); } else { markAsValid("userEmail"); } if (subject == "") { markAsInvalid("subject", "required"); } else { markAsValid("subject"); } if (content == "") { markAsInvalid("content", "required"); } else { markAsValid("content"); }

} function markAsValid(id) { document.getElementById(id+"-info").style.display = "none";

} function markAsInvalid(id, feedback) { document.getElementById(id+"-info").style.display = "inline"; document.getElementById(id+"-info").innerText = feedback;

}
This section is something common in all of my contact forms example. But, this is important for which we have started.
In this example, it has support to store the contact form data into a database. But, it is optional and configurable in the coding.
The PHP code has a variable $isDatabase which may have a boolean true to enable the database.
structure.sql
--

-- Database: `bootstrap_contact_form`

-- -- -------------------------------------------------------- --

-- Table structure for table `tbl_contact`

-- CREATE TABLE `tbl_contact` ( `id` int(11) NOT NULL, `user_name` varchar(255) NOT NULL, `user_email` varchar(255) NOT NULL, `subject` varchar(255) NOT NULL, `message` varchar(255) NOT NULL

) ENGINE=InnoDB DEFAULT CHARSET=latin1; --

-- Indexes for dumped tables

-- --

-- Indexes for table `tbl_contact`

--

ALTER TABLE `tbl_contact` ADD PRIMARY KEY (`id`); --

-- AUTO_INCREMENT for dumped tables

-- --

-- AUTO_INCREMENT for table `tbl_contact`

--

ALTER TABLE `tbl_contact` MODIFY `id` int(11) NOT NULL AUTO_INCREMENT, AUTO_INCREMENT=1;
The below code shows the backend logic created in PHP for handling the posted data. This code has the default PHP mail() function to send the contact details.
index.php
<?php

use Phppot\DataSource; if (! empty($_POST["send"])) { $name = $_POST["userName"]; $email = $_POST["userEmail"]; $subject = $_POST["subject"]; $message = $_POST["message"]; $isDatabase = false; if ($isDatabase) { require_once __DIR__ . "/lib/DataSource.php"; $ds = new DataSource(); $query = "INSERT INTO tbl_contact (user_name, user_email, subject, message) VALUES (?, ?, ?, ?)"; $paramType = "ssss"; $paramArray = array( $name, $email, $subject, $message ); $ds->insert($query, $paramType, $paramArray); } $toEmail = "phppot@example.com"; $mailHeaders = 'From: webmaster@example.com' . "\r\n" . 'Reply-To: ' . $name . '<' . $email . ">\r\n" . 'X-Mailer: PHP/' . phpversion(); $mailHeaders = "From: " . $name . "<" . $email . ">\r\n"; // if lines are larger than 70 chars, then should be wrapped $message = wordwrap($message, 70, "\r\n"); // your PHP setup should have configuration to send mail $isValidMail = mail($toEmail, $subject, $message, $mailHeaders); if ($isValidMail) { $displayMessage = "Message sent. Thank you."; }

}

require_once __DIR__ . "/bootstrap-contact-form.php";
After setting $isDatabase to true, configure the database details in this class to connect the database for the contact form action.
lib/DataSource.php
<?php

/** * Copyright © Phppot * * Distributed under 'The MIT License (MIT)' * In essense, you can do commercial use, modify, distribute and private use. * Though not mandatory, you are requested to attribute Phppot URL in your code or website. */

namespace Phppot; /** * Generic datasource class for handling DB operations. * Uses MySqli and PreparedStatements. * * @version 2.6 - recordCount function added */

class DataSource

{ const HOST = 'localhost'; const USERNAME = 'root'; const PASSWORD = 'test'; const DATABASENAME = 'bootstrap_contact_form'; private $conn; /** * PHP implicitly takes care of cleanup for default connection types. * So no need to worry about closing the connection. * * Singletons not required in PHP as there is no * concept of shared memory. * Every object lives only for a request. * * Keeping things simple and that works! */ function __construct() { $this->conn = $this->getConnection(); } /** * If connection object is needed use this method and get access to it. * Otherwise, use the below methods for insert / update / etc. * * @return \mysqli */ public function getConnection() { $conn = new \mysqli(self::HOST, self::USERNAME, self::PASSWORD, self::DATABASENAME); if (mysqli_connect_errno()) { trigger_error("Problem with connecting to database."); } $conn->set_charset("utf8"); return $conn; } /** * To get database results * * @param string $query * @param string $paramType * @param array $paramArray * @return array */ public function select($query, $paramType = "", $paramArray = array()) { $stmt = $this->conn->prepare($query); if (! empty($paramType) && ! empty($paramArray)) { $this->bindQueryParams($stmt, $paramType, $paramArray); } $stmt->execute(); $result = $stmt->get_result(); if ($result->num_rows > 0) { while ($row = $result->fetch_assoc()) { $resultset[] = $row; } } if (! empty($resultset)) { return $resultset; } } /** * To insert * * @param string $query * @param string $paramType * @param array $paramArray * @return int */ public function insert($query, $paramType, $paramArray) { $stmt = $this->conn->prepare($query); $this->bindQueryParams($stmt, $paramType, $paramArray); $stmt->execute(); $insertId = $stmt->insert_id; return $insertId; } /** * To execute query * * @param string $query * @param string $paramType * @param array $paramArray */ public function execute($query, $paramType = "", $paramArray = array()) { $stmt = $this->conn->prepare($query); if (! empty($paramType) && ! empty($paramArray)) { $this->bindQueryParams($stmt, $paramType, $paramArray); } $stmt->execute(); } /** * 1. * Prepares parameter binding * 2. Bind prameters to the sql statement * * @param string $stmt * @param string $paramType * @param array $paramArray */ public function bindQueryParams($stmt, $paramType, $paramArray = array()) { $paramValueReference[] = & $paramType; for ($i = 0; $i < count($paramArray); $i ++) { $paramValueReference[] = & $paramArray[$i]; } call_user_func_array(array( $stmt, 'bind_param' ), $paramValueReference); } /** * To get database results * * @param string $query * @param string $paramType * @param array $paramArray * @return array */ public function getRecordCount($query, $paramType = "", $paramArray = array()) { $stmt = $this->conn->prepare($query); if (! empty($paramType) && ! empty($paramArray)) { $this->bindQueryParams($stmt, $paramType, $paramArray); } $stmt->execute(); $stmt->store_result(); $recordCount = $stmt->num_rows; return $recordCount; }

}
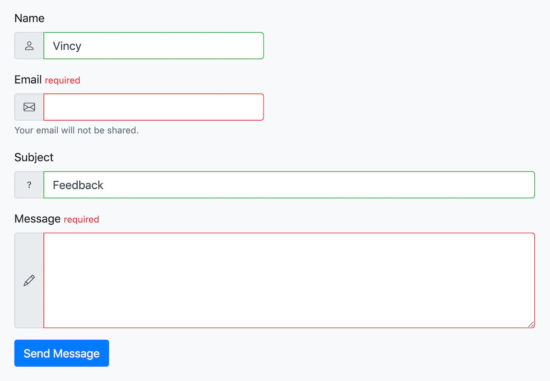
This screenshot shows the Bootstrap contact form example output. It displays the valid fields in green and the invalid fields in red.
This indication will notify the user on clicking the “Send Email” submit button.
On successful mail sending, a success response will send to the user as shown below.
https://www.sickgaming.net/blog/2020/08/...n-and-php/