Posted by: xSicKxBot - 01-23-2020, 05:01 AM - Forum: Python
- No Replies
Python Regex Split
Why have regular expressions survived seven decades of technological disruption? Because coders who understand regular expressions have a massive advantage when working with textual data. They can write in a single line of code what takes others dozens!
This article is all about the re.split(pattern, string) method of Python’s re library.
Let’s answer the following question:
How Does re.split() Work in Python?
The re.split(pattern, string, maxsplit=0, flags=0) method returns a list of strings by matching all occurrences of the pattern in the string and dividing the string along those.
The string contains four words that are separated by whitespace characters (in particular: the empty space ‘ ‘ and the tabular character ‘\t’). You use the regular expression ‘\s+’ to match all occurrences of a positive number of subsequent whitespaces. The matched substrings serve as delimiters. The result is the string divided along those delimiters.
But that’s not all! Let’s have a look at the formal definition of the split method.
Specification
re.split(pattern, string, maxsplit=0, flags=0)
The method has four arguments—two of which are optional.
pattern: the regular expression pattern you want to use as a delimiter.
string: the text you want to break up into a list of strings.
maxsplit (optional argument): the maximum number of split operations (= the size of the returned list). Per default, the maxsplit argument is 0, which means that it’s ignored.
flags (optional argument): a more advanced modifier that allows you to customize the behavior of the function. Per default the regex module does not consider any flags. Want to know how to use those flags? Check out this detailed article on the Finxter blog.
The first and second arguments are required. The third and fourth arguments are optional.
You’ll learn about those arguments in more detail later.
Return Value:
The regex split method returns a list of substrings obtained by using the regex as a delimiter.
Regex Split Minimal Example
Let’s study some more examples—from simple to more complex.
The easiest use is with only two arguments: the delimiter regex and the string to be split.
You use an arbitrary number of ‘f’ or ‘g’ characters as regular expression delimiters. How do you accomplish this? By combining the character class regex [A] and the one-or-more regex A+ into the following regex: [fg]+. The strings in between are added to the return list.
How to Use the maxsplit Argument?
What if you don’t want to split the whole string but only a limited number of times. Here’s an example:
We use the simple delimiter regex ‘-‘ to divide the string into substrings. In the first method call, we set maxsplit=5 to obtain six list elements. In the second method call, we set maxsplit=3 to obtain three list elements. Can you see the pattern?
You can also use positional arguments to save some characters:
Flags allow you to control the regular expression engine. Because regular expressions are so powerful, they are a useful way of switching on and off certain features (for example, whether to ignore capitalization when matching your regex).
Syntax
Meaning
re.ASCII
If you don’t use this flag, the special Python regex symbols w, W, b, B, d, D, s and S will match Unicode characters. If you use this flag, those special symbols will match only ASCII characters — as the name suggests.
re.A
Same as re.ASCII
re.DEBUG
If you use this flag, Python will print some useful information to the shell that helps you debugging your regex.
re.IGNORECASE
If you use this flag, the regex engine will perform case-insensitive matching. So if you’re searching for [A-Z], it will also match [a-z].
re.I
Same as re.IGNORECASE
re.LOCALE
Don’t use this flag — ever. It’s depreciated—the idea was to perform case-insensitive matching depending on your current locale. But it isn’t reliable.
re.L
Same as re.LOCALE
re.MULTILINE
This flag switches on the following feature: the start-of-the-string regex ‘^’ matches at the beginning of each line (rather than only at the beginning of the string). The same holds for the end-of-the-string regex ‘$’ that now matches also at the end of each line in a multi-line string.
re.M
Same as re.MULTILINE
re.DOTALL
Without using this flag, the dot regex ‘.’ matches all characters except the newline character ‘n’. Switch on this flag to really match all characters including the newline character.
re.S
Same as re.DOTALL
re.VERBOSE
To improve the readability of complicated regular expressions, you may want to allow comments and (multi-line) formatting of the regex itself. This is possible with this flag: all whitespace characters and lines that start with the character ‘#’ are ignored in the regex.
Although your regex is lowercase, we ignore the capitalization by using the flag re.I which is short for re.IGNORECASE. If we wouldn’t do it, the result would be quite different:
As the character class [xy] only contains lowerspace characters ‘x’ and ‘y’, their uppercase variants appear in the returned list rather than being used as delimiters.
What’s the Difference Between re.split() and string.split() Methods in Python?
The method re.split() is much more powerful. The re.split(pattern, string) method can split a string along all occurrences of a matched pattern. The pattern can be arbitrarily complicated. This is in contrast to the string.split(delimiter) method which also splits a string into substrings along the delimiter. However, the delimiter must be a normal string.
An example where the more powerful re.split() method is superior is in splitting a text along any whitespace characters:
import re text = ''' Ha! let me see her: out, alas! he's cold: Her blood is settled, and her joints are stiff; Life and these lips have long been separated: Death lies on her like an untimely Frost Upon the sweetest flower of all the field. ''' print(re.split('\s+', text)) '''

['', 'Ha!', 'let', 'me', 'see', 'her:', 'out,', 'alas!', "he's", 'cold:', 'Her', 'blood', 'is', 'settled,', 'and', 'her', 'joints', 'are', 'stiff;', 'Life', 'and', 'these', 'lips', 'have', 'long', 'been', 'separated:', 'Death', 'lies', 'on', 'her', 'like', 'an', 'untimely', 'Frost', 'Upon', 'the', 'sweetest', 'flower', 'of', 'all', 'the', 'field.', ''] '''
The re.split() method divides the string along any positive number of whitespace characters. You couldn’t achieve such a result with string.split(delimiter) because the delimiter must be a constant-sized string.
Related Re Methods
There are five important regular expression methods which you should master:
The re.findall(pattern, string) method returns a list of string matches. Read more in our blog tutorial.
The re.search(pattern, string) method returns a match object of the first match. Read more in our blog tutorial.
The re.match(pattern, string) method returns a match object if the regex matches at the beginning of the string. Read more in our blog tutorial.
The re.fullmatch(pattern, string) method returns a match object if the regex matches the whole string. Read more in our blog tutorial.
The re.compile(pattern) method prepares the regular expression pattern—and returns a regex object which you can use multiple times in your code. Read more in our blog tutorial.
These five methods are 80% of what you need to know to get started with Python’s regular expression functionality.
Where to Go From Here?
You’ve learned about the re.split(pattern, string) method that divides the string along the matched pattern occurrences and returns a list of substrings.
Learning Python is hard. But if you cheat, it isn’t as hard as it has to be:
Shipping API Integration in PHP with Australia Post Example
Last modified on January 22nd, 2020 by Vincy.
In an eCommerce website, we use the shipping API to calculate shipping cost. We calculate based on the items added to the shopping cart.
Integrating Shipping API with an eCommerce website will optimize the logistics cost. It takes care of the shipping needs in an effective way.
Shipping API integration helps eCommerce website by charging the right amount for shipping. Imagine when we add a random fixed cost to each checkout. What will happen is that, we will either overcharge the customer or end up in direct loss.
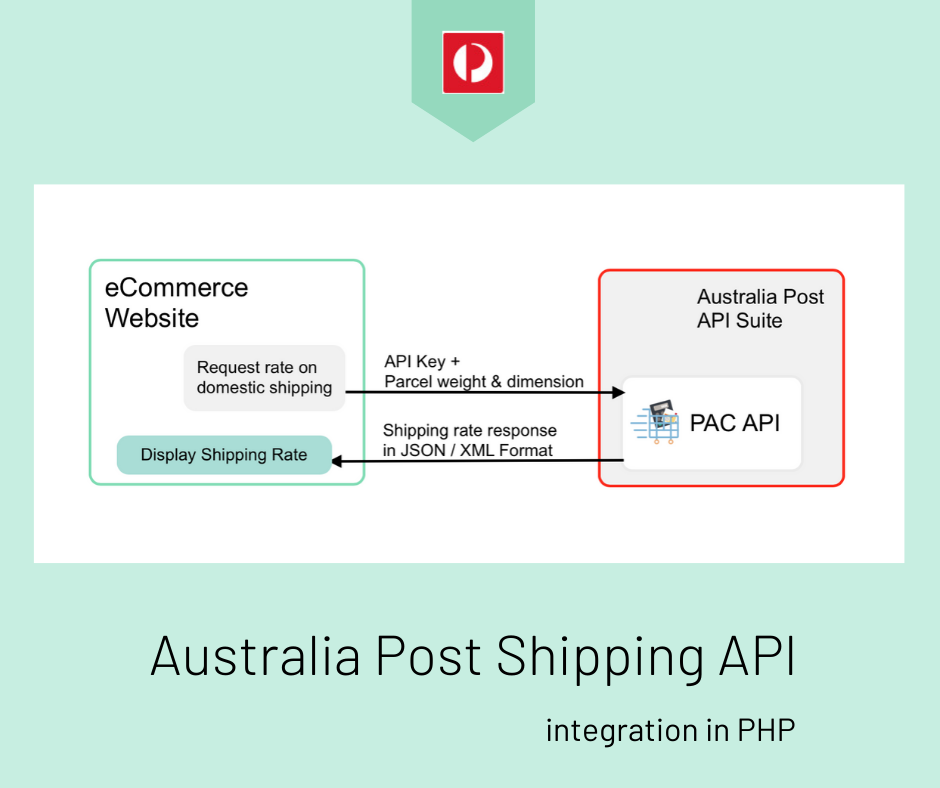
In this article, we will see how to integrate Australia Post shipping API in a PHP application. You can use this code in a shopping cart checkout page to calculate shipping rates.
I have created code to request the Australia Post API to calculate the shipping rates. This rate is for the products on domestic shipping.
Shipping API – a digital intermediate as like as other APIs. It resolves eCommerce website shipping needs.
Integratable extern responds to the queries generated by the application.
With the available services and capabilities, it help build the eCommerce website’s shipping needs.
This ready-made solution will smoothen the customer’s buying experience with your online store.
Capabilities of Shipping APIs
For each eCommerce website, the motive to integrate Shipping API differs. This variation depends on the utilities required by the shopping cart.
In general, the capabilities of Shipping APIs are,
Verifying shipping zone
Multi-carrier support
Tracking the order traces during shipment.
With these capability limit, the Shipping APIs provides ultimate services. And, they are huge in number. For example,
Ensuring the shipping destination and thereby calculate the success probability of the delivery.
Request a quote for the carrier or shipment.
Receiving notification about tracking updates.
The Australia Post shipping API provides services like,
Postage assessment calculation
Postal code search
SecurePay online payments and more.
Existing shipping API available
Postal carrier APIs like DHL, USPS, Australia Post provides services for the eCommerce website. It offers services like calculating shipping rates, tracking shipped parcel and more.
There are numerous third-party shipping APIs available. For example Postmen, EasyPost, Shippo and more.
The third-party shipping API has a RESTful interface that connects postal service APIs. It creates a channel to read the API to access its functionalities.
About Australia Post API
Australia Post API suite has the following list APIs. All these APIs help to fulfil the transactional needs of your eCommerce website.
Postage assessment calculator – To get the cost for shipping a document or parcel.
Shipping and tracking – To get service on product dispatch and tracking.
SecurePay online payments – Payment solutions for an eCommerce website via SecurePay integration.
Delivery choices API – gives the delivery choices to the user to choose location, speed, day, date, time.
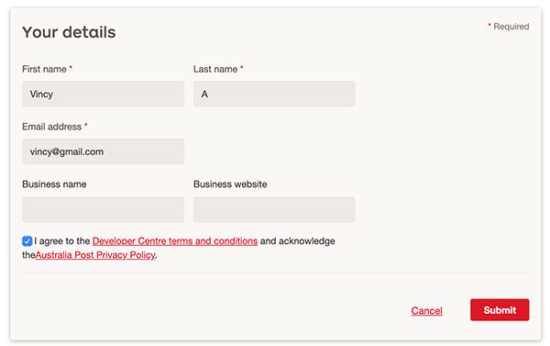
For accessing the API, it requires the corresponding API key. As per the Australia Post API access requirements it asks to register with the API to get the key.
Australia Post provides an interface to explore the APIs. You may generate live API requests via this explorer to see how it works.
About this example
In this example, it uses the Postage assessment calculator API or PAC of the Australia Post API suite.
This API provides services to calculate the shipping cost. This cost varies based on the parcel weight, dimension, and more parameters.
This API includes various endpoints returning resources data based on the access requests.
I am creating a request for calculating the shipping cost for a domestic parcel. This request needs the corresponding API key. In the next section, we will see how to get the API key for accessing the PAC API.
For this calculation, the API requires the parcel dimension, height, width. And also, it needs the shipping zone’s origin and destination postal codes. These are all common considering any eCommerce website.
I get the parameters from the user via an HTML form and send it with the API request.
This example uses PHP CURL to access the Australia Post Postage assessment calculator API.
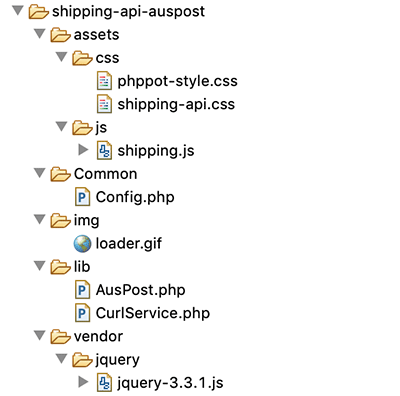
File Structure
The below screenshot shows the Australia Post shipping rate calculation example files.
Australia Post shipping API integration steps
The steps to integrate Australia Post in an eCommerce website are,
Choose API from the Australia Post API suite.
Create a new account to get the API key.
Choose the postage service and set the endpoint.
Set the API key as the HTTP header AUTH-KEY.
Generate the PAC API request with the header set in step 4.
How to get the Australia Post PAC API key
There are many APIs provided by the Australia Post in API suite. The first step is to choose the API based on the need of your eCommerce website.
As discussed in the last section, I choose PAC API for calculating the shipping cost.
The PAC API access requirements state that it need the API key. This key is for authenticating the service request generated from the application.
On submitting valid information, it will send the API key to the registered email address. You can use this API then, to access the PAC API services.
Web interface to enter details to calculate shipping rates
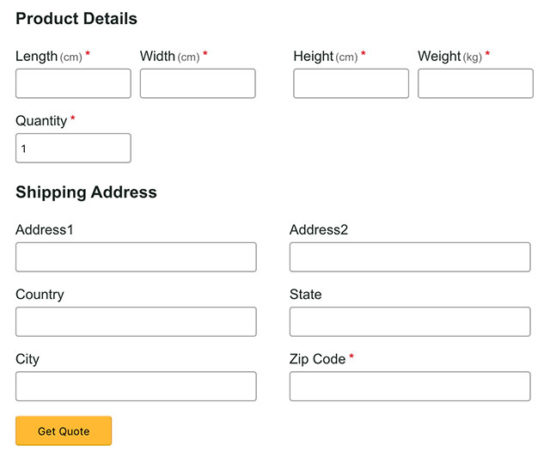
This is the code to show a form to collect the product and shipping details.
It has the fields to collect the width, height, weight, and length of the parcel. The form will show the units of these parameters to the user.
Also, it collects the shipping address. This is the shipping destination address. The zip code is a mandatory field among the shipping address fields.
The shipping origin and destination postal codes are mandatory to calculate the rates.
In this example, the postal code of the shipping origin is configurable. You can also move it to the HTML form to let the user enter the data.
This CSS includes basic styles to show the shipping form to the user. It has exclusive styles related to this example.
Apart from that, this example contains a generic CSS phppot-styles.css. It contains common template styles with a list of selectors. You can find this generic CSS in the downloadable source.
This is an exclusive service class for executing curl script. The execute() function is receiving URL, API KEY as its parameters.
It initiates curl object and set the URL. It sets the header with the API key to call the Australia Post live URL.
The rawBody will receive the API response in JSON format. You can use this as a sample to build an eCommerce website backed by a shopping cart with shipping API integration.
The output screenshot below shows the payment and shipping form. It is to get the shipping details from the user.
It also has the fields to collect parameters like height, width and the dimension of the products.
You can also integrate this form into your shopping cart checkout page to calculate rates. For a shopping cart, it requires only the shipping address.
Because, the height, width, height will be a part of a product entity. And the quantity can be read from the cart session or database. The below form is generic and with little customization can be used for any eCommerce website.
Material Maker 0.8 was just released. Material Maker is a free procedural texture generation software that was built on top of the Godot game engine. We previously covered Material Maker in this video. The 0.8 release brings several new features including several new nodes and examples.
2D SDF nodes do not output greyscale information and cannot be directly connected to greyscale/color/RGBA inputs anymore. you will have to use the sdShow Node
User interface
the 2D and 3D previews are now in separate tabs
the 3D preview in the background of the graph pane can now be shown and hidden using the “cube” button at the bottom left of the graph view and controlled independently,
the 2D preview now shows a tiled version of the selected node (so it’s easy to check the result is seamless)
the 2D preview now has controls that can be associated to (float) node parameters (this applies mainly to shape/transform nodes)the UI will now be dimmed when exiting the application (this change was contributed by Calinou)
Nodes and code generation
2 new types of node inputs/outputs have been added for 2D and 3D signed distance functions. Both types have a custom preview (distance field for 2DSDF and shaded scene for 3DSDF)
shader nodes inputs now have a “function” attribute. When this option is selected, the input is generated as a function and is usable in instance Functions. This feature made all 3D SDF nodes possible.
a few problems in convolution nodes have been fixed
New and improved nodes
all 2D signed distance functions have been modified to use the 2DSDF inputs/outputs (that are shown in orange). The sdShow node is now the only way to generate an image. Added 2DSDF transform and morph nodes.
the new 3D signed distance functions nodes can be used to describe 3D shapes. Many shapes (sphere, box, capsule, torus, cylinder…), transforms (translate, rotate, scale), operators (boolean, repeat, extrusion, revolution…) are provided and the Render node can be used to generate a height map and a normal map from 3DSDF information. All this is based on ray marching and can be used to describe 3D objects that can then be spread on the textures, as demonstrated in the “skulls” and “pile_of_bricks” examples.
the new 3D box and a sphere nodes are not based on 3DSDF and just output a height map
the new “workflow” nodes can be used to define base materials and mix them using height/orientation/offset maps, and to ultimately create complex materials without drawing spaghetti monsters in the graph view. A few simple base materials are provided in the node library as templates. The new “marble” and the updated “medieval_wall” examples show how to use all those nodes.
the bricks node has been improved with round brick corners and output UV information for each brick and each brick corner. Also added an output that gives brick orientation.
the new CustomUV node uses one of its input as coordinates to read the other input and can thus be used to implement psychedelic image transforms
the new generic truchet node tiles its input, randomly flipping it horizontally, vertically or both
the beehive node just outputs hexagonal tiles
the new convolution nodes are 3 edge detectors and a sharpen filter
the normal map node has a new option to disable its input buffer. The buffer should still be used when the input is complex, but disabling it will generate smoother normal maps
the new greyscale node converts color input to greyscale with a choice of 5 algorithms
the new swap channels node replaces all channels (R, G, B, A) of its output with 0, 1 or a (optionnally inverted) channel of its input
Material Maker 0.8 is available for download for Windows and Linux here. You can learn more about Material Maker 0.8 in the video below.
Create an account or log in an already existing one and permanently add the game on your account. Alternatively you can redeem it from the Epic Launcher on the game's giveaway page.
This is the 12th daily giveaway that lasts only 24 hours. They will give away one free game per day until the end of 2019.
A tinkerer once made a maze. To test it, he sent a little mouse to work their way out. You are that mouse, and Maze Machina is quite a clever, vexing little contraption: simultaneously stressful and accessible. The design is brilliant and such fun to play, but the margins of error are also pretty tight, at least in the modes with turn pressure.
Tinytouchtales has been a quality outfit for years now, with the games it produces being basically guaranteed day-one purchases from myself and quite a few others. In this respect the latest is also certifiably good, but it should additionally be praised for its juxtaposition of incredible simplicity and unflinching difficulty. It’s even more pared-down than you’d think, yet chock-full of interactions and interesting edge cases.
So far, Arnold Rauers’ niche has always been single-player turned-based solitaire games, with the other big ticket games (Card Crawl, Card Thief, Miracle Merchant) utilizing cards. Well, Maze Machina is solitaire all right, but it uses a randomized board of items, not cards. The goal is straightforward: grab the key, make your way to the level exit, as quick as you can. To accomplish this, you have to use items. The tile is the effect, the location is the device, just as with Michael Brough’s Imbroglio. If the mousy protagonist is on a dagger tile, then the dagger can stab enemies. That’s the game’s first key proposition: position is everything.
Movement is the other proposition. By swiping in any of the four cardinal directions, every figure on the board that can move, will move in that direction with a few minor exceptions. (The game credits Threes! for this mechanic). The figures that don’t move will use an item on their space, if possible. That means you, of course, but all of the automatons standing in your way as well. It’s fiendish how often this mechanic is difficult to manipulate to a specific end. Early levels only have a few enemies, but the later ones have five, and they stay true to their automaton nature: when destroyed they come back often (though not always?). The game wants you to find an elegant solution and not just browbeat your robot foes into submission. On that note, it has an energy system, with each move costing one stamina and a hunk of cheese replenishing said stamina every third level. ‘Elegance’ forever means the fewest moves, prioritising repositioning effects over direct battle.
The full variety of items is a doozy. Quite a few of them are weapons, with various hit ranges, priority effects and other quirks. Some are for repositioning enemies or items. There are trap helmets, thieving masks and mirror items which actually want to provoke a fracas. Most difficult of all are the random or hidden effects, because although they are difficult to discern they must nevertheless be factored in. Each level feels like an elaborate multivariate deathtrap where one false swipe can mean your poor heroic mouse is stuck spending twenty turns or more getting out.
In this way the game is closer to the type of Solitaire you’d read about in Hoyle’s book of games and bust out a pack of Penguin cards to play. In solitaires of old, fail states abound. The state of play can get wretched very quickly. Maze Machina has quite a few combo effects and unusual timing structures, so it requires very clear-sighted forecasting and strategic planning. The difference between a good plan and a sloppy one is not numerical, it’s binary. You will fail, as I have, if you play haphazardly relying on a few favorite tricks or stacking combos to bail you out. Excellent play here means minding the boring elements every bit as much as the flashy ones.
Modern videogames have gamed human psychology by attaching numerical values to anything and everything: health, rarity, currency, even free time itself, are all conventionally made fungible by rendering them as numbers. Not so with Maze Machina, which cares about effects more than numbers. A single hit destroys almost any object or entity, there are no additional unlocks or grind and the whole game is available to play without extra investment or progression.
It’s refreshing and hardcore, and to this reviewer the most fun game to fail at repeatedly. Normally I’d bounce off a game after having so little success, but I can clearly see what it wants from me: deliberate, total consideration of every possibility. My normal pattern is just to brutally find the cleanest, best path from A to B but that approach is such a bad fit for Maze Machina.
It has quite a few play modes, so to relax and practice my technique I switch from the standard mode to Limit, which puts a hard cap of 250 turns. Draft is also a refreshing twist, giving a choice between new rules which take effect every few floors. The mechanical theme is present in the art, animations, sound effects and music throughout. It’s cohesive and slick. There is a richness, both in the number of ways to play and artistic vision that… enriches the play experience. The automaton theme also emphasis how heavily turns revolve around programmed series of actions, like a Rube Goldberg Machine.
I must again reiterate how bad I am at this game. I can recognise good plays with 100% benefit of hindsight, and occasionally even set them up in advance, but I cannot for the life of me get to that mythical fifteenth level. This is fine! Great, even! I’m shocked that none of my previous puzzle experience is proving very useful, and grateful for the chance to learn a new system from scratch. I do suspect some of the variance can genuinely ruin a run, but without a more perfect understanding I’d be rightfully accused of sour grapes (a.k.a. mad because bad). I hate this game! I can’t escape it! 5/5 would embark on this embarrassing, compelling learning spree again.
Adobe Flash disabled in latest Safari Technology Preview
By Mikey Campbell Wednesday, January 22, 2020, 06:56 pm PT (09:56 pm ET)
Presaging what will be the final nail in the coffin for Adobe Flash on Safari, Apple on Wednesday disabled support for the much-maligned multimedia plug-in in the latest version of Safari Technology Preview.
Apple quietly announced the imminent demise of Flash on Safari in a set of release notes accompanying Safari Technology Preview 99. Along with a number of enhancements to WebKit code and assets is mention of a single deprecation under “Legacy Plug-Ins,” which simply states, “Removed support for Adobe Flash.”
Introduced as a developer-focused experimental browser in 2016, Safari Technology Preview provides an early look at upcoming Web technologies that will appear — or in the case of Flash, won’t appear — in both iOS and macOS. The browser is in many ways a standalone beta version of Safari.
The death of Flash is a long time coming. A once-pervasive standard for distributing rich media over the internet, the asset-hungry, proprietary software is now viewed as out-of-date and unsuitable for a mobile-first world. Late Apple cofounder Steve Jobs said as much some 10 years ago in a widely circulated letter appropriately titled “Thoughts on Flash.”
Following increased competition and pushback from the likes of Apple, Google and other browser makers, Adobe in 2017 said it would pull the plug on Flash in 2020. Now, with five words, Apple is signaling that time is nigh for Safari.
For iOS device users, the end of Flash is a non-issue as the platform never integrated the web standard. Safari on Mac has shipped with Flash disabled since macOS Sierra, leaving users to manually activate the software on a case-by-case basis.
Set up an offline command line dictionary in Fedora
You don’t need an internet connection to have an easily searchable and extendable dictionary on your Fedora computer. You can use sdcv (StarDict under Console Version) and the public Stardict files on the default repositories to keep a local record for offline use. This article shows you how.
What is sdcv?
sdcv is a command line variant of Stardict. Stardict is a part of a long legacy of GUI offline dictionaries. The “dic” files it uses are formatted as a colon delimited file, with the word in first column and the definition in the second column. You can have multiple lines with the same word and different definitions. sdcv will provide you with a search function and formatted display of your results.
Installing sdcv
You can get started quickly with sdcv and the English dictionary by installing them from the default repos:
sudo dnf install sdcv stardict-dic-en
sdcv will be ready for use right away. If you want to see what other languages are available, use this command:
dnf search stardict
How to use sdcv
sdcv has an interactive and non-interactive mode. You can perform a quick search on a word or term using this command:
sdcv word
For example, you could search sdcv linux. Alternately, you can run sdcv by itself to activate interactive mode.
Customizing sdcv
sdcv has a –color option that adds coloring to the words and source of the definition. You can also use an alias to enable –color by default. Simply edit your shell resource file (default on Fedora is ~/.bashrc) to add this command:
alias sdcv="sdcv --color"
You can also use a more friendly name like this:
alias describe="sdcv --color"
sdcv references /usr/share/stardic/dic by default, or it uses the path located in the shell variable STARDICT_DATA_DIR. You can also set up a personal dictionary in the file $HOME/.stardict/dic.
Fun facts
Believe it or not, the dict network protocol is still alive to this day. You can use it with the curl command by using a command like this to search for a word:
curl dict://dict.org/d:<word>
This pull definitions straight from the internet via your command line. Enjoy using sdcv!
Mini Review: Lydia – One Of The Most Emotionally Impactful Games On Switch
Lydia is a powerful game. It’s the kind of experience that, while very short, will make you stop and think about its story long after the end credits roll. It’s tense, funny, and heartbreaking all in one go, and with the option to purchase additional DLC in support of the Finnish A-Clinic Foundation, its underlying message will undoubtedly resonate with many people.
You play as the titular Lydia, a child with a highly active imagination trapped in a neglectful home environment. After her father tells her a story of monsters in the night, Lydia becomes convinced that monsters are real, and with the help of her beloved teddy, ventures into her wardrobe to confront her fears. To say more of the story would ultimately ruin it, but needless to say that a lot of what you see within the game is not always as it seems.
For the most part, Lydia plays out like your typical adventure title; you can directly control Lydia for large portions of the game, investigating areas of interest and talking to people within the environment. Other scenes play out more like a visual novel, occasionally providing you with dialogue choices as you progress through conversations. Disappointingly, we found on a second playthrough that many of the choices presented to you actually make very little impact to the overall plot, and this is particularly noteworthy in the final scene of the game.
What’s immediately striking with the game is the one-two punch of the visuals and sound design. It looks like an abstract graphic novel, and its black and white colour palette is very much reminiscent of Limbo, but with occasional streaks of vibrant colour dotted throughout to denote areas of danger or safety. The soundtrack consists of a mixture of sinister ambient music and emotional melodies, and the characters speak in a nonsensical tongue that somehow fits quite naturally in the overall experience.
With only 4 short chapters to play through, Lydia will only take you about 1 or 2 hours to complete, so those after more of a meaty experience might want to look elsewhere. We would, however, encourage you to experience it at least once, if only for its eye-opening message. It successfully tells a haunting story about abuse and heartbreak without necessarily shoving it down your throat, and that’s really hard to do. It’s one of the most emotionally impactful games to grace the Switch since its launch nearly three years ago.
Posted by: xSicKxBot - 01-23-2020, 05:01 AM - Forum: Lounge
- No Replies
Pokemon-Like MMO Temtem Can Already Be Snagged At A Discount
The Pokemon-like Temtem hit Steam Early Access this week, and just like the game that inspired it, people are going wild for it. Its user reviews are currently sitting at "Very Positive," and if you want to jump in at a cheaper price than what you can find on Steam, then Green Man Gaming and publisher Humble Bundle have got your back. The best part is that buying from either retailer will get you a Steam key.
Temtem's regular price is $35--and it'll only increase as development continues--but at Green Man Gaming, you can pick up Temtem for $28.69 USD with promo code UPCOMING18. However, if you're a Humble Choice subscriber, then you can snag the creature-catching game for slightly cheaper: $28. These deals are valid everywhere Green Man Gaming and Humble Bundle operate.
Temtem launched to Early Access with some server instability issues, but after its latest update, it seems to be operating more smoothly. Developer Crema stated that Temtem's early access period is expected to run through mid-2021. The studio confirmed that the version currently available to players includes about 50% of the game's overall content.
If you're interested in learning more about the Pokemon-inspired game, then be sure to read our preview on how Temtem twists the Pokemon formula. It goes into the game's double battles, which you can take on with a friend by your side, and more.




 Less than 100 keys are available for this one of a kind Crackerjack Deal.
 For just a few hours the opportunity knocks at your door...quite hard and loudly. Win Steam Keys by beating the Gameplay Challenge.