Open Liberty Java runtime now available to Red Hat Runtimes subscribers
Open Liberty is a lightweight, production-ready Java runtime for containerizing and deploying microservices to the cloud, and is now available as part of a Red Hat Runtimes subscription. If you are a Red Hat Runtimes subscriber, you can write your Eclipse MicroProfile and Jakarta EE apps on Open Liberty and then run them in containers on Red Hat OpenShift, with commercial support from Red Hat and IBM.
Develop cloud-native Java microservices
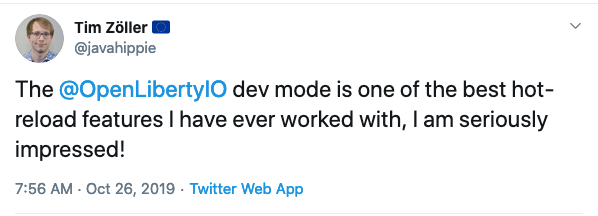
Open Liberty is designed to provide a smooth developer experience with a one-second startup time, a low memory footprint, and our new dev mode:
Open Liberty provides a full implementation of MicroProfile 3 and Jakarta EE 8. MicroProfile is a collaborative project between multiple vendors (including Red Hat and IBM) and the Java community that aims to optimize enterprise Java for writing microservices. With a four-week release schedule, Liberty usually has the latest MicroProfile release available soon after the spec is published.
Also, Open Liberty is supported in common developer tools, including VS Code, Eclipse, Maven, and Gradle. Server configuration (e.g., adding or removing a capability, or “feature,” to your app) is through an XML file. Open Liberty’s zero migration policy means that you can focus on what’s important (writing your app!) and not have to worry about APIs changing under you.
Deploy in containers to any cloud
When you’re ready to deploy your app, you can just containerize it and deploy it to OpenShift. The zero migration principle means that new versions of Open Liberty features will not break your app, and you can control which version of the feature your app uses.
Monitoring live microservices is enabled by MicroProfile Metrics, Health, and OpenTracing, which add observability to your apps. The emitted metrics from your apps and from the Open Liberty runtime can be consolidated using Prometheus and presented in Grafana.
Learn with the Open Liberty developer guides
Our Open Liberty developer guides are available with runnable code and explanations to help you learn how to write microservices with MicroProfile and Jakarta EE, and then to deploy them to Red Hat OpenShift.
In keeping with its 16-year history, the 2018 Duke's Choice Award winners were announced at the Groundbreakers Hub at Code One. The winners include JPoint, a self-driving car; community winners BgJUG (the Bulgarian JUG) . Among the winners announced were also tools from ClassGraph, Twitter4J, Apache NetBeans and Jelastic vertical memory scaling along with open source initiatives, MicroProfile.IO and Project Helidon.
Apache NetBeans - Toni Epple, Constantin Drabo, Mark Stephens
An integrated development environment (IDE) for Java. NetBeans allows applications to be developed from a set of modular software components and runs on Microsoft Windows, macOS, Linux, and Solaris.
Bulgarian Java User’s Group, BgJUG - Dmitry Alexandrov, Nayden Gochev, Ivan St. Ivanov, Mihail Stoynov, Martin Toshev
The BgJUG deserves recognition for their mastery of two pillars: the technical side and the community. Influencing the adoption of Java for more than 10 years, the group organizes highly effective events regularly. The passion, dedication, and professionalism at BgJUG are highly contagious. The human aspect, the empathy, the collaborative nature, and the diversity this team consistently promotes is very refreshing.
ClassGraph - Luke Hutchison
ClassGraph is an uber-fast parallelized classpath scanner, module scanner, and build-time/runtime annotation processor for JVM languages. ClassGraph directly parses class files to build a graph of the relatedness of all visible classes, methods, fields, and annotations, and this graph can be queried or visualized in a wide range of ways, bringing valuable meta programming features to the JVM ecosystem.
Jelastic - Ruslan Synytsky
Elastic JVM with Automatic Vertical Memory Scaling allows the JVM
to dynamically adjust the maximum memory limit for running Java process without JVM restart, and releases unused memory back to the host machine to save money for companies running workloads in the cloud.
JPoint - Bert Jan Schrijver
An autonomous driving vehicle created with Raspberry Pi, an RPi camera, Vert.x (the reactive toolkit for the JVM), and the OpenCV Java bindings.
MicroProfile.io
The MicroProfile project fills a gap in the Java EE ecosystem, allowing developers and vendors to develop and deploy simple, low-profile microservices developed on the Java EE/Jakarta EE Platform.
Project Helidon - Joe DiPol
A set of Java libraries for writing microservices, Helidon supports two programming models. Helidon MP implements MicroProfile for developers familiar with Java EE, and Helidon SE provides a functional and reactive-style API. Both are powered by Netty.
Twitter4J - Yusuke Yamamoto
A library based on OAuth, REST API, JSON, and HTTP/2 technology that helps integrate microblogging service in a type-safe way.
Posted by: xSicKxBot - 01-22-2020, 05:02 PM - Forum: Windows
- No Replies
Microsoft to launch new cloud datacenter region in Israel
Microsoft today announced plans to establish the company’s first cloud region in Israel to deliver its intelligent, trusted cloud services through a local datacenter region. This investment expands the Microsoft global cloud infrastructure to 56 cloud regions in 21 countries, with the new Israel region anticipated to be available starting with Microsoft Azure in 2021, with Office 365 to follow. The new Israel region will adhere to Microsoft’s trusted cloud principles and become part of one of the largest cloud infrastructures in the world, already serving more than a billion customers and 20 million businesses.
Azure is an ever-expanding set of cloud services that offers computing, networking, databases, analytics, and Internet of Things (IoT) services. The investment in a new Israel datacenter region will enable customers to use the most advanced technologies and adhere to data residency requirements to store data within Israel. Microsoft’s cloud services are also compliant with the European Union’s General Data Protection Regulation (GDPR) and are certified for an industry-leading portfolio of international security and privacy standards. Azure will enable the local Israeli ecosystem to build on the latest advancements in the cloud, helping organizations drive their digital transformation. Office 365, the world’s leading cloud-based productivity solution, will be available from the new datacenter region, helping customers enable the modern workplace and empower their employees with real-time collaboration and cloud-powered intelligence while maintaining security, compliance, and in-country customer data residency.
“When I speak to customers across EMEA, it is clear that the power of the cloud is essential for their competitiveness,” said Michel van der Bel, President, Microsoft Europe, Middle East and Africa. “We have made significant infrastructure investments in the region and with this announcement, our planned region in Israel will join a growing number of EMEA markets recently made available including Germany, Norway, South Africa and Switzerland. Offering Microsoft Azure and Office 365 from a datacenter region in Israel forms a key part of our investment and involvement in the startup nation, as infrastructure is an essential building block for the tech intensity that public sector entities and businesses need to embrace.”
Establishing new datacenter regions entails significant investment of resources and this announcement reinforces the continuous commitment of Microsoft to the Israeli market. The company started its journey in 1989 in Israel by opening a local branch. In 1991 Microsoft established its Israeli R&D center – its first R&D center outside of the US – one of the first major tech companies to do so in Israel. In addition, 2020 will include another key investment in the local market with the launch of a new Microsoft Israel campus. Microsoft has deep engagement with the Israeli tech ecosystem – it operates a business branch, an R&D Center, a Venture Capital Fund and Microsoft for Startups programs.
Square Enix Indie Division Teases Imminent Nintendo Switch Announcement
Is it just us, or does that logo scream “Wii U”?
Square Enix Collective, a division of the well-known Japanese publisher which provides funding and publishing services to indie developers, has teased a new Switch announcement for later this week.
The studio is remaining tight-lipped on what the announcement might be, but you can see the tease for yourself below. In this very Twitter thread, Square Enix Collective went on to explain that it publishes “super cool indie games”, so expect more of the same when this announcement does eventually drop.
Up until now, the only Switch game already confirmed for release by the division is Circuit Superstars, a cool-looking top-down racing game that was shown off during E3 2019.
In the replies to Square Enix’s tweet, fans are being quick to jump on the idea that this means a Nintendo Direct is happening. Let us remind you that, while that isn’t completely out of the question, making a Switch-related announcement doesn’t always mean that a Direct is about to happen. We’d happily consume an entire Direct right now just as much as the next person, but let’s all remain calm.
So, any thoughts or hopes on what this could be? Fire away in the comments.
Half-Life: Alyx Devs Will Answer Your Burning Questions During Reddit AMA
It's a good time to be a Half-Life fan. All of the Half-Life games are currently free on Steam, and a brand-new entry in the series, Half-Life: Alyx, is releasing in March. There are still many unanswered questions about the VR-only PC game, and Valve plans to answer (at least some) of those questions very soon.
Valve has now announced it will hold an AMA on Reddit for Half-Life: Alyx this Wednesday, January 22, beginning at 9 AM PT. The developer is asking fans to submit "all your burning questions" about Half-Life: Alyx, and it may answer "some" of them. Check back with GameSpot around then, as we'll collect some of the most interesting and noteworthy responses.
The Half-Life: Alyx team will be doing an AMA on https://t.co/y6aHejwwHE tomorrow at 9am Pacific Time. Come prepared with all your burning questions about the game's development, because we'll be there to answer some of them. pic.twitter.com/qN3BCn7OPC
Half-Life: Alyx is exclusive to VR, but it will work with any major PC VR headset you may have. The game is compatible with the Valve Index, Oculus Rift, Oculus Quest (with Link), HTC Vive headsets, and Windows Mixed Reality headsets. You can pre-order it on Steam for $54 USD.
As for the freebie offer, you can currently grab all seven of the main Half-Life instalments right now on Steam for the low, low price of $0.00. Click through the links below to get going. The games are free to play until Half-Life: Alyx releases.
Posted by: xSicKxBot - 01-22-2020, 07:35 AM - Forum: Python
- No Replies
Python Regex Match
Why have regular expressions survived seven decades of technological disruption? Because coders who understand regular expressions have a massive advantage when working with textual data. They can write in a single line of code what takes others dozens!
This article is all about the match() method of Python’s re library. There are two similar methods to help you use regular expressions:
The easy-to-use but less powerful findall() method returns a list of string matches. Check out our blog tutorial.
The search() method returns a match object of the first match. Check out our blog tutorial.
So how does the re.match() method work? Let’s study the specification.
How Does re.match() Work in Python?
The re.match(pattern, string) method matches the pattern at the beginning of the string and returns a match object.
Specification:
re.match(pattern, string, flags=0)
The re.match() method has up to three arguments.
pattern: the regular expression pattern that you want to match.
string: the string which you want to search for the pattern.
The re.match() method returns a match object. You may ask (and rightly so):
What’s a Match Object?
If a regular expression matches a part of your string, there’s a lot of useful information that comes with it: what’s the exact position of the match? Which regex groups were matched—and where?
The match object is a simple wrapper for this information. Some regex methods of the re package in Python—such as match()—automatically create a match object upon the first pattern match.
At this point, you don’t need to explore the match object in detail. Just know that we can access the start and end positions of the match in the string by calling the methods m.start() and m.end() on the match object m:
In the first line, you create a match object m by using the re.match() method. The pattern ‘h…o’ matches in the string ‘hello world’ at start position 0. You use the start and end position to access the substring that matches the pattern (using the popular Python technique of slicing). But note that as the match() method always attempts to match only at the beginning of the string, the m.start() method will always return zero.
Now, you know the purpose of the match() object in Python. Let’s check out a few examples of re.match()!
A Guided Example for re.match()
First, you import the re module and create the text string to be searched for the regex patterns:
>>> import re

>>> text = ''' Ha! let me see her: out, alas! he's cold: Her blood is settled, and her joints are stiff; Life and these lips have long been separated: Death lies on her like an untimely frost Upon the sweetest flower of all the field. '''
Let’s say you want to search the text for the string ‘her’:
>>> re.match('lips', text)

>>>
The first argument is the pattern to be found: the string ‘lips’. The second argument is the text to be analyzed. You stored the multi-line string in the variable text—so you take this as the second argument. The third argument flags of the match() method is optional.
There’s no output! This means that the re.match() method did not return a match object. Why? Because at the beginning of the string, there’s no match for the regex pattern ‘lips’.
So how can we fix this? Simple, by matching all the characters that preced the string ‘lips’ in the text:
>>> re.match('(.|\n)*lips', text)

<re.Match object; span=(0, 122), match="\n Ha! let me see her: out, alas! he's cold:\n>
The regex (.|\n)*lips matches all prefixes (an arbitrary number of characters including new lines) followed by the string ‘lips’. This results in a new match object that matches a huge substring from position 0 to position 122. Note that the match object doesn’t print the whole substring to the shell. If you access the matched substring, you’ll get the following result:
>>> m = re.match('(.|\n)*lips', text)

>>> text[m.start():m.end()] "\n Ha! let me see her: out, alas! he's cold:\n Her blood is settled, and her joints are stiff;\n Life and these lips"
Interestingly, you can also achieve the same thing by specifying the third flag argument as follows:
>>> m = re.match('.*lips', text, flags=re.DOTALL)

>>> text[m.start():m.end()] "\n Ha! let me see her: out, alas! he's cold:\n Her blood is settled, and her joints are stiff;\n Life and these lips"
The re.DOTALL flag ensures that the dot operator . matches all characters including the new line character.
What’s the Difference Between re.match() and re.findall()?
There are two differences between the re.match(pattern, string) and re.findall(pattern, string) methods:
re.match(pattern, string) returns a match object while re.findall(pattern, string) returns a list of matching strings.
re.match(pattern, string) returns only the first match in the string—and only at the beginning—while re.findall(pattern, string) returns all matches in the string.
Both can be seen in the following example:
>>> text = 'Python is superior to Python'

>>> re.match('Py...n', text)

<re.Match object; span=(0, 6), match='Python'>

>>> re.findall('Py...n', text)

['Python', 'Python']
The string ‘Python is superior to Python’ contains two occurrences of ‘Python’. The match() method only returns a match object of the first occurrence. The findall() method returns a list of all occurrences.
What’s the Difference Between re.match() and re.search()?
The methods re.search(pattern, string) and re.match(pattern, string) both return a match object of the first match. However, re.match() attempts to match at the beginning of the string while re.search() matches anywhere in the string.
You can see this difference in the following code:
>>> text = 'Slim Shady is my name'

>>> re.search('Shady', text)

<re.Match object; span=(5, 10), match='Shady'>

>>> re.match('Shady', text)

>>>
The re.search() method retrieves the match of the ‘Shady’ substring as a match object. But if you use the re.match() method, there is no match and no return value because the substring ‘Shady’ does not occur at the beginning of the string ‘Slim Shady is my name’.
How to Use the Optional Flag Argument?
As you’ve seen in the specification, the match() method comes with an optional third ‘flag’ argument:
re.match(pattern, string, flags=0)
What’s the purpose of the flags argument?
Flags allow you to control the regular expression engine. Because regular expressions are so powerful, they are a useful way of switching on and off certain features (for example, whether to ignore capitalization when matching your regex).
Syntax
Meaning
re.ASCII
If you don’t use this flag, the special Python regex symbols w, W, b, B, d, D, s and S will match Unicode characters. If you use this flag, those special symbols will match only ASCII characters — as the name suggests.
re.A
Same as re.ASCII
re.DEBUG
If you use this flag, Python will print some useful information to the shell that helps you debugging your regex.
re.IGNORECASE
If you use this flag, the regex engine will perform case-insensitive matching. So if you’re searching for [A-Z], it will also match [a-z].
re.I
Same as re.IGNORECASE
re.LOCALE
Don’t use this flag — ever. It’s depreciated—the idea was to perform case-insensitive matching depending on your current locale. But it isn’t reliable.
re.L
Same as re.LOCALE
re.MULTILINE
This flag switches on the following feature: the start-of-the-string regex ‘^’ matches at the beginning of each line (rather than only at the beginning of the string). The same holds for the end-of-the-string regex ‘$’ that now matches also at the end of each line in a multi-line string.
re.M
Same as re.MULTILINE
re.DOTALL
Without using this flag, the dot regex ‘.’ matches all characters except the newline character ‘n’. Switch on this flag to really match all characters including the newline character.
re.S
Same as re.DOTALL
re.VERBOSE
To improve the readability of complicated regular expressions, you may want to allow comments and (multi-line) formatting of the regex itself. This is possible with this flag: all whitespace characters and lines that start with the character ‘#’ are ignored in the regex.
re.X
Same as re.VERBOSE
Here’s how you’d use it in a practical example:
>>> text = 'Python is great!'

>>> re.search('PYTHON', text, flags=re.IGNORECASE)

<re.Match object; span=(0, 6), match='Python'>
Although your regex ‘PYTHON’ is all-caps, we ignore the capitalization by using the flag re.IGNORECASE.
Where to Go From Here?
This article has introduced the re.match(pattern, string) method that attempts to match the first occurrence of the regex pattern at the beginning of a given string—and returns a match object.
Python soars in popularity. There are two types of people: those who understand coding and those who don’t. The latter will have larger and larger difficulties participating in the era of massive adoption and penetration of digital content. Do you want to increase your Python skills daily without investing a lot of time?
One Page Checkout Script Free with Example Template in PHP
Last modified on December 13th, 2019 by Vincy.
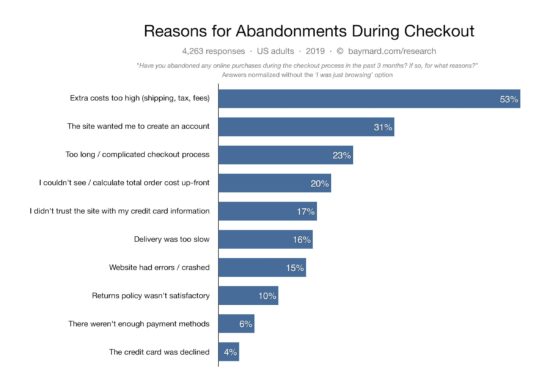
One page checkout reduces friction in the buying process, increases conversion and improves the sales. Do you know the cart abandonment rate of the customers during their purchase? Unnecessary, lengthy checkout process is one of the main reason which increases this rate.
Just by fine-tuning your checkout process, you can increase the sales by a staggering 23%. This could be a game changer for many eCommerce websites. I have cited the Baymard Institute research statistics below. Just check it out.
The right ecommerce software and a shopping cart script will definitely have an option for one page checkout. By increasing steps in the checkout flow, you do not have anything to gain. Then why not one page checkout? Not only Baymard Institute’s research, check any parties research statistics in this area and everything points towards a seamless checkout process.
Before going to provide one page checkout for your shopping cart application, we have to know what it is and the significance behind its usage. This article will help you to know about it and its advantages.
Also, I have created an example script in PHP for the implementation of this one page checkout. In a previous article, we have seen a simple PHP shopping cart code and this is its enhanced version.
One page checkout is a way to make the eCommerce checkout process easier. It reduces the navigation effort, page redirects. It gets the job done by retaining the buyer in a single page.
This makes the checkout experience easier with a single checkout click. We will not compromise any feature to implement one page checkout. It may include add-to-cart control, customer’s cart, payment and shipping and more.
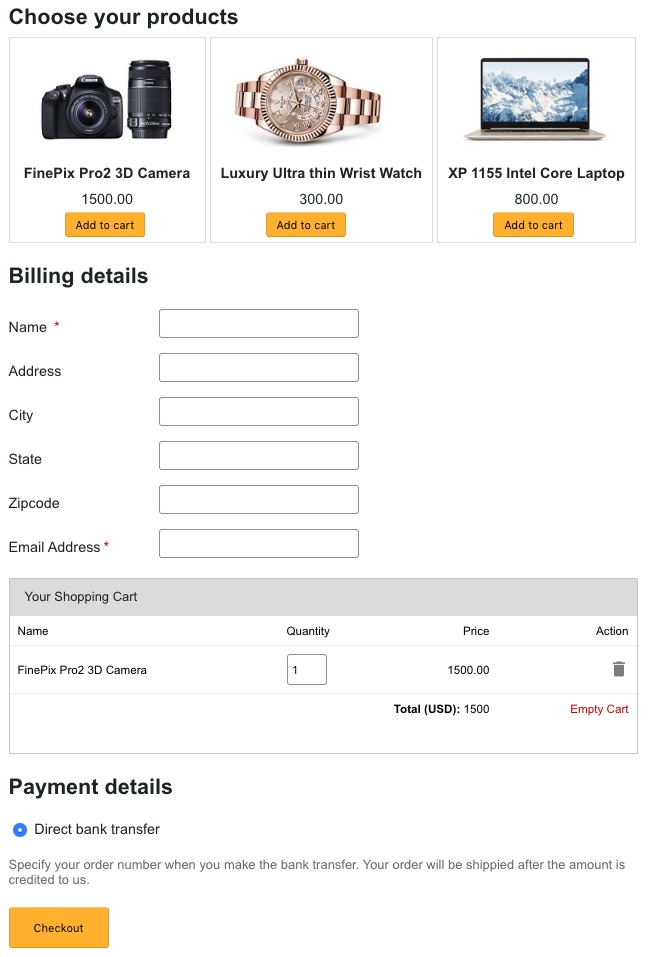
This example is for creating a one page checkout in PHP. On a single page, I have covered the product gallery and the entire cart flow. It is a lightweight script.
The gallery will show the product tiles with an add-to-cart option. Then the added cart items will have options to edit and delete.
I used jQuery AJAX for requesting the server-side code to perform the cart actions. We have already seen how to perform cart edit with AJAX.
The cart detail table will also a preview for confirmation before checkout. The checkout will need the mandatory billing details customer name and email.
A simple JavaScript validates the billing and payment form. Once the validation step got passed then it will allow the continuing process to checkout in PHP.
One page checkout example demo
I have deployed a demo for this one-page checkout example.
The below button link will redirect you to see this demo. It has the following functionality.
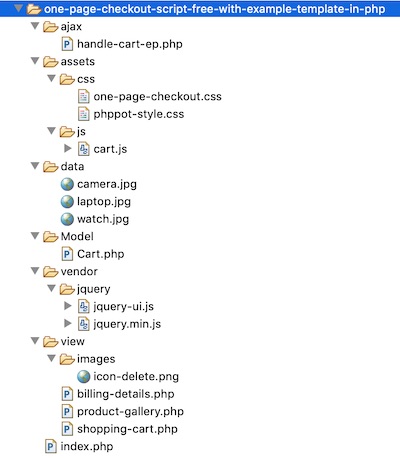
This is the complete file structure on this PHP one-page checkout example.
The figure shows the PHP endpoints, CSS and JS assets, images, data and vendor directories. It also shows the home and other HTML views and PHP classes.
In the following sections, we will see the file’s code and its purpose.
Creating one page checkout template
The one-page checkout template includes three major parts. Those are the gallery, cart and the billing & payment form.
I have created separate files for these three display components. Then, I included all into a landing page that is index.php.
index.php
<?php session_start(); if (isset($_POST["checkout-btn"])) { $order_number = rand(100, 999); } ?> <HTML> <HEAD> <TITLE>One Page Checkout Script Free Template</TITLE> <link href="./assets/css/phppot-style.css" type="text/css" rel="stylesheet" /> <link href="./assets/css/one-page-checkout.css" type="text/css" rel="stylesheet" /> <script src="./vendor/jquery/jquery.min.js" type="text/javascript"></script> <script src="./vendor/jquery/jquery-ui.js"></script> </HEAD> <BODY> <div class="phppot-container"> <div class="page-heading">One Page Checkout Script Free Template</div> <form name="one-page-checkout-form" id="one-page-checkout-form" action="" method="post" onsubmit="return checkout()"> <?php if(!empty($order_number)){?> <div class="order-message order-success"> You order number is <?php echo $order_number;?>. <span class="btn-message-close" onclick="this.parentElement.style.display='none';" title="Close">×</span> </div> <?php }?> <div class="section product-gallery"> <?php require_once './view/product-gallery.php'; ?> </div> <div class="billing-details"> <?php require_once './view/billing-details.php'; ?> </div> <div class="cart-error-message" id="cart-error-message">Cart must not be emty to checkout</div> <div id="shopping-cart" tabindex="1"> <div id="tbl-cart"> <div id="txt-heading"> <div id="cart-heading">Your Shopping Cart</div> <div id="close"></div> </div> <div id="cart-item"> <?php require_once './view/shopping-cart.php'; ?> </div> </div> </div> <div class="payment-details"> <div class="payment-details-heading">Payment details</div> <div class="row"> <div class="inline-block"> <div> <input class="bank-transfer" type="radio" checked="checked" value="Direct bank transfer" name="direct-bank-transfer">Direct bank transfer </div> <div class="info-label">Specify your order number when you make the bank transfer. Your order will be shippied after the amount is credited to us.</div> </div> </div> </div> <div class="row"> <div id="inline-block"> <input type="submit" class="checkout" name="checkout-btn" id="checkout-btn" value="Checkout"> </div> </div> </form> </div> <script src="./assets/js/cart.js"></script> <script> function checkout() { var valid = true; $("#first-name").removeClass("error-field"); $("#email").removeClass("error-field"); $("#shopping-cart").removeClass("error-field"); $("#cart-error-message").hide(); var firstName = $("#first-name").val(); var cartItem = $("#cart-item-count").val(); var email = $("#email").val(); var emailRegex = /^[a-zA-Z0-9.!#$%&'*+/=?^_`{|}~-]+@[a-zA-Z0-9](?:[a-zA-Z0-9-]{0,61}[a-zA-Z0-9])?(?:\.[a-zA-Z0-9](?:[a-zA-Z0-9-]{0,61}[a-zA-Z0-9])?)*$/; $("#first-name-info").html("").hide(); $("#email-info").html("").hide(); if (firstName.trim() == "") { $("#first-name-info").html("required.").css("color", "#ee0000").show(); $("#first-name").addClass("error-field"); valid = false; } if (email == "") { $("#email-info").html("required").css("color", "#ee0000").show(); $("#email").addClass("error-field"); valid = false; } else if (email.trim() == "") { $("#email-info").html("Invalid email address.").css("color", "#ee0000").show(); $("#email").addClass("error-field"); valid = false; } else if (!emailRegex.test(email)) { $("#email-info").html("Invalid email address.").css("color", "#ee0000") .show(); $("#email").addClass("error-field"); valid = false; } if(cartItem == 0){ $("#cart-error-message").show(); $("#shopping-cart").addClass("error-field"); valid = false; } if (valid == false) { $('.error-field').first().focus(); valid = false; } return valid; } </script> </BODY> </HTML>
Product gallery with Add-to-Cart button
This file will show a catalog to display available products in a gallery. I have shown three products in this example gallery.
These products are static from a PHP array. You can also include your database component to make it dynamic.
Each tile contains an add-to-cart button. It calls cartAction() jQuery function on its click event.
I used the PHP session for managing the cart items. The below code shows an HTML code by embedding the cart details into it from the session array.
The cart must have at least one item to proceed with checkout. So I stored the total cart item count in a hidden field. I update this field after every successful cart action.
When you submit with an empty cart, then this example will prevent checkout. It will display validation error by focusing on the empty cart section.
This HTML code is for displaying the billing and payment form to the user. The user has to enter the billing details and select the payment method before checkout.
In this example, I have provided only one payment option, Bank Transfer. At the time of processing payment via direct bank transfer, the users refer to the order number.
jQuery script to handle cart events and prepare AJAX request
The cartAction() method is for handling the add, edit, remove and empty-cart actions. It has a switch case to perform these actions.
It receives the action parameter and sends the control flow to the appropriate case. It also gets the product title, code and price.
I prepare a query string by using the product details and request PHP via AJAX. After performing the cart action, the PHP code will return the response.
In the success block, we can receive this response for updating the cart.
cart.js
function cartAction(action, product_code, productTitle, productPrice) { var queryString = ""; if (action != "") { switch (action) { case "add": queryString = 'action=' + action + '&code=' + product_code + '&quantity=' + 1 + '&productTitle=' + productTitle + '&productPrice=' + productPrice; break; case "remove": queryString = 'action=' + action + '&code=' + product_code; break; case "empty": queryString = 'action=' + action; break; } } jQuery.ajax({ url : "ajax/handle-cart-ep.php", data : queryString, type : "POST", success : function(data) { $("#cart-item").html(data); $("#count").text($("#cart-item-count").val()); }, error : function() { } }); } function updatePrice(obj) { var quantity = $(obj).val(); var code = $(obj).data('code'); queryString = 'action=edit&code=' + code + '&quantity=' + quantity; $.ajax({ type : 'post', url : "ajax/handle-cart-ep.php", data : queryString, success : function(data) { $("#total").text(data); } }); }
Process checkout in PHP
This is the PHP endpoint called via AJAX. As like as the JavaScript method, this PHP file also contains a switch case to control the cart action.
The Cart.php included in this file is a Model class that executes all the cart operations.
In this endpoint, I instantiate this model and invoke its methods based on the request.
On each cart action, it iterates the latest cart session to prepare the response.
ajax/handle-cart-ep.php
<?php namespace Phppot; use \Phppot\Cart; require_once __DIR__ . './../Model/Cart.php'; $cartModel = new Cart(); session_start(); if (! empty($_POST["action"])) { switch ($_POST["action"]) { case "add": $cartModel->addToCart(); break; case "edit": $totalPrice = $cartModel->editCart(); print $totalPrice; exit; break; case "remove": $cartModel->removeFromCart(); break; case "empty": $cartModel->emptyCart(); break; } } require_once '../view/shopping-cart.php';
The below code shows the Cart class. It handles and updates the cart session on each cart action.
The emptyCart() method wipes out the cart by clearing the current session.
Model/Cart.php
<?php namespace Phppot; class Cart { public $cartSessionItemCount = 0; function __construct() { if (! empty($_SESSION["cart_item"]) && is_array($_SESSION["cart_item"])) { $this->cartSessionItemCount = count($_SESSION["cart_item"]); } } function addToCart() { if (isset($_POST)) { $productCode = $_POST["code"]; $productTitle = $_POST["productTitle"]; $poductQuantity = $_POST["quantity"]; $productPrice = $_POST["productPrice"]; } $cartItem = array( 'code' => $productCode, 'name' => $productTitle, 'quantity' => $poductQuantity, 'price' => $productPrice ); $_SESSION["cart_item"][$productCode] = $cartItem; if (! empty($_SESSION["cart_item"]) && is_array($_SESSION["cart_item"])) { $this->cartSessionItemCount = count($_SESSION["cart_item"]); } } function editCart() { if (! empty($_SESSION["cart_item"])) { $total_price = 0; foreach ($_SESSION["cart_item"] as $k => $v) { if ($_POST["code"] == $k) { $_SESSION["cart_item"][$k]["quantity"] = $_POST["quantity"]; } $total_price = $total_price + ($_SESSION["cart_item"][$k]["quantity"] * $_SESSION["cart_item"][$k]["price"]); } return $total_price; } if (! empty($_SESSION["cart_item"]) && is_array($_SESSION["cart_item"])) { $this->cartSessionItemCount = count($_SESSION["cart_item"]); } } function removeFromCart() { if (! empty($_SESSION["cart_item"])) { foreach ($_SESSION["cart_item"] as $k => $v) { if ($_POST["code"] == $k) unset($_SESSION["cart_item"][$k]); if (empty($_SESSION["cart_item"])) unset($_SESSION["cart_item"]); } } if (! empty($_SESSION["cart_item"]) && is_array($_SESSION["cart_item"])) { $this->cartSessionItemCount = count($_SESSION["cart_item"]); } } function emptyCart() { unset($_SESSION["cart_item"]); $this->cartSessionItemCount = 0; } }
Enhancements
In this example code, there are places to bring the database into the picture. For example, the product gallery and the cart.
I have managed the gallery with a PHP array. And, I handled the cart session with PHP $_SESSION.
If you manage the shopping cart with a database, then it will help you to have a persistent cart. I have already given an example of building a persistent shopping cart in PHP.
The 125th GalaQuiz will be LIVE soon, win up to $75 in GalaCredit!
[www.indiegala.com] The GalaQuiz will take place in less than 15 minutes from this announcement Today's GalaQuiz[www.indiegala.com] hints are up. The theme will be Mario Foes. Have you ever played Mario? Of course you have. Even if you didn't it's hard not to know the Super Mario Bros. jump-men in action...but how about their foes? Join today's quiz and find out!
The Armory game engine is an interesting open source project built on top of the Blender graphics application. If you are interested in learning more about the Armory game engine, be sure to check out our complete tutorial series over on DevGa.me. Details on Armory have been scarce since 0.5 was released due to a lack of release details. The developer recently released an update with a bit of a roadmap of future Armory development.
Welcome! With 2020 already in full swing, I would like to outline some plans for Armory architecture in the upcoming year.
Move rendering to Graphics5. G5 is a newer API being developed in Kinc, leveraging modern graphics APIs like D3D12 / Vulkan / ..
As a result, support for D3D12, Vulkan, Metal and WebGPU will be priority. Once running smoothly, older graphics APIs will be dropped.
Implement ray-tracing for dynamic scenes. Right now Armory already has DXR support, but only handles static scenes. The goal is to have tanks demo running on a ray-tracing render path.
Armory traits will be written in Haxe/JS like usual, or anything which compiles into WebAssembly.
For web deployment, WebAssembly and WebGPU will be used.
Feel welcome to bring up any of these points for a discussion. If you have additional ideas which may improve the project further, please bring those up as well. The goal is to keep Armory viable long-term with a modern base ready for upcoming years.
My biggest thanks to everyone who already contributed to the project in any form over the years!
You can learn more about this release and recent Armory history in the video below. You can learn more about Kha in this video and check out our recently created video on ArmorPaint, a PBR based painting application built on the Armory engine.








 in GalaCredit!