| Welcome, Guest |
You have to register before you can post on our site.
|
| Online Users |
There are currently 554 online users.
» 0 Member(s) | 549 Guest(s)
Applebot, Baidu, Bing, Google, Yandex
|
|
|
| Armory Game Engine Tutorial Series |
|
Posted by: xSicKxBot - 06-12-2018, 04:34 PM - Forum: Game Development
- No Replies
|
 |
Armory Game Engine Tutorial Series
 If you’ve recently been to the GameFromScratch tutorial series page recently you may have noticed the addition of a new Armory game engine tutorial series. It’s not actually hosted on GameFromScratch, instead it’s on our newly launched sister site (watch out, the paints still wet!) DevGa.me. Don’t worry though, nothings changed, it’s just a newer, cleaner, mobile friendly home for tutorial series, I’ll explain more about this later. For now, just be aware there is a new text and video based tutorial series on the Armory game engine under development!
Armory (or Armory3D) is a newly free open source cross platform game engine that runs inside and tightly integrates with the Blender application. If you are interested in learning more about Armory and why I’m so excited about it, be sure to check out Introduction to Armory video. The series is still quite young but already there is a fair bit to get you started. Right now the series consists of:
The entire series homepage is available here.
Additionally the video series has begun, lagging slightly behind the text series. So far videos consist of:
There is a (very small for now…) playlist available here.
DevGa.me is not a blog format and does not have any news, it’s just home to tutorials. I will however announce new tutorials here on GameFromScratch, so stay tuned! If you want to discuss the new series, there is a conversation over on the Armory discussion forums or leave a comment below or on YouTube.
Programming, Art
Armory, Tutorial
|

|
|
| News - E3 2018: Open Beta For Ubisoft's The Crew 2 Coming Very Soon |
|
Posted by: xSicKxBot - 06-12-2018, 08:34 AM - Forum: Lounge
- No Replies
|
|
E3 2018: Open Beta For Ubisoft's The Crew 2 Coming Very Soon
An open beta for Ubisoft's racing game sequel The Crew 2 will begin on June 21, the publisher announced during its E3 2018 briefing. The beta will be held across PlayStation 4, Xbox One, and PC. While you have to wait a little while longer to play the beta, you can pre-load starting today. The open beta will be available from 1 AM PT on June 25 through the same time on June 25. It will include the game's "full open world," and it allows players to get through the first two levels. You can play with up to three friends (on the same platform) for co-op; you can also play solo. A new trailer for The Crew 2 was also released during Ubisoft's E3 briefing. It showed off yet another look at the racing game's four main disciplines: street race, rally raid, powerboat, and aerobatics. The open beta follows a closed beta that started at the end of May and wrapped up in early June. The Crew 2 launches for PS4, Xbox One, and PC on June 29. Along with the standard version, Ubisoft is releasing a special edition of The Crew 2 dubbed the Motor Edition. This includes the season pass and extra in-game content like outfits and vehicles. The premium edition unlocks three days early, on June 26, so that's another perk to picking it up.
|
|
|
|
| Turn Your Raspberry Pi into a Tor Relay Node |
|
Posted by: xSicKxBot - 06-12-2018, 08:34 AM - Forum: Linux, FreeBSD, and Unix types
- No Replies
|
|
Turn Your Raspberry Pi into a Tor Relay Node

If you’re anything like me, you probably got yourself a first- or second-generation Raspberry Pi board when they first came out, played with it for a while, but then shelved it and mostly forgot about it. After all, unless you’re a robotics enthusiast, you probably don’t have that much use for a computer with a pretty slow processor and 256 megabytes of RAM. This is not to say that there aren’t cool things you can do with one of these, but between work and other commitments, I just never seem to find the right time for some good old nerding out.
However, if you would like to put it to good use without sacrificing too much of your time or resources, you can turn your old Raspberry Pi into a perfectly functioning Tor relay node.
What is a Tor Relay node
You have probably heard about the Tor project before, but just in case you haven’t, here’s a very quick summary. The name “Tor” stands for “The Onion Router” and it is a technology created to combat online tracking and other privacy violations.
Everything you do on the Internet leaves a set of digital footprints in every piece of equipment that your IP packets traverse: all of the switches, routers, load balancers and destination websites log the IP address from which your session originated and the IP address of the internet resource you are accessing (and often its hostname, even when using HTTPS). If you’re browsing from home, then your IP can be directly mapped to your household. If you’re using a VPN service (as you should be), then your IP can be mapped to your VPN provider, and then they are the ones who can map it to your household. In any case, odds are that someone somewhere is assembling an online profile on you based on the sites you visit and how much time you spend on each of them. Such profiles are then sold, aggregated with matching profiles collected from other services, and then monetized by ad networks. At least, that’s the optimist’s view of how that data is used — I’m sure you can think of many examples of how your online usage profiles can be used against you in much more nefarious ways.
The Tor project attempts to provide a solution to this problem by making it impossible (or, at least, unreasonably difficult) to trace the endpoints of your IP session. Tor achieves this by bouncing your connection through a chain of anonymizing relays, consisting of an entry node, relay node, and exit node:
-
The entry node only knows your IP address, and the IP address of the relay node, but not the final destination of the request;
-
The relay node only knows the IP address of the entry node and the IP address of the exit node, and neither the origin nor the final destination
-
The exit node only knows the IP address of the relay node and the final destination of the request; it is also the only node that can decrypt the traffic before sending it over to its final destination
Relay nodes play a crucial role in this exchange because they create a cryptographic barrier between the source of the request and the destination. Even if exit nodes are controlled by adversaries intent on stealing your data, they will not be able to know the source of the request without controlling the entire Tor relay chain.
As long as there are plenty of relay nodes, your privacy when using the Tor network remains protected — which is why I heartily recommend that you set up and run a relay node if you have some home bandwidth to spare.
Things to keep in mind regarding Tor relays
A Tor relay node only receives encrypted traffic and sends encrypted traffic — it never accesses any other sites or resources online, so you do not need to worry that someone will browse any worrisome sites directly from your home IP address. Having said that, if you reside in a jurisdiction where offering anonymity-enhancing services is against the law, then, obviously, do not operate your own Tor relay. You may also want to check if operating a Tor relay is against the terms and conditions of your internet access provider.
What you will need
-
A Raspberry Pi (any model/generation) with some kind of enclosure
-
An SD card with Raspbian Stretch Lite
-
An ethernet cable
-
A micro-USB cable for power
-
A keyboard and an HDMI-capable monitor (to use during the setup)
This guide will assume that you are setting this up on your home connection behind a generic cable or ADSL modem router that performs NAT translation (and it almost certainly does). Most of them have a USB port you can use to power up your Raspberry Pi, and if you’re only using the wifi functionality of the router, then it should have a free ethernet port for you to plug into. However, before we get to the point where we can set-and-forget your Raspberry Pi, we’ll need to set it up as a Tor relay node, for which you’ll need a keyboard and a monitor.
The bootstrap script
I’ve adapted a popular Tor relay node bootstrap script for use with Raspbian Stretch — you can find it in my GitHub repository here: https://github.com/mricon/tor-relay-bootstrap-rpi. Once you have booted up your Raspberry Pi and logged in with the default “pi” user, do the following:
sudo apt-get install -y git

git clone https://github.com/mricon/tor-relay-bootstrap-rpi

cd tor-relay-bootstrap-rpi

sudo ./bootstrap.sh
Here is what the script will do:
-
Install the latest OS updates to make sure your Pi is fully patched
-
Configure your system for automated unattended updates, so you automatically receive security patches when they become available
-
Install Tor software
-
Tell your NAT router to forward the necessary ports to reach your relay (the ports we’ll use are 443 and 8080, since they are least likely to be filtered by your internet provider)
Once the script is done, you’ll need to configure the torrc file — but first, decide how much bandwidth you’ll want to donate to Tor traffic. First, type “Speed Test” into Google and click the “Run Speed Test” button. You can disregard the “Download speed” result, as your Tor relay can only operate as fast as your maximum upload bandwidth.
Therefore, take the “Mbps upload” number, divide by 8 and multiply by 1024 to find out the bandwidth speed in Kilobytes per second. E.g. if you got 21.5 Mbps for your upload speed, then that number is:
21.5 Mbps / 8 * 1024 = 2752 KBytes per second
You’ll want to limit your relay bandwidth to about half that amount, and allow bursting to about three-quarters of it. Once decided, open /etc/tor/torrc using your favourite editor and tweak the bandwidth settings.
RelayBandwidthRate 1300 KBytes

RelayBandwidthBurst 2400 KBytes
Of course, if you’re feeling more generous, then feel free to put in higher numbers, though you don’t want to max out your outgoing bandwidth — it will noticeably impact your day-to-day usage if these numbers are set too high.
While you have that file open, you should set two more things. First, the Nickname — just for your own recordkeeping, and second the ContactInfo line, which should list a single email address. Since your relay will be running unattended, you should use an email address that you regularly check — you will receive an alert from the “Tor Weather” service if your relay goes offline for longer than 48 hours.
Nickname myrpirelay

ContactInfo you@example.com
Save the file and reboot the system to start the Tor relay.
Testing to make sure Tor traffic is flowing
If you would like to make sure that the relay is functioning, you can run the “arm” tool:
sudo -u debian-tor arm
It will take a while to start, especially on older-generation boards, but eventually it will show you a bar chart of incoming and outgoing traffic (or error messages that will help you troubleshoot your setup).
Once you are convinced that everything is functioning, you can unplug the keyboard and the monitor and relocate the Raspberry Pi into the basement where it will quietly sit and shuffle encrypted bits around. Congratulations, you’ve helped improve privacy and combat malicious tracking online!
|
|
|
|
| Crack Open ACRN – A Device Hypervisor Designed for IoT |
|
Posted by: xSicKxBot - 06-12-2018, 01:32 AM - Forum: Linux, FreeBSD, and Unix types
- No Replies
|
|
Crack Open ACRN – A Device Hypervisor Designed for IoT
As the Internet of Things has grown in scale, IoT developers are increasingly expected to support a range of hardware resources, operating systems, and software tools/applications. This is a challenge given many connected devices are size-constrained. Virtualization can help meet these broad needs, but existing options don’t offer the right mix of size, flexibility, and functionality for IoT development.
ACRN™ is different by design. Launched at Embedded Linux Conference 2018, ACRN is a flexible, lightweight reference hypervisor, built with real-time and safety-criticality in mind and optimized to streamline embedded development through an open source platform.
One of ACRN’s biggest advantages is its small size — roughly only 25K lines of code at launch.
Read more at The Linux Foundation
|
|
|
|
| PS4 - Milanoir |
|
Posted by: xSicKxBot - 06-12-2018, 12:02 AM - Forum: New Game Releases
- No Replies
|
|
Milanoir
Hunt for the truth and escape the ones who are chasing you through an unforgiving city. Publisher: Good Shepherd Entertainment Release Date: May 31, 2018
|
|
|
|
| PS4 - Riddled Corpses EX |
|
Posted by: xSicKxBot - 06-12-2018, 12:02 AM - Forum: New Game Releases
- No Replies
|
|
Riddled Corpses EX
Riddled Corpses EX is a twin-stick shooter made in the style of 8/16 bit arcade games. Travel through diverse locations packed with danger and huge bosses. Publisher: COWCAT Release Date: Jun 05, 2018
|
|
|
|
| PC - Far Cry 5: Hours of Darkness |
|
Posted by: xSicKxBot - 06-12-2018, 12:02 AM - Forum: New Game Releases
- No Replies
|
|
Far Cry 5: Hours of Darkness
Wendell Redler is more than just a Hope County resident, he's a veteran soldier of the Vietnam War. Listen to him recount his glory days as you travel back in time to war-torn Vietnam to take down Viet-Cong. Trapped behind enemy lines, rescue your squad mates and evacuate to safety in the first war-based far cry. You must maneuver throughout this remote valley in Vietnam, and use survival instinct and stealth to save your team and get home. [Ubisoft] Publisher: Ubisoft Release Date: Jun 05, 2018
|
|
|
|
| PC - Jurassic World Evolution |
|
Posted by: xSicKxBot - 06-12-2018, 12:02 AM - Forum: New Game Releases
- No Replies
|
|
Jurassic World Evolution
Place yourself at the heart of the Jurassic franchise and build your own Jurassic World. Take charge of operations on the legendary islands of the Muertes archipelago and bring the wonder, majesty and danger of dinosaurs to life. Build for Science, Entertainment or Security interests in an uncertain world where life always finds a way.
Bioengineer dinosaurs that think, feel and react intelligently to the world around them. Play with life itself to give your dinosaurs unique behaviours, traits and appearances, then contain and profit from them to fund your global search for lost dinosaur DNA.
Control the big picture with deep management tools or go hands-on to confront challenges on the ground or in the air. Expand your islands and choose your own journey in an all-new narrative featuring iconic characters from across the franchise and decades of Jurassic lore at your fingertips. Publisher: Frontier Developments Release Date: Jun 12, 2018
|
|
|
|
| Microsoft - Watch any or all of the Xbox E3 2018 briefing videos |
|
Posted by: xSicKxBot - 06-12-2018, 12:02 AM - Forum: Windows
- No Replies
|
|
Watch any or all of the Xbox E3 2018 briefing videos
 Yesterday’s Xbox E3 2018 Briefing featured a ton of big news, from our announcements of new studios joining the Microsoft Studios family to the reveal of the next chapter in the Halo saga. There was something for everyone in the briefing too, including first looks at hardcore shooters like Metro: Exodus and Battlefield V, family-friendly titles like Ori and the Will of the Wisps and Kingdom Hearts 3, and indie gems like Session and Tunic. Did you miss out on the action? If so, we’ve got you covered with trailers and demos galore. Take a look below or watch the entire briefing above!
Halo Infinite
Ori and the Will of the Wisps
Crackdown 3
Sea of Thieves – Cursed Sails and Forsaken Shores
Forza Horizon 4
Cyberpunk 2077 Trailer
PlayerUnknown’s Battlegrounds
Gears 5 – Cinematic Announce Trailer
Gears 5 – Announce Trailer
Fallout 76
Tunic
Devil May Cry 5
Session
Gears POP!
Xbox Game Pass Catalog Preview
ID@Xbox Games Montage
Battletoads Announce Trailer
Hyper Universe
Xbox One X Enhanced Games
Xbox One E3 2018 Montage
Cuphead DLC Announce
Captain Spirit Announce
Jump Force Announce
Just Cause 4 Announce
Shadow of the Tomb Raider
Tales of Vesperia: Remastered
We Happy Few Story Trailer
NieR: Automata Become As Gods Edition
Metro Exodus Gameplay Trailer
Kingdom Heart III Frozen Trailer
The Division 2 Gameplay Demo
Dying Light 2 Gameplay Demo
Dying Light 2 Announce Trailer
Battlefield 5 Single Player Teaser
|
|
|
|
| Fedora - Khaled Monsoor: How Do You Fedora? |
|
Posted by: xSicKxBot - 06-11-2018, 05:33 PM - Forum: Linux, FreeBSD, and Unix types
- No Replies
|
|
Khaled Monsoor: How Do You Fedora?
 We recently interviewed Khaled Monsoor on how he uses Fedora. This is part of a series that profiles Fedora users and how they use Fedora to get things done. Contact us on the feedback form to tell of us about someone you think we should interview, or to express interest in being interviewed.
Who is Khaled Monsoor?
Khaled Monsoor was born and raised in Dhaka, the capital of Bangladesh. After graduating with a degree in computer science and engineering, he worked in several different business sectors. Monsoor started a masters in Bioinformatics, but decided to not pursue it.
Monsoor currently works at Augmedix Inc., a Silicon Valley medicare startup, as a research engineer. started using Linux in 2002 and got involved with the Fedora Project in 2005. He believes balancing the demands of a full-time job and family is the biggest challenge to contributing to open source projects.
His heroes are the Thundercats, Captain Planet and MacGyver. Khaled’s favorite movies are The Matrix and Interstellar. “During my youth, The Matrix [shook] my whole concept of reality. Is what we see and feel really real, or just sort of simulation or just a test? That sort of thing. In Interstellar, it’s the twisted human lives with advanced technology mesmerized me. I think the father in me cried, like a baby, with Matthew McConaughey in the hospital meeting scene.”
Monsoor also enjoys photography. He like to use his Nikon D7100, but admits the best camera is the one you have on hand. “I like magnificent nature pictures that takes me to that place, travel & street pictures of same spirit, and honest portraits that makes a close feelings of that person’s real life.”
More of Monsoor’s photos can be found on his Flickr page.
The Fedora Community
Monsoor’s first interaction with the Fedora Community left him impressed with its energy and passion about aesthetics. While there are many Linux distributions to choose from, he chose Fedora due to its “system stability, community support and Konsole terminal.” He would like to see more attention paid to Fedora’s overall visual aesthetics.
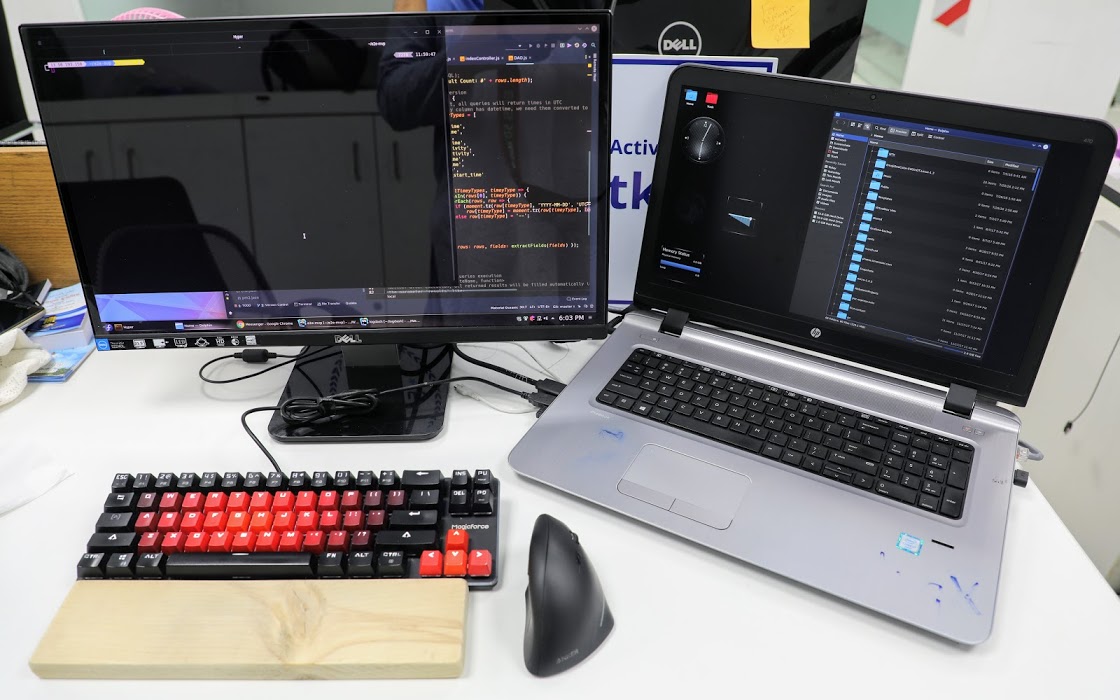
What Hardware?
For work, Monsoor uses Fedora 27 on an HP Probook 470 G3 laptop. The laptop is equipped with an Intel Core i7-6500U Processor and 16 GB RAM. It has a hybrid graphics solution utilizing Intel and AMD GPUs. The hybrid graphics is not very useful due to driver issues in Linux. Monsoor replaced the 500GB hard drive with a 128GB SSD drive to boost performance. “The big 17″ display is a huge plus for software development.”
Monsoor has repetitive pain injury (RSI) pain in his wrists so he uses a special mouse. “I use an Anker vertical wireless mouse to ease the stress on my wrist.”

What Software?
Monsoor prefers KDE Plasma for his desktop. He also makes use of Kate, Konsole, Kalc, Dolphin file manager and Kdenlive. For non-KDE software he uses Gimp, Pinta, Shotwell, Hyper Terminal, VS Code, PostgreSQL, Firefox and Libre Office.
When asked about why he prefers KDE he said, “I’m not sure, exactly. Possibly, it gives me a feeling of control. In charge of something very capable, waiting for directions and just works. Not forced over-simplistic, or trying to hide the complexities it handles, rather gives a grip on them. Or, just that its name begins with the same character (K) as my name.”
He prefers Konsole because “it shares the philosophy of KDE. Stable, capable and highly-configurable, just what power users needs. Not too dumb-looking, not too nerdy.”
|
|
|
|
|
|
|