Using Kubernetes ConfigMaps to define your Quarkus application’s properties
So, you wrote your Quarkus application, and now you want to deploy it to a Kubernetes cluster. Good news: Deploying a Quarkus application to a Kubernetes cluster is easy. Before you do this, though, you need to straighten out your application’s properties. After all, your app probably has to connect with a database, call other services, and so on. These settings are already defined in your application.properties file, but the values match the ones for your local environment and won’t work once deployed onto your cluster.
So, how do you easily solve this problem? Let’s walk through an example.
Create the example Quarkus application
Instead of using a complex example, let’s take a simple use case that explains the concept well. Start by creating a new Quarkus app:
You can keep all of the default values while creating the new application. In this example, the application is named hello-app. Now, open the HelloResource.java file and refactor it to look like this:
@Path("/hello") public class HelloResource { @ConfigProperty(name = "greeting.message") String message; @GET @Produces(MediaType.TEXT_PLAIN) public String hello() { return "hello " + message; } }
In your application.properties file, now add greeting.message=localhost. The @ConfigProperty annotation is not in the scope of this article, but here we can see how easy it is to inject properties inside our code using this annotation.
Now, let’s start our application to see if it works as expected:
$ mvn compile quarkus:dev
Browse to http://localhost:8080/hello, which should output hello localhost. That’s it for the Quarkus app. It’s ready to go.
Deploy the application to the Kubernetes cluster
The idea here is to deploy this application to our Kubernetes cluster and replace the value of our greeting property with one that will work on the cluster. It is important to know here that all of the properties from application.properties are exposed, and thus can be overridden with environment variables. The convention is to convert the name of the property to uppercase and replace every dot (.) with an underscore (_). So, for instance, our greeting.message will become GREETING_MESSAGE.
At this point, we are almost ready to deploy our app to Kubernetes, but we need to do three more things:
Create a Docker image of your application and push it to a repository that your cluster can access.
Define a ConfgMap resource.
Generate the Kubernetes resources for our application.
To create the Docker image, simply execute this command:
Be sure to set the right Docker username and to also push to an image registry, like docker-hub or quay. If you are not able to push an image, you can use sebi2706/hello-app:latest.
Make sure that you are connected to a cluster and apply this file:
$ kubectl apply -f config-hello.yml
Quarkus comes with a useful extension, quarkus-kubernetes, that generates the Kubernetes resources for you. You can even tweak the generated resources by providing extra properties—for more details, check out this guide.
After installing the extension, add these properties to our application.properties file so it generates extra configuration arguments for our containers specification:
Then, browse to the public URL or do a curl. For instance, with Minikube:
$ curl $(minikube service hello-app --url)/hello
This command should output: hello Kubernetes.
Conclusion
Now you know how to use a ConfigMap in combination with environment variables and your Quarkus’s application.properties. As we said in the introduction, this technique is particularly useful when defining a DB connection’s URL (like QUARKUS_DATASOURCE_URL) or when using the quarkus-rest-client (ORG_SEBI_OTHERSERVICE_MP_REST_URL).
Posted by: xSicKxBot - 08-18-2023, 09:46 AM - Forum: Python
- No Replies
[Tut] Alien Technology: Catching Up on LLMs, Prompting, ChatGPT Plugins & Embeddings
5/5 – (2 votes)
What is a LLM?
From a technical standpoint, a large language model (LLM) can be seen as a massive file on a computer, containing billions or even trillions of numerical values, known as parameters. These parameters are fine-tuned through extensive training on diverse datasets, capturing the statistical properties of human language.
However, such a dry description hardly does justice to the magic of LLMs. From another perspective, they function almost like an oracle. You call upon them with a query, such as llm("What is the purpose of life"), and they may respond with something witty, insightful, or enigmatic, like "42" (a humorous nod to Douglas Adams’ The Hitchhiker’s Guide to the Galaxy).
By the way, you can check out my article on using LLMs like this in the command line here:
Isn’t it wild to think about how Large Language Models (LLMs) can turn math into something almost magical? It’s like they’re blending computer smarts with human creativity, and the possibilities are just getting started.
Now, here’s where it gets really cool.
These LLMs take all kinds of complex patterns and knowledge and pack them into binary files full of numbers. We don’t really understand what these numbers represent but together they encode a deep understanding of the world. LLMs are densely compressed human wisdom, knowledge, and intelligence. Now imagine having these files and being able to copy them millions of times, running them all at once.
It’s like having a huge team of super-smart people, but they’re all in your computer.
So picture this: Millions of brainy helpers in your pocket, working day and night on anything you want.
You know how doctors are always trying to figure out the best way to treat illnesses? Imagine having millions of super-smart helpers to quickly find the answers.
Or think about your savings and investments; what if you had a team of top financial experts guiding you 24/7 to make the smartest choices with your money?
And for kids in school, picture having a personal tutor for every subject, making sure they understand everything perfectly. LLMs is like having an army of geniuses at your service for anything you need.
LLMs, what Willison calls alien technology, have brought us closer to solving the riddle of intelligence itself, turning what was once the exclusive domain of human cognition into something that can be copied, transferred, and harnessed like never before.
I’d go as far as to say that the age-old process of reproducing human intelligence has been transcended. Intelligence is solved. LLMs will only become smarter from now on. Like the Internet, LLMs will stay and proliferate and penetrate every single sector of our economy.
How Do LLMs Work?
The underlying mechanism of Large Language Models (LLMs) might seem almost counterintuitive when you delve into how they operate. At their core, LLMs are essentially word-prediction machines, fine-tuned to anticipate the most likely next word (more precisely: token) in a sequence.
For example consider ChatGPT’s LLM chat interface that has reached product market fit and is used by hundreds of millions of users. The ingenious “hack” that allows LLMs to participate in a chat interface is all about how the input is framed. In essence, the model isn’t inherently conversing with a user; it’s continuing a text, based on a conversational pattern it has learned from vast amounts of data.
Consider this simplified example:
You are a helpful assistant User: What is the purpose of life?
Assistant: 42
User: Can you elaborate?
Assistant:
Here’s what’s happening under the hood:
Setting the Scene: The introductory line, "You are a helpful assistant" sets a context for the LLM. It provides an instruction to guide its responses, influencing its persona.
User Input: The following lines are framed as a dialogue, but to the LLM, it’s all part of a text it’s trying to continue. When the user asks, "What is the purpose of life?" the LLM looks at this as the next part of a story, or a scene in a play, and attempts to predict the next word or phrase that makes the most sense.
Assistant Response: The assistant’s response, "42" is the model’s guess for the next word, given the text it has seen so far. It’s a clever completion, reflecting the model’s training on diverse and creative texts. In the second run, however, the whole conversation is used as input and the LLM just completes the conversation.
Continuing the Conversation: When the user follows up with "Can you elaborate?" the LLM is once again seeking to continue the text. It’s not consciously leading a conversation but following the statistical patterns it has learned, which, in this context, would typically lead to an elaboration.
The magic is in how all these elements come together to create an illusion of a conversation. In reality, the LLM doesn’t understand the conversation or its participants. It’s merely predicting the next word, based on an intricately crafted pattern.
This “dirty little hack” transforms a word-prediction engine into something that feels interactive and engaging, demonstrating the creative application of technology and the power of large-scale pattern recognition. It’s a testament to human ingenuity in leveraging statistical learning to craft experiences that resonate on a very human level.
Prompt Engineering is a clever technique used to guide the behavior of Large Language Models (LLMs) by crafting specific inputs, or prompts, that steer the model’s responses. It’s akin to creatively “hacking” the model to generate desired outputs.
For example, if you want the LLM to act like a Shakespearean character, you might begin with a prompt like "Thou art a poet from the Elizabethan era". The model, recognizing the pattern and language style, will respond in kind, embracing a Shakespearean tone.
This trickery through carefully designed prompts transforms a word-prediction machine into a versatile and interactive tool that can mimic various styles and tones, all based on how you engineer the initial prompt.
The secret to the magical capabilities of Large Language Models (LLMs) seems to lie in a simple and perhaps surprising element: scale.
The colossal nature of these models is both their defining characteristic and the key to their unprecedented performance.
Tech giants like Meta, Google, and Microsoft have dedicated immense resources to developing LLMs. How immense? We’re talking about millions of dollars spent on cutting-edge computing power and terabytes of textual data to train these models. It’s a gargantuan effort that converges in a matrix of numbers — the model’s parameters — that represent the learned patterns of human language.
The scale here isn’t just large; it’s virtually unprecedented in computational history. These models consist of billions or even trillions of parameters, fine-tuned across diverse and extensive textual datasets. By throwing such vast computational resources at the problem, these corporations have been able to capture intricate nuances and create models that understand and generate human-like text.
However, this scale comes with challenges, including the enormous energy consumption of training such models, the potential biases embedded in large-scale data, and the barrier to entry for smaller players who can’t match the mega corporations’ resources.
The story of LLMs is a testament to the “bigger is better” philosophy in the world of artificial intelligence. It’s a strategy that seems almost brute-force in nature but has led to a qualitative leap in machine understanding of human language. It illustrates the power of scale, paired with ingenuity and extensive resources, to transform a concept into a reality that pushes the boundaries of what machines can achieve.
Attention Is All You Need
The 2017 paper by Google “Attention is All You Need” marked a significant turning point in the world of artificial intelligence. It introduced the concept of transformers, a novel architecture that is uniquely scalable, allowing training to be run across many computers in parallel both efficiently and easily.
This was not just a theoretical breakthrough but a practical realization that the model could continually improve with more and more compute and data.
Key Insight: By using unprecedented amount of compute on unprecedented amount of data on a simple neural network architecture (transformers), intelligence seems to emerge as a natural phenomenon.
Unlike other algorithms that may plateau in performance, transformers seemed to exhibit emerging properties that nobody fully understood at the time. They could understand intricate language patterns, even developing coding-like abilities. The more data and computational power thrown at them, the better they seemed to perform. They didn’t converge or flatten out in effectiveness with increased scale, a behavior that was both fascinating and mysterious.
OpenAI, under the guidance of Sam Altman, recognized the immense potential in this architecture and decided to push it farther than anyone else. The result was a series of models, culminating in state-of-the-art transformers, trained on an unprecedented scale. By investing in massive computational resources and extensive data training, OpenAI helped usher in a new era where large language models could perform tasks once thought to be exclusively human domains.
This story highlights the surprising and yet profound nature of innovation in AI.
A simple concept, scaled to extraordinary levels, led to unexpected and groundbreaking capabilities. It’s a reminder that sometimes, the path to technological advancement isn’t about complexity but about embracing a fundamental idea and scaling it beyond conventional boundaries. In the case of transformers, scale was not just a means to an end but a continually unfolding frontier, opening doors to capabilities that continue to astonish and inspire.
Ten Tips to Use LLMs Effectively
As powerful and versatile as Large Language Models (LLMs) are, harnessing their full potential can be a complex endeavor.
Here’s a series of tricks and insights to help tech enthusiasts like you use them effectively:
Accept that No Manual Exists: There’s no step-by-step guide to mastering LLMs. The field is still relatively new, and best practices are continually evolving. Flexibility and a willingness to experiment are essential.
Iterate and Refine: Don’t reject the model’s output too early. Your first output might not be perfect, but keep iterating. Anyone can get an answer from an LLM, but extracting good answers requires persistence and refinement. You can join our prompt engineering beginner and expert courses to push your own understanding to the next level.
Leverage Your Domain Knowledge: If you know coding, use LLMs to assist with coding tasks. If you’re a marketer, apply them for content generation. Your expertise in a particular area will allow you to maximize the model’s capabilities.
Understand How the Model Works: A rough understanding of the underlying mechanics can be immensely beneficial. Following tech news, like our daily Finxter emails, can keep you informed and enhance your ability to work with LLMs.
Gain Intuition by Experimenting: Play around with different prompts and settings. Daily hands-on practice can lead to an intuitive feel for what works and what doesn’t.
Know the Training Cut-off Date: Different models have different cut-off dates. For example, OpenAI’s GPT-3.5 models were trained until September 2021, while Claude 2 Anthropic and Google PaLM 2 are more recent. This can affect the accuracy and relevance of the information they provide.
Understand Context Length: Models have limitations on the number of tokens (words, characters, spaces) they can handle. It’s 4000 tokens for GPT-3, 8000 for GPT-4, and 100k for Claude 2. Tailoring your input to these constraints will yield better results.
Develop a “Sixth Sense” for Hallucinations: Sometimes, LLMs may generate information that seems plausible but is incorrect or hallucinated. Developing an intuition for recognizing and avoiding these instances is key to reliable usage.
Stay Engaged with the Community: Collaborate with others, join forums, and stay abreast of the latest developments. The collective wisdom of the community is a powerful asset in mastering these technologies.
Be Creative: Prompt the model for creative ideas (e.g., "Give me 20 ideas on X"). The first answers might be obvious, but further down the list, you might find a spark of brilliance.
Retrieval Augmented Generation
Retrieval Augmented Generation (RAG) represents an intriguing intersection between the vast capabilities of Large Language Models (LLMs) and the power of information retrieval. It’s a technique that marries the best of both worlds, offering a compelling approach to generating information and insights.
Here’s how it works and why it’s making waves in the tech community:
What is Retrieval Augmented Generation?
RAG is a method that, instead of directly training a model on specific data or documents, leverages the vast information already available on the internet. By searching for relevant content, it pulls this information together and uses it as a foundation for asking an LLM to generate an answer.
Figure: Example of a simple RAG procedure pasting Wikipedia data into the context of a ChatGPT LLM prompt to extract useful information.
How Does RAG Work?
Search for Information: First, a search is conducted for content relevant to the query or task at hand. This could involve scouring databases, the web, or specialized repositories.
Prepend the Retrieved Data: The content found is then prepended to the original query or prompt. Essentially, it’s added to the beginning of the question or task you’re posing to the LLM.
Ask the Model to Answer: With this combined prompt, the LLM is then asked to generate an answer or complete the task. The prepended information guides the model’s response, grounding it in the specific content retrieved.
Why is RAG Valuable?
Customization: It allows for tailored responses based on real-world data, not just the general patterns an LLM has learned from its training corpus.
Efficiency: Rather than training a specialized model, which can be costly and time-consuming, RAG leverages existing models and augments them with relevant information.
Flexibility: It can be applied to various domains, from coding to medical inquiries, by merely adapting the retrieval component to the area of interest.
Quality: By guiding the model with actual content related to the query, it often results in more precise and contextually accurate responses.
Retrieval Augmented Generation represents an elegant solution to some of the challenges in working with LLMs. It acknowledges that no model, no matter how large, can encapsulate the entirety of human knowledge. By dynamically integrating real-time information retrieval, RAG opens new horizons for LLMs, making them even more versatile and responsive to specific and nuanced inquiries.
In a world awash with information, the fusion of search and generation through RAG offers a sophisticated tool for navigating and extracting value. Here’s my simple formula for RAG:
USEFULNESS ~ LLM_CAPABILITY * CONTEXT_DATAor more simply: USEFULNESS ~ Intelligence * Information
Let’s examine an advanced and extremely powerful technique to provide helpful context to LLMs and, thereby, get the most out of it:
Embeddings and Vector Search: A Special Case of Retrieval Augmented Generation (RAG)
In the broader context of RAG, a specialized technique called “Embeddings and Vector Search” takes text-based exploration to a new level, allowing for the construction of semantic search engines that leverage the capabilities of LLMs.
Here’s how it works:
Transforming Text into Embeddings
Text to Vector Conversion: Any string of text, be it a sentence, paragraph, or document, can be transformed into an array of floating-point numbers, or an “embedding”. This embedding encapsulates the semantic meaning of the text based on the LLM’s mathematical model of human language.
Dimensionality: These embeddings are positioned in a high-dimensional space, e.g., 1,536 dimensions. Each dimension represents a specific aspect of the text’s semantic content, allowing for a nuanced representation.
Example: Building a Semantic Search Engine
Cosine Similarity Distance: To find the closest matches to a given query, the cosine similarity distance between vectors is calculated. This metric measures how closely the semantic meanings align between the query and the existing embeddings.
Combining the Brain (LLM) with Application Data (Embedding): By pairing the vast understanding of language embedded in LLMs with specific application data through embeddings, you create a bridge between generalized knowledge and specific contexts.
Retrieval and Augmentation: The closest matching embeddings are retrieved, and the corresponding text data is prepended to the original query. This process guides the LLM’s response, just as in standard RAG.
Why is this Technique Important?
You can use embeddings as input to LLM prompts to provide context in a highly condensed and efficient form. This solves one half of the problem of using LLMs effectively!
Precision: It offers a finely-tuned mechanism for retrieving content that semantically resonates with a given query.
Scalability: The method can be applied to vast collections of text, enabling large-scale semantic search engines.
Customization: By building embeddings from specific data sources, the search process can be tailored to the unique needs and contexts of different applications.
Embeddings are a powerful extension of the RAG paradigm, enabling a deep, semantic understanding of text. By translating text into numerical vectors and leveraging cosine similarity, this technique builds bridges between the abstract mathematical understanding of language within LLMs and the real-world applications that demand precise, context-aware responses.
Using embeddings in OpenAI is as simple as running the following code:
OpenAI has recently announced the initial support for plugins in ChatGPT. As part of the gradual rollout of these tools, the intention is to augment language models with capabilities that extend far beyond their existing functionalities.
ChatGPT plugins are tools specifically designed for language models to access up-to-date information, run computations, or use third-party services such as Expedia, Instacart, Shopify, Slack, Wolfram, and more.
The implementation of plugins opens up a vast range of possible use cases. From giving parents superpowers with Milo Family AI to enabling restaurant bookings through OpenTable, the potential applications are expansive. Examples like searching for flights with KAYAK or ordering groceries from local stores via Instacart highlight the practical and innovative utilization of these plugins.
OpenAI is also hosting two plugins, a web browser and a code interpreter (see below) to broaden the model’s reach and increase its functionality. An experimental browsing model will allow ChatGPT to access recent information from the internet, further expanding the content it can discuss with users.
ChatGPT Code Interpreter: What Is It and How Does It Work?
The ChatGPT Code Interpreter is a revolutionary feature added to OpenAI’s GPT-4 model, enabling users to execute Python code within the ChatGPT environment.
It functions as a sandboxed Python environment where tasks ranging from PDF conversion using OCR to video trimming and mathematical problem-solving can be carried out.
Users can upload local files in various formats, including TXT, PDF, JPEG, and more, as the Code Interpreter offers temporary disk space and supports over 300 preinstalled Python packages.
Whether it’s data analysis, visualization, or simple file manipulations, the Code Interpreter facilitates these actions within a secure, firewalled environment, transforming the chatbot into a versatile computing interface.
Accessible to ChatGPT Plus subscribers, this feature amplifies the range of possibilities for both coders and general users, blending natural language interaction with direct code execution.
Here’s a list of tasks that can be solved by Code Interpreter that were previously solved by specialized data scientists:
Explore Your Data: You can upload various data files and look into them. It’s a handy way to see what’s going on with your numbers.
Clean Up Your Data: If your data’s a little messy, you can tidy it up by removing duplicates or filling in missing parts.
Create Charts and Graphs: Visualize your data by making different types of charts or graphs. It’s a straightforward way to make sense of complex information.
Try Out Machine Learning: Build your own machine learning models to predict outcomes or categorize information. It’s a step into the more advanced side of data handling.
Work with Text: Analyze texts to find out what’s being said or how it’s being expressed. It’s an interesting dive into natural language processing.
Convert and Edit Files: Whether it’s PDFs, images, or videos, you can convert or modify them as needed. It’s quite a practical feature.
Gather Data from Websites: You can pull data directly from web pages, saving time on collecting information manually.
Solve Mathematical Problems: If you have mathematical equations or problems, you can solve them here. It’s like having a calculator that can handle more complex tasks.
Experiment with Algorithms: Write and test your algorithms for various purposes. It’s a useful way to develop custom solutions.
Automate Tasks: If you have repetitive or routine tasks, you can write scripts to handle them automatically.
Edit Images and Videos: Basic editing of images and videos is possible, allowing for some creative applications.
Analyze IoT Device Data: If you’re working with Internet of Things (IoT) devices, you can analyze their data in this environment.
Here’s an example run in my ChatGPT environment:
Yay you can now run Python code and plot scripts in your ChatGPT environment!
If you click on the “Show work” button above, it toggles the code that was executed:
A simple feature but powerful — using ChatGPT has now become even more convincing for coders like you and me.
To keep learning about OpenAI and Python, you can download our cheat sheet here:
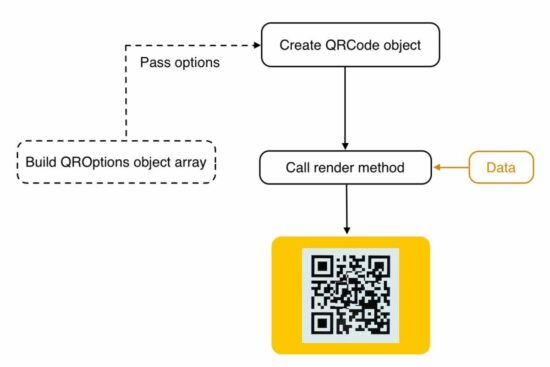
This tutorial will create an example for generating a QR code using PHP. This example uses the Chillerlan QR code library. It is a PHP library with advanced features for creating QR codes, bar codes, and more.
There are two examples in this project. The first is a basic use-case scenario, and the second is an advanced example.
Both will help familiarize this library to send data for QR code rendering.
Quick Example
<?php

require_once '../vendor/autoload.php'; use chillerlan\QRCode\QRCode; // Core class for generating the QR code

$qrCode = new QRCode(); // data for which the QR code will be generated

$data = 'www.phppot.com'; // QR code image generation using render function

// it returns the an image resource.

$qrCodeImage = $qrCode->render($data); // Show the generated QR code image on screen

// following header is necessary to show image output

// in the browser

header('Content-Type: image/png');

imagepng($qrCodeImage);

imagedestroy($qrCodeImage);
The above code is a quick example of generating a Chillerlan QR code. You should use Composer to download the chillerlan dependency.
This example imports the library class and gives the data to generate the QR code.
The render() function passes the data to the library with which it will output the QR code image. This output can be returned to a browser or can be saved as a file.
Run the following command in your terminal to install this Chillerlan PHP library.
composer require chillerlan/php-qrcode
Example 2 – How to configure size, EC level, scale
More configurations help to adjust the QR code quality without affecting readability. The below parameters are used, which override the default configurations.
The version is to set the size of a QR code.
ECC level to set the possible values(L, M, Q, H). It is the damage tolerance percentage. We have seen it when coding with phpqrcode library.
Scale sets the size of a QR code pixel. The maximum size increases the QR code’s quality.
This library has the QROptions class to set the configurations explicitly. When initiating this class, the code below prepares an array of {version, eccLeverl …} options.
This QROptions instance generates the QRCode object to call the render() action handler. As in the above example, the render() uses the data and bundles it into the QR code binary.
<?php

require_once '../vendor/autoload.php'; use chillerlan\QRCode\QRCode;

use chillerlan\QRCode\QROptions; // data to embed in the QR code image

$data = 'www.phppot.com'; // configuration options for QR code generation

// eccLevel - Error correction level (L, M, Q, H)

// scale - QR code pixe size

// imageBase64 - output as image resrouce or not

$options = new QROptions([ 'version' => 5, 'eccLevel' => QRCode::ECC_H, 'scale' => 5, 'imageBase64' => true, 'imageTransparent' => false, 'foregroundColor' => '#000000', 'backgroundColor' => '#ffffff'

]); // Instantiating the code QR code class

$qrCode = new QRCode($options); // generating the QR code image happens here

$qrCodeImage = $qrCode->render($data); header('Content-Type: image/png');

imagepng($qrCodeImage);

imagedestroy($qrCodeImage);
Chillerlan PHP library
This is one of the popular QR Code generators in PHP. It has clean and easily understandable code with proper modularity.
Some of its features are listed below. This feature list represents the capability of being a component of a PHP application.
Features
Creates QR Codes with an improved Model, Version, ECC level, and more configuration
It supports encoding numeric, alphanumeric, 8-bit binary, and more.
It supports QR code output in GD, ImageMagick, SVG markup, and more formats.
It provides QR code readers using GD and ImageMagick libraries.
More about QR code
Hereafter we will see more about the QR code and its evolution, advantages, and usage scenarios.
The QR code, or the quick response code, is a two-dimensional (2D) bar code. The linked article has the code to generate a barcode using PHP.
The QR code is a Japanese invention for the automotive industry. Later it spreads to more domains. Some of the commonly used places are,
Marketing
Linking to service providers
Information sharing
Online payments.
It provides easy access to online information through digital scanners. The QR code contains encoded data that can be decoded with digital scanning. It shares the information, links the service provider or prompts for the payment initiation after scanning.
Example usages of QR code generation and scanning
It shows payee details to ensure and allows one to enter the amount to make a mobile payment.
It facilitates storing location and contact details. It is for marking locations in the Google map while scanning.
When reading the QR code, the application will download v-cards using the contact details stored.
The app developing company shows QR codes in the app store to download mobile apps.
- Click on the GET Button - Verify that the price is zero - Click on the Place Order Button - That's it, the game will be added to you Epic Games Account
This game is free to keep if claimed by Augusts 17th , 2023 5:00 PM or in a day
Decoupling microservices with Apache Camel and Debezium
The rise of microservices-oriented architecture brought us new development paradigms and mantras about independent development and decoupling. In such a scenario, we have to deal with a situation where we aim for independence, but we still need to react to state changes in different enterprise domains.
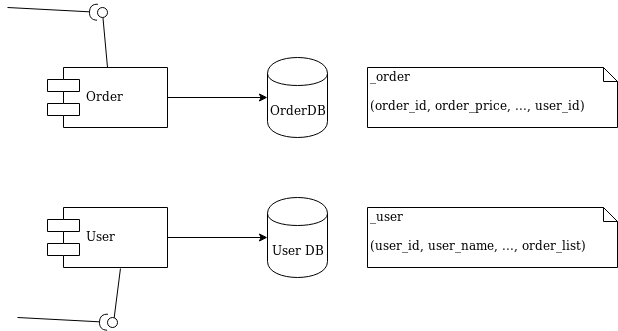
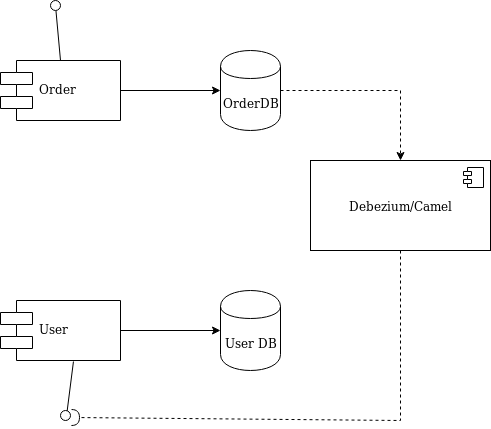
I’ll use a simple and typical example in order to show what we’re talking about. Imagine the development of two independent microservices: Order and User. We designed them to expose a REST interface and to each use a separate database, as shown in Figure 1:
Figure 1: Order and User microservices.
We must notify the User domain about any change happening in the Order domain. To do this in the example, we need to update the order_list. For this reason, we’ve modeled the User REST service with addOrder and deleteOrder operations.
Solution 1: Queue decoupling
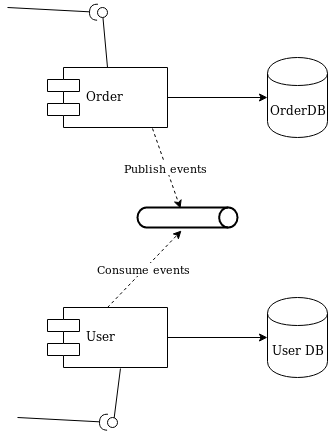
The first solution to consider is adding a queue between the services. Order will publish events that User will eventually process, as shown in Figure 2:
Figure 2: Decoupling with a queue.
This is a fair design. However, if you don’t use the right middleware you will mix a lot of infrastructure code into your domain logic. Now that you have queues, you must develop producer and consumer logic. You also have to take care of transactions. The problem is to make sure that every event ends up correctly in both the Order database and in the queue.
Solution 2: Change data capture decoupling
Let me introduce an alternative solution that handles all of that work without your touching any line of your microservices code. I’ll use Debezium and Apache Camel to capture data changes on Order and trigger certain actions on User. Debezium is a log-based data change capture middleware. Camel is an integration framework that simplifies the integration between a source (Order) and a destination (User), as shown in Figure 3:
Figure 3: Decoupling with Debezium and Camel.
Debezium is in charge of capturing any data change happening in the Order domain and publishing it to a topic. Then a Camel consumer can pick that event and make a REST call to the User API to perform the necessary action expected by its domain (in our simple case, update the list).
Decoupling with Debezium and Camel
I’ve prepared a simple demo with all of the components we need to run the example above. You can find this demo in this GitHub repo. The only part we need to develop is represented by the following source code:
Apache Camel has a Debezium component that can hook up a MySQL database and use Debezium embedded engine. The source endpoint configuration provides the parameters needed by Debezium to note any change happening in the debezium._order table. Debezium streams the events according to a JSON-defined format, so you know what kind of information to expect. For each event, you will get the information as it was before and after the event occurs, plus a few useful pieces of meta-information.
Thanks to Camel’s content-based router, we can either call the addOrderUsingPOST or deleteOrderUsingDELETE operation. You only have to develop a message translator that can convert the message coming from Debezium:
public class AfterStructToOrderTranslator implements Processor { private static final String EXPECTED_BODY_FORMAT = "{\"userId\":%d,\"orderId\":%d}"; public void process(Exchange exchange) throws Exception { final Map value = exchange.getMessage().getBody(Map.class); // Convert and set body int userId = (int) value.get("user_id"); int orderId = (int) value.get("order_id"); exchange.getIn().setHeader("userId", userId); exchange.getIn().setHeader("orderId", orderId); exchange.getIn().setBody(String.format(EXPECTED_BODY_FORMAT, userId, orderId)); } }
Notice that we did not touch any of the base code for Order or User. Now, turn off the Debezium process to simulate downtime. You will see that it can recover all events as soon as it turns back on!
The example illustrated here uses Debezium’s embedded mode. For more consistent solutions, consider using the Kafka connect mode instead, or tuning the embedded engine accordingly.
Posted by: xSicKxBot - 08-17-2023, 11:05 AM - Forum: Python
- No Replies
[Tut] Write a Long String on Multiple Lines in Python
5/5 – (1 vote)
To create and manage multiline strings in Python, you can use triple quotes and backslashes, while more advanced options involve string literals, parentheses, the + operator, f-strings, the textwrap module, and join() method to handle long strings within collections like dictionaries and lists.
Let’s get started with the simple techniques first:
Basic Multiline Strings
In Python, there are multiple ways to create multiline strings. This section will cover two primary methods of writing multiline strings: using triple quotes and backslashes.
Triple Quotes
Triple quotes are one of the most common ways to create multiline strings in Python. This method allows you to include line breaks and special characters like newline characters directly in the string without using escape sequences. You can use triple single quotes (''') or triple double quotes (""") to define a multiline string.
Here is an example:
multiline_string = '''This is an example

of a multiline string

in Python using triple quotes.''' print(multiline_string)
This will print:
This is an example

of a multiline string

in Python using triple quotes.
Backslash
Another way to create a multiline string is by using backslashes (\). The backslash at the end of a line helps in splitting a long string without inserting a newline character. When the backslash is used, the line break is ignored, allowing the string to continue across multiple lines.
Here is an example:
multiline_string = "This is an example " \ "of a multiline string " \ "in Python using backslashes." print(multiline_string)
This will print:
This is an example of a multiline string in Python using backslashes.
In this example, even though the string is split into three separate lines in the code, it will be treated as a single line when printed, as the backslashes effectively join the lines together.
Advanced Multiline Strings
In this section, we will explore advanced techniques for creating multiline strings in Python. These techniques not only improve code readability but also make it easier to manipulate long strings with different variables and formatting options.
String Literals
String literals are one way to create multiline strings in Python. You can use triple quotes (''' or """) to define a multiline string:
multiline_string = """This is a multiline string

that spans multiple lines."""
This method is convenient for preserving text formatting, as it retains the original line breaks and indentation.
Another approach to create multiline strings is using parentheses. By enclosing multiple strings within parentheses, Python will automatically concatenate them into a single string, even across different lines:
multiline_string = ("This is a long string that spans " "multiple lines and is combined using " "the parentheses technique.")
This technique improves readability while adhering to Python’s PEP 8 guidelines for line length.
+ Operator
You can also create multiline strings using the + operator to concatenate strings across different lines:
multiline_string = "This is a long string that is " + \ "concatenated using the + operator."
While this method is straightforward, it can become cluttered when dealing with very long strings or multiple variables.
F-Strings
F-Strings, introduced in Python 3.6, provide a concise and flexible way to embed expressions and variables within strings. They can be combined with the aforementioned techniques to create multiline strings. To create an F-String, simply add an f or F prefix to the string and enclose expressions or variables within curly braces ({}):
name = "Alice"

age = 30

multiline_string = (f"This is an example of a multiline string " f"with variables, like {name} who is {age} years old.")
F-Strings offer a powerful and readable solution for handling multiline strings with complex formatting and variable interpolation.
In Python, there are several ways to create multiline strings, but sometimes it is necessary to split a long string over multiple lines without including newline characters. Two useful methods to achieve this are the join() method and the textwrap module.
Join() Method
The join() method is a built-in method in Python used to concatenate list elements into a single string. To create a multiline string using the join() method, you can split the long string into a list of shorter strings and use the method to concatenate the list elements without newline characters.
Here is an example:
multiline_string = ''.join([ "This is an example of a long string ", "that is split into multiple lines ", "using the join() method."

])

print(multiline_string)
This code would print the following concatenated string:
This is an example of a long string that is split into multiple lines using the join() method.
Notice that the list elements were concatenated without any newline characters added.
Textwrap Module
The textwrap module in Python provides tools to format text strings for displaying in a limited-width environment. It’s particularly useful when you want to wrap a long string into multiple lines at specific column widths.
To use the textwrap module, you’ll need to import it first:
import textwrap
To wrap a long string into multiple lines without adding newline characters, you can use the textwrap.fill() function. This function takes a string and an optional width parameter, and returns a single string formatted to have line breaks at the specified width.
Here is an example:
long_string = ( "This is an example of a long string that is " "split into multiple lines using the textwrap module."

)

formatted_string = textwrap.fill(long_string, width=30)

print(formatted_string)
This code would print the following wrapped string:
This is an example of a long

string that is split into

multiple lines using the

textwrap module.
The textwrap module provides additional functions and options to handle text formatting and wrapping, allowing you to create more complex multiline strings when needed.
Code Style and PEP8
Line Continuation
In Python, readability is important, and PEP8 is the widely-accepted code style guide. When working with long strings, it is essential to maintain readability by using multiline strings. One common approach to achieve line continuation is using parentheses:
long_string = ("This is a very long string that " "needs to be split across multiple lines " "to follow PEP8 guidelines.")
Another option is using the line continuation character, the backslash \:
long_string = "This is a very long string that " \ "needs to be split across multiple lines " \ "to follow PEP8 guidelines."
Flake8
Flake8 is a popular code checker that ensures your code adheres to PEP8 guidelines. It checks for syntax errors, coding style issues, and other potential problems. By using Flake8, you can maintain a consistent code format across your project, improving readability and reducing errors.
To install and run Flake8, use the following commands:
pip install flake8

flake8 your_script.py
E501
When using PEP8 code checkers like Flake8, an E501 error is raised when a line exceeds 80 characters. This is to ensure that your code remains readable and easy to maintain. By splitting long strings across multiple lines using line continuation techniques, as shown above, you can avoid E501 errors and maintain a clean and readable codebase.
Working with Collections
In Python, working with collections like dictionaries and lists is an important aspect of dealing with long strings spanning multiple lines. Breaking down these collections into shorter, more manageable strings is often necessary for readability and organization.
Dictionaries
A dictionary is a key-value pair collection, and in Python, you can define and manage long strings within dictionaries by using multiple lines. The syntax for creating a dictionary is with {} brackets:
my_dict = { "key1": "This is a very long string in Python that " "spans multiple lines in a dictionary value.", "key2": "Another lengthy string can be written " "here using the same technique."

}
In the example above, the strings are spread across multiple lines without including newline characters. This helps keep the code clean and readable.
Brackets
For lists, you can use [] brackets to create a collection of long strings or other variables:
my_list = [ "This is a long string split over", "multiple lines in a Python list."

] another_list = [ "Sometimes, it is important to use", "newline characters to separate lines.",

]
In this example, the first list stores the chunks of a long string as separate elements. The second list showcases the usage of a newline character (\n) embedded within the string to further organize the text.
Frequently Asked Questions
How can I create a multiline string in Python?
There are multiple ways to create a multiline string in Python. One common approach is using triple quotes, either with single quotes (''') or double quotes ("""). For example:
multiline_string = ''' This is a multiline string '''
How to break a long string into multiple lines without adding newlines?
One way to break a long string into multiple lines without including newlines is by enclosing the string portions within parentheses. For example:
long_string = ('This is a very long string ' 'that spans multiple lines in the code ' 'but remains a single line when printed.')
What is the best way to include variables in a multiline string?
The best way to include variables in a multiline string is by using f-strings (formatted string literals) introduced in Python 3.6. For example:
name = 'John'

age = 30 multiline_string = f''' My name is {name} and I am {age} years old. ''' print(multiline_string)
How to manage long string length in Python?
To manage long string length in Python and adhere to the PEP8 recommendation of keeping lines under 80 characters, you can split the string over multiple lines. This can be done using parentheses as shown in a previous example or through string concatenation:
long_string = 'This is a very long string ' + \ 'that will be split over multiple lines ' + \ 'in the code but remain a single line when printed.'
What are the ways to write a multi-line statement in Python?
To create multiline statements in Python, you can use line continuation characters \, parentheses (), or triple quotes ''' or """ for strings. For example:
result = (1 + 2 + 3 + 4 + 5) multiline_string = """ This is a multiline string """
How to use f-string for multiline formatting?
To use f-strings for multiline formatting, you can create a multiline string using triple quotes and include expressions inside curly braces {}. For example:
Python One-Liners Book: Master the Single Line First!
Python programmers will improve their computer science skills with these useful one-liners.
Python One-Linerswill teach you how to read and write “one-liners”: concise statements of useful functionality packed into a single line of code. You’ll learn how to systematically unpack and understand any line of Python code, and write eloquent, powerfully compressed Python like an expert.
The book’s five chapters cover (1) tips and tricks, (2) regular expressions, (3) machine learning, (4) core data science topics, and (5) useful algorithms.
Detailed explanations of one-liners introduce key computer science concepts and boost your coding and analytical skills. You’ll learn about advanced Python features such as list comprehension, slicing, lambda functions, regular expressions, map and reduce functions, and slice assignments.
You’ll also learn how to:
Leverage data structures to solve real-world problems, like using Boolean indexing to find cities with above-average pollution
Use NumPy basics such as array, shape, axis, type, broadcasting, advanced indexing, slicing, sorting, searching, aggregating, and statistics
Calculate basic statistics of multidimensional data arrays and the K-Means algorithms for unsupervised learning
Create more advanced regular expressions using grouping and named groups, negative lookaheads, escaped characters, whitespaces, character sets (and negative characters sets), and greedy/nongreedy operators
Understand a wide range of computer science topics, including anagrams, palindromes, supersets, permutations, factorials, prime numbers, Fibonacci numbers, obfuscation, searching, and algorithmic sorting
By the end of the book, you’ll know how to write Python at its most refined, and create concise, beautiful pieces of “Python art” in merely a single line.
There are more PHP libraries to support this feature. In this tutorial, we will see one of the popular web-scraping components named DomCrawler.
This component is underneath the PHP Symfony framework. This article has the code for integrating and using this component to crawl web pages.
We can also create custom utilities to scrape the content from the remote pages. PHP allows built-in cURL functions to process the network request-response cycle.
About DomCrawler
The DOMCrawler component of the Symfony library is for parsing the HTML and XML content.
It constructs the crawl handle to reach any node of an HTML tree structure. It accepts queries to filter specific nodes from the input HTML or XML.
It provides many crawling utilities and features.
Node filtering by XPath queries.
Node traversing by specifying the HTML selector by its position.
Node name and value reading.
HTML or XML insertion into the specified container tag.
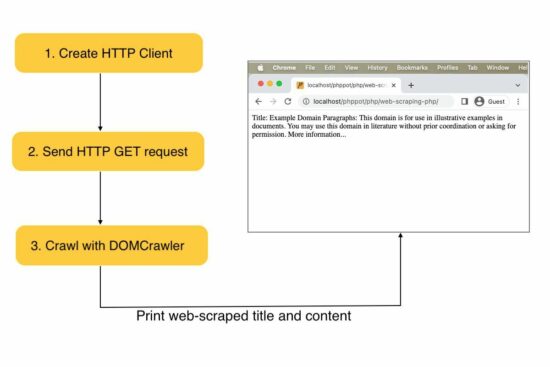
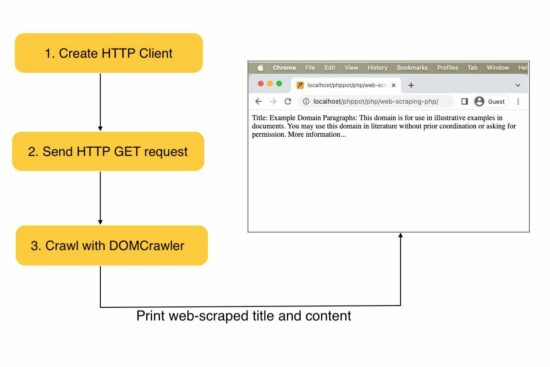
Steps to create a web scraping tool in PHP
Install and instantiate an HTTP client library.
Install and instantiate the crawler library to parse the response.
Prepare parameters and bundle them with the request to scrape the remote content.
Crawl response data and read the content.
In this example, we used the HTTPClient library for sending the request.
Web scraping PHP example
This example creates a client instance and sends requests to the target URL. Then, it receives the web content in a response object.
The PHP DOMCrawler parses the response data to filter out specific web content.
In this example, the crawler reads the site title by parsing the h1 text. Also, it parses the content from the site HTML filtered by the paragraph tag.
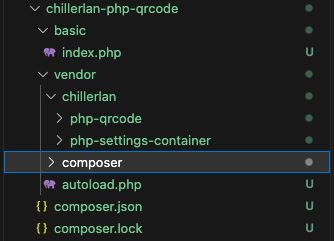
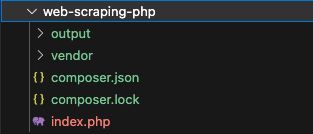
The below image shows the example project structure with the PHP script to scrape the web content.
How to install the Symfony framework library
We are using the popular Symfony to scrape the web content. It can be installed via Composer. Following are the commands to install the dependencies.
After running these composer commands, a vendor folder can map the required dependencies with an autoload.php file. The below script imports the dependencies by this file.
index.php
<?php require 'vendor/autoload.php'; use Symfony\Component\HttpClient\HttpClient;

use Symfony\Component\DomCrawler\Crawler; $httpClient = HttpClient::create(); // Website to be scraped

$website = 'https://example.com'; // HTTP GET request and store the response

$httpResponse = $httpClient->request('GET', $website);

$websiteContent = $httpResponse->getContent(); $domCrawler = new Crawler($websiteContent); // Filter the H1 tag text

$h1Text = $domCrawler->filter('h1')->text();

$paragraphText = $domCrawler->filter('p')->each(function (Crawler $node) { return $node->text();

}); // Scraped result

echo "H1: " . $h1Text . "\n";

echo "Paragraphs:\n";

foreach ($paragraphText as $paragraph) { echo $paragraph . "\n";

}

?>
Ways to process the web scrapped data
What will people do with the web-scraped data? The example code created for this article prints the content to the browser. In an actual application, this data can be used for many purposes.
It gives data to find popular trends with the scraped news site contents.
It generates leads for showing charts or statistics.
It helps to extract images and store them in the application’s backend.
Web scraping is theft if you scrape against a website’s usage policy. You should read a website’s policy before scraping it. If the terms are unclear, you may get explicit permission from the website’s owner. Also, commercializing web-scraped content is a crime in most cases. Get permission before doing any such activities.
Before crawling a site’s content, it is essential to read the website terms. It is to ensure that the public can be subject to scraping.



 From a technical standpoint, a large language model (LLM) can be seen as a massive file on a computer, containing billions or even trillions of numerical values, known as parameters. These parameters are fine-tuned through extensive training on diverse datasets, capturing the statistical properties of human language.

 You know how doctors are always trying to figure out the best way to treat illnesses? Imagine having millions of super-smart helpers to quickly find the answers.
  Or think about your savings and investments; what if you had a team of top financial experts guiding you 24/7 to make the smartest choices with your money?
  And for kids in school, picture having a personal tutor for every subject, making sure they understand everything perfectly. LLMs is like having an army of geniuses at your service for anything you need.

 Academy:


 Recommended: