HARVESTELLA takes place on a planet where four giant crystals, known as the Seaslight, govern the seasons. One day, the Seaslight start behaving abnormally. Quietus begins to visit in the interim between seasons - and quickly establishes itself as the season of death. The Seaslight glow with a strange light, emitting a dust formed of light that threatens all it touches - crops die, and people are trapped inside.
During one particular Quietus, your character - a traveler - collapses in an isolated village. You meet a girl called Aria, who claims to have come from the future and is researching the mysteries of this new, unwelcome season.
Thus you and she take the first step on a journey that will reveal the very truth of the world.
JDK 12.0.2, 11.0.4, 8u221, and 7u231 Have Been Released!
The JDK 12.0.2, 11.0.4, 8u221, and 7u231 update releases are now available. You can download the latest JDK releases from the Java SE Downloads page. OpenJDK 12.0.2 is available on http://jdk.java.net/12/. An item of interest in the CPU release is that JDK 8u221 also includes JDK 8u221 for ARM. Info...
While working on the second box in the series, Looking Glass, I stumbled upon a bash script written by Tay1or, another user on TryHackMe.
The opening challenge involves finding the correct port which hides an encrypted poem, Jabberwocky by Lewis Caroll.
Using a script here is a more efficient solution because it is quite time-consuming to manually attempt connecting to different ssh ports over and over until the correct port can be found.
The box also resets the mystery port after each login, so unless you solve the box on your first attempt, the script will come in handy multiple times.
Bash Script
Here is Tay1or’s bash script with a few slight modifications in bold to make it run on my machine:
#!/usr/bin/bash low=9000
high=13000 while true
do mid=$(echo "($high+$low)/2" | bc) echo -n "Low: $low, High: $high, Trying port: $mid – " msg=$(ssh -o "HostKeyAlgorithms=+ssh-rsa" -p $mid $targetIP | tr -d '\r') echo "$msg" if [[ "$msg" == "Lower" ]] then low=$mid elif [[ "$msg" == "Higher" ]] then high=$mid fi
done
I’m still new to bash scripting, but because I already understand the context of the problem being faced, I can more or less guess what the script is doing.
At the top, under the shebang line, it first sets low and high values for the ports to be searched. Then we see a while true loop.
The first command in the loop calculates the midpoint between the low and the high port values in the given range.
The echo command prints the low/high/and midpoint port that is currently being tested.
Then we have if/elif commands to respond appropriately to the output of the $msg to set the mid to either the lower or higher range variables. By resetting the range after each attempted connection, the search will take a minimal amount of time by eliminating the largest number of ports possible on each attempt.
When the output msg is neither “Higher” or “Lower” it will end the loop because we will have hit our secret encrypted message on the correct port.
Conversion into a Python script
I started wondering how it might be possible to translate the bash script to a Python script and decided to try my hand at converting the functionality of the code.
I’m more comfortable scripting in Python, and I think it will probably come in handy later in future challenges to be able to quickly write up a script during CTF challenges to save time.
The inputs of the code are the targetIP and high and low values of the target SSH port range.
Outputs are the response from the targetIP on each attempted connection until the secret port is found. Once the secret port is found, the program will reiterate that you have found the port.
I posted the final version of the python script here on GitHub. For your convenience, I’ll include it here too:
#!/usr/bin/env python3

# These sites were used as references: https://stackabuse.com/executing-shell-commands-wi>

# https://stackoverflow.com/questions/4760215/running-shell-command-and-capturing-the-> #set up initial conditions for the target port search

import subprocess

low_port=9000

high_port=13790

targetIP = "10.10.252.52"

print(targetIP)

#initialize loop_key variable:

loop_key="higher" while loop_key=="Higher" or "Lower": print('low = ' + str(low_port) + ', high = ' + str(high_port))

#a good place to use floor division to cut off the extra digit mid_port=(high_port+low_port)//2 print('Trying port ' + str(mid_port)) #attempt to connect to the mid port result = subprocess.run(['ssh', 'root@' + str(targetIP), '-oHostKeyAlgorithms=+ssh-rsa', '-p', str(mid_port)], stdout=subprocess.PIPE) # prep the decoded output variable msg = result.stdout decoded_msg = msg.decode('utf-8') # print result of attempted ssh connection print(decoded_msg) if "Higher" in decoded_msg: #print("yes I see the words Higher") high_port=mid_port print(high_port) loop_key="Higher" elif "Lower" in decoded_msg: low_port=mid_port print(low_port) loop_key="Lower" else: print("You found the secret port - " + str(mid_port)) exit()
PHPMyAdmin is one of the widely used database clients for PHP MySQL developers. It provides a simple user interface that can be easily adapted by beginners.
We can blindly say that PHPMyAdmin as the de-facto database client used by PHP developers for MySQL / MariaDB. It is hugely popular and that is because of its simplicity and ease of use.
It allows many database operations. Example,
Creating databases and the corresponding tables.
Adding and managing data.
Altering the existing structure and attributes defined.
Import, and export operations.
In this article, we will see how to create a MySQL database using PHPMyAdmin.
How to create a database?
First login to the PHPMyAdmin client to go to the database control panel.
After login, it redirects to the PHPMyAdmin control panel which allows doing the following.
To manage and manipulate MySQL database assets.
To perform CRUD or other database-related operations.
There are 4 ways to create a new MySQL database using the PHPMyAdmin client interface.
Via the left panel navigation.
Via the header tab control navigation.
By executing a CREATE statement via the SQL tab.
By importing a CREATE statement SQL script via the Import tab.
1. Create database via left panel
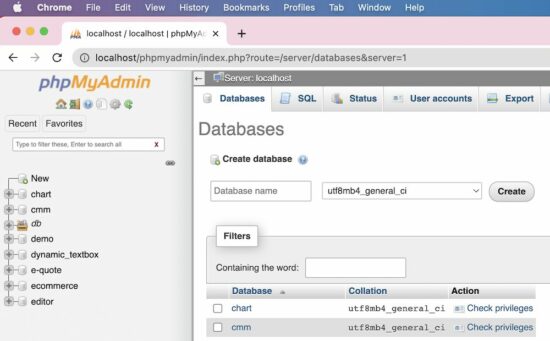
In the PHPMyAdmin left panel, it contains a New link. It redirects to the page to create a new database.
2. Create database via header tab
The PHPMyAdmin UI shows tabs like Database, Import, Export and more. The Database tab redirects to show a list of existing databases with an option to create a new one.
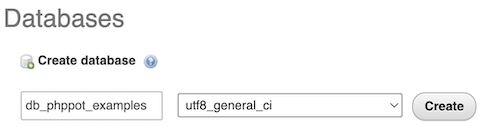
Both of these navigation controls will display the UI as shown in the figure.
The database create-form shows two fields.
To type the name of the database to be created.
To choose a collation that is encoding type.
In the above screenshot, the utf8_unicode_ci collation is selected.
The other two methods are for the one who has the SQL script for creating a new MySQL database.
Sometimes the database SQL will be provided. In that case, it is not required to use the interface to input the database name and the collation.
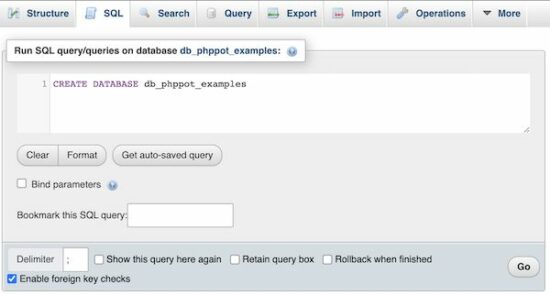
3. Create database via SQL tab, by running a CREATE SQL query
Choose the SQL tab from the PHPMyAdmin header. It will show a textarea to paste the CREATE database query.
Then, execute the entered query to see the created database among the existing list.
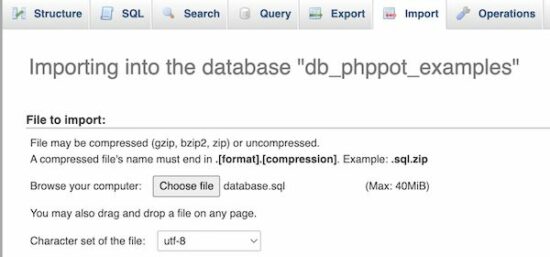
4. Create database via Import tab, by uploading a SQL script
If you have the database CREATE statement Choose the Import tab from the PHPMyAdmin header. Then browse the SQL script that contains the CREATE statement.
Then click the “Go” button to process the import. It will result in displaying a new database imported.
After creating a MySQL database using PHPMyAdmin, the next job is to start adding the tables.
The PHPMyAdmin has the option to “Check privileges” to map roles and MySQL database operations.
But, this is a rarely used feature. If the database is associated with more than one user, then this feature will be used.
How to create tables in a database?
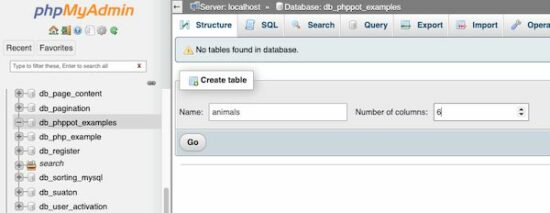
After creating a database, the PHPMyAdmin shows a form to a create table. That form show fields to enter the table name and the number of columns of the table.
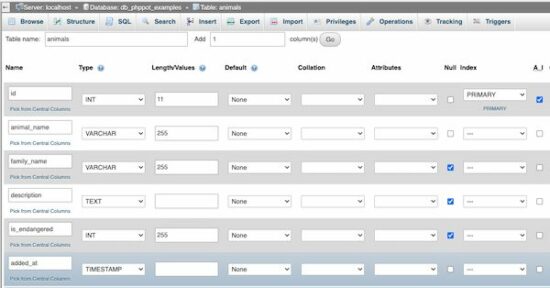
After specifying the table name and the “Number of columns”, the PHPMyAdmin panel will show inputs to add the table column specification.
See the following screen that is added with the column names with their corresponding types and more details.
Add user accounts and set privileges
Select the “User accounts” tab to see the number of existing user accounts. The PHPMyAdmin also allows adding a new user via the interface.
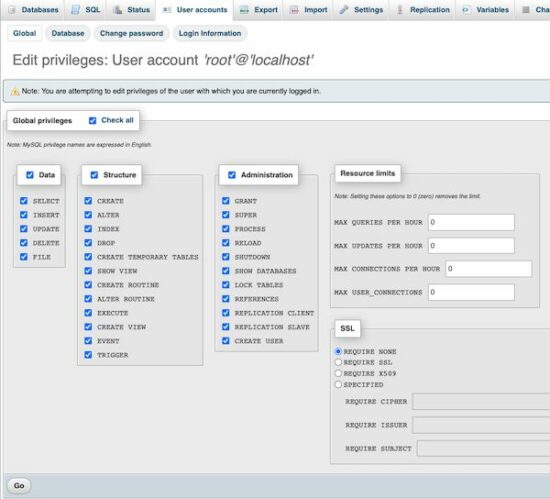
The “Create user” page will have the option to select the user account details and set the permission to perform operations like,
CRUD operations on the Data.
CREATE, ALTER, DROP and more operations on the MySQL database Structure.
Access Administration tools.
Setting resource limits like making the number of simultaneous connections.
See the screenshot below to allow or deny access permissions of the user created for a MySQL database.
[www.indiegala.com] Add to your collection & get a selection of games made with heart and mind brought to you by Whale Rock Games for the passionate gamers: Synthwave Burnout, NeuraGun, Inquisitor's Heart and Soul, Cybernetic Fault, Cyberpunk SFX, Euphoria: Supreme Mechanics.
[www.indiegala.com] For a limited time, any purchase made on IndieGala, be it store deals or bundles, will be rewarding you instantly and handsomely, directly into your IndieGala account, ready to be used!
We are welcoming everyone to join our discord[discord.gg]. We are more active there on finding giveaways, small or large, and there are daily raffles you can participate.
Rise to all the challenges of the most comprehensive, realistic and demanding rally simulation ever developed. Dive into the heart of the action and drive the cars from the 2022 WRC championship, including the new hybrid models.
Posted by: xSicKxBot - 11-24-2022, 10:09 AM - Forum: Lounge
- No Replies
Pokemon Scarlet And Violet Breeding And Egg Power Guide:
Because it's Gen 9, there's a new breeding method in Pokemon Scarlet and Violet. The older ways of Gold and Silver allowing trainers to breed new Pokemon with perfect IVs, natures, abilities, and max shiny odds, but the Paldea region is a "no daycare zone" that swaps nurseries and incense for a DIY picnic setup. The new system is designed to stir creativity within social circles and aid stat builds and competitive monster-making so before you break out the Peanut Butter & Jam Sandwiches, here's a brief explainer on how breeding eggs works in Pokemon Scarlet and Violet. For science, of course!
Instead of leaving two compatible Pokemon in a Day Care (or Nursery), players can now spawn new Pokemon wherever they set up a picnic in the open world. All that's required in Scarlet and Violet is two Pokemon (one male, one female) who belong to the same Egg Group, a flat surface in a non-town area, and a scenic backdrop for ambiance. Eggs will start to slowly appear over time in a basket near the picnic table and while rolling hills and Tauros might get in your way, trainers can increase their egg frequency with Meal Powers or use a Mirror Herb item to pass down other Egg Moves.
The Duke's Choice Award is dedicated to all members of the Java ecosystem! In keeping with its 17-year history, the 2019 Duke's Choice Award winners will be announced at Code One, the world's biggest Java technology conference and gathering of Java community members. The Duke's Choice Award celebrat...
(Fixed) ModuleNotFoundError: No Module Named ‘git’ | Python
5/5 – (1 vote)
Quick Fix: Python raises the ModuleNotFoundError: No module named 'git' when you haven’t installed GitPython explicitly with pip install GitPython or pip3 install GitPython (Python 3). Or you may have different Python versions on your computer, and GitPython is not installed for the particular version you’re using.
You’ll learn how to fix this error below after diving into the concrete problem first.
Problem Formulation
You’ve just learned about the awesome capabilities of the GitPython library, and you want to try it out, so you start your code with the following statement:
import git
or even something like:
from git import Repo
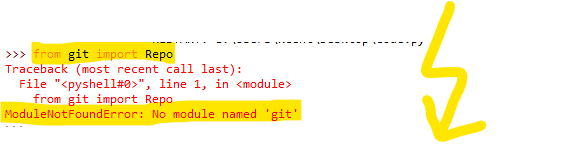
This is supposed to import the git library into your (virtual) environment. However, it only throws the following ModuleNotFoundError: No module named 'git':
>>> import git

Traceback (most recent call last): File "<pyshell#6>", line 1, in <module> import git

ModuleNotFoundError: No module named 'git'
Solution Idea 1: Install Library GitPython
The most likely reason is that Python doesn’t provide GitPython in its standard library. You need to install it first!
To fix this error, you can run the following command in your Windows shell:
$ pip install GitPython
This simple command installs GitPython in your virtual environment on Windows, Linux, and MacOS. Uppercase or lowercase library name doesn’t matter.
This assumes that your pip version is updated. If it isn’t, use the following two commands in your terminal, command line, or shell (there’s no harm in doing it anyways):
Note: Don’t copy and paste the $ symbol. This is just to illustrate that you run it in your shell/terminal/command line.
Also, try the following variant if you run Python 3 on your computer:
pip3 install GitPython
Solution Idea 2: Fix the Path
The error might persist even after you have installed the GitPython library. This likely happens because pip is installed but doesn’t reside in the path you can use. Although pip may be installed on your system the script is unable to locate it. Therefore, it is unable to install the library using pip in the correct path.
To fix the problem with the path in Windows follow the steps given next.
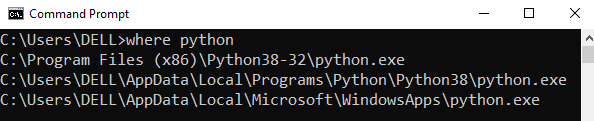
Step 1: Open the folder where you installed Python by opening the command prompt and typing where python
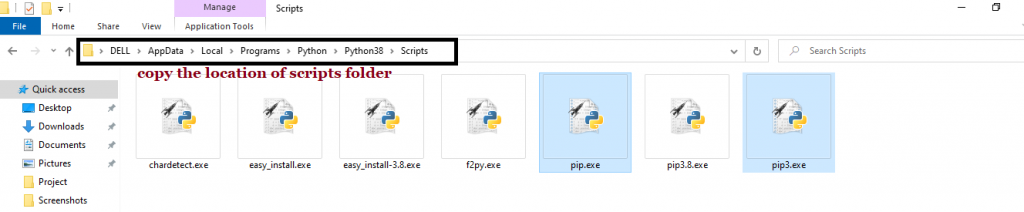
Step 2: Once you have opened the Python folder, browse and open the Scripts folder and copy its location. Also verify that the folder contains the pip file.
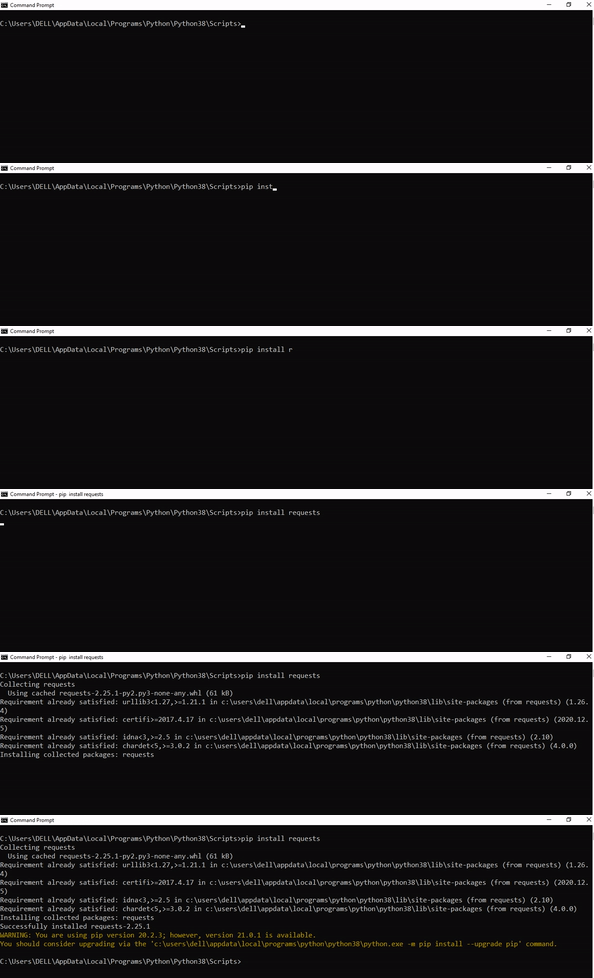
Step 3: Now open the Scripts directory in the command prompt using the cd command and the location that you copied previously.
Step 4: Now install the library using pip install GitPython command. Here’s an analogous example:
After having followed the above steps, execute our script once again. And you should get the desired output.
Other Solution Ideas
The ModuleNotFoundError may appear due to relative imports. You can learn everything about relative imports and how to create your own module in this article.
You may have mixed up Python and pip versions on your machine. In this case, to install GitPython for Python 3, you may want to try python3 -m pip install GitPython or even pip3 install GitPython instead of pip install GitPython
If you face this issue server-side, you may want to try the command pip install – user GitPython
If you’re using Ubuntu, you may want to try this command: sudo apt install GitPython
You can also check out this article to learn more about possible problems that may lead to an error when importing a library.
Understanding the “import” Statement
import git
In Python, the import statement serves two main purposes:
Search the module by its name, load it, and initialize it.
Define a name in the local namespace within the scope of the import statement. This local name is then used to reference the accessed module throughout the code.
What’s the Difference Between ImportError and ModuleNotFoundError?
What’s the difference between ImportError and ModuleNotFoundError?
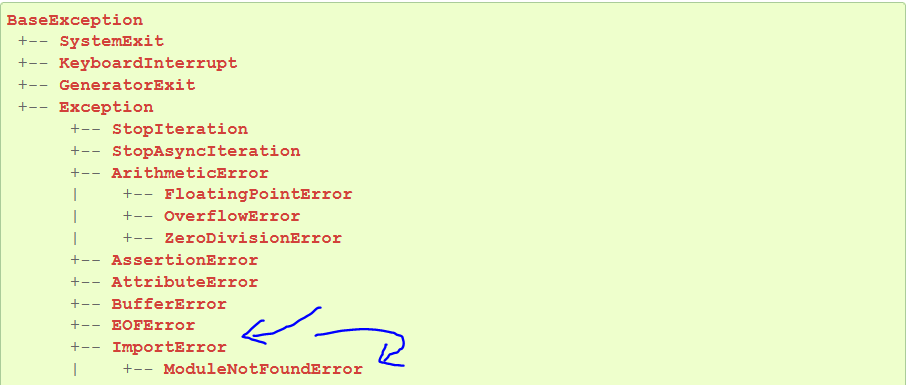
Python defines an error hierarchy, so some error classes inherit from other error classes. In our case, the ModuleNotFoundError is a subclass of the ImportError class.
You can see this in this screenshot from the docs:
You can also check this relationship using the issubclass() built-in function:
Specifically, Python raises the ModuleNotFoundError if the module (e.g., git) cannot be found. If it can be found, there may be a problem loading the module or some specific files within the module. In those cases, Python would raise an ImportError.
If an import statement cannot import a module, it raises an ImportError. This may occur because of a faulty installation or an invalid path. In Python 3.6 or newer, this will usually raise a ModuleNotFoundError.
Related Videos
The following video shows you how to resolve the ImportError:
How to Fix “ModuleNotFoundError: No module named ‘git’” in PyCharm
If you create a new Python project in PyCharm and try to import the GitPython library, it’ll raise the following error message:
Traceback (most recent call last): File "C:/Users/.../main.py", line 1, in <module> import git

ModuleNotFoundError: No module named 'git' Process finished with exit code 1
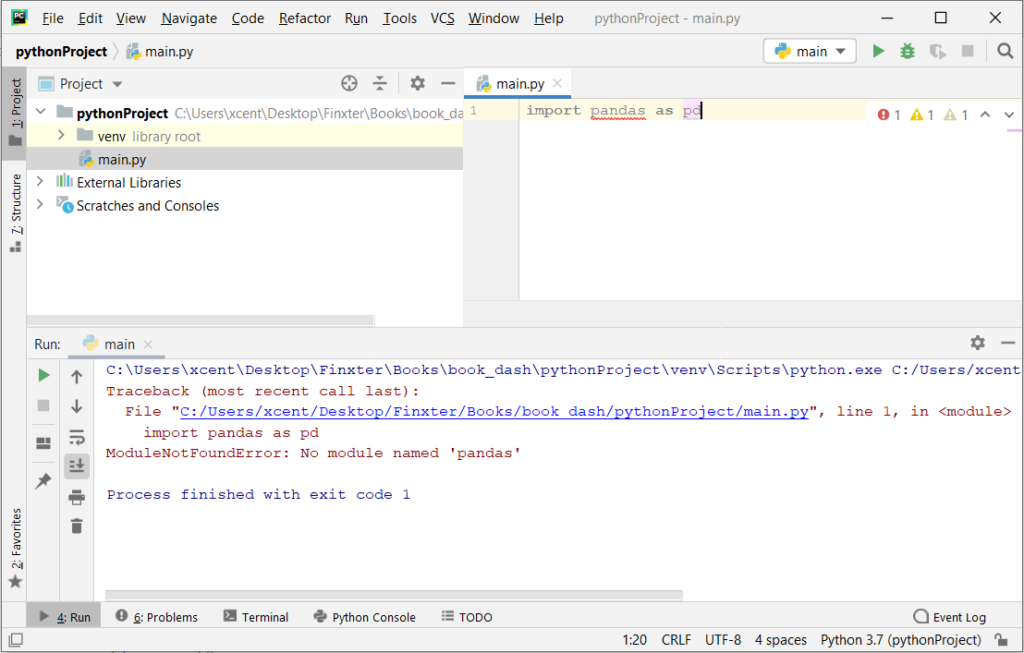
The reason is that each PyCharm project, per default, creates a virtual environment in which you can install custom Python modules. But the virtual environment is initially empty—even if you’ve already installed GitPython on your computer!
Here’s a screenshot exemplifying this for the pandas library. It’ll look similar for GitPython.
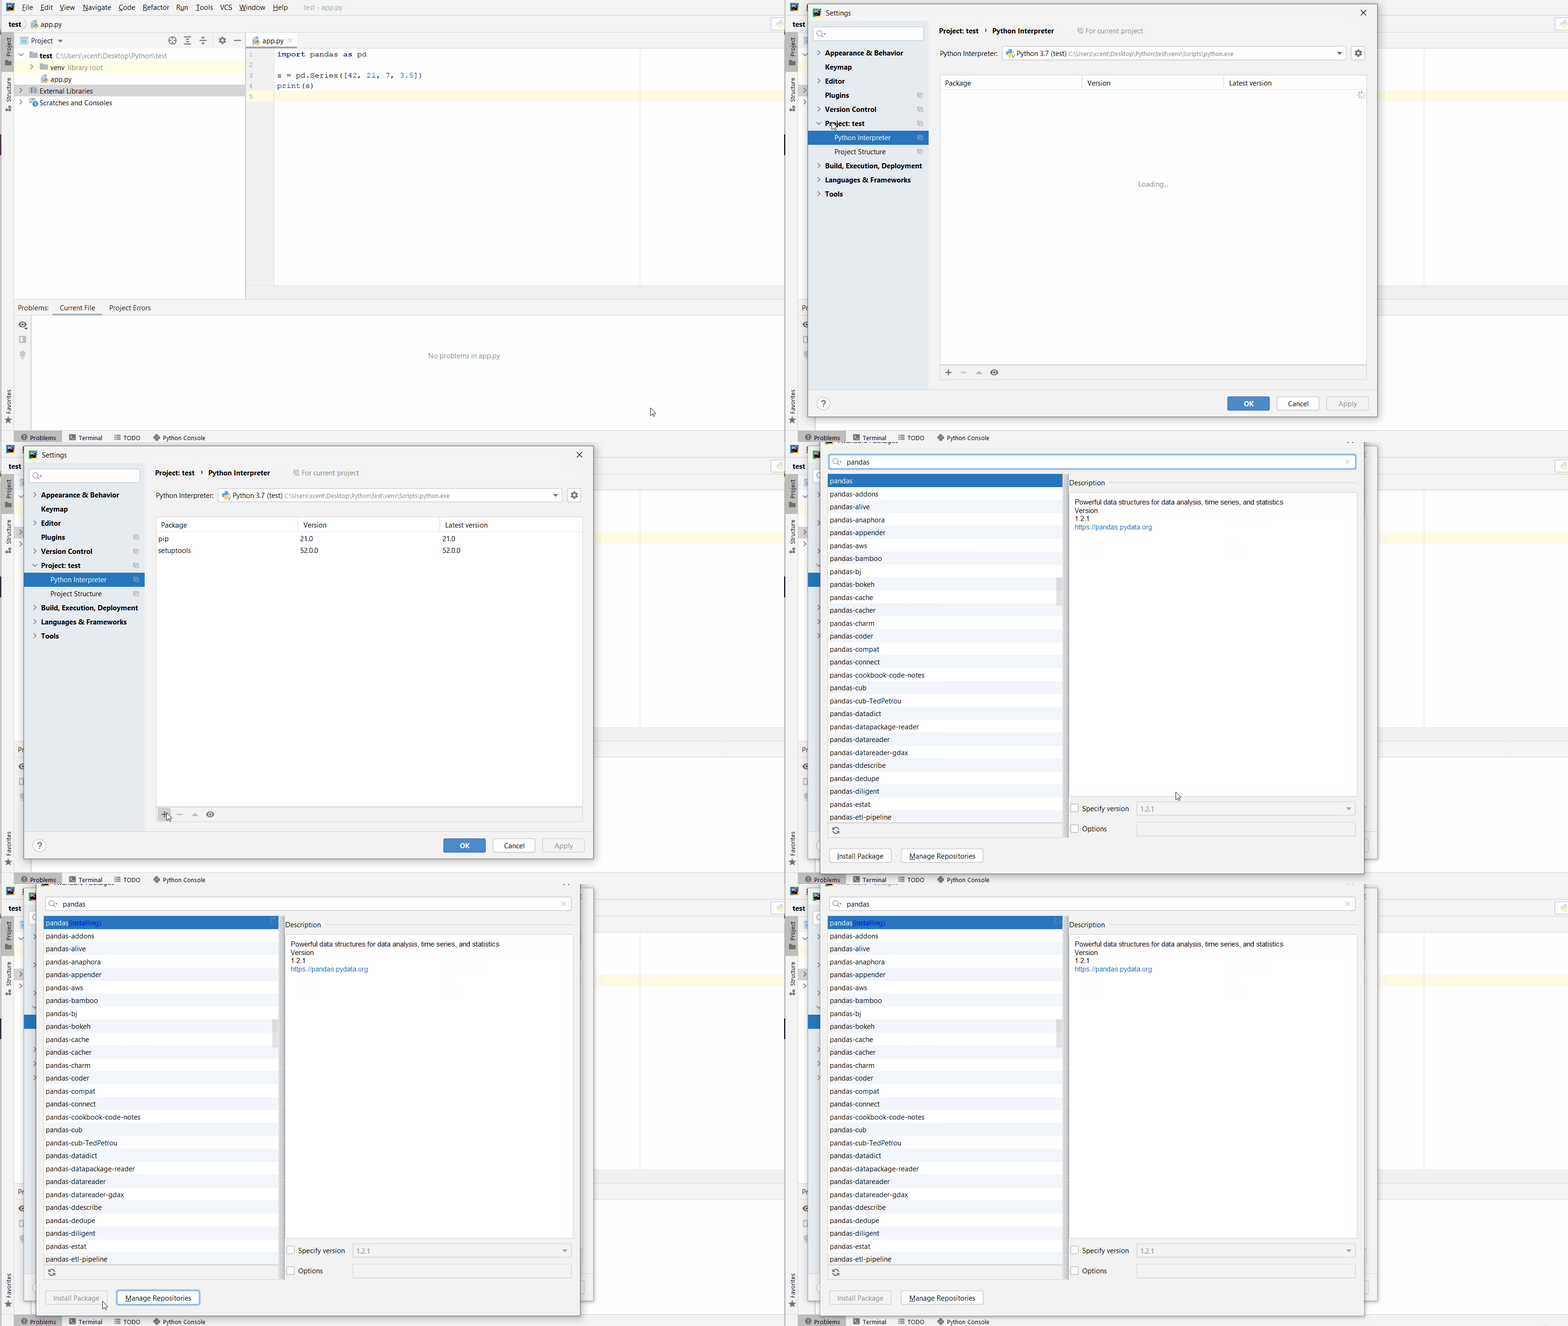
The fix is simple: Use the PyCharm installation tooltips to install Pandas in your virtual environment—two clicks and you’re good to go!
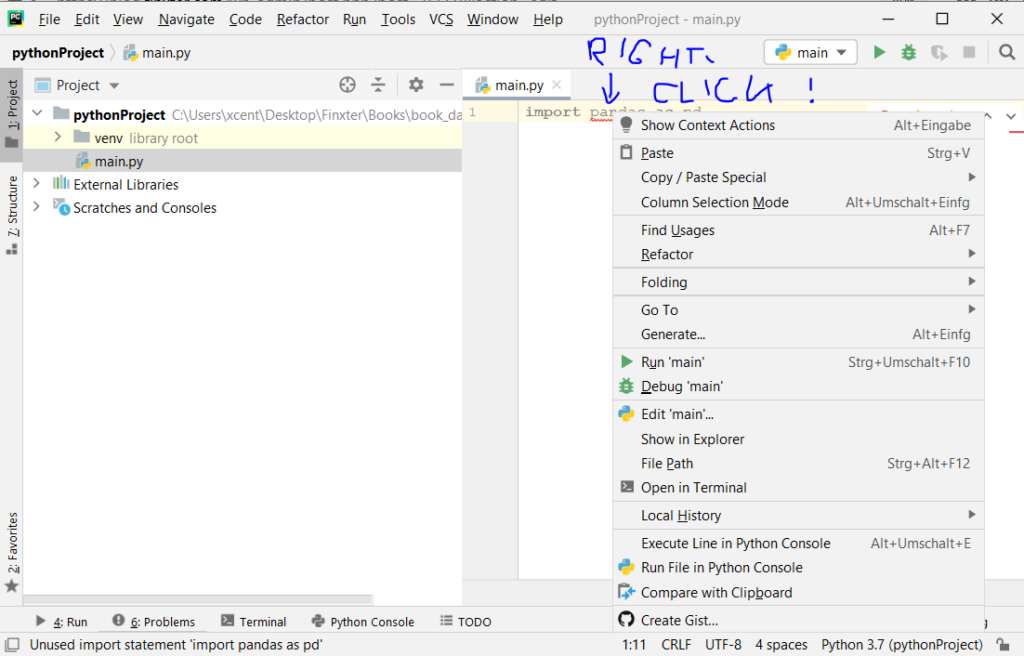
First, right-click on the pandas text in your editor:
Second, click “Show Context Actions” in your context menu. In the new menu that arises, click “Install Pandas” and wait for PyCharm to finish the installation.
The code will run after your installation completes successfully.
As an alternative, you can also open the Terminal tool at the bottom and type:



 Recommended Tutorial:





 Note: Don’t copy and paste the