Wylde Flowers is a cozy life and farming sim with a witchy twist! Escape to a cute world of diverse folks, and magical spells, as you and the coven unravel a mystery!
Play as Tara, as she arrives at a cozy rural island to help out her grandma and the family farm.
Explore a wholesome world of magical realms, beautiful beaches, secretive forests and the friendly town of Fairhaven.
Meet a charming cast of fully voice acted characters, with intriguing back stories to reveal. Find friendship or maybe even romance?
Transform the Wylde family farm into a productive haven bursting with fresh vegetables, fruit trees and cute baby animals!
Reveal the hidden darkness which is affecting the town and discover how to bring everyone together.
To convert a given Boolean value to a string in Python, use the str(boolean) function and pass the Boolean value into it. This converts Boolean True to string "True" and Boolean False to string "False".
Here’s a minimal example:
>>> str(True) 'True'

>>> str(False) 'False'
Python Boolean Type is Integer
Booleans are represented by integers in Python, i.e., bool is a subclass of int. Boolean value True is represented with integer 1. And Boolean value False is represented with integer 0.
Here’s a minimal example:
>>> True == 1

True

>>> False == 0

True
Convert True to ‘1’ and False to ‘0’
To convert a Boolean value to a string '1' or '0', use the expression str(int(boolean)). For instance, str(int(True)) returns '1' and str(int(False)) returns '0'. This is because of Python’s use of integers to represent Boolean values.
Here’s a minimal example:
>>> str(int(True)) '1'

>>> str(int(False)) '0'
Convert List of Boolean to List of Strings
To convert a Boolean to a string list, use the list comprehension expression [str(x) for x in my_bools] assuming the Boolean list is stored in variable my_bools. This converts each Boolean x to a string using the built-in str() function and repeats it for all x in the Boolean list.
Here’s a simple example:
my_bools = [True, True, False, False, True]

my_strings = [str(x) for x in my_bools]

print(my_strings)

# ['True', 'True', 'False', 'False', 'True']
Convert String Back to Boolean
What if you want to convert the string representation 'True' and 'False' (or: '1' and '0') back to the Boolean representation True and False?
You can convert a string value s to a Boolean value using the Python function bool(s).
For example, bool('True') and bool('1') return True.
However, bool('False') and bool('0') return False as well which may come unexpected to you.
This is because all Python objects are “truthy”, i.e., they have an associated Boolean value. As a rule of thumb: empty values return Boolean True and non-empty values return Boolean False. So, only bool('') on the empty string '' returns False. All other strings return True!
Easy – first pass the string into the eval() function and then pass the result into the bool() function. In other words, the expression bool(eval(my_string)) converts a string to a Boolean mapping 'True' and '1' to Boolean True and 'False' and '0' to Boolean False.
Finally – this behavior is as expected by many coders just starting out.
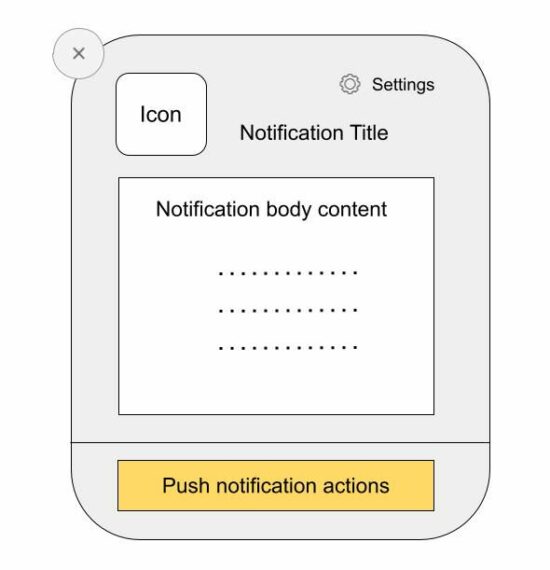
Web push notifications are messages pushed asynchronously from a website and mobile application to an event target.
There are two types of web push notifications:
Desktop notifications are shown when the foreground application is running and they are simple to use.
Notifications that are shown from the background even after the application is not running. It’s via a background service worker sync with the page or app.
This tutorial implements the first type of sending the push notification via JavaScript. It uses the JavaScript Notification class to create and manage notification instances.
Note: To show the notifications, permission should be granted by the user.
About the example
This example sends the web push notifications by calling the JavaScript Notification.
It sends only one notification by running this script. It can also be put into a cycle to automatically send notifications at a periodic interval.
This code uses the following steps to push the notification to the event target.
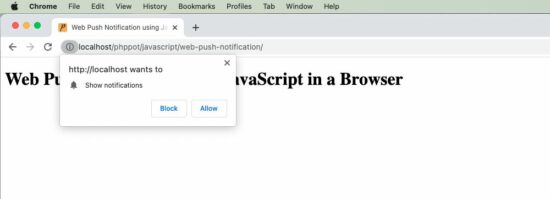
It checks if the client has the required permissions and popups content window to have user acceptance.
It creates a notification instance by supplying the title, body and icon (path).
It refers to the on-click event mapping with the notification instance.
When the user clicks on the notification, it opens the target URL passed while creating the JavaScript Notification class.
index.php
<!DOCTYPE html>

<html>

<head>

<title>Web Push Notification using JavaScript in a Browser</title>

<script src="https://code.jquery.com/jquery-3.6.1.min.js" integrity="sha256-o88AwQnZB+VDvE9tvIXrMQaPlFFSUTR+nldQm1LuPXQ=" crossorigin="anonymous"></script>

</head>

<body> <div class="phppot-container"> <h1>Web Push Notification using JavaScript in a Browser</h1> <script> pushNotify(); function pushNotify() { if (!("Notification" in window)) { // checking if the user's browser supports web push Notification alert("Web browser does not support desktop notification"); } else if (Notification.permission === "granted") { console.log("Permission to show web push notifications granted."); // if notification permissions is granted, // then create a Notification object createNotification(); } else if (Notification.permission !== "denied") { alert("Going to ask for permission to show web push notification"); // User should give explicit permission Notification.requestPermission().then((permission) => { // If the user accepts, let's create a notification createNotification(); }); } // User has not granted to show web push notifications via Browser // Let's honor his decision and not keep pestering anymore } function createNotification() { var notification = new Notification('Web Push Notification', { icon: 'https://phppot.com/badge.png', body: 'New article published!', }); // url that needs to be opened on clicking the notification // finally everything boils down to click and visits right notification.onclick = function() { window.open('https://phppot.com'); }; } </script> </div>

</body>

</html>
Permissions required
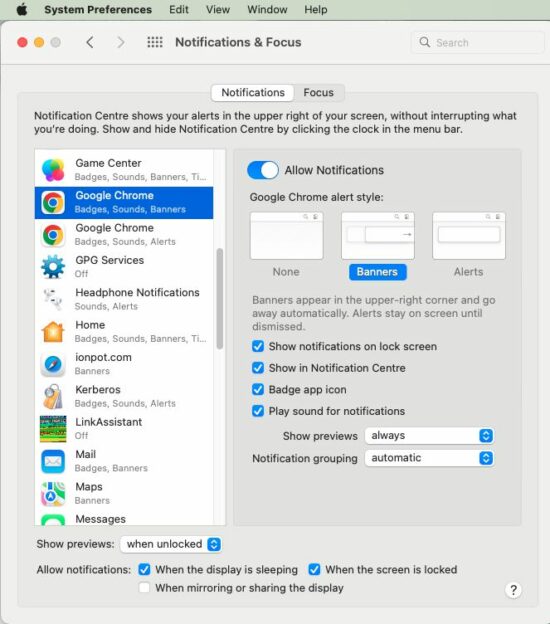
The following screenshot shows the settings to enable notification in the browser level and the system level.
Browser level permission
OS level permission
This is to allow the Google Chrome application to receive notifications. Similarly, select appropriate browser applications like Safai and Firefox to allow notification in them.
We are welcoming everyone to join our discord[discord.gg]. We are more active there on finding giveaways, small or large, and there are daily raffles you can participate.
Posted by: xSicKxBot - 10-04-2022, 11:37 AM - Forum: Lounge
- No Replies
Tower Of Fantasy Is Finally Coming To Steam Later This Month
Those waiting for Tower of Fantasy to arrive on Steam before diving into the anime MMORPG won't have to wait much longer, as publisher Level Infinite has confirmed that the free-to-play gacha game will be available to download and play on Valve's platform starting October 20.
The game has been available on PC via download from the official Tower of Fantasy site since its launch back in early August and is also available on mobile devices. In addition to the game's availability on Steam, October 20 is also the day Tower of Fantasy's first major update will arrive on all available platforms. The update will introduce the new Vera region, which is made up of the unforgiving wastes of the Desert Gobby and a floating cyberpunk city called Mirroria.
Developer Hotta Studios is promising new missions, events, raids, boss battles, vehicles, and weapons in the update, and fans have already gotten a glimpse at some of what is to come. A recent story trailer teased new unlockable characters and a deadly new enemy type known as Abyssants.
Announcing Return to Monkey Island, the long-awaited follow-up to the legendary Secret of Monkey Island and Monkey Island 2: LeChuck's Revenge by Ron Gilbert's Terrible Toybox in collaboration with Devolver Digital and Lucasfilm Games, coming 2022.
Posted by: xSicKxBot - 10-03-2022, 07:46 AM - Forum: Python
- No Replies
Python Time Series Forecast on Bitcoin Data (Part II)
5/5 – (1 vote)
A Time Series is essentially a tabular data with the special feature of having a time index. The common forecast taks is ‘knowing the past (and sometimes the present), predict the future’. This task, taken as a principle, reveals itself in several ways: in how to interpret your problem, in feature engineering and in which forecast strategy to take.
This is the second article in our series. In the first article we discussed how to create features out of a time series using lags and trends. Today we follow the opposite direction by highlighting trends as something you want directly deducted from your model.
Reason is, Machine Learning models work in different ways. Some are good with subtractions, others are not.
For example, for any feature you include in a Linear Regression, the model will automatically detect whether to deduce it from the actual data or not. A Tree Regressor (and its variants) will not behave in the same way and usually will ignore a trend in the data.
Therefore, whenever using the latter type of models, one usually calls for a hybrid model, meaning, we use a Linear(ish) first model to detect global periodic patterns and then apply a second Machine Learning model to infer more sophisticated behavior.
The hybrid model part of this article is heavily based on Kaggle’s Time Series Crash Course, however, we intend to automate the process and discuss more in-depth the DeterministicProcess class.
DeterministicProcess aims at creating features to be used in a Regression model to determine trend and periodicity. It takes your DatetimeIndex and a few other parameters and returns a DataFrame full of features for your ML model.
A usual instance of the class will read like the one below. We use the sentic_mean column to illustrate.
from statsmodels.tsa.deterministic import DeterministicProcess y = dataset['sentic_mean'].copy() dp = DeterministicProcess(

index=y.index, constant=True, order=2

) X = dp.in_sample() X
We can use X and y as features and target to train a LinearRegression model. In this way, the LinearRegression will learn whatever characteristics from y can be inferred (in our case) solely out of:
the number of elapsed time intervals (trend column);
the last number squared (trend_squared); and
a bias term (const).
Check out the result:
from sklearn.linear_model import LinearRegression model = LinearRegression().fit(X,y) predictions = pd.DataFrame( model.predict(X), index=X.index, columns=['Deterministic Curve']

)
Even the quadratic term seems ignorable here. The DeterministicProcess class also helps us with future predictions since it carries a method that provides the appropriate future form of the chosen features.
Specifically, the out_of_sample method of dp takes the number of time intervals we want to predict as input and generates the needed features for you.
Although the order-three polynomial fits the data better, use discretion in deciding whether the sentiment count will decrease so drastically in the next 60 days or not. Usually, trust short-time predictions rather than long ones.
DeterministicProcess accepts other parameters, making it a very interesting tool. Find a description of the almost full list below.
dp = DeterministicProcess( index, # the DatetimeIndex of your data period: int or None, # in case the data shows some periodicity, include the size of the periodic cycle here: 7 would mean 7 days in our case constant: bool, # includes a constant feature in the returned DataFrame, i.e., a feature with the same value for everyone. It returns the equivalent of a bias term in Linear Regression order: int, # order of the polynomial that you think better approximates your trend: the simplest the better seasonal: bool, # make it True if you think the data has some periodicity. If you make it True and do not specify the period, the dp will try to infer the period out of the index additional_terms: tuple of statsmodel's DeterministicTerms, # we come back to this next drop: bool # drops resulting features which are collinear to others. If you will use a linear model, make it True

)
Seasonality
As a hardened Mathematician, seasonality is my favorite part because it deals with Fourier analysis (and wave functions are just… cool!):
Do you remember your first ML course when you heard Linear Regression can fit arbitrary functions, not only lines? So, why not a wave function? We just did it for polynomials and didn’t even feel like it
In general, for any expression f which is a function of a feature or of your DatetimeIndex, you can create a feature column whose ith row is the value of f corresponding to the ith index.
Then linear regression finds the constant coefficient multiplying f that best fits your data. Again, this procedure works in general, not only with Datetime indexes – the trend_squared term above is an example of it.
For seasonality, we use a second statsmodel‘s amazing class: CalendarFourier. It is another statsmodel‘s DeterministicTerm class (i.e., with the in_sample and out_of_sample methods) and instantiates with two parameters, 'frequency' and 'order'.
As a 'frequency', the class expects a string such as ‘D’, ‘W’, ‘M’ for day, week or month, respectively, or any of the quite comprehensive Pandas Datetime offset aliases.
The 'order' is the Fourier expansion order which should be understood as the number of waves you are expecting in your chosen frequency (count the number of ups and downs – one wave would be understood as one up and one down)
CalendarFourier integrates swiftly with DeterministicProcess by including an instance of it in the list of additional_terms.
If we take seasonal=True inside DeterministicProcess, we get a crispier line:
Including ax.set_xlim(('2022-08-01', '2022-10-01')) before plt.show() zooms the graph in:
Although I suggest using the seasonal=True parameter with care, it does find interesting patterns (with huge RMSE error, though).
For instance, look at this BTC percentage change zoomed chart:
Here period is set to 30 and seasonal=True. I also manually rescaled the predictions to be better visible in the graphic. Although the predictions are far away from truth, thinking as a trader, isn’t it impressive how many peaks and hills it gets right? At least for this zoomed month…
To maintain the workflow promise, I prepared a code that does everything so far in one shot:
def deseasonalize(df: pd.Series, season_freq='A', fourier_order=0, constant=True, dp_order=1, dp_drop=True, model=LinearRegression(), fourier=None, dp=None, **DeterministicProcesskwargs)->(pd.Series, plt.Axes, pd.DataFrame): """ Returns a deseasonalized and detrended df, a seasonal plot, and the fitted DeterministicProcess instance. """ if fourier is None: fourier = CalendarFourier(freq=season_freq, order=fourier_order) if dp is None: dp = DeterministicProcess( index=df.index, constant=True, order=dp_order, additional_terms=[fourier], drop=dp_drop, **DeterministicProcesskwargs ) X = dp.in_sample() model = LinearRegression().fit(X, df) y_pred = pd.Series( model.predict(X), index=X.index, name=df.name+'_pred' ) ax = plt.subplot() y.plot(ax=ax, legend=True) predictions.plot(ax=ax) y_pred.columns = df.name y_deseason = df - y_pred y_deseason.name = df.name +'_deseasoned' return y_deseason, ax, dp The sentic_mean analyses get reduced to: y_deseason, ax, dp= deseasonalize(y, season_freq='A', fourier_order=2, constant=True, dp_order=2, dp_drop=True, model=LinearRegression() )
Cycles and Hybrid Models
Let us move on to a complete Machine Learning prediction. We use XGBRegressor and compare its performance among three instances:
Predict sentic_mean directly using lags;
Same prediction adding the seasonal/trending with a DeterministicProcess;
A hybrid model, using LinearRegression to infer and remove seasons/trends, and then apply a XGBRegressor.
The first part will be the bulkier since the other two follow from simple modifications in the resulting code.
Preparing the data
Before any analysis, we split the data in train and test sets. Since we are dealing with time series, this means we set the ‘present date’ as a point in the past and try to predict its respective ‘future’. Here we pick 22 days in the past.
s = dataset['sentic_mean'] s_train = s[:'2022-09-01']
We made this first split in order to not leak data while doing any analysis.
Next, we prepare target and feature sets. Recall our SentiCrypto’s data was set to be available everyday at 8AM. Imagine we are doing the prediction by 9AM.
In this case, anything until the present data (the ‘lag_0‘) can be used as features, and our target is s_train‘s first lead (which we define as a -1 lag). To choose other lags as features, we examine theirs statsmodel’s partial auto-correlation plot:
from statsmodels.graphics.tsaplots import plot_pacf plot_pacf(s_train, lags=20)
We use the first four for sentic_mean and the first seven + the 11th for sentic_count (you can easily test different combinations with the code below.)
Now we finish choosing features, we go back to the full series for engineering. We apply to s_maen and s_count the make_lags function we defined in the last article (which we transcribe here for convenience).
def make_lags(df, n_lags=1, lead_time=1): """ Compute lags of a pandas.Series from lead_time to lead_time + n_lags. Alternatively, a list can be passed as n_lags. Returns a pd.DataFrame whose ith column is either the i+lead_time lag or the ith element of n_lags. """ if isinstance(n_lags,int): lag_list = list(range(lead_time, n_lags+lead_time)) else: lag_list = n_lags lags ={ f'{df.name}_lag_{i}': df.shift(i) for i in lag_list } return pd.concat(lags,axis=1) X = make_lags(s, [0,1,2,3,4]) y = make_lags(s, [-1]) display(X)

y
Now a train-test split with sklearn is convenient (Notice the shuffle=False parameter, that is key for time series):
from sklearn.model_selection import train_test_split X_train, X_test, y_train, y_test = train_test_split(X, y, test_size=22, shuffle=False) X_train
(Observe that the final date is set correctly, in accordance with our analysis’ split.)
You can reduce overfitness by reducing the number of estimators, but the R2 test score maintains negative.
We can replicate the process for sentic_count (or whatever you want). Below is a function to automate it.
from xgboost import XGBRegressor

from sklearn.model_selection import train_test_split

from sklearn.metrics import r2_score

from statsmodels.tsa.stattools import pacf def apply_univariate_prediction(series, test_size, to_predict=1, nlags=20, minimal_pacf=0.1, model=XGBRegressor(n_estimators=50)): ''' Starting from series, breaks it in train and test subsets; chooses which lags to use based on pacf > minimal_pacf; and applies the given sklearn-type model. Returns the resulting features and targets and the trained model. It plots the graph of the training and prediction, together with their r2_score. ''' s = series.iloc[:-test_size] if isinstance(to_predict,int): to_predict = [to_predict] from statsmodels.tsa.stattools import pacf s_pacf = pd.Series(pacf(s, nlags=nlags)) column_list = s_pacf[s_pacf>minimal_pacf].index X = make_lags(series, n_lags=column_list).dropna() y = make_lags(series,n_lags=[-x for x in to_predict]).loc[X.index] X_train, X_test, y_train, y_test = train_test_split(X, y, test_size=test_size, shuffle=False) model.fit(X_train,y_train) predictions_train = pd.DataFrame( model.predict(X_train), index=X_train.index, columns=['Train Predictions'] ) predictions_test = pd.DataFrame( model.predict(X_test), index=X_test.index, columns=['Test Predictions'] ) fig, (ax1,ax2) = plt.subplots(1,2, figsize=(14,5), sharey=True) y_train.plot(ax=ax1, legend=True) predictions_train.plot(ax=ax1) ax1.set_title('Train Predictions') y_test.plot(ax=ax2, legend=True) predictions_test.plot(ax=ax2) ax2.set_title('Test Predictions') plt.show() print(f'R2 train score: {r2_score(y_train[:-1],predictions_train[:-1])}') print(f'R2 test score: {r2_score(y_test[:-1],predictions_test[:-1])}') return X, y, model apply_univariate_prediction(dataset['sentic_count'],22)
Since the features created by DeterministicProcess are only time-dependent, we can add them harmlessly to the feature DataFrame we automated get from our univariate predictions.
The predictions, though, are still univariate. We use the deseasonalize function to obtain the season features. The data preparation is as follows:
s = dataset['sentic_mean'] X, y, _ = apply_univariate_prediction(s,22); s_deseason, _, dp = deseasonalize(s, season_freq='A', fourier_order=2, constant=True, dp_order=2, dp_drop=True, model=LinearRegression() );

X_f = dp.in_sample().shift(-1) X = pd.concat([X,X_f], axis=1, join='inner').dropna()
With a bit of copy and paste, we arrive at:
And we actually perform way worse!
Deseasonalizing
Nevertheless, the right-hand graphic illustrates the inability of grasping trends. Our last shot is a hybrid model.
Here we follow three steps:
We use the LinearRegression to capture the seasons and trends, rendering the series y_s. Then we acquire a deseasonalized target y_ds = y-y_s;
Train an XGBRegressor on y_ds and the lagged features, resulting in deseasonalized predictions y_pred;
Finally, we incorporate y_s back to y_pred to compare the final result.
Although Bitcoin-related data are hard to predict, there was a huge improvement on the r2_score (finally something positive!). We define the used function below.
Instead of going through every detail, we will also automate this code. In order to get the code running smoothly, we revisit the deseasonalize and the apply_univariate_prediction functions in order to remove the plotting part of them.
The final function only plots graphs and returns nothing. It intends to give you a baseline for a hybrid model score. Change the function at will to make it return whatever you need.
def get_season(series: pd.Series, test_size, season_freq='A', fourier_order=0, constant=True, dp_order=1, dp_drop=True, model1=LinearRegression(), fourier=None, is_seasonal=False, season_period=None, dp=None): """ Decompose series in a deseasonalized and a seasonal part. The parameters are relative to the fourier and DeterministicProcess used. Returns y_ds and y_s. """ se = series.iloc[:-test_size] if fourier is None: fourier = CalendarFourier(freq=season_freq, order=fourier_order) if dp is None: dp = DeterministicProcess( index=se.index, constant=True, order=dp_order, additional_terms=[fourier], drop=dp_drop, seasonal=is_seasonal, period=season_period ) X_in = dp.in_sample() X_out = dp.out_of_sample(test_size) model1 = model1.fit(X_in, se) X = pd.concat([X_in,X_out],axis=0) y_s = pd.Series( model1.predict(X), index=X.index, name=series.name+'_pred' ) y_s.name = series.name y_ds = series - y_s y_ds.name = series.name +'_deseasoned' return y_ds, y_s def prepare_data(series, test_size, to_predict=1, nlags=20, minimal_pacf=0.1): ''' Creates a feature dataframe by making lags and a target series by a negative to_predict-shift. Returns X, y. ''' s = series.iloc[:-test_size] if isinstance(to_predict,int): to_predict = [to_predict] from statsmodels.tsa.stattools import pacf s_pacf = pd.Series(pacf(s,nlags=nlags)) column_list = s_pacf[s_pacf>minimal_pacf].index X = make_lags(series, n_lags=column_list).dropna() y = make_lags(series,n_lags=[-x for x in to_predict]).loc[X.index].squeeze() return X, y def get_hybrid_univariate_prediction(series: pd.Series, test_size, season_freq='A', fourier_order=0, constant=True, dp_order=1, dp_drop=True, model1=LinearRegression(), fourier=None, is_seasonal=False, season_period=None, dp=None, to_predict=1, nlags=20, minimal_pacf=0.1, model2=XGBRegressor(n_estimators=50) ): """ Apply the hybrid model method by deseasonalizing/detrending a time series with model1 and investigating the resulting series with model2. It plots the respective graphs and computes r2_scores. """ y_ds, y_s = get_season(series, test_size, season_freq=season_freq, fourier_order=fourier_order, constant=constant, dp_order=dp_order, dp_drop=dp_drop, model1=model1, fourier=fourier, dp=dp, is_seasonal=is_seasonal, season_period=season_period) X, y_ds = prepare_data(y_ds,test_size=test_size) X_train, X_test, y_train, y_test = train_test_split(X, y_ds, test_size=test_size, shuffle=False) y = y_s.squeeze() + y_ds.squeeze() model2 = model2.fit(X_train,y_train) predictions_train = pd.Series( model2.predict(X_train), index=X_train.index, name='Prediction' )+y_s[X_train.index] predictions_test = pd.Series( model2.predict(X_test), index=X_test.index, name='Prediction' )+y_s[X_test.index] fig, (ax1,ax2) = plt.subplots(1,2, figsize=(14,5), sharey=True) y_train_ps = y.loc[y_train.index] y_test_ps = y.loc[y_test.index] y_train_ps.plot(ax=ax1, legend=True) predictions_train.plot(ax=ax1) ax1.set_title('Train Predictions') y_test_ps.plot(ax=ax2, legend=True) predictions_test.plot(ax=ax2) ax2.set_title('Test Predictions') plt.show() print(f'R2 train score: {r2_score(y_train_ps[:-to_predict],predictions_train[:-to_predict])}') print(f'R2 test score: {r2_score(y_test_ps[:-to_predict],predictions_test[:-to_predict])}')
A note of warning: if you do not expect your data to follow time patterns, do focus on cycles! The hybrid model succeeds well for many tasks, but it actually decreases the R2 score of our previous Bitcoin prediction:
This article aims at presenting functions for your time series workflow, specially for lags and deseasonalization. Use them with care, though: apply them to have baseline scores before delving into more sophisticated models.
In future articles we will bring forth multi-step predictions (predict more than one day ahead) and compare performance of different models, both univariate and multivariate.
Posted by: xSicKxBot - 10-03-2022, 07:46 AM - Forum: Lounge
- No Replies
Madden 23 Franchise Glitch: How To Fix Saves And Restore Final Scores
Madden 23's Franchise mode is, for many players, the marquee mode to play every single year, and a Connected Franchise (CFM) can be even more exciting, letting you join a league with up to 31 other players and create your own NFL universe of star rookies, burgeoning dynasties, and heated rivalries. But a particularly annoying and sadly widespread bug is causing issues for Connected Franchise players right now. Oftentimes, final scores aren't saving, and in some cases, the league is even traveling back in time, like moving from the middle of the regular season to suddenly the middle of the preceding NFL Draft.
Suffice it to say this is incredibly frustrating for CFM players, as stats, scores, and other milestones can all be wiped away in an instant due to what seems to be a cloud syncing issue. We've reached out to EA for comment--and hopefully guidance--on how to navigate this issue until a patch resolves it, but in the meantime, one prominent CFM league believes it may have found a temporary solution to the game's Franchise glitch, at least in cases when a game's final score and stats don't seem to have been saved.
Madden 23 Connected Franchise bug fix - First method
For starters, we'll explain what this bug looks like in-game. Imagine you've just finished a game against an opponent in Week 3 of the regular season. When you get back to the Franchise menu, you should see things like the box score and new upgrades for players. Instead, many players are all too commonly finding that their just-played game is sitting there in the menu waiting to be played as though it never has been.
RetroArch is hands down the best retro gaming system emulator out. RA is a software to manage EVERY game for EVERY console/system out.
Here's a quick run down of some big ones I like:
Atari 2600, Atari 5200, Atari 7800, Atari Lynx, Sega Saturn, Sega Master System, Sega Dreamcast/NAOMI, Sony PlayStation, Sony PlayStation 2, Nintendo NES/Famicom, Nintendo SNES/SFC, Nintendo Virtual Boy, Game Boy/Color, Game Boy Advance, Nintendo DS, Nintendo 3DS, Nintendo 64, Nintendo GameCube/Wii, Xbox, DOS, RPG Maker 2000/2003, Commodore Amiga and LOADS more as you can see.
What RA has to offer:
[*]Universal button mapping. You can set your buttons for any RA core, and also save per-game settings and button remaps for the best experience. You can also set up hotkeys for things like save states, loading save states, bringing up the RA menu, fast forward, etc. With this method, you only have to remember hotkeys for one platform instead of different key mapping options across various emulators.
[*]Precise video scaling options. With RetroArch, you can adjust the game image to match your device’s dimensions and resolution, or even apply bezel overlays to customize the layout of your screen. If you have certain preferences for your scaling (perfect pixel accuracy, or stretching out the image to take up the full screen), RA should have what you need.
[*]Shaders and Filters. Shaders apply an overlay to your screen that can mimic scanlines, colorization, or other effects that will recreate CRT monitors, chunky LCD grid displays, and more. Filters behave like shaders for your games, and can alter the screen to provide you a better visual experience. Adding filters to your game image will smooth out pixel distortion for screens that don’t accurately match the original console you are emulating.
[*]Playlists and thumbnails. RetroArch uses “Playlists” to organize the game library, and it will allow you to add box art (“Thumbnails”) to every game as you scroll through, and you can also set favorites, which is very handy.
[*]In-game saves and save states. RetroArch has the ability to save your game with SRAM (in-game) saves like how it was on the original console, and you can also use save states to take a snapshot of any game at any time as well.
[*]Fast forward, rewind support. RetroArch has universal support for fast forward and rewind hotkeys, which will allow you to navigate slow (or perilous) moments in certain games.
[*]Universal cheats. With RetroArch, you can simply add the appropriate cheat files and access all of the cheats from the RA menu.
[*]Achievements. RetroArch supports Retro Achievements, which are super fun.
[*]NetPlay. You can use RetroArch to host or join online gaming sessions for retro games.
[*]Recording and Streaming. You can record your gameplay directly in the app, and even stream it to services like Twitch.
[*]Active development. RetroArch has been around since 2004 and its development team is very active.
Game ROMs and BIOS files
The thing you need most to get this running, are games for the cores, and bios files for certain systems to be able to start up. Not all systems require bios files. Most systems just require the ROM to play. ROM or Read Only memory, or plural ROMs, are the game files. They will hold the games information to start them up. Usually decrypted or dumped straight from the real thing. RetroArch (generally) has the ability to use .zip or .7z files that will compress those ROM files as well. To find which ROM files work best for your desired core, I recommend going to the Libretro Docs page, then navigating the Core Library menu on the left-hand side to find the core you want to use, and then consult the “Extensions” section to see what files are accepted. Here is an example of the Gambatte core section, which will show you the accepted file types for Game Boy and Game Boy Color, plus information on BIOS and other core-specific options.
What you want to accomplish, is building a standardized ROM library. This can be done in a number of ways, but the easiest way to do it would be to make a folder on your computer called “GAMES”. Inside, create subfolders for each of your systems (NES, SNES, GB, GBC, etc.). Then in each of those subfolders, add your ROM files. I recommend sticking with the same file type for each system, like .sfc files for SNES games. File names should be named according to the “No Intro” standard (e.g. “Super Mario Bros. 3 (USA)”).
Additionally, inside your GAMES folder, make a BIOS folder and put the BIOS files inside. BIOS files are necessary system files for certain consoles to run properly. Examples of systems that will not run without BIOS include PlayStation 1, PS2, Game Boy Advance, and Sega CD. Here is more information about BIOS files, including links to specific BIOS requirements for each core. Most work without them though. It is technically illegal to give ROMs or bios files away due to copyright. There tons of public links out there available though. A quick google of "retro arch bios files" shows archive.org has a download link with direct + torrents downloads lol. So they are very common to find.
Bios Link: https://letmegooglethat.com/?q=retro+arch+bios+files
ROM Link: https://letmegooglethat.com/?q=rom+downloads
Here is a list of recommended BIOS files to get you started: SEGA CD: bios_CD_E.bin
bios_CD_J.bin
bios_CD_U.bin FAMICOM DISK SYSTEM: disksys.rom GAME BOY (for boot logo): gb_bios.bin GAME BOY COLOR (for boot logo): gbc_bios.bin GAME BOY ADVANCE: gba_bios.bin NEO GEO: neogeo.zip PLAYSTATION 1: scph1001.bin TURBOGRAFX-CD: syscard1.pce
syscard2.pce
syscard3.pce
How to Install RetroArch:
There are many ways to install RetroArch, depending on the system you using, and whether or not it is pre-installed. You can find LakkaTV, Retro-Pie, EmuELEC, and a few other operating systems that come with retroarch already. RA supports LakkaTV as their own. Retro-Pie would be my next suggestion. Probably more support for LakkaTV, as you can find their discord is highly used.
Devices supported:
Android, iOS, MacOS, Linux, Windows (of course), nvidia shield, steam deck, almost any device as you can see. It's a well developed application with loads of cross-platform capabilities.
I'm going to explain the best way to install to Windows. It's the most universal, widely used among the community, and most others will vouch, this is the way to go about setting up.
Figure out the newest version from here, https://buildbot.libretro.com/
As of writing this it's 1.11.0
Want the 64 bit version, and should be here
We want everything already in the folder, that way it can be transferred anywhere and still work.
Once you install, it does things different. This way it can be on USB, plug into any computer and still plays.
I host my file from a SAMBA share on linux home server, mount the samba share as network location on each computer, and everyone has the same files.
This can cause issues with game saves though. So I'd recommend just configuring your copy, and putting it on each computer if you don't want your saves overwritten. I trust my userbase to not overwrite a good save. And I make backups of the saves.
Note**
If you use Steam on windows to download and not from official site, not all the cores are available. It is a very stripped version. Takes a lot more to get everything working properly.
Note2**
Not all cores are available across all devices. You just can't run a PS2 on a phone yet. Or gamecube via phone. They require too much resources and will lag to all hell. That's why here, we are recommending PC to use. So all core are compatible.
There are 2 kinds of saves, quick save (usually happens in game), core snapshot save (usually done by pressing f2). Most people don't recommend the latter, but it's a good backup to have if someone overwrites the other save or vice versa.
Understanding configurations and saves
Before we get started, it is very important to understand how configuration saves work in RetroArch, because it follows a specific logic. 99% of the time when someone tells me they “screwed up their RetroArch” it’s because they saved a configuration in a way they didn’t expect. So let’s take a minute and explain how this stuff works. CONFIGURATION FILE. Basic configurations are saved in a configuration file called retroarch.cfg. This is where you would save system-wide configurations that would apply to the entire frontend. For example, this file will dictate what menu driver (theme) to display when showing RetroArch, your button mapping preferences, hotkeys, video scaling options, and more. To make adjustments to the configuration file, you need to be using RetroArch without a game loaded, and then you will make your adjustments and go to Main Menu > Configuration File > Save Current Configuration. Consider this your “baseline” configurations. Note that the configuration file can only be saved when a game is NOT loaded. OVERRIDES. If you want to make a specific configuration that applies only to a certain emulator, emulated console, or game, you will want to use overrides. These are basically configuration (.cfg) files that are specific to a game or console. For example, if there is a certain game where you want to use a special hotkey or video scaling option, you would open up that game, make the adjustment in the settings, and then save it as a per-game override. Every other game will function normally, but the next time you boot that specific game, those per-game settings will load.
There are three types of overrides, which follow a specific hierarchy: core overrides, content directory overrides, and game overrides. In order to save an override, you need to launch a game first, and then access the RetroArch Quick Menu (which we will set up in the hotkeys section below), and then go to Quick Menu > Overrides to save the override. CORE OVERRIDES will save your configuration for that entire core. This is good when you have a core that emulates multiple systems and you want to have the same experience across each of those systems. An example of this would be the Gambatte core, which emulates Game Boy and Game Boy Color. If you make a CORE OVERRIDE for Gambatte, all Game Boy and Game Boy Color games will be affected when launching those games with the Gambatte core. CONTENT DIRECTORY OVERRIDES will save your configuration for every game file in that same folder. For example, if you save a content directory override for a Game Boy game, it will affect all Game Boy games, but not Game Boy Color games since those ROM files will (likely) reside in a different folder — even though they use the same core. This feature is helpful when you have disparate systems that are supported by the same core. Another example is the Genesis Plus GX core, which can support Sega Genesis, 32X, Master System, and Game Gear. If you were to make some configuration adjustments that would be beneficial for the Genesis but not the Game Gear, you would want to use a content directory override instead of a core override, that way it would only affect Genesis games. GAME OVERRIDES affect only that one game, and not others. REMAP FILES. If you want to save game-specific controls, then this is done via a REMAP (.rmp) file. To do so, you will need to enter the RetroArch Quick Menu > Controls section, make your changes (likely in the Port 1 Controls subsection), then save a Core / Content Directory / Game Remap file. These three types of remap files follow the same pattern as the overrides above. The hierarchy of these overrides and remap files are as follows:
So by default the settings within retroarch.cfg will be your primary configuration settings, but if you have a core override then those settings will take precedence. But if you also have a content directory (or game) override, that will take precedence over anything else. INDEPENDENT SAVES. Confusingly, there are a couple other options and configurations that work outside of the process above. This is because they are governed by their own configuration files, and not the typical retroarch.cfg or override cfg/rmp files mentioned above.
If you open a game then go into Quick Menu > Options and make adjustments here (which are called “Core Options“), it will affect everything that boots from that core, and you don’t need to manually save it — the settings changes will just save at the core level when you close out the game. Within this Options menu you can also choose to manually save these core options by game or content directory by going into the Manage Core Options section.
If you open a game then go into Quick Menu > Shaders you can save what they call “Shader Presets“, which will apply a specific shader profile. Like with other options, you can specify how they apply, as either GLOBAL (whole system), CORE, CONTENT DIRECTORY, or GAME presets.
Note that some operating systems, like EmuELEC, Batocera, and 351ELEC, use their own frontend (EmulationStation) to synchronize settings with the RetroArch system that functions as a backend. This means that you will go into the EmulationStation frontend menu and make adjustments there, which will then trigger configuration or override file adjustments in RetroArch without having to actually use RetroArch itself. As an added bonus, 351ELEC will actually provide optimized settings custom tailored to the device you are using it on. Alternatively, if you try to go into RetroArch and adjust things yourself, you may find that your saved configurations won’t work, because the EmulationStation settings will override RetroArch. In most cases, stick with the EmulationStation menu to make your changes.
Set your file directory
When you launch RetroArch for the first time, it will create a file structure, which they call “Directories” on your device. Generally this will be the same folder where your RetroArch app is located, or in the root directory of your device (like an Android phone). However, you may want to adjust the file locations manually, so that you can point RetroArch to your own BIOS folder, or to change the location of your save files for easier access.
Go to Settings > Directory and you will see a list of directory paths. Here you can configure them to your needs. Some adjustments worth considering:
System/BIOS: You can either go into the default RetroArch directory on your device and find the “system” folder to add all your BIOS files, or you can just change the BIOS location to point to wherever your BIOS are already saved. Go in here and navigate to your BIOS folder, then select “Use This Directory”.
File Browser: You can adjust this to the main GAMES folder you have on your device, so that way you don’t have to navigate to that folder every time you want to add a new system to your Playlists. This will save you time in the long run.
Cheat Files: If you manually install cheat files like in my section below, this option will allow you to set a new default cheat file location. If you were able to install cheats via the Update Cheats function described in the next section, you won’t need to do anything.
Screenshots: Here you can adjust the screenshots location to the folder of your choice.
Save Files: For easier access, you can change the location of your save files on your device. If you are running RetroArch on your PC, you could theoretically point this section to a cloud-based folder (like a Dropbox or Google Drive folder) and create a cloud-based save system that would work across multiple devices.
Save States: This works like the Save Files section above, but with Save States. The same process applies here.
You could offload even more of your directories to custom folders as well, so that they were located somewhere independent of the default RetroArch folders. This is beneficial if you want to update RetroArch in the future while preserving your current setup. See the Updating RetroArch section below for more information.
After you have made your adjustments, be sure to go to Main Menu > Configuration File > Save Current Configuration. Update RetroArch assets, cores, and more
Now that we have built our file structure and know how to save configurations, let’s go in and start updating RetroArch. The core system you installed may not have all of its functions included, so you will want to load them yourself. Note that you will need to be connected to the Internet for this section to work. To do so, go to Main Menu > Online Updater and run some of the updater functions available. I recommend the following:
Update Core Info Files
Update Assets
Update Controller Profiles
Update Cheats
Update Databases
Update Shaders
Note that some versions of RetroArch may not have these options, which is done by design. Don’t sweat it.
Additionally you will want to go into Online Updater > Core Downloader and download the cores you want to run on your system. You can download as many or few as you would like. I would recommend fully downloading one core before starting the download for the next core, because it can mess up your downloads to queue them all up at once. Periodically, you can also go in and select Update Installed Cores to see if there have been any updates to the cores since you first downloaded them. My preferred RetroArch cores for popular systems:
Arcade (FB Alpha 2012) -- for low-end devices
Arcade (FinalBurn Neo) -- fighting games and beat'em ups
Arcade (MAME 2003-Plus) -- all-around arcade emulation
Commodore Amiga (PUAE)
DOS (DosBox-Pure)
NEC PCE/TG-16/PCE-CD/TG-CD (Beetle PCE)
Nintendo GB/GBC (Gambatte)
Nintendo GBA (gpSP or mGBA)
Nintendo Virtual Boy (Beetle VB)
Nintendo DS (melonDS)
Nintendo NES (Nestopia or fceumm)
Nintendo SNES (Snes9x Current)
Nintendo 64 (ParaLLEl or Mupen64Plus)
Nintendo GameCube/Wii (Dolphin)
ScummVM -- point-and-click PC games
Sega Master System/Genesis/CD (Genesis Plus GX)
Sega 32x (PicoDrive)
Sega Saturn (YabaSanshiro or Beetle Saturn)
Sega Dreamcast (Flycast)
SNK Neo Geo (FinalBurn Neo)
Sony PlayStation (DuckStation, SwanStation, or PCSX ReARMed)
Sony PlayStation 2 (PCSX2)
Sony Playstation Portable (PPSSPP) GLUI menu driver OZONE menu driver RGUI menu driver XMB menu driver
The default menu drivers: glui, ozone, rgui, and xmb. Adjust the user interface
Once you have an understanding of how to save configurations, and we have the most updated assets, let’s start actually adjusting RetroArch. We’ll start with the user interface, which is called a “menu driver” in RetroArch.
When starting up the system, you will likely be greeted with a black and white interface called “glui”. It’s okay, but I find that it can be confusing to navigate. Instead, I prefer to use an older interface called “xmb”, modeled after the original PlayStation 3 cross-menu bar. I prefer this menu because it makes the submenus more logical and visual to me, so that is what I will use in my video guides.
To change the User Interface, go to Settings > User Interface > Menu and adjust it to one of the other menus. Then go to Configuration File > Save Current Configuration to save your changes. After you exit and re-open RetroArch, you will have the new menu.
You can also adjust the menu appearance to fit your preferences. To do so, go to Settings > User Interface > Appearance and adjust the settings here. You can adjust the Menu Scale Factor to increase or decrease the menu font, adjust the menu icons, or change the background color, and more.
Finally, you can adjust the menu items that are displayed on your interface, to clean it up a bit. Go to Settings > User Interface > Menu Item Visibility and toggle off the menus you don’t want to see. In general, these are the menu items I turn off by default:
Show ‘Explore’ > OFF
Show ‘Favorites’ > OFF
Show ‘Images’ > OFF
Show ‘Music’ > OFF
Show ‘Netplay’ > OFF
After you have made your adjustments, be sure to go to Main Menu > Configuration File > Save Current Configuration. Button mapping and hotkeys
Button mapping is likely the next thing you want to do. This will align your controller’s controls with the RetroArch universal button mapping. If you are using an x-input controller (like an Xbox controller) the buttons will likely be automatically mapped, and if you are using a handheld device that has a RetroArch backend already baked in (like ArkOS, EmuELEC, or 351ELEC), then you likely don’t have to map the controls. But some bluetooth or wired controllers may behave unexpectedly, so let’s adjust the button mapping.
To configure your controls, open RetroArch and go to Settings > Input > Port 1 Controls > Set All Controls and follow the prompts.
After you are done setting up the controls, you will want to decide which buttons you want to use for OK and Cancel buttons. If you don’t like how they are configured by default, you can go into Settings > Input > Menu Controls and swap the buttons.
Once you have mapped your controls, be sure to go to RetroArch Main Menu > Configuration File > Save Current Configuration. Note that you can make core or game specific button mapping by using overrides, if you want to have a special setup for a particular game or core. Additionally, in the Input setting there is an option to create and save Controller Profiles, which you could use for multiple controllers (for example, if you wanted to use a specific controller for SNES gameplay, you could map the controls to that one controller and then choose that profile for SNES gameplay). HOTKEYS are simple button combinations that will allow you to make certain adjustments while in games and RetroArch. You will want to set these up next.
Open RetroArch and then go to Settings > Input > Hotkeys. Here you will see a number of hotkey options.
Here are a couple options that are fundamental to the hotkey experience: Confirm Quit: with this ON, you will have to press the Quit RetroArch hotkey twice to actually exit. This can be good to avoid accidental button presses, but can get annoying over time. I leave this one OFF. Menu Toggle Controller Combo: this option will pause your game and bring up the RetroArch Quick Menu. This can be a specific key combination that works independently of any other hotkey setup. For this one I choose Hold Start (2 Seconds). This means if I hold the START button for two seconds, the RetroArch Quick Menu will appear. Hotkey Enable: this will be your primary hotkey button. Every hotkey you choose in the options below it will need to be used in combination with your hotkey enable button. For this I usually choose the SELECT button. This means that SELECT + whatever other hotkey I choose will be my button combo to activate a hotkey shortcut.
There are several hotkeys I recommend you set while you’re in these settings. Here are some of my preferred hotkeys:
Hotkey Enable: SELECT button
Fast-Forward (Toggle): R2 button
Rewind: L2 button *
Load State: L1 button
Save state: R1 button
Show FPS (Toggle): Y button
Pause (Toggle): A button **
Reset Game: B button
Close Content (or Quit RetroArch): START button ***
Menu (Toggle): X button
Volume Up: Left d-pad
Volume Down: Right d-pad
Run-Ahead (Toggle): Up d-pad
* For the Rewind function to work, you will need to go into Settings > Frame Throttle > Rewind > ON. This is not something I would recommend turning on as a global configuration, because some systems (like Saturn or PS1) will be very slow with it on, and some (like PSP) may outright crash. Instead, I recommend setting the hotkey now, then for the systems you want to use rewind (like NES, for example), you can go into the Quick Menu by pressing SELECT + X and then go turn Rewind on and save it as a core override. More information is in the section below. ** A bug in some versions of RetroArch (like the Android build) occurs when mapping the A button as a hotkey using controllers that don’t have an embedded controller profile. This will break the use of the A button within the menu. So in some cases you may not want to map the A button to a hotkey at all.
*** Note that your SELECT + START hotkey should be set to either “Close Content” or “Quit RetroArch”, but this will depend on your use case. If you plan on using RetroArch as your frontend, then you will want to Close Content to return to the RetroArch menu. If you are using a different frontend, like EmulationStation or LaunchBox, you will want to set it to Quit RetroArch so that when using this hotkey it will return you to the frontend instead.
After you’ve made all of your configurations, go to the RetroArch Main Menu > Configuration File > Save Current Configuration. Optional features
An option I like to set with my games is AUTO SAVE / AUTO LOAD. This will create a save state when you close down a game, and then load that save state when you launch the game again. It provides a pick-up-and-play feel to your retro gaming. To set this, use the following two commands:
Settings > Saving > Auto Save State > ON
Settings > Saving > Load State Automatically > ON
The auto save/load feature works best when combine with the “Reset Game” hotkey above, so that way if your game loads at a part you don’t want, you can press SELECT + B to reboot the game and start over.
The REWIND feature in RetroArch is helpful when you want to re-do a mistake on the fly. And while we set it as the SELECT + L2 hotkey above, by default this feature should be turned OFF in RetroArch, and then enabled only for certain systems. That’s because this feature has a somewhat high performance tax which can negatively affect performance on systems like PS1 and above. Instead, you will want to use a core override to save this setting. First, start up a game (like an NES game), and then press SELECT + X to bring up the Quick Menu, then navigate to the Rewind section within the Quick Menu. Now select Rewind Support > ON. Now you can go to Quick Menu > Overrides > Save Core Overrides, which will enable rewind support on all NES games running that emulator core.
There is also a RUN AHEAD feature which will reduce latency on certain setups. For example, this may be beneficial when using the Android-based version of RetroArch and a bluetooth controller, to give a more natural feel to retro gaming. Like with the rewind feature, this has a performance tax and should only be used on systems that would benefit from it (like SNES and below). For this reason we’ll use a core override again. First, start up a game (like an NES game), and then press SELECT + X to bring up the Quick Menu, then navigate to the Latency section within the Quick Menu. Now select Run-Ahead to Reduce Latency > ON. Now you can go to Quick Menu > Overrides > Save Core Overrides, which will enable run ahead support on all NES games running that emulator core. Note that this is one of many advanced features to improve latency; here is more information.
Finally, on many versions of RetroArch (specifically those with touchscreen capability, like Android), they may have a TOUCHSCREEN BUTTON OVERLAY on your screen when starting up a game. If you have a controller you likely do not want to see this overlay. To turn it off, go to Settings > On-Screen Display > On-Screen Overlay > Display Overlay > Hide Overlay When Controller is Connected > ON. Create playlists
You can set up playlists within RetroArch to browse and launch your games directly in the program. This will be helpful if you just want to remain within RetroArch to launch your games. There are two methods for creating playlists in RetroArch: SCAN DIRECTORY. This is the most straightforward way to make playlists, and is best for systems with unzipped ROMs that have distinct file types (like .nes games). With this option, you will navigate to the folder that contains your ROM files, then select “Scan this Directory”. RetroArch will then recognize and scan the directory for games, and assign the console and assets to that system. You should then see it in your playlist. When you have a more common file type for your games (like .bin files for Genesis games, it’s better to do a Manual Scan). MANUAL SCAN. This is the preferred way to scan your directories because it gives you more control. Here is the breakdown: Content Directory: navigate to your ROM folder and select “Scan this Directory”
System Name: select the system name you want to associate with your playlist
Custom System Name: use this if you want to use a special name for this playlist. Note that you will also need to set your “System Name” to “Custom” for this to work
Default Core: select the core you want to associate with this play list. Afterwards you can assign a different core to specific games by selecting the game and choose “Set Core Association”
File Extensions: add in all of the file extensions you want to scan for your console. You can leave this blank if they are all the same (e.g. zip files for arcade games), but for the most part it’s helpful to add these in, especially if you are using several file types. Separate each file extension with a space (no comma), like this for Dremcast: cdi, gdi, chd
Scan Recursively: turn this on if you want to scan subfolders too
Scan Inside Archives: this will scan the files within the zip file, whether you want this on will depend on the system you are scanning. You will want this off if scanning arcade games
Arcade DAT File: this is important if you are scanning arcade games, because it will associate your zip file (“simps2pj”) with a full file name (The Simpsons). To set this up, head to this page and download the latest MAME dat/xml file. Then save this file somewhere that you can access on your device, and choose it when at this part of the menu
Arcade DAT Filter: with this selected, only arcade games that appear in the DAT file will show up in your playlist. Generally you want this setting OFF
Overwrite Existing Playlist: this will overwrite anything already in the playlist. You generally want this OFF if you are just adding new games to your playlist
If you want thumbnails to appear next to your games, you need two things: 1) the files must be named according to the “No Intro” standard (e.g. “Super Mario Bros. 3 (USA)”) and 2) go into Online Updater > On-Demand Thumbnail Downloads > ON so that they will download when you browse through your playlist. Alternatively, you can manually scan each playlist for thumbnails in the Online Updater section instead.
Finally, you can go into Settings > Playlists and adjust how your playlists behave. There is also a Manage Playlists section within here that will allow you to adjust things like the default core, how the thumbnails appear, or just delete the playlist altogether. Scaling and video options
One of the biggest advantages of using RetroArch is that you can use universal and streamlined video options. So let’s take some time to go over the basics here. ASPECT RATIO
Let’s first define aspect ratio. A square screen aspect ratio would be defined as 1:1 (or 1.0), and very few game systems ran at this aspect ratio (Watara Supervision). At the other end of the spectrum, a standard widescreen TV aspect ratio would be 16:9, or 1.76,
Most classic home consoles had an aspect ratio of 4:3 to match CRT TVs. Handheld systems had varying aspect ratios, due to having a variety of screens. Arcade system aspect ratios are also all over the place, because each cabinet was different. Some other notes:
Aspect ratios for some systems are not set in stone. Atari 2600 games didn’t technically have pixels, so they are at a different standard. Similarly, more modern consoles like the PS2 had widescreen options and variable resolutions.
The NES had a resolution of 256×240, but only showed 256×224 on NSTC screens (which were limited to 224 vertical pixels); the 256×240 resolution can still be displayed on emulators. So while the NTSC TV showed an aspect ratio of 4:3 (1.33), most emulators show NES at 16:15 (1.07), and likely look best at a 4:3 anyway.
Some games actually had different native resolutions on the same system. Most NTSC SNES games had a native resolution of 256×224 pixels, while Star Fox had 224×190, and Yoshi’s Island had 256×208. So for the chart below I stuck with the general NTSC aspect ratios.
PAL TVs output a 240-pixel height, so PAL ROMs may have different resolutions than shown below. PAL ROMs on Nintendo GameCube have a resolution of 768×576.
Some systems introduced scaling for certain games. For example, the PS1 mostly played games at a resolution of 320×240, but some scenes could scale up to 640×480. N64 games could scale from 320×240 up to 640×480 as well.
Common aspect ratios for handheld and home console systems (click to enlarge) So why is aspect ratio important? Because if you plan on playing RetroArch on a modern TV or monitor (which likely has a 16:9 aspect ratio), emulated systems at their native aspect ratio will have black bars on the left and right sides. If you want to preserve the native aspect ratio then it’s all good, but if you want to stretch out the display to take up more space on your TV, then you will need to adjust scaling options.
You can adjust the aspect ratio by going into Settings > Video > Scaling > Aspect Ratio and adjusting your global configuration. I would recommend “Core Provided” since that will allow each emulator core to decide the appropriate aspect ratio. If you want to stretch the aspect ratio to fit your screen no matter what, you would want to select your screen’s ratio (like 16:9). Just beware that the emulation police will likely come for you if you don’t use the proper aspect ratio.
After you have made your adjustment, go to Main Menu > Configuration File > Save Current Configuration. You could also use the Overrides function to make core-specific or game-specific configurations. INTEGER SCALING
Because many handheld systems had a much lower pixel density than the resolution of your TV, monitor, or phone, some of these systems will benefit from integer scaling. Integer scaling is defined as scaling by a factor of a whole number (2x, 3x, etc), as opposed to non-integer scaling (1.5x, etc). When turned on, RetroArch will scale up to the greatest integer scale below your device’s resolution. So for Nintendo 64 games, which have a native resolution of 640×480, it will scale up to 2x, or 1240×960, with black borders on all sides. This will keep a 1:1 pixel ratio and everything will look nice and crisp, so long as you don’t mind the black bars around the image.
If you don’t turn on integer scaling, the image will scale to match your device’s display (while preserving aspect ratio) to fill out as much of the screen as possible, but this may result in pixel distortion which can make some pixels look distorted on your display. You may not notice the difference, which is totally fine. You can also use shaders or filters to re-balance the image, as you’ll see in the section below.
To turn on integer scaling, go to Settings > Video > Scaling > Integer Scaling and make your adjustment. Like with everything else, you will need to save your configuration file, and you could also use overrides to make per-core or per-game settings, too. 1) Special 1 colorization with bevel shader 2) Special 1 colorization with lcd3x shader 3) GB-DMG colorization with bevel shader 4) no colorization with gameboy shader 5) no colorization with gb-palette-dmg shader 6) no colorization with sameboy-dmg-response-time shader
Game Boy colorization and shader combo examples Shaders and filters
You can add Shaders to your game image to recreate classic looks (like scanlines to mimic CRT displays) or LCD grids, and more. They are stackable and adjustable, giving you a lot of freedom in their implementation. For more information on shaders, check out this page from RetroArch. Shaders can become very complex, so we will stick with just the basics here.
To find shaders, start a game then enter the Quick Menu > Shaders > Video Shaders > ON, then navigate to the Load menu. You will likely have the choice of glsl or slang shaders; slang shaders are newer but may not be compatible with your device. You can experiment with the two to find which set you prefer. Within each shader folder will be subfolders that contain shader collections. Some of the best places to start looking are the handheld folder (for handheld systems) or the interpolation folder. Once you have found shaders you like, you can save them as global, core-based, or game-based presets within the Shaders folder. Filters behave a lot like shaders but are more CPU intensive, although sometimes they can create a more accurate effect than shaders alone. You can find the filters section in Settings > Video > Video Filter. The Normal 2x and 4x shaders are effective in balancing pixels when not using integer scaling. This will give you the best “clean” screen option but will have some CPU tax, so I do not recommend using them on lower-end consoles like RK3326 handheld devices (Abernic RG351 series, PowKiddy RGB10, etc.). Another set of filters that work really well with NES and SNES games are the Blargg filters, which recreate the experience of using an older television set. Once you have found a filter you like, you can save the configuration file for a global setting, or use overrides for core-specific or game-specific settings. Note that the way you save shaders versus filters is different. Shaders are saved by their own presets within the Shaders setting menu, while Filters are saved via overrides or the global configuration file (Save Current Configuration). Core options
The last settings worth messing with are core options. You can find these by starting up a game, entering the Quick Menu > Options section, and seeing what core options are available. For example, on higher-end systems like N64 or PSP, within the core options you can find the ability to upscale the resolution from 480p to 720p or 1080p, or higher. Each core options section will be unique to that core, so go in there and see what options you have. If you have any questions about any of these settings, I recommend consulting the LibRetro Docs page and browsing their Core Library to see what options are available and what they do. SGB 1A SGB 2A SGB 3A
Sample SGB (Super Game Boy) colorization: 1A, 2A, and 3A
An easy example of core options would be to adjust colorization options for Game Boy within the Gambatte core, demonstrated above.
Open a Game Boy game in RetroArch
Bring up the RetroArch Quick Menu, then go to Options > GB Colorization > Internal. Next, go to Internal Palette > Special 1. This will produce a night light green colorization. For colorization that is more in line with the original DMG display, set it to Options > GB Colorization > DMG. Experiment to find what you like best! Above you can see three Super Game Boy colorization options.
To set it as default for that game or for all Game Boy games no further configuration is necessary. Core options will automatically save when you close the game out. To save it for a specific game, go to Options > Manage Core Options > Save Game Options.
Another core options adjustment you could make in Gambatte is LCD ghosting, which will recreate the original blur effect on the Game Boy.
Go to Quick Menu > Options > Interframe Blending. There you will see two LCD ghosting effects:
LCD Ghosting (Accurate)
LCD Ghosting (Fast)
To set it as default, go to Overrides > Save Content Directory Overrides.
image courtesy of Libretro
Finally, in addition to ghosting and GB colorization, the Gambatte RetroArch core also provides an accurate color correction for Game Boy Color games, as you can see above. This setting is found in Quick Menu > Options > Color Correction Mode > Accurate. You can also adjust the “frontlight position” options within Color Correction Mode to tone down any harsh contrast in your current configuration. Retro Achievements website RetroAchievements
One neat feature that is available within RetroArch is a service called RetroAchievements. These function as you would expect — as you complete a milestone in a retro game, you will get an achievement pop-up celebrating that accomplishment. Moreover, you can track your achievements from within RetroArch or on the RetroAchievements website. And if you want to go all the way down the rabbit hole, you could compete with friends or join the community to participate in discussions or contribute to creating or refining achievements in the future. Note the you must be connected to the internet for RetroAchievements to work.
To get started, go to RetroAchievements.org and register for a free account. Then in RetroArch, go to Settings > Achievements > ON and enter your username and password. Finally, to save this setting, go to Main Menu > Configuration File > Save Current Configuration. The same account can be used on multiple versions of RetroArch spread across various platforms.
If you’d like to add me as a friend or track my (abysmal) progress on retro games, here is my profile. Cheats
RetroArch has an embedded universal cheat system, which can be used in a pinch or for the duration of your game.
To set these up, you must first go into Main Menu > Online Updater > Update Cheats. This will download the cht database and install everything automatically.
If you do not have internet access on your device, or if you use an operating system that doesn’t enable the cheats downloader function, you can still load cheats offline. This only needs to be done one time.
First, go to this GitHub page and click on the green “Code” button, and select Download Zip. Download that file, and unzip it. Inside you’ll find a folder named “cht”, and within that, a bunch of game system folders. Grab the game system folders for the systems that you want to enable cheats for, and place those folders somewhere handy, like in a “Cheats” folder within the GAMES folder where your ROMs reside.
Open up RetroArch then navigate to Settings > Directory > Cheat File, and then navigate to the Cheats folder, then select



 Question: Given a Boolean value
  Recommended Tutorial:
  This is because all Python objects are “truthy”, i.e., they have an associated Boolean value. As a rule of thumb: empty values return Boolean



 As a rule of thumb, the order should be one plus the total number of (trending) hills + peaks in the graph, but not much more than that.


![[Image: 8Pi3uJi.png]](https://i.imgur.com/8Pi3uJi.png)
![[Image: screen-shot-2022-02-25-at-7.40.53-pm.png?w=778]](https://retrogamecorps.files.wordpress.com/2022/02/screen-shot-2022-02-25-at-7.40.53-pm.png?w=778)
![[Image: screenshot_20220227-104921.png?w=720]](https://retrogamecorps.files.wordpress.com/2022/02/screenshot_20220227-104921.png?w=720)
![[Image: screenshot_20220226-092631.png?w=640]](https://retrogamecorps.files.wordpress.com/2022/02/screenshot_20220226-092631.png?w=640) GLUI menu driver
GLUI menu driver![[Image: screenshot_20220226-092700.png?w=640]](https://retrogamecorps.files.wordpress.com/2022/02/screenshot_20220226-092700.png?w=640) OZONE menu driver
OZONE menu driver![[Image: screenshot_20220226-092731.png?w=640]](https://retrogamecorps.files.wordpress.com/2022/02/screenshot_20220226-092731.png?w=640) RGUI menu driver
RGUI menu driver![[Image: screenshot_20220226-092536.png?w=640]](https://retrogamecorps.files.wordpress.com/2022/02/screenshot_20220226-092536.png?w=640) XMB menu driver
XMB menu driver![[Image: aspect.008.png?w=1024]](https://retrogamecorps.files.wordpress.com/2022/02/aspect.008.png?w=1024)
![[Image: screenshot_20220227-104951.png?w=720]](https://retrogamecorps.files.wordpress.com/2022/02/screenshot_20220227-104951.png?w=720)
![[Image: screenshot_20220227-105042.png?w=720]](https://retrogamecorps.files.wordpress.com/2022/02/screenshot_20220227-105042.png?w=720)
![[Image: screenshot_20220227-110323.png?w=1024]](https://retrogamecorps.files.wordpress.com/2022/02/screenshot_20220227-110323.png?w=1024)
![[Image: aspect.001.png]](https://retrogamecorps.files.wordpress.com/2022/02/aspect.001.png)
![[Image: aspect.002.png]](https://retrogamecorps.files.wordpress.com/2022/02/aspect.002.png)
![[Image: bevel-adventure-island-usa-210125-123644.png?w=320]](https://retrogamecorps.files.wordpress.com/2021/01/bevel-adventure-island-usa-210125-123644.png?w=320) 1) Special 1 colorization with bevel shader
1) Special 1 colorization with bevel shader![[Image: lcd3x-adventure-island-usa-210125-123530.png?w=320]](https://retrogamecorps.files.wordpress.com/2021/01/lcd3x-adventure-island-usa-210125-123530.png?w=320) 2) Special 1 colorization with lcd3x shader
2) Special 1 colorization with lcd3x shader![[Image: sameboy-dmg-response-time-adventure-isla....png?w=320]](https://retrogamecorps.files.wordpress.com/2021/01/sameboy-dmg-response-time-adventure-island-usa-210125-124101.png?w=320) 3) GB-DMG colorization with bevel shader
3) GB-DMG colorization with bevel shader![[Image: gameboy-adventure-island-usa-210125-123819.png?w=320]](https://retrogamecorps.files.wordpress.com/2021/01/gameboy-adventure-island-usa-210125-123819.png?w=320) 4) no colorization with gameboy shader
4) no colorization with gameboy shader![[Image: gb-palette-dmg-adventure-island-usa-2101....png?w=320]](https://retrogamecorps.files.wordpress.com/2021/01/gb-palette-dmg-adventure-island-usa-210125-123918.png?w=320) 5) no colorization with gb-palette-dmg shader
5) no colorization with gb-palette-dmg shader![[Image: bevel-dmg-adventure-island-usa-210125-13....png?w=320]](https://retrogamecorps.files.wordpress.com/2021/01/bevel-dmg-adventure-island-usa-210125-130028-1.png?w=320) 6) no colorization with sameboy-dmg-response-time shader
6) no colorization with sameboy-dmg-response-time shader![[Image: sgb-1a-adventure-island-usa-210125-130633.png?w=320]](https://retrogamecorps.files.wordpress.com/2021/01/sgb-1a-adventure-island-usa-210125-130633.png?w=320) SGB 1A
SGB 1A![[Image: sgb-2a-adventure-island-usa-210125-130716.png?w=320]](https://retrogamecorps.files.wordpress.com/2021/01/sgb-2a-adventure-island-usa-210125-130716.png?w=320) SGB 2A
SGB 2A![[Image: sgb-3aadventure-island-usa-210125-130734.png?w=320]](https://retrogamecorps.files.wordpress.com/2021/01/sgb-3aadventure-island-usa-210125-130734.png?w=320) SGB 3A
SGB 3A![[Image: colour_correction-768x984-1.png?w=768]](https://retrogamecorps.files.wordpress.com/2021/01/colour_correction-768x984-1.png?w=768) image courtesy of
image courtesy of ![[Image: screen-shot-2022-02-27-at-10.51.45-am.png?w=1024]](https://retrogamecorps.files.wordpress.com/2022/02/screen-shot-2022-02-27-at-10.51.45-am.png?w=1024) Retro Achievements website
Retro Achievements website![[Image: screenshot_20220227-105243.png?w=720]](https://retrogamecorps.files.wordpress.com/2022/02/screenshot_20220227-105243.png?w=720)

Share this page