Why have regular expressions survived seven decades of technological disruption? Because coders who understand regular expressions have a massive advantage when working with textual data. They can write in a single line of code what takes others dozens!
This article is all about the re.fullmatch(pattern, string) method of Python’s re library. There are three similar methods to help you use regular expressions:
The findall(pattern, string) method returns a list of string matches. Check out our blog tutorial.
The search(pattern, string) method returns a match object of the first match. Check out our blog tutorial.
The match(pattern, string) method returns a match object if the regex matches at the beginning of the string. Check out our blog tutorial.
So how does the re.fullmatch() method work? Let’s study the specification.
How Does re.fullmatch() Work in Python?
The re.fullmatch(pattern, string) method returns a match object if the pattern matches the whole string.
Specification:
re.fullmatch(pattern, string, flags=0)
The re.fullmatch() method has up to three arguments.
pattern: the regular expression pattern that you want to match.
string: the string which you want to search for the pattern.
The re.fullmatch() method returns a match object. You may ask (and rightly so):
What’s a Match Object?
If a regular expression matches a part of your string, there’s a lot of useful information that comes with it: what’s the exact position of the match? Which regex groups were matched—and where?
The match object is a simple wrapper for this information. Some regex methods of the re package in Python—such as fullmatch()—automatically create a match object upon the first pattern match.
At this point, you don’t need to explore the match object in detail. Just know that we can access the start and end positions of the match in the string by calling the methods m.start() and m.end() on the match object m:
In the first line, you create a match object m by using the re.fullmatch() method. The pattern ‘h…o’ matches in the string ‘hello’ at start position 0 and end position 5. But note that as the fullmatch() method always attempts to match the whole string, the m.start() method will always return zero.
Now, you know the purpose of the match object in Python. Let’s check out a few examples of re.fullmatch()!
A Guided Example for re.fullmatch()
First, you import the re module and create the text string to be searched for the regex patterns:
>>> import re

>>> text = '''

Call me Ishmael. Some years ago--never mind how long precisely

--having little or no money in my purse, and nothing particular

to interest me on shore, I thought I would sail about a little

and see the watery part of the world. '''
Let’s say you want to match the full text with this regular expression:
>>> re.fullmatch('Call(.|\n)*', text)

>>>
The first argument is the pattern to be found: 'Call(.|\n)*'. The second argument is the text to be analyzed. You stored the multi-line string in the variable text—so you take this as the second argument. The third argument flags of the fullmatch() method is optional and we skip it in the code.
There’s no output! This means that the re.fullmatch() method did not return a match object. Why? Because at the beginning of the string, there’s no match for the ‘Call’ part of the regex. The regex starts with an empty line!
So how can we fix this? Simple, by matching a new line character ‘\n’ at the beginning of the string.
>>> re.fullmatch('\nCall(.|\n)*', text)

<re.Match object; span=(0, 229), match='\nCall me Ishmael. Some years ago--never mind how>
The regex (.|\n)* matches an arbitrary number of characters (new line characters or not) after the prefix ‘\nCall’. This matches the whole text so the result is a match object. Note that there are 229 matching positions so the string included in resulting match object is only the prefix of the whole matching string. This fact is often overlooked by beginner coders.
What’s the Difference Between re.fullmatch() and re.match()?
The methods re.fullmatch() and re.match(pattern, string) both return a match object. Both attempt to match at the beginning of the string. The only difference is that re.fullmatch() also attempts to match the end of the string as well: it wants to match the whole string!
You can see this difference in the following code:
>>> text = 'More with less'

>>> re.match('More', text)

<re.Match object; span=(0, 4), match='More'>

>>> re.fullmatch('More', text)

>>>
The re.match(‘More’, text) method matches the string ‘More’ at the beginning of the string ‘More with less’. But the re.fullmatch(‘More’, text) method does not match the whole text. Therefore, it returns the None object—nothing is printed to your shell!
What’s the Difference Between re.fullmatch() and re.findall()?
There are two differences between the re.fullmatch(pattern, string) and re.findall(pattern, string) methods:
re.fullmatch(pattern, string) returns a match object while re.findall(pattern, string) returns a list of matching strings.
re.fullmatch(pattern, string) can only match the whole string, while re.findall(pattern, string) can return multiple matches in the string.
Both can be seen in the following example:
>>> text = 'the 42th truth is 42'

>>> re.fullmatch('.*?42', text)

<re.Match object; span=(0, 20), match='the 42th truth is 42'>

>>> re.findall('.*?42', text)

['the 42', 'th truth is 42']
Note that the regex .*? matches an arbitrary number of characters but it attempts to consume as few characters as possible. This is called “non-greedy” match (the *? operator). The fullmatch() method only returns a match object that matches the whole string. The findall() method returns a list of all occurrences. As the match is non-greedy, it finds two such matches.
What’s the Difference Between re.fullmatch() and re.search()?
The methods re.fullmatch() and re.search(pattern, string) both return a match object. However, re.fullmatch() attempts to match the whole string while re.search() matches anywhere in the string.
You can see this difference in the following code:
>>> text = 'Finxter is fun!'

>>> re.search('Finxter', text)

<re.Match object; span=(0, 7), match='Finxter'>

>>> re.fullmatch('Finxter', text)

>>>
The re.search() method retrieves the match of the ‘Finxter’ substring as a match object. But the re.fullmatch() method has no return value because the substring ‘Finxter’ does not match the whole string ‘Finxter is fun!’.
How to Use the Optional Flag Argument?
As you’ve seen in the specification, the fullmatch() method comes with an optional third ‘flag’ argument:
re.fullmatch(pattern, string, flags=0)
What’s the purpose of the flags argument?
Flags allow you to control the regular expression engine. Because regular expressions are so powerful, they are a useful way of switching on and off certain features (for example, whether to ignore capitalization when matching your regex).
Syntax
Meaning
re.ASCII
If you don’t use this flag, the special Python regex symbols w, W, b, B, d, D, s and S will match Unicode characters. If you use this flag, those special symbols will match only ASCII characters — as the name suggests.
re.A
Same as re.ASCII
re.DEBUG
If you use this flag, Python will print some useful information to the shell that helps you debugging your regex.
re.IGNORECASE
If you use this flag, the regex engine will perform case-insensitive matching. So if you’re searching for [A-Z], it will also match [a-z].
re.I
Same as re.IGNORECASE
re.LOCALE
Don’t use this flag — ever. It’s depreciated—the idea was to perform case-insensitive matching depending on your current locale. But it isn’t reliable.
re.L
Same as re.LOCALE
re.MULTILINE
This flag switches on the following feature: the start-of-the-string regex ‘^’ matches at the beginning of each line (rather than only at the beginning of the string). The same holds for the end-of-the-string regex ‘$’ that now matches also at the end of each line in a multi-line string.
re.M
Same as re.MULTILINE
re.DOTALL
Without using this flag, the dot regex ‘.’ matches all characters except the newline character ‘n’. Switch on this flag to really match all characters including the newline character.
re.S
Same as re.DOTALL
re.VERBOSE
To improve the readability of complicated regular expressions, you may want to allow comments and (multi-line) formatting of the regex itself. This is possible with this flag: all whitespace characters and lines that start with the character ‘#’ are ignored in the regex.
re.X
Same as re.VERBOSE
Here’s how you’d use it in a practical example:
>>> text = 'Python is great!'

>>> re.search('PYTHON', text, flags=re.IGNORECASE)

<re.Match object; span=(0, 6), match='Python'>
Although your regex ‘PYTHON’ is all-caps, we ignore the capitalization by using the flag re.IGNORECASE.
Where to Go From Here?
This article has introduced the re.fullmatch(pattern, string) method that attempts to match the whole string—and returns a match object if it succeeds or None if it doesn’t.
Learning Python is hard. But if you cheat, it isn’t as hard as it has to be:
User Registration in PHP with Login: Form with MySQL and Code Download
Last modified on January 3rd, 2020 by Vincy.
Are you looking for code to create user registration in PHP? A lightweight form with MySQL database backend. Read on!
There are lots of PHP components for user registration available on the Internet. But these contain heavy stuff and lots of dependencies.
An appropriate code should be lightweight, secure, feature-packed and customizable. I am going to explain how to code this user registration in PHP with a login.
With this code, you can customize or put any add-ons as per your need and enhance it.
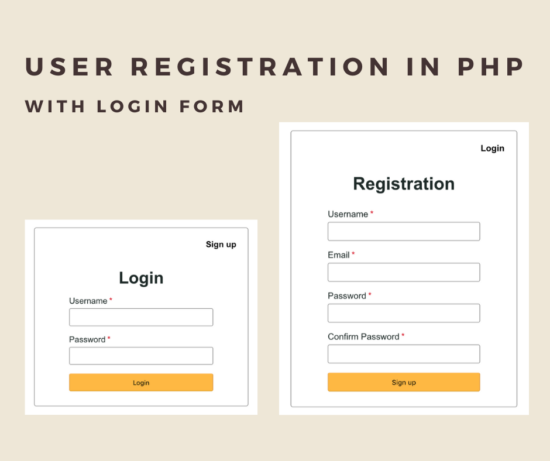
On a landing page, it shows a login form with a signup link. The registered user can enter their login details with the login form. Once done, he can get into the dashboard after authentication.
If the user does not have an account, then he can click the signup option to create a new account.
The user registration form requests username, email, password from the user. On submission, PHP code allows registration if the email does not already exist.
This example code has client-side validation for validating the entered user details. And also, it includes contains the server-side uniqueness test. The user email is the base to check uniqueness before adding the users to the MySQL database.
This linked article includes a basic example of implementing user registration in PHP and MySQL.
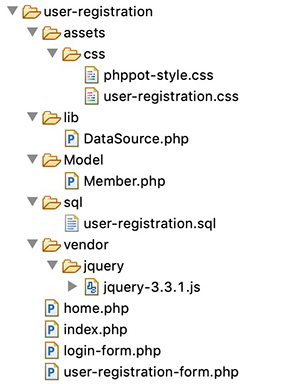
File structure
Create user registration and login form
I have created three HTML view login form, registration form and the dashboard for this code.
Below HMTL code is for displaying the login form to the user. In this form, it has two inputs to allow the user to enter their username and password.
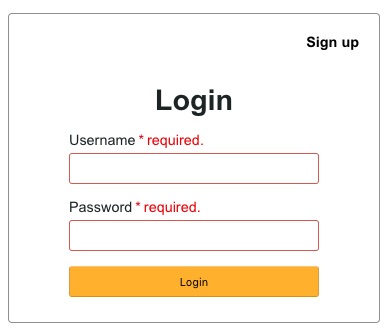
Without these details, a validation code will not allow the login to proceed. The login form tag’s on-click attribute is with loginValidation(). This function contains the login form validation script.
On submitting this login form, the PHP code will validate the user. If the users clear the authentication, then it will redirect him to the dashboard.
If the user attempts to log in with the wrong data, then the code will display a login error message in the login form. If you want to limit the failed login attempts, the linked article has an example of that.
This is a user registration form getting minimal user data from the user. All form fields are mandatory.
It will pass-through a JavaScript validation before processing the user registration in PHP.
On submitting the registration form fields, it will invoke the signupValidation() JavaScript method. In this method, it validates with the non-empty check, email format, and the password match.
After validation, the PHP registration will take place with the posted form data.
There are two methods for validating the form fields before sending the data to the PHP code.
On invalid data submission, the code will return a boolean false. It forces the user to enter the required fields by highlighting them.
login-form.php (JavaScript)
function loginValidation() { var valid = true; $("#username").removeClass("error-field"); $("#password").removeClass("error-field"); var UserName = $("#username").val(); var Password = $('#signup-password').val(); $("#username-info").html("").hide(); $("#email-info").html("").hide(); if (UserName.trim() == "") { $("#username-info").html("required.").css("color", "#ee0000").show(); $("#username").addClass("error-field"); valid = false; } if (Password.trim() == "") { $("#signup-password-info").html("required.").css("color", "#ee0000").show(); $("#signup-password").addClass("error-field"); valid = false; } if (valid == false) { $('.error-field').first().focus(); valid = false; } return valid; }
user-registration-form.php (JavaScript)
function signupValidation() { var valid = true; $("#username").removeClass("error-field"); $("#email").removeClass("error-field"); $("#password").removeClass("error-field"); $("#confirm-password").removeClass("error-field"); var UserName = $("#username").val(); var email = $("#email").val(); var Password = $('#signup-password').val(); var ConfirmPassword = $('#confirm-password').val(); var emailRegex = /^[a-zA-Z0-9.!#$%&'*+/=?^_`{|}~-]+@[a-zA-Z0-9](?:[a-zA-Z0-9-]{0,61}[a-zA-Z0-9])?(?:\.[a-zA-Z0-9](?:[a-zA-Z0-9-]{0,61}[a-zA-Z0-9])?)*$/; $("#username-info").html("").hide(); $("#email-info").html("").hide(); if (UserName.trim() == "") { $("#username-info").html("required.").css("color", "#ee0000").show(); $("#username").addClass("error-field"); valid = false; } if (email == "") { $("#email-info").html("required").css("color", "#ee0000").show(); $("#email").addClass("error-field"); valid = false; } else if (email.trim() == "") { $("#email-info").html("Invalid email address.").css("color", "#ee0000").show(); $("#email").addClass("error-field"); valid = false; } else if (!emailRegex.test(email)) { $("#email-info").html("Invalid email address.").css("color", "#ee0000") .show(); $("#email").addClass("error-field"); valid = false; } if (Password.trim() == "") { $("#signup-password-info").html("required.").css("color", "#ee0000").show(); $("#signup-password").addClass("error-field"); valid = false; } if (ConfirmPassword.trim() == "") { $("#confirm-password-info").html("required.").css("color", "#ee0000").show(); $("#confirm-password").addClass("error-field"); valid = false; } if(Password != ConfirmPassword){ $("#error-msg").html("Both passwords must be same.").show(); valid=false; } if (valid == false) { $('.error-field').first().focus(); valid = false; } return valid; }
Process user registration in PHP
After submitting the form details, it processes user registration in the PHP code.
This code uses default form submit to post data to the PHP. If you want the user registration code with AJAX, then we have to prevent the default submit with a script.
I have added this code at the beginning of the user-registration-form.php. It checks if the user submitted the form. Then, it invokes the registerMember() method defined in the Member model.
login-form.php (PHP code)
<?php use Phppot\Member; if (! empty($_POST["signup-btn"])) { require_once './Model/Member.php'; $member = new Member(); $registrationResponse = $member->registerMember(); } ?>
I have shown the Member model class code below. It contains all the functions related to this user registration and login example.
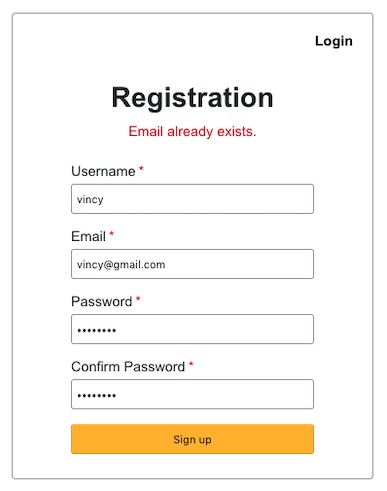
In the registerMember() function, it checks if the posted email already exists. If so, it truncates the registration flow and returns the error. Otherwise, it creates the Insert query to add the member record into the MySQL database.
The loginMember() function checks if there is any match for the entered login details. If the match found, it clears the authentication and allows the user to access the dashboard.
Model/Member.php
<?php namespace Phppot; class Member { private $ds; function __construct() { require_once __DIR__ . './../lib/DataSource.php'; $this->ds = new DataSource(); } public function isMemberExists($email) { $query = 'SELECT * FROM tbl_member where email = ?'; $paramType = 's'; $paramValue = array( $email ); $insertRecord = $this->ds->select($query, $paramType, $paramValue); $count = 0; if (is_array($insertRecord)) { $count = count($insertRecord); } return $count; } public function registerMember() { $result = $this->isMemberExists($_POST["email"]); if ($result < 1) { if (! empty($_POST["signup-password"])) { $hashedPassword = password_hash($_POST["signup-password"], PASSWORD_DEFAULT); } $query = 'INSERT INTO tbl_member (username, password, email) VALUES (?, ?, ?)'; $paramType = 'sss'; $paramValue = array( $_POST["username"], $hashedPassword, $_POST["email"] ); $memberId = $this->ds->insert($query, $paramType, $paramValue); if(!empty($memberId)) { $response = array("status" => "success", "message" => "You have registered successfully."); } } else if ($result == 1) { $response = array("status" => "error", "message" => "Email already exists."); } return $response; } public function getMember($username) { $query = 'SELECT * FROM tbl_member where username = ?'; $paramType = 's'; $paramValue = array( $username ); $loginUser = $this->ds->select($query, $paramType, $paramValue); return $loginUser; } public function loginMember() { $loginUserResult = $this->getMember($_POST["username"]); if (! empty($_POST["signup-password"])) { $password = $_POST["signup-password"]; } $hashedPassword = $loginUserResult[0]["password"]; $loginPassword = 0; if (password_verify($password, $hashedPassword)) { $loginPassword = 1; } if ($loginPassword == 1) { $_SESSION["username"] = $loginUserResult[0]["username"]; $url = "./home.php"; header("Location: $url"); } else if ($loginPassword == 0) { $loginStatus = "Invalid username or password."; return $loginStatus; } } }
PHP login authentication code
Below PHP code is for invoking the authentication function after login. It is in the login-form.php file above the HTML code.
user-registration-form.php (PHP Code)
<?php if (! empty($_POST["login-btn"])) { require_once './Model/Member.php'; $member = new Member(); $loginResult = $member->loginMember(); } ?>
User dashboard
This is the user dashboard HTML code. It shows a welcome message with the logged-in member name. It also has an option to logout from the current session.
Create an account or log in an already existing one and permanently add the game on your account. Alternatively you can redeem it from the Epic Launcher on the game's giveaway page.
This is the 11th daily giveaway that lasts only 24 hours. They will give away one free game per day until the end of 2019.
Rumor: ‘iPhone 12’ will look like a slimmer, taller iPhone 11
By Mikey Campbell Monday, January 20, 2020, 05:00 pm PT (08:00 pm ET)
Rumblings out of Apple’s East Asian supply chain this week offer fresh insight into this year’s iPhone release cycle, with a report on Monday claiming the company’s 2020 handsets will be similar in design to the iPhone 11 lineup albeit with a few sizing tweaks.
iPhone 11 and iPhone 11 Pro.
Citing an unnamed Chinese supplier, Mac Otakara reports Apple’s next-generation iPhone range, tentatively dubbed “iPhone 12,” will share a case design with iPhone 11 and 11 Pro.
Until today, most predictions pointed to the adoption of a squared metal frame design that harkens back to iPhone 4 and iPhone 4S. Noted TF Securities analyst Ming-Chi Kuo first delivered word of the “significant” design change last September, saying the new frame structure would rely on a “more complex segmentation design, new trenching, and injection molding procedures.”
Today’s report casts doubt on Kuo’s expectations and suggests iPhone will retain a metal chassis with gently bowed edges.
Seemingly confirming rumors that Apple will field three screen sizes in 2020 — 5.4-, 6.1- and 6.7-inch variants — sources claim to have information on chassis dimensions. The height of the smallest 5.4-inch version is said to be between that of the iPhone SE and iPhone 8, while the 6.1-inch model lies between the iPhone 11 and iPhone 11 Pro. Apple’s largest 2020 model, predicted to boast a 6.7-inch screen, will supposedly be slightly taller than this year’s iPhone 11 Pro Max.
The report goes on to say Apple’s 2020 iPhone range will boast a depth of around 7.40 millimeters, much thinner than the 8.1mm iPhone 11 Pro or 8.3mm iPhone 11. Bezel size is expected to be about 2mm, roughly equivalent to current generation iPhones.
All 2020 models are anticipated to benefit from OLED screens, a new “A14” system-on-chip processor and 5G connectivity. The entry-level 5.4- and 6.1-inch iPhones will likely sport dual rear-facing cameras, while the top-end 6.1-inch and 6.7-inch versions should carry over iPhone 11 Pro’s triple-camera array. High-end iterations are also predicted to gain VCSEL time of flight sensors for depth sensing operations.
Soon You’ll Be Able To Try Yooka-Laylee And The Impossible Lair Before You Buy
When we reviewed Yooka-Laylee And The Impossible Lair back in October 2019, we said it was “a fantastic sophomore effort that pays tribute to Rare’s past and establishes Playtonic as one of the UK’s most exciting studios.” If that wasn’t enough encouragement for you to buy it, then perhaps the ability to sample a portion of the game before you take the plunge will suffice?
That’s precisely what Playtonic is doing at the end of this month. A free demo will hit the eShop on January 30th (a week after Steam). The demo will include “an assortment of vibrant and exciting 2D levels”, a ‘Pagie Challenge’, a state change for one of the stages, some tonics to sample (one of which gives Yooka a massive head), and access to titular Impossible Lair itself (gasp!). Furthermore, your progress from the demo can be carried over to the full game.
But why now, and why not at the time of release, you may ask? Well, according to Playtonic’s Twitter, demos aren’t just something you pop out with minimal effort – they have to be certified just like a full release, and there simply wasn’t the time or resource to produce a demo at launch. We’ll let them off, because they’re good people.
Will you be downloading this demo on the 30th? Let us know by voting in the poll below.
Posted by: xSicKxBot - 01-21-2020, 10:44 AM - Forum: Lounge
- No Replies
Xbox: You Can Check Your Decade's Achievements With This Great Tool
Xbox Achievements remain a core part of the Xbox ecosystem, and having a high gamerscore in a game--or finally snagging a difficult Achievement--can feel pretty good. Xbox achievement tracking site True Achievements has created a tool, called #MyDecadeOnXbox, to give you some insight into your own play habits.
Log into your Xbox account and the site's tracker will tell you how many games you played over that decade on Xbox, how many achievements and gamerscore you unlocked, how many of those achievements were rare, and much more. It tracks your best month and day for achievements, gives you a platform breakdown, and lists your rarest achievements.
It's worth noting that this is not an official Microsoft initiative--you will need a True Achievements account, and you'll need to give them access to your Xbox account information to get these figures.
It's an interesting list of statistics, and a good way to chart how your play habits on Xbox systems have or have not changed. Xbox Achievements have changed a lot over the decade, as the distinction between retail and "arcade" games has been dropped, and Microsoft has been less rigid over how many Achievements a game can or can't have. You can even earn them on Switch, but only in a tiny handful of games.
Achievements will likely remain a big part of the Xbox Series X when it launches in late 2020. There are still plenty of Xbox One games on the horizon as well, though, so Achievement hunters will be able to keep busy this year.
Digital board game ports are a wonderful thing, but they can be at times confusing. As an inherently license’-based activity (with one or two exceptions), it can create weird situations like what happened with the digital adaptation of Carcassonne.
There in fact two different versions of Carcassonne you can buy on the market right now, one developed by The Coding Monkeys that’s only available on iOS, and then a slightly shinier version that came later developed by Asmodee Digital, which is only available on Steam and Android. That’s about to change come March 1st, 2020.
The Coding Monkeys announced over the weekend that their deal with the Carcassonne license holder, Hans im Glück, is coming to an end and won’t be renewed. Their version of the game will be removed from the App store come March, and you won’t be able to buy it again. Here’s what you need to bear in mind:
If you already own the game and it’s installed on your device, you’ll be able to play it beyond March 1st, 2020.
If you already own the game but it’s not installed, in theory you should still be able to download it regardless but this can be an inconsistent principle at times – best to put it on a device for safe keeping.
TCM have said they will keep their servers running for at least a year, so multiplayer will still work for a time. What happens after that will depend on whether the studio can afford to keep them running.
Even if they turn off the servers, as far as we know the game didn’t need to connect to an online server to play so solo/pass-and-play should still work.
iOS users need not fear that they’ll lose access to Carcassonne forever – Asmodee Digital’s own port will finally be coming to the Apple App Store come March. I imagine this is something they’ve been wanting ever since they made their own version of the game a couple of years ago.
The Coding Monkey’s version of the game is held in pretty high esteem and is a poster-child example of board game ports on mobile. Asmodee’s version is fine and is in 3D, giving it more appealing visuals, but i’d be hard-pressed to say it was the ‘better’ version. Still, it’s probably better to have a single, unified app for things like this.
As a final farewell, The Coding Monkeys are running a sale on their version of the game plus everything else they’ve made to date, so be sure to check it out.
What are your thoughts on this and the two versions of Carcassonne? Let us know in the comments!
Apple CEO Tim Cook on Monday said the company is investigating technology that could help identify health risks at an early stage, similar to heart monitoring features introduced with Apple Watch.
Apple Watch’s new Cycle app tracks menstrual cycles.
Cook commented on Apple’s contributions to the healthcare space during a panel, suggesting what started with heart health tracking on Apple Watch could soon branch out into other areas of interest.
Current Apple Watch models are equipped with sensors capable to detecting atrial fibrillation, or AFib, a common heart arrhythmia that can lead to stroke in some patients. Apple Watch Series 4 and Series 5 go a step further and include an FDA-approved electrocardiogram function for more accurate readings.
As the first FDA-approved consumer device to incorporate an ECG, Apple Watch is an early entrant in what appears to be a burgeoning crossover sector that joins consumer tech with healthcare.
“I’m seeing that this intersection has not yet been explored very well. There’s not a lot of tech associated with the way people’s healthcare is done unless they get into very serious trouble.”” Cook said in a Q&A session with IDA Ireland CEO Martin Shanahan, according toSilicon Republic. IDA on Monday presented Cook with the inaugural Special Recognition Award for Apple’s 40 years of investment in Ireland
Most Apple Watch heart monitoring features, like AFib detection, are inherently preventative and can potentially reduce healthcare fees or even save lives.
“I think you can take that simple idea of having preventive things and find many more areas where technology intersects healthcare, and I think all of our lives would probably be better off for it,” Cook said. He added that the cost of healthcare can “fundamentally be taken down, probably in a dramatic way” by integrating common healthcare technologies in consumer devices.
“Most of the money in healthcare goes to the cases that weren’t identified early enough,” Cook said. “It will take some time but things that we are doing now — that I’m not going to talk about today — those give me a lot of cause for hope.”
Apple is known to be at work on multiple health-focused initiatives, though none have been formally announced. A recent patent filing from December, for example, suggests the company is developing methods of using Apple Watch to detect Parkinson’s Disease and diagnose tremor symptoms. Similar initiatives, like the sound monitoring Noise app and menstrual cycle tracking Cycle app, were announced and subsequently released with watchOS 6.
The Apple chief also touched on AR, once again calling it the “next big thing” in tech. Cook has long been bullish on the prospects of AR, which are being borne in iOS app releases.
“I think it’s something that doesn’t isolate people. We can use it to enhance our discussion, not substitute it for human connection, which I’ve always deeply worried about in some of the other technologies.”
Learning about Partitions and How to Create Them for Fedora
Operating system distributions try to craft a one size fits all partition layout for their file systems. Distributions cannot know the details about how your hardware is configured or how you use your system though. Do you have more than one storage drive? If so, you might be able to get a performance benefit by putting the write-heavy partitions (var and swap for example) on a separate drive from the others that tend to be more read-intensive since most drives cannot read and write at the same time. Or maybe you are running a database and have a small solid-state drive that would improve the database’s performance if its files are stored on the SSD.
The following sections attempt to describe in brief some of the historical reasons for separating some parts of the file system out into separate partitions so that you can make a more informed decision when you install your Linux operating system.
If you know more (or contradictory) historical details about the partitioning decisions that shaped the Linux operating systems used today, contribute what you know below in the comments section!
Common partitions and why or why not to create them
The boot partition
One of the reasons for putting the /boot directory on a separate partition was to ensure that the boot loader and kernel were located within the first 1024 cylinders of the disk. Most modern computers do not have the 1024 cylinder restriction. So for most people, this concern is no longer relevant. However, modern UEFI-based computers have a different restriction that makes it necessary to have a separate partition for the boot loader. UEFI-based computers require that the boot loader (which can be the Linux kernel directly) be on a FAT-formatted file system. The Linux operating system, however, requires a POSIX-compliant file system that can designate access permissions to individual files. Since FAT file systems do not support access permissions, the boot loader must be on a separate file system than the rest of the operating system on modern UEFI-based computers. A single partition cannot be formatted with more than one type of file system.
The var partition
One of the historical reasons for putting the /var directory on a separate partition was to prevent files that were frequently written to (/var/log/* for example) from filling up the entire drive. Since modern drives tend to be much larger and since other means like log rotation and disk quotas are available to manage storage utilization, putting /var on a separate partition may not be necessary. It is much easier to change a disk quota than it is to re-partition a drive.
Another reason for isolating /var was that file system corruption was much more common in the original version of the Linux Extended File System (EXT). The file systems that had more write activity were much more likely to be irreversibly corrupted by a power outage than those that did not. By partitioning the disk into separate file systems, one could limit the scope of the damage in the event of file system corruption. This concern is no longer as significant because modern file systems support journaling.
The home partition
Having /home on a separate partition makes it possible to re-format the other partitions without overwriting your home directories. However, because modern Linux distributions are much better at doing in-place operating system upgrades, re-formatting shouldn’t be needed as frequently as it might have been in the past.
It can still be useful to have /home on a separate partition if you have a dual-boot setup and want both operating systems to share the same home directories. Or if your operating system is installed on a file system that supports snapshots and rollbacks and you want to be able to rollback your operating system to an older snapshot without reverting the content in your user profiles. Even then, some file systems allow their descendant file systems to be rolled back independently, so it still may not be necessary to have a separate partition for /home. On ZFS, for example, one pool/partition can have multiple descendant file systems.
The swap partition
The swap partition reserves space for the contents of RAM to be written to permanent storage. There are pros and cons to having a swap partition. A pro of having swap memory is that it theoretically gives you time to gracefully shutdown unneeded applications before the OOM killer takes matters into its own hands. This might be important if the system is running mission-critical software that you don’t want abruptly terminated. A con might be that your system runs so slow when it starts swapping memory to disk that you’d rather the OOM killer take care of the problem for you.
Another use for swap memory is hibernation mode. This might be where the rule that the swap partition should be twice the size of your computer’s RAM originated. Ideally, you should be able to put a system into hibernation even if nearly all of its RAM is in use. Beware that Linux’s support for hibernation is not perfect. It is not uncommon that after a Linux system is resumed from hibernation some hardware devices are left in an inoperable state (for example, no video from the video card or no internet from the WiFi card).
In any case, having a swap partition is more a matter of taste. It is not required.
The root partition
The root partition (/) is the catch-all for all directories that have not been assigned to a separate partition. There is always at least one root partition. BIOS-based systems that are new enough to not have the 1024 cylinder limit can be configured with only a root partition and no others so that there is never a need to resize a partition or file system if space requirements change.
The EFI system partition
The EFI System Partition (ESP) serves the same purpose on UEFI-based computers as the boot partition did on the older BIOS-based computers. It contains the boot loader and kernel. Because the files on the ESP need to be accessible by the computer’s firmware, the ESP has a few restrictions that the older boot partition did not have. The restrictions are:
The ESP must be formatted with a FAT file system (vfat in Anaconda)
The ESP must have a special type-code (EF00 when using gdisk)
Because the older boot partition did not have file system or type-code restrictions, it is permissible to apply the above properties to the boot partition and use it as your ESP. Note, however, that the GRUB boot loader does not support combining the boot and ESP partitions. If you use GRUB, you will have to create a separate partition and mount it beneath the /boot directory.
The Boot Loader Specification (BLS) lists several reasons why it is ideal to use the legacy boot partition as your ESP. The reasons include:
The UEFI firmware should be able to load the kernel directly. Having a separate, non-ESP compliant boot partition for the kernel prevents the UEFI firmware from being able to directly load the kernel.
Nesting the ESP mount point three mount levels deep increases the likelihood that an intermediate mount could fail or otherwise be unavailable when needed. That is, requiring root (/), then boot (/boot), then efi (/efi) to be consecutively mounted is unnecessarily complex and prone to error.
Requiring the boot loader to be able to read other partitions/disks which may be formatted with arbitrary file systems is non-trivial. Even when the boot loader does contain such code, the code that works at installation time can become outdated and fail to access the kernel/initrd after a file system update. This is currently true of GRUB’s ZFS file system driver, for example. You must be careful not to update your ZFS file system if you use the GRUB boot loader or else your system may not come back up the next time you reboot.
Besides the concerns listed above, it is a good idea to have your startup environment — up to and including your initramfs — on a single self-contained file system for recovery purposes. Suppose, for example, that you need to rollback your root file system because it has become corrupted or it has become infected with malware. If your kernel and initramfs are on the root file system, you may be unable to perform the recovery. By having the boot loader, kernel, and initramfs all on a single file system that is rarely accessed or updated, you can increase your chances of being able to recover the rest of your system.
In summary, there are many ways that you can layout your partitions and the type of hardware (BIOS or UEFI) and the brand of boot loader (GRUB, Syslinux or systemd-boot) are among the factors that will influence which layouts will work.
Other considerations
MBR vs. GPT
GUID Partition Table (GPT) is the newer partition format that supports larger disks. GPT was designed to work with the newer UEFI firmware. It is backward-compatible with the older Master Boot Record (MBR) partition format but not all boot loaders support the MBR boot method. GRUB and Syslinux support both MBR and UEFI, but systemd-boot only supports the newer UEFI boot method.
By using GPT now, you can increase the likelihood that your storage device, or an image of it, can be transferred over to a newer computer in the future should you wish to do so. If you have an older computer that natively supports only MBR-partitioned drives, you may need to add the inst.gpt parameter to Anaconda when starting the installer to get it to use the newer format. How to add the inst.gpt parameter is shown in the below video titled “Partitioning a BIOS Computer”.
If you use the GPT partition format on a BIOS-based computer, and you use the GRUB boot loader, you must additionally create a one megabyte biosboot partition at the start of your storage device. The biosboot partition is not needed by any other brand of boot loader. How to create the biosboot partition is demonstrated in the below video titled “Partitioning a BIOS Computer”.
LVM
One last thing to consider when manually partitioning your Linux system is whether to use standard partitions or logical volumes. Logical volumes are managed by the Logical Volume Manager (LVM). You can setup LVM volumes directly on your disk without first creating standard partitions to hold them. However, most computers still require that the boot partition be a standard partition and not an LVM volume. Consequently, having LVM volumes only increases the complexity of the system because the LVM volumes must be created within standard partitions.
The main features of LVM — online storage resizing and clustering — are not really applicable to the typical end user. Most laptops do not have hot-swappable drive bays for adding or reconfiguring storage while the system is running. And not many laptop or desktop users have clvmd configured so they can access a centralized storage device concurrently from multiple client computers.
LVM is great for servers and clusters. But it adds extra complexity for the typical end user. Go with standard partitions unless you are a server admin who needs the more advanced features.
Video demonstrations
Now that you know which partitions you need, you can watch the sort video demonstrations below to see how to manually partition a Fedora Linux computer from the Anaconda installer.
These videos demonstrate creating only the minimally required partitions. You can add more if you choose.
Because the GRUB boot loader requires a more complex partition layout on UEFI systems, the below video titled “Partitioning a UEFI Computer” additionally demonstrates how to install the systemd-boot boot loader. By using the systemd-boot boot loader, you can reduce the number of needed partitions to just two — boot and root. How to use a boot loader other than the default (GRUB) with Fedora’s Anaconda installer is officially documented here.






 The Massive Gameplay Giveaway has been restocked and it is open for just a few hours.