

This example contains a React drag-and-drop file upload with file type and size validation. It connects backend to upload files to the server via Axios.
The workflow allows users to drop files to upload and shows file preview below the drop area. This file upload example includes the following featured functionalities.
- Drag and drop
- File validation
- Uploading to backend
- Saving file path to database
- Preview after upload
- Error handling
It is easy to integrate into any React application, since it is structured with separate components for the upload and preview UI.

React UI with file upload interface
Two React components created for this file upload UI. Those are UploadBox and FilePreview.
The UploadBox is the drop area for dragged files to be uploaded. Once upload completed, file thumbnails are shown in a preview box by using the FilePreview component.
The FileUpload JSX handles the following processes before uploading a file.
- File validation about its extension and size.
- Handling errors or success acknowledgement for UI.
- Preparing form data with the file binaries.

src/components/FileUpload.jsx
import { useState } from "react";
import axios from "axios";
import SERVER_SIDE_API_ROOT from "../../config";
import FilePreview from "./FilePreview";
import UploadBox from "./UploadBox";
import "../../public/assets/css/style.css";
const FileUpload = () => { const [files, setFiles] = useState([]); const [dragActive, setDragActive] = useState(false); const [uploading, setUploading] = useState(false); const [errorMsg, setErrorMsg] = useState(""); const allowedExtensions = ["jpg", "jpeg", "png", "gif", "pdf", "doc", "docx", "txt"]; const MAX_FILE_SIZE = 2 * 1024 * 1024; const uploadFiles = async (fileList) => { setErrorMsg(""); const safeFiles = []; const rejectedFiles = []; fileList.forEach((file) => { const ext = file.name.split(".").pop().toLowerCase(); if (!allowedExtensions.includes(ext)) return rejectedFiles.push("Invalid file type"); if (file.size > MAX_FILE_SIZE) return rejectedFiles.push("Maximum file size is 2MB."); if (file.size <= 0) return rejectedFiles.push("Empty file"); safeFiles.push(file); }); if (rejectedFiles.length > 0) { setErrorMsg(rejectedFiles[0]); setUploading(false); return; } if (!safeFiles.length) return; const formData = new FormData(); safeFiles.forEach((file) => formData.append("files[]", file)); setUploading(true); const delay = new Promise((resolve) => setTimeout(resolve, 800)); try { const res = await Promise.all([ axios.post(`${SERVER_SIDE_API_ROOT}/file-upload.php`, formData, { headers: { "Content-Type": "multipart/form-data" }, }), delay, ]); const uploadedFiles = res[0].data.files.filter((f) => f.status === "uploaded"); setFiles((prev) => [...prev, ...uploadedFiles.map(f => safeFiles.find(sf => sf.name === f.name))]); } catch { setErrorMsg("Server error — please try again later."); } setUploading(false); }; const handleDrop = async (e) => { e.preventDefault(); setDragActive(false); await uploadFiles(Array.from(e.dataTransfer.files)); }; return ( <div className="upload-wrapper"> <UploadBox dragActive={dragActive} uploading={uploading} errorMsg={errorMsg} handleDrop={handleDrop} setDragActive={setDragActive} > </UploadBox> <FilePreview files={files} uploading={uploading} /> </div> );
};
export default FileUpload;
PHP file upload endpoint
The PHP script validates the received file binary before uploading to the server directory. If the validation passes, this script give name to the file with a unique random id.
Once the PHP move_uploaded_file() saves the files to the directory, this code inserts the target path to the database.
drag-drop-file-upload-api/file-upload.php
<?php
header("Access-Control-Allow-Origin: *");
header("Access-Control-Allow-Methods: POST, GET, OPTIONS");
header("Access-Control-Allow-Headers: Content-Type");
include "db.php";
$uploadDir = "uploads/";
$response = [];
if (!file_exists($uploadDir)) { mkdir($uploadDir, 0777, true);
}
$allowedExtensions = ['jpg', 'jpeg', 'png', 'gif', 'pdf', 'txt', 'doc', 'docx'];
$maxFileSize = 2 * 1024 * 1024; foreach ($_FILES['files']['name'] as $key => $name) { $tmpName = $_FILES['files']['tmp_name'][$key]; $extension = strtolower(pathinfo($name, PATHINFO_EXTENSION)); $size = $_FILES['files']['size'][$key]; if (!in_array($extension, $allowedExtensions)) { $response[] = [ "name" => $name, "status" => "blocked", "message" => "File type not allowed (.{$extension})" ]; continue; } if ($size > $maxFileSize) { $response[] = [ "name" => $name, "status" => "blocked", "message" => "Maximum file size is 2M." ]; continue; } if ($size <= 0) { $response[] = [ "name" => $name, "status" => "blocked", "message" => "Empty file" ]; continue; } $uniqueName = uniqid() . "_" . basename($name); $targetPath = $uploadDir . $uniqueName; if (move_uploaded_file($tmpName, $targetPath)) { $stmt = $conn->prepare("INSERT INTO uploaded_files (file_name, file_path) VALUES (?, ?)"); $stmt->bind_param("ss", $uniqueName, $targetPath); $stmt->execute(); $response[] = [ "name" => $name, "path" => $targetPath, "status" => "uploaded" ]; } else { $response[] = [ "name" => $name, "status" => "failed", "message" => "Error moving uploaded file." ]; }
}
echo json_encode(["success" => true, "files" => $response]);
?>
Drop area to place the dragged files
It contains UI elements to define the file drop area. The drop box uses onDragOver callback to highlight the drop area on hover.
And, the onDrop callback prepares the form data to post the dropped file binary to the server.

src/components/UploadBox.jsx
const UploadBox = ({ dragActive, uploading, errorMsg, handleDrop, setDragActive }) => ( <> <div className={`upload-box ${dragActive ? "active" : ""}`} onDragOver={(e) => { e.preventDefault(); setDragActive(true); }} onDragLeave={() => setDragActive(false)} onDrop={handleDrop} > <h3 className="upload-title">Drag & Drop Files Here</h3> <p className="upload-text">Files will upload automatically</p> </div> {uploading && <p className="uploading-text">Uploading...</p>} {errorMsg && <p className="error-text">{errorMsg}</p>} </>
); export default UploadBox;
Showing file preview with thumbnails
The FilePreview component displays the uploaded files in a list format. It will show its thumbnail, name and size.
If an image upload, the preview will show the image thumbnail. It a document type file is uploaded, the default icon is shown to the preview screen.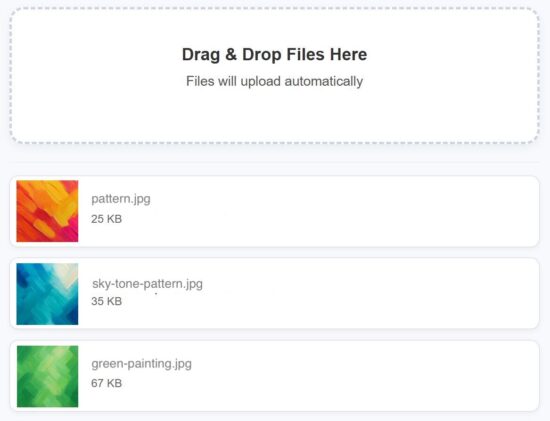
src/components/FilePreview.jsx
const FilePreview = ({ files, uploading }) => { if (!files.length) return null; return ( <div className="preview-list"> {files.map((file, i) => ( <div key={i} className="preview-row"> {file.type?.startsWith("image/") ? ( <div className="preview-thumb-wrapper"> <img src={URL.createObjectURL(file)} alt={file.name} className={`preview-thumb ${uploading ? "blurred" : ""}`} /> {uploading && ( <div className="preview-loader"> <img src="/assets/image/loader.svg" alt="Loading..." /> </div> )} </div> ) : ( <div className="file-icon"></div> )} <div className="file-info"> <p className="file-name">{file.name}</p> <p className="file-size">{Math.round(file.size / 1024)} KB</p> </div> </div> ))} </div> );
};
export default FilePreview;
How to set up this application
The below steps help to set up this example to run in your environment. After these steps, start the npm dev server and run the React drag and drop app.
- Download the source and unzip into your computer.
- Copy the
drag-drop-file-upload-apiinto the PHP web root. - Create a database
file_upload_dband import the SQL script in thedrag-drop-file-upload-api/sql - Configure database details with
db.php - Configure the PHP endpoint URL in React in
src/config.js
Conclusion
I hope the React code provides a modern file upload interface. The drag-and-drop, file validation, preview rendering and database insert is a stack of features enriches the example code. This code well-structured and ready to integrate with an application easily. If you want any add-on feature to this example, please let me know.
References:
