Posted on Leave a comment

Check Python Version from Command Line and in Script

5/5 – (1 vote)

Check Python Version from Command Line

Knowing your Python version is vital for running programs that may be incompatible with a certain version. Checking the Python version from the command line is simple and can be done using your operating system’s built-in tools.

Windows Command Prompt

In Windows, you can use PowerShell to check your Python version. Open PowerShell by pressing Win+R, typing powershell, and then pressing Enter. Once PowerShell is open, type the following command:

python --version

This command will return the Python version installed on your Windows system. If you have both Python 2 and Python 3 installed, you can use the following command to check the Python 3 version:

python3 --version

macOS Terminal

To check the Python version in macOS, open the Terminal by going to Finder, clicking on Applications, and then navigating to Utilities > Terminal. Once the Terminal is open, type the following command to check your Python version:

python --version

Alternatively, if you have Python 3 installed, use the following command to check the Python 3 version:

python3 --version

Linux Terminal

In Linux, open a terminal window and type the following command to check your Python version:

python --version

For Python 3, use the following command:

python3 --version

It is also possible to check the Python version within a script using the sys module:

import sys
print(sys.version)

This code snippet will print the Python version currently being used to run the script. It can be helpful in identifying version-related issues when debugging your code.

Check Python Version in Script

Using Sys Module

The sys module allows you to access your Python version within a script. To obtain the version, simply import the sys module and use the sys.version_info attribute. This attribute returns a tuple containing the major, minor, and micro version numbers, as well as the release level and serial number.

Here is a quick example:

import sys
version_info = sys.version_info
print(f"Python version: {version_info.major}.{version_info.minor}.{version_info.micro}")
# Output: Python version: 3.9.5

You can also use sys.version to get the Python version as a string, which includes additional information about the build. For example:

import sys
version = sys.version
print(f"Python version: {version.split()[0]}")

These methods work for both Python 2 and Python 3.

Using Platform Module

Another way to check the Python version in a script is using the platform module. The platform.python_version() function returns the version as a string, while platform.python_version_tuple() returns it as a tuple.

Here’s an example of how to use these functions:

import platform
version = platform.python_version()
version_tuple = platform.python_version_tuple()
print(f"Python version: {version}")
print(f"Python version (tuple): {version_tuple}")

Both the sys and platform methods allow you to easily check your python version in your scripts. By utilizing these modules, you can ensure that your script is running on the correct version of Python, or even tailor your script to work with multiple versions.

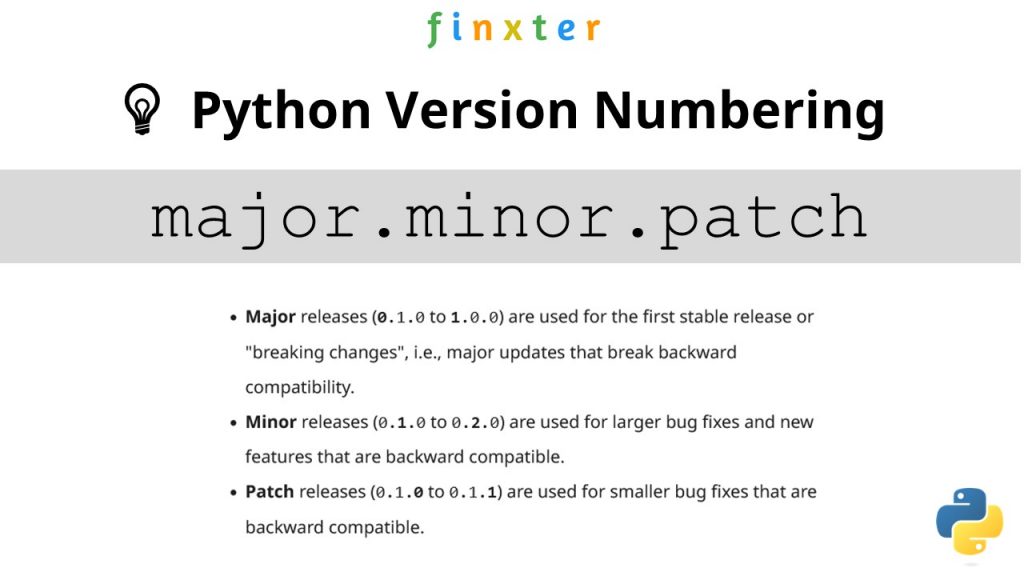
Python Version Components

Python versions are composed of several components that help developers understand the evolution of the language and maintain their projects accordingly. In this section, we will explore the major components, including Major Version, Minor Version, and Micro Version.

Major Version

The Major Version denotes the most significant changes in the language, often introducing new features or language elements that are not backwards compatible. Python currently has two major versions in widespread use: Python 2 and Python 3. The transition from Python 2 to Python 3 was a significant change, with many libraries and applications needing updates to ensure compatibility.

For example, to check the major version of your Python interpreter, you can use the following code snippet:

import sys
print(sys.version_info.major)

Minor Version

The Minor Version represents smaller updates and improvements to the language. These changes are typically backwards compatible, and they introduce bug fixes, performance enhancements, and minor features. For example, Python 3.6 introduced formatted string literals (f-strings) to improve string manipulation, while Python 3.7 enhanced asynchronous functionality with the asyncio module.

You can check the minor version of your Python interpreter with this code snippet:

import sys
print(sys.version_info.minor)

Micro Version

The Micro Version is the smallest level of changes, focused on addressing specific bugs, security vulnerabilities, or minor refinements. These updates should be fully backwards compatible, ensuring that your code continues to work as expected. The micro version is useful for package maintainers and developers who need precise control over their dependencies.

To find out the micro version of your Python interpreter, use the following code snippet:

import sys
print(sys.version_info.micro)

In summary, Python versions are a combination of major, minor, and micro components that provide insight into the evolution of the language. The version number is available as both a tuple and a string, representing release levels and serial versions, respectively.

Working with Multiple Python Versions

Working with multiple Python versions on different operating systems like mac, Windows, and Linux is often required when developing applications or scripts. Knowing how to select a specific Python interpreter and check the version of Python in use is essential for ensuring compatibility and preventing errors.

Selecting a Specific Python Interpreter

In order to select a specific Python interpreter, you can use the command line or terminal on your operating system. For instance, on Windows, you can start the Anaconda Prompt by searching for it in the Start menu, and on Linux or macOS, simply open the terminal or shell.

Once you have the terminal or command prompt open, you can use the python command followed by the specific version number you want to use, such as python2 or python3. For example, if you want to run a script named example_script.py with Python 3, you would enter python3 example_script.py in the terminal.

Note: Make sure you have the desired Python version installed on your system before attempting to select a specific interpreter.

To determine which Python version is currently running your script, you can use the sys module. In your script, you will need to import sys and then use the sys.version attribute to obtain information about the currently active Python interpreter.

Here’s an example that shows the Python version in use:

import sys
print("Python version in use:", sys.version.split()[0])

For a more platform-independent way to obtain the Python version, you can use the platform module. First, import platform, and then use the platform.python_version() function, like this:

import platform
print("Python version in use:", platform.python_version())

In conclusion, managing multiple Python versions can be straightforward when you know how to select a specific interpreter and obtain the currently active Python version. This knowledge is crucial for ensuring compatibility and preventing errors in your development process.

๐Ÿ Recommended: How To Run Multiple Python Versions On Windows?

Python Version Compatibility

Python, one of the most widely-used programming languages, has two major versions: Python2 and Python3. Understanding and checking their compatibility ensures that your code runs as intended across different environments.

To check the Python version via the command line, open the terminal (Linux, Ubuntu) or command prompt (Windows), and run the following command:

python --version

Alternatively, you can use the shorthand:

python -V

For checking the Python version within a script, you can use the sys module. In the following example, the major and minor version numbers are obtained using sys.version_info:

import sys
version_info = sys.version_info
print(f"Python {version_info.major}.{version_info.minor} is running this script.")

Compatibility between Python2 and Python3 is essential for maintaining codebases and leveraging pre-existing libraries. The 2to3 tool checks for compatibility by identifying the necessary transitions from Python2 to Python3 syntax.

To determine if a piece of code is Python3-compatible, run the following command:

2to3 your_python_file.py

Python packages typically declare their compatibility with specific Python versions. Reviewing the package documentation or its setup.py file provides insight into supported Python versions. To determine if a package is compatible with your Python environment, you can check the package’s release history on its project page and verify the meta-information for different versions.

When using Ubuntu or other Linux distributions, Python is often pre-installed. To ensure compatibility between different software components and programming languages (like gcc), regularly verify and update your installed Python versions.

Comparing Python Versions

When working with Python, it’s essential to know which version you are using. Different versions can have different syntax and functionality. You can compare the Python version numbers using the command line or within a script.

To check your Python version from the command line, you can run the command python --version or python3 --version. This will display the version number of the Python interpreter installed on your system.

In case you are working with multiple Python versions, it’s important to compare them to ensure compatibility. You can use the sys.version_info tuple, which contains the major, minor, and micro version numbers of your Python interpreter. Here’s an example:

import sys if sys.version_info < (3, 0, 0): print("You are using Python 2.x")
else: print("You are using Python 3.x or higher")

This code snippet compares the current Python version to a specific one (3.0.0) and prints a message to the shell depending on the outcome of the comparison.

In addition to Python, other programming languages like C++ can also have different versions. It’s important to be aware of the version number, as it affects the language’s features and compatibility.

Remember to always verify and compare Python version numbers before executing complex scripts or installing libraries, since a mismatch can lead to errors and unexpected behavior. By using the command line or programmatically checking the version in your script, you can ensure smooth and error-free development.

Frequently Asked Questions

How to find Python version in command line?

You can find the Python version in the command line by running the following command:

python --version

Or:

python -V

This command will display the Python version installed on your system.

How to check for Python version in a script?

To check for the Python version in a script, you can use the sys module. Here’s an example:

import sys
print("Python version")
print(sys.version)
print("Version info.")
print(sys.version_info)

This code will print the Python version and version information when you run the script.

Ways to determine Python version in prompt?

As mentioned earlier, you can use the python --version or python -V command in the command prompt to determine the Python version. Additionally, you can run:

python -c "import sys; print(sys.version)"

This will run a one-liner that imports the sys module and prints the Python version.

Is Python installed? How to verify from command line?

To verify if Python is installed on your system, simply run the python --version or python -V command in the command prompt. If Python is installed, it will display the version number. If it’s not installed, you will receive an error message or a command not found message.

Verifying Python version in Anaconda environment?

To verify the Python version in an Anaconda environment, first activate the environment with conda activate <environment_name>. Next, run the python --version or python -V command as mentioned earlier.

Determining Python version programmatically?

Determining the Python version programmatically can be done using the sys module. As shown in the second question, you can use the following code snippet:

import sys
print("Python version: ", sys.version)
print("Version info: ", sys.version_info)

This code will print the Python version and version information when executed.

๐Ÿ Recommended: HOW TO CHECK YOUR PYTHON VERSION

The post Check Python Version from Command Line and in Script appeared first on Be on the Right Side of Change.

Posted on Leave a comment

Python to .exe โ€“ How to Make a Python Script Executable?

5/5 – (1 vote)

I have a confession to make. I use Windows for coding Python.

This means that I often need to run my practical coding projects as Windows .exe files, especially if I work with non-technical clients that don’t know how to run a Python file.

In this tutorial, I’ll share my learnings on making a Python file executable and converting them to an .exe so that they can be run by double-click.

PyInstaller

To make a Python script executable as a .exe file on Windows, use a tool like pyinstaller. PyInstaller runs on Windows 8 and newer.

โญ Pyinstaller is a popular package that bundles a Python application and its dependencies into a single package, including an .exe file that can be run on Windows without requiring a Python installation.

Here are the general steps to create an executable file from your Python script using Pyinstaller:

  1. Install Pyinstaller by opening a command prompt and running the command: pip install pyinstaller or pip3 install pyinstaller depending on your Python version.
  2. Navigate to the directory where your Python script is located in the command prompt using cd (command line) or ls (PowerShell).
  3. Run the command: pyinstaller --onefile your_script_name.py. This command creates a single executable file of your Python script with all its dependencies included.
  4. After the command completes, you can find the executable file in a subdirectory called dist.
  5. You can now distribute the executable file to users, who can run it on their Windows machines by double-clicking the .exe file.

What Does the –onefile Option Mean?

The --onefile file specifier is an option for Pyinstaller that tells it to package your Python script and all its dependencies into a single executable file.

By default, Pyinstaller will create a directory called dist that contains your script and a set of related files that it needs to run. However, using the --onefile option, Pyinstaller will generate a single .exe file, which is more convenient for the distribution and deployment of the application.

1-Paragraph Summary

To convert a Python file my_script.py to an executable my_script.exe using Pyinstaller, install Pyinstaller using pip install pyinstaller, navigate to the script directory in the command prompt, run pyinstaller --onefile my_script.py, then locate the executable file in the dist folder.

If you want to keep improving your coding skills, check out our free Python cheat sheets!

Posted on Leave a comment

5 Easy Ways to Edit a Text File From Command Line (Windows)

5/5 – (1 vote)

Problem Formulation

Given is a text file, say my_file.txt. How to modify its content in your Windows command line working directory?

I’ll start with the most direct method to solve this problem in 90% of cases and give a more “pure” in-terminal method afterward.

Method 1: Using Notepad

The easiest way to edit a text file in the command line (CMD) on your Windows machine is to run the command notepad.exe my_text_file.txt, or simply notepad my_text_file.txt, in your cmd to open the text file with the visual editor Notepad.

notepad.exe my_file.txt

You can also skip the .exe prefix in most cases:

notepad my_text_file.txt

Now, you may ask:

๐Ÿ’ก Is Notepad preinstalled in any Windows installation? The answer is: yes! Notepad is a generic text editor to create, open, and read plaintext files and it’s included with all Windows versions.

Here’s how that looks on my Win 10 machine:

When I type in the command notepad.exe my_text_file.txt, CMD starts the Notepad visual editor in a new window.

I can then edit the file and hit CTRL + S to save the new contents.

But what if you cannot open a text editor—e.g. if you’re logged into a remote server via SSH?

Method 2: Pure CMD Approach

If you cannot open Notepad or other visual editors for some reason, a simple way to overwrite a text file with built-in Windows command line tools is the following:

  • Run the command echo 'your new content' > my_file.txt to print the new content using echo and pipe the output into the text file my_text_file.txt using >.
  • Check the new content using the command type my_text_file.txt.
C:\Users\xcent\Desktop>echo 'hello world' > my_file.txt
C:\Users\xcent\Desktop>type my_file.txt 'hello world'

Here’s what this looks like on my Windows machine, where I changed my_file.txt to contain the text 'hello world!':

This is a simple and straightforward approach to small changes. However, if you have a large file and you just want to edit some minor details, this is not the best way.

Method 3: Change File Purely In CMD (Copy Con)

If you need a full-fledged solution to edit potentially large files in your Windows CMD, use this method! ๐Ÿ‘‡

To create a new file in Windows command prompt, enter copy con followed by the target file name (copy con my_file.txt). Then enter the text you want to put in the file. To end and save the file, press Ctrl+Z then Enter or F6 then Enter.

copy con my_file.txt

How this looks on my Win machine:

A couple of notes:

๐Ÿ’ก Info: To edit an existing file, display the text by using the type command followed by the file name. Then copy and paste the text into the copy con command to make changes. Be careful not to make any typos, or you’ll have to start over again. Backspace works if you catch the mistake before pressing Enter. Note that this method may not work in PowerShell or other command line interfaces that don’t support this feature.

Method 4: If you SSH’d to a Unix Machine

Of course, if you have logged in a Unix-based machine, you don’t need to install any editor because it comes with powerful integrated editors such as vim or emacs.

One of the following three commands should open your file in a terminal-based editing mode:

vim my_text_file.txt
vi my_text_file.txt
emacs my_text_file.txt

You can learn more about Vim here.

Summary

To edit a file.txt in the command line, use the command notepad file.txt to open a graphical editor on Windows.

If you need a simple file edit in your terminal without a graphical editor and without installation, you can use the command echo 'new content' > file.txt that overwrites the old content in file.txt with new content.

If you need a more direct in-CMD text editor run copy con file.txt to open the file in editing mode.

If you’re SSH’d into a Unix machine, running the Vim console-based editor may be the best idea. Use vim file.txt or vi file.txt to open it.

Feel free to join our email coding academy (it’s free):

๐Ÿ‘‰ Recommended: How to Edit a Text File in PowerShell (Windows)

Posted on Leave a comment

How to Flush Your Cache on Windows and Router

5/5 – (1 vote)

I work a lot with DNS settings for my websites and apps.

Today I added a few new DNS entries to set up a new server. I used DNS propagation checkers and confirmed that the DNS entries were already updated internationally. But unfortunately, I myself couldn’t access the website on my Windows machine behind my Wifi router. I could, however, access the website with my smartphone after switching off Wifi there.

This left only one conclusion: My browser, Windows OS, or router cached the stale DNS entries.

So the natural question arises:

๐Ÿ’ฌ Question: How to flush your browser cache, Windows cache, and router cache and reset the DNS entries so they’ll be loaded freshly from the name servers?

I’ll answer these three subproblems one by one in this short tutorial:

  • Step 1: Flush your browser DNS cache (Chrome, Edge, Firefox)
  • Step 2: Flush your Windows DNS cache
  • Step 3: Flush your router DNS cache

Let’s dive into each of them one by one!

Step 1: Reset Your Browser Cache

First, reset your browser cache because it may store some DNS entries. I’ll show you how to flush your browser cache for the three most popular browsers on Windows:

  • Chrome
  • Edge
  • Firefox

Here’s how! ๐Ÿ‘‡

Clear Cache In Chrome

  1. Open Chrome
  2. At the top right, click More with the three vertical dots
  3. Click More tools > Clear browsing data
  4. Choose a time range. To flush everything, select All time
  5. Check boxes next to Cookies and other site data and Cached images and files
  6. Click Clear data

๐Ÿ‘‰ More here

Clear Cache In Microsoft Edge

Go to Settings > Privacy, search, and services > scroll down > click Choose what to clear > Change the Time range and check boxes next to Cookies and other site data and Cached images and files. Then click Clear now.

๐Ÿ‘‰ More here

Clear Cache In Firefox

Click the menu button (three horizontal bars) and select Settings > Privacy & Security. Scroll down to Cookies and Site Data section and click Clear Data.... Remove check mark in front of Cookies and Site Data so that only Cached Web Content is checked. Click the Clear button.

๐Ÿ‘‰ More here

Now your browser has no stale DNS entries — but in my case, this didn’t fix the problem. After all, your operating system may have cached it first!

Step 2: Reset Your Windows OS Cache

There’s a long and a short answer to the question on how to flush the Windows operating system cache. In my case, it worked with the shorter answer but you may want to use the long answer instead if you absolutely need to make sure your Windows DNS cache is empty.

How to Flush Your Windows Cache (Short Answer)

Type cmd into the Windows search field and press Enter. Type “ipconfig /flushdns” and press Enter.

How to Flush Your Windows Cache (Long Answer)

  • Type cmd into the Windows search field and press Enter.
  • Type “ipconfig /flushdns” and press Enter.
  • Type “ipconfig /registerdns” and press Enter.
  • Type “ipconfig /release” and press Enter.
  • Type “ipconfig /renew” and press Enter.
  • Type “netsh winsock reset” and press Enter.
  • Restart the computer.

    Step 3: Reset Your Router Cache

    This one is simple (although a bit time-consuming): To reset your router DNS cache for sure, unplug your router and leave it unplugged for 30 seconds or more. This will reset its DNS cache for sure. Done!

    Posted on Leave a comment

    The Power of Automation Using Python โ€“ Segregating Images Based on Dimensions

    Rate this post

    Project Description

    Recently, I was tasked with a manual project where my client had a directory where he had downloaded tons of wallpapers/images. Some of these were Desktop wallpapers, while the other images were mobile wallpapers. He wanted me to separate these images and store them in two separate folders and also name them in a serial order.

    Well! The challenge here was – there were lots of images and separating them out by checking the dimension of each image individually and then copying them to separate folders was a tedious task. This is where I thought of automating the entire process without having to do anything manually. Not only would this save my time and energy, but it also eliminates/reduces the chances of errors while separating the images.

    Thus, in this project, I will demonstrate how I segregated the images as Desktop and Mobile wallpapers and then renamed them – all using a single script!

    Since the client data is confidential, I will be using my own set of images (10 images) which will be a blend of desktop and mobile wallpapers. So, this is how the directory containing the images looks –

    Note that it doesn’t matter how many images you have within the folder or in which order they are placed. The script can deal with any number of images. So, without further delay, let the game begin!


    Step 1: Import the Necessary Libraries and Create Two Separate Directories

    Since we will be working with directories and image files, we will need the help of specific libraries that allow us to work on files and folders. Here’s the list of libraries that will aid us in doing so –

    • The Image module from the PIL Library
    • The glob module
    • The os module
    • The shutil module

    You will soon find out the importance of each module used in our script. Let’s go ahead and import these modules in our script.

    Code:

    from PIL import Image
    import glob
    import os
    import shutil

    Now that you have all the required libraries and modules at your disposal, your first task should be to create two separate folders – One to store the Desktop wallpapers and another to store the Mobile wallpapers. This can be done using the makedirs function of the os module.

    Theย os.makedirs()ย method constructs a directory recursively. It takes the path as an input and creates the missing intermediate directories. We can even use the os.makedirsย method to create a folder inside an empty folder. In this case, the path to the folder you want to create will be the only single argument toย os.makedirs().

    Code:

    if not os.path.exists('Mobile Wallpapers'): os.makedirs('Mobile Wallpapers')
    if not os.path.exists('Desktop Wallpapers'): os.makedirs('Desktop Wallpapers')

    Wonderful! This should create a couple of folders named – ‘Mobile Wallpapers’ and ‘Desktop Wallpapers’.

    ๐Ÿ“ขRelated Read: How to Create a Nested Directory in Python?

    Step 2: Segregating the Images

    Now, in order to separate the images as mobile wallpapers and desktop wallpapers, we need to work with their dimensions.

    Though the following piece of code wouldn’t be a part of our script but it can prove to be instrumental in finding the dimensions (height and width) of the images.

    Approach:

    • Open all the image files present in the directory one by one. To open an image the Image.open(filename) function can be used and the image can be stored as an object.
    • Once you have the image object, you can extract the height and width of the image using the height and width properties.
      • In our case, each Desktop Wallpaper had a fixed width of 1920. This is going to be instrumental in our next steps to identify if an image is a desktop image or a mobile image. In other words, every image that has a width of 1920 will be a Desktop image and every other image will be a mobile image. This might vary in your case. Nevertheless, you will certainly find a defining width or height to distinguish between the types of images.

    Code:

    for filename in glob.glob(r'.\Christmas\*.jpg'): im = Image.open(filename) print(f"{im.width}x{im.height}")

    Output:

    1920x1224
    1920x1020
    1920x1280
    1920x1280
    3264x4928
    2848x4288
    4000x6000
    3290x5040
    3278x4912
    1920x1280

    There we go! It is evident that all the desktop images have a width of 1920. This was also a pre-defined condition which made things easier for me to separate out the images.

    ๐Ÿ“ขRecommended Read: How to Get the Size of an Image with PIL in Python

    Once you know that the images with 1920 width are desktop images, you can simply use an if condition to check if the width property is equal to 1920 or not. If yes, then use the shutil.copy method to copy the file from its location into the previously created Desktop Wallpapers folder. Otherwise, copy the file to the Mobile Wallpapers folder.

    Code:

    for filename in glob.glob(r'.\Christmas\*.jpg'): im = Image.open(filename) img_path = os.path.abspath(filename) if im.width == 1920: shutil.copy(img_path, r'.\Desktop Wallpapers') else: shutil.copy(img_path, r'.\Mobile Wallpapers')

    Step 3: Rename the Files Sequentially

    All that remains to be done is to open the Desktop Wallpapers folder and Mobile Wallpapers folder and rename each image inside the respective folders sequentially.

    Approach:

    • Open the images in both the folders separately using the glob module.
    • Rename the images sequentially using os.rename method.
    • To maintain a sequence while naming the images you can use a counter variable and increment it after using it to name each image.

    Code:

    count = 1
    for my_file in glob.glob(r'.\Desktop Wallpapers\*.jpg'): img_name = os.path.abspath(my_file) os.rename(img_name, r'.\Desktop Wallpapers\Desktop-img_'+str(count)+'.jpg') count += 1 flag = 1
    for my_file in glob.glob(r'.\Mobile Wallpapers\*.jpg'): img_name = os.path.abspath(my_file) os.rename(img_name, r'.\Mobile Wallpapers\Mobile-img_'+str(flag)+'.jpg') flag += 1

    Putting It All Together

    Finally, when you put everything together, this is how the complete script looks like –

    from PIL import Image
    import glob
    import os
    import shutil if not os.path.exists('Mobile Wallpapers'): os.makedirs('Mobile Wallpapers')
    if not os.path.exists('Desktop Wallpapers'): os.makedirs('Desktop Wallpapers') for filename in glob.glob(r'.\Christmas\*.jpg'): im = Image.open(filename) img_path = os.path.abspath(filename) if im.width == 1920: shutil.copy(img_path, r'.\Desktop Wallpapers') else: shutil.copy(img_path, r'.\Mobile Wallpapers') count = 1
    for my_file in glob.glob(r'.\Desktop Wallpapers\*.jpg'): img_name = os.path.abspath(my_file) os.rename(img_name, r'.\Desktop Wallpapers\Desktop-img_'+str(count)+'.jpg') count += 1 flag = 1
    for my_file in glob.glob(r'.\Mobile Wallpapers\*.jpg'): img_name = os.path.abspath(my_file) os.rename(img_name, r'.\Mobile Wallpapers\Mobile-img_'+str(flag)+'.jpg') flag += 1 

    Note that the paths used in the above script are strictly limited to my system. In your case, please specify the path where you have stored the images.

    Output:

    Summary

    Thus, thirty lines of code can save you several hours of tedious manual work. This is how I completed my project and submitted the entire work to my happy client in a matter of one hour (even less). Now, I can download as many wallpapers as I want for my mobile and desktop screens and separate them sequentially in different directories using the same script. Isn’t that wonderful?

    ๐Ÿ“ขRecommended Read: How Do I List All Files of a Directory in Python?

    Posted on Leave a comment

    How to Schedule a Batch Python Script

    5/5 – (1 vote)

    Problem Formulation and Solution Overview

    During your career as a Pythonista, you will encounter situations where a Python script will need to be executed on a scheduled basis, such as daily, weekly, or monthly.

    This article shows you how to accomplish this task using a .bat (batch) file.


    ๐Ÿ’ฌ Question: How would we write code to run a .bat (batch) file on a schedule?

    We can accomplish this task by completing the following steps:

    1. Create a Python Script
    2. Create a .bat File
    3. Execute a .bat File
    4. Schedule a .bat File Using Windows Task Scheduler
    5. Bonus: Schedule a Monthly .bat File

    Create a Python Script

    Let’s first start by creating a Python script that counts down from five (5) to one (1).

    In the current working directory, create a Python file called counter.py. Copy and paste the code snippet below into this file and save it.

    from time import sleep lift_off = 5 while lift_off > 0: print (f'Lift Off in {lift_off} seconds!') sleep(2) lift_off -= 1

    The first line in the above code snippet imports the time library. This allows access to the sleep() function, which pauses the script between iterations.

    Next, a while loop is instantiated and executes the code inside this loop until the value of lift_off is zero (0).

    On each iteration, the following occurs:

    • A line of text is output to the terminal indicating the value of lift_off.
    • The script pauses for two (2) seconds.
    • The value of lift_off is decreased by one (1).

    To confirm script runs successfully. Navigate to the command prompt and run the following:

    python counter.py

    The output from this script should be as follows:

    Lift Off in 5 seconds!
    Lift Off in 4 seconds!
    Lift Off in 3 seconds!
    Lift Off in 2 seconds!
    Lift Off in 1 seconds!

    Great! Now let’s create a .bat (Batch) file to run this script!

    YouTube Video

    Create a .bat File

    This section creates a .bat file that executes counter.py by calling this file inside the .bat file.

    In the current working directory, create a Python file called counter.bat. Copy and paste the code snippet below into this file and save it.

    @echo off "C:\Python\python.exe" "C:\PYTHON_CODE\counter.py"

    The first line of the code snippet turns off any output to the terminal (except the code inside counter.py). For example, If the first line (@echo off) was removed and counter.bat was executed, the following would be output to the terminal.

    C:\WORK> "C:\Python\python.exe" "C:\PYTHON_CODE\counter.py"
    Lift Off in 5 seconds!
    Lift Off in 4 seconds!
    Lift Off in 3 seconds!
    Lift Off in 2 seconds!
    Lift Off in 1 seconds!

    The following line of code specifies the following:

    • The location of the python.exe file on your computer.
    • The location of the python script to execute.

    Let’s see if this works!

    ๐Ÿ’ก Note: It is best practice to ensure that the full paths to the python.exe and counter.py files are added.


    Execute a .bat File

    This section executes the .bat file created earlier. This code calls and executes the code inside the counter.py file.

    To run the .bat file, navigate to the IDE, and click to select and highlight the counter.bat file. Then, press the F5 key on the keyboard to execute.

    If successful, the output should be the same as running the counter.py file directly.

    Lift Off in 5 seconds!
    Lift Off in 4 seconds!
    Lift Off in 3 seconds!
    Lift Off in 2 seconds!
    Lift Off in 1 seconds!

    Perfect! Let’s schedule this to run Daily at a specified time.


    Schedule a .bat File Using Windows Task Scheduler

    This example uses Windows Task Scheduler to schedule a .bat file to run at a specified date/time.

    To set up a Task Scheduler on Windows, navigate to the command prompt from Windows and run the following code:

    taskschd.msc

    Alternatively, click the Windows start button, search for, and select Task Scheduler.

    Either of the above actions will display the Task Scheduler pop-up.

    From the Actions area, click Create Basic Task. This action displays the Create a Basic Task Wizard pop-up.

    From the Create a Basic Task pop-up, enter a Name and Description into the appropriate text boxes. Click the Next button to continue.

    This action displays the Task Trigger pop-up. Select when to run the .bat file. For this example, Daily was chosen. Click the Next button to continue.

    Since Daily was selected earlier, the Daily pop-up displays. Modify the fields to meet the desired date and time requirements. Click the Next button to continue.

    This action displays the Action pop-up. Select Start a program. Click the Next button to continue.

    This action displays the Start a Program pop-up. Browse to select the counter.bat file created earlier. Click the Next button to continue.

    This action displays the Summary pop-up. If satisfied with the selections made earlier, click the Finish button to complete the setup.

    Great! The task is now scheduled to run at the date/time specified.


    View, Edit, or Delete a Scheduled Task

    To view a list of Scheduled Tasks, navigate to the Task Scheduler pop-up and select Task Scheduler Library.

    To delete a task, click to select the appropriate task from the list of scheduled events. Then click the Delete link on the right-hand side.

    To edit a task, click to select the appropriate task from the list of scheduled events. Then click the Properties link on the right-hand side to display the Properties pop-up. From this pop-up, all of the above selections can be modified.

    Click the OK button to confirm any changes and close the pop-up.

    ๐Ÿ’ก Note: We recommend you review the fields on each tab to learn more about scheduling tasks.


    Bonus: Schedule a Monthly .bat File

    This section reads in a CSV containing sales data. This data is then sorted and filtered based on the current month. This is scheduled to run on the first day of each month. To follow along, download the CSV file.

    In the current working directory, create a Python file called sales.py. Copy and paste the code snippet below into this file and save it.

    import pandas as pd from datetime import datetime
    import openpyxl today = datetime.now()
    cols = ['OrderDate', 'Region', 'Item', 'Units'] df = pd.read_csv('sales.csv', usecols=cols)
    df["OrderDate"] = pd.to_datetime(df["OrderDate"])
    df = df.sort_values(by=['OrderDate']) df_monthly = df[df['OrderDate'].dt.month == today.month]
    df_monthly.to_excel('monthly_rpt.xlsx', columns=cols, index=False, header=True)

    In the current working directory, create a Python file called sales.bat Copy and paste the code snippet below into this file and save it. Modify to meet your locations.

    @echo off "C:\Python\python.exe" "C:\PYTHON_CODE\sales.py"

    Let’s set up a Monthly schedule to run on the first day of each month by performing the following steps:

    • Start the Windows Task Scheduler.
    • From the Task Scheduler pop-up, select Create Basic Task from the Actions area.
    • From the Create a Basic Task pop-up, enter a Name and Description in the appropriate text boxes. Click the Next button to continue.
    • From the Task Trigger pop-up, select Monthly. Click the Next button to continue.
    • From the Monthly pop-up, complete the fields as outlined below:
      • A Start Date and Start Time.
      • From the Months dropdown, select each month that the report will run. For this example, all months were selected.
      • From the Days dropdown, select the day(s) of the month to run this report. For this example, 1 was selected.
      • Click the Next button to continue.
    • From the Action pop-up, select Start a Program. Click the Next button to continue.
    • From the Start a Program pop-up, click the Browse button to locate and select the sales.bat file.
    • From the Summary window click the Finish button.

    This completes the configuration and activates the Scheduler to run on the specified day/time.


    Summary

    This article has shown you have to create and run a .bat file that executes a Python script on a scheduled basis.

    Good Luck & Happy Coding!


    Programming Humor – Python

    “I wrote 20 short programs in Python yesterday. It was wonderful. Perl, I’m leaving you.”xkcd

    Posted on Leave a comment

    How to Create and Run a Batch File That Runs a Python Script?

    5/5 – (1 vote)

    Problem Formulation and Solution Overview

    This article will show you how to create and execute a batch file in Python.

    โ„น Info: A batch or .bat file is a file that contains commands to be executed in the order specified. This file type can organize and automate tasks that need to be run regularly without requiring user input. These files can be created using a text editor, such as Notepad.

    To make it more interesting, we have the following running scenario:

    The Sales Manager of Suppliworks has asked you to create and send him a Monthly Sales Report. This file will arrive as an unsorted, unfiltered CSV. You will need to filter this criterion based on the current month and save it as an Excel file to the current working directory.

    Download the sales.csv file to follow along with our article.


    ๐Ÿ’ฌ Question: How would we write code to create and execute a batch file in Python?

    We can accomplish this task by completing the following steps:

    1. Install the Batch Runner Extension
    2. Create the Python Script
    3. Create the .bat file
    4. Execute

    Install Batch Runner Extension

    To run/execute a bat file, an extension will need to be installed in the IDE.

    To install this extension, navigate to the IDE, Extensions area. In the VSC IDE, this can be found on the far left panel bar shown below.

    In the Search textbox, enter Batch Runner. While entering this text, the IDE automatically searches for extensions that match the criteria entered.

    Once the desired extension is found, click the Install button to the left of the Batch Runner extension to start the installation process.

    Once the installation has been completed, the Install button converts to a Settings icon. The extension is now ready to use!

    ๐Ÿ’ก Note: Feel free to install the Batch Extension of your choosing.


    Create Python Script

    This section creates a Python file that reads in a CSV, sorts, filters and saves the output to an Excel file.

    You can replace this with any Python file you want to run. For this example, we’ll need two libraries:

    • The pandas library will need to be installed for this example, as the code reads in and filters a CSV file.
    • The openpyxl library will need to be installed for this example, as the code exports the filtered DataFrame to an Excel file. To install this library, navigate to the IDE terminal command prompt. Enter and run the code snippet shown below.

    To install those libraries, navigate to the IDE terminal command prompt. Enter and run the two commands to install both libraries:

    pip install pandas
    pip install openpyxl

    In the current working directory, create a Python file called sales.py.

    Copy and paste the code snippet below into this file and save it.

    import pandas as pd from datetime import datetime
    import openpyxl today = datetime.now()
    cols = ['OrderDate', 'Region', 'Item', 'Units'] df = pd.read_csv('sales.csv', usecols=cols)
    df["OrderDate"] = pd.to_datetime(df["OrderDate"])
    df = df.sort_values(by=['OrderDate']) df_monthly = df[df['OrderDate'].dt.month == today.month]
    df_monthly.to_excel('monthly_rpt.xlsx', columns=cols, index=False, header=True)

    The first three (3) lines in the above code snippet import references to the libraries necessary to run this code error-free.

    The following line retrieves the current date using datetime.now() from the datetime library. The results save to the variable today. If the contents were output to the terminal, the following displays:

    2022-11-08 07:59:00.875656

    The next line declares a List containing the DataFrame Columns to retrieve from the CSV file and export to the Excel file. The results save to cols.

    Then, the sales.csv file is opened, and columns specified in cols are retrieved. The results save to the DataFrame df. If df was output to the terminal, the following snippet displays:

    Top Five (5) Records of sales.csv

    OrderDate Region Item Units
    0 11/6/2022 East Pencil 95
    1 11/23/2022 Central Binder 50
    2 11/9/2022 Central Pencil 36
    3 11/26/2022 Central Pen 27
    4 11/15/2022 West Pencil 56

    The next line converts the OrderDate into a proper Date format.

    OrderDate Region Item Units
    0 2022-11-06 East Pencil 95
    1 2022-11-23 Central Binder 50
    2 2022-11-09 Central Pencil 36
    3 2022-11-26 Central Pen 27
    4 2022-11-15 West Pencil 56

    As you can see, the DataFrame, df, is not in any kind of sort order. The next line takes care of this by sorting on the OrderDate field in ascending order. The results save back to the DataFrame df.

    OrderDate Region Item Units
    22 2022-01-15 Central Binder 46
    23 2022-02-01 Central Binder 87
    24 2022-02-18 East Binder 4
    25 2022-03-07 West Binder 7
    26 2022-03-24 Central Pen Set 50

    This script’s final two (2) lines filter the DataFrame, df, based on the current month. The results save to df_monthly. These results are then exported to Excel and placed into the current working directory.

    If you run this code, you will see that the Excel file saved the appropriate filtered results into the monthly_rpt.xlsx file.

    Great! Now let’s create a Batch file to run this script!


    Create Batch File

    In this section, a bat file is created to run the Python file sales.py.

    In the current working directory, create a bat file called sales.bat.

    Copy and paste the code snippet below into this file and save it.

    @echo off "C:\Python\python.exe" "sales.py"

    The first line of the code snippet turns off any output to the terminal.

    The following line specifies the following:

    • The location of the python.exe file on your computer.
    • The Python script to execute.

    Let’s see if this works!


    Execute

    This section executes the bat file, which calls and runs the code inside the sales.py file.

    To run the bat file, navigate to the IDE, and click to select the sales.bat file.

    Press the F5 key on the keyboard to execute.

    If successful, the monthly_rpt.xlsx file will appear in the current working directory!


    Summary

    This article has shown you have to create and run a .bat file that executes a Python script. This file can execute a simple Python script as well as an intricate one.

    Good Luck & Happy Coding!


    Posted on Leave a comment

    How to Check โ€˜futureโ€™ Package Version in Python?

    5/5 – (2 votes)

    In this article, I’ll show you:

    ๐Ÿ’ฌ How to check the version of the Python module (package, library) future? And how to check if future is installed anyways?

    These are the eight best ways to check the installed version of the Python module future:

    • Method 1: pip show future
    • Method 2: pip list
    • Method 3: pip list | findstr future
    • Method 4: library.__version__
    • Method 5: importlib.metadata.version
    • Method 6: conda list
    • Method 7: pip freeze
    • Method 8: pip freeze | grep future

    Before we go into these ways to check your future version, let’s first quickly understand how versioning works in Python—you’ll be thankful to have spent a few seconds on this topic, believe me!

    A Note on Python Version Numbering

    ๐Ÿ’กPython versioning adds a unique identifier to different package versions using semantic versioning. Semantic versioning consists of three numerical units of versioning information in the format major.minor.patch.

    Python Version Numbering

    In this tutorial, we’ll use the shorthand general version abbreviation like so:

    x.y.z

    Practical examples would use numerical values for x, y, and z:

    • 1.2.3
    • 4.1.4
    • 1.0.0

    This is shorthand for

    major.minor.patch
    • Major releases (0.1.0 to 1.0.0) are used for the first stable release or “breaking changes”, i.e., major updates that break backward compatibility.
    • Minor releases (0.1.0 to 0.2.0) are used for larger bug fixes and new features that are backward compatible.
    • Patch releases (0.1.0 to 0.1.1) are used for smaller bug fixes that are backward compatible.

    Let’s dive into the meat of this article:

    ๐Ÿ’ฌ Question: How to check the (major, minor, patch) version of future in your current Python environment?

    Method 1: pip show

    To check which version of the Python library future is installed, run pip show future or pip3 show future in your CMD/Powershell (Windows), or terminal (macOS/Linux/Ubuntu).

    This will work if your pip installation is version 1.3 or higher—which is likely to hold in your case because pip 1.3 was released a decade ago in 2013!!

    Here’s an example in my Windows Powershell: I’ve highlighted the line that shows that my package version is a.b.c:

    PS C:\Users\xcent> pip show future
    Name: future
    Version: a.b.c
    Summary: ...
    Home-page: ...
    Author: ...
    Author-email: ...
    License: ...
    Location: ...
    Requires: ...
    Required-by: ...

    In some instances, this will not work—depending on your environment. In this case, try those commands before giving up:

    python -m pip show future
    python3 -m pip show future
    py -m pip show future
    pip3 show future

    Next, we’ll dive into more ways to check your future version.

    But before we move on, I’m excited to present you my new Python book Python One-Liners (Amazon Link).

    If you like one-liners, you’ll LOVE the book. It’ll teach you everything there is to know about a single line of Python code. But it’s also an introduction to computer science, data science, machine learning, and algorithms. The universe in a single line of Python!

    The book was released in 2020 with the world-class programming book publisher NoStarch Press (San Francisco).

    Link: https://nostarch.com/pythononeliners

    Method 2: pip list

    To check the versions of all installed packages, use pip list and locate the version of future in the output list of package versions sorted alphabetically.

    This will work if your pip installation is version 1.3 or higher.

    Here’s a simplified example for Windows Powershell, I’ve highlighted the line that shows the package version is 1.2.3:

    PS C:\Users\xcent> pip list
    Package Version
    --------------- ---------
    aaa 1.2.3
    ...
    future 1.2.3
    ...
    zzz 1.2.3

    In some instances, this will not work—depending on your environment. Then try those commands before giving up:

    python -m pip list
    python3 -m pip list
    py -m pip list
    pip3 list 

    Method 3: pip list + findstr on Windows

    To check the versions of a single package on Windows, you can chain pip list with findstr future using the CMD or Powershell command: pip3 list | findstr future to locate the version of future in the output list of package versions automatically.

    Here’s an example for future:

    pip3 list | findstr future 1.2.3

    Method 4: Module __version__ Attribute

    To check which version is installed of a given library, you can use the library.__version__ attribute after importing the library (package, module) with import library.

    Here’s the code:

    import my_library
    print(my_library.__version__)
    # x.y.z for your version output

    Here’s an excerpt from the PEP 8 docs mentioning the __version__ attribute.

    PEP 8 describes the use of a module attribute called __version__ for recording “Subversion, CVS, or RCS” version strings using keyword expansion. In the PEP authorโ€™s own email archives, the earliest example of the use of an __version__ module attribute by independent module developers dates back to 1995.”

    You can also use the following one-liner snippet to run this from your terminal (macOS, Linux, Ubuntu) or CMD/Powershell (Windows):

    python3 -c "import my_library; print(my_library.__version__)"

    However, this method doesn’t work for all libraries, so while simple, I don’t recommend it as a general approach for that reason.

    Method 5: importlib.metadata.version

    The importlib.metadata library provides a general way to check the package version in your Python script via importlib.metadata.version('future') for library future. This returns a string representation of the specific version such as 1.2.3 depending on the concrete version in your environment.

    Here’s the code:

    import importlib.metadata
    print(importlib.metadata.version('future'))
    # 1.2.3

    Method 6: conda list

    If you have created your Python environment with Anaconda, you can use conda list to list all packages installed in your (virtual) environment. Optionally, you can add a regular expression using the syntax conda list regex to list only packages matching a certain pattern.

    How to list all packages in the current environment?

    conda list

    How to list all packages installed into the environment 'xyz'?

    conda list -n xyz

    Regex: How to list all packages starting with 'future'?

    conda list '^future'

    Method 7: pip freeze

    The pip freeze command without any option lists all installed Python packages in your environment in alphabetically order (ignoring UPPERCASE or lowercase). You can spot your specific package future if it is installed in the environment.

    pip freeze

    Output example (depending on your concrete environment/installation):

    PS C:\Users\xcent> pip freeze
    aaa==1.2.3
    ...
    future==1.2.3
    ...
    zzz==1.2.3

    You can modify or exclude specific packages using the options provided in this screenshot:

    Method 8: pip freeze + grep on Linux/Ubuntu/macOS

    To check the versions of a single package on Linux/Ubuntu/macOS, you can chain pip freeze with grep future using the CMD or Powershell command: pip freeze | grep future to programmatically locate the version of your particular package future in the output list of package versions.

    Here’s an example for future:

    pip freeze | grep future
    future==1.2.3

    Related Questions

    Check future Installed Python

    How to check if future is installed in your Python script?

    To check if future is installed in your Python script, you can run import future in your Python shell and surround it by a try/except to catch a potential ModuleNotFoundError.

    try: import future print("Module future installed")
    except ModuleNotFoundError: print("Module future not installed")

    Check future Version Python

    How to check the package version of future in Python?

    To check which version of future is installed, use pip show future or pip3 show future in your CMD/Powershell (Windows), or terminal (macOS/Linux/Ubuntu) to obtain the output major.minor.patch.

    pip show future # or pip3 show future
    # 1.2.3

    Check future Version Linux

    How to check my future version in Linux?

    To check which version of future is installed, use pip show future or pip3 show future in your Linux terminal.

    pip show future # or pip3 show future
    # 1.2.3

    Check future Version Ubuntu

    How to check my future version in Ubuntu?

    To check which version of future is installed, use pip show future or pip3 show future in your Ubuntu terminal.

    pip show future # or pip3 show future
    # 1.2.3

    Check future Version Windows

    How to check my future version on Windows?

    To check which version of future is installed, use pip show future or pip3 show future in your Windows CMD, command line, or PowerShell.

    pip show future # or pip3 show future
    # 1.2.3

    Check future Version Mac

    How to check my future version on macOS?

    To check which version of future is installed, use pip show future or pip3 show future in your macOS terminal.

    pip show future # or pip3 show future
    # 1.2.3

    Check future Version Jupyter Notebook

    How to check my future version in my Jupyter Notebook?

    To check which version of future is installed, add the line !pip show future to your notebook cell where you want to check. Notice the exclamation mark prefix ! that allows you to run commands in your Python script cell.

    !pip show future

    Output: The following is an example on how this looks for future in a Jupyter Notebook cell:

    Package Version
    --------------- ---------
    aaa 1.2.3
    ...
    future 1.2.3
    ...
    zzz 1.2.3

    Check future Version Conda/Anaconda

    How to check the future version in my conda installation?

    Use conda list 'future' to list version information about the specific package installed in your (virtual) environment.

    conda list 'future'

    Check future Version with PIP

    How to check the future version with pip?

    You can use multiple commands to check the future version with PIP such as pip show future, pip list, pip freeze, and pip list.

    pip show future
    pip list
    pip freeze
    pip list

    The former will output the specific version of future. The remaining will output the version information of all installed packages and you have to locate future first.

    Check Package Version in VSCode or PyCharm

    How to check the future version in VSCode or PyCharm?

    Integrated Development Environments (IDEs) such as VSCode or PyCharm provide a built-in terminal where you can run pip show future to check the current version of future in the specific environment you’re running the command in.

    pip show future
    pip3 show future pip list
    pip3 list pip freeze
    pip3 freeze

    You can type any of those commands in your IDE terminal like so:

    pip IDE check package version

    Summary

    In this article, you’ve learned those best ways to check a Python package version:

    • Method 1: pip show future
    • Method 2: pip list
    • Method 3: pip list | findstr future
    • Method 4: library.__version__
    • Method 5: importlib.metadata.version
    • Method 6: conda list
    • Method 7: pip freeze
    • Method 8: pip freeze | grep future

    Thanks for giving us your valued attention — we’re grateful to have you here! ๐Ÿ™‚


    Programmer Humor

    There are only 10 kinds of people in this world: those who know binary and those who donโ€™t.
    ๐Ÿ‘ฉ๐Ÿง”โ€โ™‚๏ธ
    ~~~

    There are 10 types of people in the world. Those who understand trinary, those who donโ€™t, and those who mistake it for binary.
    ๐Ÿ‘ฉ๐Ÿง”โ€โ™‚๏ธ๐Ÿ‘ฑโ€โ™€๏ธ

    Related Tutorials

    Posted on Leave a comment

    How to Check โ€˜abcโ€™ Package Version in Python?

    5/5 – (2 votes)

    In this article, I’ll show you:

    ๐Ÿ’ฌ How to check the version of the Python module (package, library) abc? And how to check if abc is installed anyways?

    These are the eight best ways to check the installed version of the Python module abc:

    • Method 1: pip show abc
    • Method 2: pip list
    • Method 3: pip list | findstr abc
    • Method 4: library.__version__
    • Method 5: importlib.metadata.version
    • Method 6: conda list
    • Method 7: pip freeze
    • Method 8: pip freeze | grep abc

    Before we go into these ways to check your abc version, let’s first quickly understand how versioning works in Python—you’ll be thankful to have spent a few seconds on this topic, believe me!

    A Note on Python Version Numbering

    ๐Ÿ’กPython versioning adds a unique identifier to different package versions using semantic versioning. Semantic versioning consists of three numerical units of versioning information in the format major.minor.patch.

    Python Version Numbering

    In this tutorial, we’ll use the shorthand general version abbreviation like so:

    x.y.z

    Practical examples would use numerical values for x, y, and z:

    • 1.2.3
    • 4.1.4
    • 1.0.0

    This is shorthand for

    major.minor.patch
    • Major releases (0.1.0 to 1.0.0) are used for the first stable release or “breaking changes”, i.e., major updates that break backward compatibility.
    • Minor releases (0.1.0 to 0.2.0) are used for larger bug fixes and new features that are backward compatible.
    • Patch releases (0.1.0 to 0.1.1) are used for smaller bug fixes that are backward compatible.

    Let’s dive into the meat of this article:

    ๐Ÿ’ฌ Question: How to check the (major, minor, patch) version of abc in your current Python environment?

    Method 1: pip show

    To check which version of the Python library abc is installed, run pip show abc or pip3 show abc in your CMD/Powershell (Windows), or terminal (macOS/Linux/Ubuntu).

    This will work if your pip installation is version 1.3 or higher—which is likely to hold in your case because pip 1.3 was released a decade ago in 2013!!

    Here’s an example in my Windows Powershell: I’ve highlighted the line that shows that my package version is a.b.c:

    PS C:\Users\xcent> pip show abc
    Name: abc
    Version: a.b.c
    Summary: ...
    Home-page: ...
    Author: ...
    Author-email: ...
    License: ...
    Location: ...
    Requires: ...
    Required-by: ...

    In some instances, this will not work—depending on your environment. In this case, try those commands before giving up:

    python -m pip show abc
    python3 -m pip show abc
    py -m pip show abc
    pip3 show abc

    Next, we’ll dive into more ways to check your abc version.

    But before we move on, I’m excited to present you my new Python book Python One-Liners (Amazon Link).

    If you like one-liners, you’ll LOVE the book. It’ll teach you everything there is to know about a single line of Python code. But it’s also an introduction to computer science, data science, machine learning, and algorithms. The universe in a single line of Python!

    The book was released in 2020 with the world-class programming book publisher NoStarch Press (San Francisco).

    Link: https://nostarch.com/pythononeliners

    Method 2: pip list

    To check the versions of all installed packages, use pip list and locate the version of abc in the output list of package versions sorted alphabetically.

    This will work if your pip installation is version 1.3 or higher.

    Here’s a simplified example for Windows Powershell, I’ve highlighted the line that shows the package version is 1.2.3:

    PS C:\Users\xcent> pip list
    Package Version
    --------------- ---------
    aaa 1.2.3
    ...
    abc 1.2.3
    ...
    zzz 1.2.3

    In some instances, this will not work—depending on your environment. Then try those commands before giving up:

    python -m pip list
    python3 -m pip list
    py -m pip list
    pip3 list 

    Method 3: pip list + findstr on Windows

    To check the versions of a single package on Windows, you can chain pip list with findstr abc using the CMD or Powershell command: pip3 list | findstr abc to locate the version of abc in the output list of package versions automatically.

    Here’s an example for abc:

    pip3 list | findstr abc 1.2.3

    Method 4: Module __version__ Attribute

    To check which version is installed of a given library, you can use the library.__version__ attribute after importing the library (package, module) with import library.

    Here’s the code:

    import my_library
    print(my_library.__version__)
    # x.y.z for your version output

    Here’s an excerpt from the PEP 8 docs mentioning the __version__ attribute.

    PEP 8 describes the use of a module attribute called __version__ for recording “Subversion, CVS, or RCS” version strings using keyword expansion. In the PEP authorโ€™s own email archives, the earliest example of the use of an __version__ module attribute by independent module developers dates back to 1995.”

    You can also use the following one-liner snippet to run this from your terminal (macOS, Linux, Ubuntu) or CMD/Powershell (Windows):

    python3 -c "import my_library; print(my_library.__version__)"

    However, this method doesn’t work for all libraries, so while simple, I don’t recommend it as a general approach for that reason.

    Method 5: importlib.metadata.version

    The importlib.metadata library provides a general way to check the package version in your Python script via importlib.metadata.version('abc') for library abc. This returns a string representation of the specific version such as 1.2.3 depending on the concrete version in your environment.

    Here’s the code:

    import importlib.metadata
    print(importlib.metadata.version('abc'))
    # 1.2.3

    Method 6: conda list

    If you have created your Python environment with Anaconda, you can use conda list to list all packages installed in your (virtual) environment. Optionally, you can add a regular expression using the syntax conda list regex to list only packages matching a certain pattern.

    How to list all packages in the current environment?

    conda list

    How to list all packages installed into the environment 'xyz'?

    conda list -n xyz

    Regex: How to list all packages starting with 'abc'?

    conda list '^abc'

    Method 7: pip freeze

    The pip freeze command without any option lists all installed Python packages in your environment in alphabetically order (ignoring UPPERCASE or lowercase). You can spot your specific package abc if it is installed in the environment.

    pip freeze

    Output example (depending on your concrete environment/installation):

    PS C:\Users\xcent> pip freeze
    aaa==1.2.3
    ...
    abc==1.2.3
    ...
    zzz==1.2.3

    You can modify or exclude specific packages using the options provided in this screenshot:

    Method 8: pip freeze + grep on Linux/Ubuntu/macOS

    To check the versions of a single package on Linux/Ubuntu/macOS, you can chain pip freeze with grep abc using the CMD or Powershell command: pip freeze | grep abc to programmatically locate the version of your particular package abc in the output list of package versions.

    Here’s an example for abc:

    pip freeze | grep abc
    abc==1.2.3

    Related Questions

    Check abc Installed Python

    How to check if abc is installed in your Python script?

    To check if abc is installed in your Python script, you can run import abc in your Python shell and surround it by a try/except to catch a potential ModuleNotFoundError.

    try: import abc print("Module abc installed")
    except ModuleNotFoundError: print("Module abc not installed")

    Check abc Version Python

    How to check the package version of abc in Python?

    To check which version of abc is installed, use pip show abc or pip3 show abc in your CMD/Powershell (Windows), or terminal (macOS/Linux/Ubuntu) to obtain the output major.minor.patch.

    pip show abc # or pip3 show abc
    # 1.2.3

    Check abc Version Linux

    How to check my abc version in Linux?

    To check which version of abc is installed, use pip show abc or pip3 show abc in your Linux terminal.

    pip show abc # or pip3 show abc
    # 1.2.3

    Check abc Version Ubuntu

    How to check my abc version in Ubuntu?

    To check which version of abc is installed, use pip show abc or pip3 show abc in your Ubuntu terminal.

    pip show abc # or pip3 show abc
    # 1.2.3

    Check abc Version Windows

    How to check my abc version on Windows?

    To check which version of abc is installed, use pip show abc or pip3 show abc in your Windows CMD, command line, or PowerShell.

    pip show abc # or pip3 show abc
    # 1.2.3

    Check abc Version Mac

    How to check my abc version on macOS?

    To check which version of abc is installed, use pip show abc or pip3 show abc in your macOS terminal.

    pip show abc # or pip3 show abc
    # 1.2.3

    Check abc Version Jupyter Notebook

    How to check my abc version in my Jupyter Notebook?

    To check which version of abc is installed, add the line !pip show abc to your notebook cell where you want to check. Notice the exclamation mark prefix ! that allows you to run commands in your Python script cell.

    !pip show abc

    Output: The following is an example on how this looks for abc in a Jupyter Notebook cell:

    Package Version
    --------------- ---------
    aaa 1.2.3
    ...
    abc 1.2.3
    ...
    zzz 1.2.3

    Check abc Version Conda/Anaconda

    How to check the abc version in my conda installation?

    Use conda list 'abc' to list version information about the specific package installed in your (virtual) environment.

    conda list 'abc'

    Check abc Version with PIP

    How to check the abc version with pip?

    You can use multiple commands to check the abc version with PIP such as pip show abc, pip list, pip freeze, and pip list.

    pip show abc
    pip list
    pip freeze
    pip list

    The former will output the specific version of abc. The remaining will output the version information of all installed packages and you have to locate abc first.

    Check Package Version in VSCode or PyCharm

    How to check the abc version in VSCode or PyCharm?

    Integrated Development Environments (IDEs) such as VSCode or PyCharm provide a built-in terminal where you can run pip show abc to check the current version of abc in the specific environment you’re running the command in.

    pip show abc
    pip3 show abc pip list
    pip3 list pip freeze
    pip3 freeze

    You can type any of those commands in your IDE terminal like so:

    pip IDE check package version

    Summary

    In this article, you’ve learned those best ways to check a Python package version:

    • Method 1: pip show abc
    • Method 2: pip list
    • Method 3: pip list | findstr abc
    • Method 4: library.__version__
    • Method 5: importlib.metadata.version
    • Method 6: conda list
    • Method 7: pip freeze
    • Method 8: pip freeze | grep abc

    Thanks for giving us your valued attention — we’re grateful to have you here! ๐Ÿ™‚


    Programmer Humor

    There are only 10 kinds of people in this world: those who know binary and those who donโ€™t.
    ๐Ÿ‘ฉ๐Ÿง”โ€โ™‚๏ธ
    ~~~

    There are 10 types of people in the world. Those who understand trinary, those who donโ€™t, and those who mistake it for binary.
    ๐Ÿ‘ฉ๐Ÿง”โ€โ™‚๏ธ๐Ÿ‘ฑโ€โ™€๏ธ

    Related Tutorials

    Posted on Leave a comment

    8 Best Ways to Check the Package Version in Python

    5/5 – (1 vote)

    In this article, I’ll show you how to check the version of a Python module (package, library).

    These are the eight best ways to check the version of a Python module:

    • Method 1: pip show my_package
    • Method 2: pip list
    • Method 3: pip list | findstr my_package
    • Method 4: my_package.__version__
    • Method 5: importlib.metadata.version
    • Method 6: conda list
    • Method 7: pip freeze
    • Method 8: pip freeze | grep my_package

    Let’s dive into some examples for each of those next!

    Method 1: pip show

    To check which version of a given Python library, say xyz, is installed, use pip show xyz or pip3 show xyz. For example, to check the version of your NumPy installation, run pip show numpy in your CMD/Powershell (Windows), or terminal (macOS/Linux/Ubuntu).

    This will work if your pip installation is version 1.3 or higher—which is likely to hold in your case because pip 1.3 was released a decade ago in 2013!!

    Here’s an example in my Windows Powershell for NumPy: I’ve highlighted the line that shows that my package version is 1.21.0:

    PS C:\Users\xcent> pip show numpy
    Name: numpy
    Version: 1.21.0
    Summary: NumPy is the fundamental package for array computing with Python.
    Home-page: https://www.numpy.org
    Author: Travis E. Oliphant et al.
    Author-email: None
    License: BSD
    Location: c:\users\xcent\appdata\local\programs\python\python39\lib\site-packages
    Requires:
    Required-by: pandas, matplotlib

    In some instances, this will not work—depending on your environment. In this case, try those commands before giving up:

    python -m pip show numpy
    python3 -m pip show numpy
    py -m pip show numpy
    pip3 show numpy

    Of course, replace “numpy” with your particular package name.

    Method 2: pip list

    To check the versions of all installed packages, use pip list and locate the version of your particular package in the output list of package versions sorted alphabetically.

    This will work if your pip installation is version 1.3 or higher.

    Here’s an example in my Windows Powershell, I’ve highlighted the line that shows that my package version is 1.21.0:

    PS C:\Users\xcent> pip list
    Package Version
    --------------- ---------
    beautifulsoup4 4.9.3
    bs4 0.0.1
    certifi 2021.5.30
    chardet 4.0.0
    cycler 0.10.0
    idna 2.10
    kiwisolver 1.3.1
    matplotlib 3.4.2
    mss 6.1.0
    numpy 1.21.0
    pandas 1.3.1
    Pillow 8.3.0
    pip 21.1.1
    pyparsing 2.4.7
    python-dateutil 2.8.1
    pytz 2021.1
    requests 2.25.1
    setuptools 56.0.0
    six 1.16.0
    soupsieve 2.2.1
    urllib3 1.26.6

    In some instances, this will not work—depending on your environment. Then try those commands before giving up:

    python -m pip list
    python3 -m pip list
    py -m pip list
    pip3 list 

    Method 3: pip list + findstr on Windows

    To check the versions of a single package on Windows, you can chain pip list with findstr xyz using the CMD or Powershell command: pip3 list | findstr numpy to locate the version of your particular package xyz in the output list of package versions automatically.

    Here’s an example for numpy:

    pip3 list | findstr numpy 1.21.0

    Method 4: Library.__version__ Attribute

    To check your package installation in your Python script, you can also use the xyz.__version__ attribute of the particular library xyz. Not all packages provide this attribute but as it is recommended by PEP, it’ll work for most libraries.

    Here’s the code:

    import numpy
    print(numpy.__version__)
    # 1.21.0

    Here’s an excerpt from the PEP 8 docs mentioning the __version__ attribute.

    PEP 8 describes the use of a module attribute called __version__ for recording โ€œSubversion, CVS, or RCSโ€ version strings using keyword expansion. In the PEP authorโ€™s own email archives, the earliest example of the use of an __version__ module attribute by independent module developers dates back to 1995.”

    Method 5: importlib.metadata.version

    The importlib.metadata library provides a general way to check the package version in your Python script via importlib.metadata.version('xyz') for library xyz. This returns a string representation of the specific version. For example, importlib.metadata.version('numpy') returns 1.21.0 in my current environment.

    Here’s the code:

    import importlib.metadata
    print(importlib.metadata.version('numpy'))
    # 1.21.0

    Method 6: conda list

    If you have created your Python environment with Anaconda, you can use conda list to list all packages installed in your (virtual) environment. Optionally, you can add a regular expression using the syntax conda list regex to list only packages matching a certain pattern.

    How to list all packages in the current environment?

    conda list

    How to list all packages installed into the environment 'xyz'?

    conda list -n xyz

    Regex: How to list all packages starting with 'py'?

    conda list '^py'

    Regex: How to list all packages starting with 'py' or 'code'?

    conda list '^(py|code)'

    Method 7: pip freeze

    The pip freeze command without any option lists all installed Python packages in your environment in alphabetically order (ignoring UPPERCASE or lowercase). You can spot your specific package if it is installed in the environment.

    pip freeze

    Output from my local Windows environment with PowerShell (strange packages I know) ;):

    PS C:\Users\xcent> pip freeze
    asn1crypto==1.5.1
    et-xmlfile==1.1.0
    openpyxl==3.0.10

    For example, I have the Python package openpyxl installed with version 3.0.10.


    You can modify or exclude specific packages using the options provided in this screenshot:

    Method 8: pip freeze + grep on Linux/Ubuntu/macOS

    To check the versions of a single package on Linux/Ubuntu/macOS, you can chain pip freeze with grep xyz using the CMD or Powershell command: pip freeze | grep xyz to programmatically locate the version of your particular package xyz in the output list of package versions.

    Here’s an example for numpy:

    pip freeze | grep scikit-learn
    scikit-learn==0.17.1

    Related Questions

    Check Package Version Python

    How to check package version in Python?

    To check which version of a given Python package is installed, use pip show my_package. For example, to check the version of your NumPy installation, run pip show numpy in your CMD/Powershell (Windows), or terminal (macOS/Linux/Ubuntu).

    pip show my_package

    Check Package Version Linux

    How to check my package version in Linux?

    To check which version of a given Python package is installed, use pip show my_package. For example, to check the version of your NumPy installation, run pip show numpy in your Linux terminal.

    pip show my_package

    Check Package Version Ubuntu

    How to check my package version in Ubuntu?

    To check which version of a given Python package is installed, use pip show my_package. For example, to check the version of your NumPy installation, run pip show numpy in your Ubuntu terminal/shall/bash.

    pip show my_package

    Check Package Version Windows

    How to check package version on Windows?

    To check which version of a given Python package is installed, use pip show my_package. For example, to check the version of your NumPy installation, run pip show numpy in your Windows CMD, command line, or PowerShell.

    pip show my_package

    Check Package Version Mac

    How to check package version on macOS?

    To check which version of a given Python package is installed, use pip show my_package. For example, to check the version of your NumPy installation, run pip show numpy in your macOS terminal.

    pip show my_package

    Check Package Version Jupyter Notebook

    How to check package version in your Jupyter Notebook?

    To check which version of a given Python package is installed, add the line !pip show my_package to your notebook cell where you want to check. Notice the exclamation mark prefix ! that allows you to run commands in your Python script cell. For example, to check the version of your NumPy installation, run !pip show numpy in your macOS terminal.

    !pip show my_package

    For example, this is a screenshot on how this looks for numpy in a Jupyter Notebook:

    Check Package Version Terminal

    How to check package version in my terminal?

    To check which version of a given Python package is installed, use pip show my_package. For example, to check the version of your NumPy installation, run pip show numpy in your terminal.

    pip show my_package

    Check Package Version Conda/Anaconda

    How to check package version in my conda installation?

    Use conda list 'my_package' to list version information about the specific package installed in your (virtual) environment.

    conda list 'my_package'

    Check Package Version with PIP

    How to check package version with pip?

    You can use multiple commands to check the package version with PIP such as pip show my_package, pip list, pip freeze, and pip list.

    pip show my_package
    pip list
    pip freeze
    pip list

    Check Package Version in VSCode or PyCharm

    How to check package version in VSCode or PyCharm?

    Integrated Development Environments (IDEs) such as VSCode or PyCharm provide a built-in terminal where you can run pip show my_package to check the current version of my_package in the specific environment you’re running the command in.

    pip show my_package
    pip list
    pip freeze

    You can type any of those commands in your IDE terminal like so:

    pip IDE check package version

    Summary

    In this article, you’ve learned those best ways to check a Python package version:

    • Method 1: pip show my_package
    • Method 2: pip list
    • Method 3: pip list | findstr my_package
    • Method 4: my_package.__version__
    • Method 5: importlib.metadata.version
    • Method 6: conda list
    • Method 7: pip freeze
    • Method 8: pip freeze | grep my_package

    Thanks for giving us your valued attention — we’re grateful to have you here! ๐Ÿ™‚


    Programmer Humor

    There are only 10 kinds of people in this world: those who know binary and those who donโ€™t.
    ๐Ÿ‘ฉ๐Ÿง”โ€โ™‚๏ธ
    ~~~

    There are 10 types of people in the world. Those who understand trinary, those who donโ€™t, and those who mistake it for binary.
    ๐Ÿ‘ฉ๐Ÿง”โ€โ™‚๏ธ๐Ÿ‘ฑโ€โ™€๏ธ